

Table of Contents
This blog post may contain affiliate links. As an Amazon Associate I earn from qualifying purchases.
Most still life photos look accidental—the objects are there, but nothing draws the eye. That gap between a snapshot and a photograph that stops people mid-scroll comes down to intentional decisions made before you press the shutter. While many guides suggest “finding good light,” knowing how to shape it is an entirely different skill. This is what separates compelling still life work from flat, forgettable images.
In this guide, you’ll learn 15 concrete still life photography tips—covering composition, lighting, gear, and advanced techniques—so you can transform any collection of objects into a purposeful, striking photograph.
Strong still life photography tips come down to three intentional decisions: light direction, composition structure, and subject selection—not expensive gear.
- Light is sculptural: Sidelighting reveals texture and depth that flat, frontal light destroys.
- Your hero object rules: Every arrangement needs one dominant subject; support elements should serve it, not compete.
- The Intentional Frame: Great still life photos are designed before you press the shutter—composition, mood, and story are pre-planned.
- Shoot RAW at f/11: Preserves maximum detail and ensures edge-to-edge sharpness for still subjects on a tripod.
What Is Still Life Photography?
Still life photography is a genre defined by inanimate subjects arranged under the photographer’s full creative control. What sets it apart is that the photographer governs every variable in the frame, from subject placement to lighting. This totality of control is the genre’s defining feature and its greatest creative opportunity.
The Art of the Intentional Arrangement
At its core, the meaning of still life photography is captured by The Intentional Frame—the principle that every element is positioned and lit on purpose. Unlike sports or street photography, where the photographer reacts to events, the still life photographer directs the entire scene. For example, when shooting a coffee cup, you decide its angle, the background color, and where light falls on its rim. This complete authorship is the governing principle behind every technique in this guide.
Still life photography is the only genre where the photographer controls every variable in the frame—subject, light, and arrangement—making it the ideal training ground for deliberate visual thinking.
Types: Classic to Found Still Life
Knowing your style shapes every decision. The three main types are:
- Classic/Formal: Deliberate arrangements on a neutral background, creating a controlled, graphic look.
- Lifestyle: Objects photographed in their natural, lived-in environment, like a coffee mug on a desk. This style feels relatable and dominates social media.
- Found Still Life: Capturing naturally occurring arrangements without staging them, such as a rusted can on a windowsill. It trains your observational eye more than any arranged shoot will.
As Format’s photography guide highlights, recognizing these distinctions is foundational to developing a consistent photographic voice.

Caption: Classic, lifestyle, and found still life each demand a different mindset and produce distinct images from the same objects.
Essential Gear and Camera Settings
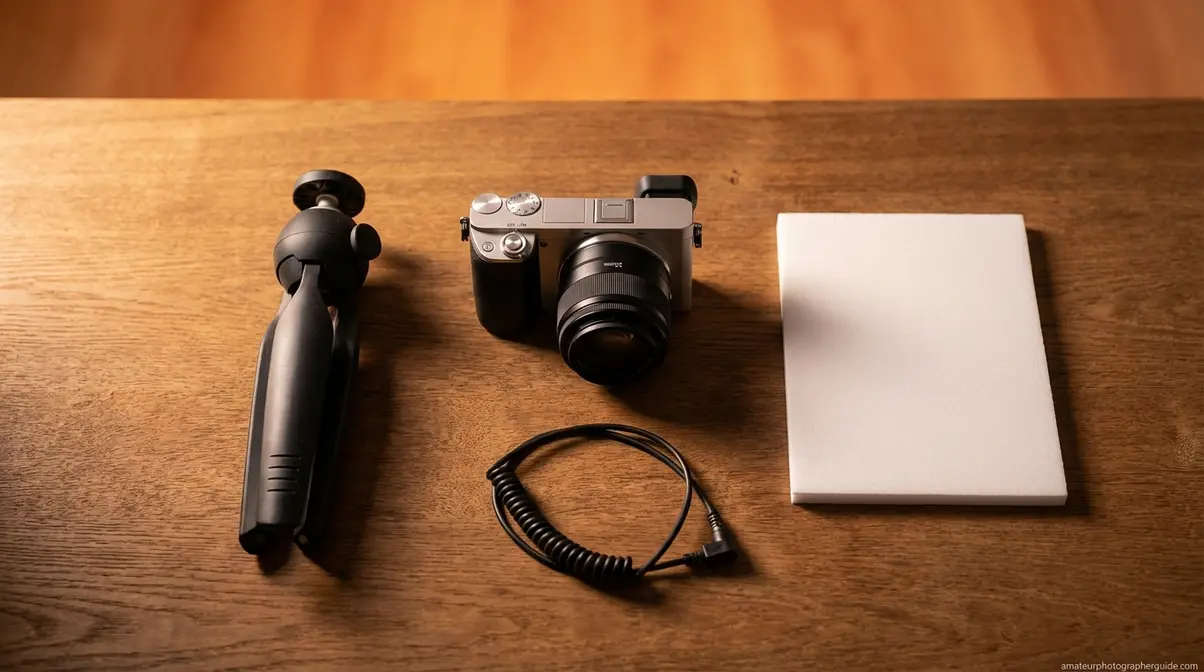
The best still life photography tips are useless if your images are soft or noisy. Before covering composition, get your technical foundation right. Most photographers use a tripod, which enables slow shutter speeds without blur and keeps ISO at its lowest setting for the cleanest files. You don’t need expensive gear; a camera with manual mode and a 50mm lens is sufficient.
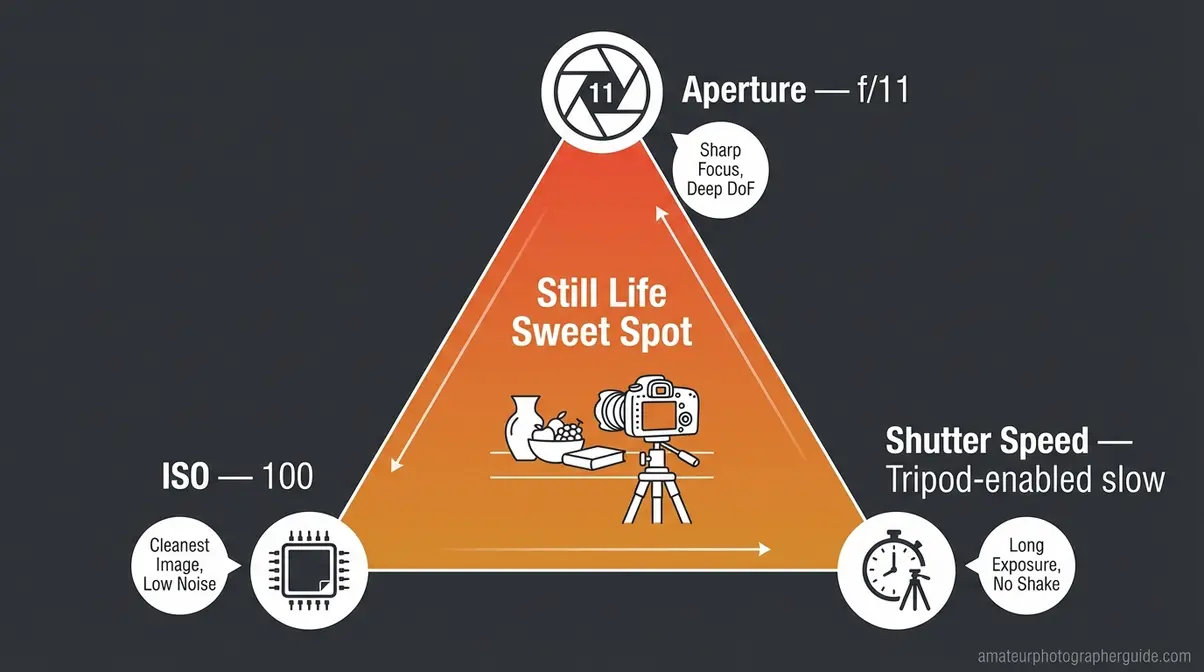
Caption: The exposure triangle optimized for still life: f/11 for sharpness, ISO 100 for clean shadows, and a tripod-enabled slow shutter.
What Gear Do You Actually Need?
Start with what you have. Any camera with a manual mode—DSLR or mirrorless—is capable of excellent work. The lens matters more than the body. A prime lens (a fixed focal-length lens) delivers sharper results than most kit zooms. A 50mm prime is a great starting point, as it’s affordable and produces a natural perspective.
- Essential accessories:
- A tripod: Non-negotiable for enabling slow shutter speeds and precise framing.
- A remote shutter or 2-second self-timer: Eliminates camera shake.
- A white foam board: Bounces light into shadows, acting as an inexpensive reflector.
As Adobe’s photography guide notes, still life photography places particular emphasis on composition and subject experimentation, which a stable tripod setup facilitates.
Correct Camera Settings for Sharp Images
These settings provide the technical foundation for great still life photos.
Aperture (f-stop): The f-stop controls depth of field—the range that appears sharp. For still life, f/8–f/16 keeps everything in focus. Start at f/11, where most lenses hit their peak sharpness without causing diffraction (softening at very small apertures).
ISO: Always start at ISO 100 (or your camera’s base ISO). Since subjects are stationary, you can use a slow shutter speed on a tripod without needing to raise the ISO and introduce noise.
RAW format: RAW files preserve all the data your sensor captures, unlike JPEGs which compress and discard information. For still life, where post-production is an intentional final step, shooting RAW is non-negotiable.
| Setting | Recommended Value | Why It Matters |
|---|---|---|
| Aperture | f/8 – f/16 (start at f/11) | Sharpness sweet spot; full depth of field |
| ISO | 100 (or camera’s base ISO) | Minimum noise; cleanest shadow detail |
| Shutter Speed | 1/125s or slower (use tripod) | Irrelevant for still subjects—let aperture and ISO lead |
| File Format | RAW | Preserves full exposure data for post-processing |
Community consensus across photography forums captures this framework precisely:
“Shoot raw, use a long lens, and shoot at a high aperture like f/11, 16, or 22.”
— Community consensus across photography forums

Caption: Pin this settings reference to your camera bag. These four decisions cover 90% of still life shooting scenarios.
Mastering Composition and Styling
Strong composition is the difference between a photograph that feels designed and one that feels accidental. The two most common beginner errors are cluttered arrangements and the absence of a clear focal point. The solution is often subtractive: you’ll spend more time editing your scene down than building it up.
Removing one object from a still life arrangement almost always improves it—the most common composition mistake is including too much, not too little.
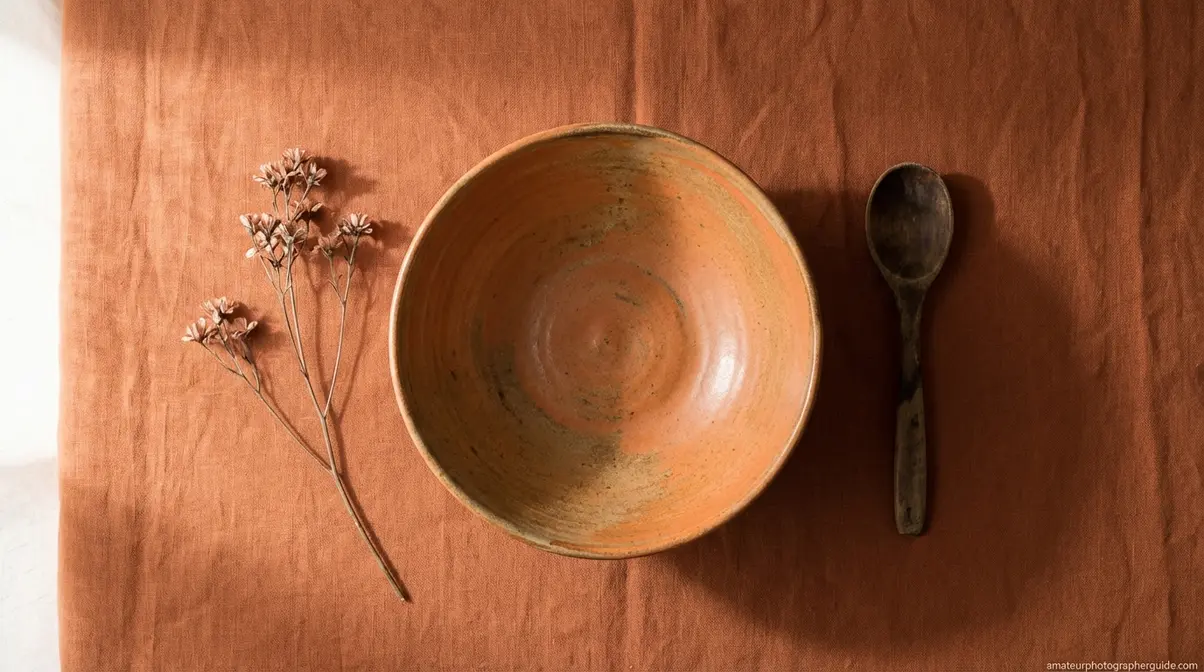
Build Around a Hero Object
Every effective still life starts with a hero object—the single dominant subject. Everything else in the frame serves it. Your hero earns the most screen real estate, the most direct light, and the viewer’s first glance. It’s typically the object with the most visual weight, texture, or narrative meaning.
- A useful rule of thumb: your hero should occupy roughly 60% of the visual weight. Supporting props and empty space fill the remaining 40%. For example:
- A worn hardcover book (hero) with reading glasses and a dried flower (support).
- A sliced lemon (hero) with a small glass bottle of oil (support).
Supporting elements should add narrative context without competing for attention.
Caption: Notice how supporting elements direct the eye toward the hero object rather than away from it.
Composition Rules That Actually Work
Four principles reliably improve still life arrangements:
- Rule of Odds: An odd number of objects (3, 5, or 7) creates more dynamic, naturally pleasing arrangements than even numbers, which can feel static.
- The 20-60-20 Depth Rule: Layer your scene with 20% foreground interest, 60% midground (the hero object), and 20% background. This creates three-dimensional depth in a flat photograph.
- Negative Space: Deliberate empty areas create visual breathing room and force the viewer’s eye to the hero.
- Leading Lines: Use props like a flower stem or the edge of a cloth to draw the eye into your hero object.
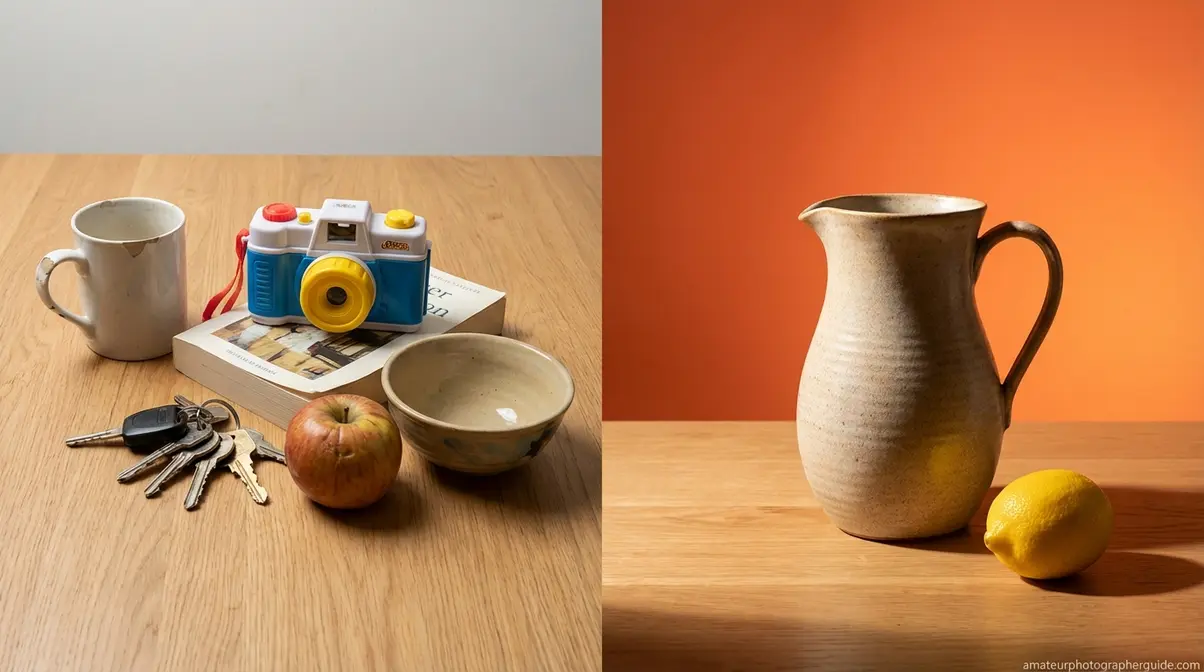
Backgrounds and Props: Less Is More
Your background is an active compositional decision. A few simple surfaces cover most scenarios: white foam board (clean, commercial), natural wood (warm, rustic), linen (soft texture), and dark paper (moody, dramatic). Start with a white foam board and a piece of dark fabric; they cover 80% of situations for under $15.
The same restraint applies to props. If a composition feels busy, remove an object. Simple still life photography isn’t about limiting creativity—it’s about respecting your subject enough to give it space. The best still life photography tips often start with what’s already on your kitchen counter or bookshelf.
Caption: The same objects on four different backgrounds will produce four different moods—background choice is a creative decision.
Controlling Light for Mood and Texture

Photograph a white coffee cup on a white background with overhead room lighting, and it will look like a flat, shadowless disc. Now, move a single lamp to the side. The cup suddenly has depth, a rim, and a shadow that grounds it in space. This single change—moving the light source—is the most transformative adjustment you can make in still life photography.
Sidelighting at 90° to your subject is the single most impactful lighting change you can make to reveal texture and eliminate the flat, two-dimensional look that plagues most still life photos.
Using Natural Light Effectively
Window light offers a soft, directional quality that is difficult to replicate artificially. Start with a north-facing window (in the northern hemisphere) for diffused, consistent light without harsh shadows.
Position matters more than window size. Place your setup so the window is to the side of your subject (at 9 or 3 o’clock if your camera is at 6 o’clock). Frontal light flattens your subject. If you have harsh direct sunlight, diffuse it with a thin white curtain or a sheet of baking parchment to create a softbox effect. As noted in A Beautiful Mess, these simple techniques are highly effective.
Caption: A simple setup: camera at 6 o’clock, window at 9, and a white foam board opposite to fill shadows. This works for most natural-light shots.
Sidelighting and Low-Key for Drama
Sidelighting—positioning your light at a 90-degree angle to your subject—is foundational. It rakes across surfaces, revealing details like the pores of an orange’s skin or the grain of a wooden board. Two distinct approaches give you control over mood:
- Low-key lighting produces dark, dramatic images. The setup: a dark backdrop, a single directional light to one side, and no fill card to keep shadows deep.
- High-key lighting produces airy, clean images. The setup: a light-colored backdrop, window light, and a white reflector on the shadow side to soften shadows.
| Low-Key | High-Key | |
|---|---|---|
| Background | Dark paper or fabric | White or light paper/fabric |
| Light sources | Single directional light | Window + reflector or multiple diffused sources |
| Fill card | None—preserve deep shadows | White foam board on shadow side |
| Mood | Dramatic, moody, editorial | Airy, clean, commercial |
Caption: The only structural difference between these setups is the fill card and background choice; the light source position is identical.
Artificial Light: When and How to Use It
Artificial light is useful when you need to shoot regardless of the time of day or maintain identical lighting across multiple sessions. Continuous LED panels are a great starting point, as they are affordable and let you see the light’s effect in real time.
The most important principle is diffusion. Never point a hard light source directly at your subject. Use a softbox or bounce the light off a white card. A larger, softer light source produces softer shadows that reveal form without being distracting. As Zenfolio’s photography tips recommend, matching your lighting equipment to your goals is key.
Creative Ideas and Inspiration

Creative block is a common barrier. The good news: still life photography ideas are everywhere in your home. The skill is training your eye to see them.
The best still life photography ideas are already in your home—the skill is learning to see ordinary arrangements as potential compositions.
10 Still Life Ideas to Shoot at Home
These subjects work well for still life photography at home because they have inherent visual qualities that reward deliberate framing:
- A ceramic mug with steam: Combines warm tones, a circular form, and implied movement.
- Citrus fruit, sliced and whole: Offers vibrant color and texture contrast.
- Old books stacked at angles: Layering creates immediate depth; add a prop for narrative.
- Dried botanicals: Delicate structures that reward f/11 detail work and sidelighting.
- Kitchen tools and ingredients: The arrangement implies action and tells a story.
- Candles, lit and unlit: The wax texture and flame create their own light source.
- Shells and smooth stones: A pure texture study perfect for 90° sidelighting.
- Vintage glass bottles: Experiment with backlight to explore translucency and refraction.
- Spools of thread or buttons: Arrange by color gradient for a graphic composition.
- A single flower in a simple vase: An exercise in constraint and hero-object discipline.
Caption: Pair each idea with the sidelighting or low-key techniques from the lighting section to explore different moods.
Found Still Life: Training Your Eye
Found still life—capturing naturally occurring arrangements—is the fastest way to develop your observational instincts. Spend 20 minutes walking through your home and identify three compositions without touching anything: glasses on a book, condensation rings on a windowsill, or paint-stained brushes on a worktop.
This exercise removes the anxiety of an arranged setup. You’re not inventing a composition; you’re discovering one. This constraint forces you to think about light, angle, and framing.
Advanced Techniques for Still Life

The transition from intermediate to advanced still life photography often involves two key skills: capturing true edge-to-edge sharpness with focus stacking and building a cohesive series rather than isolated images. Both apply The Intentional Frame at a higher level of planning.
Focus Stacking for Maximum Sharpness
Focus stacking is a technique where you take multiple exposures of the same scene, each focused at a slightly different distance, and merge them in post-processing. This achieves sharpness throughout the entire depth of field, which is often impossible in a single shot due to optical limitations like diffraction.
When to use it: macro still life, where depth of field is naturally shallow, or any scene where you want every element razor-sharp.
- 5-step workflow:
- Mount your camera on a tripod. Any movement will make the merge unusable.
- Set your focus to the nearest point of your subject.
- Take your first exposure, then manually shift focus slightly further into the scene.
- Repeat until you have focused past the farthest point in your frame (typically 5–15 exposures).
- Merge the images in software like Lightroom or Photoshop.
As HowStuffWorks photography covers, depth of field management is a defining challenge of still life, and focus stacking is its most thorough solution.
Caption: Each exposure covers a narrow slice of depth. The final merge produces sharpness that no single exposure could achieve.
Building a Cohesive Photo Series
A photo series solves a creative problem: how to make your work say something larger than a single image can. A series is The Intentional Frame applied across a project, bound by a consistent color palette, background, lighting, and compositional logic.
- Choosing a theme:
- Seasonal: Objects representing a specific time of year.
- Material: Everything ceramic, or everything glass.
- Conceptual: Objects representing “slowness” or “morning ritual.”
Before you shoot, write down your visual rules (e.g., “Every image uses a white linen background, sidelighting from the left, and a maximum of three objects”). These rules prevent your series from becoming disjointed and help produce portfolio-quality work.
Common Mistakes and How to Fix Them
Knowing the right still life photography tips only takes you halfway. Understanding where photographers consistently go wrong is just as important.
The five most common still life mistakes—flat lighting, clutter, poor backgrounds, no hero object, and skipping post-processing—are each fixable with a single decision change.
What are the most common still life mistakes?
- Flat, frontal lighting: Problem: Shadows disappear, and objects appear two-dimensional. Fix: Turn off all room lights and use a single window or lamp positioned at 90° to your subject.
- Too many objects, no hero: Problem: The eye doesn’t know where to land; the image reads as inventory, not a composition. Fix: Remove half the objects and designate one clear hero.
- Ignoring the background: Problem: A busy background competes with your subject for attention. Fix: Use a simple foam board, fabric, or paper backdrop in a neutral tone.
- Not shooting RAW: Problem: Critical exposure and color data are permanently discarded, limiting your editing options. Fix: Switch to RAW in your camera menu.
- Skipping the tripod: Problem: Handheld shooting at slow shutter speeds causes motion blur, and focus stacking becomes impossible. Fix: Any tripod, even an inexpensive one, solves this.
As Digital Photography School identifies, these errors are consistent patterns that hold back intermediate photographers.
Caption: Each “before” in this comparison represents a single decision to change—not a fundamental limitation of gear or skill.
Post-Production: The Final 20%
Post-production isn’t a rescue phase; it’s the intentional completion of The Intentional Frame. The in-camera image is the raw material; the edited file is the finished photograph.
- Five core Lightroom adjustments for still life:
- Exposure: Correct the overall brightness.
- White balance: Critical for accurate colors, especially in food and product work.
- Clarity and Texture: These sliders reveal surface detail and add tactile quality.
- Color grading: Choose your tones deliberately to create a specific mood.
- Shadows and Highlights: Protect detail at both ends of the tonal range.
Avoid over-editing. Heavy vignettes, excessive saturation, and over-sharpening can make an image look synthetic. Editing should enhance what was already there, not transform it.
Frequently Asked Questions
What makes a good still life photography?
A good still life photograph succeeds through deliberate decisions about lighting, composition, and a clear hero subject. Effective composition uses principles like the Rule of Odds to guide the viewer’s eye, while controlled sidelighting reveals texture and creates dimension. The most compelling images also tell a small story, implying a moment or mood.
What is the F for in photography?
The “f” in photography stands for f-stop, which measures the aperture opening in a lens. A lower f-number (like f/2.8) means a wider opening, creating a shallow depth of field where the background is blurry. A higher f-number (like f/11) means a smaller opening, keeping more of the scene in sharp focus. For still life, f/8–f/16 is standard for edge-to-edge sharpness.
What are the 5 C’s of photography?
A widely used framework for the 5 C’s of photography includes Craft, Composition, Content, Concept, and Color. Craft refers to technical skill (focus, exposure), while Composition is the arrangement of elements. Content is the subject matter, Concept is the underlying idea the image communicates, and Color sets the mood. Together, they form a complete framework for evaluating a photograph.
Conclusion
Still life photography rewards deliberate thinking over expensive gear. By applying the core still life photography tips in this guide—from sidelighting your hero object to shooting RAW at f/11 on a tripod—you can move from flat, accidental snapshots to purposeful, compelling images. Every strong still life photograph was designed before the shutter was pressed.
That’s The Intentional Frame at work. When you control every variable, you’re not taking photographs, you’re making them. Apply this principle by choosing one hero object, one light source, and one background. The best still life photographers you admire didn’t start with complicated setups; they started with one deliberate decision and built from there.
Pick one idea from the list in this guide, set it up near a window, and shoot. That single deliberate session will teach you more about still life technique than reading ten more articles, because The Intentional Frame only becomes real when you execute it.
