
Table of Contents
This blog post may contain affiliate links. As an Amazon Associate I earn from qualifying purchases.
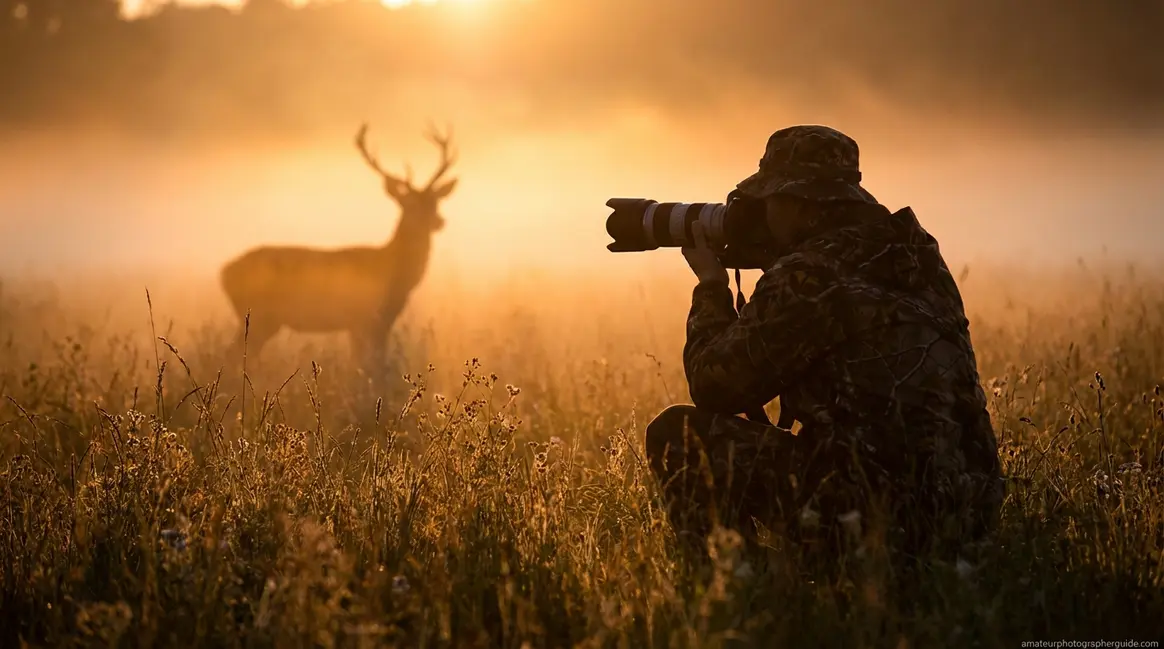
You spotted the deer. The light was perfect. You raised your camera, held your breath—and came home with a blurry, underexposed mess that looked nothing like the moment you saw.
That experience is more common than you think. Most beginners blame their gear, but the real problem is usually a gap in the full system: camera technique and the ability to find, approach, and frame animals before you ever press the shutter. Most guides online skip that second half entirely.
These wildlife photography tips for beginners cover both sides of that system. We’ll go from the three settings that control every photo to the fieldcraft skills that determine whether the animal stays long enough for you to take it. Work through this guide, and you’ll have a practical process to apply every time you head out.
Key Takeaways: Wildlife Photography for Beginners
Great wildlife photos require two skill sets in equal measure—camera technique and fieldcraft (finding and approaching animals)—what we call the Field-to-Frame Framework.
- Set a fast shutter speed first: Start at 1/1000s or faster to freeze animal movement.
- Use a wide aperture (f/4–f/5.6): This blurs the background and makes your subject stand out.
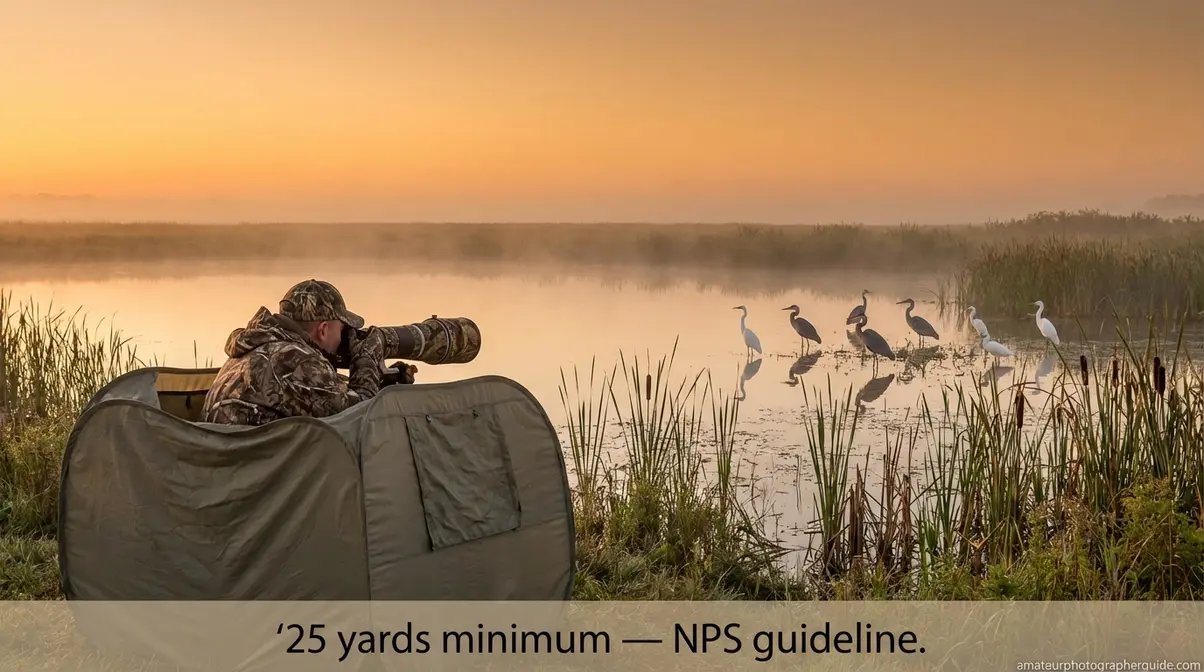
- Ethics matter: The U.S. National Park Service requires photographers to stay at least 25 yards from most wildlife, and 100 yards from bears and wolves (NPS, Yellowstone Safety Guidelines).
- You don’t need a safari: Local parks, ponds, and backyards offer all the practice you need.
- Fieldcraft is half the battle: Patient, quiet observation gets you closer than any expensive lens.
Photography Basics for Beginners
Most beginners try to fix their photos in post-processing. Professionals fix them before they press the shutter. The difference is a mental model for thinking about your settings and position before an animal ever appears.
That model is the Field-to-Frame Framework: the idea that success depends equally on what you do in the field (finding and approaching animals) and at the frame (your camera settings and composition). Every tip in this guide belongs to one of those two categories.
How We Put This Guide Together
Our team reviewed consensus from professional wildlife photographers and naturalists, cross-referenced it with guidance from the U.S. National Park Service and the U.S. Fish & Wildlife Service, and synthesized the most common beginner pain points—blurry photos, spooked animals, and gear confusion.
We prioritized advice that works for beginners using a basic DSLR or mirrorless camera without expensive lenses. Every recommendation was tested against one standard: does it produce meaningfully better photos for someone frustrated by their results so far?
The Exposure Triangle
You need to understand the Exposure Triangle—the relationship between aperture, shutter speed, and ISO. These three settings control how your photo looks. Change one, and you must adjust another to keep the image correctly exposed.
- Aperture is the opening in your lens that controls light. Think of it like the pupil of your eye. A wide aperture (like f/4) blurs the background, making your subject pop.
- Shutter speed is how long the shutter stays open. A fast shutter speed (like 1/1000s) is like blinking quickly—it freezes a flying bird mid-wing. A slow one (1/60s) turns it into a blur.
- ISO is your camera’s sensitivity to light. Higher ISO means a brighter image but more visual noise (grain). In a dark forest, ISO 3200 may look grainy; in sunlight, ISO 400 will be crisp.

Caption: The Exposure Triangle shows how aperture, shutter speed, and ISO interact.
For a visual walkthrough, watch:
Composition: Rule of Thirds & The 5 C’s
The Rule of Thirds is a guideline that divides your frame into a 3×3 grid. Instead of centering your animal, position it at one of the four intersection points. This creates visual tension that makes photos feel more alive. Nearly every camera can display this grid in the viewfinder.
What are the 5 C’s of photography?
The 5 C’s of Photography are Composition, Creativity, Color, Contrast, and Close-up. They are a foundational checklist for compelling images. For wildlife scenes, Composition means using the Rule of Thirds; Creativity is your unique angle; Color leverages contrast between the animal and its environment; Contrast is using light and shadow for depth; and Close-up means filling the frame to create intimacy.
Now that you have the vocabulary, let’s cover a key decision for any list of wildlife photography tips for beginners: your gear.
Your First Camera and Lens

Your first trip to a camera store can feel overwhelming. The good news: for beginners on a budget under $500, the choice is simpler than it looks. You need one camera body and one versatile telephoto lens.
Remember the Field-to-Frame Framework: gear affects the “Frame,” but it doesn’t determine the “Field.” A $300 camera with good fieldcraft beats a $3,000 one with a poor approach every time.
DSLR vs. Mirrorless Cameras
A DSLR (Digital Single-Lens Reflex) uses a mirror to show an optical view. A mirrorless camera uses a digital sensor and an electronic viewfinder. Both are great for beginners, but they differ in price, battery life, and autofocus.
| Feature | DSLR (e.g., Canon Rebel SL3) | Mirrorless (e.g., Sony α6400) |
|---|---|---|
| Price (body) | ~$300–$500 refurbished | ~$829–$878 used/new |
| Autofocus | Good—limited animal-eye AF | Excellent—real-time animal-eye tracking |
| Battery Life | Excellent (600–900 shots) | Moderate (300–400 shots) |
| Weight | Slightly heavier | Lighter, more compact |
| Best For | Budget-conscious beginners | Beginners planning to progress |
For most beginners, a refurbished DSLR like the Canon EOS Rebel SL3 or Nikon D3500 offers the best value. If your budget allows, the Sony α6400 (around $829–$878 used as of March 2026) offers animal-eye autofocus that’s a huge help for tracking moving subjects.
The Only Lens You Need to Start
Focal length (in mm) determines magnification. For wildlife, you need enough “reach” to photograph animals from a respectful distance.
The ideal starting point is a 70-300mm telephoto zoom. It offers a versatile magnification range, lets you shoot from an ethical distance, and costs around $100–$200 used for models like the Canon 70-300mm f/4-5.6 IS II USM or Nikon AF-P DX 70-300mm. A 300mm lens on a crop-sensor camera gives you an effective 480mm reach—enough for most beginner situations.
Upgrade only when you consistently get sharp shots at 300mm and need more reach for birds in flight or distant mammals.
Essential Non-Camera Gear
The “Field” half of the Framework depends on more than your camera. How you look and how still you are determines if animals stay.
| Gear Item | Purpose | Cost |
|---|---|---|
| Camo/earth-tone clothing | Reduces your visibility | $20–$80 |
| Pop-up hide or blind | Conceals your position | $50–$150 |
| Bean bag or monopod | Stabilizes a heavy lens | $10–$40 |
A pop-up hide near a water source can be a bigger upgrade than a new lens. Now that your gear is sorted, let’s dial in your settings.
Camera Settings for Sharp Photos
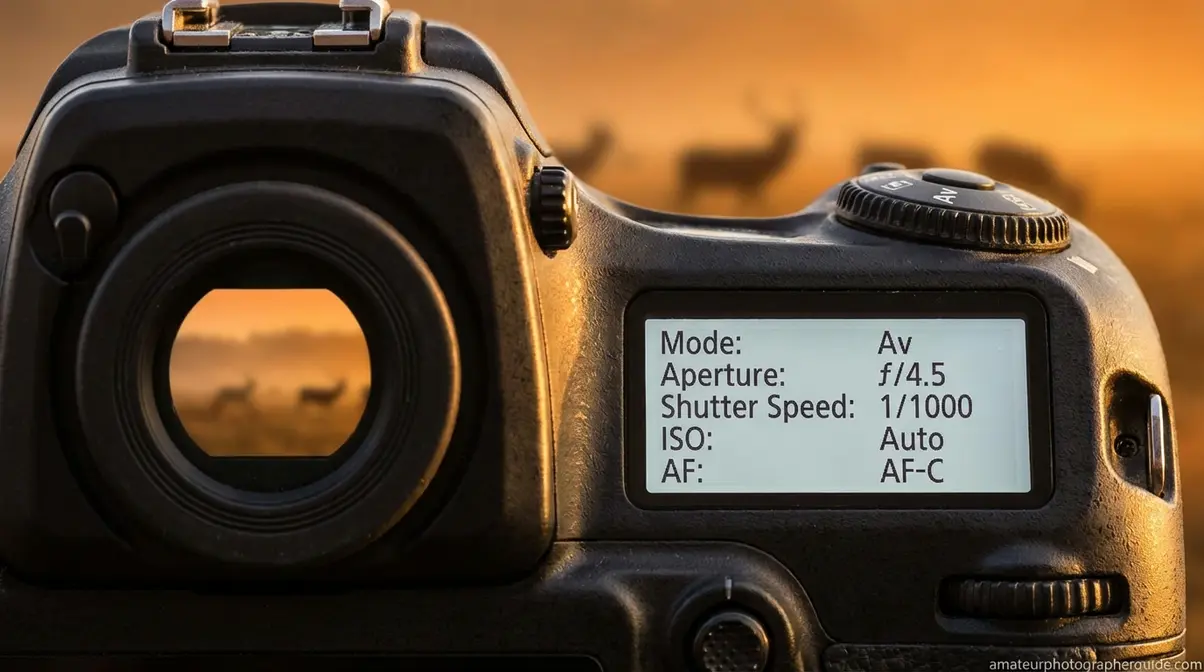
Four camera settings are key for sharp wildlife photos. Here’s the order to set them:
- Mode: Aperture Priority (A on Nikon, Av on Canon)
- Aperture: f/4–f/5.6 as a starting point
- Shutter Speed: 1/1000s minimum for most wildlife
- ISO: Auto ISO with a cap of 6400
- Autofocus: AF-C (Continuous) with animal-eye detection enabled
These “Frame” settings prepare you to turn good fieldcraft into great photos. This is one of the most important wildlife photography tips for beginners to master.
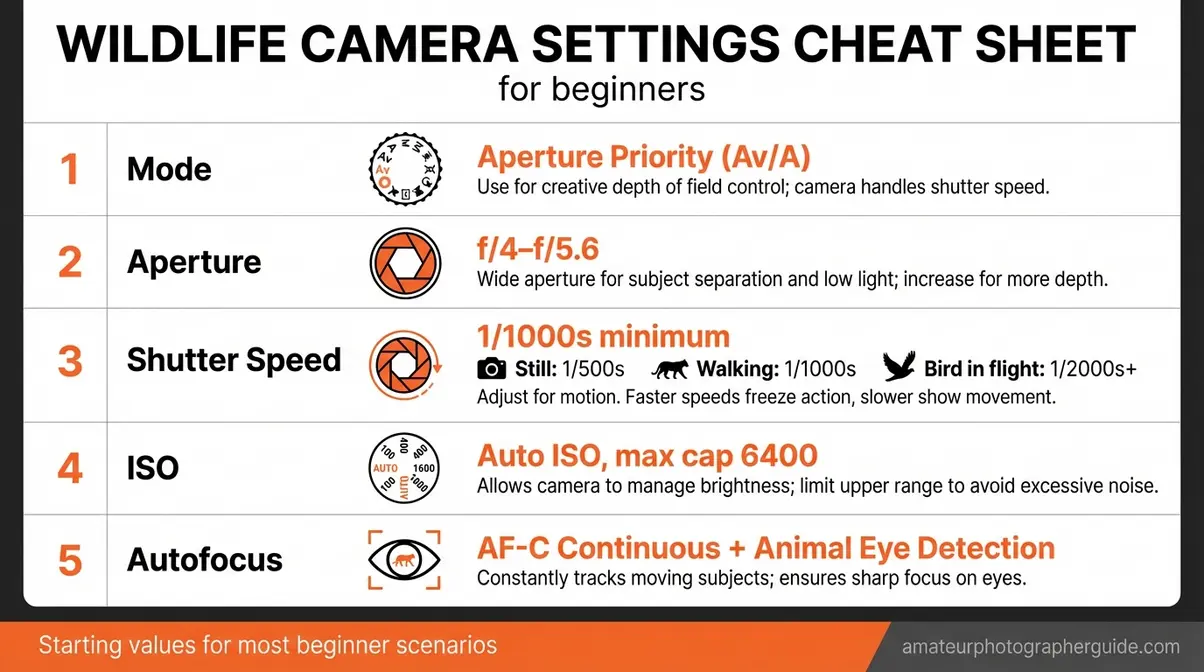
Caption: Save this cheat sheet. These starting values apply to most beginner scenarios.
Shutter Speed: Stop Blurry Animals
Shutter speed is how long your sensor is exposed to light. It’s the most important setting for sharp photos because animals rarely hold still. Camera manufacturer advises OM System that fast shutter speeds are crucial to freeze movement (OM System, 2026).
- Still animal: 1/500s
- Walking animal: 1/1000s
- Bird in flight: 1/2000s+
If your deer photo is crisp but its tail is blurred, your shutter speed was too slow. Double it next time.
Aperture: Blur the Background
Aperture is the opening in your lens controlling light. The f-stop describes its size—and it’s counter-intuitive: a lower f-stop means a larger opening. As explained by Adobe, a low f-stop like f/4 lets in more light (Adobe, 2026).
Start between f/4 and f/5.6. This range blurs a busy forest background, making your subject pop. In Aperture Priority mode (A or Av), you set the aperture, and the camera handles exposure automatically. This gives you creative control over background blur while simplifying your decisions.
Digital Camera World’s f-stop guide confirms that understanding this relationship is key to consistent exposure (Digital Camera World, 2026).
ISO: Manage Grain in Low Light
ISO is your camera’s sensitivity to light. A higher ISO lets you shoot in dimmer conditions but introduces noise (a speckled texture).
The rule for beginners: use Auto ISO with a maximum cap of 6400. Your camera will pick the lowest possible ISO for a good exposure. Beyond ISO 6400, grain often becomes distracting.
| Lighting | Suggested ISO |
|---|---|
| Bright sun | 100–400 |
| Overcast/shade | 400–1600 |
| Forest/dawn/dusk | 1600–6400 |
If your image is too dark at ISO 6400, your shutter speed is likely too fast for the light.
Autofocus: Track Moving Animals
Autofocus mode determines how your camera tracks a subject. You need to know two:
- AF-S (Single-Shot): Locks focus once. Good for stationary subjects.
- AF-C (Continuous): Called AI-Servo on Canon. Tracks a moving subject. Essential for any animal in motion.
Use AF-C as your default. If your camera has animal-eye detection, enable it. This feature automatically locks focus onto an animal’s eye—the most critical point of focus in any wildlife portrait.
Composition & Shooting Techniques
Settings get you a sharp image. Composition makes it worth looking at. These techniques are the highest-impact adjustments a beginner can make.
Get to the Animal’s Eye Level
Most beginners take photos while standing, looking down on their subjects. This angle makes animals look small and disconnected.
The fastest improvement: get down. Crouch, kneel, or lie flat. When your lens is level with the animal’s eye, the background blurs more naturally, and you enter the animal’s world. A sparrow photographed at eye level looks wild; from above, it looks like a garden ornament.
Use the Rule of Thirds
Your instinct is to center the subject. Centered shots feel static.
Enable the Rule of Thirds grid in your camera. Place the animal at a grid intersection. If it’s facing a direction, leave space in front of it. This is called “space to move into” and makes a photo feel dynamic.
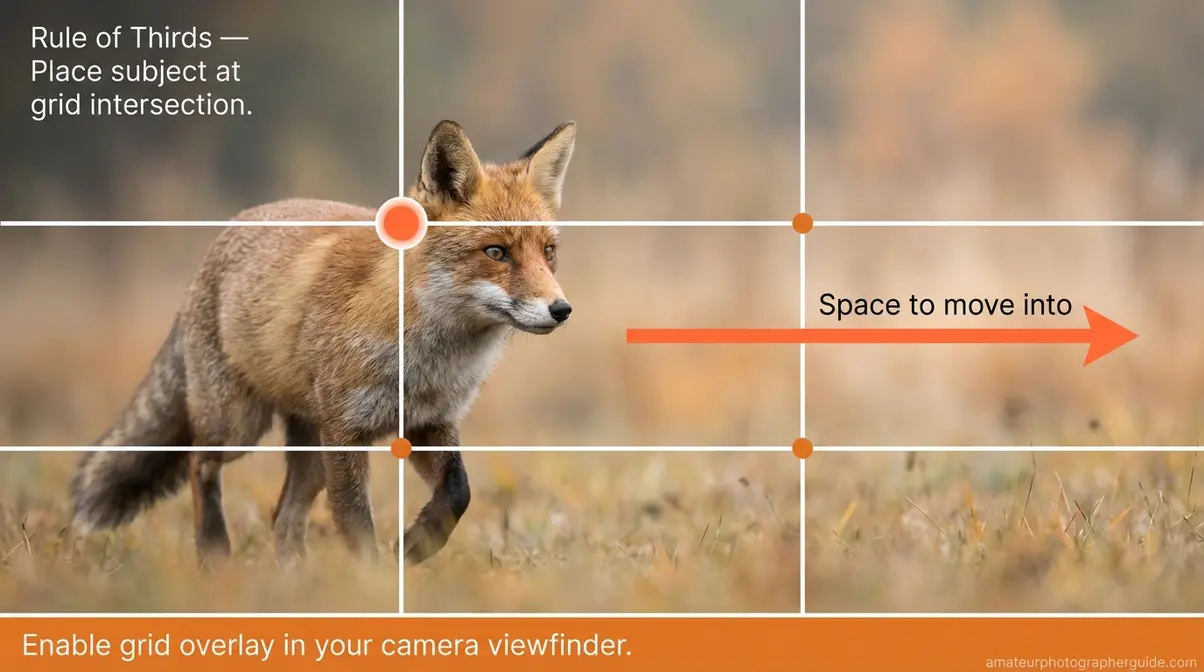
Caption: Placing a subject at a third-intersection with open space creates visual movement.
Lock Focus on the Eye
Viewers look at an animal’s eyes first. If the eye is sharp, the photo works. If it’s soft, the photo feels wrong.
- Switch to AF-C (Continuous Autofocus).
- In your camera’s menu, enable “Animal Detection” or “Eye AF.”
- Half-press the shutter to lock tracking onto the nearest eye before shooting.
If your camera lacks eye detection, use a single, small autofocus point and place it over the eye manually.
Control Your Background
A cluttered background—a fence post, a distracting bright patch—can ruin a great photo. The fix is usually to move your position slightly.
- Before you shoot, ask:
- Is anything distracting behind the animal?
- Can I shift my position for a cleaner background?
- Is my aperture wide enough (f/4–f/5.6) to blur what remains?
A one-foot shift can move a distracting branch out of the frame. Scan the background before you even look for an animal.
Wildlife Photography Ethics & Fieldcraft
“Essentially animal photography involves lots of woodsman skills.”
— Wildlife photography community member
This is the heart of the Field-to-Frame Framework’s “Field” half. Getting a great photo starts long before you raise your camera. Our team reviewed guidance from the U.S. Fish & Wildlife Service, National Park Service, and NOAA to compile these recommendations.
When and Where to Find Wildlife
Animals are creatures of routine. Understanding their patterns is key.
Golden hours are real. Dawn and dusk are when most animals are active. The light is also soft and warm, making it the most flattering. Plan your outings around these times.
Water sources concentrate wildlife. Ponds, streams, and marshes attract more animals than almost any other habitat. Set up near water with the light behind you, be patient, and animals will often come to you.
NOAA’s marine life viewing guidelines recommend researching species-specific habits before you go, and this applies to land animals too (NOAA Marine Life Viewing Guidelines).
How to Approach Animals Safely
Slow movement, quiet clothing, and patience get you close. Rushing an animal will cause it to flee.
Use available cover like trees and hedgerows. Move when the animal’s head is down or turned away. Freeze when it looks up. This stop-start pattern is how naturalists close distance without causing alarm.
Safe distances matter. According to the U.S. National Park Service’s safety guidelines for Yellowstone, you must stay 25 yards from most wildlife (bison, elk, deer) and 100 yards from bears and wolves (NPS, 2026). A 300mm or 400mm lens is an ethical tool that lets you fill the frame from a respectful distance.
Core Ethical Rules
The U.S. Fish & Wildlife Service is explicit: the animal’s welfare comes before any photograph. As the FWS’s Ethics & Wildlife Photography page states, photographers must maintain the highest ethical standards (FWS, 2026).
- Never bait or call animals.
- Never approach nesting sites.
- Never use continuous flash on nocturnal animals.
- Never share GPS coordinates of sensitive locations.
- Leave no trace.
The National Wildlife Federation Photographer Guidelines reinforce that any action interfering with natural behavior is unethical. A photo is never worth an animal’s distress.
How to Practice in Your City
A persistent myth is that good wildlife photos require remote destinations. They don’t. The skills are built through repetition, and that can happen in your nearest green space. These wildlife photography tips for beginners are for everyone.
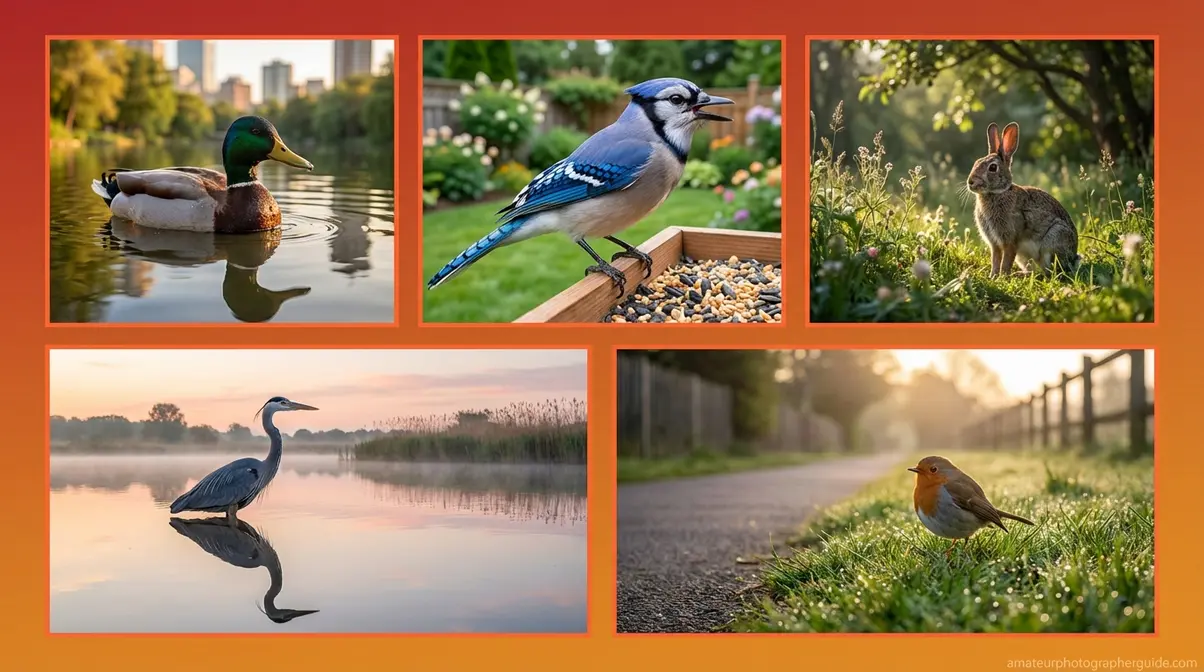
Five Local Spots for Practice
These locations are available near almost every city and offer reliable subjects to challenge your skills.
- City parks with ponds: Ducks, geese, and herons tolerate human presence and are great for practicing tracking and eye focus.
- Backyard feeders: Songbirds are predictable and reward fast reaction times.
- Suburban woodland edges: Squirrels, rabbits, and deer are less skittish than wild populations, giving you more time to adjust settings.
- Reservoirs and wetlands: These areas concentrate wading birds and raptors, especially during migration.
- Neighborhood walks at dawn: A common robin in beautiful light makes for a more impressive photo than a blurry exotic species.
Building a Practice Routine
The photographers who improve fastest are those who practice with a specific goal.
- Weekdays: Review 10 photos from your last outing. Identify one thing that went wrong (blurry eyes, cluttered background) and note the fix.
- Weekend (1–2 hours): Go out with one goal. Not “take good photos,” but a specific skill: practice AF-C tracking, getting to eye level, or controlling your background.
This loop—go out, review, fix—is the fastest way to internalize the Field-to-Frame Framework.
Common Beginner Mistakes
Recognizing these predictable errors is the first step to eliminating them.
Common Pitfalls
- Shooting in Auto mode: Full Auto often chooses a slow shutter speed that blurs any moving subject. Switch to Aperture Priority.
- Approaching too fast: A direct approach triggers an animal’s flight instinct. Move in slow arcs and stop when it looks up.
- Focusing on the body: A 2mm focus error between the eye and shoulder can ruin a portrait. Use your smallest autofocus point on the eye.
- Ignoring the background: A fence post behind an animal is nearly impossible to fix in editing. Scan the background before every shot.
- Giving up in “bad” weather: Overcast days produce soft, even light that’s excellent for wildlife portraits.
When to Choose Alternatives
This guide focuses on a traditional camera and telephoto lens. However:
- For small backyard birds, a 400mm+ prime lens and a garden hide will outperform a 70-300mm zoom.
- For underwater or macro wildlife, the settings and fieldcraft here are largely inapplicable.
- For commercial photography on federal lands, you need a permit from the FWS.
When to Seek Expert Help
If you still can’t get sharp shots of moving subjects, a one-day workshop with a local photography club can often solve the problem. Hands-on instruction for camera-specific autofocus settings is invaluable.
Frequently Asked Questions
What are the most common wildlife photography mistakes beginners make?
The most common mistake is using a shutter speed that’s too slow, leading to motion blur. Many beginners use Auto mode, which often selects 1/100s or slower. The second mistake is approaching animals too quickly, causing them to flee. Other errors include centering every subject and focusing on the body instead of the eye.
What is the 20-60-20 rule in photography?
This rule describes how pros allocate shooting time: 20% at maximum zoom, 60% at mid-zoom, and 20% for wider, environmental shots. It’s a reminder that patience and positioning matter more than just taking pictures.
What is the 3:1 rule in photography?
The 3:1 lighting ratio describes the difference in light intensity between the bright and shadow sides of a subject. A 3:1 ratio creates natural-looking depth. This ratio occurs naturally during the golden hours (dawn and dusk), which is why photos taken at these times look so compelling.
What are the 7 C’s of photography?
The 7 C’s expand on the classic 5 by adding Clarity (sharp focus) and Candid (natural moments). For wildlife, Clarity is critical. Candid shots showing genuine behavior, like a fox playing, carry more emotional weight than static portraits.
What does the “f” stand for in photography?
The “f” in f-stop stands for focal length. The f-number is a ratio, but in practical terms, all you need to remember is that a lower f-number means a wider aperture (more light, more background blur). For wildlife, f/4–f/5.6 is a great starting range.
What are the 4 pillars of photography?
The 4 pillars are Light, Subject, Composition, and Moment. Every great photo succeeds in all four areas. This maps directly to our Field-to-Frame Framework: “Field” skills help you find the right subject and moment, while “Frame” skills help you capture the light and composition.
What are the 7 basics of photography?
The 7 basics are aperture, shutter speed, ISO, white balance, focal length, composition, and focus. For wildlife beginners, prioritize them in this order: shutter speed, aperture, ISO, focus, composition, focal length, and finally white balance (Auto WB works well outdoors).
Conclusion
For beginner wildlife photographers, consistent results come from applying the complete system. The Field-to-Frame Framework captures this perfectly: your camera settings determine what happens at the frame, while your fieldcraft and ethics determine what happens in the field. Research from the U.S. Fish & Wildlife Service confirms what pros know—the photographers who cause the least disturbance get the best shots.
Every section of this guide is a component of that framework. Your knowledge of the Exposure Triangle and Rule of Thirds is the “Frame” half. Your knowledge of golden hours, approach techniques, and ethical distances is the “Field” half. Neither works without the other.
Your next step is simple: pick one local spot and go out this weekend with one specific skill to practice. Don’t try to apply everything at once. Start with shutter speed and eye focus, then add background control. The wildlife you need to become a better photographer is already nearby. Go find it.
