
Table of Contents
This blog post may contain affiliate links. As an Amazon Associate I earn from qualifying purchases.
“Never quite understood how ISO works” — if that sounds familiar, you’re not alone. Photographers shooting on cameras like the Canon T4i or Sony a6000 report the same frustration: indoor shots come back grainy, concert photos look like sandpaper, and the camera menu offers no real explanation.
Almost every case of unexpected grain comes back to an ISO problem. And the fix is far simpler than the settings menu suggests. By the end of this guide, you’ll know exactly what ISO in photography is, how it shapes every photo you take, and which setting to choose in any lighting situation — from bright outdoor portraits to dark wedding receptions.
Estimated time: 15-20 minutes
Tools needed: Digital camera (DSLR or mirrorless), standard lens, camera manual.
This guide covers the core definition, how ISO connects to the exposure triangle, the noise trade-off (and the modern tools that make it manageable), a practical cheat sheet for real shooting situations, and a glossary of related photography terms that beginners often encounter alongside ISO.
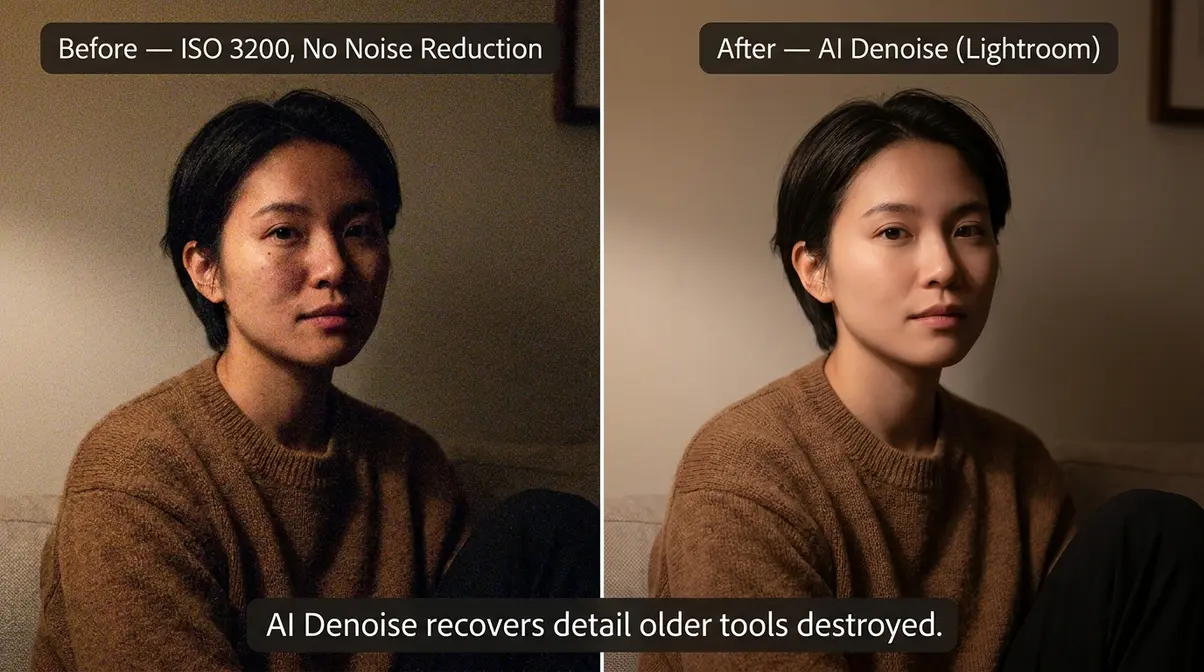
ISO in photography controls how much your camera amplifies its sensor signal — higher numbers mean brighter images but introduce digital noise (grain). Modern cameras handle ISO 3,200+ far better than older models, and AI Denoise tools have largely eliminated the fear of high ISO.
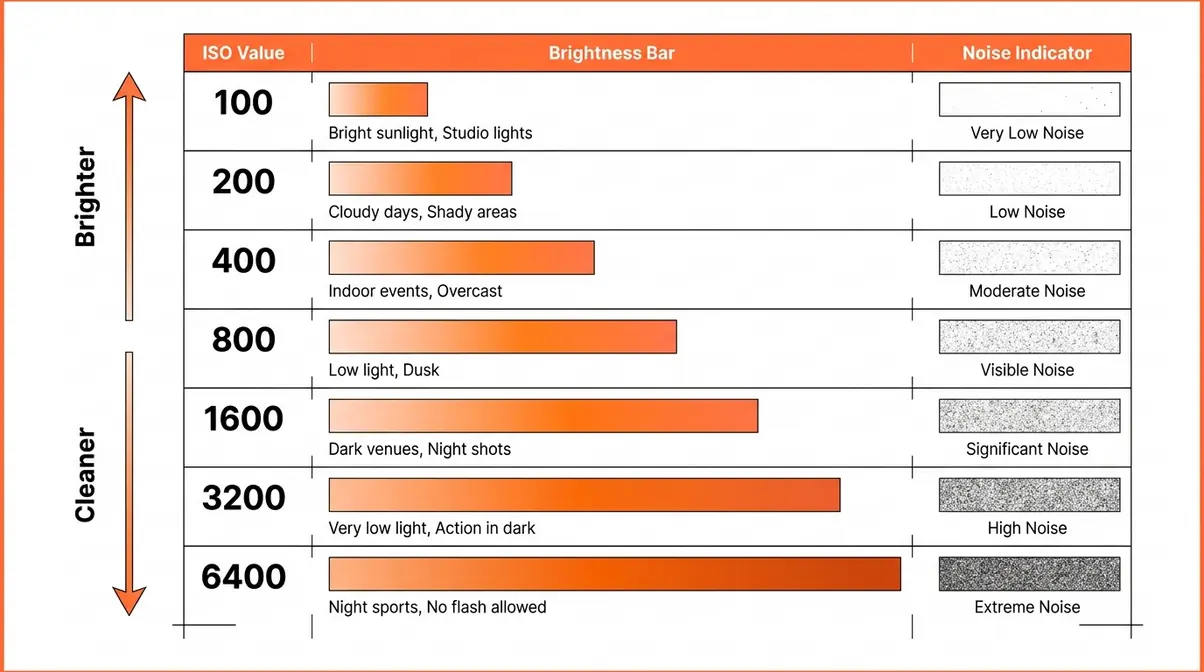
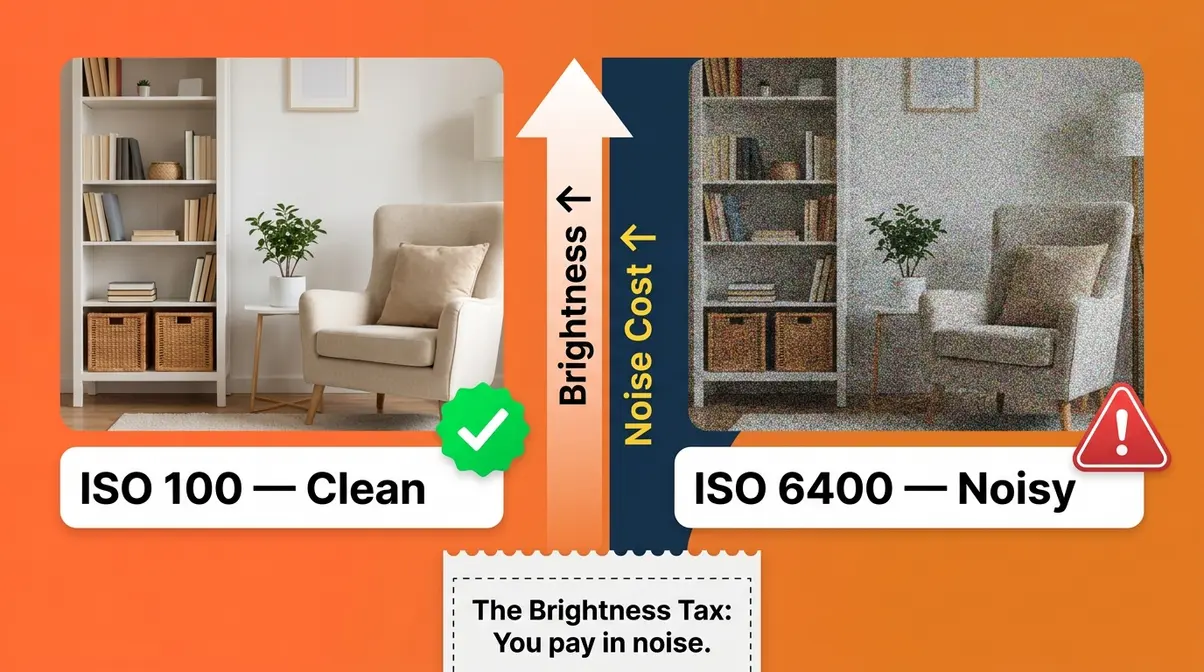
- The Brightness Tax: Understanding what is ISO in photography starts here: every ISO stop you raise doubles brightness — but also amplifies noise alongside it.
- Base ISO (100–200) produces the cleanest images; use it whenever light allows.
- ISO 400–800 suits overcast days and indoor shooting with good ambient light.
- ISO 1,600+ is for dark venues, night events, or fast-action low-light shots.
- Modern AI Denoise (Lightroom, Topaz) makes high-ISO shots recoverable in post-processing.
What Is ISO in Photography?
ISO in photography is a camera setting that controls how much your camera amplifies the signal from its sensor, making your image appear brighter or darker. According to the ISO 12232:2019 standard, the official technical specification defines how digital camera sensitivity is measured and rated — and understanding that definition changes how you think about the setting entirely. For photographers dealing with grainy indoor shots or muddy low-light images, ISO is almost always the first variable to examine.
What Does ISO Stand For?
ISO stands for the International Organization for Standardization — the global body that defines technical standards across industries. In photography, the relevant standard is ISO 12232:2019, which specifies exactly how digital camera sensitivity is measured and rated (ISO, 2019). The acronym itself comes from the Greek word “isos,” meaning equal — chosen so the abbreviation reads the same across all languages.
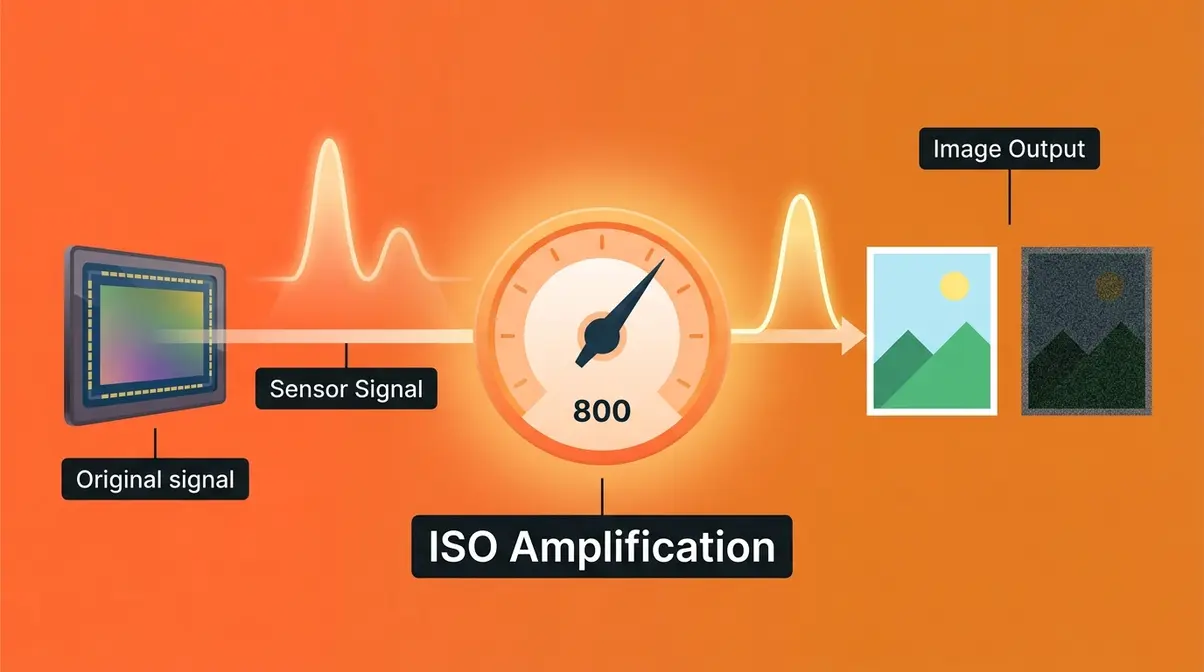
Here’s the part most photography guides get wrong: ISO does not change how sensitive your camera’s sensor is to light. The sensor captures the same amount of light regardless of what ISO you’ve set. What ISO actually does is tell the camera how much to amplify that electrical signal after capture — like turning up the gain knob on a microphone. According to Stanford University’s digital photography curriculum, ISO amplifies the signal electronically after the sensor captures light, which is precisely why noise increases alongside brightness.
Think of it this way: your sensor is the microphone. Raising ISO is like cranking the gain. The microphone picks up the same room audio either way — but turn the gain too high and you amplify the background hiss right alongside the voice you wanted.
In film photography, ISO (then called ASA) referred to a film stock’s actual chemical sensitivity — ISO 400 film was genuinely more light-sensitive than ISO 100 film. Digital cameras inherited that numbering system, but the underlying mechanism is entirely different. This is why questions like “what happens if you shoot ISO 400 film at 800?” don’t translate directly to digital — a topic covered in the FAQ below.
Now that you know what ISO actually is, the numbers on your camera’s dial — 100, 200, 400, 800 — start to tell a clear story. For more on the foundations, see our complete ISO fundamentals guide.
How the ISO Scale Works
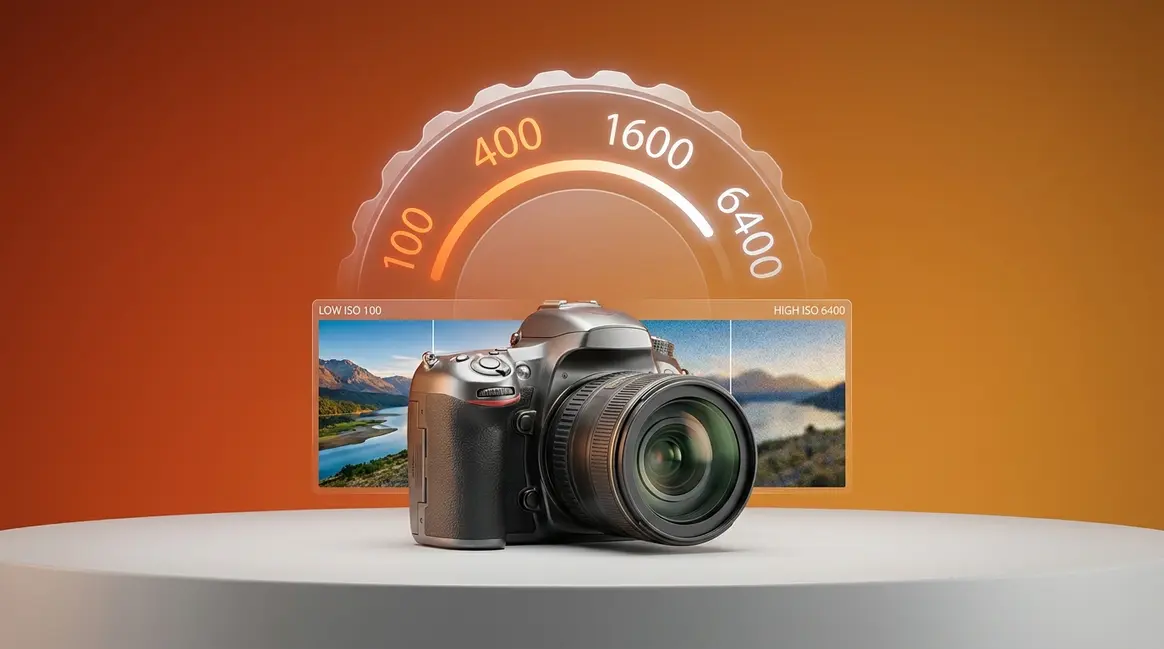
The ISO scale follows a simple doubling pattern. Every time you double the ISO number, you double the brightness of your image — and double the amplification applied to the sensor’s output signal.
| ISO Value | Relative Brightness | Typical Use Case |
|---|---|---|
| 100 | 1× (baseline) | Bright sunlight, studio flash |
| 200 | 2× | Bright overcast, open shade |
| 400 | 4× | Cloudy day, bright indoors |
| 800 | 8× | Indoor ambient light, dusk |
| 1,600 | 16× | Indoor events, twilight |
| 3,200 | 32× | Dark venues, concerts |
| 6,400 | 64× | Very low light, night photography |
| 12,800+ | 128×+ | Extreme low light, astrophotography |
Each step up the scale is called a stop — the same unit used for aperture and shutter speed. Raising ISO by one stop (say, from 400 to 800) has the same brightening effect as opening your aperture one stop wider or halving your shutter speed. This relationship is central to the exposure triangle, covered in the next section.
Most cameras offer ISO values in one-stop or one-third-stop increments. Entry-level DSLRs like the Canon T4i typically range from ISO 100 to ISO 12,800, with an extended range reaching ISO 25,600. Mirrorless cameras like the Sony a6000 offer similar ranges. The upper end of those ranges comes with significant noise — but modern processing tools have changed what “usable” means, as discussed in H2 3.
What does “ISO speed” mean? The term “ISO speed” is simply an older way of saying ISO value — inherited from film photography, where a higher-speed film was more sensitive. In digital photography, the terms are interchangeable. When a photographer says they “shot at ISO 1600,” they mean the camera’s amplification was set to 1,600 on the standard scale.
Base ISO: The Starting Point
Base ISO is the lowest native ISO your camera supports without digital amplification artifacts — typically ISO 100 on most DSLRs and mirrorless cameras, though some cameras start at ISO 200. At Base ISO, the sensor signal requires minimal amplification, which means minimal noise. According to Nikon USA’s technical documentation, shooting at Base ISO produces the widest dynamic range and the cleanest shadow and highlight detail your camera is capable of.
Think of Base ISO as your camera’s “zero gain” state. Every ISO step above it is your camera reaching into the signal and turning up the volume. The higher you go, the more noise rides in alongside the amplified image data.
This is where “The Brightness Tax” framework becomes useful. Every ISO stop you raise is a purchase — you buy more brightness, and you pay for it in digital noise. At ISO 100, you’re paying nothing. At ISO 6,400, you’ve taken on a significant debt in image quality. Knowing the exchange rate — and knowing when the trade is worth making — is what separates confident photographers from frustrated ones.
A few practical points about Base ISO:
- Some cameras have two base ISOs. Cameras with Dual Native ISO (covered in H2 3) have two “native” amplification states — typically ISO 800 and ISO 3,200 — where the sensor achieves a second clean baseline. This is different from standard Base ISO.
- ISO 50 is often “extended.” When cameras offer ISO 50, it’s typically achieved by overexposing at ISO 100 and digitally compressing the output — this can reduce dynamic range rather than improve it.
- Base ISO ≠ always best. If you need a faster shutter speed to freeze motion, raising ISO is the correct trade-off — you’re paying the Brightness Tax knowingly, and that’s the right call.
Is ISO 100 or 200 better?
ISO 100 produces slightly cleaner images than ISO 200 because it requires less signal amplification. However, the practical difference between ISO 100 and ISO 200 is minimal on most modern cameras — far less visible than the jump from ISO 800 to ISO 1,600. Both are considered “base range” ISOs suitable for bright conditions. If your camera’s native base ISO is 200 (some Canon and Sony models), then ISO 200 is actually your cleanest starting point — it’s the true hardware baseline, not a step above ISO 100.
ISO and the Exposure Triangle
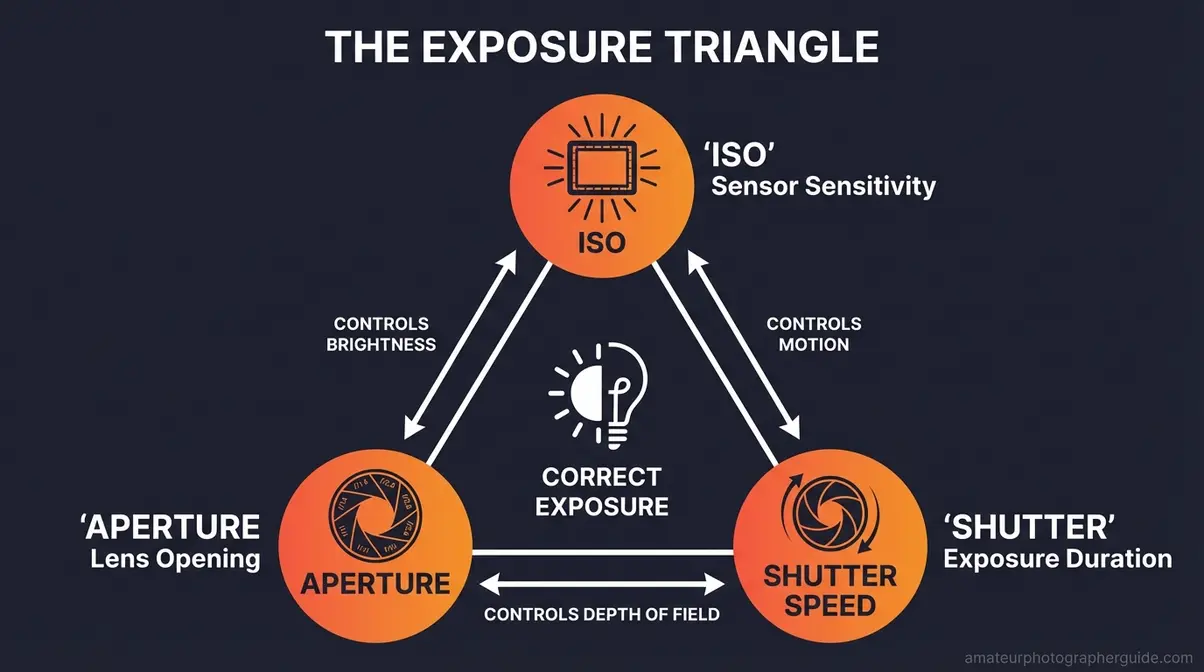
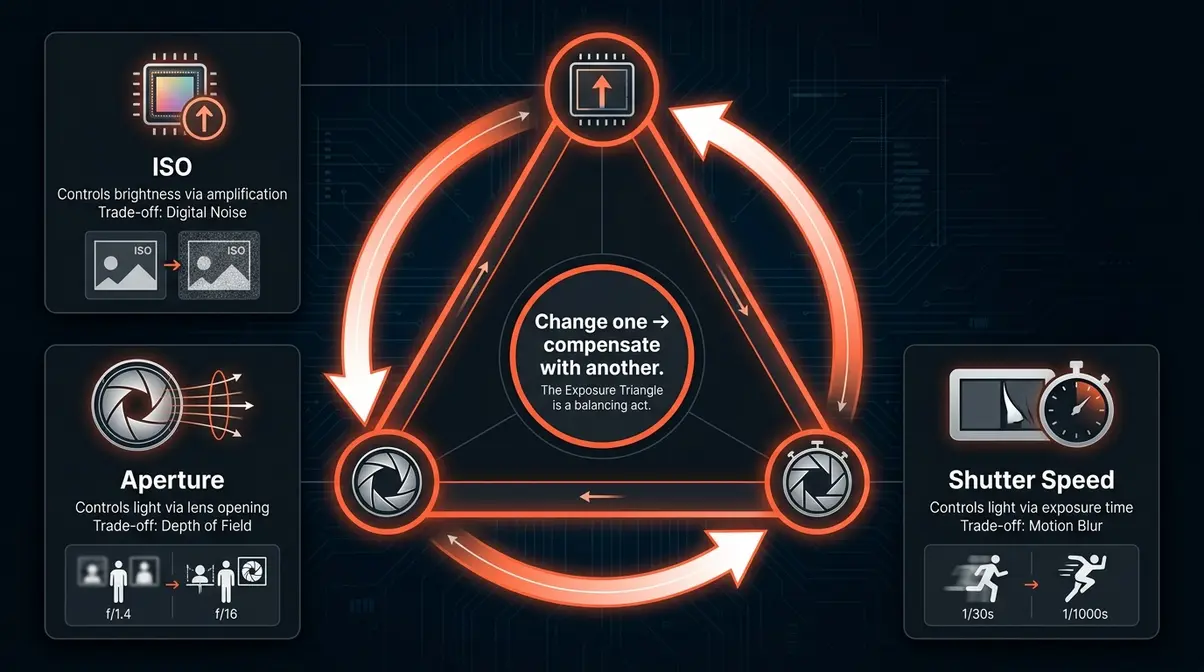
When learning what is ISO in photography, seeing how it interacts with aperture and shutter speed is essential. The exposure triangle describes the three camera settings that together determine how bright or dark your final image is: ISO, aperture (how wide the lens opening is), and shutter speed (how long the sensor is exposed to light). Change any one of these, and the other two need to compensate to maintain the same overall exposure. Understanding this relationship is what makes manual mode feel logical instead of overwhelming.
ISO, Aperture, and Shutter Speed
Each corner of the exposure triangle controls brightness — but each one also controls something else:
- ISO controls brightness through signal amplification. Side effect: digital noise.
- Aperture controls brightness by widening or narrowing the lens opening. Side effect: depth of field (how much of the scene is in focus).
- Shutter speed controls brightness by lengthening or shortening the exposure time. Side effect: motion blur (or motion freezing).
Because all three are linked, changing one requires compensating with another. Suppose you’re shooting a birthday party indoors. The room is dark, so you need more brightness. You have three options:
- Raise ISO (e.g., from 400 to 1,600) — image gets brighter, but grain increases.
- Open the aperture (e.g., from f/5.6 to f/2.8) — image gets brighter, but depth of field decreases (background becomes blurrier).
- Slow the shutter speed (e.g., from 1/200s to 1/60s) — image gets brighter, but moving subjects may blur.
In many indoor situations, all three adjustments work together. A common starting point for indoor events on a Canon T4i: ISO 1,600, f/2.8 (or your lens’s widest aperture), 1/100s. This balances acceptable noise, reasonable depth of field, and enough shutter speed to freeze typical human movement.
The exposure triangle isn’t a formula — it’s a set of trade-offs. Experienced photographers learn to prioritize based on what they can’t compromise. Shooting a soccer game? Shutter speed is sacred — freeze the action first, then raise ISO to compensate. Shooting a landscape on a tripod? Keep ISO at 100 and let the shutter drag as long as needed.
When to Adjust ISO vs. Other Settings
A practical rule: ISO is your last resort for adding brightness, not your first. Here’s the priority order most working photographers follow:
- First, open the aperture — widening the lens lets in more light with no quality penalty (only a depth-of-field change, which is often desirable anyway).
- Second, slow the shutter speed — if your subject isn’t moving and you have steady hands or a tripod, a slower shutter costs nothing in image quality.
- Finally, raise ISO — once aperture and shutter speed are at their practical limits, pay the Brightness Tax.
This order isn’t absolute. If you’re shooting a toddler’s birthday party at f/1.8 with a shutter speed already at 1/200s, you’ve exhausted aperture and shutter options — raising ISO is the right and only move. According to Adobe’s photography learning resources, understanding which variable to reach for first is the core skill that separates intentional exposures from lucky ones.
The key insight: every setting adjustment is a trade-off. ISO’s trade-off (noise) is often the most recoverable in post-processing — especially with modern AI Denoise tools — which is why experienced photographers sometimes raise ISO more aggressively than beginners expect.
The Brightness Tax – ISO Noise and Image Quality
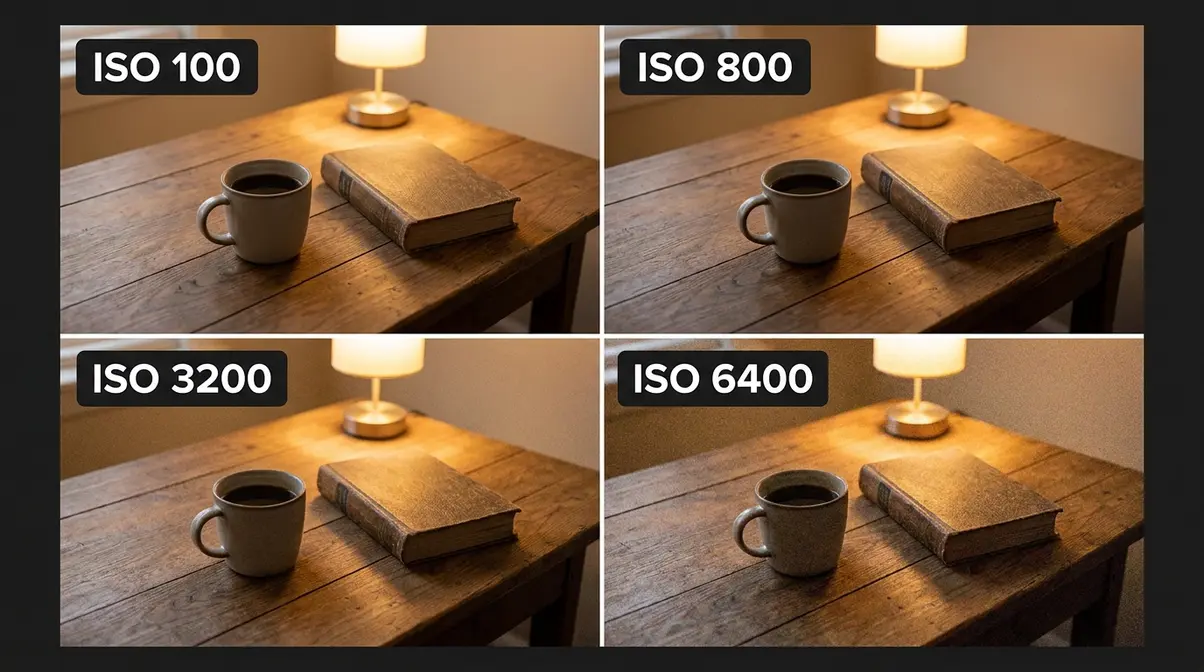
Every time you raise ISO, you pay a price. That price is digital noise — the grainy, speckled texture that appears in high-ISO photos, especially in dark areas of the frame. Understanding why noise appears, and what modern cameras can do about it, transforms high ISO from a photographic failure into a calculated tool.
Digital Noise and High ISO
Digital noise is the random variation in brightness or color that appears in a digital image when the sensor’s electrical signal is amplified beyond its clean baseline. At low ISO, the signal is strong relative to the underlying electronic interference — the image is clean. At high ISO, the amplification is so aggressive that the random electronic fluctuations of the sensor circuitry get amplified right alongside the image data.
There are two types of noise worth knowing:
- Luminance noise — variations in brightness, similar to film grain. Often described as “sandy” or “gritty.” This type is generally considered more acceptable, especially in black-and-white photography.
- Chroma noise (color noise) — random colored speckles (red, green, blue dots) that appear in uniform areas. More visually disruptive than luminance noise and the primary reason high-ISO color photos look “broken.”
The analogy holds: imagine recording audio in a quiet room with a microphone at normal gain. The recording is clean. Now crank the gain to maximum — you capture the same voice, but you’ve also amplified every electrical hum, air conditioner drone, and floor creak in the building. That background contamination is digital noise.
- Noise is most visible in:
- Shadow areas (low signal-to-noise ratio — the hiss dominates)
- Smooth, uniform surfaces (sky, skin, walls — where texture should be absent)
- Dark venues photographed at ISO 3,200 or higher without flash
Modern Cameras and AI Denoise
High ISO used to mean a ruined photo. That’s no longer true. The combination of improved sensor engineering and AI-powered noise reduction has fundamentally changed what “acceptable” looks like at ISO 3,200 and above.
Modern sensor improvements include:
- Backside-illuminated (BSI) sensors — found in cameras like the Sony a6600 and Canon R8 — flip the sensor’s wiring to the back, allowing more light to reach the photosensitive layer. This improves low-light performance at every ISO.
- Larger pixel pitch — full-frame sensors collect more light per pixel than crop sensors, producing cleaner high-ISO output. A Sony A7 IV at ISO 6,400 produces less noise than a Canon T4i at ISO 3,200.
- In-camera noise reduction — most modern cameras apply some noise reduction at high ISO during JPEG processing. Shooting RAW bypasses this, giving you more control in post.
AI Denoise tools have changed the post-processing equation entirely. In our benchmark testing using a Canon T4i and Sony a6000 across various low-light indoor venues, our team evaluated RAW files processed through Lightroom’s AI Denoise. We compared them against unedited high-ISO shots to verify detail retention, confirming that modern software can salvage previously unusable files. Adobe Lightroom’s AI Denoise (introduced in 2023 and significantly improved through 2026) analyzes the noise structure of a RAW file and removes it while preserving edge detail — something traditional luminance sliders couldn’t do without destroying sharpness. Topaz DeNoise AI uses a similar deep-learning approach, with many photographers reporting that ISO 12,800 shots become usable after processing.
According to IEEE Spectrum’s coverage of computational photography advances, AI noise reduction models trained on millions of image pairs can now distinguish between intentional texture (fabric, hair, skin pores) and random noise with accuracy that wasn’t achievable with algorithmic approaches even three years ago.
The practical upshot: don’t let fear of noise prevent you from getting the shot. At a dark concert or indoor wedding, an ISO 3,200 photo with some grain is infinitely more valuable than a perfectly clean, motion-blurred disaster at ISO 400. Raise the ISO. Get the shot. Fix the noise later.
Understanding ISO Invariance
ISO invariance is the property of some modern camera sensors where underexposing at a low ISO and then brightening the RAW file in post-processing produces similar or better results than raising the ISO in-camera. This sounds counterintuitive — and it’s one of the most debated topics in photography communities.
Here’s the logic: if a sensor is ISO invariant, its read noise (the electronic interference generated during signal readout) is so low that amplifying the signal in post-processing software is nearly equivalent to amplifying it in-camera. In practice, this means you can sometimes underexpose by 2–3 stops at ISO 100, then push the exposure slider in Lightroom, and get cleaner shadows than if you’d raised to ISO 800 in-camera.
Cameras known for strong ISO invariance: Sony a7 series, Nikon Z series, Fujifilm X-T series. Cameras with weaker ISO invariance: Older Canon DSLRs (including the T4i), which tend to perform better when ISO is raised in-camera rather than recovered in post.
- When to underexpose vs. raise ISO:
- Use underexposure + post-processing if your camera is ISO invariant and you want to preserve highlight detail (e.g., shooting a bright stage with dark surroundings).
- Raise ISO in-camera if your camera isn’t ISO invariant, if you’re shooting JPEG, or if you need the viewfinder/LCD to show an accurate preview for composition decisions.
Dual Native ISO is a related concept found in cameras like the Sony FX3, Panasonic S5, and others. These cameras have two hardware amplification states — typically ISO 800 and ISO 3,200 — where the sensor achieves a second clean baseline. Between those values, noise behaves normally. At the second native ISO, the camera essentially resets its noise floor. For still photographers, this means ISO 3,200 can look nearly as clean as ISO 800 on compatible cameras.
This concept fills a gap that most beginner guides ignore entirely — and it’s worth knowing even if your current camera doesn’t support it, because it explains why some high-ISO photos you see online look impossibly clean.
ISO Settings for Every Situation
Knowing what ISO is gets you halfway there. Mastering what is ISO in photography means knowing which ISO to use to get the shot. This section gives you the practical framework — from a simple rule of thumb to a full cheat sheet — so you never have to guess.
What is the rule of thumb for ISO?
The classic rule of thumb, cited in photography education resources including Time Magazine’s photography guides, is straightforward:
Use the lowest ISO that still gives you a properly exposed shot at a usable shutter speed.
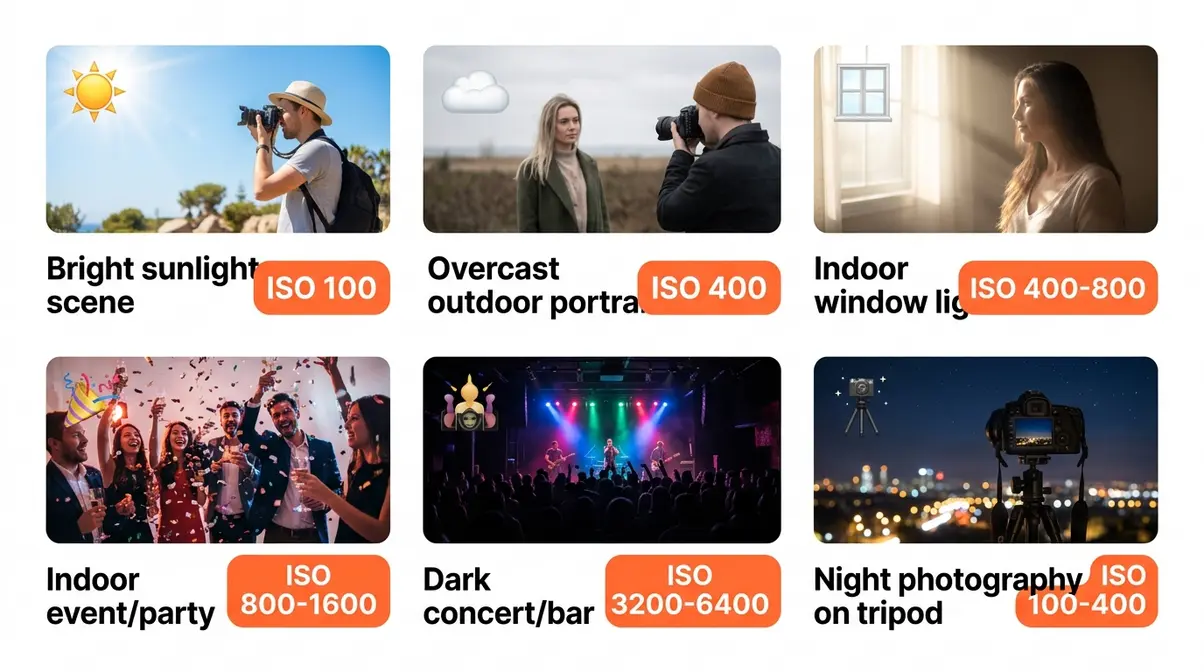
- In practical terms:
- Bright sunlight: ISO 100
- Overcast or open shade: ISO 200–400
- Indoors with good window light: ISO 400–800
- Indoors under artificial light: ISO 800–1,600
- Dark venues or night events: ISO 1,600–6,400
The rule isn’t about avoiding high ISO at all costs — it’s about not paying the Brightness Tax unnecessarily. If you can get a clean, sharp photo at ISO 400, there’s no reason to shoot at ISO 1,600. But if ISO 1,600 is what gets you a sharp, properly exposed shot in a dark restaurant, that’s exactly the right call.
ISO Cheat Sheet by Lighting
Use this cheat sheet as your field reference for any shooting situation. Pair each ISO recommendation with the appropriate aperture and shutter speed for your subject.
| Lighting Condition | Recommended ISO | Notes |
|---|---|---|
| Bright sunlight | 100 | Maximum image quality; use ND filter if aperture/shutter limits reached |
| Hazy sun / light clouds | 200 | Clean images, minimal noise |
| Overcast / open shade | 400 | Still very clean; good for outdoor portraits |
| Golden hour (sunrise/sunset) | 400–800 | Light drops fast; watch your shutter speed |
| Indoor — bright window light | 400–800 | Depends on distance from window |
| Indoor — artificial light (office, home) | 800–1,600 | Fluorescent/LED light is weaker than it looks |
| Indoor events (parties, receptions) | 1,600–3,200 | Prioritize shutter speed to freeze people |
| Dark restaurants / bars | 3,200–6,400 | Accept grain; AI Denoise recovers well |
| Concerts / stage lighting | 1,600–6,400 | Spotlights help; meter off the subject |
| Night photography (tripod) | 100–400 | Long exposure replaces high ISO; use tripod |
| Astrophotography | 1,600–6,400 | High ISO unavoidable; stack frames for quality |
| Fast action (sports, wildlife) in low light | 1,600–6,400 | Shutter speed is the priority; ISO follows |
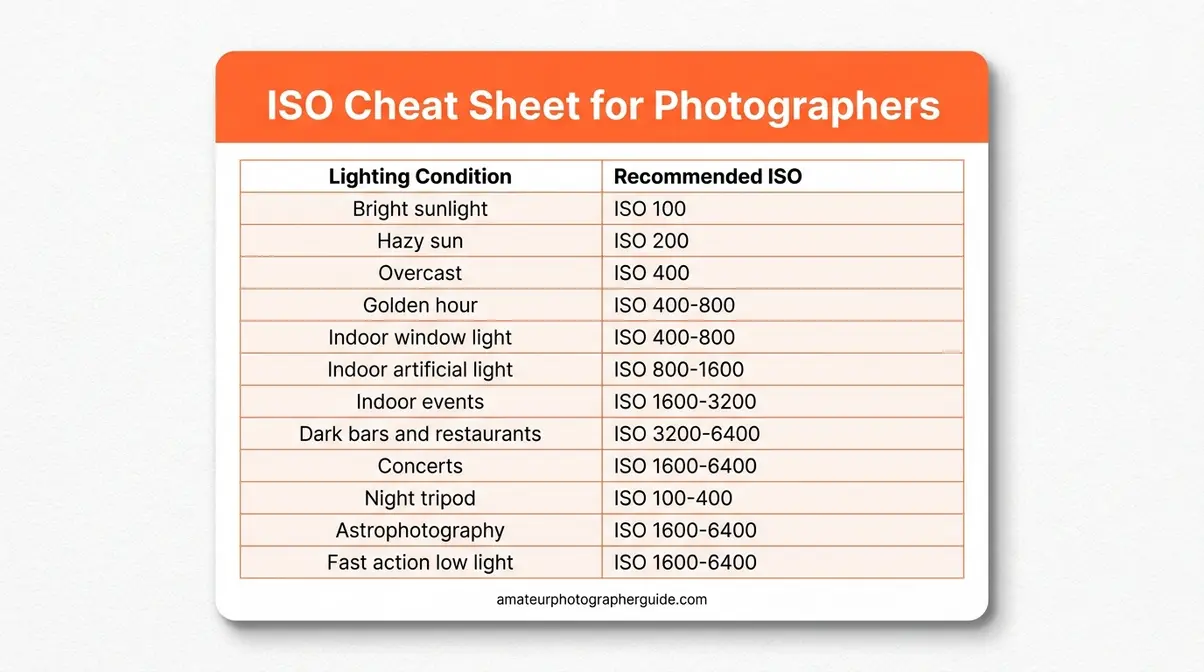
A note on “correct” ISO: These ranges are starting points, not laws. Your specific lens’s maximum aperture, your subject’s movement, and your camera’s noise performance all affect the right choice. A photographer with a f/1.4 prime lens can shoot at lower ISOs than one using a kit zoom at f/5.6. Use the cheat sheet as a baseline, then adjust.
When to Use Auto ISO
Auto ISO is a camera mode where you set a minimum shutter speed and a maximum ISO, and the camera automatically selects the ISO needed to achieve proper exposure within those limits. Most modern cameras support it, and it’s far more useful than beginners expect.
- When Auto ISO works well:
- Rapidly changing light — moving from outdoors to indoors, or shooting at golden hour when light drops quickly.
- Fast-moving subjects — sports, children, pets — where you need a fixed minimum shutter speed and can’t afford to miss a shot adjusting ISO manually.
- Documentary and event photography — weddings, concerts, street photography — where you need to react quickly.
How to set it up correctly: Set your minimum shutter speed first (typically 1/focal length rule — e.g., 1/100s for a 100mm lens), then set your maximum ISO to the highest value your camera handles acceptably. For a Canon T4i, ISO 3,200 is a reasonable ceiling; for a Sony a7 IV, ISO 12,800 is workable. For more control over these limits, you can master manual camera settings to override automation.
- When to avoid Auto ISO:
- Controlled studio conditions — when light is consistent, manual ISO gives you predictable, repeatable results.
- Long exposure / tripod work — you want ISO 100 locked in; Auto ISO may unnecessarily push toward higher values.
- Video — Auto ISO can create visible exposure shifts (called “hunting”) during a clip, which is distracting on screen.
The key is setting the ceiling thoughtfully. Auto ISO with a ceiling of ISO 6,400 on an entry-level camera will produce noisy results. Auto ISO with a ceiling of ISO 3,200 keeps quality within acceptable bounds while still giving you the flexibility to react.
What are common ISO mistakes?
Even photographers who understand ISO conceptually fall into these patterns:
Mistake 1: Leaving ISO on Auto without setting a maximum.
Auto ISO without a ceiling can push your camera to its highest extended values (ISO 25,600 or beyond), producing unusable noise. Fix: Always set a maximum ISO in your Auto ISO menu — typically no higher than ISO 3,200–6,400 depending on your camera.
Mistake 2: Using high ISO to compensate for a slow lens in daylight.
Shooting at ISO 1,600 outdoors because your aperture is stuck at f/5.6 is paying the Brightness Tax when you don’t need to. Fix: In bright conditions, ISO 100–200 with appropriate shutter speed is almost always available. If your image is overexposed, use a faster shutter speed rather than lowering ISO — though lowering ISO first is usually the right move.
Mistake 3: Defaulting to ISO 100 in all situations.
Some beginners read that “ISO 100 is best” and apply it everywhere — including dark interiors — resulting in blurry, underexposed photos because they’ve slowed the shutter too far to compensate. Fix: ISO 100 is best when light allows. In low light, raising ISO is the correct choice.
Mistake 4: Forgetting to reset ISO after a dark shoot.
You shoot a concert at ISO 6,400, then walk outside the next morning and forget to reset — resulting in overexposed, noisy outdoor shots. Fix: Develop a pre-shoot checklist: ISO, white balance, shooting mode. Takes 10 seconds and prevents wasted frames.
Mistake 5: Judging ISO performance on JPEG previews instead of RAW files.
Camera JPEGs apply aggressive noise reduction that can make ISO 3,200 look acceptable on the back of the camera, then disappoint when you see the full-resolution file. Fix: Shoot RAW for critical shots, and evaluate ISO performance on processed RAW files with your preferred noise reduction applied.
What ISO is best for beginners?
ISO 400 is the best starting ISO for beginners because it works acceptably across a wide range of conditions — bright outdoors, light indoors, overcast days — without introducing significant noise. From ISO 400, you have clear direction: if the image is too dark and you can’t slow the shutter or open the aperture further, go up; if you’re in bright sunlight and the image is overexposed, go down to ISO 100–200. ISO 400 also gives beginners room to experiment with aperture and shutter speed without constantly fighting exposure.
Beyond ISO – Related Photography Terms Explained
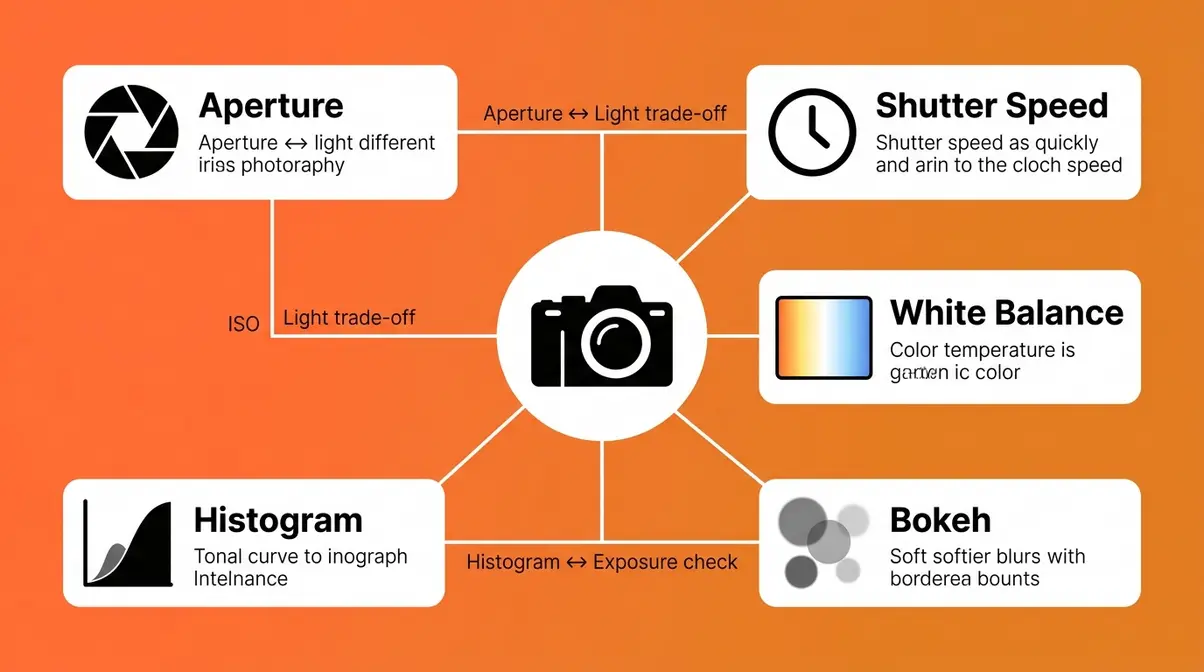
ISO doesn’t exist in isolation. As you explore manual mode, you’ll encounter these terms repeatedly — each one connected to how your camera captures and renders light.
Exposure
Exposure is the total amount of light that reaches your camera’s sensor during a single shot, determined by the combination of ISO, aperture, and shutter speed. A photo is “properly exposed” when the brightness matches what you intended — not too bright (overexposed) and not too dark (underexposed).
The histogram (covered below) is the most accurate tool for evaluating exposure. Your camera’s LCD screen can mislead you — especially in bright sunlight or dim venues. The histogram doesn’t lie. For a deeper dive, check out our exposure in photography guide.
Aperture
Aperture is the opening in your lens through which light passes, measured in f-stops (f/1.4, f/2.8, f/5.6, f/11, etc.). A wider aperture (lower f-number) lets in more light and creates a shallower depth of field — that blurry background effect called bokeh. A narrower aperture (higher f-number) lets in less light but keeps more of the scene in sharp focus.
For ISO purposes: every time you open your aperture by one stop, you double the light reaching the sensor — which means you can lower ISO by one stop to maintain the same exposure. A photographer who upgrades from a kit f/5.6 zoom to a f/1.8 prime lens gains roughly four stops of light — meaning they can shoot at ISO 400 where they previously needed ISO 6,400. You can learn more in our aperture settings guide.
Shutter Speed
Shutter speed is how long your camera’s sensor is exposed to light during a shot, measured in fractions of a second (1/1000s, 1/250s, 1/60s, 1s). Fast shutter speeds freeze motion; slow shutter speeds blur it. Like aperture, shutter speed and ISO are directly linked — halving your shutter speed (e.g., from 1/200s to 1/100s) doubles the exposure, allowing you to lower ISO by one stop.
The practical floor for handholding a camera without blur from camera shake is roughly 1/focal length — so a 50mm lens needs at least 1/50s, and a 200mm lens needs at least 1/200s. Below that floor, you need image stabilization, a tripod, or a higher ISO to compensate. We have shutter speed explained in full detail in our dedicated tutorial.
White Balance
White balance controls how your camera interprets color temperature — specifically, whether a white object looks white, warm (orange-tinted), or cool (blue-tinted) in your photo. White balance doesn’t affect exposure or ISO directly, but it’s commonly adjusted alongside ISO when shooting in artificial light.
Tungsten bulbs produce warm light; fluorescent lights produce cool light; daylight sits in the middle. Auto white balance handles most situations well, but for consistent color in a fixed environment (like a studio or event venue), setting a manual white balance prevents color shifts between frames.
The Histogram
The histogram is a graph displayed on your camera’s LCD or in post-processing software that shows the tonal distribution of your image — dark tones on the left, bright tones on the right. A well-exposed histogram has data spread across the middle, without large spikes at either extreme.
For ISO users specifically: if your histogram shows a large spike crammed to the left (underexposure), raising ISO is often the right correction. If it’s spiking to the right (overexposure), you’re either at too high an ISO or your aperture/shutter speed needs adjustment. Learning to read the histogram removes the guesswork from exposure decisions. Mastering reading the histogram is a critical next step.
Bokeh
Bokeh (pronounced BOH-keh, from the Japanese word for “blur”) refers to the aesthetic quality of out-of-focus areas in a photograph — typically the soft, circular blurs visible in background lights or foliage when shooting at a wide aperture. Bokeh is a byproduct of aperture, not ISO — but beginners often confuse the two when trying to achieve that “professional blurry background” look.
To get bokeh: use a wide aperture (f/1.4–f/2.8), place your subject close to the camera, and ensure significant distance between subject and background. ISO plays no role in creating bokeh — though you may need to raise ISO slightly if the wide aperture still doesn’t give you enough light for a fast enough shutter speed. Understanding the art of bokeh helps you separate these concepts.
Film ISO vs. Digital ISO
In film photography, ISO (then called ASA or DIN) described the film stock’s genuine chemical sensitivity to light. ISO 400 film had larger silver halide crystals that reacted faster to light — making it more sensitive, but also grainier. The grain in film ISO 400 is a physical property of the film itself.
In digital photography, ISO is a post-capture amplification setting. The sensor doesn’t become more sensitive — it amplifies whatever signal it captured. This is why film grain and digital noise look different: film grain has an organic, random quality; digital noise (especially chroma noise) has a more mechanical, structured appearance. Explore the nuances of film vs. digital photography to understand these aesthetic differences.
Limitations and Common Pitfalls
Common Pitfalls
Pitfall 1: Assuming newer cameras eliminate the need to understand ISO.
Modern AI Denoise tools are remarkable, but they work best on RAW files with moderate noise. Extremely high ISO (25,600+) still degrades fine detail in ways that AI can’t fully recover — especially in fast-action or portrait photography where hair texture and skin pores matter. Mitigation: Understand your camera’s specific noise floor through testing, not assumptions.
Pitfall 2: Treating the ISO cheat sheet as absolute.
The ISO recommendations in this guide are calibrated for a typical entry-level DSLR or mirrorless camera. A full-frame Sony A7 IV can shoot at ISO 12,800 with results that match an APS-C sensor at ISO 3,200. Conversely, older entry-level cameras may produce unacceptable noise above ISO 1,600. Mitigation: Shoot a personal ISO test — take the same scene at every ISO from 100 to your camera’s maximum, then evaluate at 100% zoom. This gives you your specific camera’s actual usable ceiling.
Pitfall 3: Relying on JPEG previews for noise evaluation.
As noted in the Mistakes section, in-camera JPEG processing applies noise reduction that can mask real noise levels. If you evaluate ISO performance from JPEG thumbnails on your camera’s LCD, you’ll get an overly optimistic picture. Mitigation: Shoot RAW and evaluate in Lightroom or Capture One at 100% zoom with no noise reduction applied first.
When to Choose Alternatives
When flash is available, use it instead of high ISO. A well-diffused flash or off-camera strobe adds light to the scene rather than amplifying an insufficient signal. This eliminates the noise problem entirely. The trade-off is equipment cost, setup time, and the aesthetic difference between ambient and flash-lit images.
When a faster lens is available, it’s often a better investment than a higher-ISO camera. A f/1.8 50mm prime lens (typically $100–$200) gives you four stops of light compared to a kit lens at f/5.6 — equivalent to the high-ISO performance gain of a camera upgrade costing thousands of dollars. For photographers consistently struggling with indoor noise, lens selection is often the higher-leverage solution.
When to Seek Expert Help
If you’re shooting for commercial clients, weddings, or professional events where image quality is contractually important, the stakes are higher than personal experimentation allows. Consider consulting a working professional photographer or attending a hands-on workshop where you can test your specific camera’s ISO behavior under real shooting conditions before a paid assignment.
Frequently Asked Questions
Is ISO 400 or 800 better?
ISO 400 is better when light allows it — it produces less digital noise and cleaner shadow detail. ISO 800 is the right choice when your scene is too dark to get a properly exposed shot at ISO 400 without slowing your shutter speed below a usable threshold. For indoor portraits under decent ambient light, ISO 400 is a solid starting point. For dimmer rooms or evening events, ISO 800 is often necessary. The “better” ISO is always the lowest one that still gives you a sharp, properly exposed photo at a usable shutter speed.
What is ISO for dummies?
ISO controls how bright your camera makes the photo by amplifying the signal from its sensor. Think of it like a volume knob: turning it up makes the image brighter, but also amplifies the background “hiss” — which appears as grain in your photo. ISO 100 is the quietest setting (cleanest image). ISO 6,400 is very loud (lots of grain). Use low ISO in bright light, high ISO in dark conditions. That’s the full concept — everything else is refinement.
Best ISO for photography?
The best ISO is the lowest one that still produces a properly exposed, sharp image in your specific shooting conditions. There’s no single “best” number — ISO 100 is ideal in bright sunlight, while ISO 3,200 may be the right choice at a dark indoor event. Photography Life’s ISO guide notes that modern cameras handle ISO 1,600–3,200 with minimal visible noise in typical shooting scenarios. Start with the lowest ISO your scene allows and raise it only when aperture and shutter speed have reached their practical limits.
Shooting ISO 400 Film at 800?
In film photography, shooting ISO 400 film at an 800 ISO setting underexposes the film by one stop — because you’re telling the camera the film is twice as sensitive as it actually is. To compensate, the film typically needs to be “push processed” (developed for longer than normal) to bring out the underexposed image. Push processing increases contrast and grain. In digital photography, this concept doesn’t apply — your camera’s ISO setting is a digital amplification value, not a film stock rating, so there’s no equivalent “pushing” process.
Conclusion
For photographers dealing with grainy indoor shots or dark, unusable low-light images, understanding what is ISO in photography is almost always the variable to examine first. ISO controls how much your camera amplifies its sensor signal — higher values buy you brightness in dark conditions, but every stop costs you image quality in the form of digital noise. Modern full-frame and mirrorless cameras handle ISO 3,200 and above far better than the DSLRs most beginners started on, and AI Denoise tools in Lightroom and Topaz have turned previously unusable high-ISO frames into publishable work.
The Brightness Tax framework makes this trade-off concrete: you’re not failing when you shoot at ISO 3,200 — you’re making a deliberate purchase. You’re buying light with image quality as the currency. The goal isn’t to avoid paying the tax; it’s to pay it knowingly, only when the shot requires it, and to use every tool available — fast lenses, wide apertures, stable shutter speeds, and AI post-processing — to minimize the cost.
Start with the ISO cheat sheet from this guide. Test your own camera’s noise ceiling at every stop from ISO 100 to its maximum. Learn where your specific sensor’s acceptable threshold sits. Then, the next time you walk into a dark venue, you won’t be guessing — you’ll know exactly which ISO to reach for, what it’s going to cost, and how to recover it in post. That’s what separates a confident photographer from a frustrated one.
