
Table of Contents
- What You’ll Need Before You Start
- Step 1: Decide If Photography Is Right for You
- Step 2: Master Camera & Core Skills
- Step 3: Practice & Build Your Eye
- Step 4: Choose Your Photography Niche
- Step 5: Build a Hiring Portfolio
- Step 6: Set Up Your Photography Business
- Step 7: Pricing & Finding Clients
- Step 8: Market Yourself and Grow Your Brand
- Step 9: Pursue Advanced Careers
- Step 10: Future-Proof Against AI
- Common Mistakes and How to Avoid Them
- Frequently Asked Questions
- Your 10-Step Roadmap Starts Now
This blog post may contain affiliate links. As an Amazon Associate I earn from qualifying purchases.
“I really wanna be a photographer but, I don’t know where to start. What do I need to buy? What do I need to learn? What do I have to know about being a photographer?”
If that sounds like you, you’re not alone — and you’re in exactly the right place.
Most guides throw vague tips at you: “practice daily,” “find your niche.” They leave aspiring photographers more confused than when they started. They skip the part about actually making money.
In this guide, you’ll discover exactly how to become a photographer in 10 clear steps — from picking up a camera for the first time to landing your first paying client. You’ll cover technical skills, portfolio building, business setup, pricing, marketing, and how to stay competitive as AI reshapes the industry.
Key Takeaways: How to Become a Photographer
Learning how to become a photographer means balancing The Photographer’s Triangle: Creative Vision, Technical Mastery, and Business Acumen — most beginners focus on only one leg and wonder why their career stalls.
- No degree required: Most successful photographers are self-taught or learned by assisting professionals
- Timeline: Expect 1–2 years of consistent practice before landing paid work regularly
- Earning potential: The median annual wage for photographers is approximately $40,000, but specialization dramatically increases income (BLS, 2023)
- Biggest gap: Most guides cover gear and technique — this guide covers the business skills that actually generate income
What You’ll Need Before You Start
You don’t need much to begin. Here’s the honest list:
- A camera — any camera. A smartphone works to start. An entry-level DSLR or mirrorless camera is ideal, but it’s not a requirement on day one.
- A computer — for editing photos and managing your business later.
- 20 minutes a day — consistency beats marathon sessions every time.
- Patience — skill compounds over months, not days. Expect slow early progress.
- No degree, certification, or prior experience — none of it is required.
That’s genuinely it. The goal of this section is to remove the anxiety of “am I ready?” You are ready enough to begin today.
Step 1: Decide If Photography Is Right for You
Photography is a realistic career for people who treat it as a business, not just a hobby. The U.S. Bureau of Labor Statistics (BLS) reports a median annual wage of approximately $40,000 for photographers, with significant upside for those who specialize. The top 10% of earners make more than $76,000 per year (BLS, 2023). That gap between the median and the top 10% is explained almost entirely by business skills, not camera technique.
Before you spend a dollar on gear or a course, you need an honest framework for what this career actually requires.
Is Photography a Realistic Career?
Yes — but it requires an entrepreneurial mindset alongside artistic talent. According to National Endowment for the Arts research, photographers have one of the highest rates of self-employment among all artist categories, meaning most photographers run their own business rather than collect a paycheck from an employer (NEA, 2021). That’s a crucial distinction.
Consider a concrete example: a wedding photographer charging $2,500 per event and booking 20 weddings per year earns $50,000 gross — above the median — before expenses. That figure is achievable within 3–5 years of consistent work for someone who builds their business deliberately. The median annual wage for photographers in the U.S. is $40,000, but the top 10% earn more than $76,000 (BLS, 2023) — a gap explained almost entirely by business skills, not camera technique.
The good news: you don’t need a degree, a $3,000 camera, or years of experience to start.
What You Need Before You Start
What education is needed to become a photographer? Less than you think. The BLS notes that most photographers learn through experience, self-study, or assisting established photographers — not formal degree programs. Online platforms like Coursera, Udemy, and YouTube are all legitimate, career-building paths. Community college courses in photography are affordable and useful, but optional.
On the gear front, a used Canon EOS Rebel T7 or Nikon D3500 (both available under $300 used as of 2026) is more than sufficient for a beginner learning composition and light. Many working photographers started with a smartphone. Equipment matters far less than the discipline of shooting regularly.
If you want to learn how to start with no prior experience, the barrier is lower than most people assume.
Now that you know what the journey looks like, let’s build the first leg of your triangle — technical mastery.
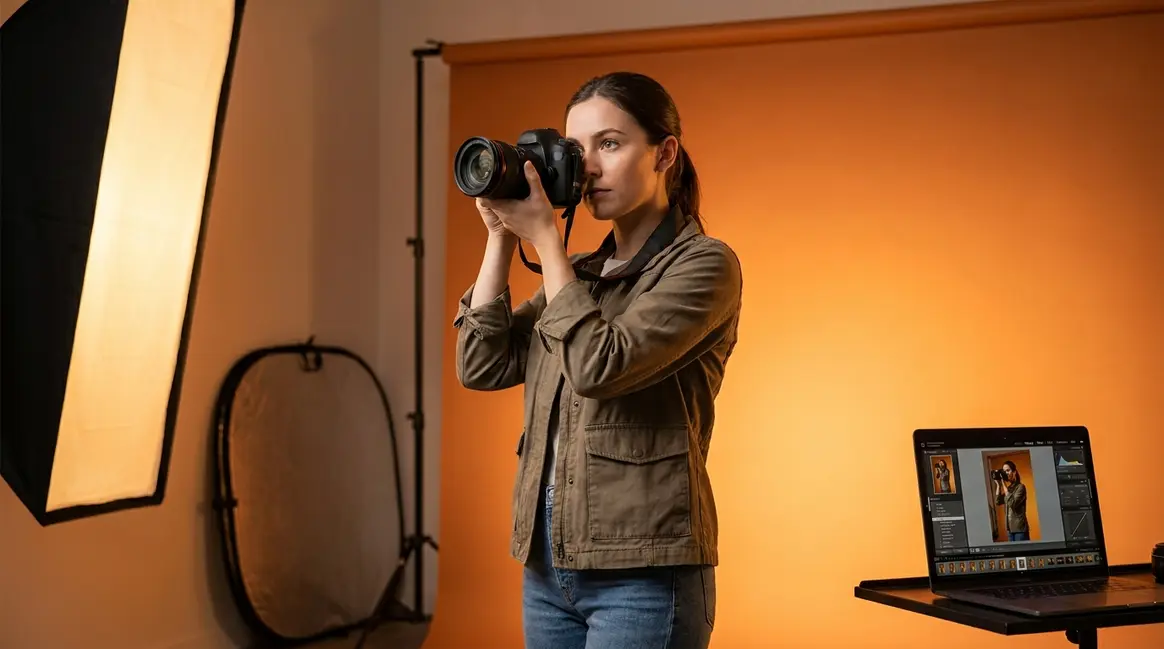
Step 2: Master Camera & Core Skills
Technical skill is the foundation every photographer builds on. Before you worry about niches, portfolios, or clients, you need to understand how your camera actually works. Photography communities consistently report that the single biggest leap in image quality comes not from buying better gear, but from learning to shoot in manual mode.
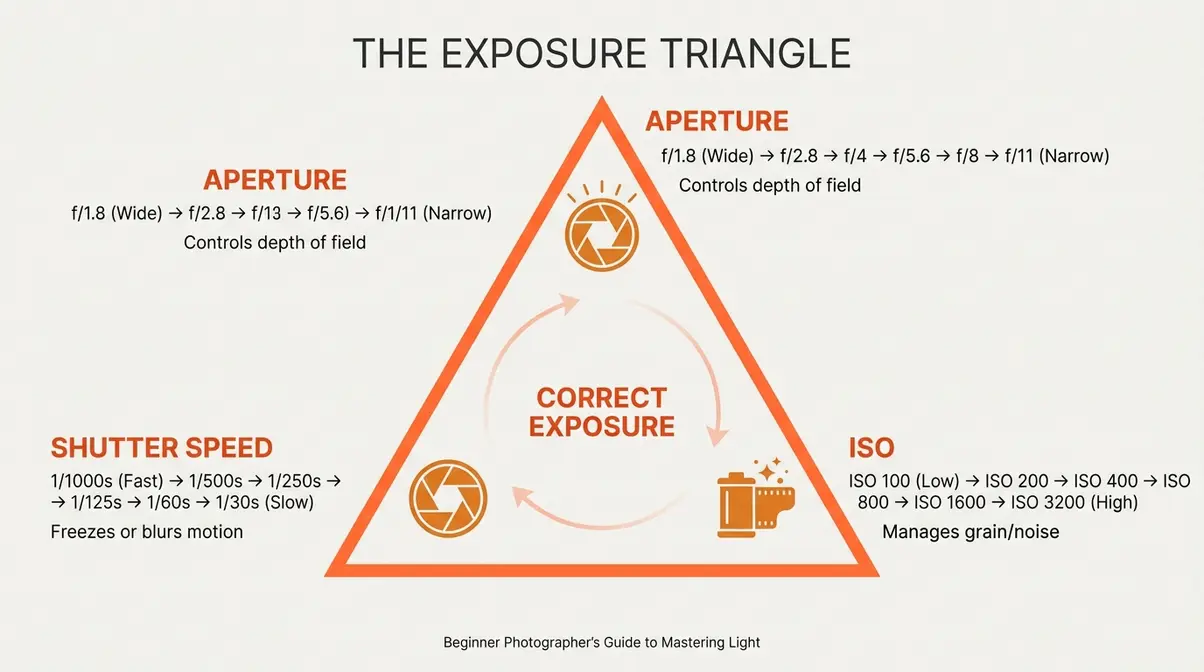
Three Essential Technical Skills
Every camera setting ultimately controls one thing: how much light reaches your sensor, and how. The three core controls are:
- Aperture (the opening in your lens that controls how much light enters, measured in f-stops like f/1.8 or f/11). A wide aperture like f/1.8 lets in more light and blurs the background — great for portraits. A narrow aperture like f/11 keeps everything sharp — great for landscapes.
- Shutter speed (how long your camera’s sensor is exposed to light, measured in fractions of a second). A fast shutter speed like 1/1000s freezes motion. A slow one like 1/30s creates motion blur — intentional or not.
- ISO (your camera’s sensitivity to light). Low ISO like 100 produces clean images in bright conditions. High ISO like 3200 lets you shoot in the dark but adds “grain” (digital noise) to your photos.
Together, these three form the exposure triangle — the single most important technical concept to master. Photography communities consistently report that understanding the exposure triangle is the turning point where beginner images start looking intentional rather than accidental.
Start by shooting in Aperture Priority mode (marked “A” or “Av” on most cameras). This lets you control one variable while the camera handles the rest. Once that feels natural, graduate to full manual mode.
What Camera Gear Do You Need?
You don’t need the latest or most expensive camera. Our evaluation of beginner camera recommendations across major photography communities found that the following entry-level options consistently appear at the top of recommendation lists for new photographers:
| Camera | Type | Approx. Used Price (2026) | Best For |
|---|---|---|---|
| Canon EOS Rebel T7 | DSLR | ~$250–$320 | All-around beginner |
| Nikon D3500 | DSLR | ~$280–$350 | Beginners wanting great battery life |
| Sony a6000 | Mirrorless | ~$350–$450 | Compact, fast autofocus |
| Fujifilm X-T30 | Mirrorless | ~$500–$650 | Creative film simulations |
Beyond a camera body, your starter kit needs one lens (the kit lens that ships with most entry-level cameras is fine), a memory card (at least 64GB), and a spare battery. That’s it. Resist the urge to buy more gear before you’ve outgrown what you have.
Free vs. Paid Learning Resources
Do you need a photography degree? No — and most working photographers don’t have one. Before diving into advanced courses, reviewing 7 essential photography beginner tips can help solidify your foundational knowledge. Here’s how to learn how to become a professional photographer without formal schooling:
- Free: YouTube channels like Tony & Chelsea Northrup, Peter McKinnon, and Mango Street cover everything from camera basics to business strategy at no cost.
- Low-cost: Udemy photography courses regularly go on sale for $15–$20 and offer structured, beginner-friendly curriculums.
- Mid-cost: Platforms like CreativeLive and Skillshare offer monthly subscriptions ($10–$20/month) with professional-level instruction.
- Community: Reddit’s r/photography community has a thriving wiki and weekly feedback threads where beginners get honest critique for free.
The Digital Photography School also offers a well-regarded free beginner series covering composition, light, and camera settings in practical, non-technical language.
Formal degrees and certificate programs (like those offered by NYIP) exist and have value, but they’re not a prerequisite for a working photography career. Self-taught photographers fill every niche from wedding photography to National Geographic assignments.
Where technical skill meets creative habit is where real progress happens — which brings us to Step 3.
Step 3: Practice & Build Your Eye

Technical knowledge without consistent practice is just theory. The photographers who improve fastest are not the ones with the best gear — they’re the ones who shoot regularly, review their work critically, and edit deliberately.
How Long Does It Take?
There’s no universal timeline, but photography communities offer a useful benchmark: most beginners reach a “competent amateur” level within 6–12 months of regular shooting (defined as at least 3–4 sessions per week). Reaching a level where clients pay consistently typically takes 1–2 years of dedicated practice. Specialization — becoming genuinely excellent in one niche — often takes 3–5 years.
The 10,000-hour rule is often misapplied here. You don’t need 10,000 hours before you can charge for your work. You need enough skill that clients feel confident hiring you, which is a much lower bar than mastery.
The Daily Practice Habit
The photographers who become great share one habit: they shoot with intention, not just volume. If you’re struggling with blurry or poorly lit shots, exploring different ways to improve photo quality through camera settings is your best next step. Here’s a simple framework:
- Set a constraint. Shoot only with one focal length for a week. Or only in black and white. Constraints force creative problem-solving.
- Review critically. After each session, pick your three best shots. Ask: what worked? What would I change?
- Seek feedback. Post to photography communities (r/photocritique, Flickr groups) and ask for specific feedback, not general opinions.
- Study the work of photographers you admire. Reverse-engineer their lighting, framing, and timing.
Even 20 minutes of deliberate practice per day compounds dramatically over 12 months. Aspiring photographers who build this habit consistently report faster improvement than those who shoot for hours once a week.
Post-Processing Basics
Editing is not cheating — it’s half the job. Every professional photographer edits their work. If you feel overwhelmed by editing software, learning how to master post-processing photography will give you a reliable blueprint. Learning Adobe Lightroom (approximately $10/month as part of Adobe’s Photography Plan) is the most important software investment a beginner can make. Lightroom handles color correction, exposure adjustments, and batch editing efficiently.
Shoot in RAW format (a file type that captures all the data your sensor records, unlike compressed JPEGs) from the start. RAW files give you far more flexibility in editing and are the industry standard for professional work. Many beginners skip this step and regret it later.
Free alternatives like Darktable and RawTherapee exist for those not ready to pay for Adobe’s suite.
Step 4: Choose Your Photography Niche

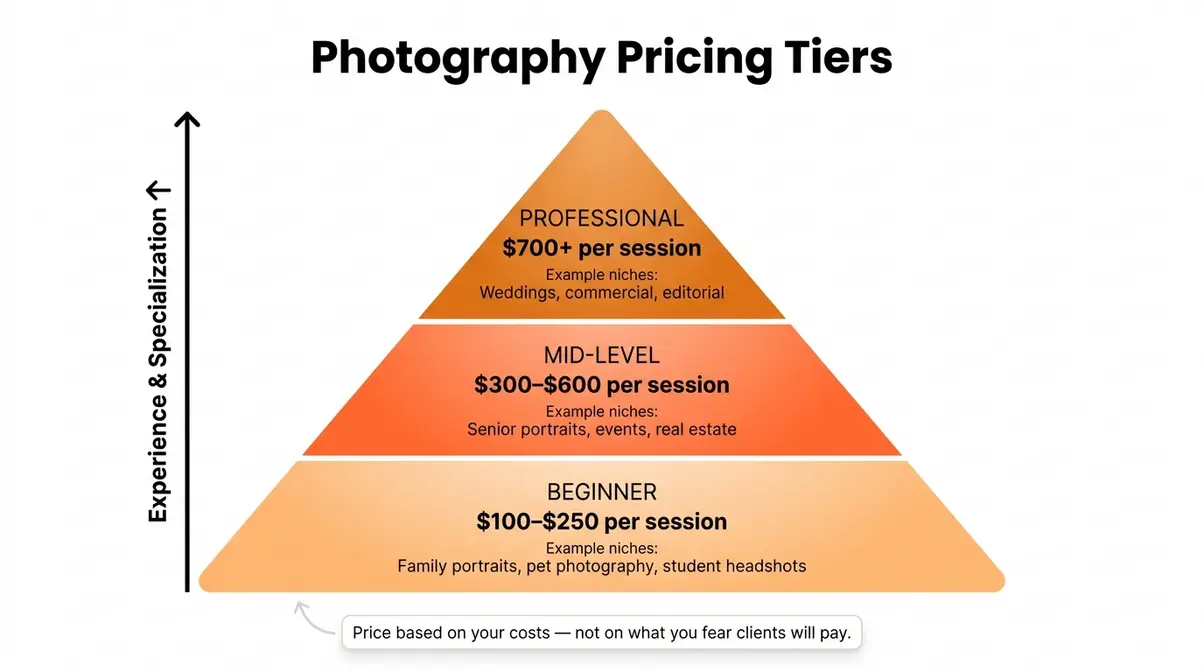
Trying to photograph everything is one of the most common mistakes new photographers make. Clients hire specialists. Your portfolio, marketing, and pricing all become clearer — and more compelling — once you commit to a direction.
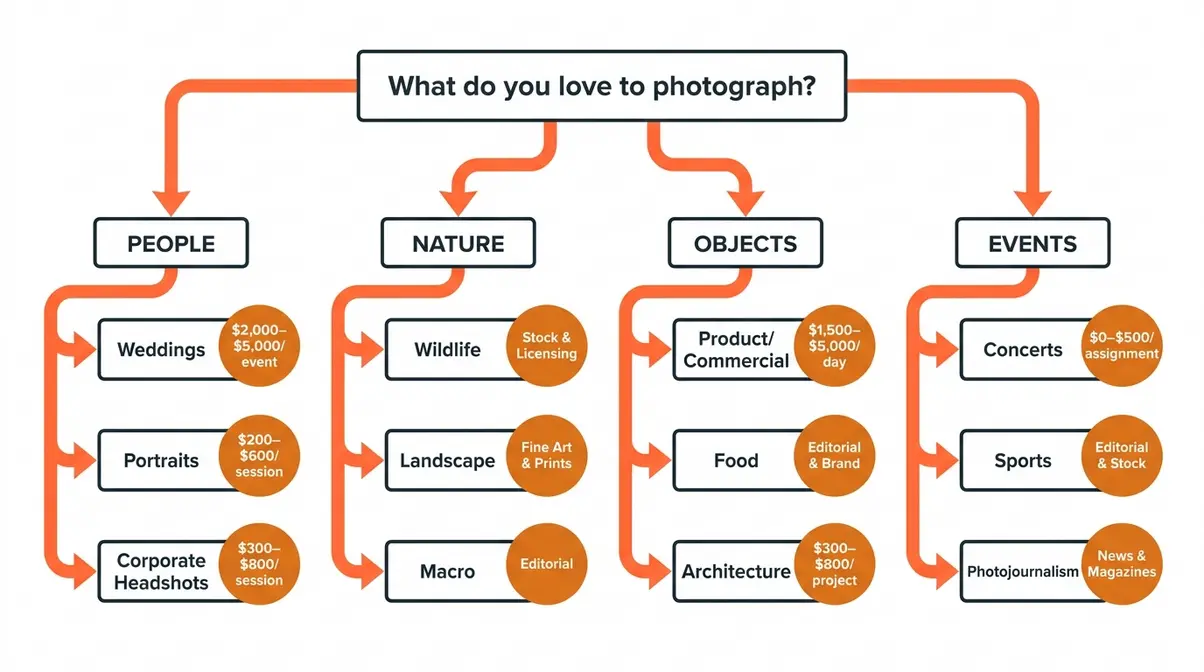
High-Earning Niches
Some photography niches command consistently higher rates than others. Based on industry pricing data and community reporting:
- Wedding photography: Average packages range from $2,000–$5,000+ per event. Experienced wedding photographers in major markets routinely charge $4,000–$8,000. If you want to know how to become a wedding photographer, start by second-shooting (assisting an established wedding photographer) to build experience without the full responsibility.
- Commercial and product photography: Brands pay well for consistent, professional product images, so mastering the best product photography tips can quickly boost your income. Day rates for experienced commercial photographers range from $1,500–$5,000.
- Real estate photography: Lower per-shoot rates ($150–$400 per property) but high volume potential. Learning how to become a real estate photographer is relatively straightforward — the technical demands are lower than other niches, making it a strong entry point.
- Portrait photography: Family and newborn sessions typically run $200–$600. Senior portraits and corporate headshots can reach $300–$800 per session.
Creative Photography Niches
Not every niche is primarily about income — some are about passion, with income following over time:
- Wildlife photography: Learning how to become a wildlife photographer requires patience, specialized long lenses (often $1,000+), and choosing your first wildlife photography camera wisely. Income paths include stock photography, print sales, and editorial licensing.
- Concert and music photography: How to become a concert photographer typically starts with shooting local bands for free, building a portfolio, then pitching to music publications and PR firms. Pay varies widely — from free tickets to $500+ per assignment.
- Travel photography: One of the most competitive niches. Stock photography licensing and brand partnerships are the primary income streams.
- Fine art photography: Galleries, print sales, and licensing. Income is unpredictable but can be substantial for photographers who build a recognizable style.
Specialized Career Paths
Photography careers extend well beyond portraits and weddings:
- Medical and scientific photography: Hospitals, universities, and research institutions hire photographers to document procedures, specimens, and research. These roles often require specialized training.
- Architectural photography: Interior designers, architects, and real estate developers hire photographers to document buildings. For deeper insights, review specific architectural photography tips to master perspective and lighting.
- Photojournalism and editorial: News organizations and magazines hire staff and freelance photographers. Competitive, but rewarding for those drawn to documentary storytelling.
How to Test a Niche
Before you build your entire portfolio around one niche, test it. Offer two or three free or low-cost shoots in that niche and evaluate: Did you enjoy it? Did the clients respond well? Can you see yourself doing this 30+ times per year?
Photography communities consistently advise spending at least 3 months shooting a niche before declaring it your specialty. Your portfolio and client conversations will quickly reveal whether the fit is real.
Find your niche by following your genuine interest first — income follows skill and specialization, not the other way around.
Step 5: Build a Hiring Portfolio
Your portfolio is your single most important marketing tool. It’s not about how many photos you have — it’s about what those photos say about your abilities and your style.
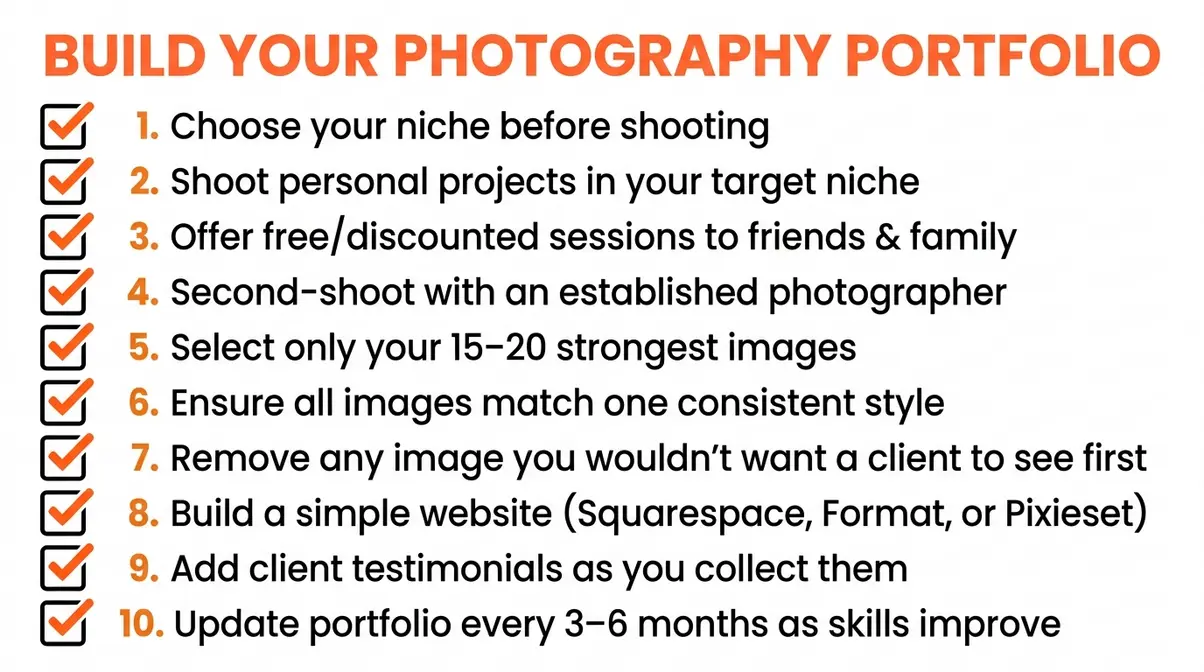
Making Your Portfolio Stand Out
Clients are not looking for variety — they’re looking for evidence that you can solve their specific problem. A wedding client wants to see wedding photos. A real estate agent wants to see interiors. Mixing 10 different genres into one portfolio creates confusion, not confidence.
Photography communities and working professionals consistently report the same guidance: a focused portfolio of 15–20 strong, consistent images outperforms a gallery of 100 mediocre ones. Every image in your portfolio should be one you’d be proud to have a client see first.
How to build your portfolio when you have no clients yet:
- Shoot personal projects in your target niche — styled shoots, volunteer sessions, or documentary projects.
- Offer free or discounted sessions to friends and family in exchange for permission to use the images professionally.
- Second-shoot with an established photographer in your niche. This is one of the fastest ways to build a relevant, professional-quality portfolio.
- Enter photo contests — winning or placing in even small competitions adds credibility.
For an internal guide to building your first photography portfolio, focus on consistency of style over breadth of subject matter.
How Many Photos Do You Need?
The industry standard for a beginner portfolio is 15–25 images, all within your chosen niche. Quality is the only metric that matters. Photography communities consistently flag “quantity padding” — filling a portfolio with mediocre images to appear more experienced — as one of the biggest mistakes beginners make. Clients notice.
Once your portfolio exists, it needs a home. A simple website (Squarespace, Format, or Pixieset all offer photography-specific templates for $12–$25/month) is more professional than a social media profile alone. Your website is your storefront.
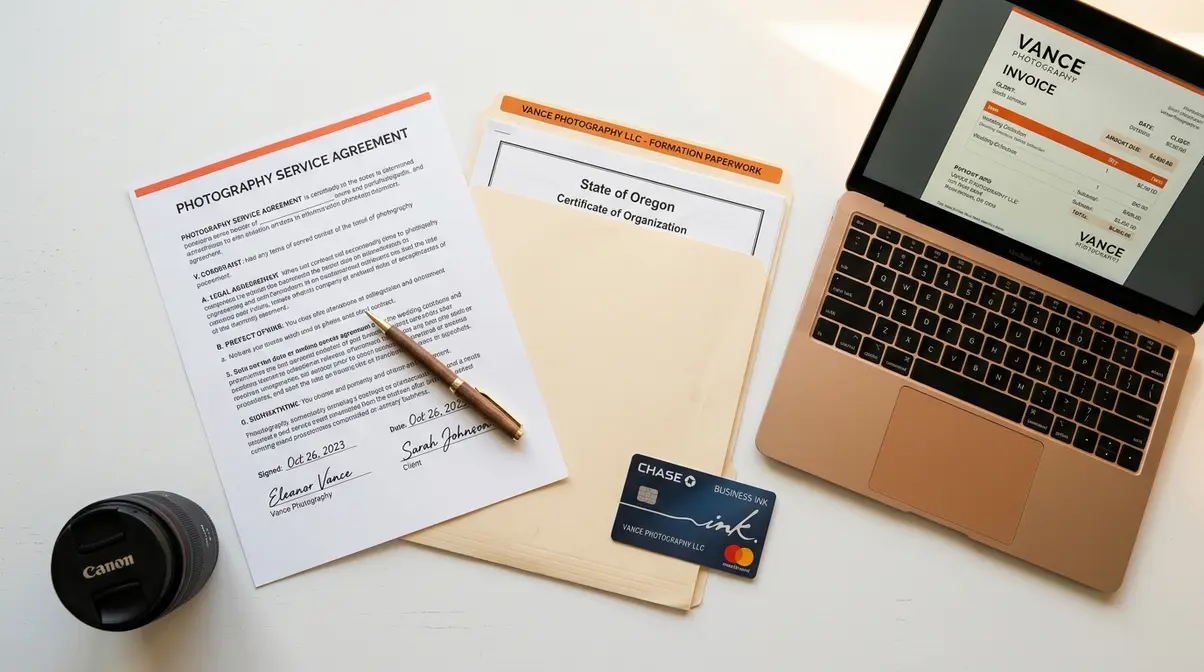
Step 6: Set Up Your Photography Business
This is where The Photographer’s Triangle becomes critical. Most beginner guides end at “build a portfolio.” But creative skill without business structure leads to burnout, undercharging, and legal exposure. Setting up your business correctly from the start protects you and positions you to grow.
Setting Up Legally
You don’t need a lawyer to get started, but you do need a few basics:
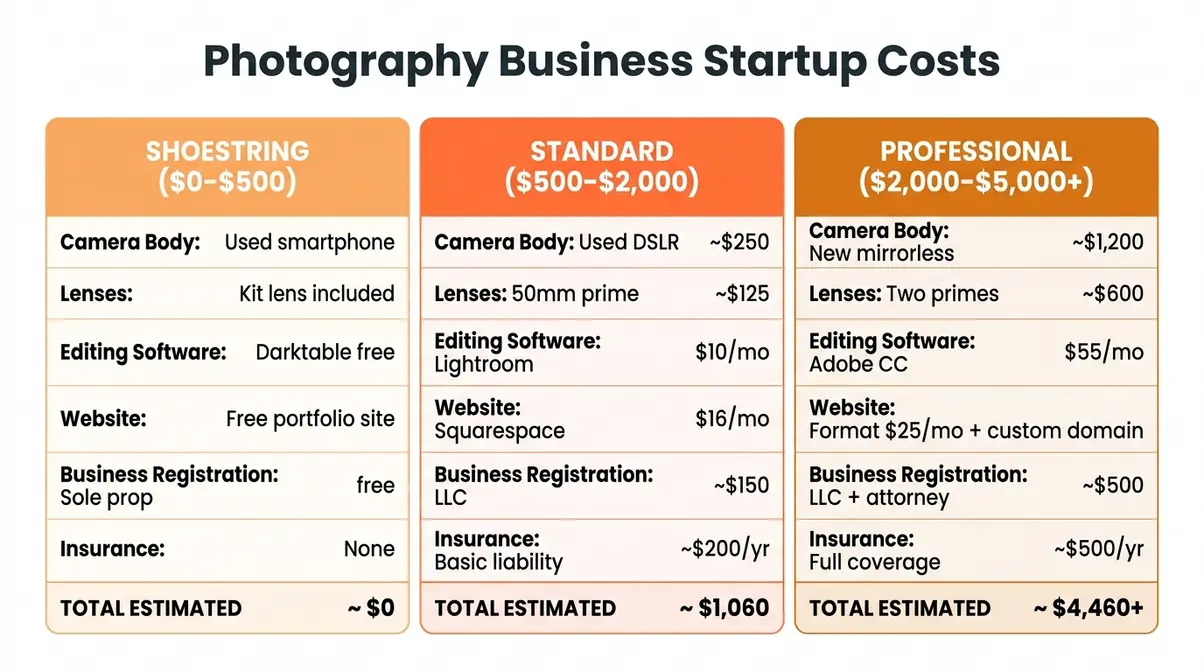
- Choose a business structure. Most solo photographers operate as a sole proprietor initially. As income grows, forming an LLC (Limited Liability Company) protects your personal assets from business liability. LLC formation costs $50–$500 depending on your state.
- Get a business bank account. Separating personal and business finances simplifies taxes and looks professional to clients.
- Register your business name. A DBA (“doing business as”) filing lets you operate under a name other than your own for $10–$50 in most states.
Once your basic structure is in place, you must handle the financial and protective aspects of your new enterprise. Our team evaluated dozens of photography business setups and found that separating personal and business finances early prevents the most common tax-season headaches.
- Understand your tax obligations. Self-employed photographers pay self-employment tax (approximately 15.3% on net earnings) in addition to income tax. Setting aside 25–30% of each payment for taxes is a standard practice.
- Get liability insurance. A general liability policy for photographers typically runs $200–$500/year and covers equipment damage, accidents on shoots, and client disputes.
For guidance on photography business legal setup, consulting a local small business development center (SBDC) is free and often more useful than generic online advice.
Contracts and Copyrights
Never shoot a paid session without a signed contract. A basic photography contract covers:
- Session date, location, and deliverables (how many edited images, in what format, by what deadline)
- Payment terms (deposit amount, final payment due date)
- Cancellation and rescheduling policy
- Copyright and usage rights — by default, you own the copyright to every photo you take. A contract specifies what rights the client receives (personal use, commercial use, exclusivity).
- Model releases — required if you plan to use images in your portfolio or for commercial purposes
Copyright is one of the most misunderstood areas for new photographers. You own your images the moment you take them. Clients purchase a license to use those images — they don’t own the copyright unless you explicitly transfer it in writing (which commands a much higher fee).
Templates for photography contracts are available through organizations like ASMP (American Society of Media Photographers) and through photography-specific legal platforms.
Income Disclaimer: Income potential as a photographer is not guaranteed and varies significantly based on individual skill, effort, market conditions, geographic location, and niche. The figures cited in this guide represent industry benchmarks, not guaranteed outcomes.
Step 7: Pricing & Finding Clients
Pricing is where many aspiring photographers either undervalue their work or price themselves out of the market before they’ve built a reputation. The goal is a price that reflects your skill level, covers your costs, and positions you for growth.
How much is a 1-hour photo shoot?
A 1-hour photo shoot typically costs between $150 and $400 for a beginner to mid-level photographer, and $400–$800+ for experienced professionals, depending on location, niche, and deliverables (industry pricing benchmarks, 2026). Here’s a simple framework to set your rate:
- Cost-Based Pricing Formula:
- Calculate your monthly business costs (gear payments, software, insurance, website, travel) — let’s say $400/month.
- Decide how many paid sessions you want per month — let’s say 8.
- Divide costs by sessions: $400 ÷ 8 = $50 per session just to break even.
- Add your desired hourly wage. If you want to earn $25/hour and a session takes 3 hours total (shoot + edit + delivery), that’s $75 in labor.
- Your floor price: $50 + $75 = $125 per session. Charge above this floor, not below it.
Most new photographers find that charging $150–$250 for portrait sessions in their first year is competitive and sustainable while building a client base.
What is the 80/20 rule?
The 80/20 rule in photography states that 80% of your revenue will come from 20% of your clients — your best, most loyal, most referral-generating clients. This principle, adapted from Pareto’s principle, has significant practical implications:
- Identify your top 20% early. These are clients who pay on time, refer others, and are easy to work with. Prioritize their experience.
- Fire the bottom 20%. Clients who are late to pay, difficult on shoots, or chronically undervalue your work consume disproportionate time and energy.
- Build repeat business systems. Loyalty discounts, annual session reminders, and referral incentives turn one-time clients into recurring revenue.
Finding your first clients requires active outreach, not passive waiting:
- Post consistently on Instagram and Facebook in your local area, tagging locations.
- Offer a limited number of “portfolio-building” sessions at a discounted rate to generate real client images.
- Ask every early client for a Google review and a referral.
- Join local networking groups (BNI, Chamber of Commerce) where potential clients gather.
- List your services on platforms like Thumbtack, The Knot (for wedding photographers), and local Facebook groups.
For more on finding your first photography clients, local community groups and assisting gigs with established photographers remain the fastest path to a real client list.
Income Disclaimer: These pricing benchmarks reflect industry averages and community-reported rates. Individual results vary based on market, skill level, niche, and business development effort. Income potential is not guaranteed.
Step 8: Market Yourself and Grow Your Brand
The best photographer in your city with no marketing presence will lose clients to a mediocre photographer with a strong one. Marketing is the third leg of The Photographer’s Triangle — and the one most creative people resist.
Building Your Online Presence
Your website is non-negotiable. Social media platforms change algorithms and ownership. Your website is the one online asset you control completely. A photography website needs:
- A portfolio gallery — 15–25 images, niche-specific
- An “About” page — who you are, who you serve, your style
- A contact form — easy to find, easy to use
- Pricing information (or at minimum, a “starting at” figure — hiding prices creates friction)
- Client testimonials — social proof from real sessions
Squarespace, Format, and Pixieset all offer photography-optimized templates. Expect to spend $12–$25/month. This is one of the best investments in your business.
For photography website setup tips, prioritize mobile-first design — most clients will view your site on a phone before booking.
Social Media & Networking
Instagram remains the dominant platform for photographers to attract clients, particularly in portrait, wedding, and lifestyle niches. Post consistently (3–5 times per week), use location-based hashtags, and engage with local community accounts. Quality beats quantity — 12 excellent posts per month outperform 30 mediocre ones.
Beyond Instagram:
- Pinterest drives long-tail traffic for wedding and portrait photographers — pins last years, unlike Instagram posts.
- Google Business Profile (free) makes you discoverable in local searches — essential for any photographer serving a geographic market.
- Networking in person remains one of the highest-converting client acquisition methods. Venue coordinators, event planners, and makeup artists all refer photographers regularly. Build those relationships deliberately.
Word-of-mouth is the most powerful marketing channel available to photographers. Every client experience is a marketing event. Deliver beyond expectations, follow up personally, and ask for referrals explicitly.
Step 9: Pursue Advanced Careers
Once you’ve established your foundation — technical skills, a niche, a portfolio, and a functioning business — you can pursue the photography careers that feel like a dream from the outside.
Working for Top Publications
How to become a photographer for National Geographic is one of the most common aspirational questions in photography communities — and the honest answer is that it takes years of specialized work and a very specific path:
- Specialize deeply. National Geographic publishes wildlife, nature, culture, and science photography. Vogue publishes fashion and portrait work. You must be genuinely exceptional in one of these areas.
- Build a body of work. Not a portfolio of 20 images — a body of work. Long-form projects, documentary series, and published essays in smaller outlets first.
- Get published regionally first. Local and regional magazines, newspapers, and online publications are the stepping stones. Editors at major publications look at your publication history.
- Submit directly. Both National Geographic and major fashion publications accept query submissions from established photographers. Research their submission guidelines carefully.
- Consider a photography agent. Major editorial photographers often work with agents who pitch their work to publications on their behalf.
For how to become a photographer for Vogue specifically, fashion assisting — working as a second photographer or assistant on fashion shoots — is the most direct path. Build relationships with fashion editors, stylists, and art directors.
Non-Traditional Career Paths
Not all photography careers involve creative clients. Specialized fields offer stable employment with different skill requirements:
- Forensic and crime scene photography: Learning how to become a crime scene photographer or how to become a forensic photographer typically requires a criminal justice or forensic science background alongside photography skills. Many forensic photographers work for law enforcement agencies or medical examiner offices. Formal training through programs like the Evidence Photographers International Council (EPIC) is the standard path.
- Medical photography: Hospitals and medical schools employ photographers to document clinical procedures, research, and patient cases. A background in biology or healthcare combined with strong technical photography skills is the typical profile.
- Aerial and drone photography: FAA Part 107 certification (required for commercial drone operation in the U.S.) opens access to real estate, construction, agriculture, and film production clients. The certification exam costs approximately $175 and requires dedicated study.
For an overview of photography career paths beyond portraits, specialized fields often offer more stable income than purely creative freelance work.
Step 10: Future-Proof Against AI
AI is the most significant shift in photography since digital cameras replaced film. Ignoring it is not an option. Understanding it honestly is the only productive response.
Is AI replacing photographers?
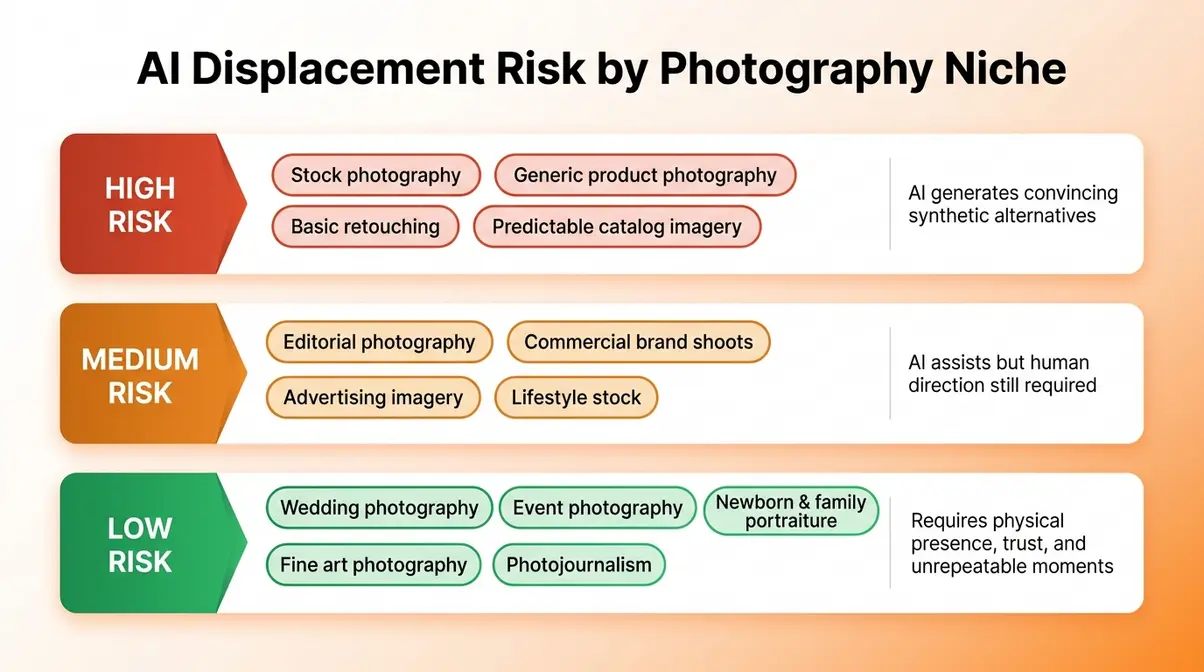
AI tools are replacing certain types of photography work — specifically, generic stock imagery, simple product photography with predictable lighting, and basic retouching tasks. Tools like Midjourney and Adobe Firefly can generate convincing synthetic images for some commercial applications.
However, photography communities and industry analysts consistently report that AI cannot replicate the core value of professional photography: human presence, relationship, and the capture of genuine, unrepeatable moments. A wedding is not repeatable. A newborn session requires trust, not just technical output. Corporate headshots require a photographer who can make nervous executives feel comfortable in front of a camera.
According to Reuters and industry observers, AI’s impact on photography is similar to its impact on other creative fields — it automates the generic, which raises the floor and makes differentiation more important, not less. The photographers most at risk are those doing undifferentiated, commodity work. The photographers least at risk are those with a recognizable style, strong client relationships, and skills that require physical presence.
How to Stay Competitive
The third leg of The Photographer’s Triangle — Business Acumen — is your best defense against AI disruption. Here’s what to prioritize:
- Develop a recognizable style. AI generates average. A distinctive, personal visual style is not replicable by a prompt.
- Invest in relationships. Clients hire photographers they trust. That trust is built over time through communication, reliability, and personal connection — none of which AI provides.
- Learn to use AI as a tool. Adobe Lightroom’s AI-powered masking, noise reduction, and sky replacement tools already save professional photographers hours per week. Embracing these tools makes you faster, not replaceable.
- Specialize in presence-dependent work. Events, weddings, documentary, and portraiture all require a human photographer on location. These niches are structurally protected from AI displacement.
- Add video to your services. Demand for video content continues to grow. Photographers who also deliver short-form video for social media and brand content expand their revenue streams significantly.
Common Mistakes and How to Avoid Them
Even motivated, talented aspiring photographers make predictable errors. Knowing them in advance saves months of frustration.
The Most Costly Beginner Mistakes
Gear obsession before skill. Photography communities report this as the most universal beginner mistake: spending $2,000 on a camera body before understanding the exposure triangle. Better gear doesn’t produce better photos until you understand what you’re doing. Spend your first $300 on a used camera and your first six months on learning to use it.
Underpricing to get clients. Charging $50 for a portrait session attracts clients who expect $50 worth of professionalism and then complain about everything. Underpricing also creates a ceiling — raising rates from $50 to $200 is much harder than starting at $150 and raising to $250. Price based on your costs and the value you deliver, not on anxiety about whether anyone will pay.
Skipping contracts. A single uncontracted session that goes wrong — a client disputes deliverables, a wedding date changes without notice, a hard drive fails — can cost more than an entire month of revenue. Use a contract for every paid session, no exceptions.
Waiting for perfection before launching. Your portfolio will never feel ready. Launch with what you have, continue improving, and update your portfolio as your skills grow. Aspiring photographers who wait for perfection often wait indefinitely.
When to Seek Mentorship
Some challenges are better solved with expert guidance than trial and error:
- Business setup: A local Small Business Development Center (SBDC) offers free consulting on business structure, taxes, and licensing. Use it.
- Legal questions: Photography contracts and copyright disputes benefit from a brief consultation with an intellectual property attorney. Many offer free initial consultations.
- Skill plateaus: If your images stop improving despite consistent practice, a one-day workshop or mentorship session with an established photographer in your niche can break the plateau faster than another six months of solo practice.
Finding a good mentor — someone working in the niche you want to enter — is one of the highest-leverage investments a developing photographer can make. Many established photographers offer mentorship programs. Assisting gigs are often the best informal mentorship available.
Frequently Asked Questions
How do I get started as a photographer?
Getting started as a photographer requires three things: a camera (any camera, including a smartphone), a commitment to regular practice, and a willingness to learn the exposure triangle — aperture, shutter speed, and ISO. Most beginners make their most significant progress in the first three months simply by shooting consistently and reviewing their work critically. Start with free resources on YouTube, pick one subject to photograph repeatedly, and focus on understanding light before worrying about gear or clients.
What qualifications do you need to be a photographer?
No formal qualifications are required to become a photographer. The BLS confirms that most photographers learn through experience and self-study rather than degree programs. Some specialized fields — forensic photography, medical photography — benefit from formal training in the associated discipline. For the majority of photography niches, a strong portfolio and demonstrable skills matter far more than credentials. Community college courses, online platforms, and assisting established photographers are all recognized paths.
Do photographers make good money?
Photographers can earn well, but income varies significantly by niche and business skill. The BLS reports a median annual wage of approximately $40,000 for photographers (BLS, 2023), with the top 10% earning more than $76,000. Wedding photographers in competitive markets routinely gross $80,000–$120,000+ annually. Commercial and editorial photographers with strong client rosters can earn considerably more. The key variable is business development — photographers who treat their work as a business consistently out-earn those who treat it as an art form alone.
Is being a photographer a good career?
Photography is a good career for people who combine creative passion with business discipline. It offers flexible hours, creative autonomy, and genuine income potential — but it requires entrepreneurial skills that most creative-focused beginners underestimate. The photographers who thrive long-term are those who treat their work as a business from day one: using contracts, pricing based on costs, marketing consistently, and investing in skills beyond camera technique. For those willing to build all three sides of The Photographer’s Triangle — Creative Vision, Technical Mastery, and Business Acumen — photography is a sustainable and rewarding career.
Your 10-Step Roadmap Starts Now
For aspiring photographers who feel overwhelmed by where to start, the path forward is clearer than it looks. The BLS reports steady demand for photographers across commercial, portrait, and editorial niches — and the photographers who build sustainable careers are those who develop all three sides of The Photographer’s Triangle: Creative Vision, Technical Mastery, and Business Acumen equally.
The framework matters because most beginners master one leg and neglect the other two. Technical skill without business acumen produces talented photographers who undercharge and burn out. Business skill without creative vision produces work that clients tolerate but don’t love or refer. All three legs, developed together, produce photographers who build real careers.
Start where you are. Use the gear you have. Shoot consistently. Then build the business around the skill — one step at a time. The photographers who succeed are not the ones who started with the best equipment or the most natural talent. They’re the ones who didn’t stop.
Your next step: pick up your camera today and shoot for 20 minutes with one specific goal in mind. That’s how every working photographer started.
