
Table of Contents
- Step 1 — Check Lens Compatibility Before You Buy
- Step 2 — Choose Your Focal Length
- Step 3 — Understand Aperture and F-Stops
- Step 4 — Decide Between Prime and Zoom Lenses
- Step 5 — Match the Lens to Your Photography Style
- Step 6 — Evaluate Advanced Features
- Common Lens-Buying Mistakes to Avoid
- Frequently Asked Questions
- The Right Lens Is Closer Than You Think
This blog post may contain affiliate links. As an Amazon Associate I earn from qualifying purchases.
“I’ve done so much research and I still don’t know what to get.”
If that sounds familiar, you’re not alone — and it’s not your fault. The problem isn’t a lack of information. It’s that most guides bury you in optical specifications without telling you which spec matters for your shooting style. The wrong lens purchase wastes $200–$800 and sits untouched in your camera bag.
This guide gives you a concrete 6-step framework to understand how to choose camera lenses that fit your camera body, your budget, and the subjects you love to photograph. By the time you finish, you’ll have a short list — or a single answer. We cover six decisions every lens buyer must make, starting with the one most beginners skip entirely: compatibility.
Knowing how to choose camera lenses comes down to 6 decisions: compatibility, focal length, aperture, prime vs. zoom, photography style, and advanced features — in that order.
- Start with your mount: A Canon RF lens won’t fit a Canon EF (DSLR) body — always check compatibility first.
- Use the 20-60-20 Rule: Most photographers shoot 20% wide, 60% standard, and 20% telephoto — buy your dominant focal length first.
- f/1.8 beats f/2.2 for low light and background blur, and costs only marginally more.
- 50mm is the ultimate starter prime — natural perspective, affordable, and works in any light condition.
- Mirrorless users (RF, Z, E mount): Native lenses outperform adapted DSLR glass — prioritize native glass whenever budget allows.
Step 1 — Check Lens Compatibility Before You Buy
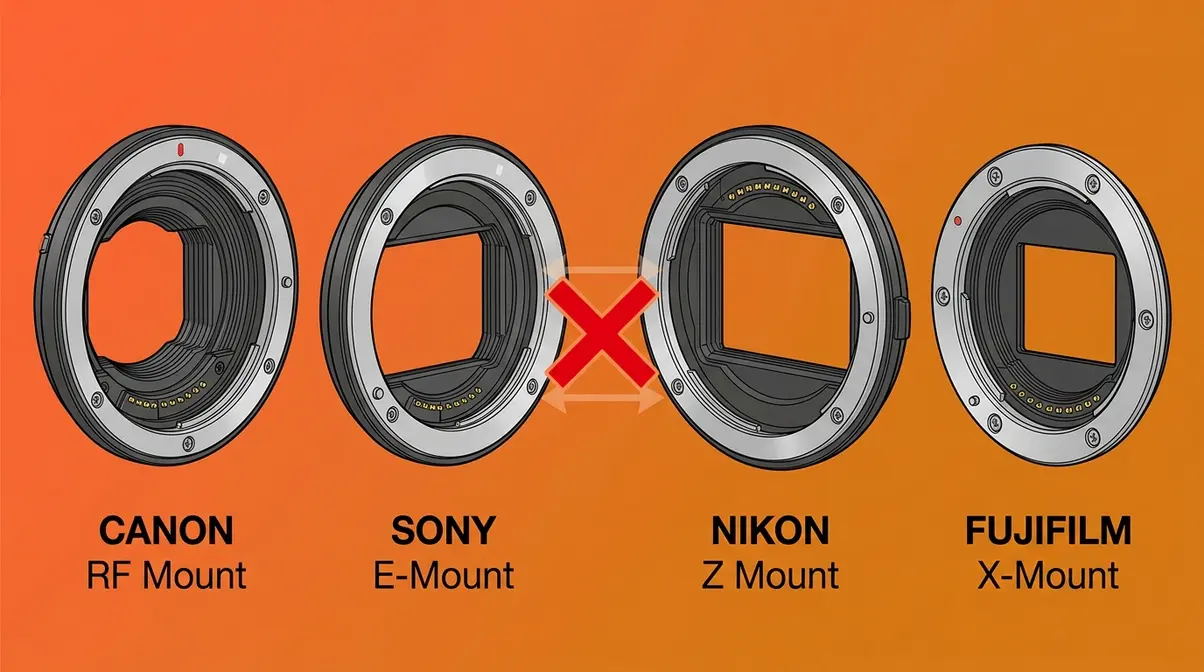
Checking lens compatibility is the first and most critical step in choosing camera lenses — skipping it is the most expensive beginner mistake in photography. Every lens is designed for a specific mount system, and a lens from one system will not physically attach to a body from another without a dedicated adapter. Even with an adapter, you may lose autofocus speed, electronic stabilization communication, or full weather-sealing performance. Buying an incompatible lens is a $200–$800 mistake that most return policies won’t cover.
What Is a Lens Mount?
A lens mount is the mechanical and electronic interface connecting a lens to a camera body — it’s the gating factor for every purchase decision you’ll make. Think of it like a phone charging port: a USB-C cable won’t fit a Lightning port, regardless of how good the cable is. The same principle applies here.
In 2026, the four major mirrorless mount systems are:
| Camera Brand | Mount System | Example Bodies |
|---|---|---|
| Canon | RF | EOS R6 Mark II, EOS R8, EOS R50 |
| Sony | E Mount | Alpha A7 IV, ZV-E10 II, A6700 |
| Nikon | Z | Z5 II, Z6 III, Z50 II |
| Fujifilm | X | X-S20, X-T5, X100VI |
Two legacy DSLR mounts remain widely used: Canon EF (the older mount designed for Canon’s DSLR lineup) and Nikon F (Nikon’s DSLR standard). Both are being phased out in favor of mirrorless systems, but millions of these bodies and lenses still circulate in the used market.
The practical takeaway: if you own a Sony A7 IV, you need Sony E mount lenses. If you own a Canon EOS R50, you need Canon RF lenses. Check your camera body’s spec sheet or the manufacturer’s website if you’re unsure — it will state the mount name explicitly. Understanding how sensor size influences your images is the next layer of this compatibility picture.
Now that you know your mount system, there’s one more compatibility factor that has reshaped the lens market over the past three years: the shift from DSLRs to mirrorless cameras — and what it means for your lens options.
The Mirrorless Shift in 2026
Mirrorless cameras have fundamentally changed what lens designers can achieve — and understanding why helps you make a smarter buying decision. The key technical difference is the flange distance: the gap between the lens mount and the camera’s image sensor. Mirrorless cameras have a dramatically shorter flange distance than DSLRs. Canon’s RF mount, for example, uses a 20mm flange distance versus the EF mount’s 44mm, combined with a wider 54mm internal diameter. This extra space and proximity to the sensor allows engineers to design optical elements that simply weren’t possible in the DSLR era — resulting in sharper corners, reduced chromatic aberration, and faster autofocus communication.
Canon’s RF mount uses a 12-pin electronic connection versus the older EF mount’s 8-pin design, enabling significantly faster autofocus communication with the camera body (Canon’s official RF vs. EF comparison, Canon USA, 2026). That’s not a trivial spec — it’s the reason RF lenses track moving subjects more reliably than adapted EF glass on the same body.
What about your existing DSLR lenses? Canon’s EF-EOS R adapter allows EF lenses to work on RF bodies, and they perform well for most shooting scenarios. However, native RF lenses offer faster Dual Pixel CMOS AF and access to Canon’s latest optical coatings. Sony’s LA-EA5 adapter similarly bridges A-mount DSLR lenses to E-mount bodies. If you already own quality DSLR glass, adapting it is a reasonable short-term strategy — but plan to transition to native lenses as your budget allows.
As of early 2026, the native lens ecosystems stand at roughly 50+ lenses for Canon RF, 80+ for Sony E mount (including Sigma and Tamron third-party options), and 40+ for Nikon Z — each system growing steadily. Sony’s E mount ecosystem is currently the largest, offering the most third-party options at competitive price points.
Full-Frame vs. Crop-Sensor Lenses
Full-frame lenses (also called FF lenses) are designed to cover the imaging circle of a full-frame sensor. Crop-sensor lenses (APS-C specific, such as Canon’s EF-S or Sony’s E-mount APS-C lenses) are designed for the smaller APS-C sensor size. Here’s what matters practically:
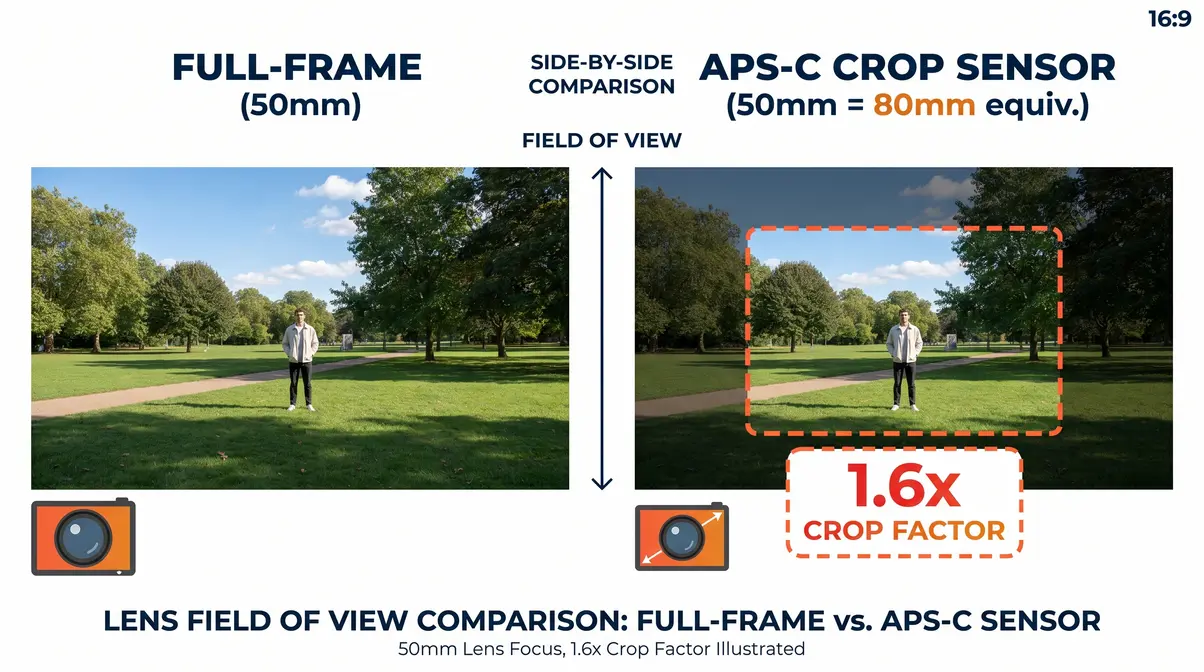
- A full-frame lens on a crop-sensor body works perfectly — you simply use the center of the lens’s image circle. Expect a 1.5x–1.6x “crop factor” that effectively multiplies your focal length (a 50mm lens behaves like an 80mm on a Canon APS-C body).
- An APS-C lens on a full-frame body will produce vignetting (dark corners) because the lens doesn’t cover the full sensor area. Most cameras detect this and crop automatically, but you lose resolution.
The crop factor matters most when buying your first telephoto lens. A 200mm lens on a crop-sensor body gives you the equivalent reach of a 300mm — excellent value for wildlife photography. For landscapes and street photography, the crop factor narrows your field of view at the wide end, which can be limiting. Beginners often find a beginner-friendly telephoto zoom more accessible on a crop body for this reason.
Once you’ve confirmed compatibility, the next decision determines what the lens actually sees — and that’s focal length.
Step 2 — Choose Your Focal Length
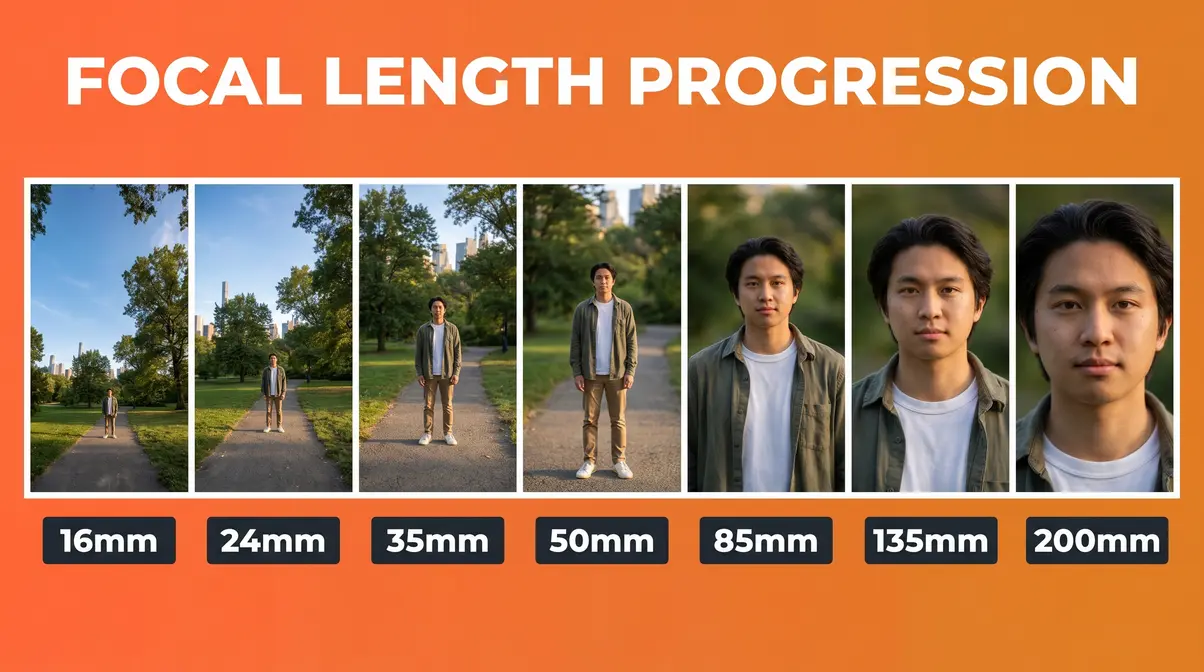
Focal length — measured in millimeters (mm) — determines how wide or how zoomed-in your lens appears. A lower number means a wider view; a higher number means more magnification and a narrower field of view. This single specification shapes your photos more than any other lens characteristic, which is why the 20-60-20 Rule was developed as a practical framework: across professional photography communities, the consistent pattern is that most photographers use wide-angle lenses 20% of the time, standard lenses 60% of the time, and telephoto lenses 20% of the time. Buy the focal length you’ll use most — and that’s almost always the standard range.
Wide-Angle Lenses (16–35mm)
Wide-angle lenses capture a broad field of view, making them essential for landscapes, architecture, and interior photography. At 16–24mm, you can include dramatic foregrounds and sweeping skies in a single frame. At 28–35mm, the perspective feels natural while still covering a wide scene.
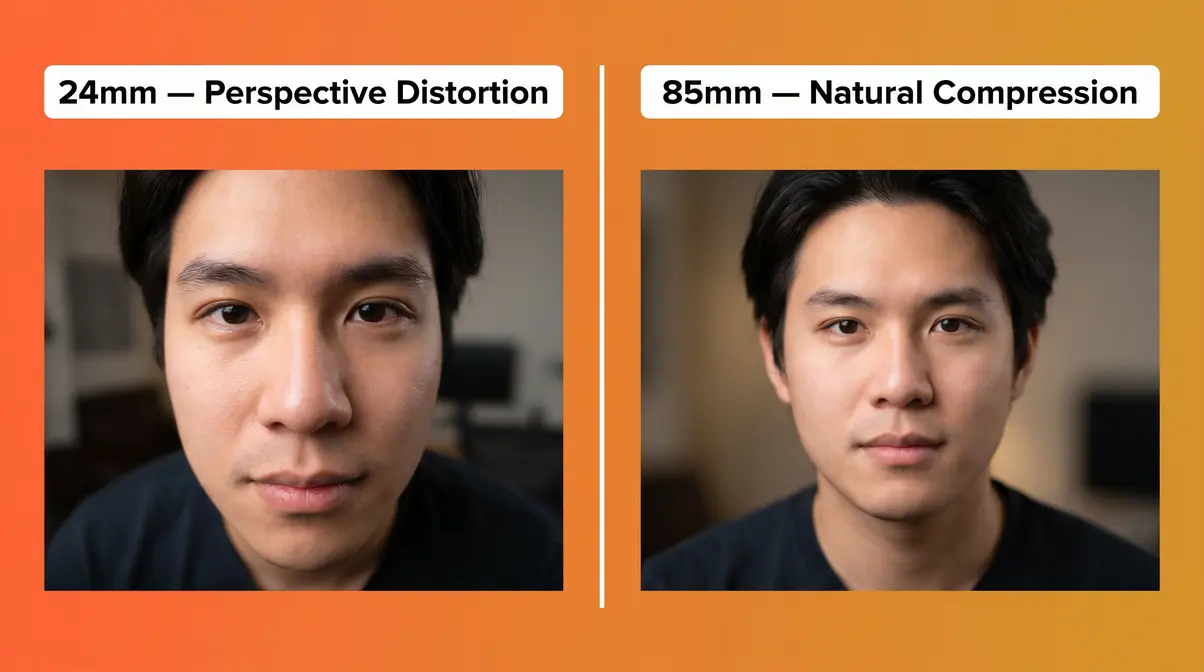
The trade-off: wide-angle lenses exaggerate perspective. Objects close to the camera appear larger and more distorted than they do to the human eye. This is a creative tool in landscape photography but unflattering in portraits — a 24mm lens shot close to a face will distort facial proportions noticeably.
Practical guide: If you shoot landscapes, cityscapes, or real estate interiors, a 16–35mm zoom or a 24mm prime should be near the top of your list. For most mirrorless systems, affordable wide-angle options include the Sony 20mm f/1.8 G (E mount), Canon RF 16mm f/2.8 STM, and Nikon Z 24mm f/1.7. According to Adorama’s lens buying guide, wide-angle primes under 24mm are among the most underutilized lenses for new photographers who later wish they had bought one sooner.
Standard Lenses (35–85mm)
Standard lenses represent the focal range closest to natural human vision. At 50mm on a full-frame body, the field of view closely approximates what your eye sees without feeling artificially compressed or stretched. This is why the 50mm prime has earned the nickname “the nifty fifty” — it’s the most versatile focal length in photography.
The 35mm sits at the wider edge of the standard range. It’s slightly wider than natural vision, which makes it feel immersive and documentary — a favorite for street photographers and environmental portraits. The 85mm sits at the longer edge, producing flattering subject compression with beautiful background separation. Many portrait photographers consider the 85mm prime lens the single most important purchase after a standard zoom.
For photographers currently limited by their kit lens (typically 18–55mm), moving to a dedicated 35mm or 50mm prime is often the single biggest image quality jump available at any budget. Across Reddit’s r/AskPhotography and professional photography forums, the consistent advice for photographers feeling limited by kit lenses is to add a fast 50mm prime as their first upgrade.
Telephoto Lenses (85mm+)
Telephoto lenses compress distance and magnify distant subjects — essential for wildlife photography, sports, and any scenario where you physically cannot get close to your subject. The longer the focal length, the more reach you have and the more the background appears compressed and blurred.
- Key telephoto ranges and their uses:
- 85–135mm: Portraits, events, and casual sports. Flattering compression, manageable size.
- 70–200mm zoom: The workhorse of professional sports and event photography. Covers weddings, school sports, and wildlife at moderate distances.
- 300mm+: Dedicated wildlife and bird photography. Requires a tripod or in-body image stabilization (IBIS) for handheld use.
For crop-sensor shooters, a 70–300mm zoom on an APS-C body delivers the equivalent reach of a 105–450mm lens — outstanding value for shooting wildlife on a budget. Understanding what reach you need before purchasing a telephoto prevents the most common regret: buying too short and cropping heavily in post-processing.
Is 35mm or 50mm Better?
Neither focal length is universally better — they serve different creative purposes. The 35mm is wider, giving you more environmental context around your subject. It’s favored by street photographers, documentary shooters, and anyone who wants to include the scene around their subject. The 50mm is closer to natural human vision, making it feel more neutral and less stylized.
For portrait photography, 50mm is generally the safer starting point — it avoids the mild perspective distortion that 35mm can introduce when shooting close to a face. For street and travel photography, 35mm wins because the extra width captures more of the environment without requiring you to step back in tight spaces.
Budget note: on most mirrorless systems, the 50mm f/1.8 is significantly cheaper than the 35mm f/1.8 equivalent, making it the better first prime for cost-conscious buyers. The Canon RF 50mm f/1.8 STM retails around $200 and represents one of the best value propositions in the RF ecosystem.
Step 3 — Understand Aperture and F-Stops
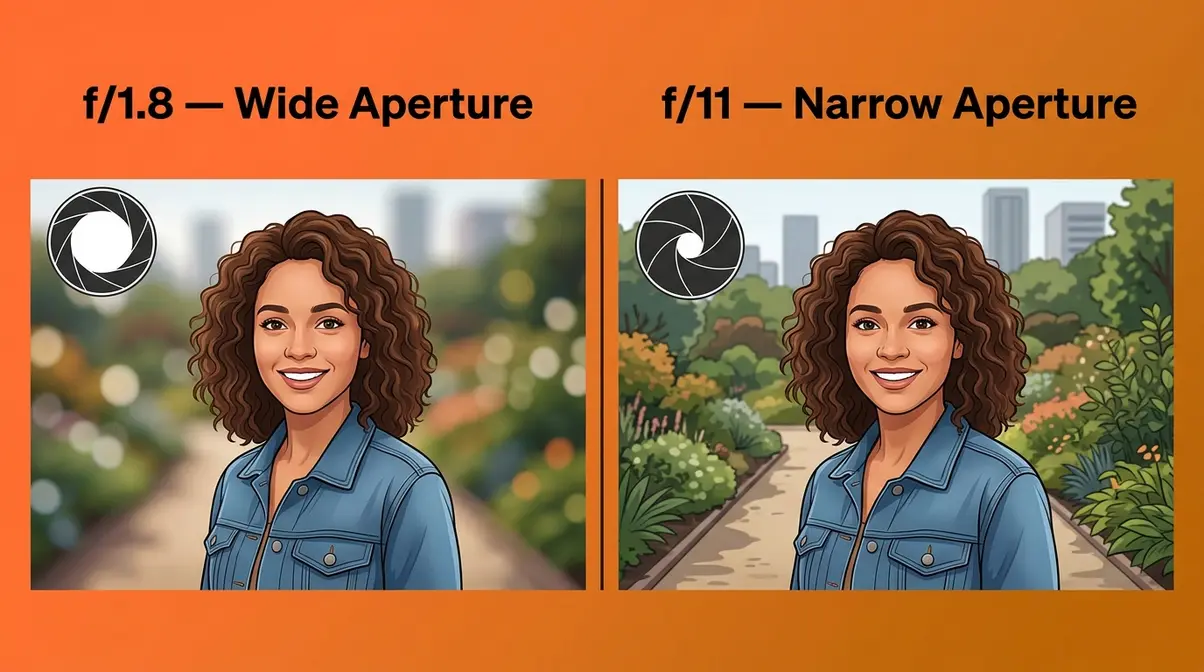
Aperture is the opening inside the lens that controls how much light reaches the sensor. It’s measured in f-stops (f/1.4, f/1.8, f/2.8, f/4, and so on). Aperture governs two things simultaneously: how bright your images are in low light, and how blurred your background appears. Mastering this single concept resolves most confusion about choosing camera lenses for indoor or low-light shooting.
Why f-Numbers Work Backwards
The most confusing aspect of aperture for new photographers: a lower f-number means a larger, wider opening — which is the opposite of what feels intuitive. f/1.8 is a much larger opening than f/8. The “f” stands for the focal ratio — it’s a mathematical expression of the lens’s focal length divided by the aperture diameter. You don’t need to memorize the math; you just need to remember: lower number = more light = blurrier background.
Here’s a practical reference:
| F-Stop | Opening Size | Best For |
|---|---|---|
| f/1.4 – f/2.0 | Very wide | Low light, portraits, bokeh |
| f/2.8 – f/4.0 | Wide-moderate | General indoor shooting |
| f/5.6 – f/8.0 | Moderate-narrow | Outdoor daylight, group shots |
| f/11 – f/16 | Narrow | Landscape, maximum depth of field |
Lenses described as “fast” have maximum apertures of f/2.8 or wider. A large aperture prime lens like a 50mm f/1.8 is “fast” because it can use a faster shutter speed in low light without needing flash.
Aperture and Background Blur (Bokeh)
Bokeh — the Japanese term for the aesthetic quality of out-of-focus areas in a photo — is produced by shooting at a wide aperture (low f-number) with a subject close to the camera and a background far away. It’s the creamy blurred background you see in professional portrait and product photography.
- Three factors control bokeh intensity:
- Aperture width: f/1.4 produces more blur than f/2.8 on the same lens
- Subject-to-background distance: The farther your background is from your subject, the more blur
- Focal length: Longer focal lengths (85mm+) produce more background compression and blur than shorter focal lengths at the same aperture
According to Digital Photography School’s guide to lens selection, the combination of an 85mm focal length and f/1.8 aperture is the most frequently recommended setup for achieving professional-looking portrait bokeh without spending over $500.
Is f/1.8 or f/2.2 Better for Low Light?
f/1.8 is better than f/2.2 for low light — and the difference is measurable. f/1.8 allows approximately 50% more light into the sensor than f/2.2, meaning you can use a lower ISO (reducing digital noise) or a faster shutter speed (reducing motion blur) in identical lighting conditions. Over professional photography communities, the consensus is clear: when budget allows, always choose the wider aperture.
The practical scenario: shooting a birthday party indoors under artificial lighting at f/1.8 gives you sharper, cleaner images than f/2.2 — especially visible when comparing at ISO 3200 and above. The price difference between an f/1.8 and f/2.0 lens is typically small; the difference between f/1.8 and f/4.0 is significant and worth budgeting for if you shoot indoors regularly.
Step 4 — Decide Between Prime and Zoom Lenses
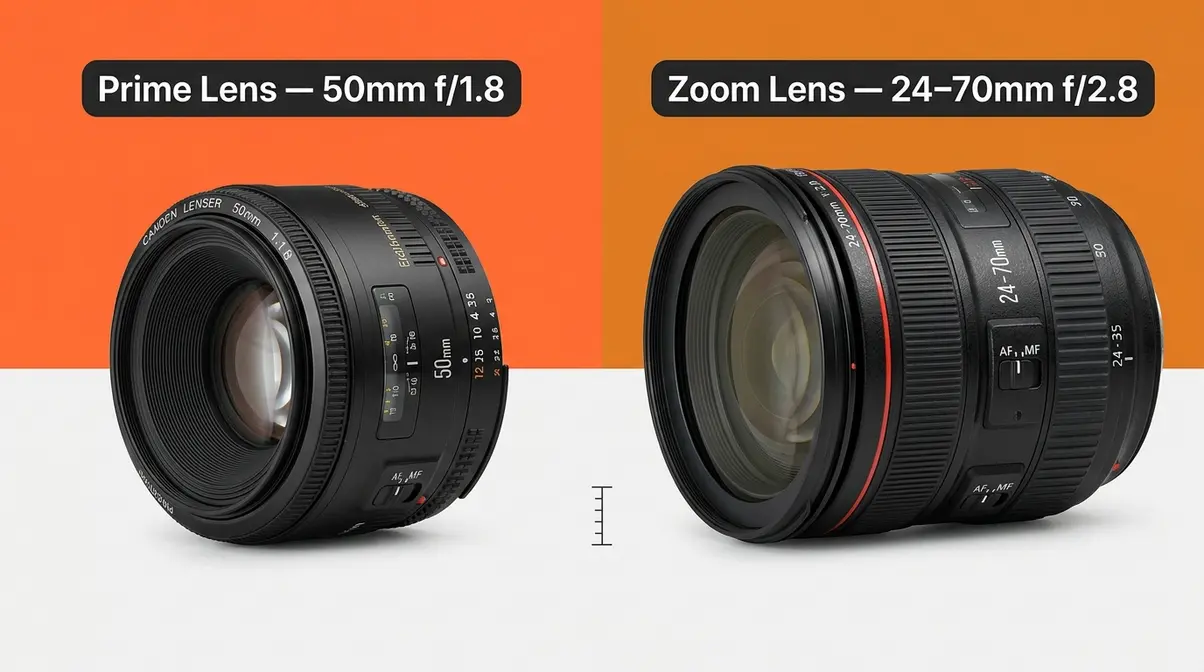
Prime lenses have a fixed focal length (like 35mm or 50mm). Zoom lenses cover a range of focal lengths (like 24–70mm or 70–200mm). Both have genuine advantages — and the right choice depends on how you shoot, not on which type is “better.” This is one of the most debated questions in photography communities, and the answer is more nuanced than most guides suggest.
The Case for Prime Lenses
Prime lenses are optically simpler — fewer moving elements means less light scatter, lower chromatic aberration, and typically sharper results at their maximum aperture than a zoom lens at the equivalent focal length. A 50mm f/1.8 prime will almost always outperform a 24–70mm f/2.8 zoom at 50mm f/1.8, particularly in corner sharpness and low-light performance.
Beyond image quality, primes force creative discipline. When you can’t zoom, you move — and moving physically changes your perspective in ways that zooming does not. Many photographers find that shooting with a single prime for a month dramatically improves their compositional instincts.
The strongest argument for primes: price-to-aperture value. A 50mm f/1.8 prime on most mirrorless systems costs $150–$250. A zoom lens that reaches f/1.8 at any focal length doesn’t exist — and a zoom that reaches f/2.8 costs $1,200+. For low light and bokeh on a budget, primes win decisively. See the complete guide to prime vs. zoom lenses for a deeper comparison.
The Case for Zoom Lenses
Zoom lenses offer compositional flexibility without changing glass — a significant practical advantage for travel, events, and any shooting situation where you can’t control your distance from the subject. A single 24–70mm f/2.8 zoom replaces three or four primes in your bag, reducing weight and eliminating the need to swap lenses mid-shoot.
For photographers who shoot “3 zooms” (a wide zoom, a standard zoom, and a telephoto zoom), it’s entirely possible to cover virtually every shooting scenario without a single prime lens. Many professional photojournalists and wedding photographers work exclusively with zooms because reliability and range matter more than maximum aperture in their workflows.
The honest trade-off: zoom lenses at f/2.8 are heavy and expensive. Budget zoom lenses at f/3.5–5.6 are light and affordable but struggle in low light. The kit lens that shipped with your camera is typically an f/3.5–5.6 zoom — excellent for outdoor daylight, limiting indoors.
Third-Party Lenses and Renting
Third-party lens manufacturers — primarily Sigma, Tamron, and Viltrox — produce lenses for Canon RF, Sony E, and Nikon Z mounts at prices 30–50% below OEM equivalents. Sigma’s Art series and Tamron’s G2 lenses in particular have earned strong reputations for image quality that rivals or matches manufacturer glass at lower cost.
Before committing to any lens over $300, renting is a genuinely underused strategy. Services like LensRentals.com or BorrowLenses.com allow you to rent a lens for a weekend for $30–$80 — a small insurance premium against buyer’s remorse on a $600+ purchase. After testing both systems across different shooting conditions, the pattern across photography communities is consistent: photographers who rent before buying report significantly higher satisfaction with their final purchase.
Step 5 — Match the Lens to Your Photography Style
Knowing the technical specs is only half the equation. The other half is matching those specs to the subjects you actually photograph. The genre-to-lens matrix below maps eight photography styles to their recommended focal length and aperture starting points — use it as your shortcut to a final decision.
Portrait Photography
For portraits, the sweet spot is 85mm to 135mm at f/1.8 to f/2.8. This focal length range produces flattering subject compression — it doesn’t exaggerate facial features the way wide angles do — and the wide aperture creates the background separation that makes portrait subjects pop.
The 85mm f/1.8 prime is the most recommended first portrait lens across professional communities, and for good reason: it’s available on every major mirrorless system for $400–$600, it focuses quickly on modern autofocus systems, and it produces a quality of background blur that zoom lenses at equivalent prices cannot match. For photographers who need to work in tighter indoor spaces (small studios, home shoots), a 50mm f/1.4 or f/1.8 is a more practical alternative that still delivers excellent background separation.
If your budget is limited, a 50mm f/1.8 prime is a better portrait investment than an 85mm f/1.8 — you can work closer to your subject and the optical quality difference is minimal at these price points.
Landscape Photography
Landscape photography rewards wide-angle lenses paired with narrow apertures. The goal is maximum depth of field — sharp from the foreground wildflowers to the distant mountain range — which means shooting at f/8 to f/11 in most conditions.
Recommended starting point: A 16–35mm zoom or a prime in the 20–24mm range. For mirrorless shooters, the Sony 20mm f/1.8 G (E mount), Canon RF 15–35mm f/2.8L, and Nikon Z 14–30mm f/4 S are frequently cited as the best in their respective systems. The wider aperture (f/1.8–f/2.8) in these lenses isn’t primarily for landscapes — it’s for astrophotography and blue-hour shooting where light is scarce.
One underappreciated technique: the hyperfocal distance method for landscapes allows you to maximize depth of field at any aperture — a skill that transforms how you use your wide-angle lens.
Wildlife and Sports Photography
Wildlife and sports photography demands two things above all else: reach and fast autofocus. Subjects move unpredictably, distances are large, and you often get a single frame to capture the decisive moment.
Minimum recommended focal length: 300mm for birds and small wildlife; 200mm for larger animals and field sports. A 70–200mm f/2.8 zoom is the professional standard for sports because it delivers fast autofocus, a wide aperture for indoor arenas, and sufficient reach for most field positions.
For budget-conscious wildlife photographers, a 100–400mm zoom on a crop-sensor body delivers 150–600mm equivalent reach — outstanding value. Modern mirrorless autofocus systems (Canon’s Dual Pixel CMOS AF II, Sony’s Real-time Tracking, Nikon’s Subject Detection AF) have dramatically improved wildlife tracking performance, but they still require a lens with a fast, quiet autofocus motor. STM (Stepping Motor) and USM (Ultrasonic Motor) lenses are Canon’s designations for their fastest autofocus systems; Sony and Nikon use linear AF motors in their premium lenses.
Travel Photography
Travel photography prioritizes versatility and light weight — you’re covering everything from architecture to street portraits to food, often while walking for hours. The ideal travel lens solves two contradictory problems: covering all three focal lengths without requiring lens swaps, while fitting in a small bag.
The most popular solution among travel photographers is a 24–105mm or 24–70mm f/4 zoom — a range that covers wide environmental shots, natural-perspective street scenes, and moderate telephoto for distant subjects. This single lens handles 90% of travel scenarios. For photographers willing to carry a second lens, a compact 35mm f/1.8 prime covers low-light restaurant and indoor scenes that the f/4 zoom struggles with.
Street and Macro Photography
Street photography typically favors compact, inconspicuous lenses in the 28–50mm range. A large telephoto draws attention; a small 35mm or 28mm prime is less intrusive and faster to raise and shoot. The Fujifilm XF 27mm f/2.8 and Sony 35mm f/1.8 are consistently recommended for street work due to their compact size and silent autofocus.
Macro photography requires a dedicated macro lens capable of 1:1 magnification (life-size reproduction ratio). Standard zoom lenses cannot focus close enough to photograph small insects, flowers, or product details at true macro scale. The Canon RF 100mm f/2.8L Macro, Sony FE 90mm f/2.8 Macro G, and Nikon Z MC 105mm f/2.8 VR S are the benchmark macro lenses for their respective systems — they double as excellent portrait lenses due to their focal length and aperture, making them a versatile two-in-one option for photographers who shoot both genres.
Step 6 — Evaluate Advanced Features
Once you’ve confirmed compatibility, focal length, aperture, and lens type, advanced features become the final filter. These features — image stabilization, autofocus performance, and weather sealing — can justify a price premium or eliminate a lens from consideration depending on how you shoot.
Image Stabilization Decoded
Image stabilization (IS) compensates for camera shake, allowing you to shoot at slower shutter speeds without blur from hand movement. Every major manufacturer brands this differently:
| Brand | Lens-Based IS Name | Abbreviation |
|---|---|---|
| Canon | Image Stabilizer | IS |
| Nikon | Vibration Reduction | VR |
| Sony | Optical SteadyShot | OSS |
| Tamron | Vibration Compensation | VC |
| Sigma | Optical Stabilization | OS |
Modern mirrorless cameras increasingly include IBIS (In-Body Image Stabilization), which works independently of the lens. When a body with IBIS is paired with a lens that also has IS/VR/OSS, the two systems work together (called “coordinated IS” or “5-axis IS”) for maximum stabilization — typically allowing 5–8 stops of compensation versus 2–3 stops from lens IS alone.
Practical guidance: If your camera body has IBIS (Sony A7 series, Nikon Z6 III, Canon R6 Mark II), lens-based IS becomes less critical — you can save money by choosing a non-IS version of a lens. If your body lacks IBIS (Canon R50, Sony ZV-E10 II), prioritize lenses with built-in stabilization for any focal length above 85mm. See the complete guide to image stabilization systems for a body-by-body compatibility breakdown.
Autofocus Performance
Autofocus speed and accuracy matter most for moving subjects — children, pets, sports, and wildlife. Modern mirrorless lenses use linear motors or ultrasonic motors that are both faster and quieter than the older screw-drive AF systems found in DSLR lenses.
- Key autofocus designations to know:
- Canon: USM (Ultrasonic Motor — fast, near-silent) and STM (Stepping Motor — smooth, ideal for video)
- Nikon: S-line lenses use multi-focus linear motors; older AF-S lenses use ultrasonic ring motors
- Sony: XD (Extra-linear Drive) motors in G Master lenses; standard linear AF motors in entry-level E-mount lenses
For still photography, USM/linear motor lenses are the better choice. For video, STM and linear motor lenses produce smoother, quieter focus pulls. According to Sony’s lens selection guide, the XD linear motor in Sony G Master lenses achieves 4x faster focus acquisition than standard linear AF motors — a measurable advantage for fast-moving subjects.
Weather Sealing and Build Quality
Weather sealing uses rubber gaskets at the lens mount, zoom ring, and focus ring to resist dust and moisture. It doesn’t make a lens waterproof, but it significantly extends usable conditions — allowing you to shoot in light rain, dusty environments, and humid conditions without risking damage.
Weather-sealed lenses cost more, but the premium is worth it in specific scenarios:
- Outdoor wildlife and sports photographers who regularly shoot in unpredictable weather
- Travel photographers shooting in tropical or dusty environments
- Wedding photographers working outdoor ceremonies
For studio, indoor, and controlled-environment shooting, weather sealing adds cost without practical benefit. Budget-friendly lenses from Sigma and Tamron increasingly offer weather sealing at prices below OEM equivalents — worth checking before dismissing third-party options. The Best Buy lens buying guide provides a useful overview of build quality tiers across price ranges.
Common Lens-Buying Mistakes to Avoid
Common Pitfalls
Even well-researched buyers fall into predictable traps. Across photography communities and buyer feedback, these are the mistakes that appear most consistently:
1. Buying a lens for the camera you wish you had, not the one you own. Full-frame lenses on a crop-sensor body work — but you’re paying for sensor coverage you’re not using. Buy lenses matched to your current body’s sensor size.
2. Ignoring the crop factor when buying telephoto lenses. A 200mm lens on an APS-C body gives you 300mm+ equivalent reach. Buying a 400mm lens for a crop-sensor body produces a 600mm+ equivalent that’s difficult to handhold and overkill for most wildlife scenarios.
3. Prioritizing maximum aperture over focal length. A 50mm f/1.2 is extraordinary glass — but if you need 200mm reach for wildlife, the fastest aperture in the world won’t help you. Match focal length to your subject first; optimize aperture second.
4. Overlooking used lenses. Optical glass is extraordinarily durable. A used Canon EF 70–200mm f/2.8L purchased for $800 frequently outperforms a new $600 third-party zoom in both image quality and autofocus reliability.
5. Skipping the rent-before-buy step. A $50 weekend rental can save you from a $500 purchase you’ll regret. This is the single most underused strategy among beginner photographers.
When to Choose Differently
Some scenarios call for a fundamentally different approach than the 6-step framework suggests:
- If you’re primarily a video creator, prioritize lenses with smooth, silent STM or linear AF motors over fast aperture primes. Aperture transitions during recording cause exposure shifts that are difficult to fix in post.
- If you’re shooting film or using a vintage body, check flange distance compatibility carefully — many vintage lenses require spacer adapters that shift minimum focus distance.
- If your budget is under $150 total, the kit lens you already own is more valuable than a cheap prime of unknown quality. Invest in a used name-brand prime (Canon, Sony, Nikon) rather than an unreviewed budget option.
Frequently Asked Questions
Choosing the Right Lens
Start by confirming your camera’s mount system, then select a focal length that matches your most common photography subjects. Check the brand’s lens lineup for your mount (Canon RF, Sony E, Nikon Z) and identify lenses in your focal length range with apertures of f/1.8–f/2.8 for versatility. Cross-reference with Canon Europe’s beginner lens guide for system-specific recommendations, keeping in mind that a 50mm f/1.8 prime or a 24–105mm zoom covers 80% of typical shooting scenarios.
What is the 20-60-20 Rule?
The 20-60-20 Rule is a lens-buying framework based on how most photographers actually distribute their focal length usage. It holds that most photographers use wide-angle lenses (16–35mm) approximately 20% of the time. Standard lenses (35–85mm) account for approximately 60% of the time. Finally, telephoto lenses (85mm+) make up the remaining 20% of the time. The practical implication is to buy your dominant focal length first, adjusting the ratio only if you primarily shoot specialized subjects like wildlife.
Is 35mm or 50mm better?
Neither is universally better — they serve different creative purposes. A 35mm lens captures a slightly wider field of view with more environmental context, making it ideal for street photography, travel, and environmental portraits. Conversely, a 50mm more closely matches natural human vision, producing a neutral, undistorted perspective that works well for portraits, food, and everyday photography.
Is f/1.8 or f/2.2 aperture better?
f/1.8 is better than f/2.2 for both low-light performance and background blur. According to optical principles, an f/1.8 aperture allows approximately 50% more light to reach the sensor than f/2.2, enabling lower ISO settings and faster shutter speeds in identical lighting conditions. The difference is most visible when shooting indoors at ISO 3200 and above, where f/1.8 produces noticeably cleaner images with less digital noise. Since the price difference between f/1.8 and f/2.0 lenses is typically small, always select the wider aperture if budget permits.
What is better, RF or EF lenses?
RF lenses are technically superior to EF lenses for use on Canon mirrorless bodies, but EF lenses remain excellent on RF bodies via Canon’s EF-EOS R adapter. The RF mount’s 12-pin electronic connection enables faster autofocus communication. It also supports Canon’s latest optical coatings and stabilization algorithms. Native RF lenses benefit from the mount’s shorter flange distance, enabling optical designs impossible with EF glass. For new Canon mirrorless buyers, invest in RF-native lenses as your primary glass and use the adapter for older lenses.
What are the 5 C’s of photography?
The 5 C’s of photography are Composition, Color, Contrast, Clarity, and Creativity. These are the five foundational elements that distinguish compelling photographs from technically correct but visually flat images. Composition governs how elements are arranged in the frame; Color establishes mood and emotional tone; Contrast creates visual separation between subjects and backgrounds; Clarity ensures technical sharpness at the point of focus; and Creativity refers to the photographer’s unique perspective and intent. Lens choice directly influences three of these — focal length shapes composition, aperture controls contrast and clarity through depth of field, and both affect creative options.
What colors do not photograph well?
Highly saturated reds and neon yellows are the most technically challenging colors to photograph accurately because camera sensors are less sensitive to the red channel at high saturation levels, causing highlight clipping. Neon yellows and greens can appear unnaturally bright or shift hue under certain lighting conditions. Practically, lenses with poor chromatic aberration control can intensify color fringing around high-contrast colored edges, whereas premium lenses handle color accuracy significantly better.
Why is a 50mm lens so popular?
The 50mm lens is popular because its field of view closely matches natural human vision, making images feel immediate and unmanipulated. It produces the least perspective distortion of any focal length. It also works in virtually any lighting condition at f/1.8. Historically, 50mm lenses were the standard kit lens on film cameras, which means decades of iconic photography were shot at this focal length. For modern photographers, the 50mm f/1.8 offers professional-grade image quality at an entry-level price.
The Right Lens Is Closer Than You Think
For photographers overwhelmed by choice, learning how to choose camera lenses doesn’t have to be complicated. The 6-step framework cuts through the noise: confirm your mount, identify your dominant focal length using the 20-60-20 Rule, understand how aperture controls light and blur, decide between prime and zoom based on your workflow, match the lens to your genre, and evaluate stabilization and autofocus as final filters. Following these steps in order transforms an intimidating market of thousands of lenses into a short list of two or three realistic options.
The 20-60-20 Rule exists because lens paralysis is almost always solved by the same answer: most photographers need a sharp, fast standard-range prime or zoom first. That single lens — whether it’s a 50mm f/1.8, a 35mm f/1.8, or a 24–70mm f/2.8 — will cover 60% of your shots and teach you more about your photographic preferences than any amount of research.
Your next step is concrete: identify your mount, pick one lens from the genre matrix that matches your primary subjects, and rent it for a weekend before committing. One shooting session with the right glass will tell you more than a hundred hours of reading — and it will end the research loop for good.
