

Table of Contents
- What You’ll Need Before You Connect
- Method 1: Connect Your Canon Camera via USB Cable
- Method 2: Transfer Photos Using an SD Card Reader
- Method 3: Connect Wirelessly via Wi-Fi
- Rebel T6/T7 and 5D Series: Quick Reference
- Use Your Canon as a Webcam on Mac
- Fix It: macOS Not Detecting Your Camera
- Common Limitations & Alternatives
- Frequently Asked Questions
- Conclusion
This blog post may contain affiliate links. As an Amazon Associate I earn from qualifying purchases.
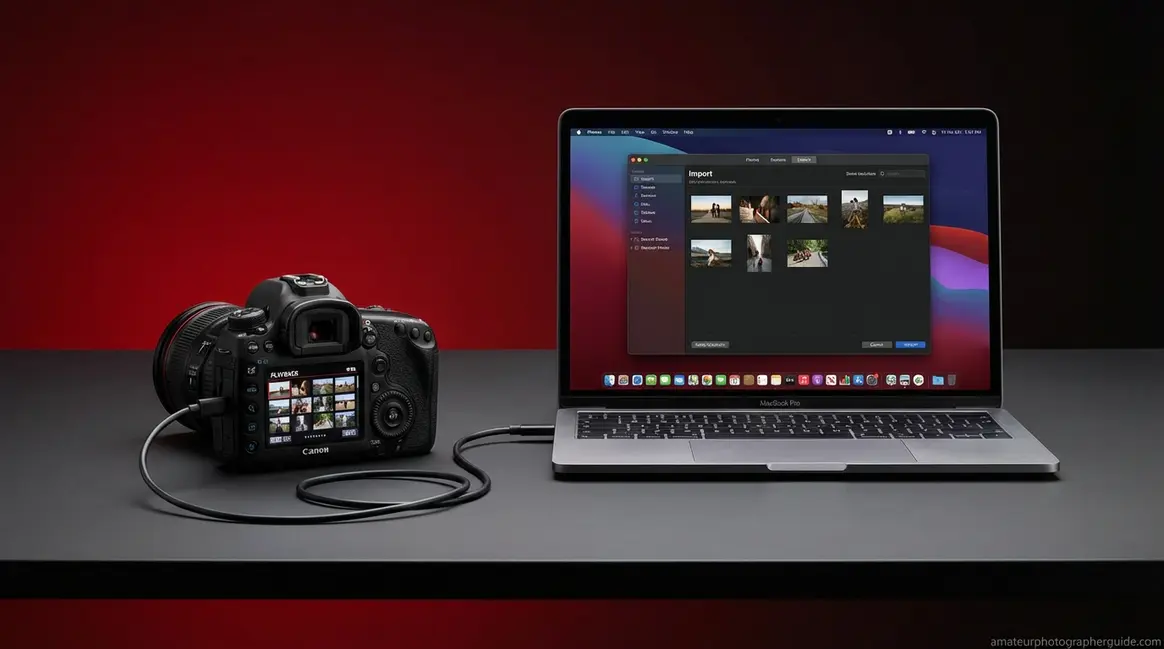
You plug your Canon camera into your MacBook, wait for something to happen, and get… nothing. No import window. No notification. No sign the computer even noticed the camera is sitting right there.
That blank screen usually has nothing to do with your camera. It has everything to do with one of three fixable things: a power-only USB cable that cannot transfer data, a macOS Sequoia permission setting that silently blocks new accessories on M1 and M2 Macs, or a port mismatch that needs a $15 adapter to solve. In this guide, you’ll learn exactly how to connect a Canon camera to a MacBook using USB, a card reader, or Wi-Fi — plus how to resolve the most common macOS Sequoia and Apple Silicon detection failures that no other guide covers. We’ll walk through all three connection methods step by step, then wrap up with a model-specific quick reference for Rebel, 5D, and EOS R owners.
Connecting a Canon camera to a MacBook takes under 5 minutes when you use the right cable. Most failed connections are caused by “The Charging Cable Trap” — a power-only USB cable that physically fits your camera but transfers no data, causing macOS to silently ignore the connection.
- USB cable method: Fastest setup — requires the correct Mini-B, Micro-B, or USB-C data cable (not a charging-only cable); works on every Mac and every Canon model
- SD card reader: Most reliable and driver-free — no software needed; simply remove the SD card and plug into a compatible card reader
- Wi-Fi via EOS Utility: Cable-free but slower — requires a compatible Wi-Fi-enabled Canon model and EOS Utility 3 installed on your Mac
- macOS Sequoia fix: If nothing else works on an M1/M2/M3 Mac, go to System Settings → Privacy & Security → Allow Accessories to Connect and approve your camera
What You’ll Need Before You Connect
A data-transfer USB cable, a working USB port (or adapter), and macOS Sonoma 14 or Sequoia 15 are the only universal requirements for connecting any Canon camera to a MacBook.
Before you try any connection method, make sure you have the following ready:
- Canon camera (any EOS, Rebel, or R-series model) — fully charged or plugged into a power source
- A data-transfer USB cable matching your camera’s port — ⚠️ this is not the same as a phone charger; see Method 1 for details. This is the cable that came inside your camera’s box.
- SD memory card (already inside the camera) plus a compatible USB card reader — for Method 2 only
- MacBook with macOS Sonoma (14) or Sequoia (15) — both Intel and Apple Silicon Macs (M1/M2/M3) work, though Sequoia requires an extra permission step
- EOS Utility 3 (free from Canon’s website) — for Wi-Fi Method 3 only; not needed for USB or card reader
- Built-in Mac apps: Photos or Image Capture — no download needed; both are already on your Mac
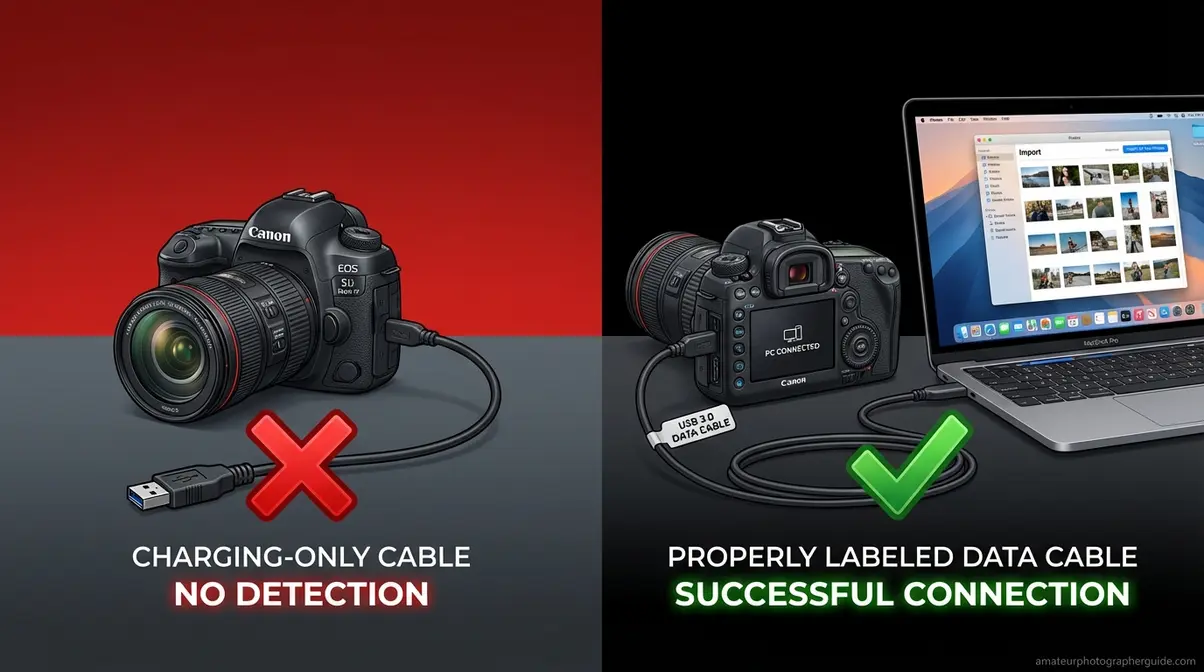
⚠️ The Charging Cable Trap: The #1 cause of silent connection failures is using a charging-only USB cable. It fits your camera and your MacBook perfectly — but carries no data whatsoever. The cable that came in your camera’s box is a data cable. A spare phone charger is almost always a charging cable. Check before you try anything else.
Method 1: Connect Your Canon Camera via USB Cable
USB is the most stable and fastest setup method for connecting a Canon camera to a MacBook. A direct cable link requires no software pairing, no Wi-Fi, and works on every version of macOS. The one thing that derails most people before they even start: not all USB cables that fit your camera will actually transfer photos. The Charging Cable Trap — using a power-only cable that looks identical to a data cable — causes macOS to silently ignore the camera. Check your cable type first, and the rest of this process takes about two minutes.
Find Your Canon’s USB Port Type
The cord you need to connect your Canon camera to a Mac depends on which USB port your camera has. Canon has used three different port types across its camera lineup, and using the wrong cable for even one end of the connection means zero data transfer.
The three Canon USB port types:
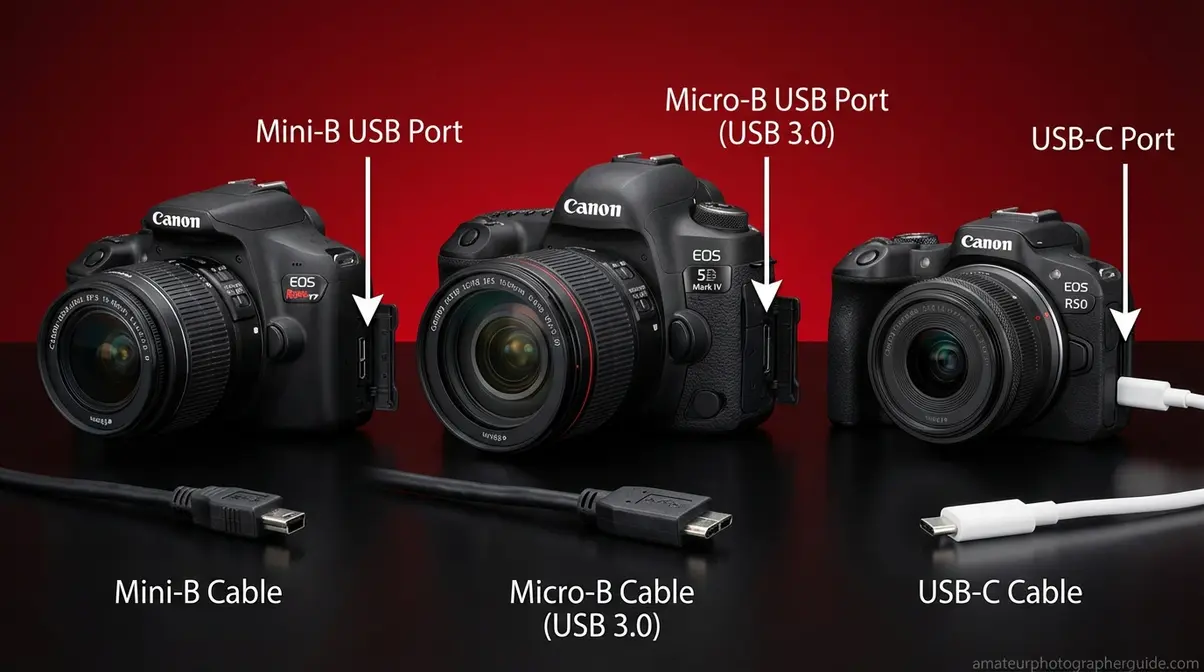
- Mini-B — Small, slightly trapezoidal shape with two tiny notched corners. Found on Canon Rebel T6, T7, T6i, T6s, and most entry-level Canon DSLRs made between 2010 and 2020. This is the most common port type on beginner Canon cameras. The cable you need: Mini-B to USB-C (for modern MacBooks) or Mini-B to USB-A (for older MacBooks, used with an adapter).
- Micro-B — Thinner and asymmetric, similar to the port on older Android phones. Found on the Canon 5D Mark IV, 7D Mark II, and some mid-range DSLRs. The cable you need: Micro-B to USB-C or Micro-B to USB-A.
- USB-C — Oval, reversible, and the same connector used on modern MacBooks. Found on the Canon EOS R5, R6, R50, and most EOS R-series mirrorless cameras made after 2018. The cable you need: USB-C to USB-C, which is the same cable your MacBook charger may already use — but confirm it is a data cable, not a charge-only cable (Canon Developer Community, Camera and USB Cable Compatibility List).
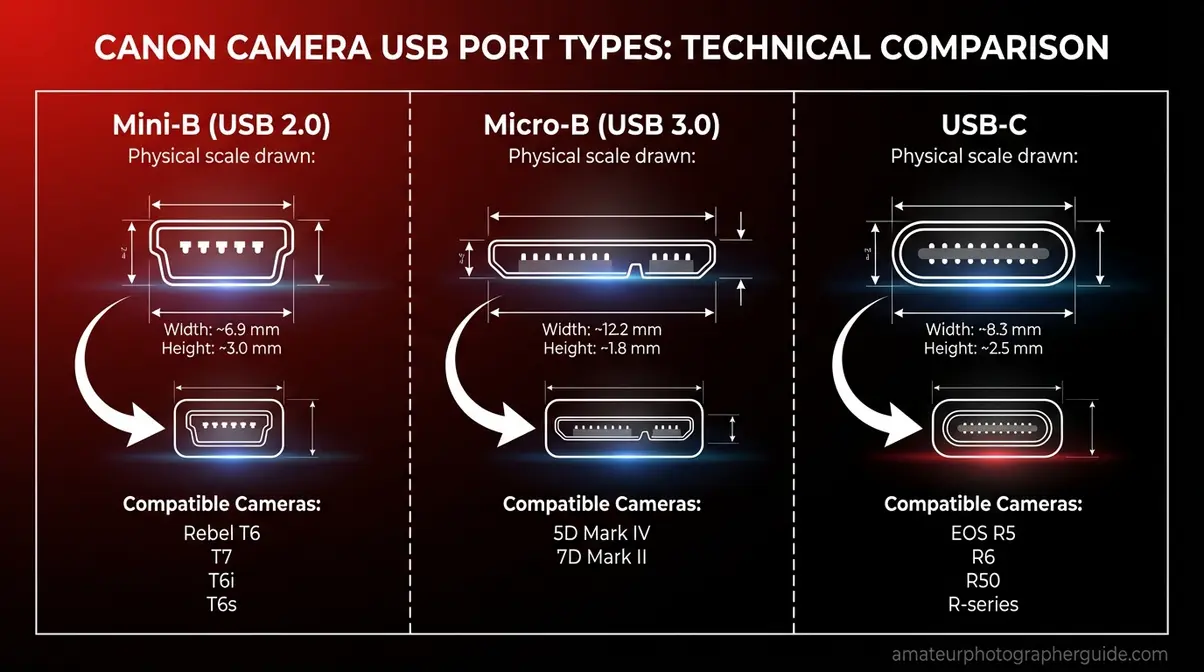
Caption: The three USB port types found on Canon cameras — identifying yours before buying a cable prevents the most common connection mistake.
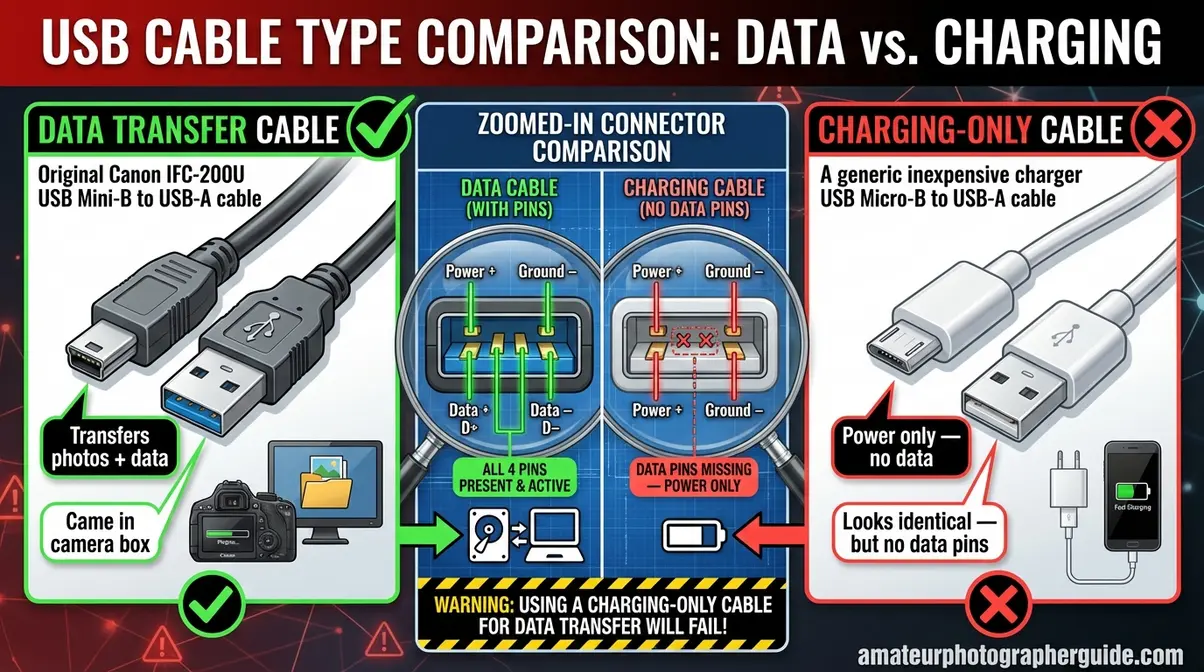
Caption: A charging cable and a data cable look nearly identical. The data cable that came in your camera’s box is the one that works — most phone charger cables transfer power only.
For a full breakdown of which cables work with which Canon models, see our guide to identifying the correct USB cable and port type.
Step-by-Step: Connect and Import
Once you have the right cable, the connection itself is straightforward. Here is the complete process from camera to Mac:
What you’ll need: Data-transfer USB cable (matching your camera’s port type), powered-on Canon camera, MacBook running macOS Sonoma or Sequoia. Estimated time: 2–3 minutes.
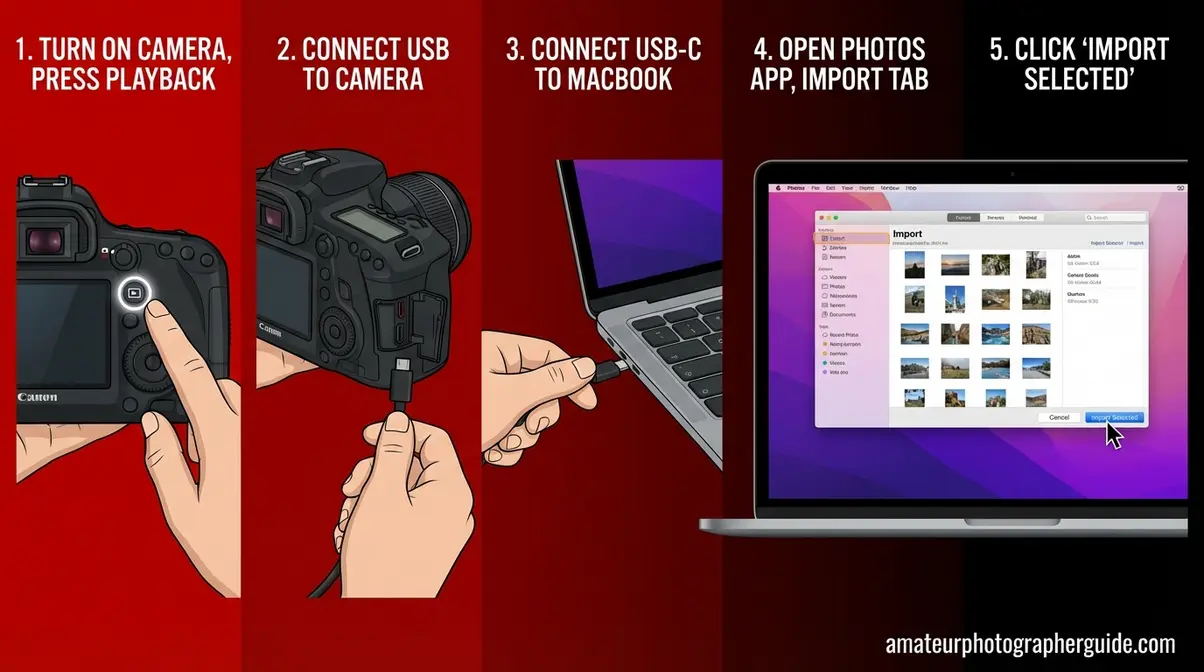
- Turn your camera on and set it to playback mode (press the Play button on the back of your camera). On most Canon models, the USB connection only works in playback mode, not in the live shooting screen.
- Connect the cable — plug the smaller end into your camera’s port, and the USB-C end into your MacBook. If your MacBook has only USB-C ports (2016 or later), you are connecting directly. If your cable has a USB-A end, you need a USB-A to USB-C adapter (also called a dongle — a small $10–$15 converter available from Apple and most electronics retailers).
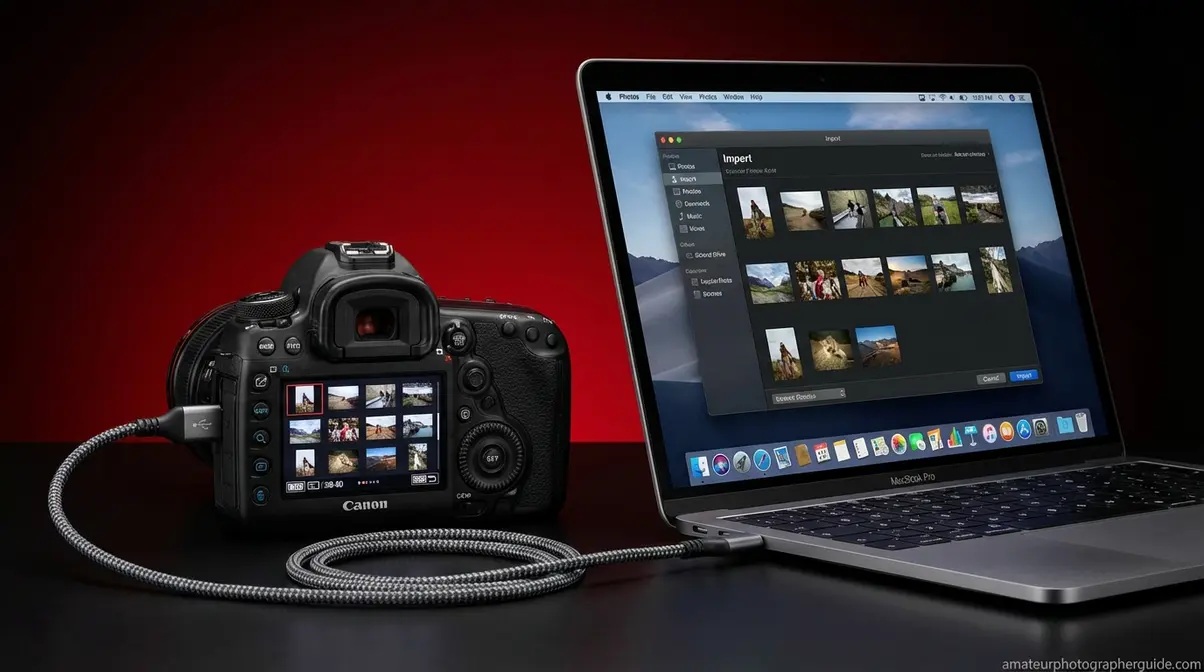
- Wait 5–10 seconds. On most Macs running Sonoma, the Photos app opens automatically and shows an “Import” tab with your camera’s photos. If Photos doesn’t open, press Command + Space, type Image Capture, and open it manually — Image Capture is a simpler alternative that some users prefer for selective imports.
- Select your photos in the import panel and click Import Selected (or Import All to bring everything over at once).
- Safely disconnect when the import completes — drag the camera icon from the desktop to the trash (eject it), then unplug the cable.
✅ Why step 1 matters: Keeping the camera in shooting mode (not playback) causes many Macs to see it as an unknown device rather than a photo storage source. Switching to playback mode first is the fix most forum posts never mention.
USB-C MacBook: Do You Need an Adapter?
Every MacBook made since 2016 uses USB-C ports exclusively. If your Canon camera has a Mini-B or Micro-B port, you have two options:
- Option A (Recommended): Buy a Mini-B to USB-C cable — this is a single cable with no adapter in the middle, which is more reliable and less likely to disconnect. Search for “Mini-B to USB-C camera cable” or “IFC-200U equivalent USB-C.” Expect to spend $8–$15.
- Option B: Use a USB-A adapter (dongle) — if you already have a Mini-B to USB-A cable (the standard cable from your camera’s box), a USB-A to USB-C adapter will work. Apple’s adapter costs $19; third-party versions cost $5–$10.
If your Canon uses USB-C (EOS R-series), no adapter is needed. Plug USB-C to USB-C directly between camera and MacBook.
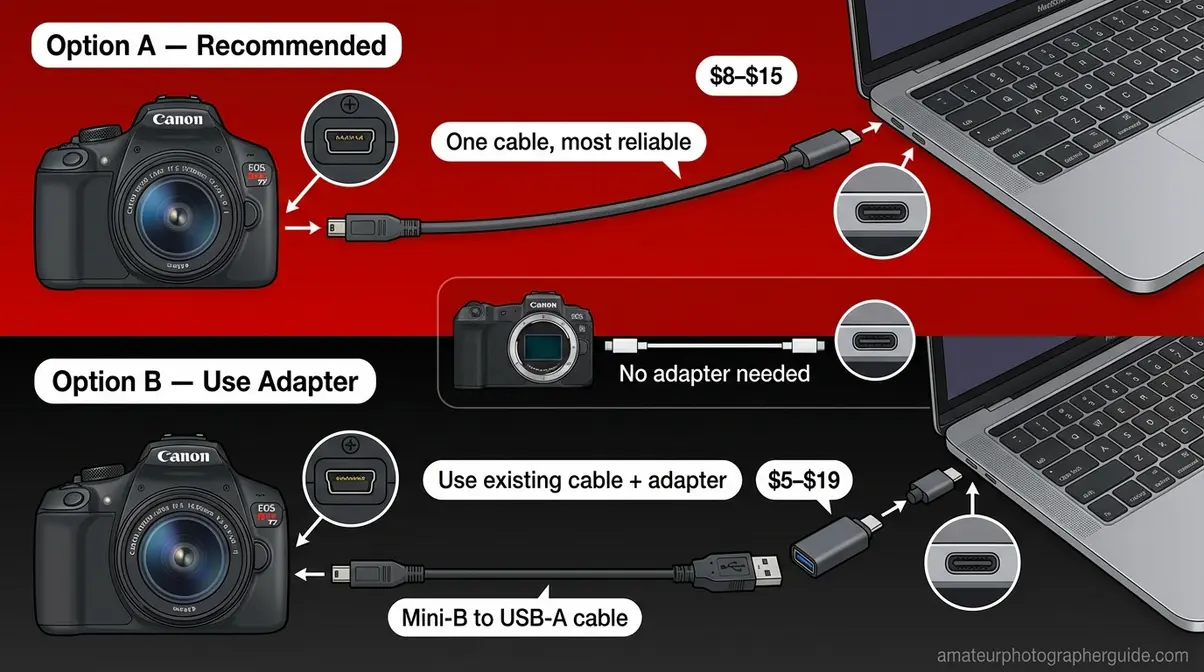
Caption: Modern MacBooks have only USB-C ports — a $10 adapter bridges the gap for Canon cameras with older Mini-B or Micro-B connectors.
For the Apple Support article on what USB accessories require approval in macOS, see allow accessories to connect settings — relevant if your Mac prompts you to authorize the camera after plugging in.
Method 2: Transfer Photos Using an SD Card Reader
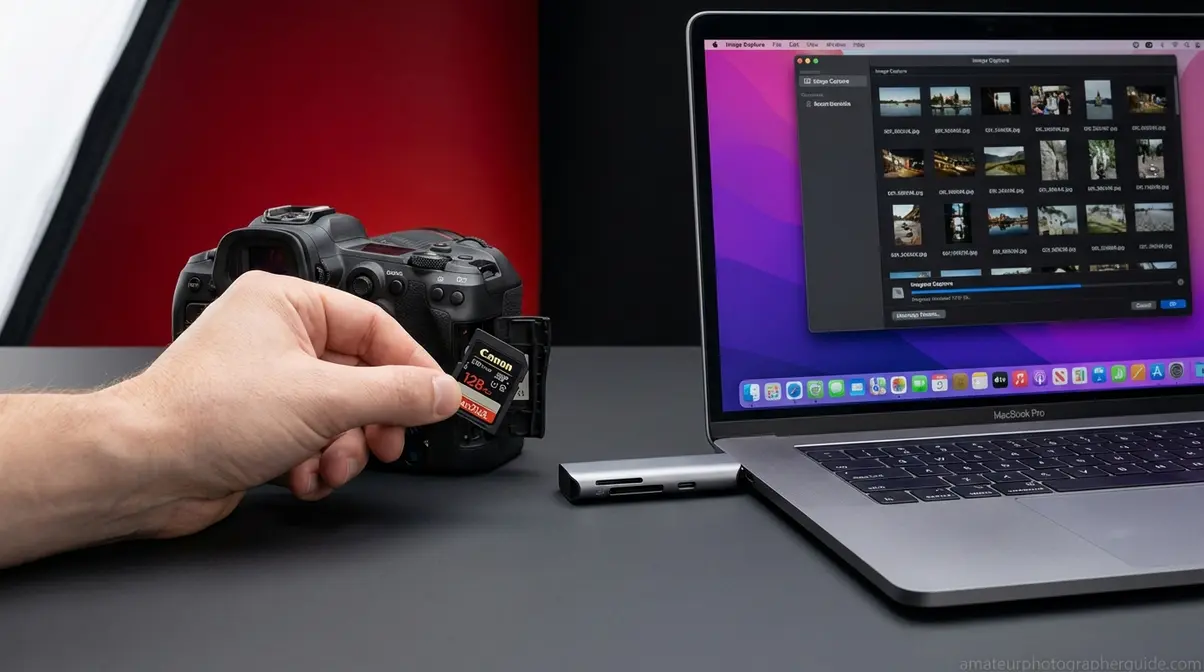
The SD card reader method is the most reliable way to get photos off your Canon camera and onto your Mac. No drivers, no software pairing, no cable type confusion — just the SD card from your camera and a compatible reader.
Many professional photographers who transfer large volumes of files use this method exclusively. It bypasses every software and driver variable that can cause USB connection failures.
Compatible MacBook Card Readers
Canon cameras use standard SD cards (SDHC and SDXC). The question is what goes between the card and your MacBook.
| MacBook Type | Built-In SD Slot? | Recommended Reader |
|---|---|---|
| MacBook Pro 14″ / 16″ (2021–2026) | ✅ Yes (full-size SD) | Use the built-in slot directly |
| MacBook Pro 13″ (M1/M2) | ❌ No | USB-C SD card reader (~$15–$25) |
| MacBook Air (M1/M2/M3) | ❌ No | USB-C SD card reader (~$15–$25) |
| MacBook Air / Pro (Intel, pre-2016) | ✅ Yes (full-size SD) | Use the built-in slot directly |
| MacBook (12″, 2015–2019) | ❌ No | USB-C SD card reader (~$15–$25) |
If your MacBook has a built-in SD card slot (check the right or left edge), you need nothing extra — just remove the SD card from your camera and slide it in. If your MacBook has only USB-C ports, a USB-C SD card reader from Anker, Apple, or CalDigit works perfectly. Avoid USB-A card readers unless you also have a USB-A to USB-C adapter.
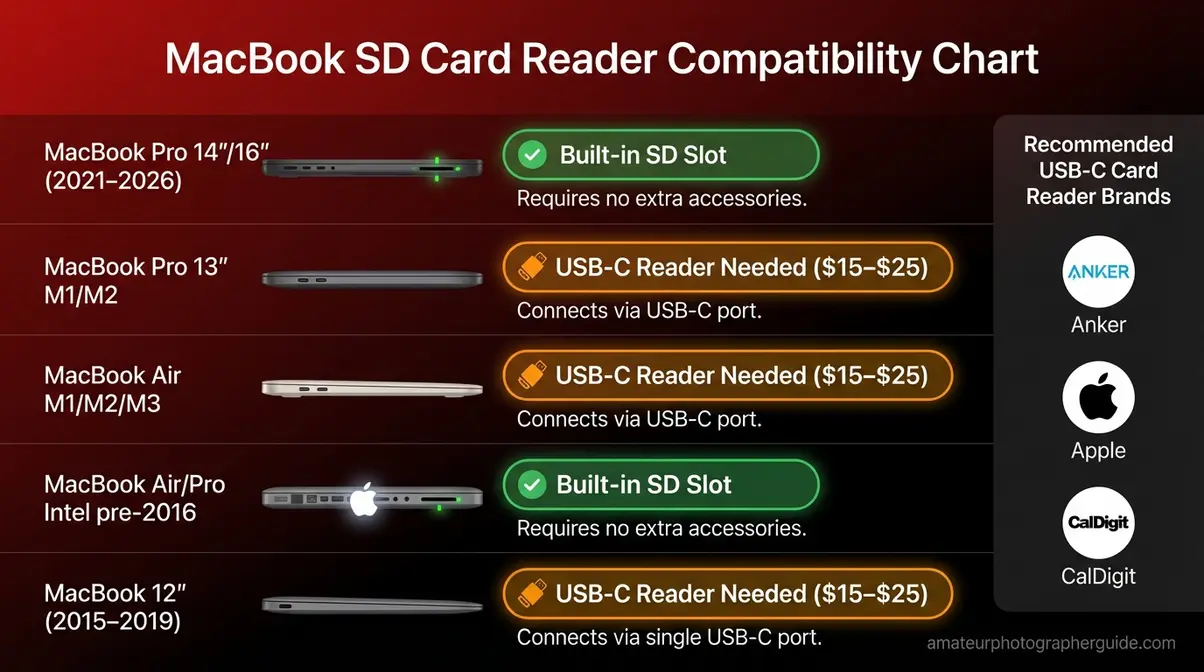
Caption: MacBook Pro 14″ and 16″ models from 2021 onward have a built-in full-size SD slot — all other current MacBooks need a USB-C card reader.
Step-by-Step: Import From SD Card
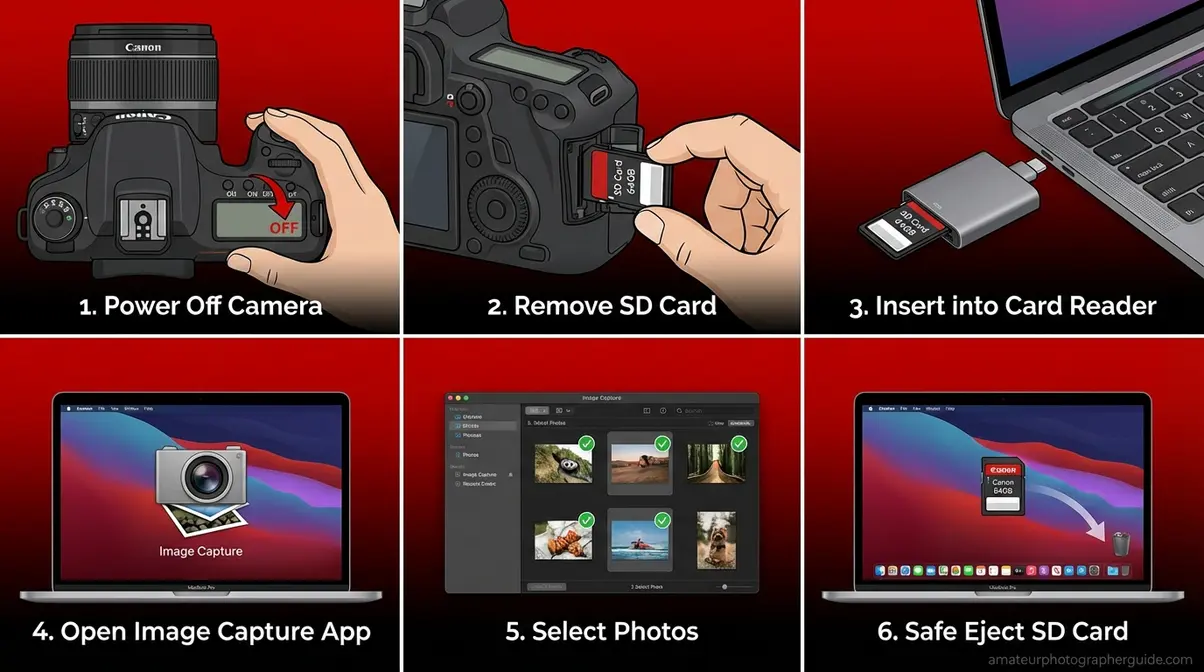
What you’ll need: SD card from your Canon camera, SD card reader (or built-in slot). Estimated time: 1–2 minutes to start the import (transfer time depends on file size).
- Turn off your camera before removing the SD card — ejecting while the camera is on risks corrupting the card.
- Remove the SD card from the slot on the side of your Canon camera (refer to your camera’s manual for the exact location — usually behind a small rubber door).
- Insert the SD card into your MacBook’s built-in SD slot, or into a USB-C card reader plugged into your MacBook.
- Open Photos (it usually opens automatically) or press Command + Space and type Image Capture for more control over where files save.
- Select the photos you want and click Import Selected or Import All.
- Eject the card by dragging the card icon from your desktop to the trash before physically removing it.
✅ Pro tip: In Image Capture, you can set a specific destination folder for imports — much handier than Photos’ default library if you want to keep Canon RAW files separate. After importing, our guide to managing and editing your photos on Mac walks you through the next steps.
Method 3: Connect Wirelessly via Wi-Fi
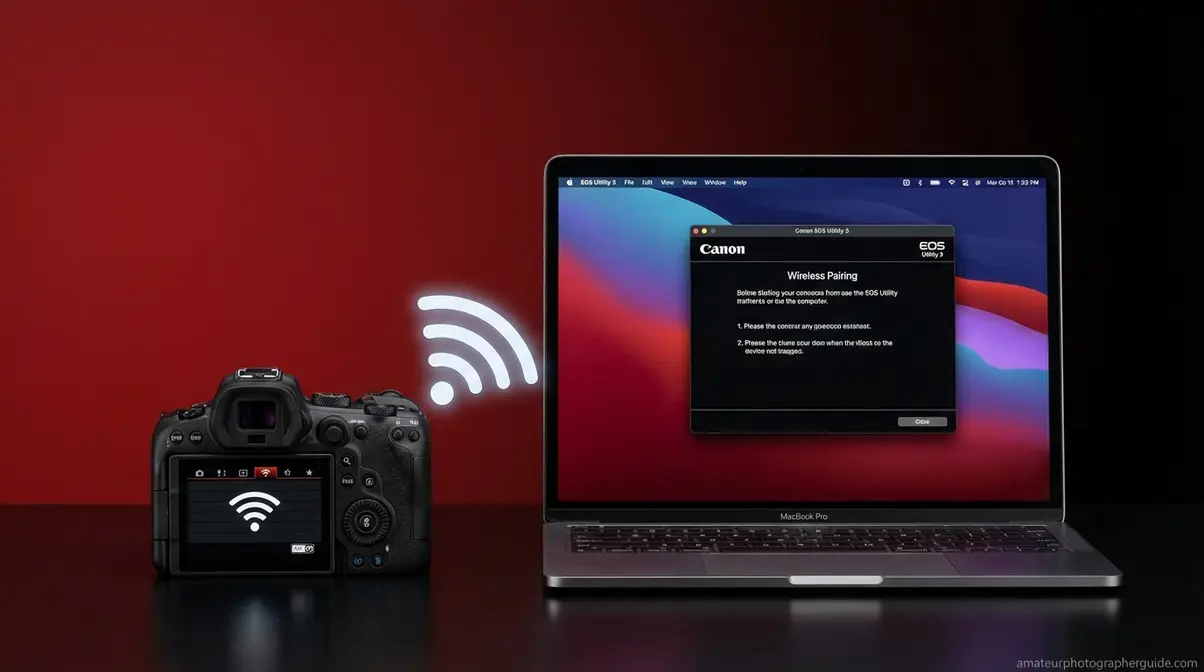
“Wi-Fi connections are painful on Canon cameras, particularly for transferring photos.” — a sentiment shared widely in the Canon photography community, and one that deserves an honest explanation rather than a cheerful tutorial that glosses over the reality.
Wi-Fi tethering is genuinely useful for tethered shooting from a tripod (where you want to see photos on your Mac immediately after each shot) and for occasional transfers when a cable is inconvenient. But for bulk photo transfer after a shoot, Wi-Fi is significantly slower than a card reader. Going in with realistic expectations makes the setup worthwhile.
Does Your Canon Have Wi-Fi?
Not every Canon camera includes Wi-Fi. Before downloading any software, confirm your model supports wireless connectivity.
- Canon cameras with built-in Wi-Fi (partial list):
- EOS R-series: R, RP, R5, R6, R6 Mark II, R50, R8, R7, R10 ✅
- EOS Rebel: T7i, SL2, SL3, T8i ✅ (note: T6 has Wi-Fi; T7 does not in all regions — check your camera’s menu for a Wi-Fi icon)
- EOS 80D, 90D, 6D Mark II, 5D Mark IV ✅
- EOS Rebel T6 (with Wi-Fi icon in menu) ✅
- Canon cameras without Wi-Fi:
- EOS Rebel T6 (some variants), T5i, T4i, and most models from 2015 and earlier ❌
How to check on your camera: Press Menu → navigate to the wireless/network icon tab (looks like a Wi-Fi symbol) → if the option exists, your camera has Wi-Fi. If the tab is missing, your model does not support wireless connection and Methods 1 or 2 are your options.
Download and Install EOS Utility on Mac
EOS Utility (EOS Utility) is Canon’s free software for remote control, live view, and photo transfer between your Canon camera and your Mac. For Wi-Fi connections, you need EOS Utility 3 — not the older version 2, which does not support wireless pairing.
- Visit the official EOS Utility software page on Canon USA’s website.
- Select your camera model from the dropdown menu.
- Download the Mac version of EOS Utility 3 (the file will be a .dmg installer).
- Open the .dmg file and run the installer — follow the on-screen prompts. The installation takes about 2 minutes.
- After installation, open Applications → Canon Utilities → EOS Utility (or type “EOS Utility” in Spotlight with Command + Space).
- macOS will ask permission for EOS Utility to access your camera, microphone, and network. Click Allow for each prompt — these are required for the software to function.

Caption: Select your exact Canon model from the dropdown on Canon USA’s support page — EOS Utility 3 is the version required for Wi-Fi pairing.
Step-by-Step: Wi-Fi Pairing
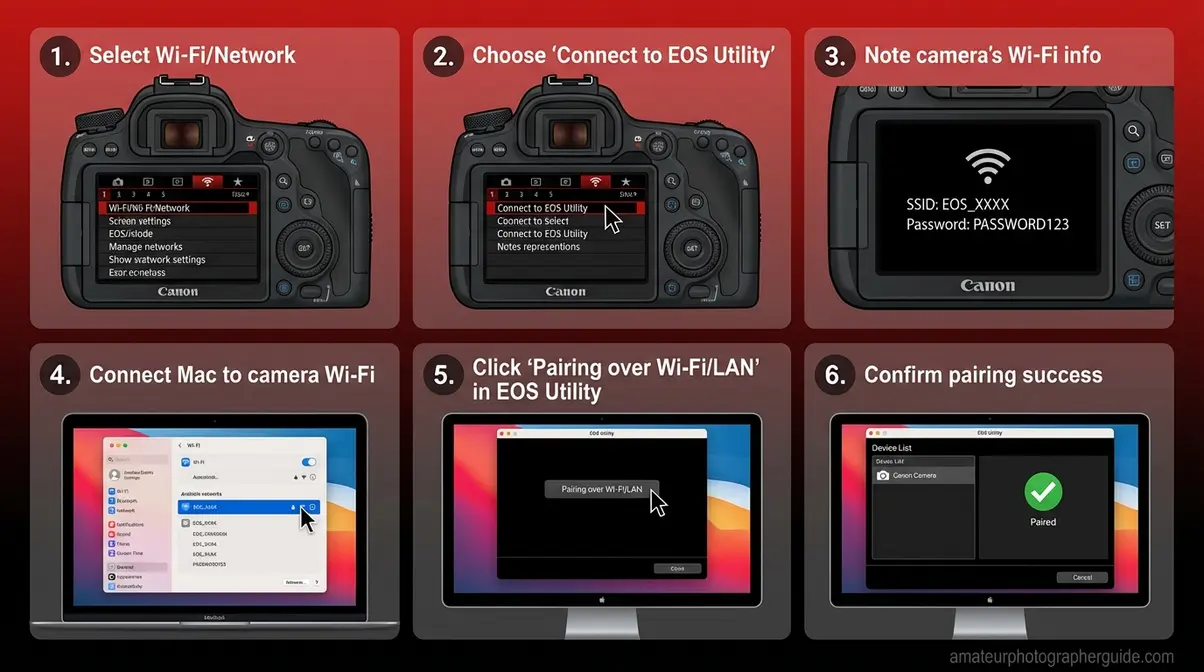
What you’ll need: Canon camera with Wi-Fi, Mac with EOS Utility 3 installed, both devices on the same network — or use your camera’s built-in access point. Estimated time: 5–10 minutes for first-time setup; under 1 minute on subsequent connections.
The steps below follow Canon’s official Wi-Fi connection guide, adapted for clarity (Canon Support, 2026):
- On your camera: Press Menu → navigate to the Wi-Fi/Network tab → select Wi-Fi Function → choose Connect to EOS Utility.
- Select “Add a device to connect to” on your camera screen. The camera will display its SSID (network name) and password.
- On your MacBook: Open System Settings → Wi-Fi and connect to the camera’s SSID using the password shown on the camera screen.
- Open EOS Utility on your Mac. Click Pairing over Wi-Fi/LAN. If a firewall dialog appears, click Allow.
- Select your camera from the list that appears in EOS Utility. Confirm the connection on the camera screen by selecting OK.
- Choose your transfer mode in EOS Utility: select Download Images to transfer photos, or Remote Control to shoot tethered directly to your Mac.
✅ If the connection drops: Wi-Fi pairing resets when you turn the camera off. For regular use, save the connection profile on your camera (Menu → Wi-Fi → Edit/Delete Connection → save your Mac’s profile) so future connections take about 10 seconds instead of restarting the full process.
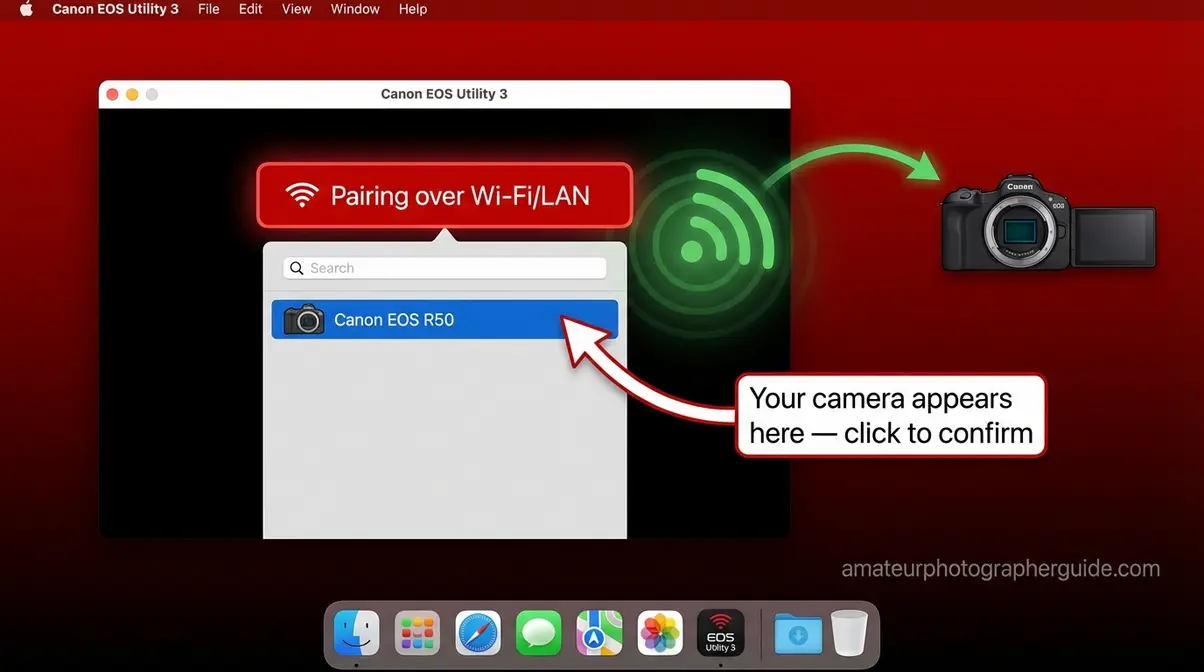
Caption: EOS Utility’s pairing screen appears within seconds of connecting your MacBook to the camera’s Wi-Fi network — select your camera model to confirm the link.
Speed Comparison: Wi-Fi vs USB vs Card
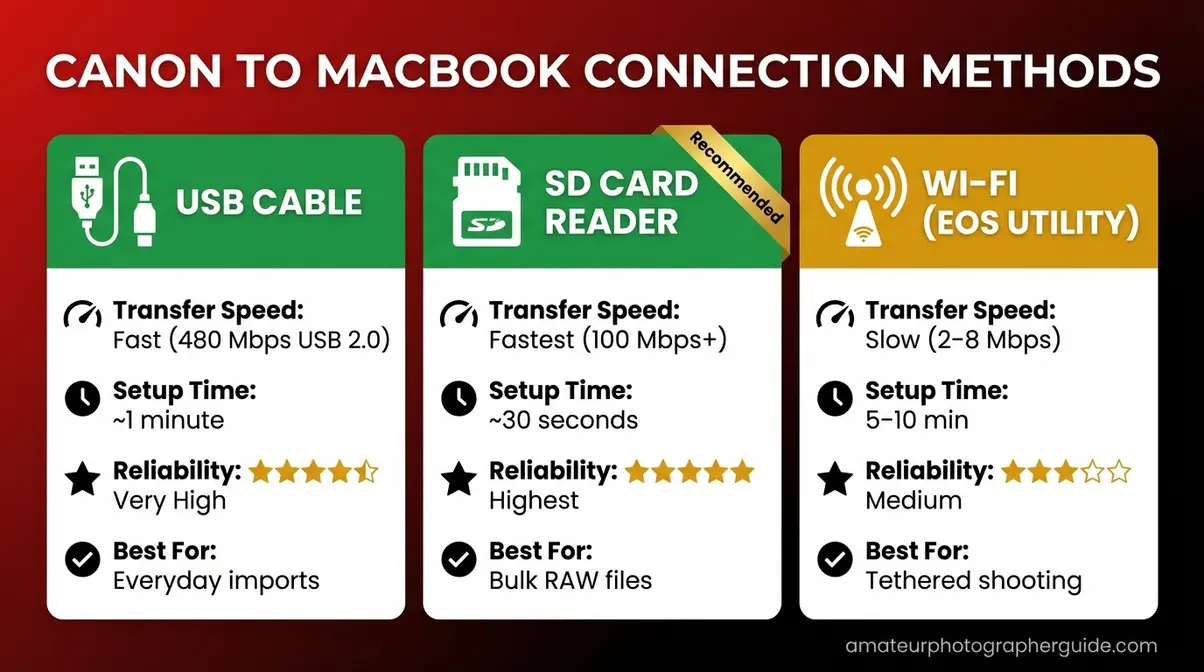
Choosing the right connection method depends on what you’re doing, not just what’s available. This table gives you an honest comparison so you can decide.
| Method | Transfer Speed | Setup Time | Reliability | Best For |
|---|---|---|---|---|
| USB Cable | Fast (USB 2.0: up to 480 Mbps) | ~1 min | Very high — no variables | Everyday photo import |
| SD Card Reader | Fast (limited by card speed) | ~30 sec | Highest — no drivers or software | Bulk transfers, RAW files |
| Wi-Fi (EOS Utility) | Slow (2–8 Mbps typical) | ~5–10 min (first time) | Medium — drops when camera powers off | Tethered shooting, remote preview |
SD card readers consistently outperform both USB and Wi-Fi for raw transfer speed because modern SD cards can sustain read speeds of 100 Mbps or higher — far beyond what the camera’s USB 2.0 port allows. Wi-Fi, by contrast, adds wireless overhead and typically delivers a fraction of that speed.
Caption: For most photographers, the card reader wins on speed and simplicity — Wi-Fi earns its place in tethered studio shooting where walking back to a card reader isn’t practical.
Rebel T6/T7 and 5D Series: Quick Reference
Finding the right H2 method above is step one. This section gives you model-specific details so you know exactly which cable to use, where the port is located on your specific camera, and what quirks to expect. For a full breakdown of each camera’s specs and features, see our Canon camera guide.
Canon Rebel T6 and T7: Mini-USB Steps
The Canon Rebel T6 and T7 are among the most popular entry-level DSLRs, and both use a Mini-B USB 2.0 port (confirmed by Canon’s Camera and USB Cable Compatibility List). This is the small, slightly trapezoidal plug with two notched corners.
Where is the port? On both the T6 and T7, the USB port sits behind a small rubber protective door on the left side of the camera body (when you’re holding the camera to shoot). The door is labeled with a small symbol and opens by pulling from the top edge.
Cable you need: Mini-B to USB-C cable (for modern MacBooks) or the original Mini-B to USB-A cable from the box plus a USB-A to USB-C adapter. Canon’s IFC-500U and IFC-200U cables are compatible; third-party equivalents work fine.
One Rebel-specific quirk: The Rebel T7 includes Wi-Fi in some regional variants but not all. Before attempting Method 3, confirm Wi-Fi is available by checking your camera’s menu for the wireless icon tab. If the tab is absent, your T7 variant does not have Wi-Fi — use USB or a card reader instead.
Step for Rebel T6/T7 users only: After plugging in and getting to the Photos app, you may see the camera listed as “Canon Digital Camera” rather than by model name. This is normal — select it and proceed with the import as described in Method 1.
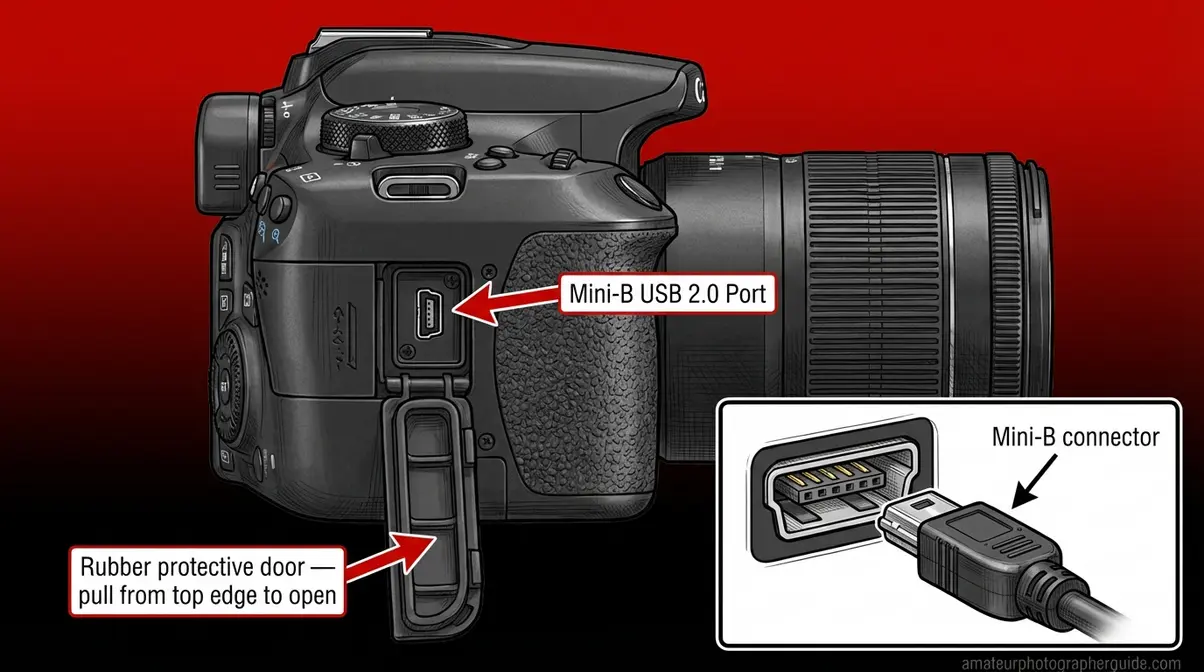
Caption: The Mini-USB port on the Canon Rebel T7 sits behind a rubber door on the camera’s left side — open it gently to reveal the connection point.
Canon 5D Mark IV: USB 3.0 Setup
The Canon 5D Mark IV is a professional-level DSLR built for studio and event photographers, and it comes with a faster connection: Micro-B USB 3.0, capable of higher data throughput than the Rebel series’ USB 2.0. You’ll recognize the Micro-B port by its thin, asymmetric shape — similar to old Android phone chargers but with an additional row of pins on one side for USB 3.0.
Cable you need: Micro-B (USB 3.0) to USB-C cable. Note: a standard Micro-B to USB-A cable (without the 3.0 extra pins) will work but limits transfer speeds to USB 2.0 rates. For professional use with large RAW files, the USB 3.0 cable is worth it.
Tethered shooting with the 5D Mark IV: Professional photographers use the 5D Mark IV for tethered shooting — connecting the camera to a Mac so that each photo appears on the screen immediately after the shutter fires. To do this, connect via USB (Method 1), then open EOS Utility → click Remote Shooting. EOS Utility’s live view panel will display your camera feed, and each shot downloads automatically to your specified Mac folder. Tether Tools sells purpose-built “stay-straight” cables for tethered 5D work that reduce disconnects from cable movement.
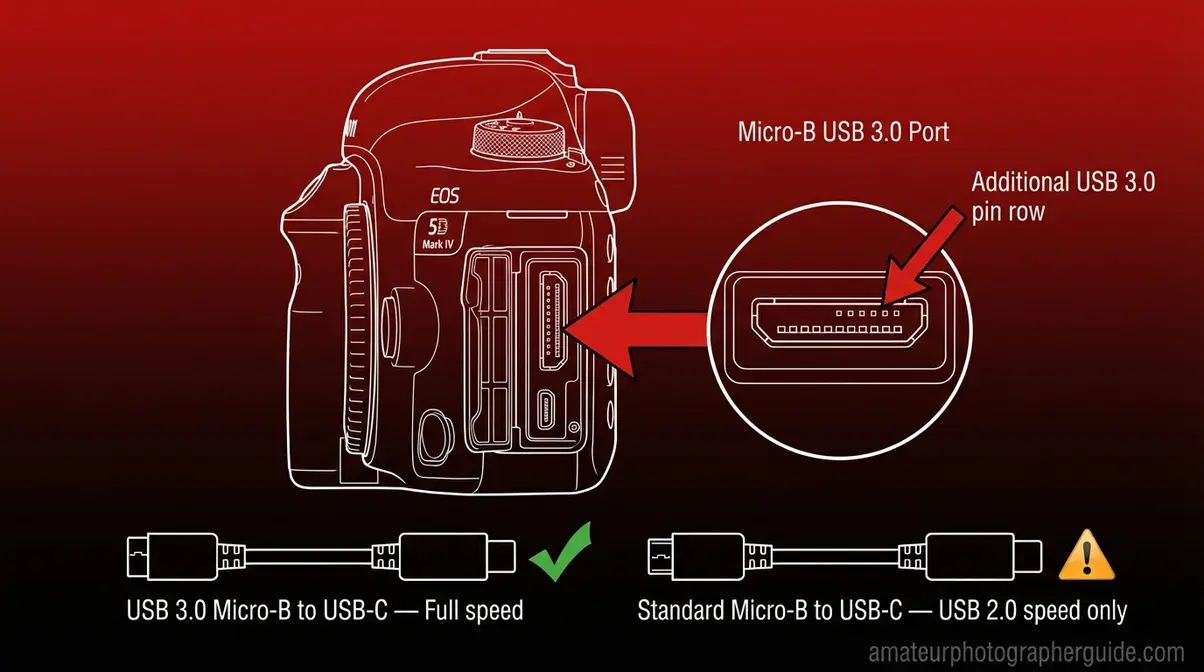
Caption: The 5D Mark IV’s Micro-B USB 3.0 port enables faster transfers than the Rebel’s USB 2.0 — use a proper USB 3.0 cable to take advantage of the full speed.
Canon EOS R-Series: USB-C Setup
Canon’s EOS R-series (R, RP, R5, R6, R7, R8, R10, R50, and their Mark II variants) uses USB-C natively — the same connector on your MacBook. This makes the connection simpler than any other Canon generation.
Cable you need: USB-C to USB-C cable. Important: confirm your USB-C cable supports data transfer, not just charging. A USB-C cable rated for charging-only (common with laptop charger cables) will trigger The Charging Cable Trap on an R-series camera just as easily as on a Rebel. The USB-C cable that ships in the R50 and R6 Mark II boxes is a data cable; the MacBook charger cable is usually not.
EOS R-series advantage: These cameras also support USB Power Delivery, meaning your Mac can trickle-charge the camera while transferring photos over the same USB-C cable. This is useful for long tethered sessions.
EOS Utility version note: Canon’s EOS Utility 3.x supports all EOS R-series cameras. If you own a very early EOS R body purchased before 2019, check Canon’s official EOS Utility software page for model-specific firmware requirements.
Use Your Canon as a Webcam on Mac
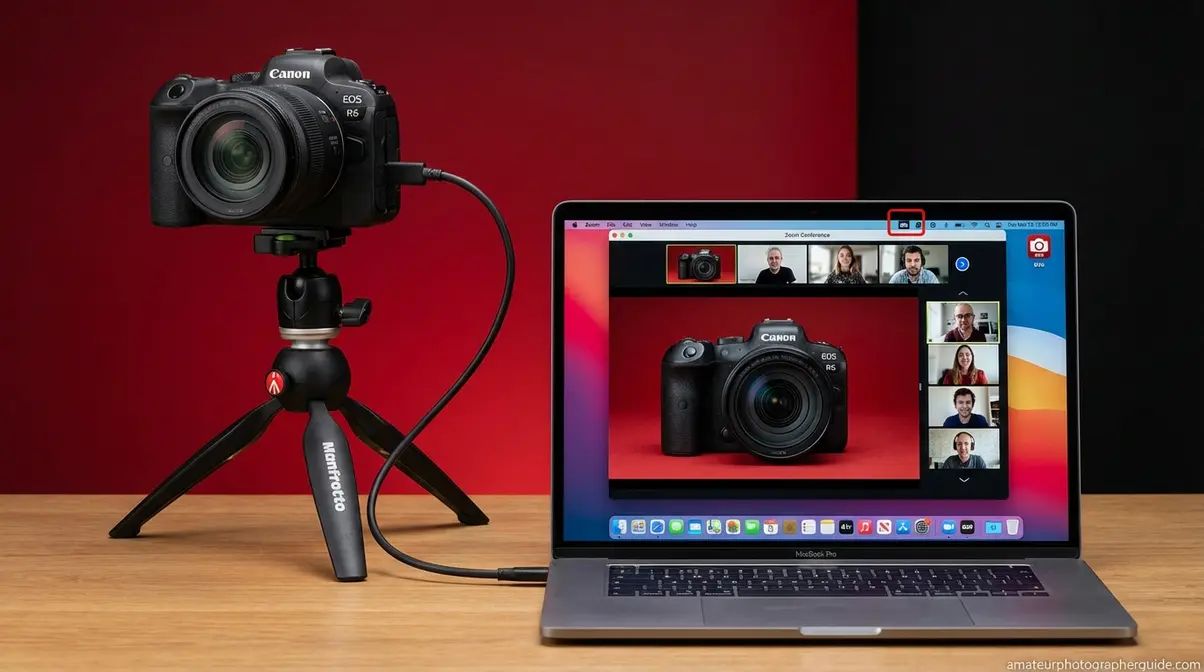
Using a Canon camera as a high-quality webcam is one of the most compelling reasons to own one — but the pricing reality in 2026 is worth knowing before you commit. EOS Webcam Utility Pro costs $4.99 per month (or $49.99 per year), making a one-time HDMI capture card often the smarter long-term buy.
Webcam Utility Pro vs HDMI Card
Canon launched EOS Webcam Utility as a free tool during the 2020 pandemic. It has since become a subscription product — EOS Webcam Utility Pro — at $4.99/month or $49.99/year (Canon USA, 2026). A 30-day free trial is available before any charge (confirmed via Canon’s official product page).
The subscription unlocks multiple camera connections (up to five cameras via USB), wireless streaming, high-resolution upscaling to full HD, and up to 60 fps output. The free tier remains available but is limited to a single camera at 720p and 30 fps.
The alternative: a USB HDMI capture card (from Elgato, AVerMedia, or generic brands) costs $20–$50 as a one-time purchase. You connect your camera’s HDMI out to the capture card, plug the card into your Mac’s USB-C port, and the camera appears as a standard webcam in Zoom, FaceTime, and OBS without any subscription. Video quality is determined by your camera’s HDMI output — typically 1080p at 30 fps on most Canon DSLRs and mirrorless models.
| Option | Cost | Quality | Setup Complexity | Best For |
|---|---|---|---|---|
| EOS Webcam Utility Pro | $4.99/mo or $49.99/yr | Up to 4K (camera-dependent) | Low (USB only) | Multi-camera streaming, wireless |
| HDMI Capture Card | $20–$50 one-time | Up to 1080p | Low (HDMI + USB) | One-time webcam use, budget setup |
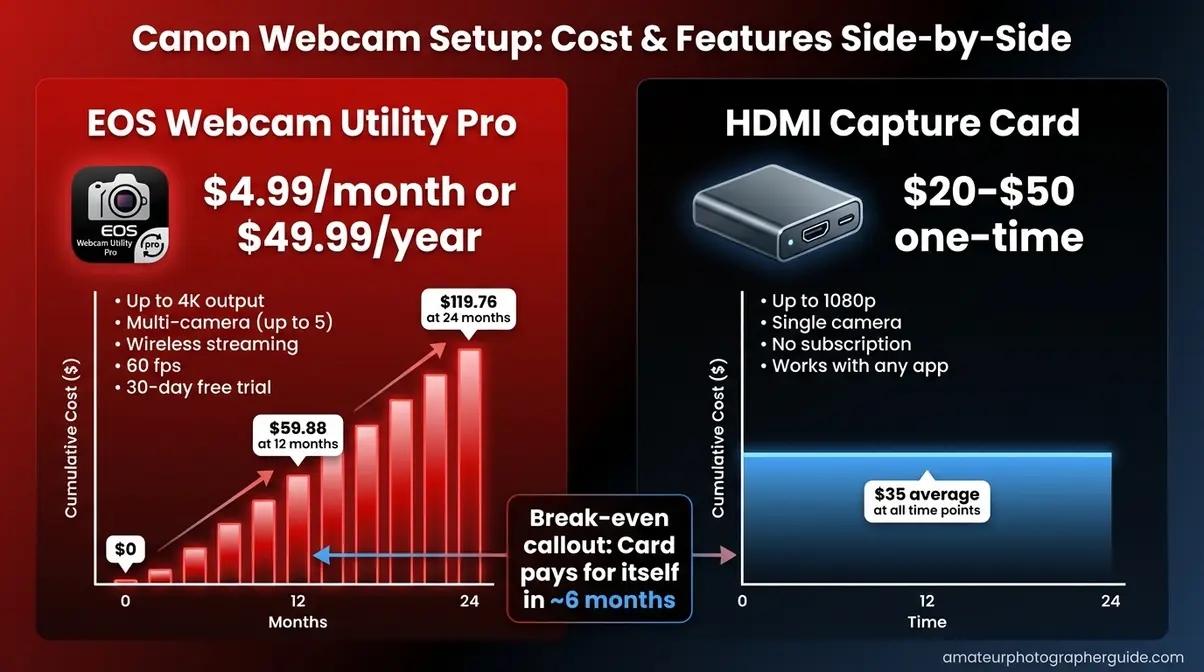
Caption: For occasional webcam use, a $25 HDMI capture card pays for itself within six months compared to the EOS Webcam Utility Pro subscription.
Step-by-Step: Webcam Setup on Mac
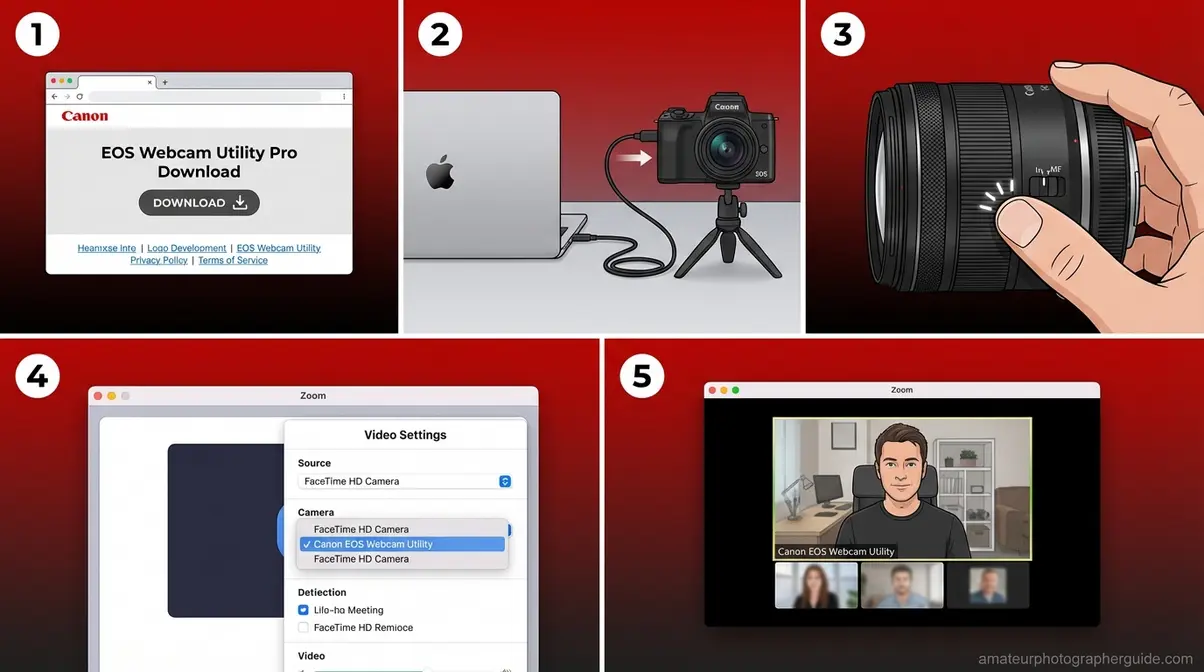
Option A — EOS Webcam Utility Pro (USB method):
What you’ll need: Canon camera, data USB cable, EOS Webcam Utility Pro (30-day free trial available). Estimated time: 5 minutes. Full installation instructions are available in Canon’s EOS Webcam Utility installation guide (PDF).
- Download and install EOS Webcam Utility Pro from Canon’s website using your MyCanon account.
- Connect your Canon camera to your Mac via USB cable (see Method 1 for cable type).
- Turn the camera on. Set the lens to Manual Focus (MF) — autofocus sounds are picked up by built-in mics during calls.
- Open your video app (Zoom, Teams, OBS, FaceTime). In the video settings, select Canon EOS Webcam Utility as the camera source.
- Your Canon’s full-sensor image should now appear as your webcam feed.
- Option B — HDMI Capture Card:
- Connect your camera’s HDMI output (using a mini-HDMI or micro-HDMI cable, depending on your model) to the capture card’s HDMI input.
- Plug the capture card into a USB-C port on your MacBook.
- Open your video app and select the capture card as the camera source (it will appear by the capture card’s brand name, e.g., “Elgato HD60 X”).
⚠️ Remove the SD card when using your camera as a webcam via EOS Webcam Utility Pro. A known issue on macOS Sequoia causes the software to fail or freeze when an SD card is present in the camera.
Fix It: macOS Not Detecting Your Camera
When your Mac shows no sign of recognizing a connected Canon camera, the cause is almost always one of five fixable problems — and macOS Sequoia adds a sixth that no previous guide addresses.
The silent failure is the most frustrating kind: you plug in, nothing happens, and the Mac gives you no error message to work from. Here’s how to diagnose it systematically.
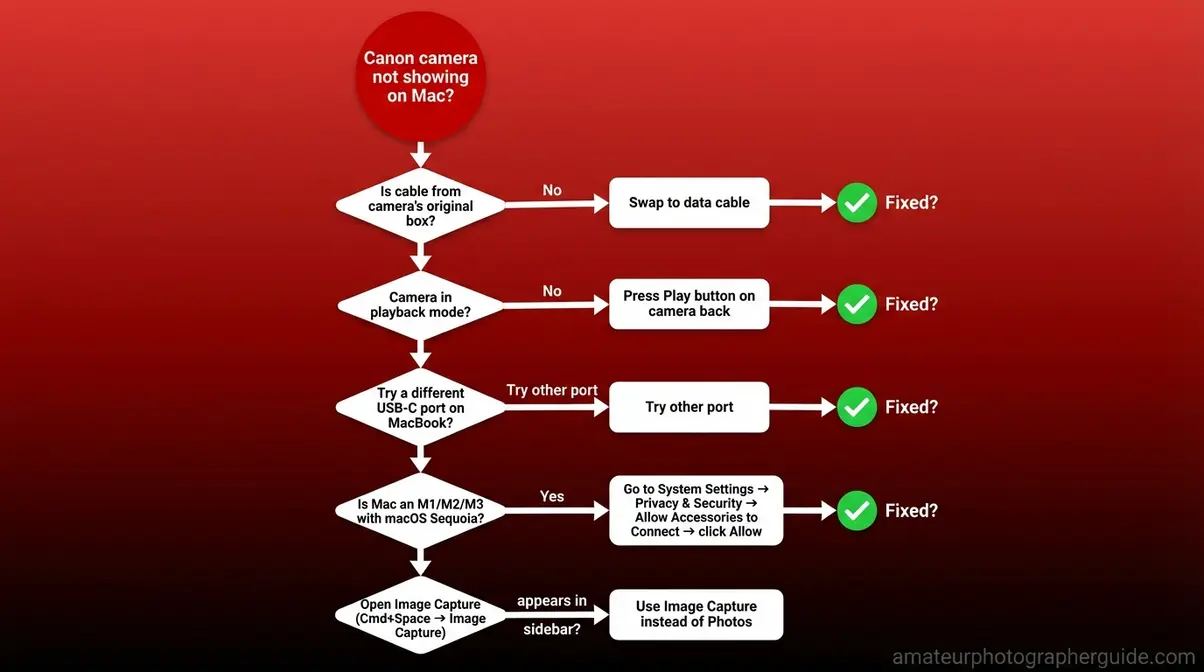
Caption: Work through this flowchart from top to bottom — most Canon detection failures resolve at step 2 (wrong cable) or step 5 (macOS Sequoia permissions).
The 5-Point Detection Checklist
Run through these five checks before concluding there is a hardware or software problem. Canon community forum reports consistently show that the first two steps alone resolve most failures:
- Check the cable first. Swap your USB cable for the one that came in your camera’s original box. A charging-only cable (The Charging Cable Trap) is the single most common cause of a Mac not detecting a Canon camera. If you don’t have the original cable, borrow a friend’s or buy a $10 replacement.
- Confirm the camera is on and in playback mode. Cameras in shooting mode may not present their photo storage to macOS. Press the Play button (the triangle icon) on the back of the camera before checking if your Mac has recognized it.
- Try a different USB port. On MacBooks with multiple USB-C ports, some ports share a single controller. Switching ports can resolve intermittent recognition failures.
- Restart the camera while connected. Turn the camera off, wait 10 seconds, then turn it back on. macOS re-queries connected USB devices when a device power-cycles, which can trigger recognition.
- Open Image Capture manually. Press Command + Space, type Image Capture, and press Enter. Image Capture sometimes detects cameras that do not trigger the Photos auto-import window. If your camera appears in Image Capture’s sidebar, the connection is working — you just need to use this app instead of Photos.
📌 If your Canon shows in Image Capture but not in Photos: Go to Photos → Preferences → General and check “Show Camera Import” is enabled. This setting is off by default on some macOS Sequoia installations.
macOS Sequoia Permissions Fix
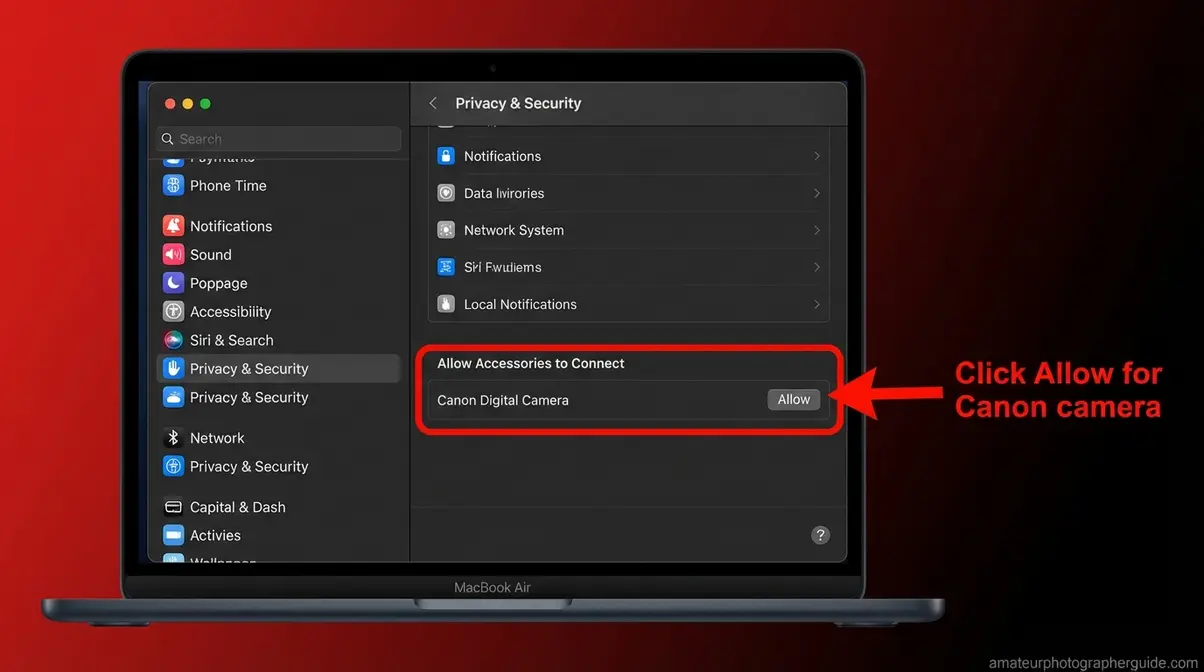
macOS Sequoia (15) introduced a significant security change: M1, M2, and M3 Macs now require explicit permission before any new USB accessory can communicate with the system. Canon cameras are classified as accessories, so the first time you connect, macOS shows a prompt — and if you miss or dismiss it, the camera silently stops working.
Here is the exact fix for Apple Silicon Macs (M1/M2/M3) on macOS Sequoia:
- Connect your Canon camera via USB and turn it on.
- Watch for a notification in the top-right corner of your screen: “Allow accessory to connect?” If it appears, click Allow. This is the most important step.
- If you missed the prompt: Go to Apple Menu → System Settings → Privacy & Security. Scroll down to the section titled “Allow accessories to connect.” Your Canon camera should appear here — click Allow.
- If the camera doesn’t appear in System Settings: Unplug the camera, wait 5 seconds, and reconnect. The prompt should reappear.
- On Intel Macs (pre-2020): This Sequoia permission step does not apply — macOS recognizes USB cameras automatically. If your Intel Mac is not detecting the camera, go back to the 5-point checklist above.
For Apple’s full documentation on this behavior, see Apple’s guide on allow accessories to connect settings.
Err 70 (Communication Error): If your Canon displays “Err 70” during a connection attempt, this indicates a USB communication failure — usually a cable issue (data cable required), a conflict with EOS Utility, or a macOS security block. The Canon Knowledge Base article for troubleshoot Canon Err 70 provides the official resolution path. Restarting both the camera and Mac, and confirming the macOS Sequoia permission is granted, resolves most Err 70 cases.
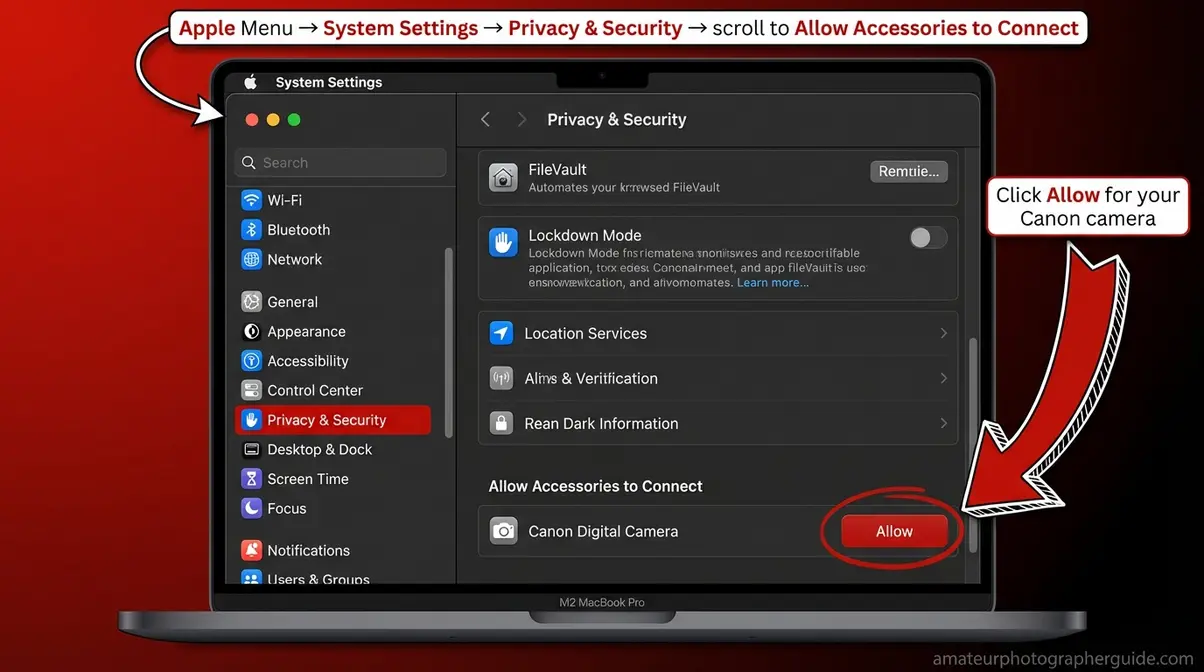
Caption: The macOS Sequoia “Allow Accessories to Connect” setting is the fix most 2026 guides miss — it’s only visible on M1/M2/M3 Macs running macOS 15.
Common Limitations & Alternatives
No single connection method works perfectly in every situation. Here is what to watch for with each approach — and what to use instead.
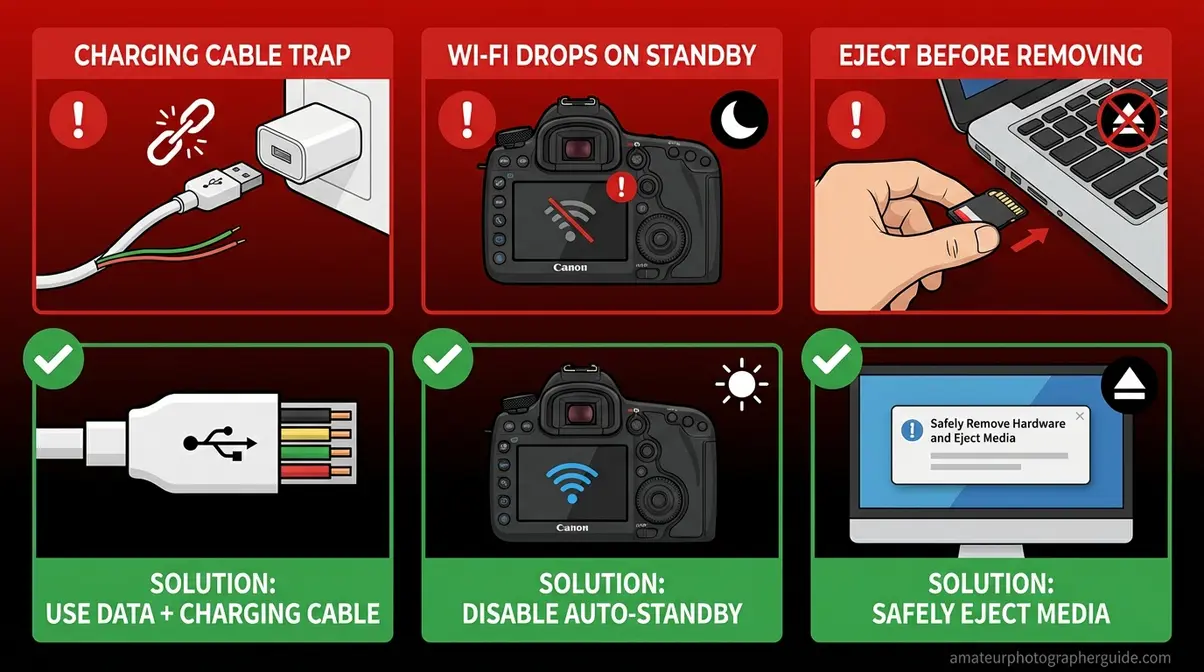
Common Pitfalls
- USB: charging cable used instead of data cable. This is The Charging Cable Trap in its most common form — the cable fits the port, the camera and Mac both power on, but no connection is established. Fix: use the original cable from the camera box or buy a confirmed data cable.
- Wi-Fi: camera powers off mid-transfer. EOS Utility’s wireless connection drops the moment the camera enters standby mode. Disable your camera’s auto-power-off during wireless sessions: Menu → Yellow Wrench → Auto Power Off → Disable.
- SD card reader: card not ejected properly. Removing the card without ejecting it first can corrupt photos. Always drag the card icon to the trash in Finder before removing the physical card.
When to Choose a Different Method
- If you’re transferring 500+ RAW files after a full shoot: Skip USB — use the SD card reader. It is faster because the bottleneck is the camera’s USB 2.0 speed, not the card reader’s.
- If your MacBook is an older Intel model (pre-2016) without USB-C: Use an SD card reader (these models have full-size SD slots) or the USB-A cable that came with your camera — no adapter needed.
- If you need to see each photo on your Mac immediately as you shoot: Use Wi-Fi or USB tethering via EOS Utility, not a card reader. Card readers only work after a shoot, not during it.
- If EOS Utility refuses to install on your Mac: Canon’s Camera Connect mobile app (free, iOS and Android) can receive photos wirelessly via your phone — not ideal, but a functional workaround while you troubleshoot the Mac software.
When to Seek Help
If your camera passes the 5-point checklist, the macOS Sequoia permissions fix, and still does not appear on your Mac, the issue may be a hardware fault (USB port damage on the camera or MacBook), a corrupted EOS Utility installation, or a firmware conflict. Contact Canon support at usa.canon.com/support or Apple Support at apple.com/support for hardware diagnostics.
Frequently Asked Questions
How do I connect my Canon camera to my Mac?
The most straightforward way to connect a Canon camera to a Mac is via USB cable. Turn the camera on in playback mode, connect the appropriate data cable (Mini-B, Micro-B, or USB-C depending on your model) to your MacBook, and wait for Image Capture or Photos to open. If nothing happens on an M1/M2/M3 Mac running macOS Sequoia, open System Settings → Privacy & Security and approve the camera under “Allow Accessories to Connect.” For cable-free transfers, EOS Utility handles Wi-Fi pairing on compatible Canon models with built-in wireless.
Why is my Canon camera not showing up on my Mac?
The most common reason a Canon camera does not show up on a Mac is the use of a charging-only USB cable — what we call The Charging Cable Trap. A charge-only cable fits the port and powers the camera, but carries no data, so macOS never detects anything. Swap to the original cable from your camera’s box. If the cable is correct, check that the camera is in playback mode (not shooting mode), and on M1/M2/M3 Macs running macOS Sequoia, confirm the camera is approved under System Settings → Privacy & Security → Allow Accessories to Connect. A restart of both devices resolves most remaining cases.
What cord do I need to connect a Canon camera to a Mac?
The cord you need depends on which USB port your specific Canon model uses. Canon Rebel T6 and T7 cameras require a Mini-B to USB-C cable (or Mini-B to USB-A with an adapter). The Canon 5D Mark IV uses a Micro-B USB 3.0 to USB-C cable. EOS R-series cameras (R5, R6, R50, etc.) use USB-C to USB-C — the same connector on modern MacBooks, though the cable must be a data cable, not a charge-only cable. When in doubt, use the cable that came inside your camera’s box.
How do I view my Canon photos on my Mac after connecting?
Once your Canon camera is connected via USB or SD card reader, your photos appear automatically in the Photos app’s Import tab. If Photos does not open automatically, press Command + Space and type Image Capture — this built-in Mac app gives you more control over where files are saved. Select the photos you want to import, choose a destination folder, and click Import Selected. After the import completes, eject the camera or card before disconnecting. For organizing and editing what you’ve imported, our guide to editing photos on Mac covers the full workflow.
How can I connect my Canon camera to my Mac wirelessly?
Wireless connection requires a Wi-Fi-enabled Canon camera and Canon’s EOS Utility 3 installed on your Mac. First, confirm your model has Wi-Fi by checking the camera’s menu for a wireless icon tab — older Rebel variants and most pre-2016 DSLRs do not include it. Download EOS Utility 3 free from Canon USA’s support page. On the camera, enable Wi-Fi, select “Connect to EOS Utility,” and note the SSID and password shown on screen. On your Mac, connect to that network, open EOS Utility, and click “Pairing over Wi-Fi/LAN.” Wi-Fi is ideal for tethered shooting but transfers photos at roughly 2–8 Mbps — considerably slower than a USB cable or SD card reader for bulk transfers.
Conclusion
For photographers trying to get their shots off a Canon camera and onto a Mac, three methods cover every situation: USB cable for quick everyday imports, SD card reader for bulk transfers and maximum reliability, and Wi-Fi via EOS Utility for tethered shooting when cables are impractical. The most important thing to verify before any method is your USB cable type — The Charging Cable Trap is the single most common reason Canon cameras go undetected on MacBooks, and it is entirely avoidable once you know to look for it. On M1 and M2 Macs running macOS Sequoia, the additional “Allow Accessories to Connect” permission step is the second most common blocker — and it takes under 30 seconds to fix once you know where to find it.
The Charging Cable Trap captures a problem that has frustrated Canon users since USB-C MacBooks became the norm: the connection looks right, the hardware is fine, but the wrong cable makes it invisible to macOS. Every method in this guide is built to sidestep exactly that kind of silent failure — matching the physical cable to the camera’s port type, using the right software version, and confirming macOS has permission to communicate with the accessory.
Start with Method 1 (USB) if you have any cable handy — confirm it is a data cable first, and the full import process takes under three minutes. If USB gives you trouble, the SD card reader in Method 2 removes every software variable and works on every Canon model without exception. Keep the troubleshooting checklist bookmarked for the next time macOS behaves unexpectedly after a system update.
