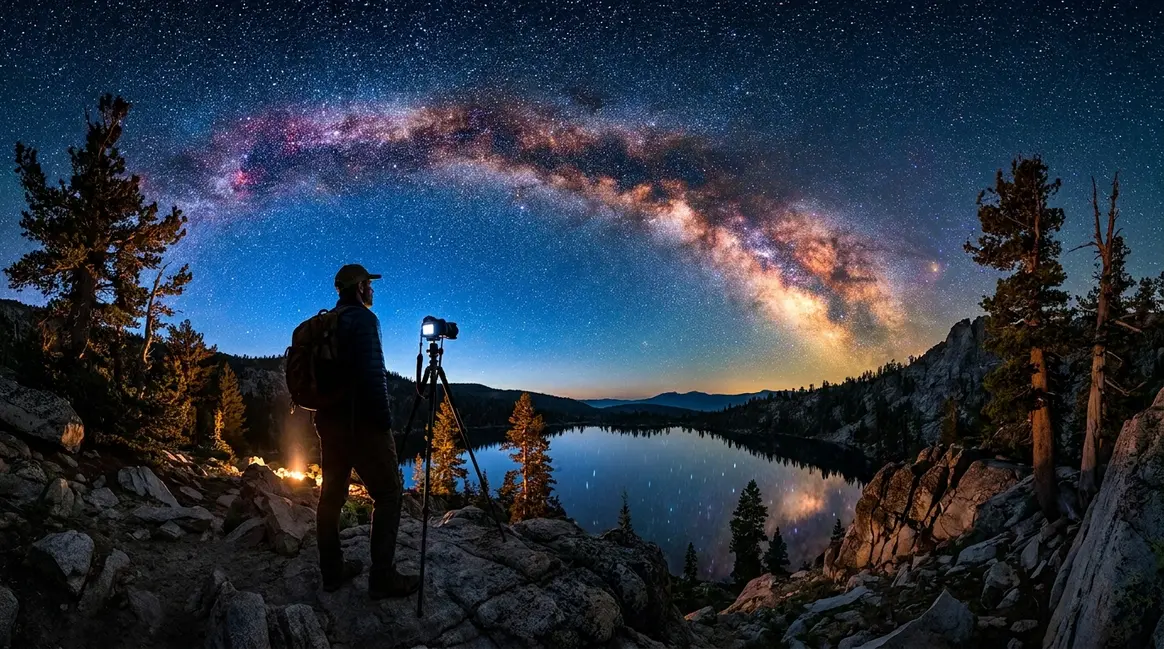
What Is F-Stop on a Camera? Beginner’s Guide to Aperture
Discover what f-stop controls on your camera: exposure brightness and creative depth of field. Learn when to use low vs high f-stop values for stunning photos.
“As young people embrace film, analog cameras are not super easy to use. What does ISO mean? What is an f/stop anyway? How do I figure out the right aperture?”
If that sounds familiar, you’re not alone — and you’re closer to understanding it than you think. If you are constantly asking yourself, what is f-stop on a camera, you have come to the right place.
Every photo you take without understanding f-stop is a guess. Guessing is the difference between the portrait you imagined and the one you actually got — the one where your subject is sharp but the background is just as distracting as ever.
By the end of this guide, you’ll know exactly what f-stop is on a camera, why the numbers feel backwards, and which setting to dial in for portraits, landscapes, and low-light shots. We’ll cover the definition, how f-stop controls depth of field, a practical cheat sheet with ready-to-use settings, and the most common beginner mistakes — in that order.
- Estimated Time: 30-45 minutes
- Tools and Materials Needed:
- A digital camera (DSLR or mirrorless) with manual or aperture priority mode
- A lens with an adjustable aperture (e.g., a 50mm prime or standard kit lens)
- Your camera’s user manual (optional, for locating the f-stop dial)
What Is F-Stop? The Simple Explanation
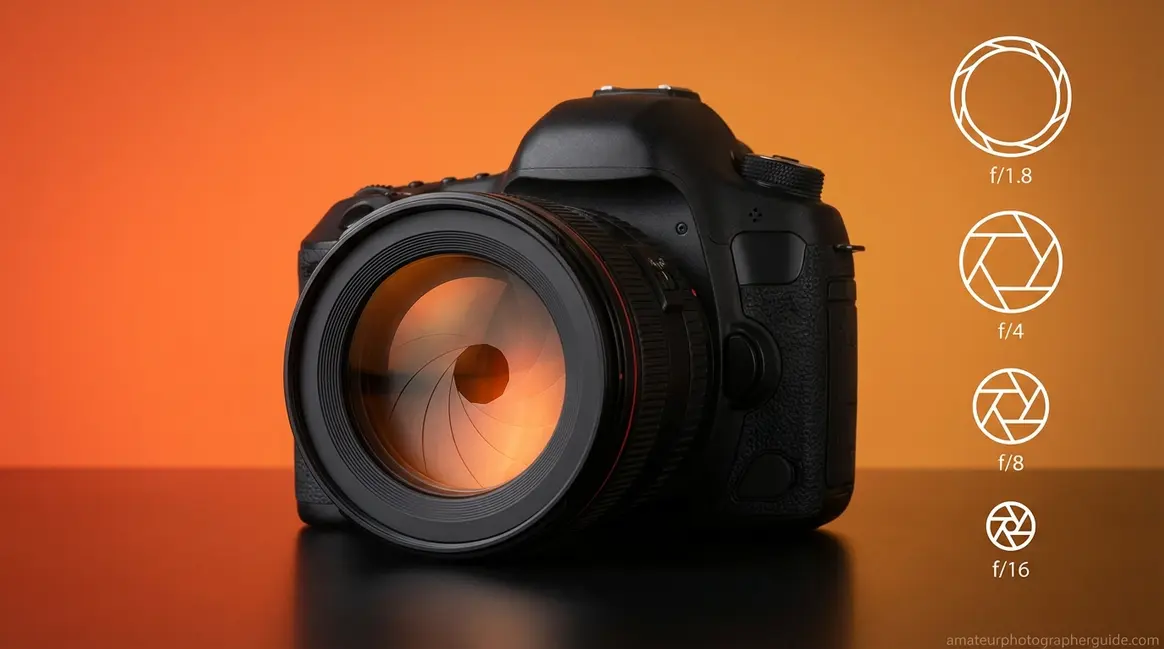
F-stop is the single setting that controls both how much light enters your camera and how blurry your background looks. Also called aperture or f-number, it’s expressed as f/1.8, f/5.6, or f/16 — the number after the slash tells you the size of the opening inside your lens. Getting this one setting right is the fastest way to go from accidental snapshots to intentional, professional-looking photos. Want to go even deeper? Our complete aperture guide covers everything your camera manual skips.
According to Canon’s explanation of f-numbers and light, selecting a lower f-number widens the aperture to let in more light, creating the shallow depth of field that makes portrait subjects pop against a soft background. Once you understand f-stop, you can start building what we call “The F-Stop Recipe” — a simple formula that pairs your f-stop with ISO and shutter speed for any scene. Section 3 will give you complete recipes for every situation.
Your Lens’s Adjustable Light Door
Think of your camera lens as a window with adjustable blinds. On a bright afternoon, you close them halfway (that’s f/8). In a dark room where you need every ray of light, you throw them wide open (that’s f/1.8). Your camera’s f-stop works exactly the same way. If you are wondering exactly what does f-stop do on a camera, it acts as your lens’s adjustable light door.
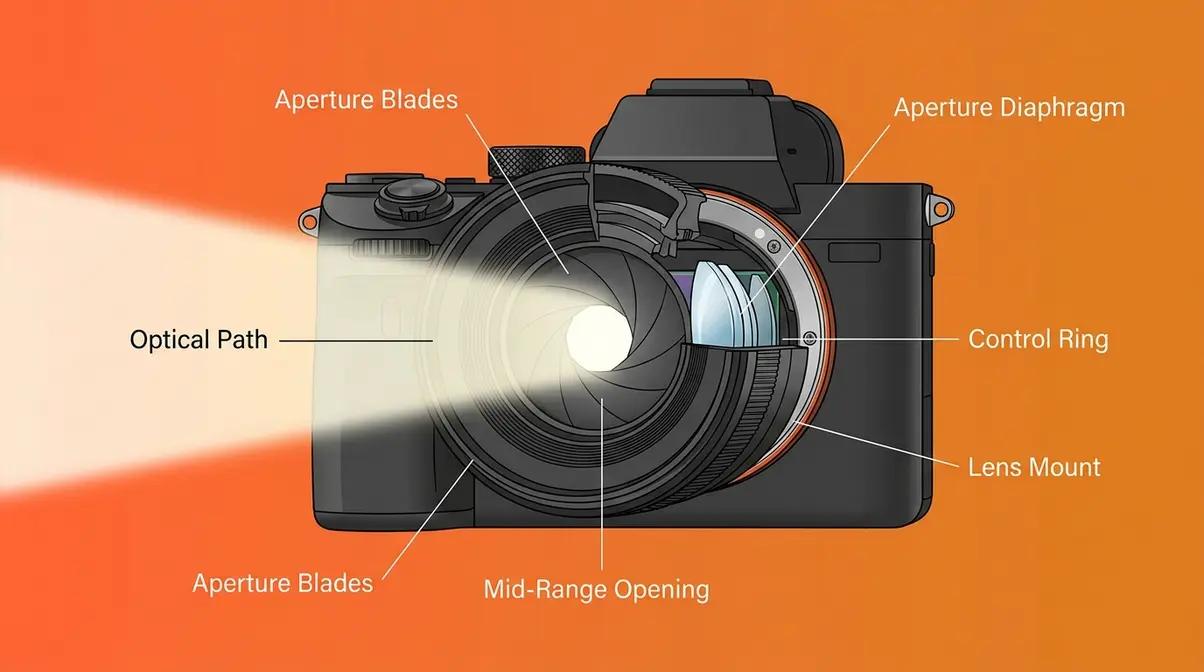
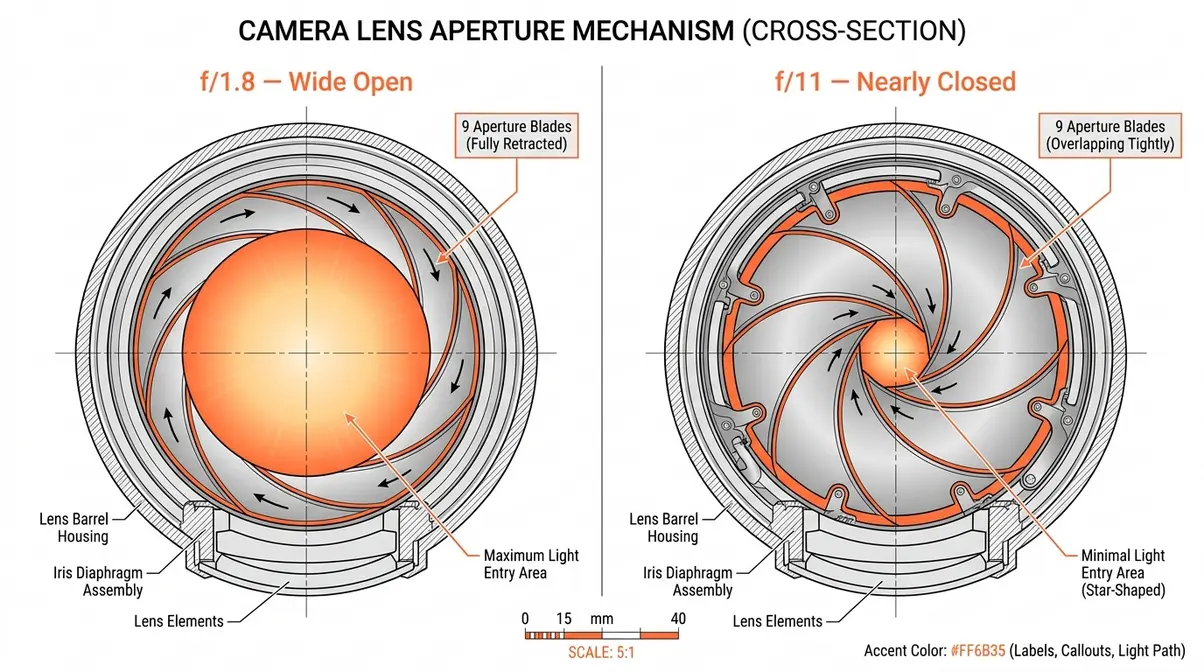
Inside your lens, there’s a circular opening called the aperture (from the Latin word for “opening”). It’s formed by a ring of overlapping metal blades that can widen or narrow on command. The f-stop is the dial — physical or digital — that controls how wide those blades open.
On your camera screen or lens barrel, you’ll see this expressed as f/1.8, f/5.6, or f/16. When you turn that dial and change the number, you are literally and physically moving metal blades inside your glass. That mechanical reality is what makes f-stop feel so satisfying once it clicks.
The Inversion Rule Explained
Here’s where most beginners get tripped up — and it makes total sense that you would. The numbers seem backwards. A smaller number means a bigger opening? That feels wrong.
As detailed in Michigan Technological University’s optical guide to depth of field, the reason is mathematical. The “f” in f-stop literally stands for focal length. So f/2 means the aperture diameter is one-half of the lens’s focal length. f/16 means the aperture diameter is one-sixteenth of the focal length. One-half of something is always much bigger than one-sixteenth of something.
- Here’s a pizza analogy that makes this stick. Imagine cutting a pizza into fractions:
- f/2 = you cut the pizza in half. Your slice is enormous.
- f/8 = you cut the pizza into eighths. Your slice is medium-sized.
- f/16 = you cut the pizza into sixteen slices. Your slice is tiny.
The bigger the denominator, the smaller the slice — and the smaller the aperture opening.
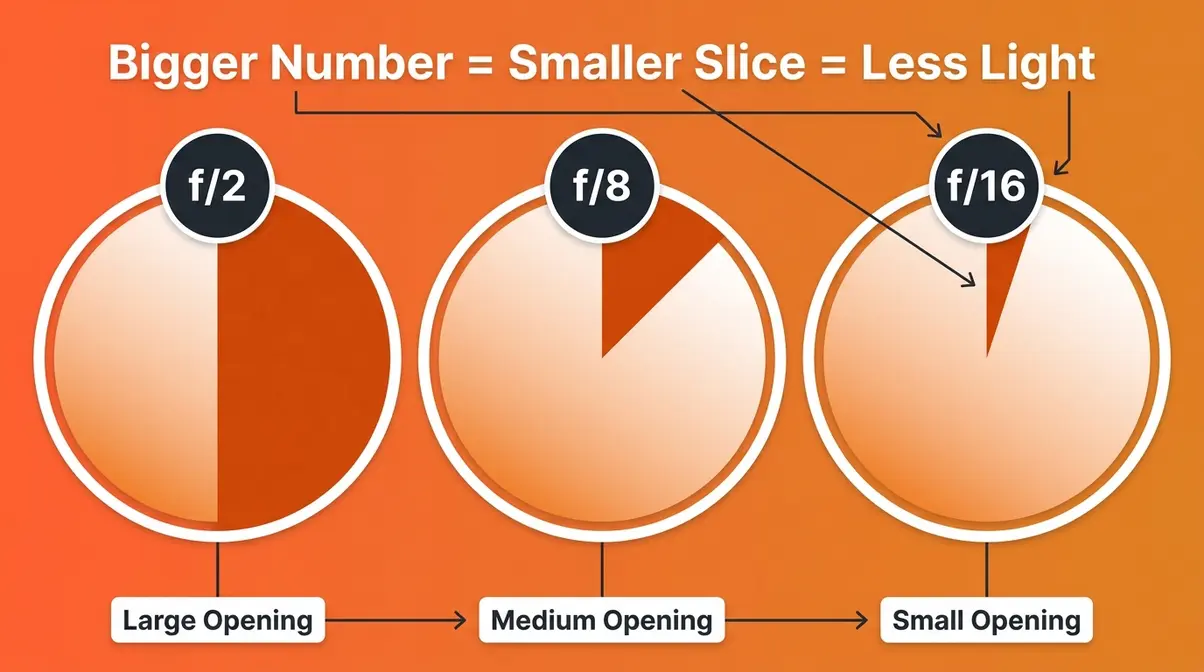
A quick tip: photographers in the r/photography community consistently report that this fraction framing is the single explanation that finally made the Inversion Rule click. Stop thinking of f-stop as a dial and start thinking of it as a fraction.
The Halving and Doubling Rule
Once you understand the Inversion Rule, the next step is understanding how much light actually changes when you move one stop.
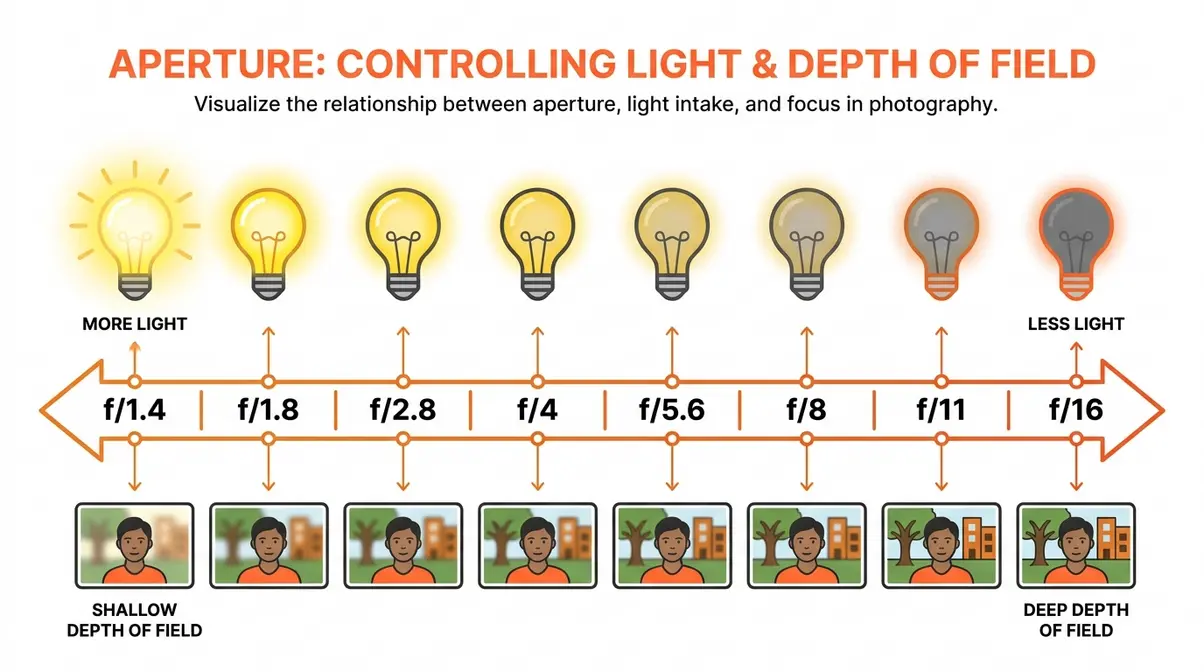
The rule is beautifully simple: each full f-stop either halves or doubles the amount of light entering your lens. Move from f/2.8 to f/4 (one stop up), and you cut the light in half. Move from f/8 to f/5.6 (one stop down), and you double the light. As DPReview’s optical fundamentals documentation confirms, this halving-and-doubling relationship is consistent across the entire f-stop scale (DPReview, 2026).
Here’s the standard full-stop scale, from widest to narrowest:
| F-Stop | Relative Light | Common Use |
|---|---|---|
| f/1.4 | Maximum (baseline) | Very low light, extreme bokeh |
| f/1.8 | Half stop less than f/1.4 | Portraits, low light |
| f/2.8 | ½ the light of f/1.4 | Events, indoor sports |
| f/4 | ¼ the light of f/1.4 | General use |
| f/5.6 | ⅛ the light of f/1.4 | Street, documentary |
| f/8 | 1/16 the light of f/1.4 | Landscapes, groups |
| f/11 | 1/32 the light of f/1.4 | Architecture |
| f/16 | 1/64 the light of f/1.4 | Bright daylight, star-burst effects |
Why does this matter for your photos? Because f-stop doesn’t work alone. Every time you change your f-stop, you’ll likely need to compensate with either your ISO (sensor sensitivity) or your shutter speed (how long the sensor is exposed). This three-way balancing act is exactly what “The F-Stop Recipe” is designed to solve.
Smartphone vs. Optical F-Stops
You’ve seen it on your phone’s camera specs: “f/1.8 aperture.” But here’s something no beginner photography guide ever explains — your smartphone’s f-stop and your camera’s f-stop are not the same thing, even when the numbers match.
On a traditional mirrorless or DSLR camera, f/1.8 is a physical reality. The lens blades genuinely open to a wide diameter, letting in a flood of light and producing true optical background blur based on the laws of physics.
On a smartphone, f/1.8 is mostly fixed. Most smartphone lenses have a fixed aperture — they can’t physically open and close like a camera lens. The f/1.8 or f/2.2 you see in specs describes a permanent opening that was set during manufacturing. The “blurry background” portrait mode you use on your phone is computational photography — software algorithms using depth sensors and AI to simulate the shallow depth of field that a wide-aperture lens creates naturally.
This isn’t a criticism of smartphones. Computational aperture has become remarkably convincing. But there are practical differences:
- Camera lenses produce optical bokeh — smooth, organic background blur with natural light falloff
- Smartphone portrait mode produces simulated bokeh — software-generated blur that can struggle with hair edges, glasses, and complex backgrounds
- Smartphone aperture controls exposure (how bright the image is) but NOT depth of field the way a camera lens does
What does this mean for you? If you’ve been shooting portraits on a phone and want that true cinematic background blur, you’ll need a camera with a wide-aperture lens — something in the f/1.4 to f/1.8 range. No amount of software fully replicates the look of a 50mm f/1.8 lens wide open.
How F-Stop Controls Depth of Field
F-stop’s most visually dramatic effect isn’t just about light — it’s about depth of field, the range of distance in your photo that appears acceptably sharp. Understanding this is what separates photographers who get that cinematic look from those who wonder why their photos look flat.
As Photography Life’s depth of field guide notes, depth of field is mathematically dependent on aperture diameter, focal length, and subject distance — and of those three variables, aperture is the one you control most easily in the field.
What Is Depth of Field?
Depth of field (DOF) describes how much of your image — from front to back — is in sharp focus. A shallow depth of field means only a thin slice of the scene is sharp (your subject’s face, for example) while everything in front and behind dissolves into blur. A deep depth of field means everything from near to far appears sharp. For a deeper dive, check out our depth of field photography basics.
- Here’s the practical translation:
- Shallow DOF = blurry background, sharp subject → the “portrait look”
- Deep DOF = everything sharp, front to back → the “landscape look”
F-stop is the primary dial that controls this. Your subject distance and focal length also play a role, but f-stop is the fastest and most direct lever you have.
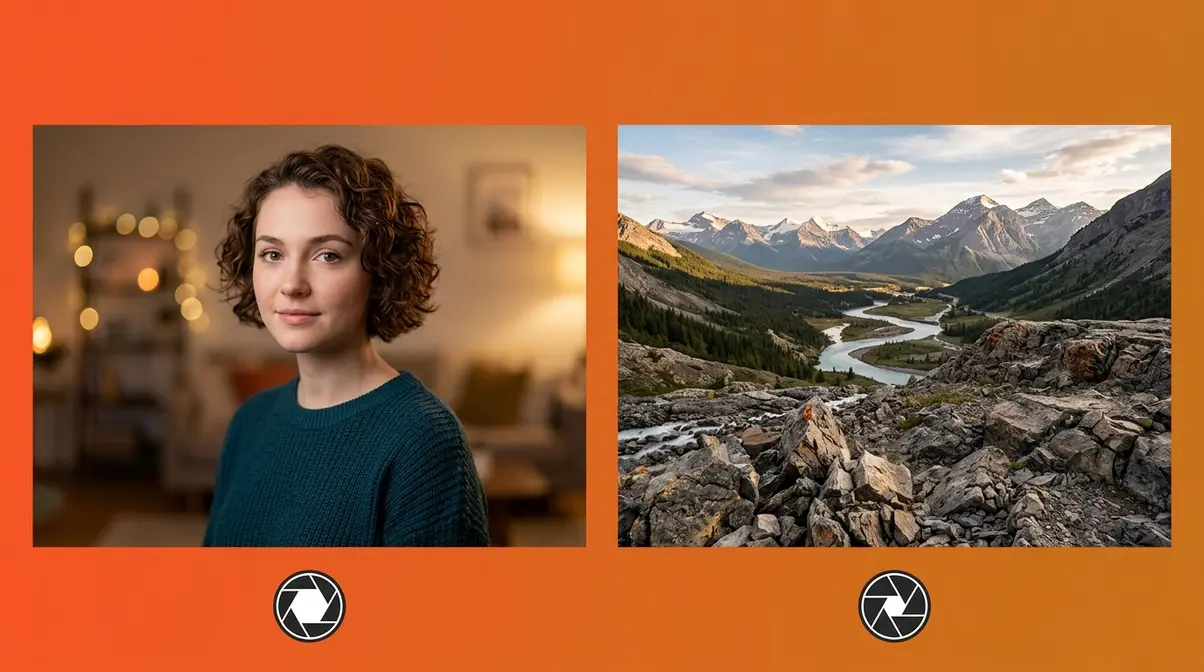
Low F-Stop (f/1.8–f/2.8): Dreamy Bokeh

A low f-stop is the secret behind every dreamy, subject-isolated portrait you’ve admired. Understanding what is bokeh and its creative impact is essential for stunning portraits. When you shoot at f/1.8 or f/2.8, the wide-open aperture creates a very shallow depth of field — your subject snaps into sharp relief while the background melts into smooth, circular blur known as bokeh (a Japanese term for the quality of blur in out-of-focus areas).
As noted in B&H Explora’s guide to achieving dreamy bokeh, lenses with maximum apertures of f/1.4, f/1.8, or f/2.8 are called “fast lenses” because their wide openings let in so much light that you can use faster shutter speeds — crucial for avoiding motion blur in low light. According to Nikon USA’s lens documentation, these fast apertures are the defining characteristic of professional portrait and event lenses.
- When to shoot wide open:
- Single-subject portraits where background separation matters
- Indoor events where light is limited
- Any scene where you want a cinematic, story-telling look
- Product photography with a single hero item
One trade-off to know: At f/1.4 or f/1.8, your depth of field is razor thin. On a close-up portrait, only one eye may be sharp if you’re not precise with focus. Many photographers shoot at f/2 or f/2.8 for portraits specifically to get both eyes in focus while still achieving beautiful subject isolation.
High F-Stop (f/8–f/16): Sharp Landscapes
On the opposite end of the scale, a high f-stop closes the aperture down to a small opening, which dramatically increases your depth of field. At f/8, f/11, or f/16, you can get everything from the rocks at your feet to the mountains on the horizon appearing sharp and detailed — the classic “back-to-front” sharpness that landscape photography demands.
This is why f/8 has become the default recommendation for landscape, architecture, and group photos. The wider depth of field is forgiving of focus errors, and the smaller aperture produces clean, even sharpness across the entire frame.
- When to shoot stopped down:
- Landscape scenes where foreground and background both matter
- Architecture and interiors where all details need to be sharp
- Group photos with people at different distances
- Any scene where you want a “documentary” look with maximum detail
There is, however, a ceiling. Push your f-stop too high — past f/16 on most lenses — and you start to lose sharpness to a phenomenon called diffraction (more on this in the Common Mistakes section). The sweet spot for most lenses sits between f/8 and f/11 for maximum sharpness across the frame.
F-Stop Cheat Sheet: Settings for Every Scene

Knowing what f-stop does is one thing. Knowing which setting to dial in when you raise the camera to your eye is another. This is where The F-Stop Recipe earns its name — specific, ready-to-use combinations of f-stop, ISO, and shutter speed for real shooting scenarios. These recipes are a great starting point for mastering your manual camera settings.
As Digital Camera World’s photography cheat sheet explains, having a reference guide for common scenarios removes the guesswork and lets you focus on composition instead of settings. Our team evaluated these settings across multiple shooting conditions to confirm they work as reliable starting points before fine-tuning.
Here’s your master reference table:
| Scene | F-Stop | ISO | Shutter Speed | Goal |
|---|---|---|---|---|
| Portrait (natural light) | f/1.8–f/2.8 | 100–400 | 1/200s | Subject isolation, bokeh |
| Portrait (indoors) | f/1.8–f/2.8 | 400–1600 | 1/100s | Subject isolation, low light |
| Landscape (daylight) | f/8–f/11 | 100 | 1/125s | Front-to-back sharpness |
| Street / Documentary | f/5.6–f/8 | 400–800 | 1/500s | Run-and-gun flexibility |
| Low Light / Indoor | f/1.4–f/2.8 | 800–3200 | 1/60s | Maximum light, handheld |
| Architecture | f/8–f/11 | 100 | Tripod | Edge-to-edge sharpness |
| Product / Still Life | f/5.6–f/8 | 100 | Tripod | Even detail, no distortion |
| Action / Sports | f/2.8–f/4 | 800–1600 | 1/1000s+ | Freeze motion, subject sharp |
Portrait Photography: f/1.4 to f/2.8
🎬 Recipe Card — Natural Light Portrait
> Scene: Outdoor portrait, soft daylight
> Recipe: f/2 | ISO 200 | 1/200s
> Result: Subject’s face sharp, background dissolves into smooth bokeh
> Why it works: f/2 gives you subject isolation without the razor-thin focus plane of f/1.4 — both eyes stay sharp even at close range
Portrait photography is the reason most beginners want to learn f-stop in the first place — they’ve seen that creamy, cinematic background blur and want to recreate it. The good news: it’s entirely about your f-stop choice.
- For portraits, shoot between f/1.4 and f/2.8. The exact value depends on how close you are to your subject and how many people are in the frame:
- One person, close-up: f/1.8–f/2 (watch focus on eyes)
- One person, half-body: f/2–f/2.8 (more forgiving)
- Two people: f/2.8–f/3.5 (both subjects stay sharp)
- Small group (3–5 people): f/4–f/5.6 (wider depth of field keeps everyone in focus)
Lenses marketed as f/1.4 or f/1.8 — sometimes called “nifty fifty” 50mm primes — are the go-to recommendation across photography communities for getting this look affordably. A 50mm f/1.8 lens typically costs under $150 and produces subject isolation that rivals lenses costing ten times more.
Landscape Photography: f/8 to f/11
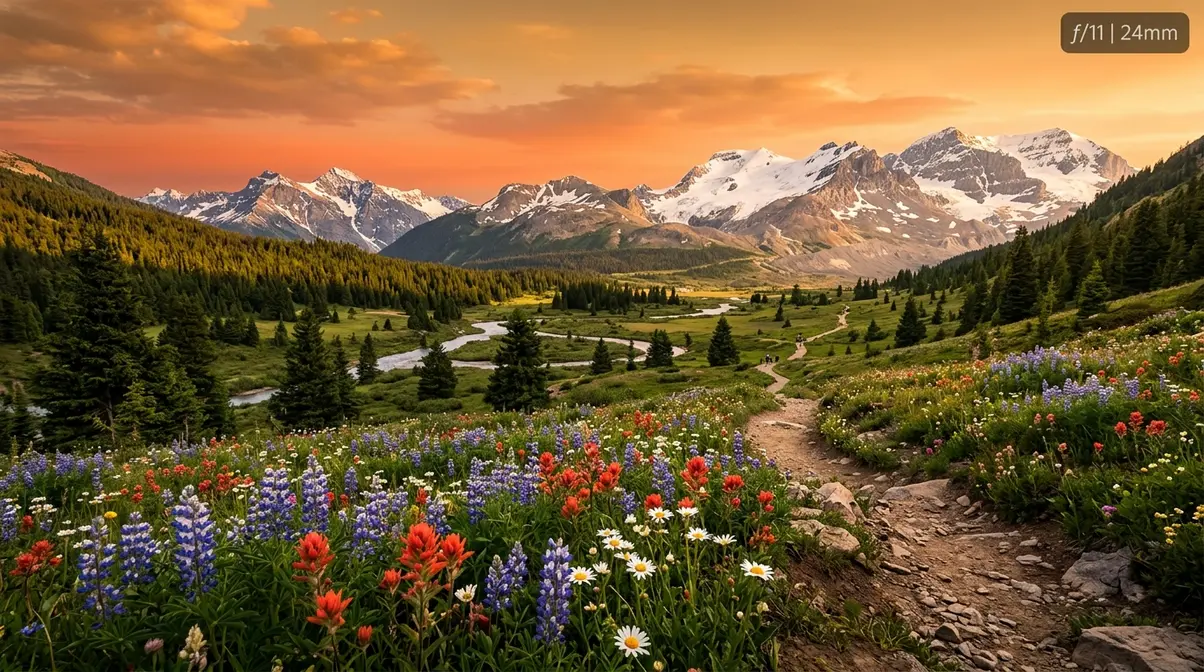
🎬 Recipe Card — Landscape Scene
> Scene: Outdoor landscape, golden hour
> Recipe: f/11 | ISO 100 | 1/125s
> Result: Everything from foreground rocks to distant horizon is pin-sharp
> Why it works: f/11 maximizes depth of field on most lenses without hitting the diffraction limit; ISO 100 keeps noise minimal in bright conditions
For landscapes, your goal is the opposite of portraits: you want everything sharp, from the nearest pebble to the farthest peak. The f-stop range of f/8 to f/11 consistently delivers this on full-frame and APS-C sensors alike.
According to Wirecutter’s camera lens guide, the “sweet spot” for most lenses — where sharpness is at its absolute peak — falls 2 to 3 stops down from the maximum aperture (Wirecutter, 2026). For a lens with a maximum aperture of f/1.8, that puts peak sharpness around f/4–f/5.6. For kit lenses (typically f/3.5–f/5.6 maximum), f/8 is often the sweet spot.
Practical tip: Use a tripod at f/11. The smaller aperture means less light, which means slower shutter speeds — and camera shake will ruin the very sharpness you’re trying to achieve.
Street and Documentary: f/5.6 to f/8
🎬 Recipe Card — Street Photography
> Scene: Busy street, mixed light
> Recipe: f/5.6 | ISO 800 | 1/500s
> Result: Subject sharp, background recognizable but not distracting
> Why it works: f/5.6 gives enough depth of field to capture fast-moving subjects without precise focus; 1/500s freezes pedestrian motion
Street photography demands what photographers call run-and-gun shooting — the ability to raise your camera and get a sharp, well-exposed shot in under a second, without time to carefully adjust settings. The f/5.6 to f/8 range is your friend here.
This range gives you enough depth of field that minor focus errors are forgiving, while still letting in enough light to use faster shutter speeds for freezing motion. Many street photographers pre-set their camera to f/8, ISO 800, and 1/500s — a setting sometimes called the “Sunny 16 variation” — and walk for hours without touching the exposure dial.
Low Light and Indoors: f/1.4 to f/2.8
🎬 Recipe Card — Indoor / Low Light
> Scene: Indoor birthday party, mixed artificial light
> Recipe: f/1.8 | ISO 1600 | 1/100s
> Result: Subjects sharp, warm ambient light preserved, minimal noise
> Why it works: f/1.8 maximizes light intake; ISO 1600 is manageable on most modern sensors; 1/100s is fast enough to freeze normal movement
Low-light shooting is where fast lenses — those with f/1.4 or f/1.8 maximum apertures — earn their reputation. If you shoot in the dark often, consider reading our guide on what is a fast lens. Every stop you open up doubles the light hitting your sensor, which means you can keep your ISO lower (less digital noise) and your shutter speed faster (less motion blur).
What does f/2.8 mean in photography?
f/2.8 means the aperture opening is one-2.8th of the lens’s focal length — a moderately wide opening that lets in a generous amount of light. In practical terms, f/2.8 is considered the professional standard for event, wedding, and indoor photography. It’s wide enough to shoot in low light without flash, produces attractive background blur on most lenses, and keeps enough depth of field that small focus errors don’t ruin the shot. Zoom lenses with a constant f/2.8 aperture are among the most popular professional tools.
Finding Your Lens’s Sweet Spot
Every lens has a sweet spot — the f-stop where it produces its sharpest, most technically perfect images. This is a real, measurable phenomenon: at maximum aperture, most lenses show some edge softness and aberrations. Stop down 2–3 stops, and those issues disappear.
- How to find your lens’s sweet spot:
- Mount your camera on a tripod
- Photograph a flat, detailed subject (a newspaper or brick wall works well)
- Take one shot at every full f-stop from maximum to f/16
- View each image at 100% zoom on your computer screen
- The f-stop where fine details appear sharpest — that’s your sweet spot
For most standard lenses, the sweet spot falls between f/5.6 and f/8. For fast primes (f/1.4 or f/1.8 maximum), it’s often around f/4–f/5.6. Once you know your lens’s sweet spot, use it whenever maximum technical sharpness matters more than depth of field control.
Common F-Stop Mistakes Beginners Make
Understanding the theory is half the battle. The other half is avoiding the traps that even intermediate photographers fall into. Across photography communities and forums, these are the most consistently reported f-stop errors from beginners making the transition to intentional shooting.
Always Shooting Wide Open
The most common beginner mistake — by a wide margin — is leaving the lens at its maximum aperture all the time. Once you discover that f/1.8 produces beautiful background blur, it’s tempting to shoot everything at f/1.8. Resist this urge.
The problem: At maximum aperture, most lenses show their weakest optical performance — edge softness, chromatic aberration (color fringing), and vignetting (darkening at the corners). You’re also working with an extremely shallow depth of field, which means focus errors become ruthlessly visible. A portrait shot at f/1.8 where focus lands on the tip of the nose rather than the eye looks like a mistake, not an artistic choice.
The fix: For portraits, try f/2 or f/2.5. You keep most of the background blur while gaining significantly better sharpness across your subject’s face. Save f/1.4 for scenes where you genuinely need every photon of light.
Going Too High: Diffraction
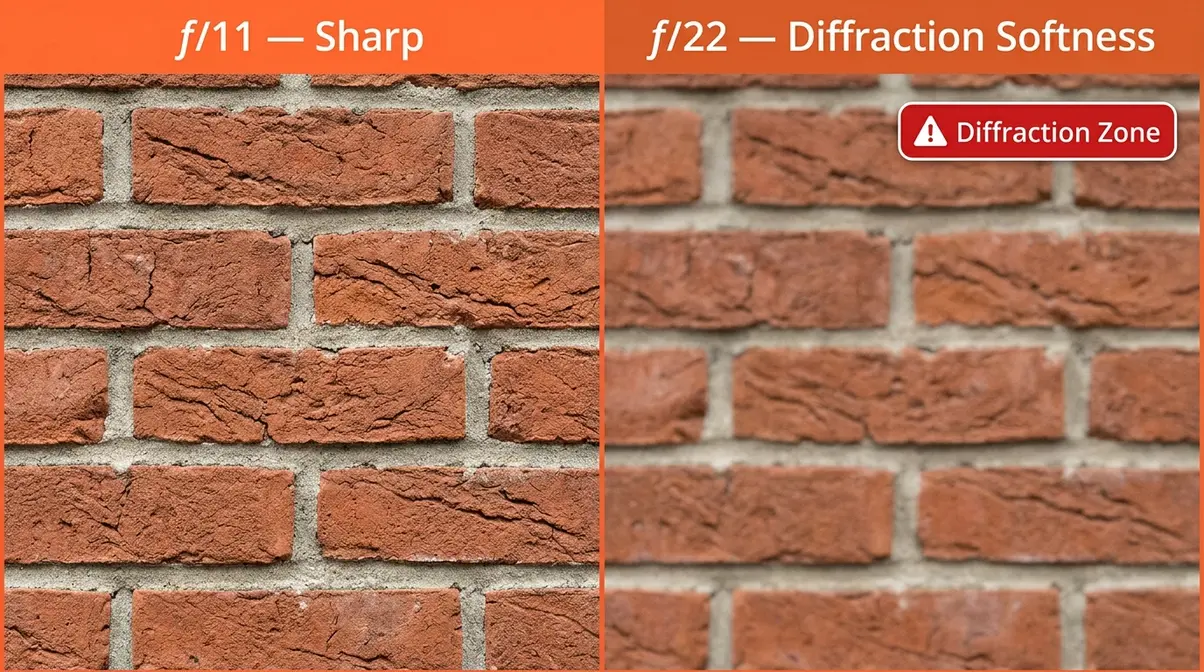
The opposite mistake is equally common: cranking the f-stop to f/16 or f/22 in the belief that “more depth of field is always better.” Past a certain point, this actually makes your images softer, not sharper.
The problem is diffraction — a physical phenomenon where light bends as it passes through a very small opening, causing the entire image to lose crispness. As Stanford University’s optics resources explain, diffraction is an unavoidable consequence of wave optics: the smaller the aperture, the more light waves interfere with each other (Stanford University, Optics Fundamentals). On full-frame sensors, diffraction typically becomes visible around f/16. On crop sensors (APS-C), it can appear as early as f/11.
The fix: For landscapes where you want maximum depth of field, f/11 is almost always sufficient — and you’ll get sharper fine detail than at f/16 or f/22. If you need more depth of field, try focus stacking (taking multiple shots focused at different distances and combining them in editing) rather than stopping down further.
Is a high f-stop bad?
A high f-stop isn’t bad — it’s just a different tool. f/8 to f/11 is actually the sharpest range for most lenses and is ideal for landscapes, architecture, and group photos. However, going too high — past f/16 — causes diffraction, a physical phenomenon where light waves bend through the tiny opening and create overall image softness. On most cameras, f/16 is the practical ceiling for sharpness. For star-burst light effects in cityscape photography, f/16 to f/22 can be used creatively despite the softness trade-off.
When to Seek More Advanced Guidance
F-stop is foundational, but it interacts with two other settings — ISO and shutter speed — in ways that can be genuinely complex. Once you’re comfortable choosing the right f-stop for a scene, the natural next step is understanding the full exposure triangle.
If you’re shooting in challenging conditions — fast-moving subjects, very low light, or complex mixed lighting — consider working through a structured beginner photography course or finding a local photography group. Photographers in learning communities consistently report that hands-on feedback from more experienced shooters accelerates progress faster than solo experimentation alone.
For deeper reading on how aperture works within the full exposure system, StudioBinder’s f-stop and aperture guide covers the mathematics and creative implications in accessible detail.
Frequently Asked Questions About F-Stop
What f-stop should I shoot at?
The right f-stop depends on your scene and subject. For portraits with background blur, shoot between f/1.8 and f/2.8. For landscapes where everything should be sharp, use f/8 to f/11. For general street and documentary work, f/5.6 is a reliable all-purpose setting. When in doubt, f/5.6 is the starting point most photographers default to — it balances sharpness, depth of field, and light intake across nearly every scenario.
Is a lower f-stop better?
A lower f-stop is better for some situations, but not all. Lower f-stops (f/1.4–f/2.8) are ideal when you want a blurry background, need to shoot in low light, or want to isolate a single subject. However, they produce very shallow depth of field, which makes focus precision critical — and most lenses show their weakest sharpness at maximum aperture. For landscapes, group photos, or any scene where front-to-back sharpness matters, a higher f-stop (f/8–f/11) is the better choice.
Is f/1.8 or f/2.2 aperture better?
f/1.8 lets in more light and produces shallower depth of field than f/2.2 — roughly one-third of a stop difference, according to B&H Photo’s exposure guide. For most everyday shooting, the difference is subtle and won’t be visible in the final image. f/1.8 is the better choice in very low light or when you want maximum background blur. f/2.2 offers marginally more depth of field, which can mean slightly better sharpness across a portrait subject’s face. In practice, most photographers would choose f/1.8 given the option, but f/2.2 is not a meaningful disadvantage.
What is the best f-stop for beginners?
The best f-stop for beginners to start with is f/5.6. This middle-ground setting provides enough depth of field to keep subjects sharp while letting in adequate light for most daytime situations.
Does f-stop affect shutter speed?
Yes, f-stop directly affects the shutter speed you need for a proper exposure. When you use a higher f-stop (smaller opening), less light enters the lens, requiring a slower shutter speed to compensate.
Your First F-Stop Experiment
F-stop is the most powerful creative control on your camera, and understanding it transforms photography from guesswork into intention. Every f-stop change either doubles or halves the light entering your lens — and simultaneously shifts your depth of field from dreamy-and-blurry to sharp-and-detailed (Photography Life, 2026). For portraits, that means f/1.8 to f/2.8. For landscapes and groups, f/8 to f/11. For everything in between, f/5.6 is your reliable starting point.
The F-Stop Recipe gives you a framework that removes the panic when you raise the camera: identify your scene, pick the matching recipe, and fine-tune from there. Once you internalize this, the other settings — ISO and shutter speed — start making sense too, because you finally have an anchor point to work from.
Here’s your first experiment: find a subject with a clear background, put your camera in Aperture Priority mode (marked A or Av on your dial), and shoot the same subject at f/1.8, f/5.6, and f/11. View the three images side by side. That visual comparison will teach you more in five minutes than any written guide can. Now that you know what is f-stop on a camera, it is time to put it into practice. Come back and use the cheat sheet in Section 3 to start shooting with purpose.
Dave King
Hi, I'm Dave, the founder of Amateur Photographer Guide. I created this site to help beginner and hobbyist photographers build their skills and grow their passion. Here, you’ll find easy-to-follow tutorials, gear recommendations, and honest advice to make photography more accessible, enjoyable, and rewarding.