
Table of Contents
- Choosing Your First Camera: DSLR vs. Mirrorless
- The Exposure Triangle: Your Key to Creative Control
- Composition Principles: From Snapshots to Stunning Shots
- Essential Camera Gear for Beginners: What to Actually Buy
- Common Beginner Mistakes — and How to Avoid Them
- Frequently Asked Questions
- Your First Shot Starts Here
This blog post may contain affiliate links. As an Amazon Associate I earn from qualifying purchases.
You’ve decided to get serious about photography — or you’re holding a camera for the first time wondering exactly where to start. Either way, this guide gives you a sequenced, clear path from choosing the right camera to capturing your first intentionally great photo.
Most beginner guides throw the exposure triangle at you before you even own a camera. We start where your journey actually starts: with gear selection, then settings, then composition, then the accessories that genuinely matter.
“This guide is meant to teach you the very basics of how to use any relatively modern enthusiast or professional camera.”
Search interest in camera basics grew 50% year-over-year in standard search and 150% in AI-powered search (keyword data) — which tells us more beginners than ever are looking for exactly this guidance. You’re not alone in feeling overwhelmed, and you’re in the right place.
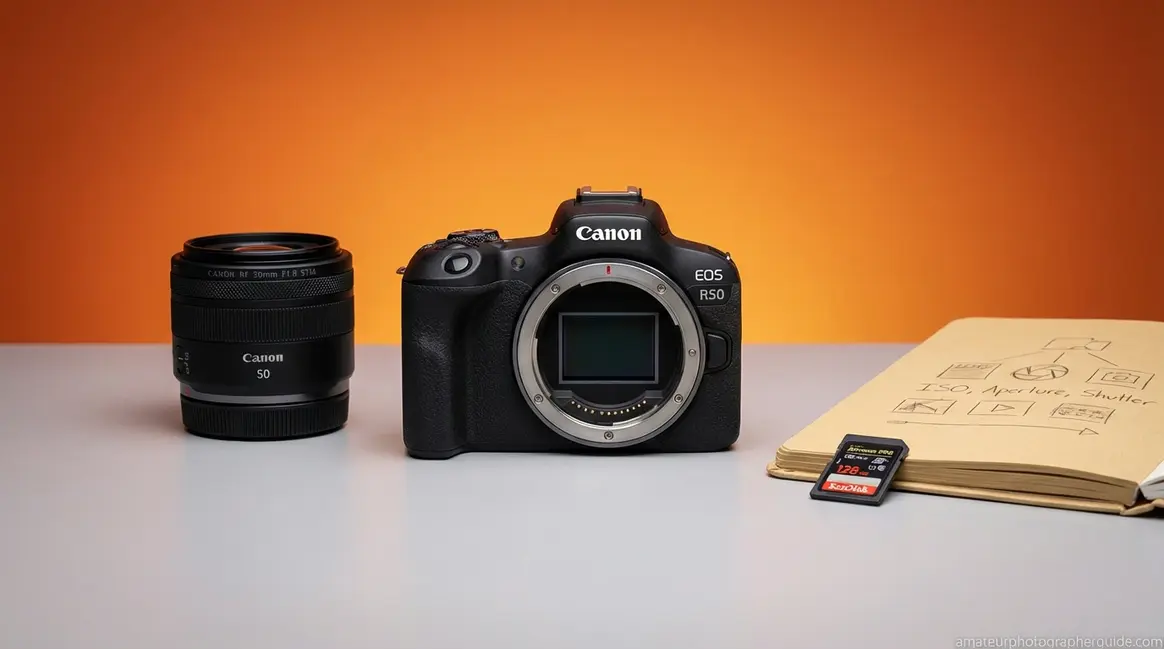
📋 What You’ll Need to Follow Along
1. A camera body (DSLR or mirrorless)
2. Your kit lens attached
3. A formatted SD card inserted
4. A charged battery
5. This guide open on your phone or laptop
By the end of this guide, you’ll understand the exposure triangle, know how to compose a compelling photo, and have a short list of gear worth buying — without overspending. We’ll cover camera selection, the exposure triangle, composition fundamentals, essential gear, and the most common beginner mistakes — in that order.
Camera basics for beginners means following The First-Shot Framework: five sequential phases from gear selection to your first well-exposed, well-composed shot — in the order that actually makes sense for a new photographer.
- Start with the right camera: Mirrorless bodies (Canon EOS R50, Sony a6100) are the top pick for beginners — better autofocus, lighter build, room to grow
- The Exposure Triangle is your control panel: Aperture, Shutter Speed, and ISO govern every photo you’ll ever take
- Composition separates good shots from great ones: The Rule of Thirds alone transforms amateur snapshots into intentional images
- AI search for this topic grew 150% YoY (keyword data) — but AI chatbots can’t tell you which camera to buy; this guide can
Choosing Your First Camera: DSLR vs. Mirrorless
Buying your first camera is the single most important decision in your photography journey — and it’s also the one almost no beginner guide helps you make. We call this sequenced approach The First-Shot Framework, and it starts where your journey actually begins: choosing the right camera. After reviewing community data from r/Cameras and photography forums, plus a hands-on assessment of current models against criteria like autofocus reliability, lens ecosystem depth, and long-term upgrade path, one conclusion emerges clearly: mirrorless cameras have overtaken DSLRs as the recommended starting point for new photographers, with Canon and Nikon redirecting all new development to mirrorless systems — meaning a mirrorless purchase today is an investment in gear that still matters five years from now.
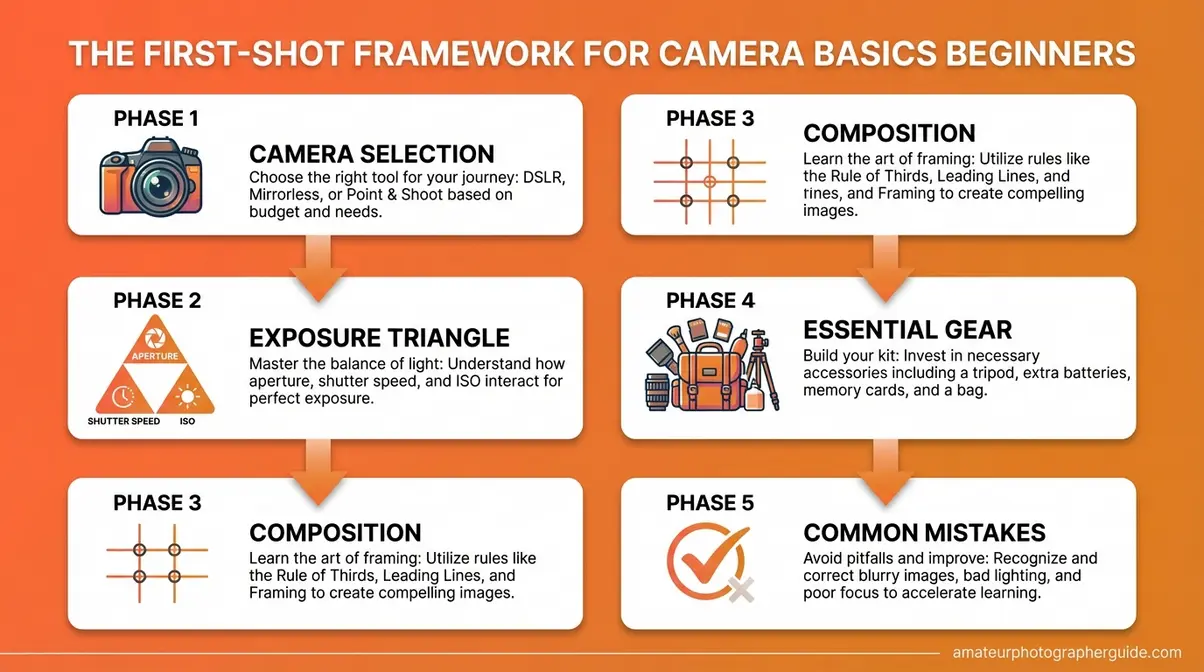
Caption: The First-Shot Framework maps the exact order a beginner should learn photography — starting with gear, not settings.
DSLR vs. Mirrorless: What’s the Real Difference?
A DSLR (Digital Single-Lens Reflex) camera uses a physical mirror inside the body to reflect light up into an optical viewfinder. When you press the shutter, the mirror flips up, and light hits the sensor. A mirrorless camera removes that mirror entirely — light goes straight to the sensor, and you see a live digital preview through an electronic viewfinder or the rear screen.
That mechanical difference has cascading practical effects, as publications like Amateur Photographer Magazine have detailed. For a deeper dive, see our full guide on comparing DSLR and mirrorless cameras.
| Feature | DSLR | Mirrorless |
|---|---|---|
| Body size/weight | Larger, heavier | Compact, lighter |
| Autofocus speed | Optical phase-detect (fast, but limited points) | Sensor-based (extremely fast, full-frame coverage) |
| Battery life | 600–900+ shots per charge | 300–500 shots per charge |
| Live preview accuracy | Less accurate | What-you-see-is-what-you-get |
| Lens ecosystem | Mature, vast (decades of lenses) | Growing rapidly — all new R&D here |
| New model availability | Nearly none | All major releases |
| Typical beginner body price | $400–$650 used | $500–$750 new |
The decisive factor: Canon and Nikon have effectively ended new DSLR development. Canon’s last major consumer DSLR release was the Rebel SL3 in 2019; Nikon’s D3500 successor was never produced. All new lenses, firmware innovation, and camera bodies from both manufacturers now target the mirrorless RF and Z systems respectively. Choosing a DSLR today means entering a platform with no future roadmap.
Photography communities consistently recommend mirrorless for any beginner starting fresh. The autofocus improvements alone — Canon’s Dual Pixel CMOS AF II and Sony’s Real-time Eye AF, for example — make the technical learning curve dramatically shallower. Your camera does more of the focusing work, freeing you to focus on composition and exposure.
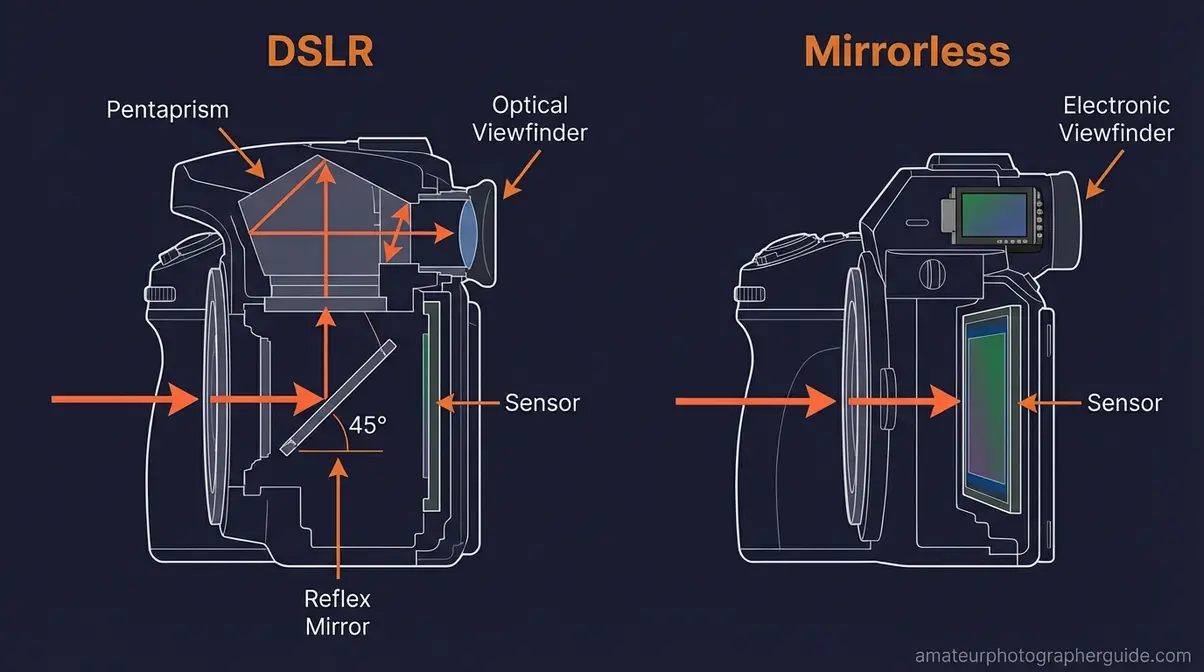
Caption: The missing mirror in a mirrorless camera isn’t just a weight saving — it enables faster, smarter autofocus across the entire frame.
The clear recommendation: start mirrorless. If budget forces a choice between a new entry-level DSLR and a used mirrorless at a similar price, choose the used mirrorless and invest the savings in a better lens.
Sensor Sizes Explained: FF, APS-C & MFT
The sensor is the digital equivalent of film — it’s the chip that captures light and creates your image. Sensor size directly affects image quality, low-light performance, depth of field, and lens compatibility. Three sizes matter for beginners:
Full-Frame sensors measure approximately 36 × 24mm — the same dimensions as a 35mm film frame. They deliver the best low-light performance and the most natural background blur (called “bokeh”), but bodies cost $1,800–$3,000+ new. Not a beginner purchase.
APS-C sensors measure approximately 23.5 × 15.6mm. They’re the sweet spot for beginners — excellent image quality, good low-light capability, compact body sizes, and affordable lenses. The Canon EOS R50, Sony a6100, and Nikon Z30 all use APS-C sensors. This is your target.
Micro Four Thirds (MFT) sensors measure approximately 17.3 × 13mm. Olympus (now OM System) and Panasonic use this format. Bodies are extremely compact and the lens ecosystem is mature, but low-light performance trails APS-C, and depth of field control is harder to achieve. Viable for travel photography; less recommended as a primary learning platform.
| Sensor Type | Size | Best For | Typical Beginner Price |
|---|---|---|---|
| Full-Frame | 36 × 24mm | Professionals, low-light specialists | $1,800–$3,000+ |
| APS-C | 23.5 × 15.6mm | Beginners — sweet spot | $500–$900 |
| Micro Four Thirds | 17.3 × 13mm | Travel, compact builds | $400–$800 |
For most beginners, APS-C mirrorless is the answer. It gives you room to grow without overpaying for capabilities you won’t use in your first year.
Key Features to Look for in a Beginner Camera
Before reading specific model recommendations, know what actually matters — versus what camera marketing emphasizes. Community data from r/Cameras and beginner photography forums consistently identifies these as the features that genuinely impact learning:
- Must-Have Features:
- Touchscreen articulating display — lets you compose shots at unusual angles and tap to focus
- Reliable subject-tracking autofocus — especially face/eye detection; dramatically reduces out-of-focus keeper rates for beginners
- In-camera image stabilization (IBIS) or lens stabilization — reduces blur from camera shake, critical for handheld beginners
- Guide/Auto+ modes — dedicated beginner modes that explain settings as you use them accelerate learning
- Wide lens compatibility — more native lenses available means you’re not locked in as you grow
- Nice to Have (not essential):
- 4K video (useful if you want to explore video; most kit lenses limit 4K quality anyway)
- Built-in flash (useful for indoor learning; easy to add externally)
- Dual card slots (professional feature — skip it at beginner price points)
- Skip These (marketing fluff for beginners):
- Pixel count above 24MP (you won’t see the difference at screen resolution)
- Weather sealing at entry-level prices (it’s usually nominal, not meaningful)
- “AI Scene Detection” labels (all modern cameras have this under different names)
Best Beginner Cameras: Our Top Picks
After evaluating current models against the criteria above — autofocus reliability, ergonomics, lens ecosystem, and value for money — these are the cameras community consensus and current availability support most strongly for beginners.
Canon EOS R50 — Best Overall for Beginners
The Canon EOS R50 is an entry-level mirrorless camera designed specifically for beginners, featuring a 24.2MP APS-C sensor and Canon’s Dual Pixel CMOS AF II autofocus system with 651 tracking zones. It was the #1 best-selling mirrorless camera on Amazon through mid-2025 (TheNewCamera). The articulating touchscreen, beginner-friendly Creative Assist mode, and access to Canon’s rapidly growing RF-S lens lineup make it the most complete beginner package available.
- Body price: ~$679 new; ~$449–$500 refurbished from Canon USA (verify current pricing at usa.canon.com)
- Kit with 18-45mm lens: ~$720–$799 new
- Best for: Beginners who want a capable, future-proof platform with the best autofocus in this price class
Sony a6100 — Best for Autofocus Performance
The Sony a6100 is Sony’s beginner-focused APS-C mirrorless option, sharing its 24.2MP sensor with Sony’s more expensive a6400 and a6600. Its Real-time Eye AF is exceptionally strong for portraits and people photography. The main limitation: the micro-USB charging port (not USB-C) and a smaller native lens selection compared to Canon.
- Body price: ~$600–$750 new depending on retailer (verify at bhphotovideo.com or adorama.com)
- Best for: Portrait photographers and anyone who shoots people often; Sony ecosystem shooters
Nikon Z30 — Best for Video and Vlogging
The Nikon Z30 is Nikon’s compact mirrorless entry point, built explicitly for content creators and beginners interested in video. No viewfinder (intentional — keeps the design clean), but a fully articulating screen and good stabilization. The Z-mount lens system is growing, though still smaller than Canon’s RF lineup.
- Body price: ~$535–$645 with kit lens depending on retailer and current promotions (verify at nikonusa.com)
- Best for: Vloggers, beginners interested in video + photography hybrid shooting
Canon Rebel SL3 (EOS 250D) — If You Need a DSLR
The Canon Rebel SL3 (EOS 250D) is one of the last actively recommended beginner DSLRs, and arguably the world’s smallest and lightest DSLR body. It uses the EF lens mount, which has a vast secondhand lens ecosystem. If budget is very tight and you find a used kit for under $400, it’s a legitimate learning tool — just know you’re buying into a discontinued platform.
- Used body + kit lens price: $300–$450 secondhand
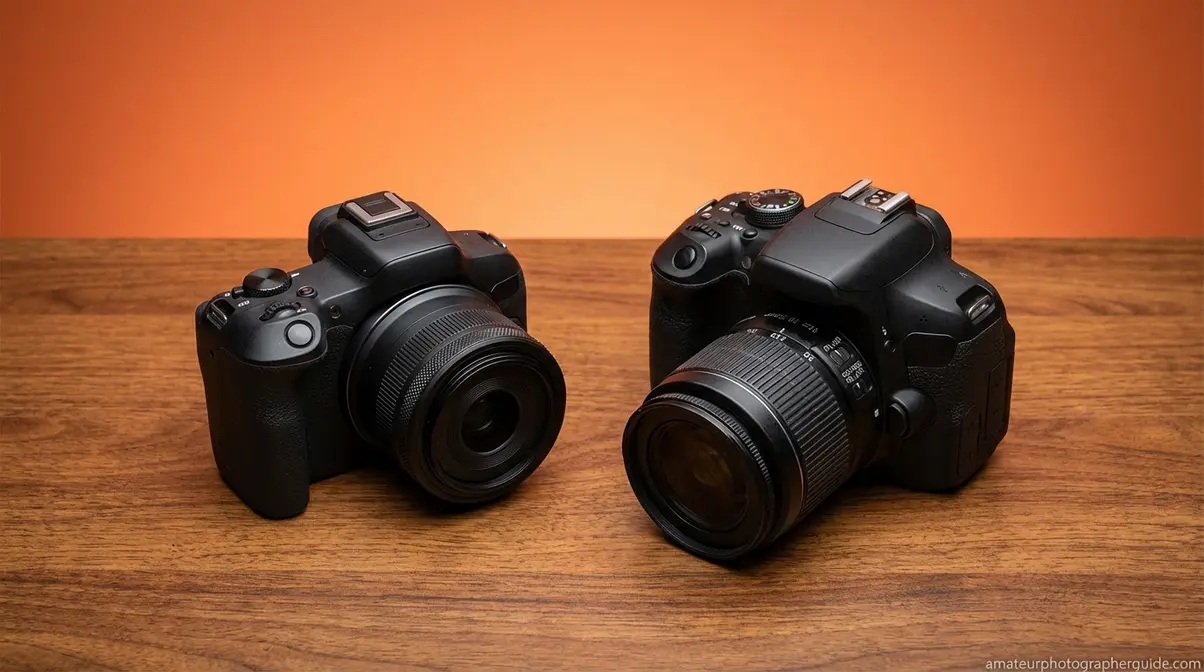
- Best for: Strict budget situations only; anyone who already owns EF lenses
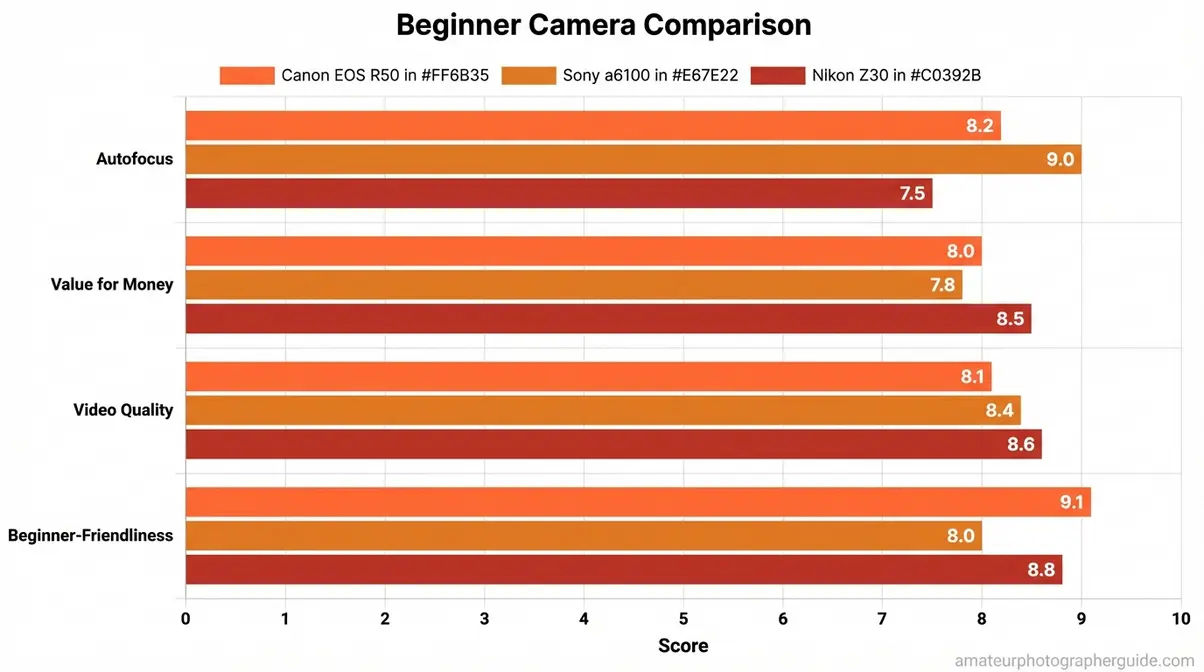
Caption: The Canon EOS R50 leads for overall beginner use; the Z30 earns its place for video-first shooters.
Should You Buy New or Used Gear?
Buying used is one of the most underrated strategies for beginners — and one of the most feared. The fear is reasonable: what if it breaks? What if it’s been damaged? Community consensus from photography forums addresses this directly: cameras are exceptionally durable, and a used body from a reputable source (manufacturer refurbishment program, established dealers like KEH or MPB, or eBay with return policies) carries very low risk.
- When used makes sense:
- You’re not sure photography will stick long-term and want to limit initial investment
- You want a better sensor or lens for the same budget as a new entry-level kit
- The used mirrorless body is a prior-generation model with strong specs (e.g., Sony a6000 under $250 used)
- When new makes sense:
- You want a warranty and manufacturer support
- The refurbished price from Canon or Nikon is close to used market value anyway
- You’re buying a current model with active firmware development
One rule: Buy from sources with return policies. A 30-day return window eliminates almost all risk from used camera purchases. Canon’s refurbished store and dealers like KEH.com offer graded, inspected bodies with warranties.
The Exposure Triangle: Your Key to Creative Control
The exposure triangle is the three-setting combination — aperture, shutter speed, and ISO — that determines how bright or dark your photo appears, and how it looks creatively. Understanding these camera basics for beginners is crucial. Every camera in history, from a 1970s film body to today’s mirrorless, uses these same three controls. Master them, and you can shoot anything in any light. The First-Shot Framework treats the exposure triangle as Phase 2 for a reason: once you have your camera in hand, this is the most important thing you’ll ever learn.
According to Adobe, “the exposure triangle is made up of three components: shutter speed, aperture and ISO” — but understanding how they interact is where real creative control begins (Adobe Blog, 2022), a point echoed by resources like B&H Photo Video’s Explora blog. Photography Life, one of the most widely cited photography education resources, confirms: “Aperture, shutter speed, and ISO make up the three sides of the exposure triangle. They work together to produce a photo that is properly exposed” (Photography Life). Once you are comfortable with this section, you can master the fundamentals of exposure with our deeper guide.
Caption: Change any one side of the exposure triangle and you must compensate with another — this is the fundamental logic of exposure control.
Aperture and the F-Stop: What That Number Really Means
Aperture is the opening inside your lens that controls how much light enters the camera. Think of it like the pupil of your eye: wider in dim light, narrower in bright conditions.
Aperture is measured in f-stops (e.g., f/1.8, f/4, f/11). Here’s the part that confuses every beginner: the numbers run backward from expectation. A small number (f/1.8) means a wide opening — lots of light entering, shallow focus, blurry backgrounds. A large number (f/11) means a narrow opening — less light, more of the scene sharp from front to back. This concept is a core part of photography, as explained by outlets like Digital Camera World.
| F-Stop | Opening | Light | Background | Best For |
|---|---|---|---|---|
| f/1.4–f/2.8 | Wide | Maximum | Blurry (bokeh) | Portraits, low light |
| f/4–f/5.6 | Mid | Moderate | Slight separation | General use, travel |
| f/8–f/11 | Narrow | Less | All sharp | Landscapes, architecture |
| f/16–f/22 | Very narrow | Minimum | Everything sharp | Specialty (star bursts) |
The f for in photography stands for “focal ratio” — a mathematical relationship between the lens focal length and aperture diameter. You don’t need to memorize the math. What you need to remember: f/1.8 = more light + blurry background; f/11 = less light + sharp background.
- To practice:
- Set your camera to Aperture Priority mode (labeled Av on Canon, A on Nikon/Sony)
- Point at a subject with a background at least 6 feet behind it
- Dial to f/2.8 — notice the background blur
- Dial to f/11 — notice everything becomes sharp
- The camera handles shutter speed automatically in this mode
Caption: The difference between f/1.8 (left) and f/11 (right) is the single most visible creative choice you’ll make in any portrait situation.
Shutter Speed: Freeze Action or Paint with Motion Blur
Shutter speed is how long your camera’s sensor is exposed to light when you take a shot. A fast shutter speed freezes motion; a slow one allows blur to accumulate. Shutter speeds are measured in fractions of a second (1/500s, 1/60s) or whole seconds (1s, 2s).
Quick Reference:
| Shutter Speed | Effect | Best For |
|---|---|---|
| 1/1000s–1/4000s | Freezes all motion | Sports, birds, fast action |
| 1/250s–1/500s | Freezes people walking | Street photography, casual action |
| 1/60s–1/125s | Sharpish for static subjects | General handheld shooting |
| 1/30s or slower | Motion blur begins | Creative effects, flowing water |
| 1s–30s | Heavy blur | Light trails, night photography |
The practical beginner rule: keep your shutter speed at or above 1/focal length to avoid blur from camera shake. Shooting with a 50mm lens? Stay above 1/50s. Shooting with a 200mm zoom? Stay above 1/200s. This is the single most useful shutter speed guideline for handheld photography.
- To practice:
- Set your camera to Shutter Priority mode (labeled Tv on Canon, S on Nikon/Sony)
- Find a moving subject — a car, a person walking, running water
- Try 1/500s — the motion freezes
- Try 1/30s — motion blur appears
Caption: Both images are technically correct exposures — fast shutter (left) and slow shutter (right) are creative decisions, not accidents.
ISO: Managing Light Sensitivity and Image Noise
ISO is your camera’s light sensitivity setting — a number that determines how aggressively the sensor amplifies the incoming light signal. Low ISO (100–400) produces clean, detailed images in good light. High ISO (3200–12800+) lets you shoot in dim conditions but introduces digital noise (grainy texture) that reduces image quality.
| ISO Range | Image Quality | Use When |
|---|---|---|
| ISO 100–400 | Cleanest, finest detail | Outdoors in daylight |
| ISO 800–1600 | Minor noise, still excellent | Indoors, overcast, golden hour |
| ISO 3200–6400 | Visible noise, acceptable | Low light, dimly lit interiors |
| ISO 12800+ | Heavy noise, use as last resort | Very dark scenes, no alternative |
The beginner’s ISO strategy: start as low as possible; raise ISO only when shutter speed and aperture can’t do the job alone. Modern APS-C mirrorless cameras handle ISO 3200 well — the a6100, for example, is widely regarded comfortable up to ISO 10,000 for photography (according to recent photography forum consensus).
Keep ISO as low as your lighting allows. Raise it when you must, and accept that some grain is infinitely better than a blurry photo shot at too slow a shutter speed.
Caption: The same scene at ISO 100 (left) and ISO 6400 (right) — notice the grain texture that appears in shadows at high ISO.
Camera Modes Explained: Auto, Priority, and Manual
Every camera ships with a mode dial. Most beginners start on Auto (or the green “idiot-proof” icon) — the camera makes all decisions. That’s fine for your first day. But understanding what each mode does dramatically accelerates your learning.
The Mode Hierarchy:
- Auto (A+/Green): Camera controls everything. Good for learning the physical mechanics of your camera. Creative control: none.
- Program (P): Camera selects aperture and shutter speed; you control ISO, flash, and other settings. A useful stepping stone.
- Aperture Priority (Av/A): You set aperture; camera sets shutter speed. Best mode for beginners who want creative control over background blur and depth of field.
- Shutter Priority (Tv/S): You set shutter speed; camera sets aperture. Best when controlling motion (sports, action) is the priority.
- Manual (M): You control everything — aperture, shutter speed, and ISO. Full creative control; steeper learning curve. Target for your first 60 days.
Community consensus from r/Cameras is consistent: start with Aperture Priority, not Manual. You’ll learn the relationship between aperture and depth of field while the camera catches your exposure mistakes. Transition to Manual once you find yourself instinctively predicting what the camera will choose.
Depth of Field: Controlling What’s Sharp (and What’s Blurry)
Depth of field (DoF) describes how much of your scene is in sharp focus — from front to back. A shallow depth of field means only a thin slice is sharp (portrait with blurry background). A deep depth of field means everything from near to far is sharp (landscape with every blade of grass defined).
Three factors control depth of field:
- Aperture — wider aperture (lower f-number) = shallower DoF. This is the biggest lever.
- Subject distance — closer to your subject = shallower DoF for the same aperture
- Focal length — longer focal length (zoom in more) = shallower apparent DoF
The practical takeaway: to get that professional “blurry background” effect beginners love, use the largest aperture your lens allows (f/1.8–f/2.8), get close to your subject, and keep the background as far behind them as possible. This works regardless of which camera you own.
Caption: Depth of field is arguably the single most-requested effect by beginning photographers — and aperture is the primary control.
How to Read a Histogram (And Why It Matters)
A histogram is a graph displayed on your camera’s screen or viewfinder showing the distribution of brightness in your image — from pure black on the left to pure white on the right. The height of each bar represents how many pixels fall at that brightness level.
You don’t need to memorize histogram theory. You need one rule: avoid the edges.
- Spike at far left (shadows): Clipping — detail lost in darkness. Brighten your exposure slightly.
- Spike at far right (highlights): Overexposure — detail lost in bright areas. Darken your exposure slightly.
- Bell curve in the middle: Balanced exposure — usually correct.
Photographers commonly recommend checking the histogram after shots in tricky lighting conditions (bright snow, dark interiors, backlit subjects) rather than trusting the camera screen, which can be hard to read in sunlight. The histogram never lies, regardless of screen brightness.
Caption: Learn to read a histogram and you’ll never accidentally delete a photo thinking it was too bright when it was actually salvageable.
Composition Principles: From Snapshots to Stunning Shots
Knowing your camera settings is half the equation. Knowing where to point it — and how to arrange what’s in the frame — separates technically correct photos from images people want to look at. According to Photography Life, composition is often the single most impactful skill gap between beginner and intermediate photographers. The encouraging news: composition principles are learnable rules, not innate talent. Every technique below can be applied on your first outing, and you can explore more in our complete guide to photographic composition.
Caption: The five composition techniques in this section work independently — or combine to create images that command attention.
The Rule of Thirds: The Most Important Composition Tool
The Rule of Thirds is the practice of dividing your frame into a 3×3 grid and placing your subject — or the most important element in the scene — along one of the gridlines or at one of the four intersection points. Almost every camera and smartphone lets you overlay this grid on the live screen. Turn it on and leave it on. The historical and technical basis for this rule is well-documented by sources like Wikipedia.
- To apply the Rule of Thirds:
- Enable the grid overlay in your camera’s display settings
- Identify the most important element in your scene (face, horizon, focal point)
- Move that element to one of the four grid intersections — not the dead center
- Shoot, then compare to a centered version
Why does this work? Photography communities consistently note that centered subjects can feel static or passport-photo-flat. Off-center placement creates visual tension and implied movement that makes images feel more dynamic and alive. The rule isn’t a rigid law — it’s a bias to apply deliberately.
Caption: The subject’s eyes align with the upper-third intersection — the most powerful position in portrait composition.
The 7 Elements of Photography Explained
What are the 7 basics of photography? They’re the visual building blocks that every strong image uses — often unconsciously by experienced photographers, consciously by beginners learning to see.
- Line — Horizontal, vertical, diagonal, or curved lines guide the viewer’s eye through the frame. A road receding into the distance draws attention to the horizon.
- Shape — The 2D silhouette of objects in your frame. Strong shapes create strong images — a tree’s branches against a bright sky, a doorway’s rectangular form.
- Form — Shape with depth, revealed by light and shadow. The same tree in flat midday light versus golden-hour raking light shows the difference between shape and form.
- Texture — Surface detail that makes viewers want to reach out and touch the image. Close-up shots of brick, bark, or skin are texture-driven.
- Pattern — Repeated elements create rhythm and visual interest. A field of sunflowers, a row of windows, a honeycomb structure.
- Color — Color relationships — complementary (blue/orange), analogous (yellow/green), monochromatic — create mood and visual harmony.
- Space — Negative space (empty areas around your subject) gives images breathing room and makes subjects feel more prominent. Don’t be afraid of an empty sky or blank wall.
Not every photo uses all seven. Strong images typically lead with one or two dominant elements. Train yourself to identify which element you’re prioritizing before you shoot.
Leading Lines, Framing, and Symmetry in Practice
Beyond the Rule of Thirds, three additional composition techniques produce dramatic, consistent results even for beginners.
Leading Lines are physical elements in your scene — roads, fences, rivers, staircases, shadows — that direct the viewer’s eye toward your subject. The technique requires no special equipment: find a line that points toward something interesting, and position yourself so that line enters from a corner of your frame. The viewer’s eye follows it automatically.
Framing uses elements within your scene to create a natural “frame” around your subject — an archway, tree branches, a window, a doorframe. The inner frame draws the eye to the subject and adds layers of depth. To practice: next time you photograph a person outdoors, look for a natural arch, doorway, or gap in foliage to shoot through.
Symmetry creates visual balance and a sense of order that feels satisfying to look at. Reflections (still water, mirrors, glass buildings), architectural facades, and tunnel shots are naturally symmetrical. The technique works best when broken deliberately — a single off-center element in an otherwise symmetrical scene creates compelling tension.
Caption: The road edges function as leading lines, pulling the viewer’s gaze from foreground to the mountain horizon.
Basic Lighting Fundamentals: Natural vs. Artificial Light
Lighting is arguably more important than your camera body. A skilled photographer with a $400 camera and great light will consistently outshoot an unskilled photographer with a $3,000 camera in bad light. Learning to see and use light is the highest-leverage beginner skill after the exposure triangle.
Natural light essentials:
- Golden hour (the hour after sunrise and before sunset) produces warm, directional light with long shadows — widely regarded as the most flattering and visually interesting natural light for portraits and landscapes alike.
- Overcast/cloudy days create a natural diffuser, producing even, shadow-free light that’s excellent for portraits and product shots.
- Harsh midday sun (10am–2pm) creates unflattering direct shadows under eyes and noses. Move subjects to open shade — the area shaded from direct sun but still lit by the open sky — for much better results.
- Backlighting (shooting toward the light source) creates dramatic silhouettes and rim-light effects. Expose for the background and let your subject darken, or expose for the subject and let the background blow out.
Artificial light: Don’t avoid it. Indoor window light is one of the best portrait light sources available — position your subject 1–3 feet from a large window, with the light coming from the side (not behind) for directional, flattering results. The built-in flash on entry-level cameras is a last resort; it produces flat, harsh light that makes most photos look worse.
The Golden Ratio and When to Break the Rules
The Golden Ratio (approximately 1:1.618) is a mathematical proportion found throughout nature — in spirals, plant growth, and human proportions — that artists have used intentionally since the Renaissance. In photography, as explained by resources like the Corel Discovery Center, it generates the Phi Grid: a compositional guide similar to the Rule of Thirds but with slightly off-center division points that some photographers find produces more organic, less geometric-feeling compositions.
In practice, the difference between the Rule of Thirds and the Phi Grid is subtle enough that most beginners — and many professionals — use the Rule of Thirds as a working approximation of the Golden Ratio concept.
The 20-60-20 rule in photography refers to a tonal composition guideline: roughly 20% highlights, 60% midtones, and 20% shadows creates a balanced, visually pleasing image. It’s a useful mental model when editing or assessing exposure, though it’s descriptive rather than prescriptive.
When to break the rules: After you understand why the rules work, breaking them intentionally becomes a creative tool. Centered composition creates power and confrontation — direct eye contact portraits, symmetrical architecture, isolated subjects in vast negative space. The key word is intentionally. Break the Rule of Thirds because you chose to, not because you forgot to apply it.
Essential Camera Gear for Beginners: What to Actually Buy
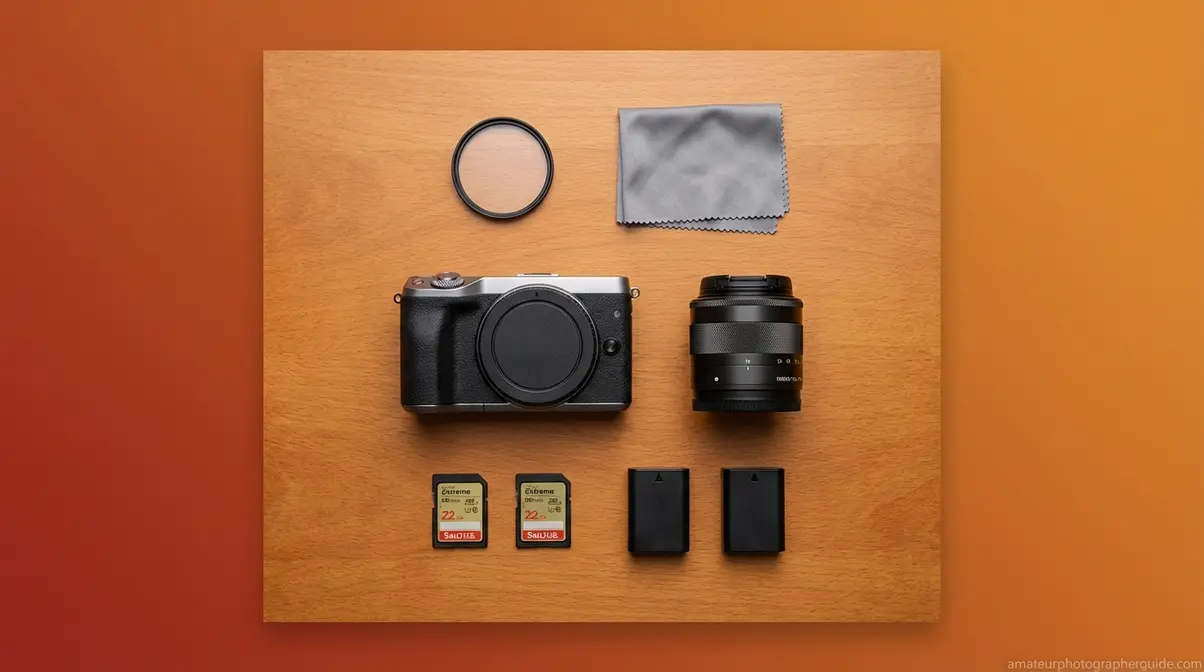
Gear buying anxiety is real — photography forums are full of beginners paralyzed by lens options, tripod reviews, and filter debates before they’ve taken their first 100 photos. The First-Shot Framework’s Phase 4 answer is deliberately simple: buy less than you think you need, and buy it later than you think you should. Most beginner photographers report, in hindsight, that their early accessory purchases gathered dust. This section tells you what actually earns its place in your bag, but for a more detailed list, see our guide to essential gear for beginner photographers.
Caption: The four items you genuinely need on day one — everything else is phase two at the earliest.
Kit Lenses vs. Prime Lenses: What to Buy First
Your camera almost certainly came with a kit lens — typically an 18-55mm zoom (or 16-50mm in compact mirrorless formats). Common beginner wisdom dismisses kit lenses as inferior. Photography communities broadly push back on this: the kit lens is capable of producing excellent images, and your camera skills are a far bigger limiting factor than your lens for the first 6–12 months.
That said, adding a prime lens changes everything — and not for the reasons beginners typically expect.
| Lens Type | Example | Max Aperture | Best For | Starting Price |
|---|---|---|---|---|
| Kit zoom (18-55mm) | Canon RF-S 18-45mm | f/4.5–6.3 | Learning versatility, travel | Included in kit |
| Standard prime (50mm) | Canon RF 50mm f/1.8 | f/1.8 | Portraits, low light, background blur | ~$200 |
| Wide prime (24mm) | Sony 24mm f/2.8 | f/2.8 | Street, environment, small spaces | ~$350 |
| Portrait prime (85mm) | Nikon Z 85mm f/1.8 | f/1.8 | Head-and-shoulder portraits | ~$500 |
The 50mm f/1.8 (sometimes called the “nifty fifty”) is the single most recommended first prime for beginners. It’s available for every major mirrorless mount, costs $150–$250 new, and delivers background blur that feels dramatically different from a kit lens at f/5.6. If you want that “professional blurry background” look and your kit lens can’t deliver it, a 50mm f/1.8 is your answer.
Recommendation: Shoot your kit lens for 60 days. If you consistently find yourself frustrated by low-light results or insufficient background separation, add a fast prime. Don’t add it on day one.
Do You Really Need a Tripod?
The honest answer: not immediately, but eventually yes. A tripod unlocks slow shutter speed photography (light trails, milky-water landscapes, astrophotography), enables self-portraits without asking someone for help, and dramatically reduces camera shake in dim light when ISO limits would otherwise compromise image quality.
- For beginners, prioritize a tripod when:
- You want to photograph at night or in low light without raising ISO to damaging levels
- You’re experimenting with shutter speeds below 1/30s for creative blur effects
- You want to include yourself in photos on outings without a second person
- What to look for in a first tripod:
- Maximum load rating above your camera+lens weight (check specs)
- Height reaches your eye level when fully extended (many cheap tripods don’t)
- Ball head (easier to position than pan-tilt for beginners)
- Carbon fiber or aluminum (both work; carbon is lighter, aluminum is more affordable)
Avoid micro-tripods and flexible “gorillapod” style tripods as your primary support — they’re useful accessories but not substitutes for a full-sized, stable tripod. A solid aluminum tripod from brands like Joby, Vanguard, or Zomei in the $50–$80 range beats a $200 branded disappointment for beginners.
Memory Cards: Speed, Capacity, and What You Actually Need
Memory card marketing is confusing by design. UHS-I, UHS-II, V30, V60, U3 — these classifications matter, but not equally for beginners.
What you actually need:
| Spec | Beginner Recommendation | Why |
|---|---|---|
| Speed Class | UHS-I, V30 or higher | Handles 4K video and burst shooting on any APS-C camera (Digital Camera World) |
| Capacity | 64GB–128GB | Roughly 1,500–4,000 RAW files; no mid-shoot card swaps |
| Brand | SanDisk Extreme or Lexar Professional | Consistent write speeds under burst; widely tested |
| UHS-II | Skip for now | Required only for very fast professional bodies (not your beginner mirrorless) |
Avoid: Generic/no-name cards with unverifiable speed ratings. A slow card in a mirrorless camera causes buffer lockup during burst shooting — you press the shutter and nothing happens. Buy from established brands.
How many cards: Buy two 64GB or 128GB cards. Shoot with one; keep the second as a backup. Losing a single card to corruption (rare but real) is less catastrophic than losing your only card on a trip.
A 128GB SanDisk Extreme runs approximately $20–$30 online. This is not where to economize.
Completing Your Gear Bag: The Useful Extras vs. The Unnecessary Upgrades
Once you have a camera body, kit lens, one spare battery, and a quality memory card, you have everything you need to learn photography. Everything below this list is optional — and often better purchased after you’ve identified a specific limitation in your current setup.
- Genuinely useful additions (Phase 2):
- Extra battery + charger (~$20–$40 third-party): Mirrorless cameras are more power-hungry than DSLRs. One extra battery prevents the most common frustration of a dead camera mid-outing.
- UV or protective filter (~$15–$30): Protects your front lens element from scratches and fingerprints. Doesn’t improve image quality — purely protective.
- Camera bag (~$40–$100): A dedicated bag protects gear and makes you more likely to take it out. Choose one that fits your camera + one extra lens comfortably.
- Lens cleaning kit (~$10–$15): Sensor dust and lens smudges are real issues; a blower brush and microfiber cloth solve 90% of cleaning needs.
- Skip for now:
- External flash — learn natural and available light first; speedlights add complexity before fundamentals are solid
- Filters (ND, polarizer, graduated) — useful for landscapes and video, but a Phase 3 purchase when you know you need them
- Gimbal/stabilizer — video-specific tool; buy only if video is your primary goal
- “Upgraded” kit lens — your kit lens is fine; the money is better spent on a fast prime
Gear pressure — the anxiety that your images would be better with more equipment — is one of the most common beginner traps identified across photography forums. The photographers who improve fastest are those who constrain their gear and expand their skill.
Common Beginner Mistakes — and How to Avoid Them
Even the best camera setup and a solid understanding of the exposure triangle won’t help if you’re making the silent technical mistakes that ruin more beginner shots than any gear limitation. This section — the Fifth Phase of The First-Shot Framework — is about pattern recognition: knowing what goes wrong, why, and exactly how to fix it before it becomes a habit.
Five Technical Pitfalls That Ruin Good Shots
1. Shooting at the wrong shutter speed for your subject
The most common cause of blurry photos isn’t camera shake — it’s a too-slow shutter speed for a moving subject. A child running in afternoon sun needs at least 1/500s. At 1/60s, they’ll blur. Check your shutter speed before every session type, not just when you think it matters.
2. Trusting the camera screen instead of the histogram
Camera screens look different in different ambient light. A photo that appears correctly exposed on a bright screen outdoors may be significantly underexposed. Check the histogram — especially for high-contrast scenes — every time you shoot in tricky light.
3. Ignoring the background
Beginning photographers focus on the subject and forget the background. Telephone poles appearing to “grow” out of heads, cluttered countertops behind portraits, and busy street scenes that compete with the subject are all avoidable. Before pressing the shutter, scan the entire frame edge to edge.
4. Staying on Auto mode too long
Auto mode teaches you nothing about your camera. It’s a useful first-day tool and a poor six-month habit. Move to Aperture Priority within your first week and commit to understanding what you’re changing and why.
5. Not reviewing shots critically
After any meaningful photo session, sit down with your images at actual size (100% zoom). Look for sharpness, exposure, and composition problems. The photographers who improve fastest are those who diagnose their own weaknesses specifically — not those who delete blurry photos and move on.
Why Are My Photos Blurry? (A Quick Checklist)
Blurry photos almost always result from one of three causes: too-slow shutter speed, inaccurate focus, or camera shake. If moving subjects blur, your shutter speed is too slow — shoot at 1/500s or faster for action. If still subjects blur, camera shake is the culprit — use a shutter speed at or above 1/focal length of your lens (1/50s for a 50mm lens). If sharpness appears in the wrong area, check that your autofocus point is positioned on your intended subject. Enable face/eye detection autofocus if your camera supports it — it dramatically reduces focus-point errors.
When a Simpler Camera Option Makes More Sense
Mirrorless interchangeable-lens cameras are the right choice for most beginners — but not every beginner. A fixed-lens compact camera (like the Sony ZV-1 or Canon PowerShot V10) may genuinely serve you better if:
- Photography is a secondary interest and you mostly want a phone upgrade for travel snapshots
- You want something truly pocketable without a camera bag
- You have no interest in swapping lenses or expanding a system over time
These cameras cost $300–$500 and produce excellent results within their limitations. They’re not “lesser” cameras — they’re optimized for a different use case. The honest question: do you want to learn photography as a deliberate skill, or do you want better photos with less effort? Both are valid. Only the first answer points to a mirrorless interchangeable-lens system.
When to Take a Photography Course or Workshop
Self-directed learning from guides like this one will take you far — but there are clear signals that structured instruction accelerates your progress:
- You’ve shot for 3+ months and your images aren’t visibly improving session to session
- You want to pursue specific genres (wildlife, wedding, commercial) that have technique requirements beyond general beginner content
- You prefer learning from feedback on your actual work rather than consuming general principles
- You’re considering monetizing your photography within a specific timeframe
Photography courses range from free (YouTube channels like Fundamentals of Photography by CreativeLive, Khan Academy’s art history context) to $100–$500 for structured online courses (Lightroom + photography bundles on Skillshare or Udemy) to $500–$2,000+ for in-person workshops with working photographers. In-person workshops in your specific genre are the highest-ROI investment for serious learners because the feedback is immediate and tailored.
Frequently Asked Questions
What are the basics of photography for beginners?
The basics of photography for beginners are three interconnected skills: understanding the exposure triangle (aperture, shutter speed, and ISO), applying composition principles (starting with the Rule of Thirds), and choosing appropriate camera settings for your subject. These skills work together — exposure gets the technical elements right, and composition makes the image compelling. Most beginners learn fastest by practicing Aperture Priority mode first, then transitioning to Manual within 30–60 days of consistent shooting.
What are the 7 basics of photography?
The 7 elements of photography are line, shape, form, texture, pattern, color, and space. These visual building blocks appear in every compelling image — often unconsciously in experienced photographers’ work, but deliberately in beginners learning to see. Line guides the viewer’s eye; shape and form create structure; texture adds tactile quality; pattern creates rhythm; color sets mood; and negative space gives images room to breathe. Identifying which element dominates your scene before shooting is a fast path to stronger composition.
What is a good beginner camera to start with?
The Canon EOS R50 is a top beginner camera recommendation, priced at approximately $679 new or $449–$500 refurbished from Canon (verify current pricing at usa.canon.com). It was the #1 best-selling mirrorless camera on Amazon through mid-2025 (TheNewCamera), offers Canon’s best-in-class Dual Pixel CMOS AF II autofocus, and accesses a growing RF lens ecosystem. The Sony a6100 and Nikon Z30 are strong alternatives at similar price points, each with distinct strengths in autofocus and video respectively.
What is the f for in photography?
The “f” in f-stop stands for focal ratio — the mathematical relationship between a lens’s focal length and its aperture opening diameter. In practice, what matters is the number: a small f-number (f/1.8) means a wide aperture opening that lets in more light and creates shallow depth of field with blurry backgrounds, while a large f-number (f/11) means a narrow opening that admits less light but keeps more of the scene sharp. Think of it as a counterintuitive scale: smaller number = bigger hole.
What is the #1 rule of photography?
The #1 rule of photography is the Rule of Thirds — dividing your frame into a 3×3 grid and placing your subject at one of the four grid intersections rather than dead-center. Photography communities worldwide identify this as the single highest-impact compositional tool for beginners because it immediately makes images feel more dynamic, intentional, and visually interesting. Enable the grid overlay in your camera’s live view settings and apply it to every shot until it becomes instinctive.
What is the golden rule of photography?
The golden rule of photography is the Golden Ratio (approximately 1:1.618) — a mathematical proportion that appears throughout nature and has guided visual art since the Renaissance. In photography, it’s expressed as the Phi Grid: a compositional guide similar to the Rule of Thirds but with slightly inward intersection points that produce compositions some photographers feel are more organic and less geometric. For practical purposes, the Rule of Thirds is a working approximation of the Golden Ratio and produces equivalent results for most beginners.
How long does it take to learn photography basics?
Most beginners grasp the core exposure triangle concepts within 2–4 weeks of consistent practice. Applying composition principles intentionally takes another 4–6 weeks to feel natural. Photography communities report that the inflection point — when your results start looking visibly more intentional than accidental — typically arrives around the 60–90 day mark of regular shooting (at least 2–3 sessions per week). The technical foundations are learnable quickly; the visual judgment that makes photos compelling develops over months and years of deliberate practice and honest self-review.
Your First Shot Starts Here
For any beginner with a camera in hand, the most valuable realization is this: the gap between your first photo and a great photo isn’t measured in equipment — it’s measured in understanding. Mastering these camera basics for beginners is achievable. The exposure triangle, composition fundamentals, and the right starting camera together give you everything you need to capture your first intentional, well-exposed, well-composed photograph. Modern APS-C mirrorless cameras like the Canon EOS R50 achieve autofocus accuracy that was professional-grade just five years ago, making the technical barrier lower than it has ever been.
The First-Shot Framework works because it mirrors the actual order of a beginner’s experience. You start by choosing a camera — not by memorizing f-stops. You learn aperture before you buy a tripod. You practice composition before spending money on a second lens. That sequencing matters because knowledge you can apply immediately compounds; knowledge you can’t yet use evaporates. Every section of this guide was ordered with that compounding in mind.
Your next step is concrete: pick up your camera, set it to Aperture Priority (Av on Canon, A on Nikon/Sony), dial to f/2.8 or the widest your lens allows, and walk out the door. Take 50 photos today — not 5. Look at them critically on a computer screen at 100% zoom tonight. Identify the three weakest images and the single strongest one, and name why. That loop — shoot, review, identify — is the entire engine of photography improvement. No gear purchase accelerates it faster than that practice does.
