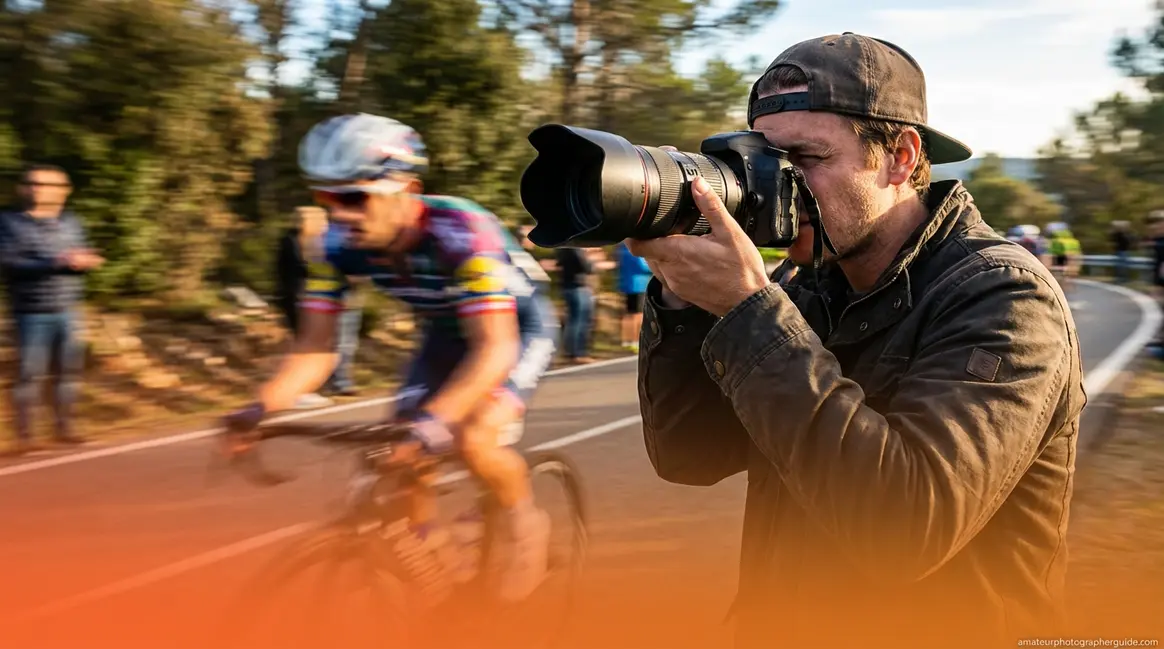
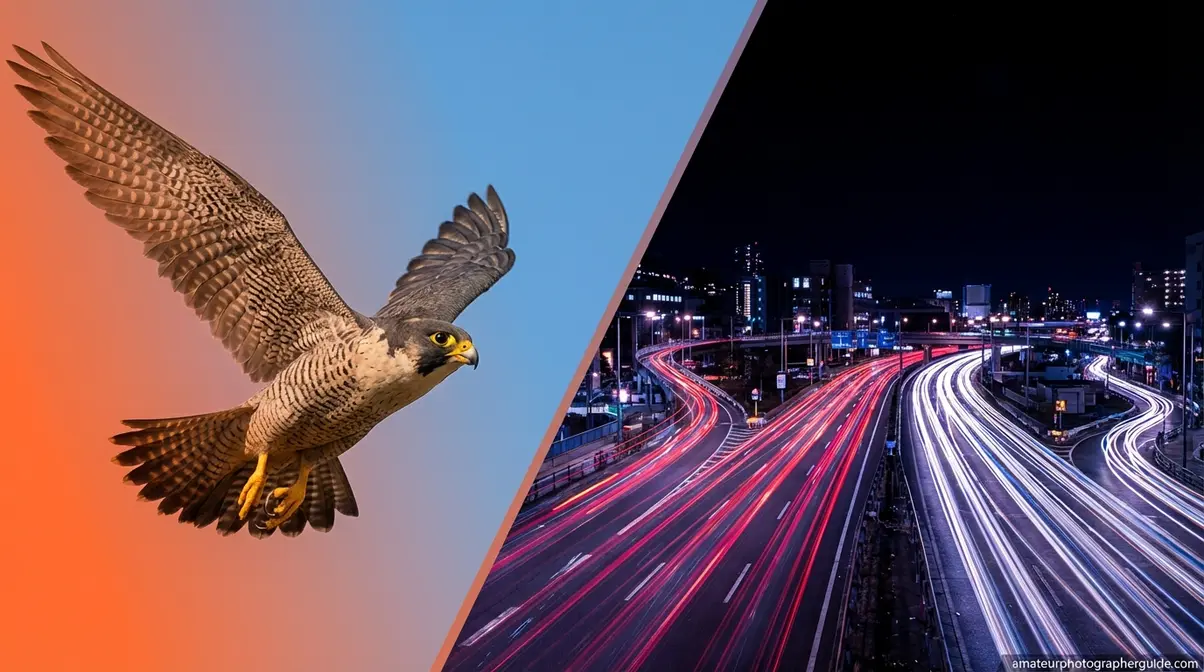
How to Photograph Moving Objects: Settings & Techniques
“High shutter speed, high ISO (don’t be scared of sensor noise), wide aperture, and — very important — practice panning shots.”
— Community voice, across photography forumsWhat’s in this guide
- Essential Camera Settings for Motion Photography
- Freezing Action: Getting Sharp, Blur-Free Photos
- Showing Action: Panning & Creative Motion Blur
- Advanced Challenges: Fast Subjects & Night Motion
- Capturing Motion on a Smartphone
- Common Motion Photography Mistakes & Fixes
- Frequently Asked Questions
- Bringing It Together
You’ve already figured out that blurry photos of moving subjects come down to camera settings. The problem? Most guides tell you to “use a faster shutter speed” without telling you how fast. A dog sprinting in the garden needs a different setting than a car passing at 60mph. This guide provides specific starting settings for over 10 motion scenarios—from kids’ sports to nighttime traffic—plus dedicated tips for capturing movement with your smartphone. We’ll cover core settings, essential techniques, and common mistakes to help you photograph moving objects confidently.
Essential Camera Settings for Motion Photography
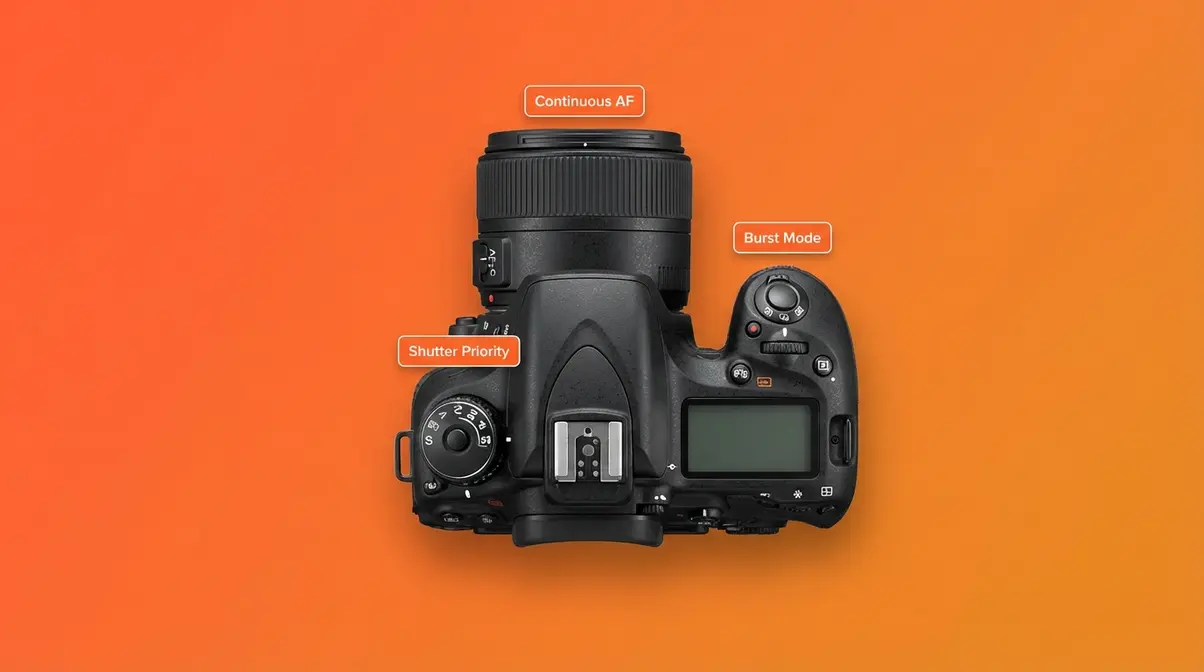
Every blurry action photo traces back to one of three settings being wrong: shutter speed, focus mode, or drive mode. According to Nikon Professional Services, choosing Continuous AF (AF-C) is critical for action, preventing the camera from locking focus on a static point as the subject moves. Always adjust all three settings before you start shooting.
- Our editorial team researched manufacturer guides and professional forums to develop “The Motion Control Dial”—a framework for setting your camera correctly. Think of it as three dials you must turn together:
- Shutter Speed Dial: Controls motion blur.
- Focus Dial: Switches from Single-Shot AF to Continuous AF to track movement.
- Drive Dial: Switches from single shot to Burst/Continuous to capture peak action.
Most photographers fail not because they are unaware of shutter speed, but because they forget to adjust the other two. AF-C and Burst Mode are a package deal for action photography.
Shutter Speed: Your Tool for Motion
The longer the shutter stays open, the more a subject moves across the sensor, creating blur. A shorter opening time freezes that movement. Shutter Priority mode—”S” on Nikon/Sony or “Tv” on Canon—lets you set the shutter speed while the camera calculates the aperture. This is the best mode for action, as you’re directly controlling the most important variable.
Focus Mode: Tracking Moving Subjects
Single-Shot AF (AF-S/One-Shot) locks focus once and is meant for still subjects. For anything moving, you must use Continuous AF—AF-C on Nikon/Sony or AI Servo on Canon. This mode continuously recalculates focus as the subject moves. As Sony’s official focus setting guide explains, using its Tracking function “helps increase the chances of capturing a subject moving at high speed.”
Drive Mode, Burst Shooting & IS
Burst Mode (Continuous Shooting) fires multiple frames per second while you hold the shutter button. As Nikon’s official guide to using Continuous shooting mode states, this is ideal for action because it increases your chances of capturing the perfect moment.
Image Stabilization (IS) has two modes crucial for motion:
| IS Mode | Compensates For | Best Use |
|---|---|---|
| IS Mode 1 | All camera movement | Stationary subjects |
| IS Mode 2 | Vertical movement only | Panning shots |
Set IS Mode 2 for panning; otherwise, Mode 1 is the default. With these settings understood, you can choose to either freeze the action or creatively blur it. For a deep dive into shutter speed or how the exposure triangle works, our other guides offer more detail.
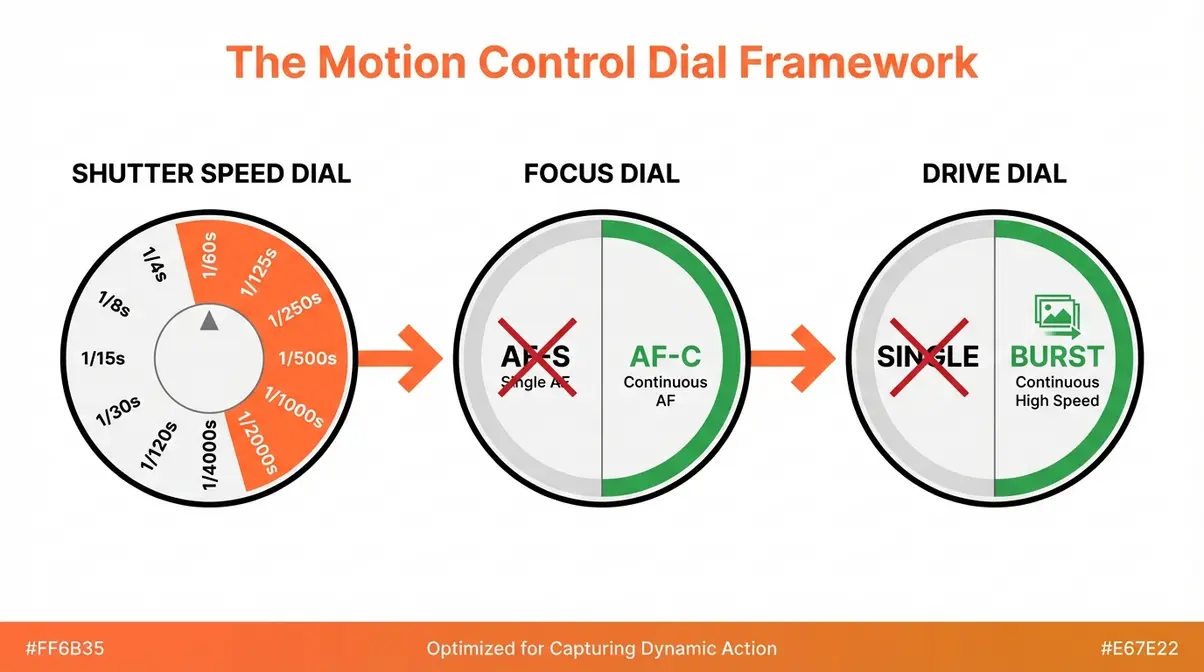
Caption: The Motion Control Dial: all three dials — shutter speed, focus mode, and drive mode — must be set together before photographing moving objects.
Freezing Action: Getting Sharp, Blur-Free Photos
To photograph moving objects without blur, set your shutter speed to at least 1/500s for most sports and active subjects. Canon’s capturing motion guide recommends 1/500s as a baseline for runners, scaling to 1/2000s or faster for birds in flight. The key is matching shutter speed to your subject’s speed. The Cookbook table below provides specific starting points for over 10 common scenarios.
“To freeze a running athlete in motion, set your shutter speed to at least 1/1000s — at 1/500s, you risk blur in fast-pumping arms and legs” (Canon Europe, Capturing Motion guide).
Choosing Shutter Speed to Freeze Motion
Your starting shutter speed depends entirely on the subject:
- 1/250s: Walking adult, slow-moving objects.
- 1/500s: Jogging adult, children playing, cyclists at moderate speed.
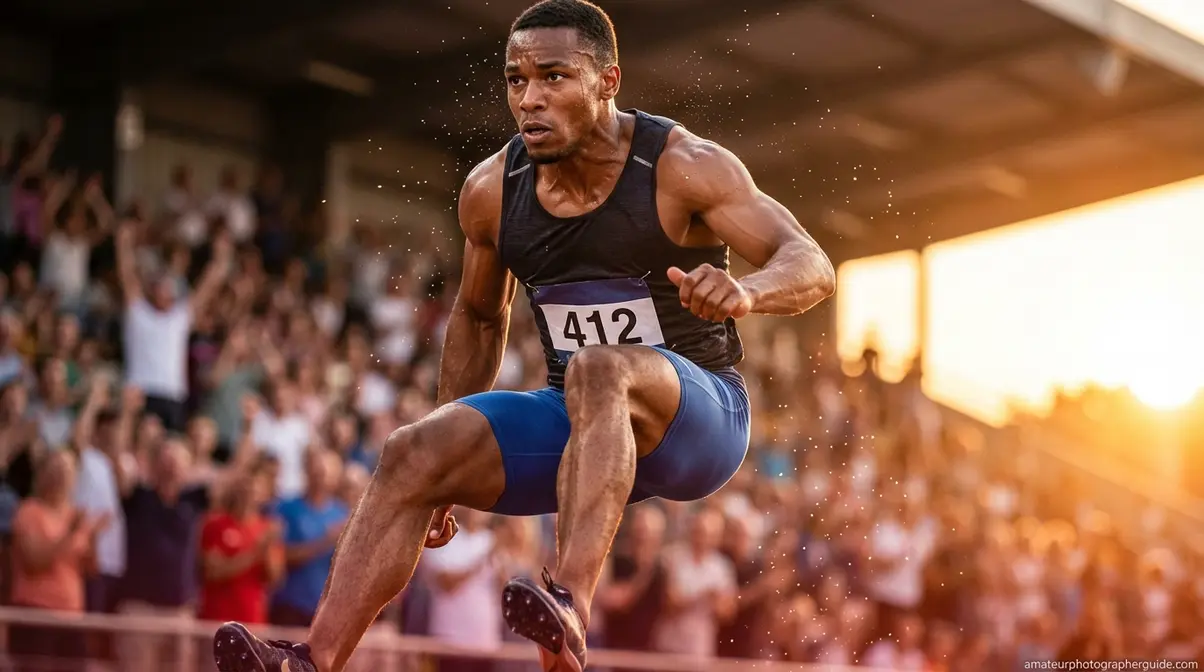
- 1/1000s: Sprinting athlete, jumping, most team sports.
- 1/2000s+: Fast cars, birds in flight, motorsport.
A subject moving directly toward you requires a slower shutter than one crossing your frame left-to-right. For example, a football tackle across the pitch needs 1/800s, but the same tackle coming toward you could be frozen at 1/500s.
How to Use Shutter Priority Mode (S/Tv)
To capture a moving object using Shutter Priority, follow these steps:
- Turn your mode dial to S (Nikon/Sony) or Tv (Canon).
- Use the command dial to set your target shutter speed—start with 1/500s.
- If the aperture value in the viewfinder is blinking, the camera cannot expose correctly. Raise your ISO or move to brighter light.
- Set your AF mode to AF-C (Continuous) or AI Servo.
- Set the drive mode to Continuous / Burst.
- Half-press the shutter to focus, then hold it down to fire a burst of shots.
For a deeper walkthrough of using Shutter Priority mode, our guide on camera modes can help.
Motion Photography Cookbook: 10+ Scenarios
This table provides proven starting points for common motion scenarios. These assume reasonable daylight; adjust your ISO up in lower light.
| Scenario | Shutter Speed | Aperture (Guide) | ISO Start | AF Mode | Drive Mode |
|---|---|---|---|---|---|
| Person walking | 1/250s | f/5.6 | 200 (daylight) | Single or AF-C | Single |
| Child running / sports | 1/500s | f/5.6 | 400 | AF-C / AI Servo | Burst |
| Competitive sports (football, basketball) | 1/1000s | f/4 | 800–1600 | AF-C / AI Servo | Burst |
| Dog or pet running | 1/1000s | f/5.6 | 800 | AF-C / AI Servo | Burst |
| Cyclist on road | 1/800s | f/5.6 | 400 | AF-C / AI Servo | Burst |
| Fast car (roadside) | 1/2000s | f/8 | 400 | AF-C | Burst |
| Bird in flight | 1/2000s–1/4000s | f/6.3 | 800–1600 | AF-C / Tracking | Burst |
| Skateboarding / BMX | 1/1000s | f/5.6 | 800 | AF-C | Burst |
| Waterfall (creative blur) | 1/8s–1s | f/16 | 100 (use tripod) | Single | Single |
| Kids in swimming pool | 1/1000s | f/5.6 | 800–1600 | AF-C | Burst |
| Night traffic (light trails) | 3–30s | f/8 | 100–200 (tripod) | Single | Single (remote) |
| Panning — passing vehicle | 1/60s–1/125s | f/8 | 200 | AF-C | Burst |
In low light, prioritize a fast shutter speed and accept the resulting sensor noise. A slightly grainy sharp photo is always better than a noiseless blurry one.
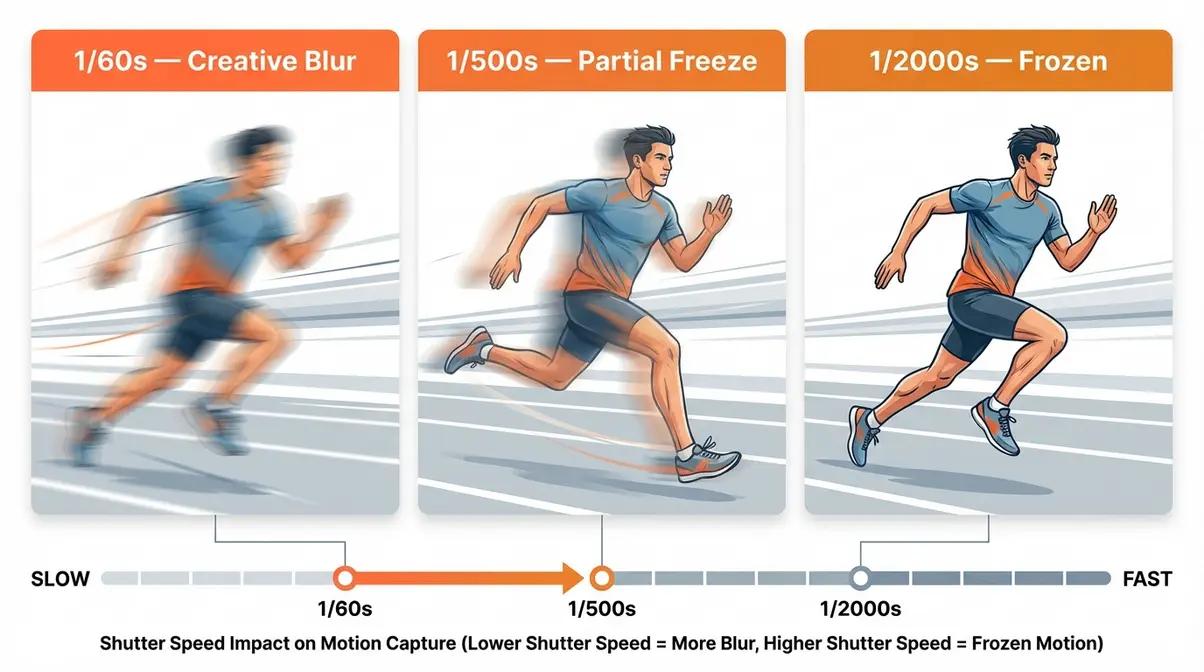
Caption: Side-by-side shutter speed comparison showing the same running subject at 1/60s, 1/500s, and 1/2000s — the difference in motion blur is immediately visible.
Showing Action: Panning & Creative Motion Blur
To convey a sense of speed, panning is the essential technique. Where freezing motion stops time, panning shows it by keeping the subject sharp against a streaked, blurry background. The New York Film Academy recommends a shutter speed between 1/30s and 1/125s as the effective range for panning.
Panning requires you to physically move the camera to follow the subject as the shutter fires. This keeps the subject sharp while the static background blurs across the sensor. Using The Motion Control Dial framework, this means deliberately slowing the Shutter Dial, activating IS Mode 2, and keeping AF-C engaged.
“Panning at 1/60s–1/125s with IS Mode 2 enabled gives beginners the best chance of a sharp subject against a dynamically blurred background” (New York Film Academy, motion photography guide).
How Panning Works: The 3-Step Technique
To execute a pan, you move the camera at the same speed as your subject. Successful panning techniques from the New York Film Academy rely on a smooth, continuous motion.
- Set Up: Stand perpendicular to the subject’s path. Set your shutter to 1/60s–1/125s, enable IS Mode 2, select AF-C, and use Burst mode.
- Follow Before Shooting: Track the subject in your viewfinder for a second or two before shooting to match its speed.
- Fire and Follow Through: Press and hold the shutter to fire a burst while continuing your swing. Don’t stop moving the camera until after the burst is complete.
The follow-through is critical for a smooth arc, just like in baseball or golf.
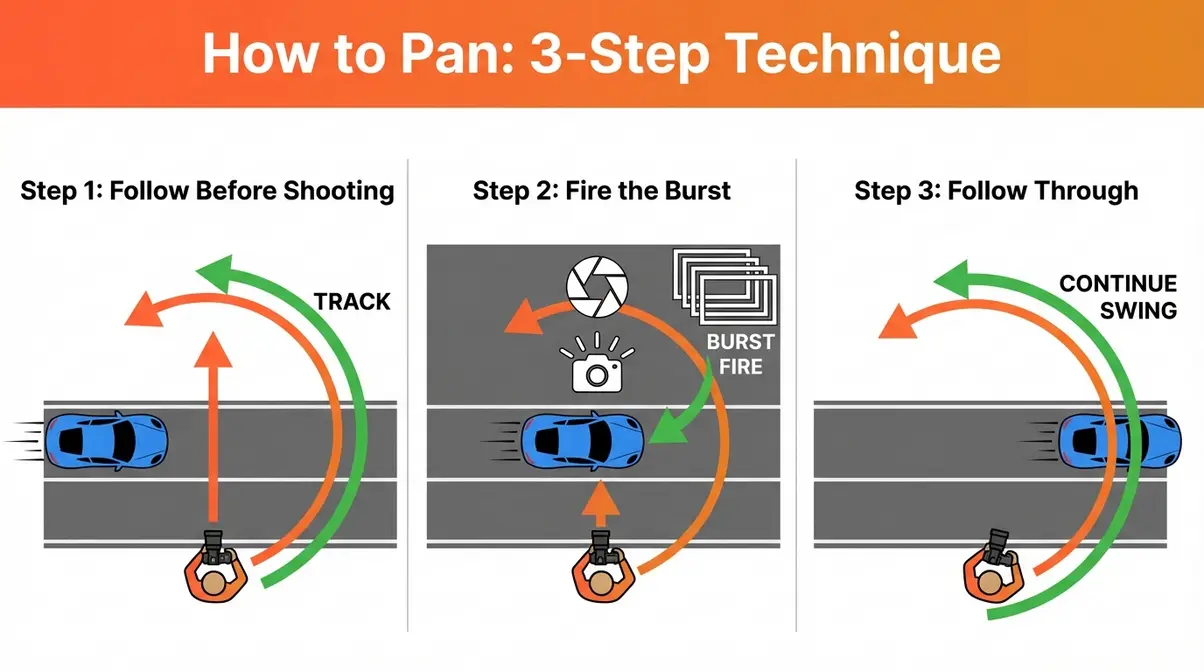
Caption: The three-step panning sequence — follow, fire, follow through — executed in one fluid motion perpendicular to the subject’s path.
Shutter Speed & Focal Length for Panning
The best shutter speed for panning is between 1/30s (more blur, harder to master) and 1/125s (less blur, easier to get a sharp subject). Start at 1/60s and adjust based on your subject’s speed.
Focal length is also critical: longer focal lengths magnify panning errors. A slight wobble at 200mm will ruin the shot. For beginners, a 70–100mm focal length provides a good balance of subject isolation and forgiveness. If your shots at 200mm are inconsistent, switch to 100mm for a higher keeper rate.
Long Exposure Blur: Waterfalls & Traffic
For a different kind of motion blur, use a long exposure with a tripod. This technique is for stationary cameras and moving scenes. Waterfalls become silky at 0.5s–4s, while traffic light trails need 5–30s exposures. A tripod is mandatory, as any camera shake will cause blur. As Adobe’s guide to motion blur suggests, use a neutral density (ND) filter to reduce light, allowing for longer exposures during the day without overexposing the image. For a complete guide to long exposure photography, that resource goes into more detail.
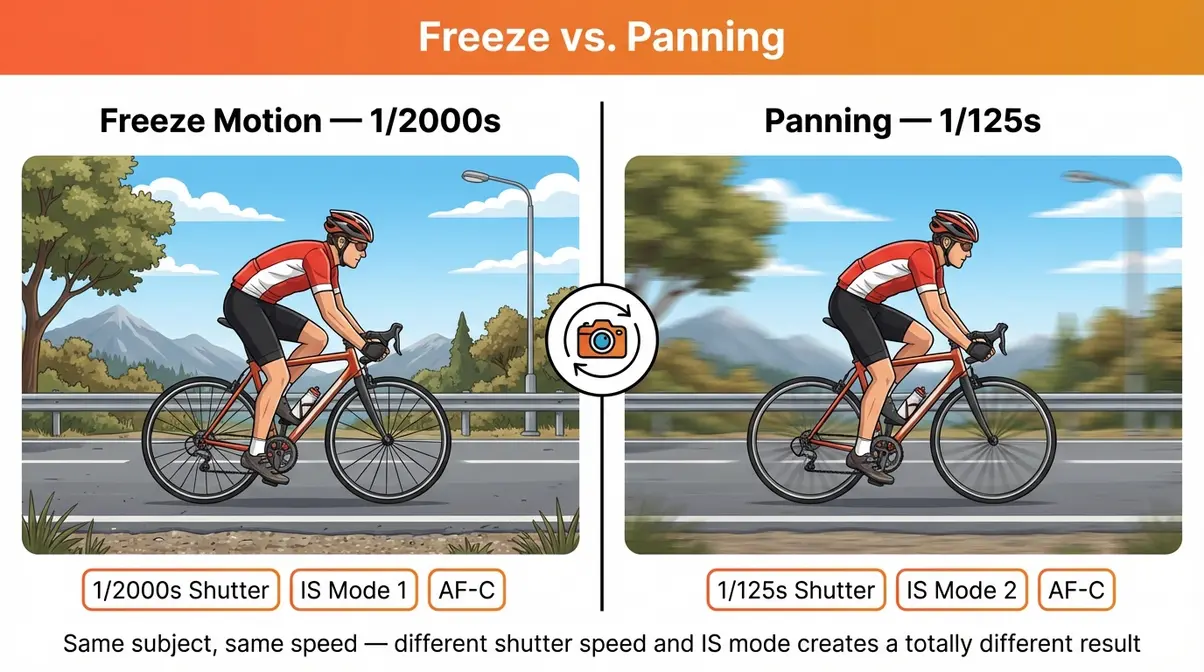
Caption: Freeze vs. panning using the same cyclist — the frozen shot shows detail; the panned shot communicates speed.
Advanced Challenges: Fast Subjects & Night Motion
Photographing extremely fast-moving objects or subjects at night pushes your camera to its limits. This requires pushing all three dials of The Motion Control Dial to their extremes: maximum burst rate, the fastest AF mode, and shutter speeds far beyond typical action settings.
“For birds in flight or motorsport, a minimum shutter speed of 1/2000s is required to freeze wing beats or wheel rotation — at anything slower, motion blur remains in the fastest-moving extremities” (Nikon Imaging, Sports AF guide).
For an introduction to sports photography that covers positioning and anticipation, that guide is a natural companion to this section. To learn about the role of ISO in low light, that resource covers sensor noise management in detail.
Photographing Extremely Fast Subjects
Subjects like birds in flight or racing cars require shutter speeds of at least 1/2000s to freeze motion in their extremities, like wingtips or spinning wheels. For erratically moving subjects, advanced AF modes are essential. As Nikon’s official guide to Dynamic-Area AF02.pdf) recommends, multi-point tracking systems help maintain focus when a subject briefly leaves the primary AF point. Modern mirrorless cameras from Sony and Canon offer AI-based subject tracking that can automatically detect and lock onto a bird’s eye.
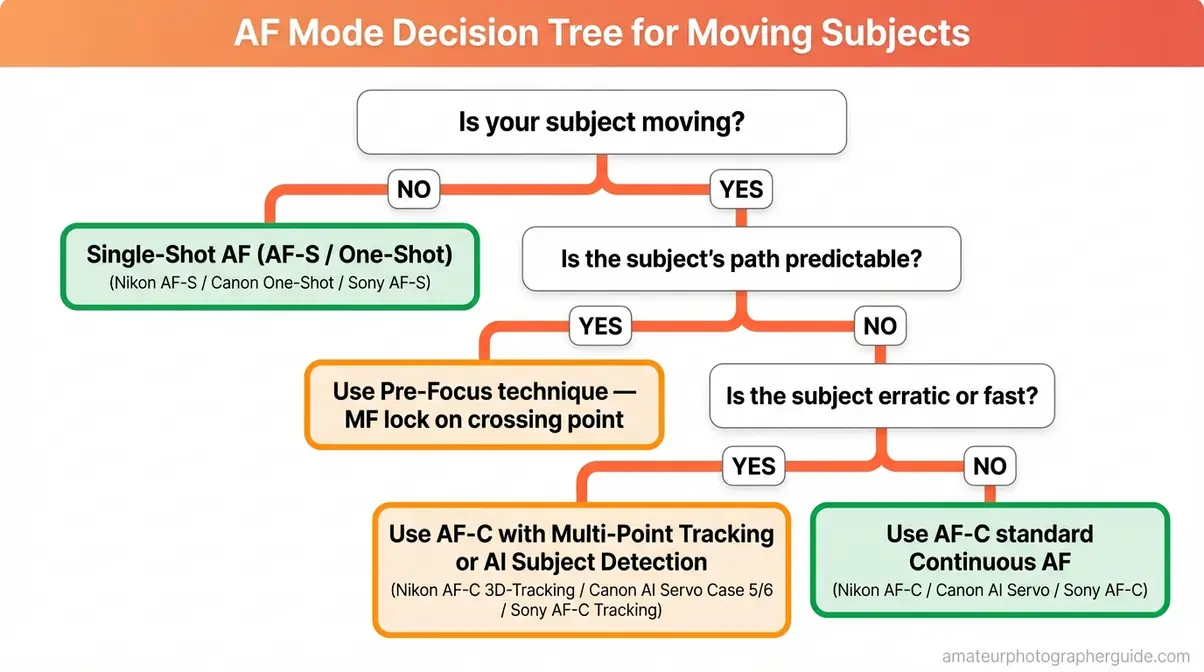
Caption: AF mode decision tree — use this flowchart to select the right autofocus mode before your next action shoot.
Pre-Focusing for Predictable Action
When a subject’s path is predictable, pre-focusing is often more reliable than continuous AF.
- Identify the crossing point, like a hurdle or finish line.
- Focus and lock. Use Single-Shot AF to focus on that spot, then switch the lens to Manual Focus (MF) to lock it.
- Wait and fire. When the subject enters the pre-focused zone, fire a full burst.
This technique eliminates any autofocus lag at the critical moment, ensuring a perfectly sharp shot.
Shooting Moving Subjects at Night
To freeze motion at night, you need a fast shutter, which reduces light. You must compensate by using a wide aperture and high ISO. A good starting point is ISO 3200–6400, an aperture of f/2.8 or wider, and a shutter speed of at least 1/500s. The resulting image may have noise, but a sharp, noisy photo is better than a clean, blurry one. In very low light, autofocus may struggle; use your camera’s AF-assist beam or pre-focus manually on a lit area.
Capturing Motion on a Smartphone
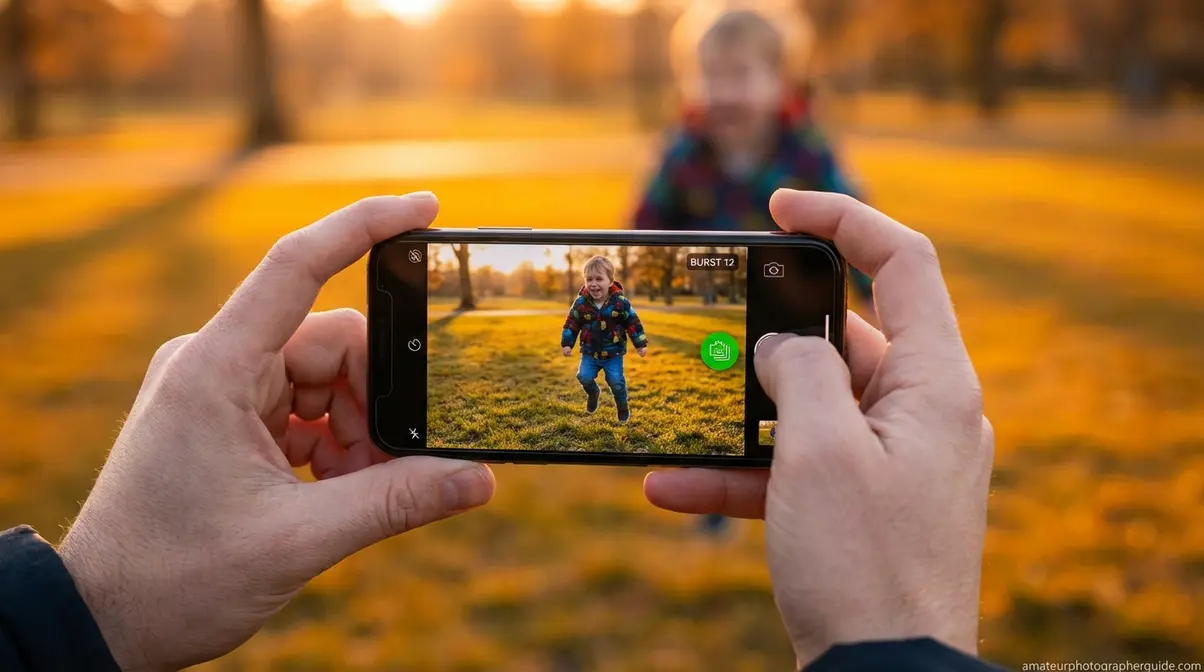
You can capture great action shots with your smartphone if you use the right modes. Instead of the default photo mode, switch to Burst Mode or Pro Mode to gain control over your shutter speed.
“iPhone Action Mode stabilises video footage at fast shutter equivalents, making it the most accessible tool for sharp action capture on a smartphone without touching manual settings” (Apple Support).
Enabling RAW capture formats provides more image data for post-processing. Apple’s official support documents instruct users on how to enable ProRAW on compatible devices.
iPhone: Burst, Action & Live Photos
- Burst Mode: Press and hold the Volume Up button to fire a continuous burst of approximately 10 frames per second. Afterward, select the best frame in the Photos app.
- Action Mode (iPhone 14+): This video feature provides exceptional stabilization. Shoot a short clip in Action Mode, then take a screenshot of the sharpest frame from the video.
- Live Photos: This feature captures 1.5 seconds before and after you press the shutter, creating a safety net for unpredictable moments. You can extract the best still image later.
Android: Pro Mode and Burst Shooting
On Android, use Pro Mode (sometimes called Expert Mode) for manual control.
- Using Samsung Pro Mode:
- In the Camera app, tap More, then select Pro.
- Tap the shutter speed icon and drag the slider to 1/500s or faster.
- Raise the ISO to 800–1600 to compensate.
- Press and hold the shutter button to shoot in burst.
As confirmed by Samsung’s guide to Pro mode controls, this gives you complete control over your photos. Most Android phones activate burst mode by pressing and holding the shutter button.
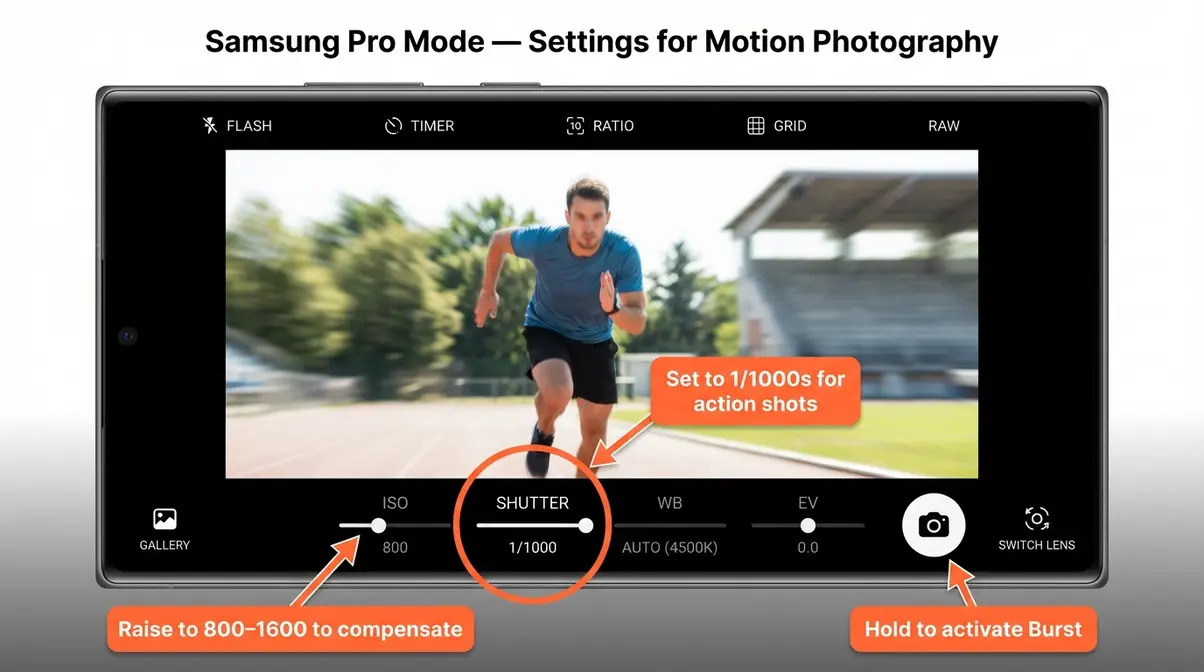
Caption: Samsung Galaxy Pro Mode with shutter speed set to 1/1000s — this single change separates sharp action shots from blurry ones on Android.
Common Motion Photography Mistakes & Fixes
Even with the correct settings, common errors can ruin your shots. Here’s how to troubleshoot the most frequent issues.
“The most common reason a fast shutter speed fails to produce a sharp photo is that AF mode is still set to Single-Shot, locking focus on the empty space where the subject used to be.”
5 Common Motion Photography Mistakes
- AF Mode on Single-Shot: Your camera focuses on the background where the subject used to be. Fix: Always switch to AF-C / AI Servo for action.
- ISO Too Low: Your shutter speed is fast, but the photo is underexposed. Fix: Raise the ISO before you shoot. A bright photo with some noise is better than a dark, unusable one.
- Panning Too Late: Your pan looks jerky instead of smooth. Fix: Start tracking the subject in your viewfinder a second or two before pressing the shutter.
- Using Single-Shot Drive Mode: You miss the peak moment. Fix: Always use Burst mode and fire multiple frames to increase your chances of capturing the perfect shot.
- Unnecessarily High ISO: Your daylight shots look grainy. Fix: In bright light, set your ISO to Auto with a reasonable ceiling (like 1600) or set it manually to a low value like 200 or 400.
When Motion Techniques Don’t Work
- Extreme Low Light: If there isn’t enough light for even a high ISO and wide aperture, you must either add a flash or embrace creative blur with a long exposure.
- Erratic Subjects: A group of birds or children moving unpredictably can overwhelm even advanced autofocus systems. Fix: Use a wider lens to give yourself more room for error and shoot more frames.
Frequently Asked Questions
Best Camera Setting for Movement?
The best setting depends on your goal. To freeze motion, use Shutter Priority (S/Tv) with a speed of 1/500s or faster, Continuous AF (AF-C/AI Servo), and Burst drive mode. To show motion creatively, slow the shutter to 1/60s–1/125s and pan with the subject. For most beginners, Shutter Priority at 1/500s with AF-C is the most reliable starting combination.
Shutter Speed for Moving Objects?
Shutter speed for moving objects depends on the subject’s speed and your creative goal. A walking person needs 1/250s; running athletes require 1/500s–1/1000s; fast cars and birds need 1/2000s or faster to freeze completely. For creative panning with a blurred background, use a slower speed of 1/60s–1/125s. When in doubt, start at 1/500s and adjust.
How to Capture a Moving Object?
To capture a moving object in photography, switch your camera to Shutter Priority (S or Tv) and set the shutter speed to at least 1/500s for active subjects. Enable Continuous Autofocus (AF-C or AI Servo) to track the subject. Use Burst mode to fire multiple frames to increase your chances of a sharp shot, then select the best one. On a smartphone, press and hold the shutter to activate Burst Mode.
Techniques for Photographing Movement?
The two primary techniques for capturing movement are freezing motion and creating motion blur. Freezing motion uses a fast shutter speed (1/500s–1/4000s) to get a crisp, sharp image. Motion blur uses a slower shutter speed, often combined with panning (following the subject with the camera), to blur the background while keeping the subject sharp, conveying a sense of speed.
Capturing Movement for Beginners?
As a beginner, the easiest way to capture movement in photography is to use Shutter Priority mode (S on Nikon/Sony, Tv on Canon) and set the shutter speed to 1/500s. Your camera will select the correct aperture. Also, switch your focus mode to Continuous AF (AF-C) and enable Burst shooting. On a smartphone, simply press and hold the shutter button to activate Burst Mode.
Bringing It Together
Learning how to photograph moving objects is straightforward once you apply three settings together: a fast shutter speed (start at 1/500s), Continuous AF mode, and Burst drive mode. The Cookbook table in this guide gives you specific starting points for over 10 common scenarios, and this core principle applies whether you’re using a DSLR or a smartphone.
That is the core of The Motion Control Dial framework: treat shutter speed, focus mode, and drive mode as three interconnected controls. Most blurry action shots happen when one of those is left on the wrong setting—usually the focus mode. Set all three correctly, and your keeper rate will improve immediately.
Start with a simple scenario from the Cookbook—a child or pet running—and dial in 1/500s, AF-C, and Burst mode. Your results will speak for themselves.
Dave King
Hi, I'm Dave, the founder of Amateur Photographer Guide. I created this site to help beginner and hobbyist photographers build their skills and grow their passion. Here, you’ll find easy-to-follow tutorials, gear recommendations, and honest advice to make photography more accessible, enjoyable, and rewarding.