
Table of Contents
- What Is Abstract Photography?
- Core In-Camera Techniques
- Creative Composition for Abstract Photos
- Advanced Gear Techniques
- Abstract Photography on Your iPhone
- Abstract Photography in Nature
- Post-Processing for Abstract Photography
- Common Abstract Photography Mistakes
- Frequently Asked Questions
- Start Seeing Differently
This blog post may contain affiliate links. As an Amazon Associate I earn from qualifying purchases.
You know the basics of exposure and composition. But if your abstract photos look more accidental than artistic, the problem isn’t your camera—it’s how you’re seeing.
Most photographers hunt for “abstract subjects.” This is a mistake. Abstract photography isn’t found in unusual objects; it lives in ordinary ones seen differently—in the shadow a drainpipe casts, the color gradient on a concrete wall, or the geometry of a chain-link fence. The subject is never the point. The visual elements are.
This guide provides 15 concrete abstract photography tips—from in-camera techniques to post-processing secrets—that will permanently change how you see through your lens. We’ll cover everything you need to make your work look intentional, not random.
Abstract photography transforms ordinary scenes into art by training you to see elements—color, line, texture, and form—rather than recognizable subjects.
- The Elements-First Shift: See color, line, texture, and form before you see the object. This perceptual habit separates intentional abstract work from happy accidents.
- ICM & zoom bursting create compelling motion blur with shutter speeds between 1/15s and 1s; slow, consistent movement is key.
- iPhone photographers can achieve long-exposure effects using the Live Photos “Long Exposure” effect—no extra gear needed.
- Post-processing is a creative tool, not a correction. Texture blending and tone curves help define your abstract style.
- Common mistake: Shooting too wide when you should isolate a slice of life—go macro or zoom tight to strip context and force abstraction.
What Is Abstract Photography?
Abstract photography prioritizes visual elements—color, line, texture, and form—over recognizable subjects. Rather than documenting what something is, it captures what it looks like when stripped of context. This requires a perceptual shift from seeing objects to seeing elements.
The Art of Education University defines the genre as focusing on form, color, and texture instead of literal subjects (2026). This is accurate, but the real work happens before you even raise the camera.
“Abstract photography succeeds when viewers feel something before they understand what they’re looking at.” — amateurphotographerguide.com, 2026
Seeing Elements, Not Objects
The difference between a snapshot and an abstract image is whether you’re looking at an object or for its visual properties. A rusted drainpipe is just a drainpipe until you notice its amber-to-charcoal color gradient, its diagonal curve, and the pitted texture catching the light. Those elements are your abstract material.
This is The Elements-First Shift—the discipline of perceiving visual elements before registering the object itself. Every tip in this guide is a vehicle for that shift. Walk past a chain-link fence and see a repeating diamond grid instead of a barrier. That reframing is the core skill.
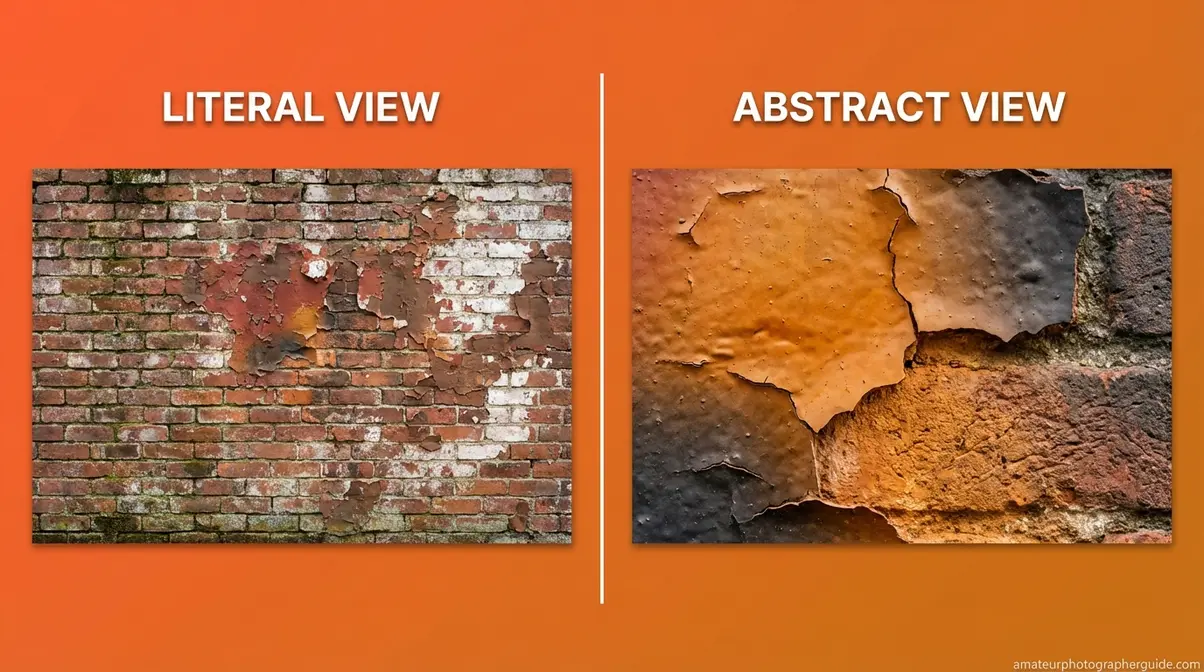
Caption: The same wall, two ways of seeing it—the Elements-First Shift in practice.
The Six Visual Elements to Hunt For
Before shooting, run through this mental checklist and ask which element is strongest in the scene.
- Line—Leading lines, curves, and diagonals. Source: The shadow a railing casts on pavement.
- Shape—Geometric or organic outlines. Source: A circular manhole cover shot from directly overhead.
- Form—The three-dimensional impression from shadow and light. Source: Crumpled fabric lit from one side.
- Texture—Surface quality: rough, smooth, or granular. Source: The eroded face of a brick wall at macro distance.
- Color—Isolated hues, gradients, or stark contrasts. Source: The shadow gradient on a concrete wall at golden hour.
- Pattern—Repetition and visual rhythm. Source: Perforated metal panels or the seed arrangement in a sunflower.
North Island College Pressbooks confirms that abstract photography encourages photographers to see the world differently. This six-element checklist is how you do it.
Core In-Camera Techniques
You’re standing in a parking garage. The overhead lights cast geometric shadows on ribbed concrete. Most photographers walk past. The Elements-First Shift stops you, because you see form, line, and color waiting for a slow shutter.
These five abstract photography tips are the backbone of the practice. Each one is a different way to collapse the recognizable into the elemental. None require unusual subjects, only unusual perception.
“Intentional Camera Movement at shutter speeds between 1/15s and 1s transforms a static scene into pure color and motion energy.” — amateurphotographerguide.com, 2026
Tip 1: Change Your Perspective
Perspective costs nothing but changes everything. Three positions consistently strip context and force viewers to focus on elements:
- Ground level: Eliminates the horizon and compresses foreground patterns.
- Extreme close-up: Fills the frame with a fragment, removing any sense of scale.
- Directly overhead (flat lay): Removes shadows that create three-dimensional form, turning objects into pure geometry.
Common mistake: Shooting at eye level preserves context, which is the enemy of abstraction. Change your angle to change how the subject is seen.
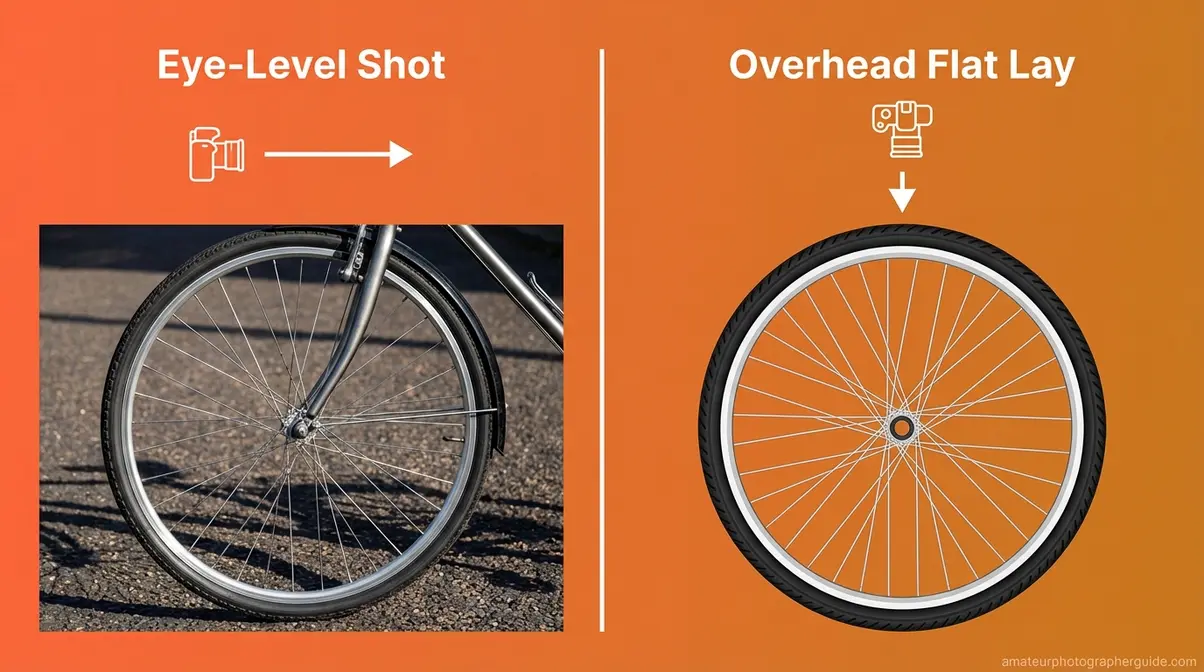
Caption: Context removal through angle—the overhead view collapses three dimensions into pure geometry.
Tip 2: Master Light and Shadow
Side lighting at low angles—like golden hour sun or a desk lamp set on the floor—is essential for surface abstracts. It creates deep, directional shadows that reveal texture which flat, frontal light erases. A concrete wall is blank grey in midday sun but becomes a terrain of peaks and craters with low, raking light.
High-contrast lighting also strips away color, emphasizing shape and form over the subject’s identity.
Pro tip: Use a single directional light source to create clear, unambiguous forms. Multiple light sources create competing shadows that can muddy an abstract composition.
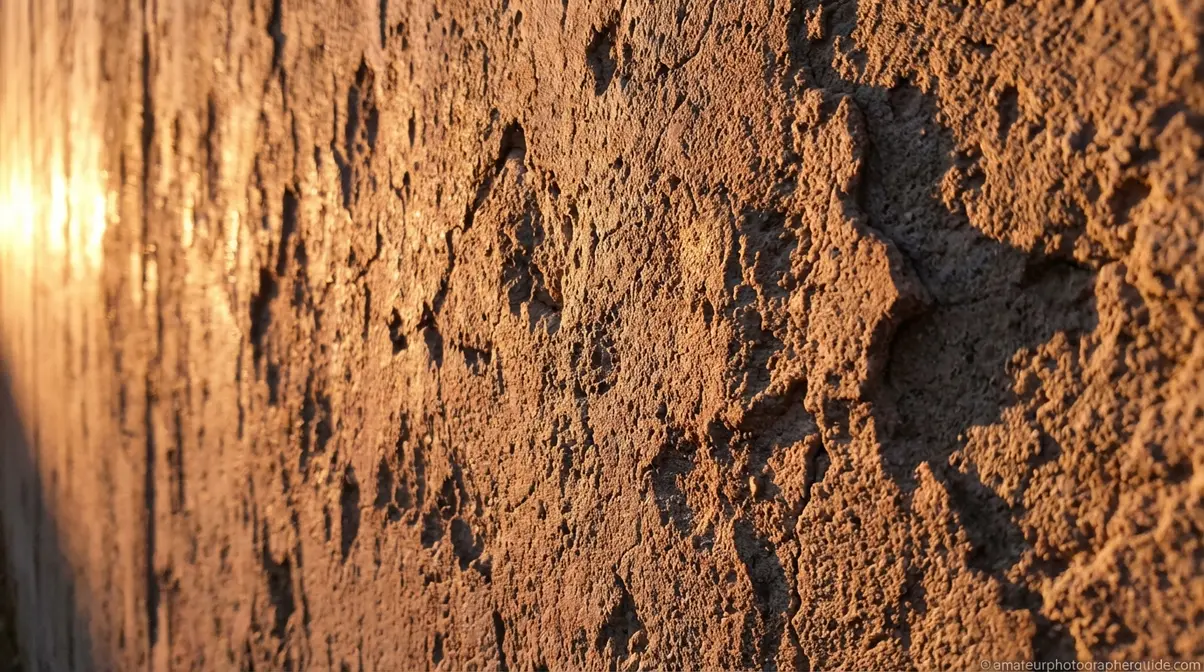
Caption: Raking light at a low angle transforms a flat surface into a three-dimensional texture study.
Tip 3: Use Intentional Camera Movement (ICM)
Intentional Camera Movement (ICM) is a technique where you deliberately move the camera during a slow-shutter exposure to collapse the subject into directional color trails. The motion mechanically strips everything but color and direction from the frame. A row of trees becomes a vertical wash of amber and green; a city street becomes horizontal trails of white and red.
| ICM Effect | Shutter Speed | Aperture | ISO | Notes |
|---|---|---|---|---|
| Vertical pan (trees, buildings) | 1/8s – 1/2s | f/8–f/16 | 100 | Use ND filter in bright light |
| Horizontal pan (traffic, crowd) | 1/15s – 1/4s | f/8–f/11 | 100 | Start steady, move fluidly |
| Rotational spin | 1/4s – 1s | f/11–f/16 | 100 | Tripod optional; center subject |
Common mistake: Moving the camera too fast. Slow, deliberate movement produces clean, painterly trails. Photography Life explains that this deliberate motion is what transforms ordinary subjects.
Caption: Three ICM movement types—each produces a distinct abstract character from the same scene.
Tip 4: Try Zoom Bursting
A zoom burst creates radial streaks from the frame’s center by turning the zoom ring while the shutter is open. This technique works best with zoom lenses like a 24–70mm or 70–200mm, where the focal length travel is long enough to create visible movement. Smoothness is more important than speed.
“Zoom your lens in or out while the shutter is open.”
This simple action is one of the most effective abstract photography tips. Start with a shutter speed of 1/4s to 1/2s, giving you time to zoom without rushing. Using a tripod ensures the radial pattern is symmetrical.
Pro tip: Zoom in (telephoto) for an implosion effect where streaks converge. Zoom out (wide) for an explosion where streaks radiate outward.
Caption: Zooming out during a 1/4s exposure transforms a static scene into a radial burst of energy.
Tip 5: Use In-Camera Multiple Exposures
Multiple Exposures is an in-camera feature on most modern cameras that layers two or more shots into a single file without Photoshop. For abstract work, it can produce images that belong to neither source shot alone.
Of the common blending modes, Bright (Light Priority) is the most useful for abstract photos. It retains the brightest pixel from each frame, preserving bold shapes. A great starting combination is to shoot a high-contrast shape (like a lit window) as the first exposure, then a texture (like tree branches) as the second. The result is a unique composite image.
Common mistake: Choosing two subjects that are too similar in tone. The overlay needs contrast—one light, one dark; one sharp, one soft—to create visual interest.
Caption: Bright-mode multiple exposure: the window’s glow absorbs the branch structure into a single image.
Creative Composition for Abstract Photos
In abstract photography, composition rules are tools to be deployed or deliberately broken. Evidence from established photography educators shows that violating rules like the Rule of Thirds is often the technique itself.
“In abstract photography, the most powerful compositional choice is often what you leave out of the frame.” — amateurphotographerguide.com, 2026
As Rocky Mountain College of Art + Design explains, using layers in composition helps draw viewers in. In abstract work, these layers can be purely visual—a foreground texture over a background color—with no real-world depth required.
Tip 6: Break Composition Rules
You know the Rule of Thirds places subjects at intersection points for balance. In abstract work, deliberate imbalance creates tension. Pushing an element into a corner or placing it dead-center feels confrontational and forces the viewer’s eye down an unusual path. This “Compositional Tension” is a powerful tool.
Pro tip: Use the Golden Ratio spiral overlay in Lightroom’s crop tool not to follow the spiral, but to identify its empty areas—these are great places for tension experiments. As Sessions College outlines, knowing the rules is the first step to breaking them effectively.
Tip 7: Use Negative Space as Your Subject
In abstract photography, negative space isn’t empty—it is the subject. A single bold shape against a clean background becomes more powerful the more open space surrounds it. The emptiness applies pressure to the focal element.
To use negative space, set a wide aperture (f/1.8–f/2.8) to blur the background into a canvas of color. Position your element to occupy only 20–30% of the frame. The remaining emptiness makes the subject feel intentional.
Common mistake: Filling the frame. In abstract work, restraint is power. Avoid the landscape photographer’s instinct to fill every corner.
Caption: Twenty percent subject, eighty percent intention—negative space makes the leaf inevitable.
Tip 8: Find Lines and Repeating Patterns
Flowing lines—staircases, fences, shadow diagonals—guide the eye and create implied movement. Diagonal lines carry energy, while curved lines create calm. A photo of just the shadow a fence casts on snow is a complete abstract image.
Repeating patterns create rhythm, but the most compelling abstracts break that rhythm once. A single dark tile in a white grid or a bent blade of grass transforms a texture into a narrative.
Pro tip: Shoot patterns from a slight angle. Perspective distortion amplifies depth, turning a 2D surface into a receding visual space.
Advanced Gear Techniques
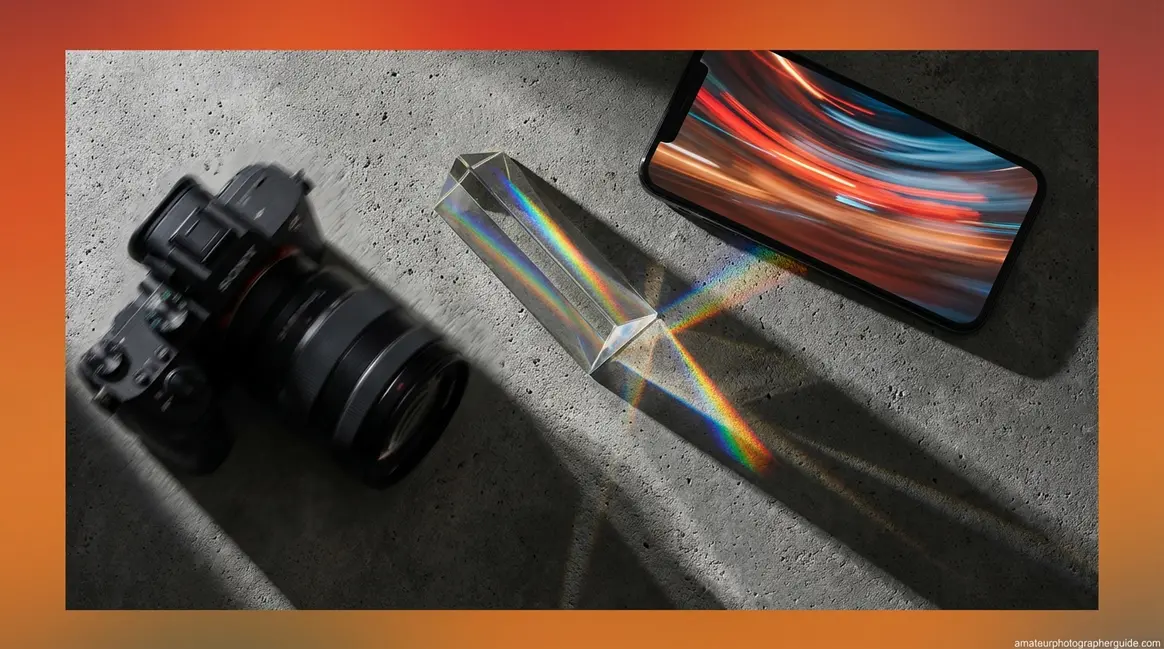
While the best abstract photos don’t require expensive gear, a few affordable tools—a $20 prism, a macro lens, a flashlight—can unlock new creative possibilities. This section provides specific workflows for these advanced abstract photography tips.
“A $20 handheld prism introduces light refraction, rainbow artifacts, and lens flares that no post-processing filter can replicate.” — amateurphotographerguide.com, 2026
Creative visual tools add literal optical layers that Photoshop cannot convincingly recreate. This is a key insight from the Rocky Mountain College of Art + Design.
Tip 9: Shoot Through Prisms and Glass
A handheld glass prism ($15–$30), held a few inches from your lens, bends and splits light in unique ways. No filter can replicate this physical effect.
- Setup:
- Set your camera to Aperture Priority or Manual at f/4–f/8.
- Hold the prism 3–6 inches from the lens.
- Rotate it slowly while watching your live view to see how the refraction pattern shifts, creating rainbow overlays or ghosted double images.
Lens ball alternative: A clear glass sphere inverts the scene inside it, creating a miniature world within the frame. Position it on a reflective surface for added complexity.
Pro tip: Prisms and lens balls work best in bright, directional light.
Caption: Hold the prism at the lens edge to split the frame between refracted and unrefracted reality.
Tip 10: Go Macro for Hidden Abstracts
Macro photography is one of the most reliable abstract photography tips. At 1:1 magnification, invisible textures become large-scale subjects: the cellular structure of a leaf, the weave of denim, or the stamen geometry inside a flower.
- Baseline Macro Settings:
- Shutter speed: 1/125s or faster to freeze micro-vibrations.
- Aperture: f/2.8–f/5.6 for selective focus that creates an abstract background.
- ISO: 100–400 to preserve fine detail.
Common mistake: Using an aperture wider than f/2. The depth of field becomes too shallow, and nothing resolves clearly. Visual Wilderness advises seeing flowers in terms of their lines and textures, which requires a sharp focal point.
Caption: At 1:1 magnification, a stamen’s geometric structure becomes an entirely abstract subject.
Tip 11: Try Light Painting
Light painting is a long-exposure technique where you move a handheld light source through a dark scene while the shutter is open. Unlike ICM, light painting creates the image from the light source itself—the darkness is your canvas.
You’ll need a dark location, a camera on a tripod, and a small light source.
| Light Source | Shutter Speed | Aperture | ISO | Room Conditions |
|---|---|---|---|---|
| Flashlight | 5–10s | f/8 | 100 | Total darkness |
| LED strip (color) | 8–15s | f/11 | 100 | Total darkness |
| Sparkler | 5–8s | f/8–f/11 | 100 | Outdoors, no wind |
Safety note: If using steel wool, do so outdoors on bare ground, away from flammable materials, and with a fire extinguisher nearby.
Pro tip: Paint behind a translucent surface, like frosted glass, to soften the light trails and create a more painterly effect.
Caption: An LED strip moved through total darkness during a 10s exposure—color and form created from light.
Abstract Photography on Your iPhone
Any iPhone running iOS 11 or later can create long-exposure abstract photos without a tripod. This section provides step-by-step iPhone abstract photography workflows, a topic many guides miss.
“Any iPhone running iOS 11 or later can create long-exposure motion blur abstract photos without a tripod — using a built-in feature most users never try.” — amateurphotographerguide.com, 2026
Tip 12: Use iPhone Live Photo Effects
iPhone’s Live Photos feature captures 1.5 seconds of motion. The Photos app can average that motion into a single image, turning moving water or traffic into a motion-blur composite ideal for abstract work. This effect collapses a scene into pure color and energy, just like a DSLR long exposure.
Apple Support confirms a Live Photo can be converted into a long-exposure image in the Photos app.
- How-To:
- Open the Camera app and ensure Live Photo mode is ON.
- Photograph a moving subject, bracing the iPhone to keep the background sharp.
- In the Photos app, swipe up on the image to reveal the Effects panel.
- Tap “Long Exposure” to automatically create the blurred image.
Pro tip: This works best with subjects that have consistent, directional motion, like flowing water or passing headlights.
Tip 13: Top Apps for Mobile Abstracts
These apps unlock DSLR-quality abstract work on your iPhone:
- Halide Mark II—Full manual RAW capture with exposures up to 15 seconds. Ranked by PetaPixel (2026) as the top pro iPhone camera app.
- Slow Shutter Cam—Simulates long exposures up to 60 seconds with Motion Blur and Light Trails modes.
- ProCamera—Full manual controls for deliberate exposure decisions.
- Snapseed—A post-processing app with a “Double Exposure” tool for in-app compositing.
Creative workflow: Shoot RAW in Halide, edit in Snapseed or Lightroom Mobile, and export at full resolution.
Abstract Photography in Nature
Natural environments are rich sources of abstract material because nature is built from the six visual elements. Applying abstract nature photography tips here means hunting for the element within the subject.
“Abstract flower photography begins when you stop photographing the whole bloom and start isolating a single petal’s texture or a stamen’s geometric structure.” — amateurphotographerguide.com, 2026
Tip 14: Find Abstraction in Flowers
To get compelling abstract flower photos, reframe your perspective. Stop seeing a “flower” and start seeing the curve of a petal, the color gradient from center to tip, or the geometry of a stamen. This is the Elements-First Shift for natural subjects.
Use a shallow depth of field (f/1.8–f/2.8) at an extreme close-up distance on a single element. This renders the surrounding flower into abstract bokeh, making the sharp zone your subject and the soft zone a field of color. Visual Wilderness advises seeing flowers in terms of their lines and patterns to create abstract imagery.
Pro tip: Overcast days provide diffused, shadowless light perfect for revealing fine surface details in macro compositions.
Caption: Overcast light and f/2.2 aperture—petal texture becomes the subject, the rest a suggestion of color.
Tip 15: Capture Abstract Wildlife in Motion
The goal of abstract wildlife photography is not a sharp ID photo, but the energy of movement. Use a panning technique: track the moving animal with a slow exposure (1/30s–1/60s) to blur the background into directional streaks while keeping a hint of the animal’s form.
Good subjects include birds in flight, running mammals like zebras (their stripes become graphic bands of color), and fish in lit water. Skillshare’s photography guide describes this as focusing on details like motion to create artistic images.
Common mistake: Using too fast a shutter speed. Abstract wildlife work requires a deliberately “wrong” shutter speed that most wildlife photographers would avoid.
Post-Processing for Abstract Photography
Post-processing is a creative act that defines your visual voice. Photographers with the most distinctive abstract work treat Lightroom and Photoshop as expressive instruments, not just correction tools.
“Post-processing is not the final step in abstract photography — it is the creative act that defines your visual voice.” — amateurphotographerguide.com, 2026
Adobe Education Exchange confirms that Photoshop supports the kind of layered, compositional post-processing described below.
Developing Your Signature Edit Style
Three Lightroom adjustments define a personal abstract style:
- Texture slider: High Texture (+60 to +80) reveals every grain in a surface. Low Texture (-40 to -60) creates smooth, painterly forms.
- Tone Curve: An S-curve deepens contrast for punchy abstracts. A flattened curve produces a matte, filmic look.
- HSL/Color Mix panel: Isolate one hue and desaturate all others. This is the “Post-Processing Elements-First Shift”—find the strongest element and amplify it.
Creative Texture Blending
Texture blending in Photoshop layers one image’s surface quality onto another’s structure.
- Workflow:
- Open your base abstract photo in Photoshop.
- Drag a texture image (rust, stone, paper) on top as a new layer.
- Set the texture layer’s blend mode to “Overlay” or “Soft Light.”
- Reduce the texture layer’s opacity to 30–70%.
- Clip a Hue/Saturation adjustment layer to the texture and desaturate it so it contributes form without competing color.
The result is a composite that reads as a single image with physical depth.
Caption: Overlay blend mode at 50% opacity—stone texture absorbs into the base image without overpowering it.
Common Abstract Photography Mistakes
Knowing where abstract photography goes wrong is key. These pitfalls represent the most common failure patterns.
Caption: Five patterns that make intentional abstract work look unintentional—and the fix for each.
- Shooting too wide. Preserving context prevents abstraction. Fix: Zoom in or move closer to isolate a slice of life.
- Fearing the blur. Trying to “rescue” a blurry shot instead of creating blur deliberately. Fix: ICM is intentional. Plan the movement and commit to it.
- Ignoring light quality. Flat midday light eliminates the shadows that create form. Fix: Shoot during golden hour or use a single directional light indoors.
- Skipping post-processing. Treating the in-camera file as final limits creative potential. Fix: Use post-processing as an expressive tool, not just for cleanup.
- No focal point. Abstract doesn’t mean random. Chaotic compositions create noise. Fix: Ensure one visual element is dominant to guide the viewer’s eye.
Frequently Asked Questions
What is the goal of abstract photography?
Abstract photography’s main goal is to evoke an emotion rather than represent a recognizable subject. It focuses on visual elements like color, line, and shape, often removing a subject from its context. A successful abstract photo prompts curiosity and emotional response before the viewer understands what the subject is.
Can I do abstract photography with an iPhone?
Yes—you can create striking abstract photos with an iPhone. The Live Photos “Long Exposure” effect creates motion-blur composites without a tripod. Newer models also have a macro mode for texture shots. Third-party apps like Halide Mark II and Slow Shutter Cam add manual controls for even greater creative range.
What makes a good abstract photo?
A good abstract photo has a strong compositional anchor, even without a clear subject. It uses visual elements—leading lines, bold color, or negative space—to guide the viewer’s eye. The image should generate a specific mood and prompt curiosity. If a viewer asks “what is that?” before “what does it mean?”, the abstraction is working.
Easy Abstract Photo Ideas for Home?
You can try several abstract photography ideas with household objects. Photograph water droplets on glass, oil and water in a dish lit from below, or the texture of denim at close range. In a dark room, try light painting with a flashlight and a 10-second exposure. Each of these ideas applies directly to the abstract photography tips in this guide.
Start Seeing Differently
The fastest path to better abstract photos is applying The Elements-First Shift consistently. Before each shot, ask: “Am I seeing line, color, texture, or form—or am I still seeing a drainpipe?” The 15 abstract photography tips in this guide, from ICM to iPhone long exposure, all serve that one perceptual goal. What changes isn’t your camera, but the question you ask before pressing the shutter.
The Elements-First Shift is a habit. The best abstract photographers apply it before shooting, during composition, and again during editing. The gear, settings, and apps are all tools that serve one underlying skill: training your eye to find the abstract in the ordinary.
Pick one technique from this guide and try it this week. Start with ICM: set your shutter to 1/8s, find a scene with color, and make 20 deliberate frames. Share your results in the comments below.
