

Table of Contents
- The 5 C’s: A Simple Framework for Portraits
- Camera Settings for Flattering Portraits
- Lighting and Composition: Transforming Your Shots
- Adapting to Any Environment
- The Human Side: Posing and Connection
- Common Portrait Photography Mistakes to Avoid
- Frequently Asked Questions About Portrait Photography
- Putting It All Together
This blog post may contain affiliate links. As an Amazon Associate I earn from qualifying purchases.
Your portraits look technically fine—correct exposure, subject in focus—but something is off. Your subjects look stiff, the lighting creates unflattering shadows under their eyes, or the background is stealing attention. If your portraits resemble mugshots more than magazine covers, the problem is almost never your camera. It’s a handful of learnable techniques you simply haven’t encountered yet.
“Portrait photography is more than just about equipment. You have to know how to pose your subjects and create a comfortable environment for them.”
That quote captures exactly what separates good portrait photographers from great ones. In this guide, you’ll find 15 portrait photography tips for beginners that cover camera settings, lighting, composition, and posing. Everything is organized around The 5 C’s of Portrait Photography—a framework you can apply on your very next shoot.
15 Portrait Photography Tips for Beginners:
- Shoot in Aperture Priority (Av) mode
- Set aperture to f/1.8–f/4 for subject-background separation
- Keep ISO as low as possible (ISO 100–400 outdoors)
- Use a 50mm or 85mm prime lens
- Always focus on the subject’s eyes
- Seek soft, diffused natural light (open shade)
- Avoid harsh midday sunlight
- Apply the Rule of Thirds—place eyes on the upper gridline
- Choose a clean, simple background
- Shoot during golden hour for warm, flattering light
- Use a reflector to fill harsh shadows
- Give your subject a simple action prompt, not a static pose
- Chat with your subject before picking up the camera
- Position your camera at or slightly above eye level
- Review your shots and cull down to your best 3–5
Portrait photography tips for beginners all come back to one insight: great portraits are made before you press the shutter, not after.
- Camera Settings: Aperture f/1.8–f/4 in Aperture Priority mode creates the flattering subject-background separation beginners struggle to achieve
- Lighting: Soft, diffused light (open shade, overcast skies) is more flattering than any studio setup
- Connection: The 5 C’s of Portrait Photography give every beginner a repeatable system — Composition, Connection, Camera Settings, Color, Culling
- Posing: Give subjects an action, not a position — “lean against the wall” beats “stand here and smile”
- The key takeaway: A confident, comfortable subject looks better than technically perfect lighting every time
The 5 C’s: A Simple Framework for Portraits
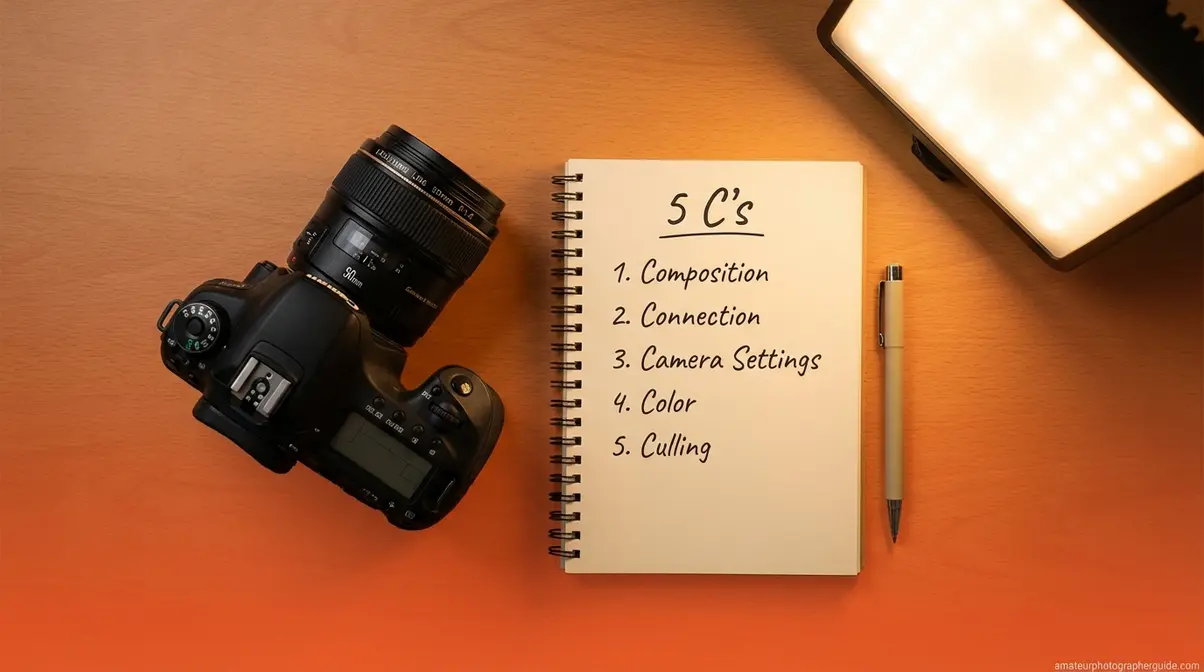
The 5 C’s of Portrait Photography—Composition, Connection, Camera Settings, Color, and Culling—give beginners a repeatable system that replaces guesswork with structure. Each C represents a distinct decision stage, from how you configure your camera (Camera Settings) to how you select your strongest frames afterward (Culling). Instead of memorizing a disconnected list of tips, you have one framework with five clear categories.
These 15 tips were identified by cross-referencing techniques taught by leading photography educators—including Adobe, Digital Photography School, and B&H Photo—with common questions from beginner photography communities. Our team organized them into this framework to make the learning process more intuitive.
| The C | What It Covers |
|---|---|
| Camera Settings | Aperture, ISO, shutter speed, lens choice |
| Composition | Rule of Thirds, lighting, backgrounds |
| Connection | Posing direction, rapport, subject psychology |
| Color | Golden hour, overcast light, natural color temperature |
| Culling | Selecting and reviewing your best frames |
The framework separates your in-session decisions (Composition, Connection, Camera Settings) from your post-session decisions (Color, Culling). This prevents the common mistake of trying to fix things in-camera that should be handled in post, which reduces pressure during the shoot.

Caption: The 5 C’s give every beginner a complete mental checklist—from camera setup through final image selection.
Camera Settings for Flattering Portraits

The single most impactful camera setting for portrait photography is aperture. Setting your aperture between f/1.8 and f/4 creates a sharp subject against a soft, blurred background—the look that defines a professional portrait. According to Canon’s official learning center, this is the first setting beginners should master. Get this right and your portraits will improve immediately.
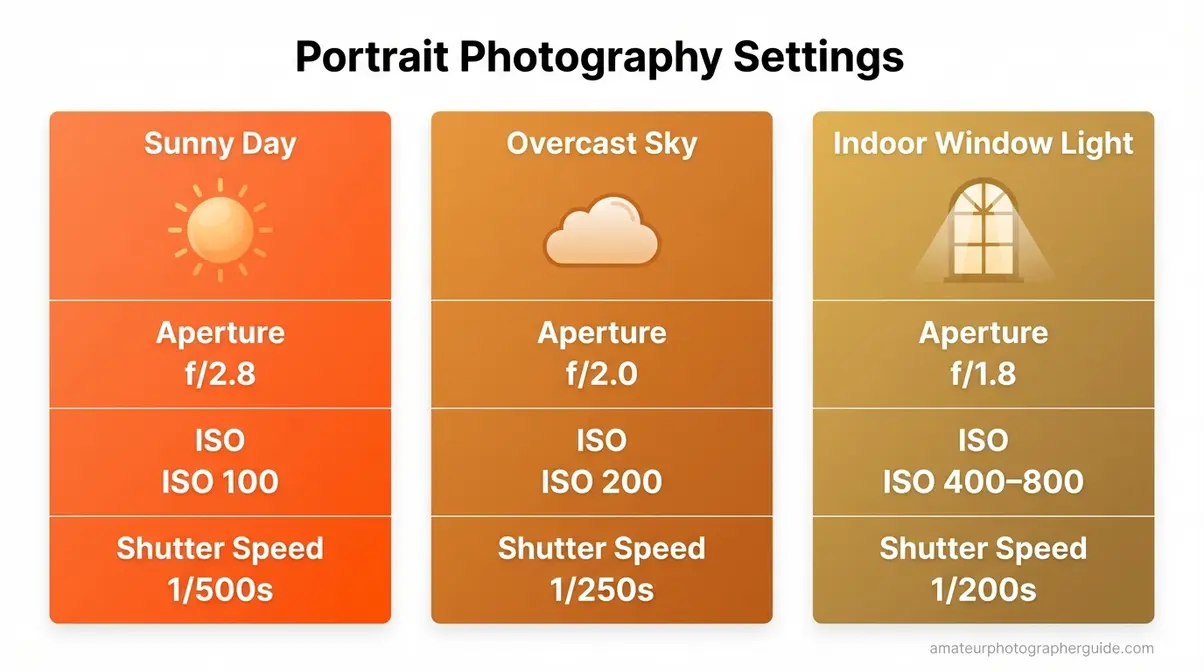
Caption: Save this settings cheat sheet and reference it before every shoot until the hierarchy becomes instinct.
Aperture and Lens Choice
Aperture Priority mode (Av on Canon, A on Nikon) lets you set the aperture while the camera handles the exposure. For most portraits, the sweet spot is f/1.8 to f/4. An f/1.8 aperture creates a dramatically blurred background, perfect for tight headshots. At f/4, more of the face and background stays in focus, which is better for environmental portraits.
- Your lens choice works with your aperture. Wide-angle lenses (24-35mm) distort facial features up close. For flattering, natural-looking portraits, a longer focal length is essential.
- 50mm f/1.8: Often called the “nifty fifty,” this is the most cost-effective and recommended first lens for beginners. It provides a natural field of view with minimal distortion.
- 85mm f/1.8: This is the classic portrait lens. It slightly compresses facial features for a traditionally flattering look and is ideal for headshots.
For a deeper dive into how these settings interact, see our full resource on mastering the exposure triangle for portraits.
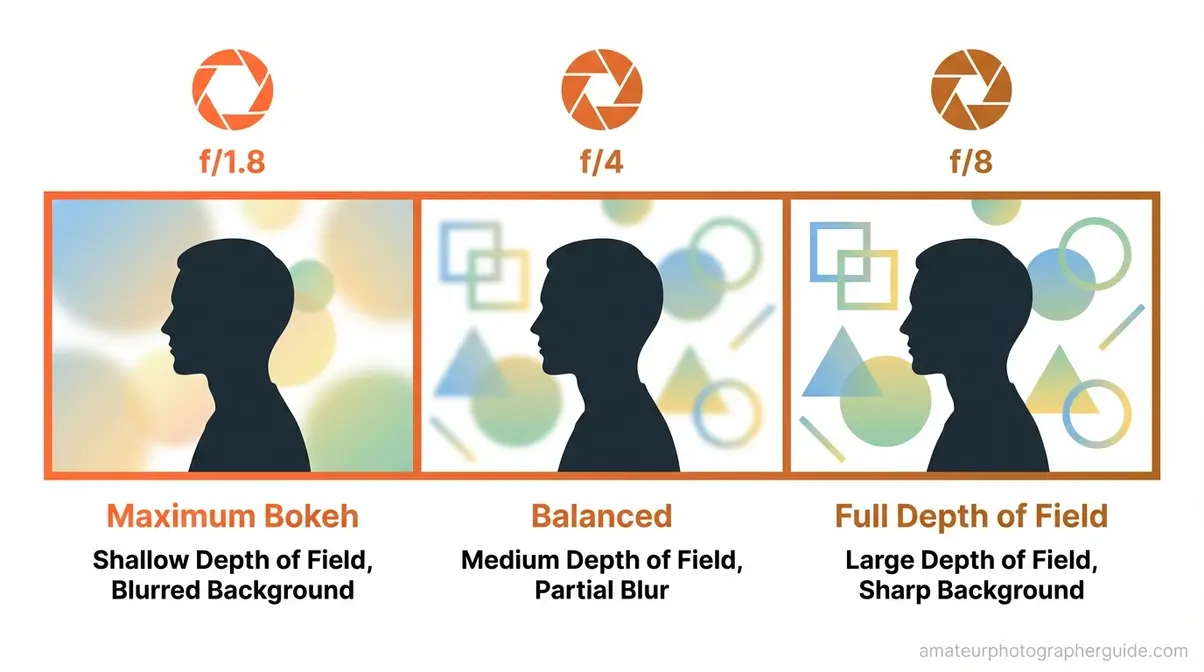
Caption: The difference between f/1.8 and f/8 is immediately visible—background blur (bokeh) drops sharply as you close the aperture.
ISO and Shutter Speed
- Once your aperture is set, follow this simple hierarchy: aperture first, shutter speed second, ISO last.
- Shutter Speed: Use a minimum of 1/200s for a still subject to prevent blur from small, natural movements. If your camera’s auto-selected shutter speed drops below 1/100s, increase your ISO.
- ISO: Keep ISO as low as possible for clean, noise-free images. Start at ISO 100 on a sunny day. Move to ISO 400–800 for window-lit interiors. As Nikon’s guide for beginners advises, only raise ISO when necessary to maintain a safe shutter speed.
A great starting point for an overcast outdoor day is f/2.8, ISO 200, 1/250s. This combination works on virtually any entry-level camera.
Lighting and Composition: Transforming Your Shots
While camera settings are the technical foundation, lighting and composition determine if a portrait is striking or forgettable. The best news for beginners is that the most effective light costs nothing. Soft, natural light almost always outperforms expensive studio gear.
Use Natural Light to Your Advantage
Harsh midday sun casts deep, unflattering shadows under the eyes—the “raccoon effect”—and causes squinting. A simple rule: if your subject is squinting, move them.
Your best tool is open shade. This is any spot sheltered from direct sun but still facing open sky or a large, light-colored surface like a building. The light that reaches your subject is soft, angled, and even. You can find open shade almost anywhere: the side of a building, under a tree canopy, or within a covered archway.
Overcast skies are a portrait photographer’s friend, acting as a giant natural softbox that provides even light. Golden hour—the hour after sunrise and before sunset—delivers warm, low-angle light that is exceptionally flattering. Use a planning app like PhotoPills or GoldenHour.One to find the exact times for your location. You can learn more in our comprehensive guide to natural light.
Caption: The same subject, the same camera, two different lighting positions—the open shade version requires no additional gear.
Caption: A large window at 45 degrees replicates a professional softbox setup at zero cost.
Apply the Rule of Thirds and Manage Your Background
The rule of thirds is one of the simplest yet most effective composition tips. Imagine your frame is divided into a 3×3 grid. Instead of centering your subject, place their eyes along the upper horizontal line. This creates a more dynamic and engaging image. Enable your camera’s grid overlay to practice this until it becomes second nature.
- A distracting background can ruin a great portrait. Watch out for things like telephone poles that appear to grow from your subject’s head. To fix this:
- Increase the distance between your subject and the background to create more blur.
- Change your shooting angle by crouching or stepping to one side.
- Use a wider aperture (like f/2.8) to soften the background further.
Finally, a crucial cropping tip: never crop at a joint. Cutting a portrait at the elbow, knee, or ankle looks unnatural. Safe crop zones are mid-thigh, mid-torso, or just below the shoulder. If you’d like to learn more, you can explore fundamental composition rules in our detailed guide.
Caption: Moving the eyes from center to the upper thirds line takes one second in the viewfinder and makes an immediately visible difference.
Caption: Background management costs nothing—it’s a positioning and angle decision, not an equipment decision.
Adapting to Any Environment

Real-world portrait sessions happen in parks, offices, and on beaches, each with unique challenges. Applying your skills to different environments is a key step in developing your style.
Outdoor and Beach Portraits
For any outdoor shoot, your primary goal is finding good light. Arrive 15 minutes early to scout the location for spots with open shade and clean backgrounds. This single habit separates prepared photographers from improvised ones. Golden hour provides the most flattering light, especially for beach portraits where the low sun and reflective water create a beautiful glow.
Beach photography introduces sand and wind. Always shoot with the sun to your back so it illuminates your subject, and be prepared for windy conditions. For a complete walkthrough, see our guide to capturing stunning beach portraits.
Caption: Open shade positioning takes 2 minutes to identify on location—and eliminates the most common outdoor lighting problems immediately.
Environmental and Corporate Portraits
An environmental portrait places the subject in their natural surroundings—a chef in a kitchen or a musician in a studio—to tell a story. According to Westcott University, the environment is a character in the portrait, not just a backdrop. Use negative space to ensure the surroundings support the subject without overwhelming them.
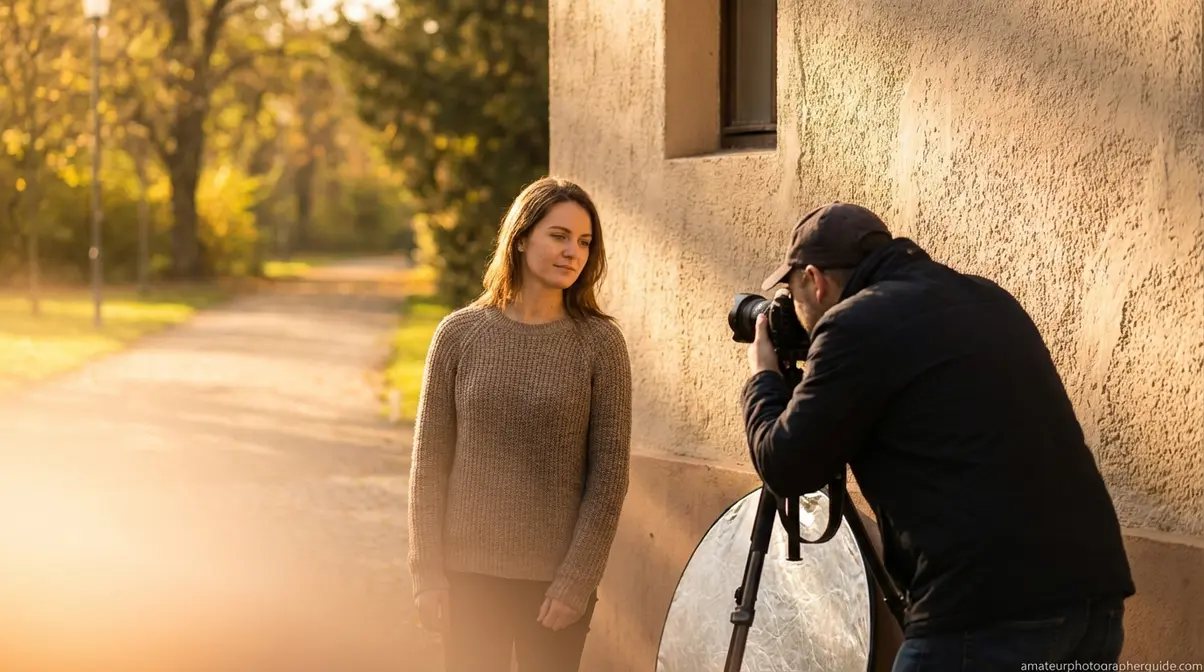
For corporate headshots, the goal is professional yet approachable. You can achieve a studio-quality look without expensive gear. The one-light setup from SLR Lounge is a go-to for professionals, and you can replicate it easily by placing your subject at a 45-degree angle to a large window. Use a white foam board or reflector on the opposite side to fill in shadows.
Caption: A 45-degree window gives you the same light quality as a studio softbox—the physics are identical.
The Human Side: Posing and Connection
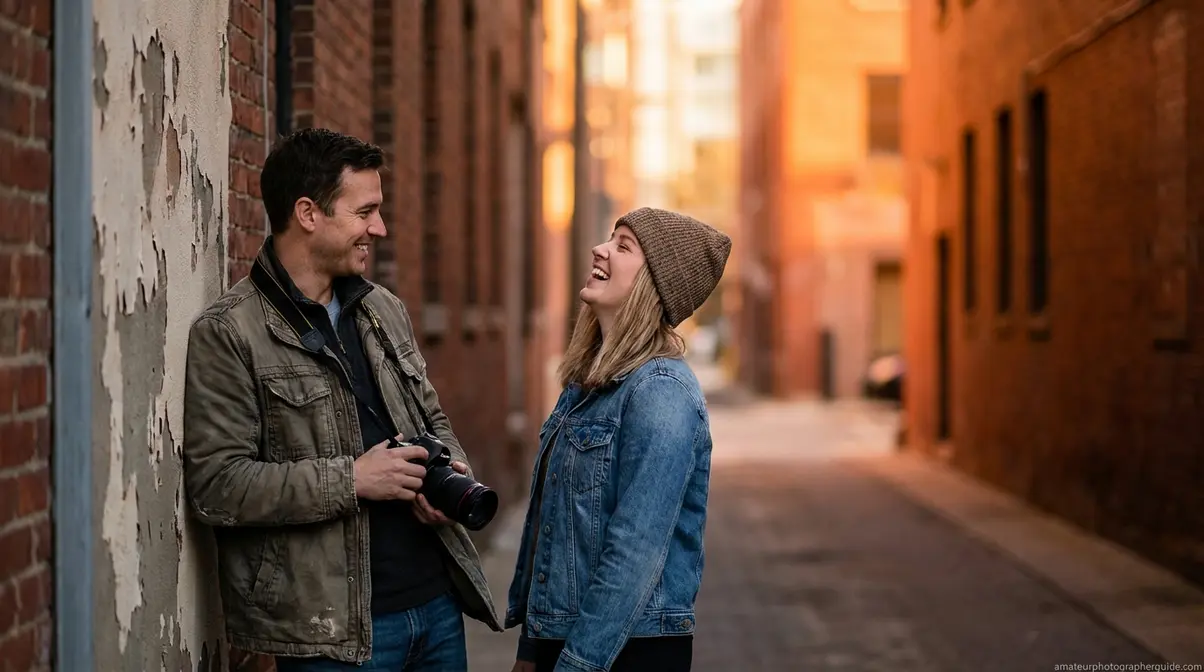
The most technically perfect portrait will fail if the subject looks uncomfortable. Mastering the human side of portrait photography—posing, expression, and connection—is what elevates your work from good to great. This is the “Connection” C in our framework and is arguably the most important.
Why People Feel “Unphotogenic”
When someone says they aren’t photogenic, they are describing a perception issue, not a physical reality. You see your face in a mirror every day, which is a horizontally flipped version of how you actually look. A camera captures your true, non-reversed image. A 2024 study in Perception found that people rate their true-image photos as less pleasant because they are unfamiliar.
Knowing this helps you reassure your subjects. Explain that the camera is capturing the version of them that everyone else sees and knows. This simple reframing can genuinely reduce their tension.
Simple Posing Directions

Beginners often struggle with directing subjects, leading to stiff, awkward poses. The solution is a simple mindset shift: give your subject something to do, not somewhere to stand. An action prompt focuses their mind on a task, not their expression, resulting in more natural photos.
- Instead of “Stand there and smile,” try these prompts:
- “Lean your shoulder against that wall and look over here.”
- “Take a slow walk toward me and glance up when I say.”
- “Put your hands in your pockets and shift your weight to one foot.”
For a complete set of ideas, check out our guide on posing tips for non-models. Small actions create relaxed, authentic portraits.
Caption: Action prompts produce natural portraits; tips for beginners often overlook this—print this card and bring it to your next shoot.
Caption: The five minutes before you pick up the camera are often more important than the first five minutes of shooting.
Common Portrait Photography Mistakes to Avoid
Knowing the common pitfalls in advance is more efficient than discovering them frame by frame. Avoiding these few errors will significantly improve the consistency of your results.
Technical and Compositional Pitfalls
- Missing Focus on the Eyes: Auto-focus often grabs the nearest object, like a nose or shoulder. Use single-point AF, place the focus point directly on your subject’s nearest eye, and lock focus before recomposing the shot.
- Using f/1.4 for Groups: A wide-open aperture is great for one person but has a razor-thin depth of field. With two or more people, one will be sharp and the others soft. Use f/2.8 for two subjects and f/4 or narrower for larger groups.
- Ignoring Shutter Speed: In Aperture Priority mode, your camera can select a shutter speed that is too slow in low light, resulting in motion blur. Glance at your shutter speed; if it’s below 1/100s, increase your ISO.
- Unflattering Overhead Lighting: Indoor ceiling lights create the same deep, unflattering shadows as midday sun. Whenever possible, move your subject near a window to use that as your primary light source.
When to Keep Learning
These tips cover the foundations that produce immediate improvement. Once you consistently nail focus, lighting, and subject comfort, you’ll be ready to explore more advanced topics like studio lighting with softboxes and modifiers or advanced post-processing in Adobe Lightroom. Reputable resources for the next level include Adobe’s portrait guide, Digital Photography School, and B&H Photo’s Explora.
Frequently Asked Questions About Portrait Photography
What are the four basics of portrait photography?
The four basics of portrait photography are lighting, composition, camera settings, and subject connection. Soft, diffused lighting is most flattering. Composition, like the Rule of Thirds, guides the viewer’s eye. Camera settings, especially a wide aperture (f/1.8–f/4), create subject-background separation. Finally, subject connection determines whether the expression in the photo feels genuine.
What is the rule of thirds in portrait photography?
The Rule of Thirds divides your frame into a 3×3 grid. For portraits, the most effective application is placing the subject’s eyes on the upper horizontal line rather than in the center. This creates a more dynamic, visually balanced image. Most cameras have a grid overlay you can enable to help practice this composition.
What is the 20-60-20 rule in photography?
The 20-60-20 rule suggests that in any given shoot, 20% of your shots will be excellent, 60% will be acceptable, and 20% will be unusable. This is why culling—reviewing and selecting only your best work—is a critical skill. Narrowing your final selection down to the strongest 3–5 frames is a professional habit that dramatically improves how others perceive your work.
What are the most common portrait photography mistakes?
The most common mistakes are missing focus on the eyes, using too wide an aperture for groups, and using unflattering overhead light. Missed eye focus is the most frequent technical error. Shooting a group at f/1.4 will leave some people blurry. Overhead light creates harsh “raccoon-eye” shadows that are difficult to fix.
What are the 5 C’s of photography?
The 5 C’s of Portrait Photography are Composition, Connection, Camera Settings, Color, and Culling. This is a framework designed to give beginners a structured system for every shoot. Camera Settings, Composition, and Connection are your in-session decisions, while Color and Culling happen in post-processing.
Can I be pretty but not photogenic?
Yes, and the reason is perceptual, not physical. A 2024 study in Perception confirmed people prefer their mirror image, which is flipped, to their true image captured by a camera. The discomfort is a familiarity gap, not a reflection of attractiveness. A relaxed environment and a skilled photographer can significantly narrow this gap.
Putting It All Together
For hobbyist photographers ready to move past technically acceptable but emotionally flat results, the path forward isn’t more gear—it’s a more structured approach. The 5 C’s of Portrait Photography—Camera Settings, Composition, Connection, Color, and Culling—give you a repeatable system where every decision has a designated phase. This framework helps create deliberate practice rather than just trial and error.
The 5 C’s work because they reflect how great portraits are actually made. Connection determines whether the emotion is real. Camera Settings and Composition determine whether that emotion is captured cleanly. Color and Culling determine how that capture is presented. Miss any one of the five and the others can’t fully compensate.
Start this week. Set your camera to Aperture Priority (Av or A), dial in f/2.8, find a patch of open shade, and spend 10 minutes talking to your subject before you shoot a single frame. Apply the Rule of Thirds using your camera’s grid overlay. Review the session and select your best three images. That single practice run will demonstrate more of the 5 C’s framework in action than any amount of reading—and your portraits will show it immediately.
