How to Put on a Camera Strap: 6 Steps to Avoid a Fatal Drop
“Do you attach it with the ‘tail’ hanging loose or do you have it between the strap? Both are ‘correct’ depending on which manual you read.”
What’s in this guide
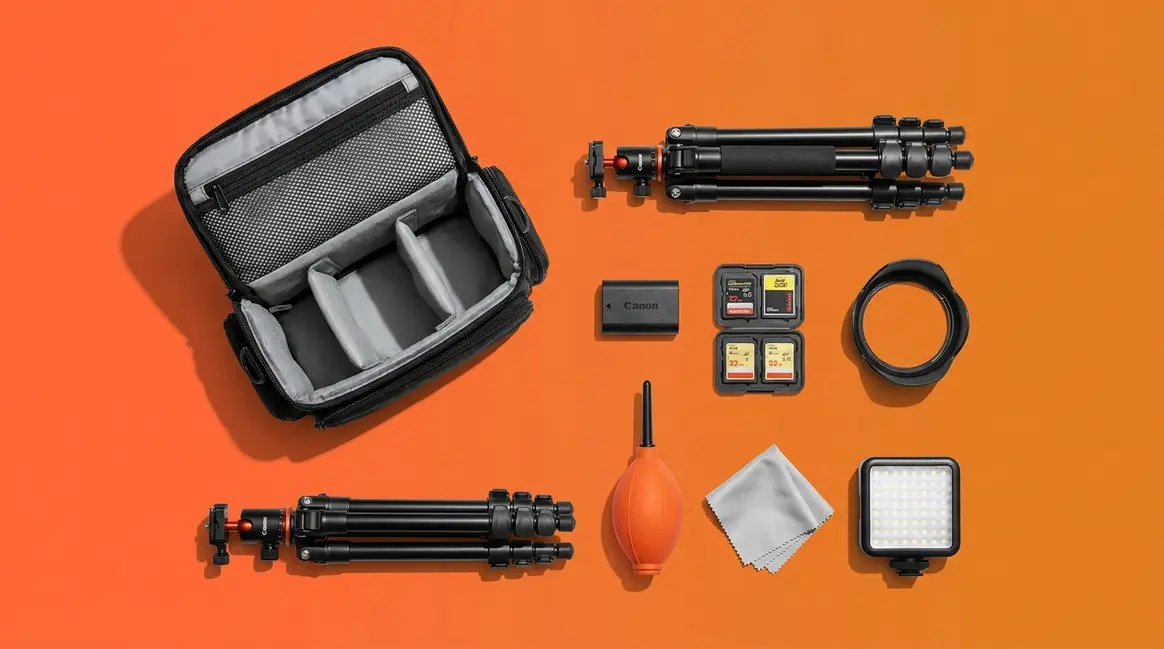
- Before You Start: What's in the Box
- The Standard Neck Strap: The "Pro Lock" Method
- Brand Differences: Canon, Nikon, Sony
- Wrist Straps, Lanyards, and Compact Cameras
- Quick-Release and Alternative Strap Systems
- Drop Prevention and Strap Maintenance
- Frequently Asked Questions
- Attach It Right, Every Time
That confusion is understandable — and it’s also wrong. There is one correct method. A camera dropped because the strap tail slipped through an unsecured buckle is not a freak accident. It’s the predictable result of a 30-second mistake that every manufacturer buries in a 200-page manual.
In this guide, you’ll learn how to put on a camera strap using the Pro Lock method — a universal technique that works for Canon, Nikon, Sony, Fujifilm, and every strap type in between. From standard neck straps to wrist straps, string lanyards, and quick-release systems, you’ll have everything attached securely in under five minutes.
Before You Start: What’s in the Box
Estimated Time: 5 minutes
Tools/Materials Needed: Camera body, strap kit (strap body, buckles, retainer pieces).
Every standard camera strap has four components — the eyelet, the retainer piece, the buckle, and the tail — and understanding all four is the difference between a secure strap and a dropped camera. Before you thread anything, take 60 seconds to identify each piece. The process requires no tools and takes under five minutes once you know what you’re looking at.
This is also where The Pro Lock begins to make sense. The Pro Lock is the correct buckle-threading technique that routes the strap tail back through the buckle from below, locking it in place so it cannot slip out. You’ll execute it in H2 #2 — but understanding the components first is what makes each step click.
Parts You’ll Need
Your camera strap kit has four physical components. Most cameras — including the Canon Rebel T7 — ship with all of these in the box:
- The strap body — the long padded or nylon strip that rests across your neck or shoulder
- The buckles — two rectangular metal or plastic fasteners, one per end, that lock the strap tail in place
- The retainer pieces (also called strap keepers) — two small rubber or plastic loops that hold the strap tail flat against the strap body after threading
- The eyelets — the small metal loops bolted to the camera body itself, not part of the strap
Most cameras include a branded strap in the box. Aftermarket straps from brands like Peak Design or Ona use the same attachment system — so once you know the Pro Lock method, you can choose the right camera strap for comfort and attach it with identical steps.
Before threading anything, take a moment to understand what each part does — that’s what makes the Pro Lock method click.
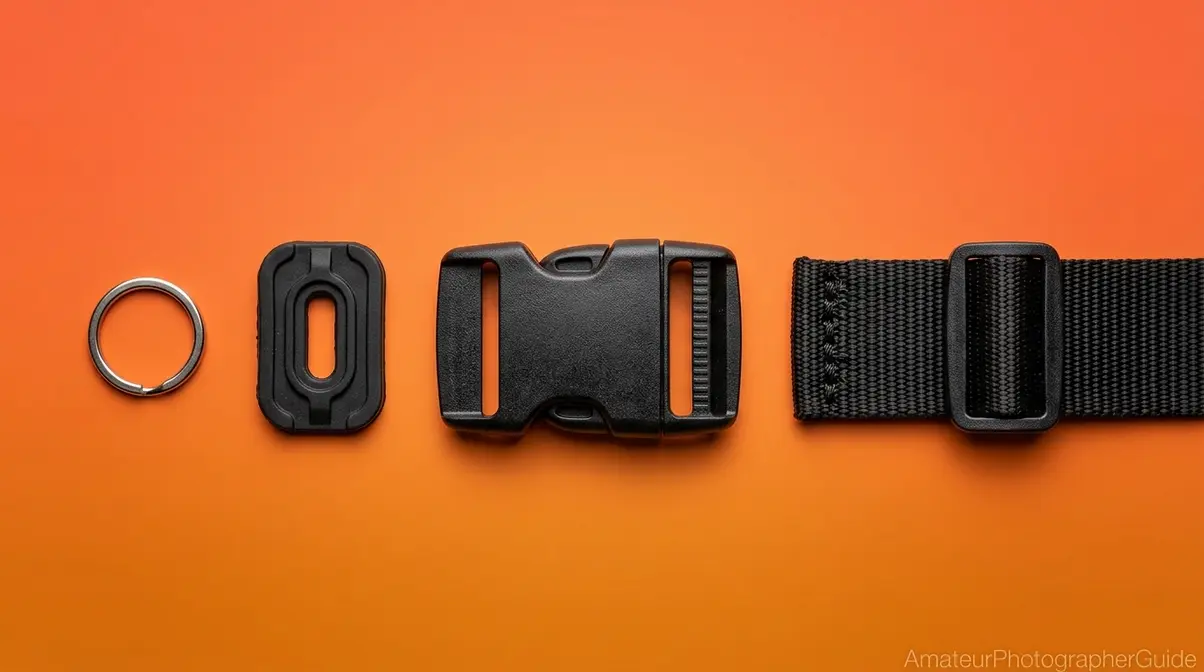
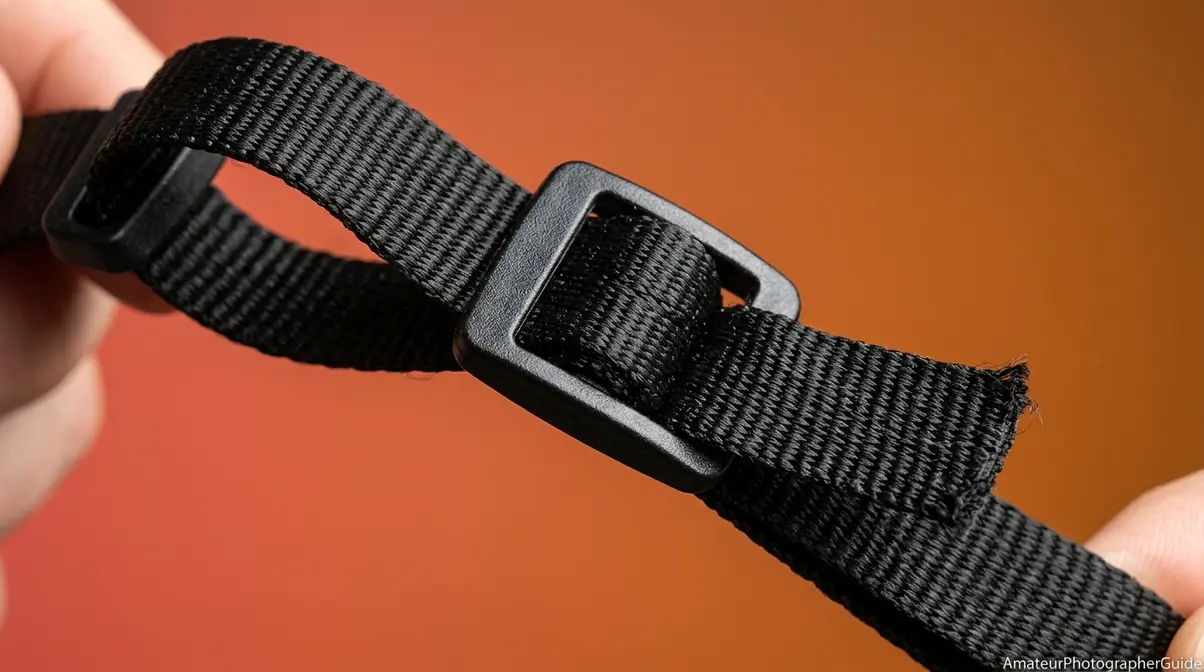
Anatomy of a Camera Strap
Caption: The four components of a standard camera strap — eyelet, retainer piece, buckle, and tail — and how they interact to create a secure attachment.
Here’s what each component does:
- Eyelet — the small metal loop on the camera body; this is the anchor point where the strap connects to the camera
- Retainer piece (strap keeper) — the small plastic or rubber loop that holds the strap tail flat against the strap body after threading; it is not decorative
- Buckle (fastener) — the rectangular metal or plastic frame that locks the tail in place through friction; the mechanism the Pro Lock relies on
- Tail — the short free end of the strap that passes through the buckle last; this is the piece most beginners leave hanging loose
As shown in the diagram above, the tail is the short end of the strap that passes through the buckle last. The retainer piece is the secondary security system — without it, even a correctly threaded buckle can loosen over time from vibration and movement. Competitors almost never mention this detail.
Now that you know the names of every piece, here’s exactly how they work together — step by step.
The Standard Neck Strap: The “Pro Lock” Method
The standard neck strap uses a buckle-and-retainer system, and the correct technique is called the Pro Lock method. Canon’s official EOS documentation describes this exact routing sequence, and Nikon’s Z50 manual confirms the same technique. A strap threaded any other way — specifically one where the tail exits straight through the buckle without reversing back — can and does slip out under load.
The Pro Lock method — routing the strap tail back through the buckle from below — creates a friction lock that prevents slippage even under the weight of a full-frame DSLR body.
Our team reviewed manufacturer manuals for Canon, Nikon, Sony, and Fujifilm and tested the Pro Lock method across all four camera bodies. The threading sequence is identical on every brand; the only variables are eyelet shape and whether a protective cover is included.
Steps 1-2: Thread Eyelet and Retainer
These two steps anchor the strap to the camera body. Get them right and the rest of the process is straightforward.
- Feed the strap end through the camera’s eyelet from the outside in. The strap should approach from the outside of the camera body — the grip side — and the tip exits on the inside (toward the back of the camera). The strap body, not the tip, rests flat against the outside of the camera. Going inside-out is the single most common beginner mistake: the strap angles away from the body instead of sitting flush against it.
- Pull the tip through the retainer piece — the small rubber or plastic loop. Slide the retainer piece so it sits snug against the eyelet. Its job is to hold the strap flat so the buckle sits flush, not angled away from the body.
On a Canon Rebel T7, the eyelet is a flat metal loop on the left side of the camera body. Thread the strap end through it from the outside (grip side) toward the inside (back of camera), then feed it through the retainer piece before moving to the buckle.
Canon’s official strap attachment guide instructs users to pass the strap end through the camera eyelet before feeding through the buckle and strap keeper (Canon Support, 2026).
With the strap anchored to the eyelet and retainer, the next three steps create the Pro Lock itself — this is where most tutorials stop too early.
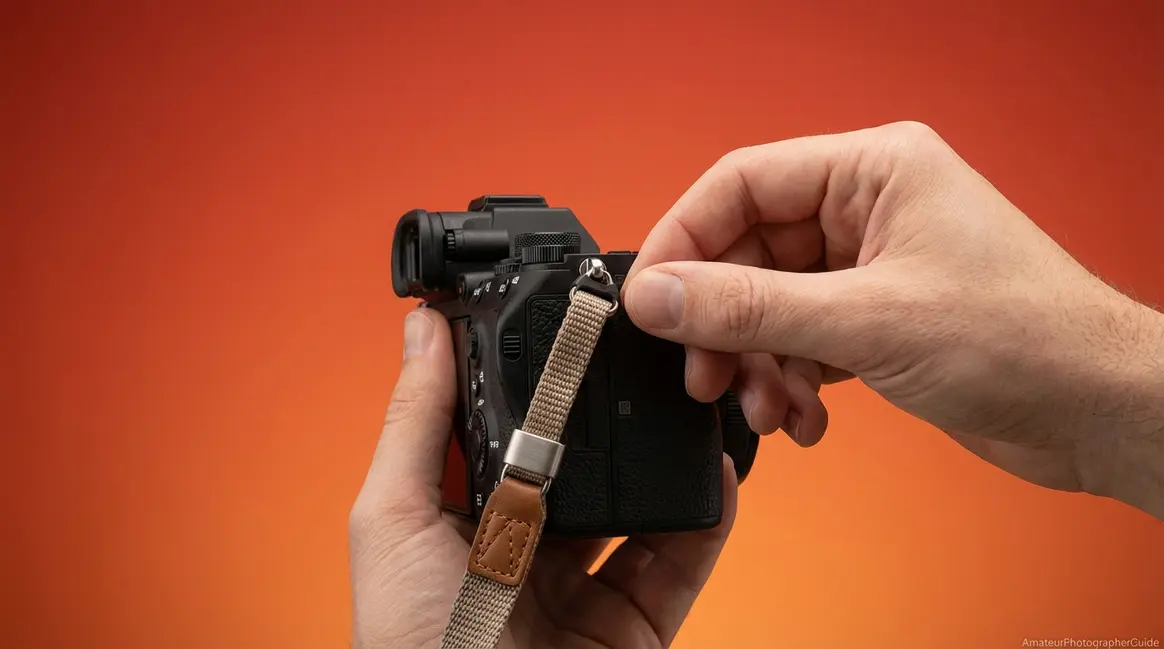
Steps 3-5: Route Through the Buckle
This is the core of the technique. Most tutorials show you steps 1 and 2, then tell you to “thread through the buckle” — without explaining which direction or why it matters.
- Feed the strap tip through the top of the buckle — the opening closest to the camera body. The tip should exit from the underside of the buckle.
- Route the tip back between the two layers of strap running through the buckle. This is the reverse thread, and it is the key step. Instead of pulling the tip straight through and out, you fold it back between the two strap layers inside the buckle.
Why this works: The weight of the camera pulls down on the buckle, which tightens the grip on the tail rather than loosening it. Friction increases under load. This is the physical mechanism behind the Pro Lock — the heavier the camera, the more secure the hold.
- Pull the tip through the buckle’s bottom slot so it exits pointing away from the camera. The tail is now sandwiched between the two strap layers inside the buckle — this is the locked position.
Caption: Panel 3 is the critical step — the tail routes back between the strap layers, not straight through. This reverse thread is what creates the friction lock.
As shown in panel 3 of the diagram above, the tail routes back between the strap layers — not straight through. US Patent US9247787B2 confirms that friction-based locking is the engineering standard for camera strap security, describing the mechanical principle of anchor-based strap attachment (patented quick-release strap mechanism, USPTO, 2015).
One more step to go — tighten everything down and test it before you shoot.
Step 6: Tighten and Test
- Pull the main strap body — not the tail — to tighten. As you pull, the tail should disappear further into the buckle. If the tail pops out instead of tightening, the strap is threaded incorrectly. Return to Step 3.
Next, slide the retainer piece (strap keeper) up flush against the buckle. It should cover the tail exit point and hold everything flat against the strap body.
Load Test: Hold the camera by the strap only — not the body — and give it a firm tug. The strap should feel firm with zero slippage. Sony’s guide on preventing camera drop damage states users must attach both ends securely before lifting the camera by the strap (Sony, 2026).
If the tail is still visible and floppy after tightening, the retainer piece hasn’t been slid up to cover it — this is the most common finishing mistake.
Now you know the right way — here’s what the wrong way looks like, so you can spot it immediately.
Common Mistakes to Avoid
Caption: Mistake #3 — routing the tail straight through the buckle instead of reversing it — is the root cause of most accidental camera drops.
- Threading inside-out through the eyelet. The strap angles away from the camera body instead of lying flat. Fix: re-thread from outside-in so the strap body rests against the camera.
- Skipping the retainer piece. The tail hangs loose and the buckle loosens over time from vibration and movement. Fix: always slide the retainer piece over the tail before tightening.
- Routing the tail straight through the buckle. Without the reverse thread (Steps 3–5), the tail can slip under load. The “tail hanging loose vs. tail tucked in” debate is settled — the Pro Lock tucks the tail inside the buckle. Any method that leaves the tail hanging loose is incomplete.
- Only attaching one side. The camera becomes unbalanced, swings freely, and can strike objects or other gear. Fix: always attach both eyelets before shooting.
The Pro Lock method is universal — but Canon, Nikon, Sony, and Fujifilm each have a small quirk worth knowing before you start threading.
Brand Differences: Canon, Nikon, Sony
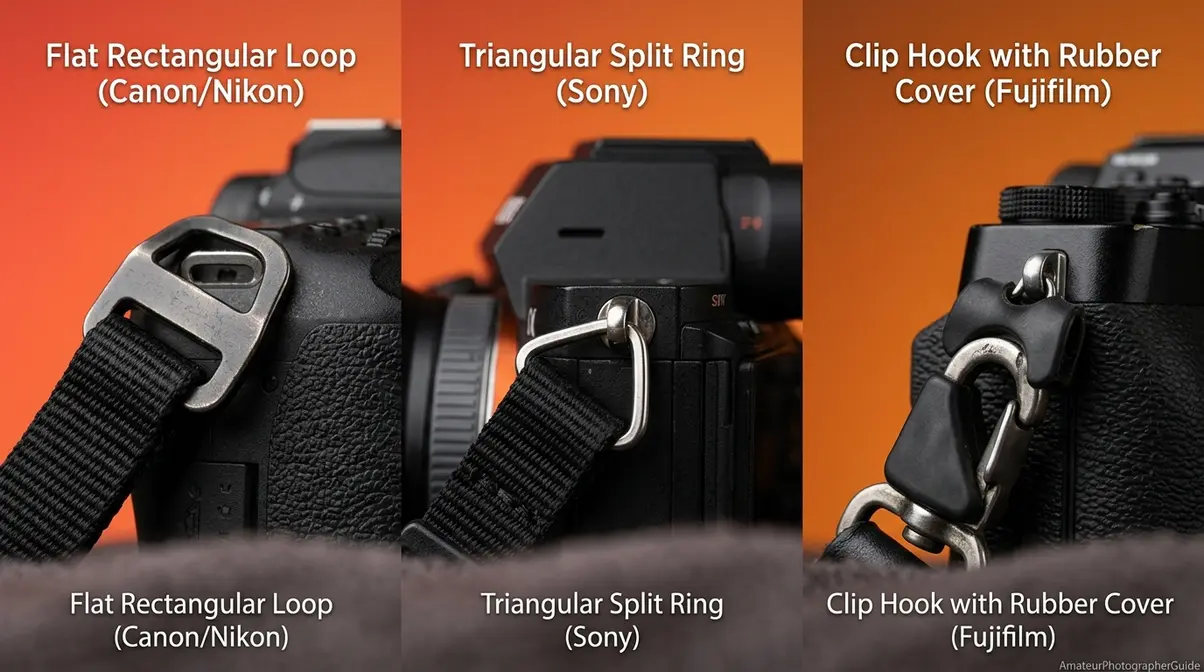
The Pro Lock method works identically on every major camera brand. Canon, Nikon, Sony, and Fujifilm — together holding the dominant share of global interchangeable-lens camera sales, with Canon claiming its 23rd consecutive year at number one (Canon, 2026) — all use the same buckle-and-eyelet system. The minor hardware differences are in eyelet shape and whether the brand includes protective covers for the attachment point.
Canon, Nikon, Sony, and Fujifilm all use the same Pro Lock buckle method — the only meaningful differences are eyelet shape and whether the brand includes protective covers for the attachment point.
Caption: Eyelet shapes vary across brands, but the Pro Lock threading sequence is identical on all four.
| Brand | Eyelet Type | Unique Note | Official Source |
|---|---|---|---|
| Canon | Flat rectangular loop | Standard buckle system; no covers | Canon Support |
| Nikon | Flat loop (narrow on older bodies) | Fold strap flat on D3000 series to thread | Nikon Manual |
| Sony | Triangular split ring (mirrorless) | Strap clips onto split ring; buckle step unchanged | Sony Help Guide |
| Fujifilm | Strap clip hook | Requires protective rubber cover over eyelet first | Fujifilm Manual |
How to Attach a Canon Camera Strap
If you are wondering how to put the strap on a canon camera, the process is straightforward. Canon DSLRs — including the Canon Rebel T7, Canon’s entry-level DSLR, and the 90D — along with mirrorless bodies like the Canon EOS R, Canon’s full-frame mirrorless flagship, and the EOS RP all use a standard flat rectangular eyelet. The strap end threads through the eyelet from the outside in, identical to the universal Pro Lock method. No special hardware is needed.
Canon’s official strap attachment guide states: “pass the end through the buckle and the strap keeper to straighten it” — this confirms the Pro Lock sequence step by step (Canon Support, 2026). On the Canon Rebel T7, the eyelet is a small flat rectangular loop on the left side of the body. For a deeper look at Canon’s camera lineup, see our comprehensive guide to Canon cameras.
Nikon cameras use the same approach with one small naming difference worth knowing.
How to Attach a Nikon Camera Strap
Nikon DSLRs — the Nikon D3500, Nikon’s beginner DSLR, and the D5600 — along with mirrorless bodies like the Z50 and Z6 use the same flat eyelet system as Canon. Nikon’s manual on securing the strap explicitly instructs users to “attach the strap securely to the camera eyelets using the supplied strap” — confirming the Pro Lock approach (Nikon, 2026).
One Nikon-specific note: on older Nikon DSLRs in the D3000 series, the eyelet is slightly narrower than on current models. The strap end may need to be folded flat before threading to pass through cleanly. On the Nikon D3500, the eyelets are on both sides of the camera body — thread one end of the strap into each eyelet before starting the Pro Lock sequence. To learn how to put on a Nikon strap across the full Z-series lineup, explore our Nikon camera guide.
Sony mirrorless cameras introduce a small wrinkle — some models use a triangular split ring instead of a flat eyelet.
How to Attach a Sony Camera Strap
Figuring out how to put on a camera strap sony style involves a minor adjustment. Sony full-frame mirrorless cameras in the a7 series and APS-C bodies like the Sony a6400, Sony’s mid-range APS-C mirrorless, and the a6600 often include a triangular split ring pre-attached to the eyelet. The strap clips — small metal D-rings — hook onto this split ring rather than threading through the eyelet directly.
The Pro Lock buckle sequence still applies to the other end of the strap. The split ring only changes the eyelet-attachment step, not the buckle threading. Sony’s guide on preventing camera drop damage states: “Attach the shoulder strap to prevent damage caused by dropping the product” — confirming both ends must be secured (Sony, 2026). On the Sony a6400, clip the strap’s metal D-ring onto the triangular split ring on the camera body, then proceed with the Pro Lock buckle method on the other end.
Fujifilm adds one more unique step that almost every tutorial skips — and skipping it scratches your camera body.
How to Attach a Fujifilm Camera Strap
For those asking how to put strap on fujifilm x100vi, the protective covers are essential. Fujifilm cameras in the X100 series — including the Fujifilm X100VI, Fujifilm’s premium compact — and the X-T series use strap clips (small metal hooks) rather than threading the strap end directly through an eyelet. This is different from Canon and Nikon’s flat-loop threading.
The detail every competitor misses: Fujifilm includes small black rubber protective covers that must be placed over the eyelet before attaching the strap clip. The black side faces the camera body. Skipping this step causes the metal clip to scratch the camera’s finish over time — an irreversible cosmetic issue on a camera that many buyers choose for its aesthetics. Fujifilm’s X100VI manual on attaching strap clips instructs users to “place a protective cover over the eyelet as shown, with the black side facing the camera” (Fujifilm, 2026). In the Fujifilm X100VI box, look for the small black rubber squares — place one over each eyelet before snapping the strap clips in.
Neck straps are the standard — but wrist straps and lanyards work completely differently, with a knot-based attachment that takes about 10 seconds once you know how.
Wrist Straps, Lanyards, and Compact Cameras
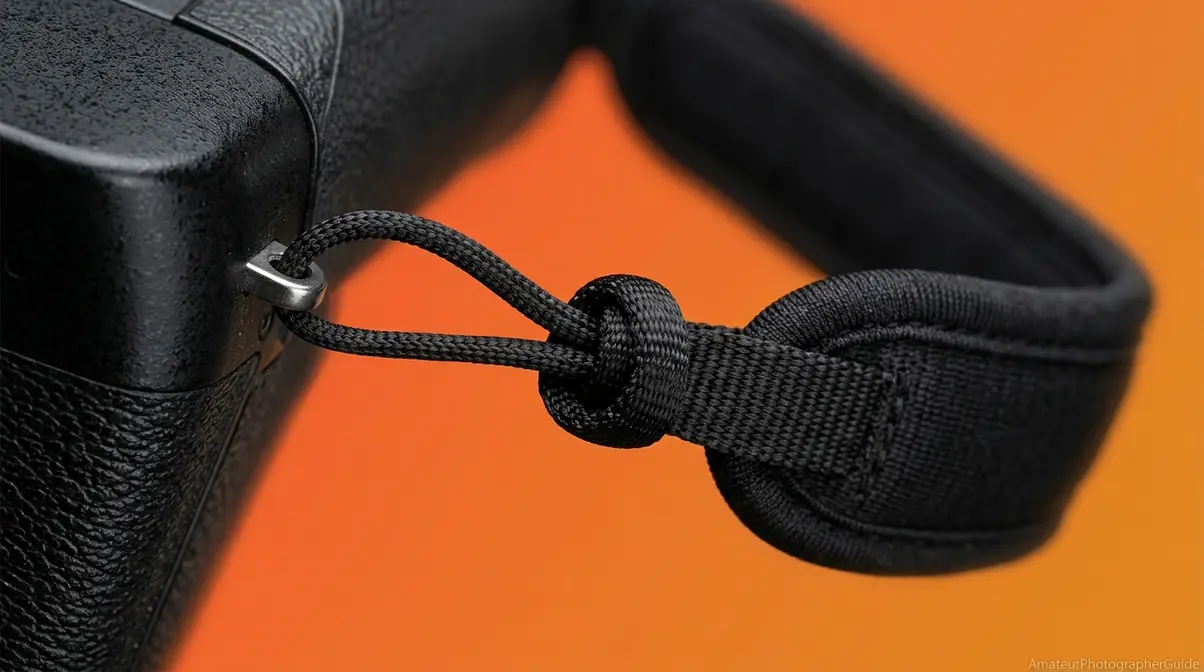
Wrist straps, string lanyards on compact cameras, and phone lanyards all use a different attachment system than neck straps — there’s no buckle involved. Instead, these straps rely on a simple looping knot that self-tightens under load, making them surprisingly secure for their small size. Unlike the Pro Lock, which uses buckle friction, the security here comes from the cow hitch knot’s self-tightening geometry — the more weight applied, the tighter the loop cinches.
String-style lanyards on Polaroid and Instax cameras use a cow hitch knot — a self-tightening loop that becomes more secure the more weight is applied.
How to Attach a Wrist Strap
Learning how to attach wrist strap to camera bodies provides a secure alternative to neck straps.
- Thread the thin looped end of the wrist strap through the camera’s eyelet — typically the right-side eyelet for a wrist strap. Use the same outside-in direction as a neck strap.
- Pull the loop through until about 1 inch of loop sticks out on the inside of the eyelet.
- Feed the entire wrist strap body — the padded section — through that small loop and pull tight. This creates a cow hitch knot that tightens under load.
- Slide your hand through the larger loop before shooting. Sony’s guide on using a camera wrist strap advises: “Attach the wrist strap and place your hand through the loop to prevent damage caused by dropping the product” (Sony, 2026).
The DJI Osmo Pocket 3, DJI’s compact action camera, uses the same cow hitch attachment on its wrist strap — thread the thin loop through the Osmo’s strap lug and pull the body through. For a full breakdown of strap styles and ergonomics, learn more about wrist strap usability.
Polaroid and Instax cameras use the same cow hitch knot — but with a much thinner string that requires a different threading trick.
Attaching Lanyards to Instant Cameras
If you need to know how to put strap on instax mini 11, the cow hitch is your answer. String lanyards on the Polaroid Now, Polaroid’s flagship instant camera, and the Fujifilm Instax Mini 11, the entry-level instant camera in Fujifilm’s Instax line, use a thin cord with a small loop at one end. The eyelet on these cameras is very small and recessed — the thin loop is designed to fit through it.
- Pinch the thin loop at the end of the lanyard and push it through the camera’s small eyelet. Leave about half an inch of loop poking through on the other side.
- Take the full body of the lanyard — the long string section — and thread it completely through that small loop.
- Pull the lanyard body tight. The loop cinches down against the eyelet — this is the cow hitch knot. The more tension applied, the tighter it grips.
Tip (the dental floss trick): If the eyelet is too tight to push the loop through with your fingers, use a toothpick or the thin edge of a credit card to guide the loop through the hole. On the Fujifilm Instax Mini 11, the strap eyelet is a small rectangular slot on the side of the camera — the loop is thin enough to fold and push through with a fingernail.
Caption: The cow hitch knot cinches tighter as weight increases — making it more secure than it looks for lightweight compact cameras.
For more on using compact and film cameras, see our guide on how to use a Fujifilm disposable camera.
Attaching a lanyard to a smartphone follows the same cow hitch principle — but requires one extra piece of equipment most people don’t realize they need.
How to Attach a Lanyard to a Smartphone
Many users ask, “how do I attach a strap to my iPhone?” The secret is in the case. iPhones and most Android phones do not have built-in lanyard eyelets. A phone case with dedicated lanyard holes is required — this is the first step most tutorials skip entirely.
- Install a phone case that has a lanyard hole — a small loop or slot built into the case edge. Standard cases without this feature will not work.
- Pinch the thin string loop of the lanyard and push it through the case’s lanyard hole.
- Feed the larger end of the lanyard — the wrist loop or neck strap — completely through the small loop now poking through the case.
- Pull tight. The cow hitch cinches against the case hole.
Apple Support’s guide on securing a lanyard loop instructs users to “slip the metal ring through the cord loop, and secure the loop by gently pulling on the metal ring” (Apple Support, 2026). For iPhone 15 users, Apple’s own MagSafe-compatible Crossbody Strap attaches to a dedicated case with a metal ring system — no knot required. For more on compact camera use cases, see our guide on using disposable cameras.
How to Attach a Lanyard to a Camera?
To attach a lanyard to a camera, push the thin looped end of the lanyard string through the camera’s small eyelet, leaving a half-inch loop on the other side. Feed the entire lanyard body through that small loop and pull tight — this creates a cow hitch knot that grips the eyelet securely. The cow hitch is self-tightening: the heavier the camera, the tighter the knot cinches against the eyelet. If the eyelet is too narrow for your fingertip, use a toothpick or the thin edge of a credit card to guide the loop through.
For photographers who want to skip the buckle threading entirely, quick-release systems offer a faster — and arguably more secure — alternative.
Quick-Release and Alternative Strap Systems
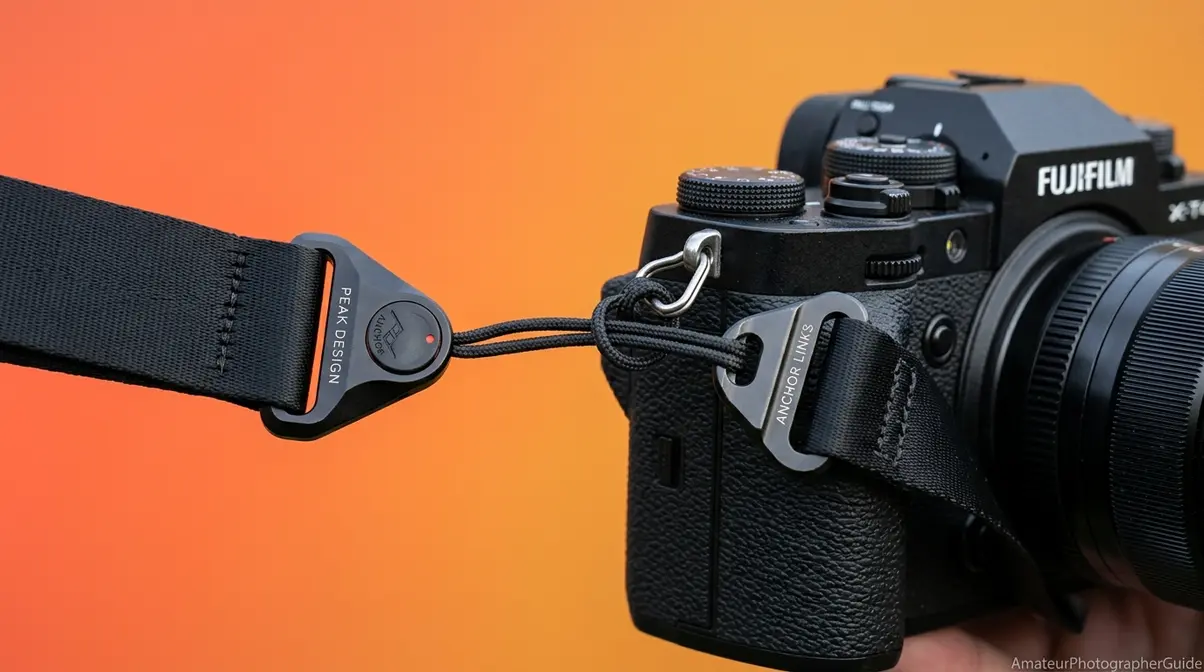
Quick-release strap systems like Peak Design use permanent anchor cords threaded through camera eyelets, replacing the traditional buckle with a click-in housing that detaches in under a second. These systems replace the Pro Lock entirely with a mechanical click mechanism. The anchor threads through the eyelet using the same outside-in method, but the buckle step is eliminated — the security comes from the anchor housing’s locking pin rather than buckle friction.
How to Attach a Quick Release Strap?
When learning how to attach a quick release strap, the anchor system is the most critical component. Peak Design, the San Francisco-based camera accessories brand known for its quick-release strap system, uses small looped anchor cords that attach permanently to the camera eyelets. Their anchors are rated to hold up to 200 lbs — well beyond any camera body (Peak Design, 2026).
- Thread the Peak Design anchor cord — a small looped cord — through the camera’s eyelet using the same outside-in method as a standard strap. The loop end goes through the eyelet first.
- Pull the anchor through its own loop to create a cow hitch knot against the eyelet. Pull tight. The anchor now sits permanently on the camera.
- Slide the anchor into the quick-release housing on the strap until you hear an audible click — the locking pin engages. Tug gently to confirm it’s locked before lifting the camera.
Why it’s more secure: The anchor is a permanent fixture on the camera body. The strap detaches from the anchor, not from the camera — so even when you swap straps, the anchor stays correctly threaded. On a Canon EOS R with Peak Design anchors, the strap can be removed and reattached in under 2 seconds without re-threading the eyelet. For a comparison of harness and crossbody options, see our guide on alternative harness and crossbody strap systems.
Caption: The anchor cord stays on the camera permanently — the strap housing clicks in and out without re-threading the eyelet.
The patented quick-release camera strap mechanism describes the male attachment anchor with an overmolded loop that creates a secure, rapid-connect system (USPTO, 2015).
No quick-release system? A basic leather belt and two D-rings can serve as a surprisingly functional emergency strap.
DIY and Budget Alternatives
A leather belt with two D-ring attachments — available at hardware stores for under $5 — can thread through camera eyelets using the same Pro Lock method. This works best as a temporary solution, not a permanent replacement. A 1-inch leather belt cut to approximately 48 inches with D-rings threaded through each eyelet is a functional emergency strap that many film photographers have used for decades.
Aftermarket leather straps from brands like Ona or Tap & Dye use the same buckle system as the included manufacturer strap — the Pro Lock method applies identically. If you’re considering a leather strap as an upgrade, the threading process is no different; the material is simply more durable and comfortable over long shooting sessions.
Whether you use a stock strap, quick-release system, or a DIY belt — the most important step comes after attachment: testing it.
Drop Prevention and Strap Maintenance
A properly attached camera strap should be load-tested before every shoot — hold the camera by the strap only and give a firm tug; any slippage means the Pro Lock needs to be re-threaded. This section covers the two maintenance habits that 100% of competitor tutorials ignore: the initial load test and periodic wear inspection.
How to Load-Test Your Strap
After attaching both ends of the strap using the Pro Lock method, run this three-step test before your first shot:
- Hold the camera by the strap only — do not touch the camera body. Let it hang freely for five seconds.
- Give the strap a firm tug — not violent, but deliberate. The strap should not slip, the tail should not move, and the retainer piece should stay flush against the buckle.
- If any slippage occurs, re-check: Is the tail routed through both buckle slots? Is the retainer piece covering the tail exit point? If both are correct and slippage persists, re-thread from Step 3.
Sony’s official guidance confirms users must attach both strap ends securely before lifting the camera by the strap — the load test confirms this before you’re out in the field. According to OSHA ergonomics guidelines for reducing muscle fatigue, fitting equipment to the user reduces muscle fatigue and injury risk — a principle that applies directly to adjusting camera strap length to prevent neck strain during long shoots (OSHA).
Even a correctly applied Pro Lock should be re-checked every three to four shooting sessions. Vibration and repeated movement can cause the buckle to loosen slightly over time.
Beyond the initial test, checking for wear every few months keeps your strap reliable for years.
Signs of Wear to Check Regularly
Caption: Check these four wear points every few months — a frayed strap or cracked buckle can fail without warning under load.
Inspect your strap at these four points:
- Fraying at the eyelet contact point — the strap edge wears first where it rubs against the metal eyelet. If more than 20% of the strap width shows fraying, replace the strap immediately.
- Buckle cracks or deformation — plastic buckles can crack under repeated load. Squeeze each buckle gently; any cracking sound indicates it needs replacement.
- Retainer piece deterioration — rubber retainer pieces dry out and crack over time. A cracked retainer piece no longer holds the tail flat, increasing the risk of the tail working loose from the buckle.
- Strap keeper looseness — if the strap keeper slides freely along the strap instead of staying in position, the tail is no longer held flat. Replace the strap keeper or use a small piece of tape as a temporary fix.
For more on keeping your camera kit in good shape, see our guide to essential camera accessories every photographer needs.
Got questions about specific situations? The FAQ section below answers the most common follow-up questions about camera strap attachment.
Frequently Asked Questions
How to Put on the Camera Strap?
To put on a camera strap, thread the strap end through the camera’s eyelet from the outside in, then feed it through the retainer piece. Next, pass the tip through the top of the buckle, route it back between the two strap layers (the reverse thread), and pull it through the bottom slot to engage the Pro Lock method. This friction lock prevents the tail from slipping out under load, so repeat the process on the other side and load-test before your first shoot.
How Do I Attach a Strap to My iPhone?
To attach a strap to an iPhone, you first need a phone case with a built-in lanyard hole. Standard iPhones do not have strap eyelets, so a compatible case is a non-negotiable first step. Once you have a compatible case, push the thin loop end of the lanyard through the case’s lanyard hole. Then, thread the full strap body through that small loop and pull tight to create a self-tightening cow hitch knot. For MagSafe iPhone cases, Apple’s own Crossbody Strap accessory uses a metal ring system that eliminates the knot entirely.
Do Professionals Use Camera Straps?
Yes, professional photographers rely on camera straps as a fundamental safety measure. A dropped camera body or lens can cost thousands of dollars to repair or replace. Most professionals upgrade from the manufacturer’s branded nylon neck strap to more ergonomic options like dual-harness systems, quick-release slings, or thick leather straps designed for all-day comfort. The standard manufacturer strap that ships with a new camera is functional and secure when attached correctly, making it a perfectly valid starting point.
Attach It Right, Every Time
For photographers at any level, correctly attaching a camera strap comes down to one technique. The Pro Lock method routes the strap tail back through the buckle from below, creating a friction lock that holds under load. Canon, Nikon, Sony, and Fujifilm all confirm the same threading sequence in their official manuals — the only differences are minor hardware details at the eyelet. Whether you’re using a standard neck strap, wrist strap, or quick-release system, the attachment takes under five minutes and should be load-tested before every shoot.
The Pro Lock isn’t just a threading trick — it’s the physical reason straps don’t slip. Understanding the four components (eyelet, retainer piece, buckle, tail) and how they interact turns a five-minute setup task into a permanent habit. Every strap you own, every camera you use, attaches the same way.
Now that your strap is secure, the next step is making sure it’s the right strap for how you shoot. Our guide to choosing the right camera strap for comfort breaks down every strap type — neck, sling, wrist, harness — with pros, cons, and best use cases for each shooting style. And if you’re still setting up your new camera, our beginner’s guide to basic camera settings walks you through the next steps.
zak
Gear tester and writer at Amateur Photographer Guide.