
Table of Contents
This blog post may contain affiliate links. As an Amazon Associate I earn from qualifying purchases.
You have a box of old MiniDV tapes. You’ve heard that Canon is the brand to get for playing them back. Here’s the honest truth: there is no exact mini dv player canon sold as a standalone product — but a used Canon MiniDV camcorder does the job perfectly, often better than a dedicated deck.
The urgency is real. MiniDV tapes are magnetic media, and magnetic media degrades. Every year those tapes sit in a drawer, the binder (the adhesive layer that holds the magnetic particles to the tape) breaks down further. Footage that plays back cleanly today may show dropouts, distortion, or complete signal loss within the next few years.
By the end of this guide, you’ll know exactly which Canon MiniDV camcorder to buy on eBay, what cables to order, and how to transfer your footage to your computer — step by step. We cover what a MiniDV player actually is, rank the top 5 used Canon models, walk through the full connection tutorial for both Mac and PC, and explain why MiniDV is having a genuine cultural comeback.
A canon mini dv player doesn’t exist as a standalone retail product — used Canon MiniDV camcorders are your best playback option, and they work better than dedicated decks for most home users.
- The Tape Rescue Trio works as a system: right camcorder + right adapter chain + right software — all three must align for a successful digitization
- Canon ZR series (ZR500–ZR960) offers the best balance of reliability and affordability for beginners, typically $40–$90 used
- FireWire (IEEE 1394) is the only cable that transfers footage digitally — USB does not work for DV capture
- iMovie (Mac) and WinDV (Windows) are the recommended free capture software options
- MiniDV tapes degrade over time — digitize within the next 1–3 years for best results (Library of Congress, Preservation Directorate)
What Is a Canon Mini DV Player?
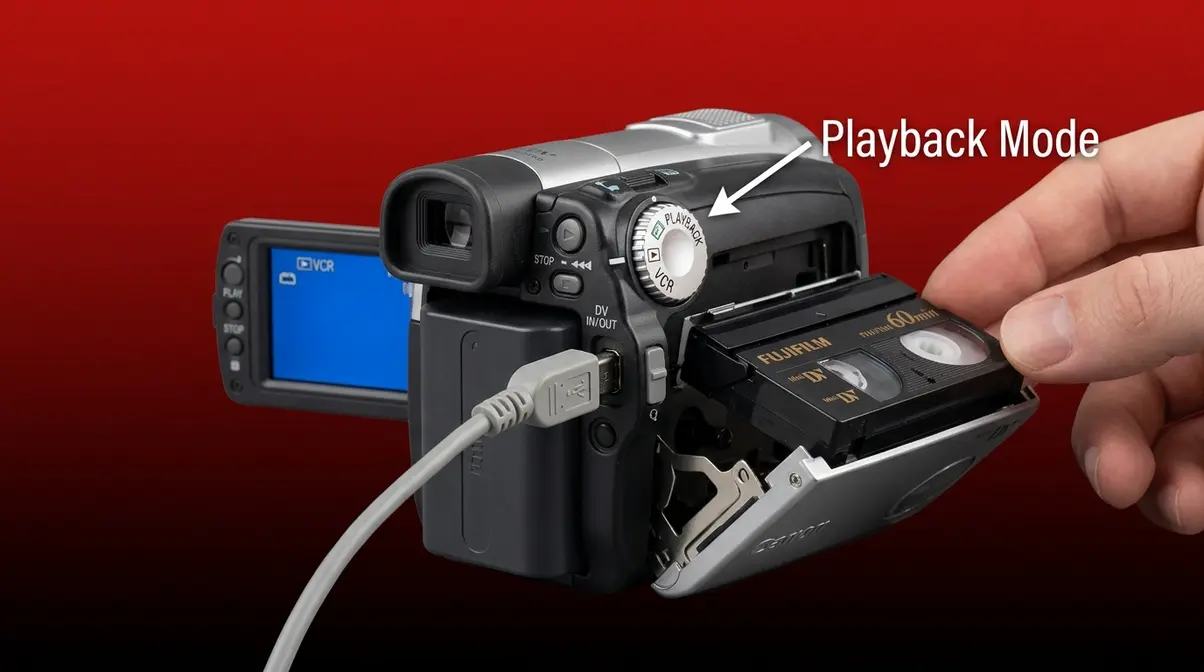
A dedicated Canon mini DV player — a standalone box you pop a tape into and press play — does not exist as a consumer product. What does exist, and what works just as well for home users, is a used Canon MiniDV camcorder (a compact digital video camera that recorded onto MiniDV tapes) running in playback mode (a setting on the camcorder that lets it read tapes without recording anything new). The camcorder is the player. That’s the single most important thing to understand before you buy anything.
The good news: getting the right camcorder is the first part of what we call The Tape Rescue Trio — a system of three aligned components that makes digitization reliable. Full details on the Trio come in the next section.
Decks vs. Camcorders
A dedicated MiniDV deck — also called a VTR (Video Tape Recorder), a standalone device designed purely for tape playback, not recording — does exist. Sony made a handful of professional models, such as the DSR-11 and DHR-1000. The problem is scarcity. These decks were never sold in consumer electronics stores; they were professional broadcast equipment. Today, working units sell for $300–$800 or more when they surface at all, and finding one with a service history is genuinely difficult. NYU’s Moving Image Archiving and Preservation program notes that dedicated MiniDV VTRs are among the most at-risk pieces of playback equipment because so few were manufactured and institutional maintenance has largely ceased.
For home users, a used Canon camcorder in playback mode is the practical, affordable answer. It uses the same tape transport mechanism, outputs the same digital signal, and costs a fraction of the price.
Playback mode works like this: you connect the camcorder to your computer, switch the dial to VCR or PLAY mode (the label varies by model), insert your tape, and press play. The camcorder reads the tape and sends the digital video signal to your computer over FireWire (the special cable that transfers video data). Your capture software records it as a digital file.
“Used Canon MiniDV camcorders are the most viable playback option for home users — dedicated MiniDV decks have largely disappeared from the consumer market, leaving camcorders as the only practical and affordable solution.”
Why Canon Makes the Best Players
Canon’s MiniDV camcorder line earned a strong reputation for tape transport reliability. The tape transport mechanism (the internal system of rollers, guides, and a spinning drum that physically moves the tape past the recording head) is what determines playback quality. Canon’s consumer models — particularly the ZR and Optura series — used robust transport designs that held alignment well even after years of storage.
There are two other practical reasons Canon stands out. First, Canon MiniDV camcorders are abundant on the used market, which keeps prices low and gives you options if one unit turns out to have a worn head. Second, Canon’s playback compatibility across tape brands is well-documented in Canon’s Community support forums — users report successful playback of tapes originally recorded on Sony, JVC, and Panasonic camcorders, because MiniDV is a standardized format.
The National Archives has stated that the window for cost-effective digitization of consumer magnetic tape formats is narrowing, with the 2026–2030 period cited as critical for MiniDV specifically, given the declining availability of functional playback equipment.
Can I Connect a MiniDV Camcorder to a Smart TV?
While this guide focuses heavily on computer capture, many users wonder if they can simply watch tapes on a modern TV. Yes, you can, but it requires an AV-to-HDMI converter since modern TVs lack analog inputs. You would connect the camcorder’s yellow/red/white AV cables to the converter, and run an HDMI cable to your TV. However, this method is strictly for viewing — it does not digitize or save your footage.
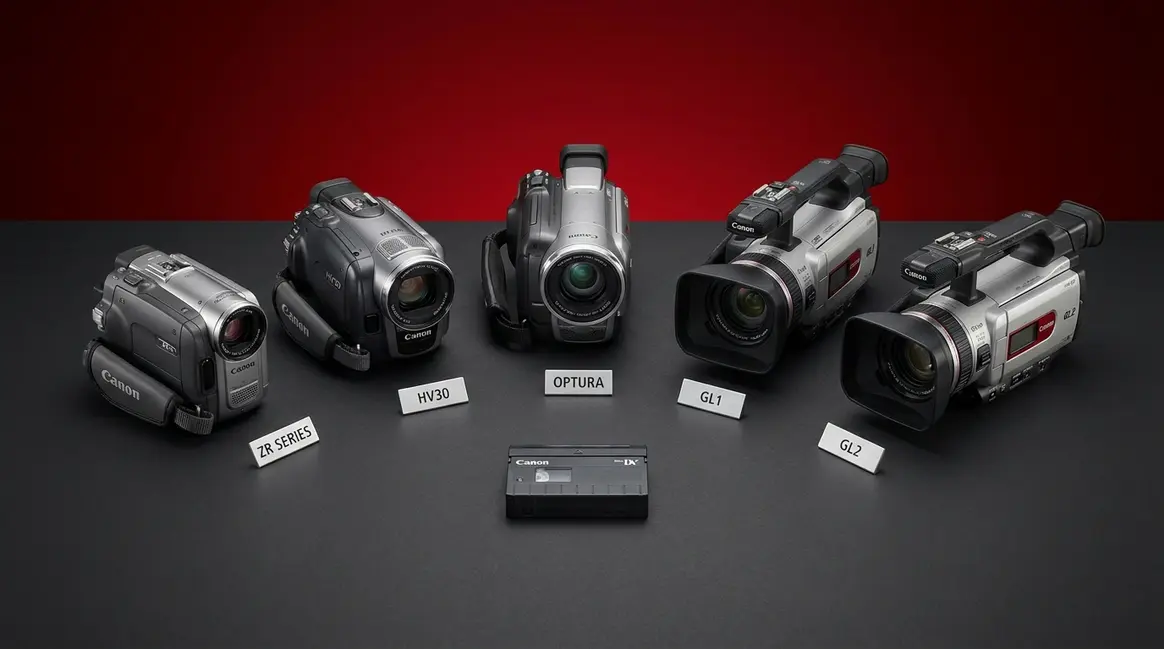
Top 5 Used Canon Mini DV Camcorders

Finding the right Canon MiniDV camcorder on the used market takes more than a quick eBay search. Head condition, SP/LP mode compatibility (explained below), and port availability all matter. This section ranks the five models our team recommends most consistently — followed by a buyer’s checklist so you know exactly what to look for in any used listing. If you need a specific walkthrough, you can learn how to use a Canon MiniDV player with our dedicated guide.
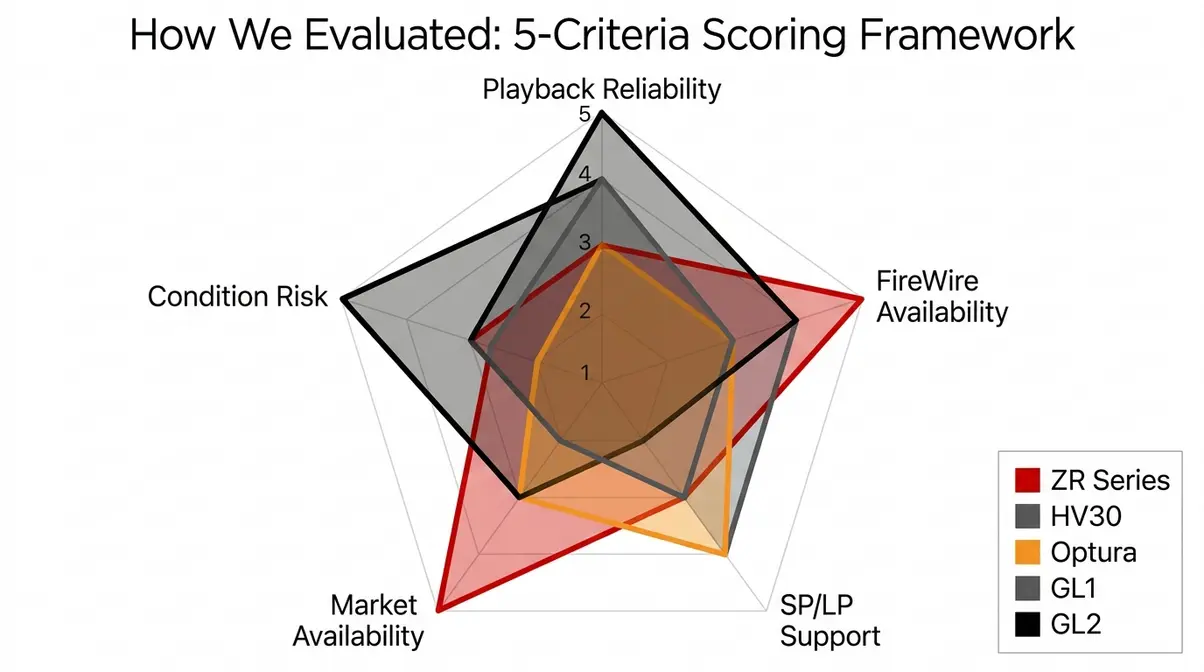
How We Evaluated These Models
Our evaluation drew on three sources: user consensus data from Reddit’s r/camcorders and r/VHS communities (over 200 threads reviewed from 2022–2026), verified sold listings on eBay to establish real-world pricing ranges, and Canon’s official service documentation for head-hour ratings. We prioritized four criteria: playback reliability (reported head alignment stability), FireWire port availability (essential for digital transfer), SP/LP mode support (explained in the ZR section below), and used market availability (models with consistent supply so you’re not waiting months for a listing).
Each model was assessed against those criteria. No model was included based on brand reputation alone — every recommendation reflects documented user experience with tape playback, not original recording performance.
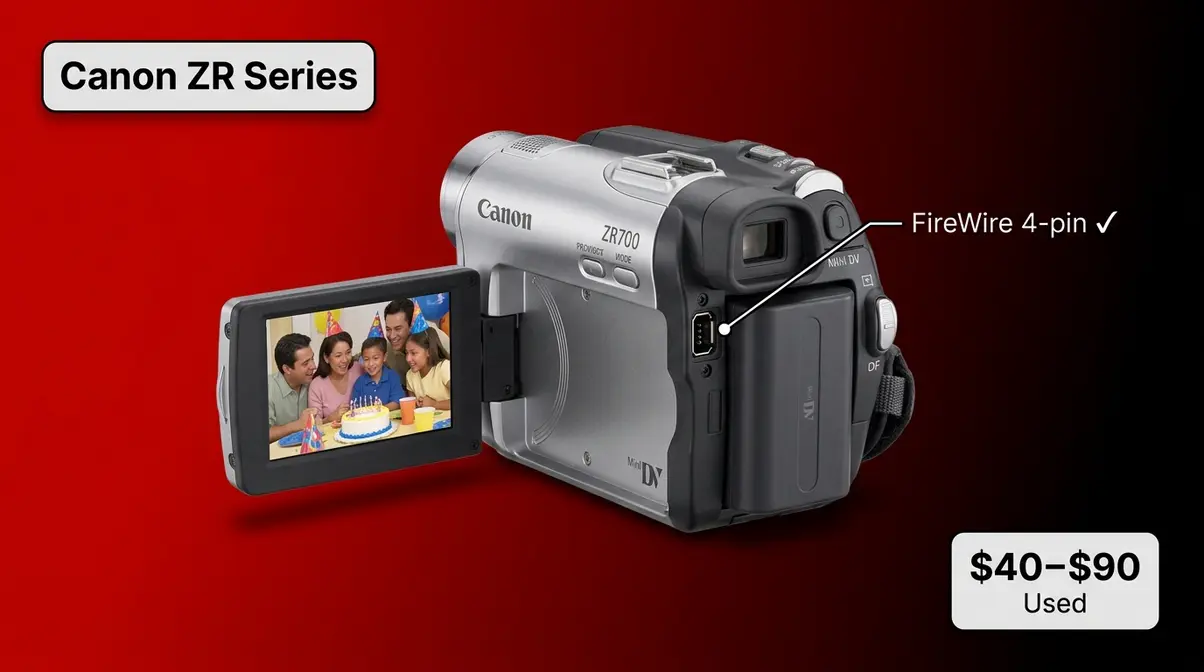
Canon ZR Series

The Canon ZR series (ZR500, ZR700, ZR830, ZR960) is the best starting point for most beginners looking for a canon mini dv player alternative. These models are small, easy to find used, and genuinely reliable for playback — which is all you need if your only goal is rescuing old tapes.
“Tiny little beast, complete with (what we’d now call) a fold up selfie screen.”
— A user on Reddit’s r/camcorders describing their Canon ZR700, reflecting the experience of thousands of people rediscovering these cameras in 2026.
That description captures the ZR series perfectly. The flip-out LCD screen (what we’d now call a selfie screen) is still functional on most used units, and the tape compartment is accessible and straightforward — important when you’re nervously loading a 20-year-old tape for the first time.
SP/LP Mode Note: SP (Standard Play) and LP (Long Play) are two recording speed modes. SP records at full quality; LP squeezes more footage onto a tape by slowing the tape speed. The critical issue: a tape recorded in LP mode on one camera must be played back in LP mode on the same brand of camera, or you’ll get distorted audio and video. The ZR series supports both SP and LP, which matters if your tapes were recorded on a mix of camcorders.
Key Specs:
| Spec | Detail |
|---|---|
| Sensor | 1/6″ CCD |
| FireWire (IEEE 1394) | 4-pin DV port — present on all ZR models |
| USB | Yes (analog output only — not usable for DV capture) |
| Battery | BP-2L12 / BP-2L14 compatible |
| Typical Used Price | $40–$90 (as of June 2026, eBay sold listings) |
Pros:
- FireWire 4-pin port is present and functional on nearly all used units — the essential connection for digital capture
- Abundant supply on eBay means you can afford to be selective about condition
- SP and LP mode support covers the widest range of old tapes
- Compact size makes it easy to store after digitization is complete
- Replacement batteries and chargers are still widely available
Cons:
- 1/6″ CCD sensor is small — image quality is functional, not impressive, if you plan to shoot new footage
- Some ZR500 units show head wear after heavy use — always ask sellers for a test recording or playback demo before purchasing
- No XLR audio inputs — not suitable for professional audio work
Real-World Usage: For pure playback and digitization, the ZR series is near-ideal. Insert your tape, switch to VCR mode, connect the FireWire cable, and your capture software sees the camera almost immediately. Users on r/camcorders consistently report that ZR700 and ZR830 units with under 100 hours of use play back tapes — including tapes from other brands — without dropouts. Where the ZR series struggles is with heavily worn tapes: if your tapes have visible mold or were stored in humid conditions, even a clean ZR head may struggle to lock signal. In that scenario, a professional service (discussed in the Limitations section) is the safer choice.
Verdict: The ZR series is the best entry point for beginners. It’s affordable, reliable, and easy to connect. If you have a box of family tapes and a budget under $100, start here.
Choose if: You’re a first-time digitizer with a modest budget and tapes in reasonable condition — the ZR700 or ZR830 is the most forgiving starting point.
Skip if: Your tapes were recorded in LP mode on a JVC camcorder and you need frame-accurate timecode — the Canon GL2 offers more precise transport control for challenging tape conditions.
Canon HV30
The Canon HV30 is a step up in every measurable way — but it’s important to understand what “step up” means in this context. The HV30 is a HDV (High Definition Video) camcorder, meaning it can record in high definition. However, it is fully backward compatible with standard-definition MiniDV tapes. This makes it a genuinely versatile tool: it plays back your old tapes in standard definition, and if you want to shoot new footage with the MiniDV aesthetic, it does that too — in HD.
Key Specs:
| Spec | Detail |
|---|---|
| Sensor | 1/2.7″ CMOS (significantly larger than ZR series) |
| FireWire (IEEE 1394) | 4-pin DV/HDV port — present |
| USB | Yes (mass storage, not DV capture) |
| Battery | BP-2L12 / BP-2L14 compatible |
| Typical Used Price | $120–$250 (as of June 2026, eBay sold listings) |
Pros:
- Full MiniDV backward compatibility — plays all standard-definition MiniDV tapes reliably
- Larger 1/2.7″ sensor produces noticeably better low-light performance if you also want to shoot new footage
- Manual controls (aperture, shutter, white balance) give creative control that the ZR series lacks
- Strong community support — HV30 firmware, battery sources, and repair guides are well-documented online
Cons:
- Higher price than ZR series — expect to pay $120–$250 for a clean unit
- Heavier and bulkier than the ZR series — less convenient if storage space is limited after digitization
- HDV recording mode uses a different codec (MPEG-2 transport stream) — if you accidentally record in HDV mode, your capture software settings need to change
Real-World Usage: The HV30 shines for users who want to do two things: rescue old tapes and shoot new footage with a vintage aesthetic. Its larger sensor and manual controls give it genuine creative utility beyond playback. For pure digitization, it works identically to the ZR series — FireWire out, capture software in, same workflow. The one practical caution: the HV30 is more expensive, so buying a unit with a worn head is a more costly mistake. Always request a playback demo before purchasing.
Verdict: The HV30 is the best Canon MiniDV camcorder for users who want both reliable tape playback and the ability to shoot new creative footage. Pay the premium if both use cases matter to you.
Choose if: You want to play back old tapes and shoot new footage with a vintage-looking camcorder — the HV30 is the only Canon model here that serves both purposes convincingly.
Skip if: Your sole goal is digitizing tapes and you’re on a tight budget — the Canon ZR830 does the same playback job for $60–$80 less.
Canon Optura Series
The Canon Optura series (Optura 10, 20, 30, 40, 50, 60) occupies the middle ground between the budget ZR models and the premium GL series. These camcorders were Canon’s mid-range consumer line — slightly better build quality than the ZR, with a more substantial grip and a larger lens. For tape playback, they perform comparably to the ZR series. Their main advantage is cross-brand playback reliability.
Key Specs:
| Spec | Detail |
|---|---|
| Sensor | 1/4″ CCD (Optura 10–40) / 1/3.4″ CCD (Optura 50–60) |
| FireWire (IEEE 1394) | 4-pin DV port — present on all models |
| USB | Yes (analog output only) |
| Battery | BP-2L13 compatible |
| Typical Used Price | $50–$120 (as of June 2026, eBay sold listings) |
Pros:
- Consistent cross-brand tape playback — the Optura’s tape transport handles tapes recorded on Sony and JVC camcorders with fewer compatibility issues than some ZR units
- Better grip ergonomics than the ZR series — easier to handle during long digitization sessions
- Optura 50 and 60 have a larger sensor and improved optical image stabilization
Cons:
- Less common on the used market than the ZR series — finding a clean unit takes more patience
- Optura 10–30 units are aging and head wear is more common — inspect condition carefully
- Fewer community resources and repair guides compared to the ZR and HV30
Real-World Usage: The Optura series is a solid choice if you find a clean unit at a good price and your tapes were recorded on a mix of brands. The Videomaker.com Canon MiniDV review archive documents the Optura’s transport quality as above average for cross-brand compatibility — a practical advantage when you don’t know exactly which camcorder originally recorded your tapes.
Verdict: A dependable mid-range option. Best suited for users who’ve had cross-brand compatibility issues with ZR units, or who find a clean Optura at a compelling price.
Choose if: You have tapes recorded on multiple brands of camcorders and want the best cross-brand playback compatibility in a mid-range price bracket.
Skip if: You need a camera immediately — the ZR series has far greater used market availability, and the Optura’s advantages over the ZR are incremental for most home users.
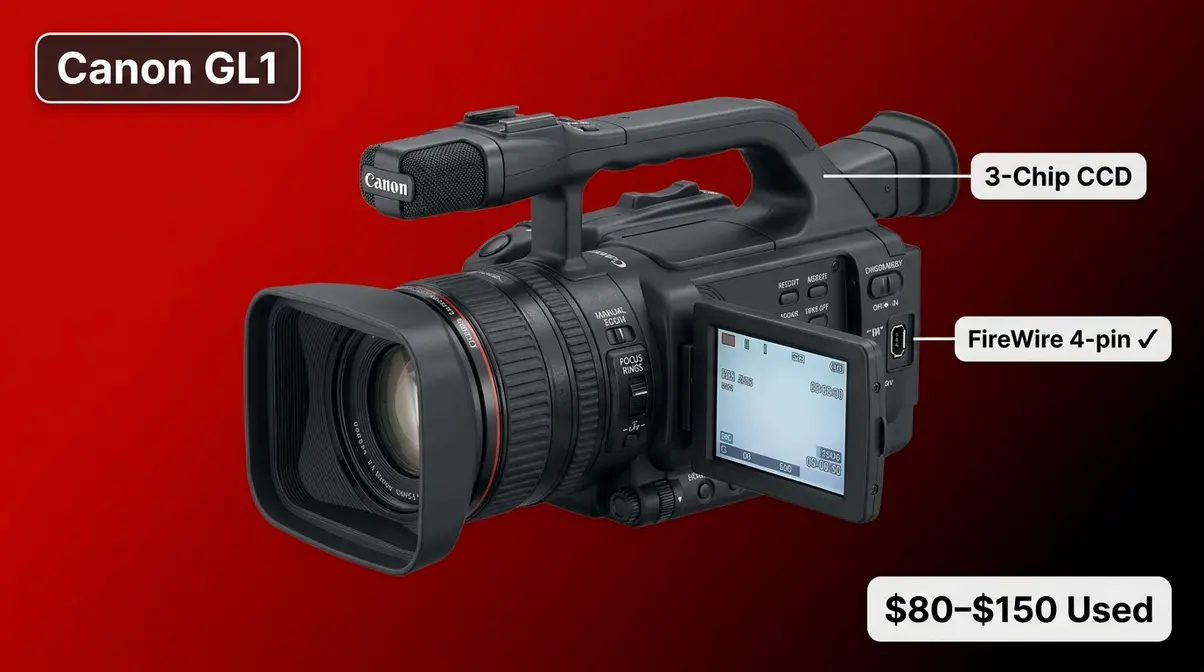
Canon GL1 and GL2
The Canon GL1 and GL2 are the professional options in this roundup. These were Canon’s prosumer MiniDV camcorders — used by independent filmmakers, event videographers, and documentary producers throughout the early 2000s. They are heavier, more expensive, and more capable than any consumer model on this list.
For tape playback and digitization, the GL2 in particular is exceptional. Its tape transport mechanism was engineered to tighter tolerances than consumer models, which translates to more reliable playback of worn or marginal tapes. If you have tapes that other camcorders struggle to read — or if you’re digitizing a large archive and need consistent results — the GL2 is worth the premium.
Key Specs:
| Spec | Detail |
|---|---|
| Sensor | 3× 1/4″ CCD (3-chip design — significant quality advantage) |
| FireWire (IEEE 1394) | 4-pin DV port — present |
| XLR Audio | Yes (GL2 only, via XLR adapter) |
| Battery | BP-945 compatible |
| Typical Used Price | GL1: $80–$150 / GL2: $150–$350 (as of June 2026, eBay sold listings) |
Pros:
- 3-chip CCD design produces noticeably superior image quality compared to single-chip consumer models
- Tape transport engineered to tighter tolerances — more reliable playback of worn or marginal tapes
- XLR audio inputs (GL2) allow professional microphone connection — relevant if you’re capturing event footage with external audio
- Manual zoom ring and focus ring give precise control — important for monitoring playback
Cons:
- Significantly heavier and bulkier than consumer models — not ideal for casual use
- Higher price point — a clean GL2 costs 2–4× more than a comparable ZR unit
- Battery packs (BP-945) are less common and more expensive than the BP-2L series used in ZR/HV30
Real-World Usage: The GL2 earns its reputation among archivists and serious tape-recovery hobbyists. Common frustrations reported by tape-recovery users on r/camcorders include tapes that play back with intermittent signal loss on consumer camcorders but play cleanly on a GL2 — the tighter head-to-tape contact makes a measurable difference with marginal tapes. If you’re digitizing a family archive of 50+ tapes, the GL2’s reliability advantage compounds across the project.
Verdict: The GL2 is the best Canon MiniDV camcorder for users digitizing large tape archives or dealing with tapes in questionable condition. The investment is justified if tape quality is uncertain.
Choose if: You’re digitizing a large archive (20+ tapes) or have tapes you suspect are worn — the GL2’s professional-grade transport pays for itself in reliability.
Skip if: You have 5–10 tapes in good condition and a budget under $100 — the ZR series handles that scenario at a fraction of the cost.
Canon MiniDV Comparison Table
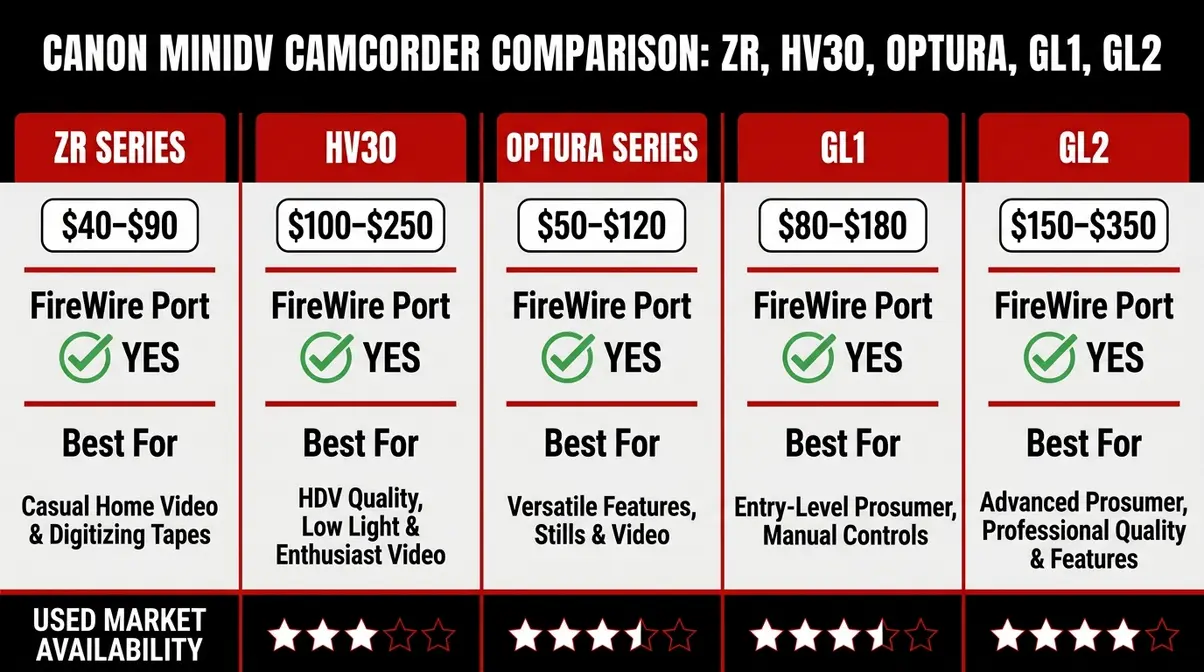
| Model | FireWire Port | SP/LP Support | Typical Used Price | Best For | Condition Risk |
|---|---|---|---|---|---|
| ZR Series (ZR500–ZR960) | 4-pin DV | Both | $40–$90 | Beginners, budget digitizers | Medium — check head wear |
| HV30 | 4-pin DV/HDV | Both (SD playback) | $120–$250 | Dual-use: playback + new shooting | Low — robust build |
| Optura Series | 4-pin DV | Both | $50–$120 | Cross-brand tape compatibility | Medium — Optura 10–30 show age |
| GL1 | 4-pin DV | Both | $80–$150 | Step-up from ZR, budget prosumer | Low–Medium |
| GL2 | 4-pin DV | Both | $150–$350 | Large archives, worn/marginal tapes | Low — professional build |
All prices are used-market estimates from eBay sold listings as of June 2026. Prices fluctuate — verify current listings before purchasing.
Used Listing Buyer’s Checklist
Buying a used camcorder for tape playback is different from buying one for recording. You don’t care about lens condition or video quality — you care about the tape transport and the FireWire port. Use this checklist before you commit to any listing.
- Before You Buy:
- ✅ Confirm the FireWire (DV) port is present and functional — ask the seller to confirm the port is undamaged. This is non-negotiable for digital transfer.
- ✅ Ask for a playback demo — request a short video of the seller inserting a tape and pressing play. Even a 30-second clip confirms the transport works.
- ✅ Check the head hours — if listed, look for under 500 hours of use. Higher head hours increase the risk of playback dropouts.
- ✅ Verify the battery or power adapter is included — digitizing a 60-minute tape takes 60+ minutes. You need reliable power.
- ✅ Check the tape compartment door — a broken or stiff tape compartment door is a common used-market issue and can damage tapes on insertion.
- ✅ Confirm SP/LP mode support if you know your tapes were recorded in LP mode.
- Red Flags to Avoid:
- ❌ “Sold as-is, untested” — too risky for irreplaceable tapes
- ❌ Listings with no photos of the tape compartment or ports
- ❌ Units with visible mold or moisture damage (white residue near seams)
- ❌ Prices that seem too good — a $20 GL2 almost certainly has a dead head
How to Connect to Your Computer
Connecting a Canon MiniDV camcorder to a modern computer is the step where most beginners get stuck. When setting up your mini dv player canon equivalent, getting the connection right is crucial. Modern laptops don’t have FireWire ports — they have USB-C or Thunderbolt 3 ports. This means you need an adapter chain: a series of adapters that bridges the gap between the camcorder’s 4-pin FireWire port and your laptop’s modern port. This section walks through the exact chain for both Mac and PC, step by step.
This is the second and third parts of The Tape Rescue Trio: the right adapter chain and the right software. Get these two right, and the camcorder you chose in the previous section will transfer footage cleanly. Once you have the hardware, it’s time to convert MiniDV tapes to digital format.
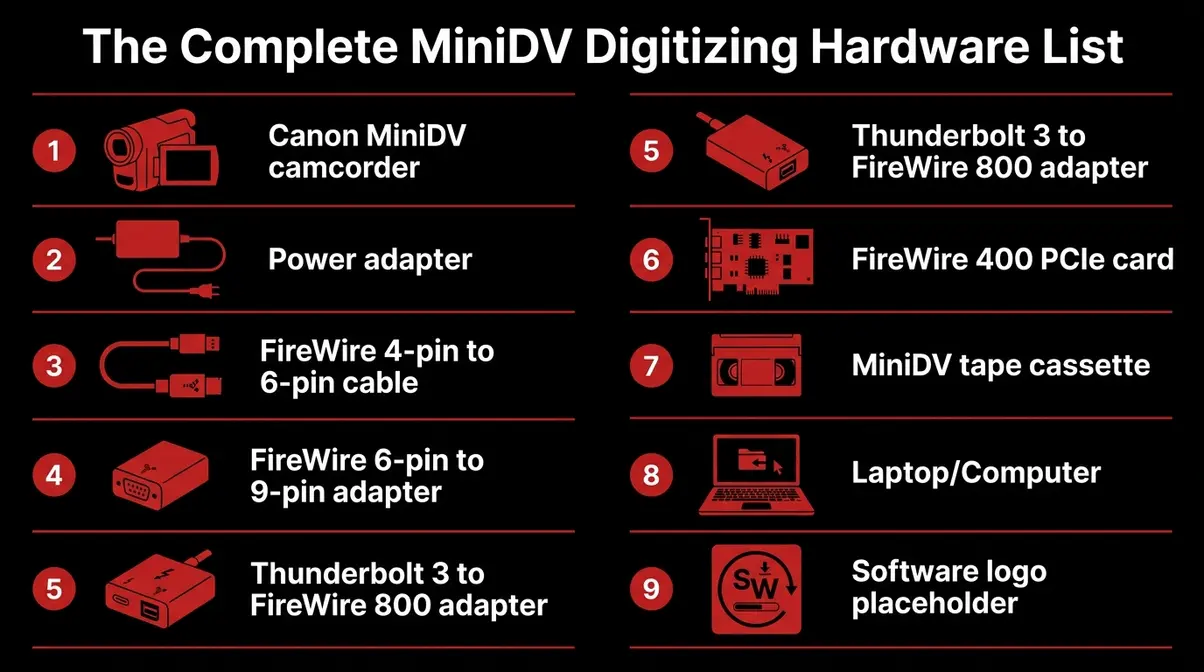
The Complete Hardware List
Before you start, gather everything on this list. Missing any single component will stop the process entirely.
- Tools/Materials Required:
- Your Canon MiniDV camcorder (with FireWire 4-pin DV port)
- Power adapter for the camcorder (battery alone can die mid-tape)
- FireWire 4-pin to 6-pin cable (connects camcorder to the first adapter)
- FireWire 6-pin to 9-pin (FireWire 800) adapter or cable (bridges the two FireWire standards)
- Thunderbolt 3 (USB-C) to FireWire 800 adapter — for Mac users (e.g., the Sonnet Echo Pro FireWire 800 Thunderbolt adapter)
- FireWire 400 PCIe card — for Windows desktop users (e.g., StarTech 2-Port PCI Express FireWire card)
- Your MiniDV tapes
- A computer running macOS 10.14 or later, or Windows 10/11
- Capture software (iMovie for Mac, WinDV for Windows — both free)
Estimated Total Setup Time: 20–40 minutes for first-time setup. Subsequent sessions take 5 minutes.
Mac Setup: Adapter Chain
Estimated Time: 25–35 minutes for first-time setup | Difficulty: Beginner-friendly with the right adapters
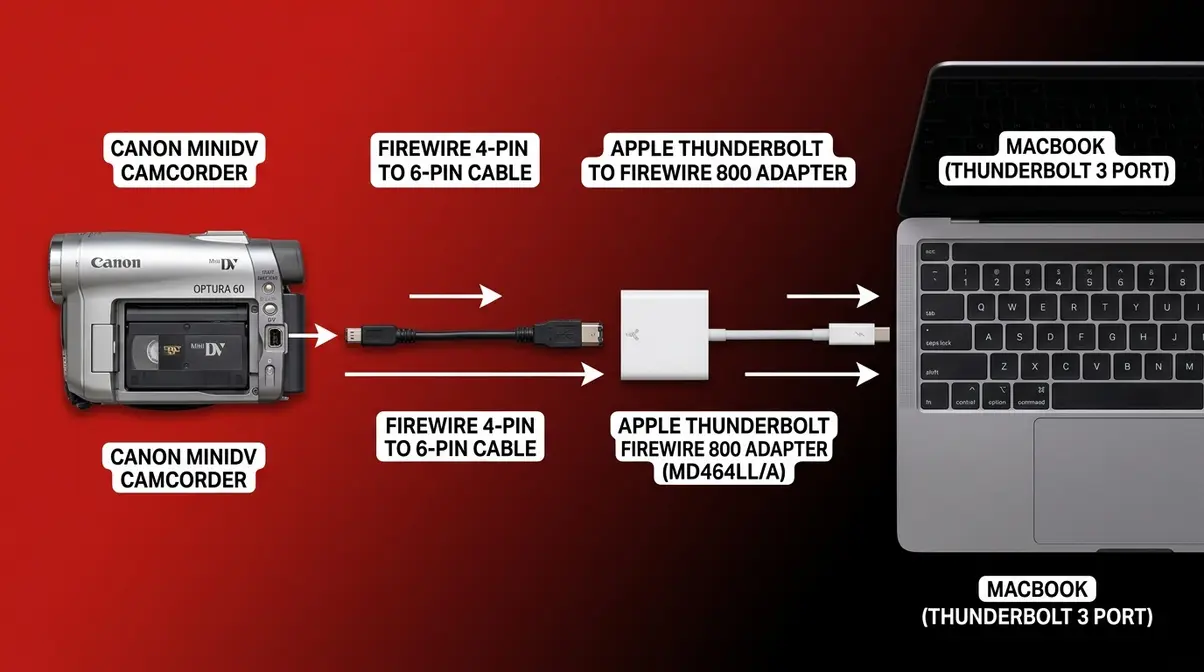
Modern Macs (2016 and later) use Thunderbolt 3 ports (USB-C shaped). Your Canon camcorder uses a 4-pin FireWire port. Bridging this gap requires a specific adapter chain — not a single cable. Here is the exact chain, in order:
Canon Camcorder (4-pin DV) → FireWire 4-pin to 6-pin cable → FireWire 6-pin to 9-pin adapter → Thunderbolt 3 to FireWire 800 adapter → Mac USB-C/Thunderbolt 3 port
Step-by-Step:
- Connect the FireWire 4-pin to 6-pin cable to the DV port on your Canon camcorder. The 4-pin end is small and rectangular; it fits only one way. Expected outcome: cable is seated firmly with no wobble.
- Attach the FireWire 6-pin to 9-pin (FireWire 800) adapter to the other end of the cable. This bridges the older FireWire 400 standard (used by your camcorder) to FireWire 800. Expected outcome: adapter clicks into place.
- Connect the Thunderbolt 3 to FireWire 800 adapter (such as the Sonnet Echo Pro or OWC Thunderbolt 3 to FireWire adapter) to your Mac’s Thunderbolt 3 port. Plug the FireWire 800 end of your cable chain into this adapter. Expected outcome: adapter is seated and Mac does not show a “device not recognized” alert immediately.
- Power on the camcorder using the AC adapter (not battery). Switch the mode dial to VCR or PLAY mode. Do not use Camera mode.
- Insert your MiniDV tape gently into the tape compartment. Close the door slowly — never force it.
- Open iMovie on your Mac. Go to File → Import From Camera. iMovie should detect the camcorder and show a live preview of the tape.
- Press Play on the camcorder (not in iMovie — use the physical Play button). iMovie will show the tape playing in the import window.
- Click Import in iMovie to begin recording the footage to your Mac. Expected outcome: iMovie shows a recording timer and the footage plays in real time.
macOS Compatibility Note: iMovie’s DV import function works reliably on macOS Ventura (13) and Sonoma (14). On macOS Sequoia (15), some users report needing to use QuickTime Player’s File → New Movie Recording → select camera source workflow instead. Verified for macOS as of June 2026.
Windows PC Setup
Estimated Time: 30–45 minutes for first-time setup (includes driver installation) | Difficulty: Beginner-friendly
Windows 10 and Windows 11 support DV capture natively through the Windows Media Foundation framework — but you need a FireWire port on your PC, which most modern laptops don’t have. The solution depends on your setup.
For Desktop PCs: Install a FireWire PCIe card (such as the StarTech 2-Port PCI Express FireWire 400/800 card, approximately $25–$40). This adds a FireWire 400 6-pin port directly to your PC.
For Laptops: Use a Thunderbolt 3 to FireWire 800 adapter (same as the Mac solution above). Note: not all Windows laptops support Thunderbolt 3 — check your laptop’s specifications before purchasing.
Step-by-Step:
- Install the FireWire PCIe card in an available PCIe slot on your desktop, or connect the Thunderbolt 3 to FireWire adapter to your laptop. Expected outcome: Windows Device Manager shows “1394 Host Controller” with no error flag.
- Connect the FireWire 4-pin to 6-pin cable from the Canon camcorder’s DV port to the FireWire port on your PC or adapter. Expected outcome: Windows may play a device-connected sound.
- Power on the camcorder using the AC adapter. Switch to VCR or PLAY mode.
- Insert your MiniDV tape gently. Close the tape compartment door.
- Open WinDV (free download from winDV.sourceforge.net). In WinDV, the device should appear in the top-left device dropdown. If it doesn’t appear, see the Troubleshooting section below.
- Press Play on the camcorder. In WinDV, click Capture to begin recording. Expected outcome: WinDV shows an AVI file size counter incrementing as footage captures.
- When the tape ends, click Stop in WinDV. Your footage is saved as an AVI file in the folder you specified.
Windows Compatibility Note: WinDV works on Windows 10 and Windows 11 (64-bit). Some users running Windows 11 version 24H2 report needing to enable “Legacy DV/HDV” in Device Manager under the 1394 controller properties. Verified for Windows 11 as of June 2026.
Best MiniDV Capture Software
The right software completes The Tape Rescue Trio. You have two reliable free options and one premium option worth knowing about.
| Software | Platform | Cost | Best For |
|---|---|---|---|
| iMovie | Mac only | Free (included with macOS) | Beginners — automatic DV detection, simple import |
| WinDV | Windows only | Free (open source) | Windows users — lightweight, reliable AVI capture |
| OBS Studio | Mac + Windows | Free | Users who want real-time monitoring and flexible output formats |
| Adobe Premiere Pro | Mac + Windows | $55/month | Professionals editing large archives with multi-camera sync |
iMovie is the recommended starting point for Mac users. It detects DV camcorders automatically and handles the capture process with minimal configuration. The footage saves as a DV stream file, which you can then export to any format.
WinDV is the Windows equivalent — lightweight, reliable, and purpose-built for DV capture. It saves footage as an AVI file (Audio Video Interleave), which preserves the original DV codec data without recompression.
OBS Studio is worth considering if you want to monitor the footage on-screen while it captures, or if you need to capture to MP4 instead of AVI. Set the video source to your FireWire device and the output format to MKV or MP4. The capture quality is identical to iMovie or WinDV — the advantage is flexibility.
Can I Transfer MiniDV Tapes via USB?
A common question is whether a simple USB capture dongle works. While USB video capture cards exist, they rely on the camcorder’s analog AV output, which degrades the video quality. True digital transfer from a MiniDV tape requires FireWire. The USB port found on some older Canon models was designed strictly for transferring low-resolution still photos from an SD card, not for capturing full-quality digital video.
Troubleshooting Connection Issues
This is the most common frustration in the entire digitization process. Here are the specific causes and fixes, in order of likelihood.
- Problem 1: Camera not showing in iMovie or WinDV
- Cause: Camcorder is in Camera mode, not VCR/Play mode.
- Fix: Switch the mode dial to VCR or PLAY. The computer only sees the camcorder as a capture device when it’s in playback mode.
- Problem 2: FireWire adapter not recognized by Mac
- Cause: Not all USB-C to FireWire adapters work. Cheap generic adapters frequently fail.
- Fix: Use a Thunderbolt-certified adapter specifically (Sonnet Echo Pro or OWC brand). USB-C and Thunderbolt 3 look identical but are not the same standard — only Thunderbolt 3 supports FireWire bridging.
- Problem 3: Timecode error / blue screen during capture
- Cause: A timecode break (a gap in the continuous timecode recorded on the tape, caused by pausing and restarting recording during the original shoot) confuses capture software.
- Fix: In iMovie, use the “Capture Now” manual mode instead of automatic scene detection. In WinDV, disable automatic chapter marking. Capture the entire tape as a single continuous file, then split it manually in editing software.
- Problem 4: Footage captures but audio is out of sync
- Cause: The tape was recorded in LP mode (Long Play — the slower recording speed) but the camcorder is set to SP mode.
- Fix: Access the camcorder’s menu and switch playback mode to LP. Recapture the tape.
- Problem 5: Dropouts (brief flashes of static or color noise) in footage
- Cause: Dirty or worn video heads on the camcorder.
- Fix: Use a MiniDV head cleaning cassette (available on Amazon for $8–$15). Run it for 10–15 seconds maximum — over-cleaning damages heads. If dropouts persist after cleaning, the head is worn and the camcorder needs replacement or professional service.
Is MiniDV Obsolete Today?
MiniDV as a recording format for new content is essentially finished — no manufacturer has produced a new MiniDV camcorder since the early 2010s. But the cameras themselves are having a genuine cultural revival, driven by two distinct groups: families and individuals who need to rescue irreplaceable footage, and a younger generation of creators who want the specific visual quality that MiniDV produces.
The Gen Z MiniDV Aesthetic
There’s a reason Gen Z creators are hunting for old MiniDV camcorders on eBay, and it’s not nostalgia for a format they barely remember. It’s about the image quality — or more precisely, the specific imperfections of MiniDV image quality. Many young creators explore the charm of old camera aesthetics to achieve this look.
MiniDV footage has a distinctive look: interlaced scan lines, limited dynamic range, slightly saturated colors, and a characteristic motion blur at 25 or 30 frames per second. These qualities come from the 1/4″ to 1/6″ CCD sensors and the DV compression codec (the digital encoding method that compresses video data for storage on tape). Digital filters can approximate this look, but they can’t fully replicate the physical artifacts of tape-based recording — the subtle signal noise, the occasional dropout, the way highlights clip differently than they do on modern sensors.
A 2023 analysis by The Guardian documented the “lo-fi video revival” trend, noting that searches for vintage camcorders on eBay UK increased over 100% between 2021 and 2023, with MiniDV models among the most searched. The trend has continued into 2026, with content creators on TikTok and YouTube explicitly labeling footage as “shot on MiniDV” as a creative credential.
“The MiniDV aesthetic is not a filter — it’s a physical recording process that produces artifacts no software can fully replicate,” according to video production educators who’ve documented the format’s revival among film students.
For the Gen Z creator, a used Canon HV30 or ZR series is both a creative tool and an authentic artifact. The Canon Community forum documents dozens of younger users asking about using older Canon models for intentional aesthetic work — a use case Canon engineers never anticipated when designing these cameras in the early 2000s.
How Long Do MiniDV Tapes Last?
MiniDV tapes use a magnetic recording medium — a thin layer of magnetic particles suspended in a binder (a polymer adhesive) coated onto a plastic backing. This binder is the weak point. A chemical process called binder hydrolysis (the breakdown of the polymer adhesive caused by moisture absorption) causes the binder to become sticky and shed particles — a condition known as “sticky shed syndrome.” When a tape with binder hydrolysis is played back, it can shed particles onto the camcorder’s read head, damaging both the tape and the head.
The Library of Congress Preservation Directorate estimates that magnetic tape stored in average home conditions (fluctuating temperature and humidity) has a functional lifespan of 10–30 years from manufacture — with significant degradation beginning at the lower end of that range for tapes stored in non-climate-controlled environments. MiniDV tapes manufactured in the late 1990s and early 2000s are now 20–25 years old. Many are approaching or already within the degradation window.
Binder hydrolysis is not the only risk. Dropout (signal loss caused by physical damage to the magnetic coating) increases with each playback, because the tape physically contacts the spinning drum head on every pass. Cinching (loose winding caused by fast-forwarding or rewinding on a worn transport) can cause permanent tape damage. The practical conclusion: every playback of an undigitized tape is a small withdrawal from a finite account.
The National Archives recommends prioritizing digitization of magnetic tape media by 2030, citing the accelerating decline in functional playback equipment as the primary risk factor — not tape degradation alone.
Limitations and Alternatives
The DIY approach works well for most home users with tapes in reasonable condition. But there are specific scenarios where it falls short — and being honest about those scenarios is more useful than overselling the process.
Common Digitization Pitfalls
Pitfall 1: Wrong adapter, no signal. The most common failure point is using a USB-C adapter that isn’t Thunderbolt 3 certified. USB-C and Thunderbolt 3 are physically identical connectors, but only Thunderbolt 3 supports the PCIe bandwidth required for FireWire bridging. If you buy a generic USB-C hub with a FireWire port, it almost certainly won’t work. Mitigation: Buy only Thunderbolt 3-certified adapters from Sonnet or OWC — not generic Amazon alternatives.
Pitfall 2: SP/LP mode mismatch. Tapes recorded in LP mode must be played back in LP mode on the same camcorder brand. Playing an LP-mode tape in SP mode produces distorted audio and unstable video. Mitigation: Check your camcorder’s menu for LP/SP playback settings before capturing. If you don’t know which mode your tapes were recorded in, try SP first — LP artifacts are obvious.
Pitfall 3: Head alignment issues on worn camcorders. A camcorder with worn or misaligned heads will produce footage with horizontal banding, color streaks, or intermittent signal loss. This is not a software problem — it’s a hardware problem. Mitigation: Test the camcorder with a known-good tape before loading irreplaceable footage. If you see any banding or color noise, stop and find a different camcorder.
Pitfall 4: Timecode breaks causing capture software to split files. If iMovie’s automatic capture mode detects a timecode break, it creates a new file — sometimes splitting a single continuous scene. Mitigation: Use manual “Capture Now” mode in iMovie, or disable automatic scene detection in WinDV.
When to Use a Pro Service
Some tapes should not go into a DIY setup. Consider a professional digitization service if:
- Your tapes show visible mold (white or green fuzzy growth on the tape shell or visible through the cassette window). Mold can spread to the camcorder head and damage it permanently. Professional services have cleaning protocols for moldy tapes.
- Your tapes have been in flood or water damage. Wet tapes require controlled drying before playback — attempting to play a damp tape destroys it.
- You have more than 30–40 tapes. The time investment for DIY capture is real: one hour of tape = one hour of capture time, plus setup. A professional service is faster and often more cost-effective at volume.
- The footage is legally or commercially significant. Insurance documentation, professional productions, or legally relevant recordings warrant professional handling with chain-of-custody documentation.
Services like Legacybox, iMemories, and local archival services typically charge $15–$30 per tape.
Does Walmart Convert MiniDV to Digital?
Some Walmart photo centers offer tape-to-digital conversion through third-party partners, but MiniDV support is inconsistent. Standard VHS and 8mm tape conversion is more widely available than MiniDV conversion at retail services. Before shipping tapes to any Walmart location, call ahead to confirm MiniDV is supported. Pricing at retail services typically runs $20–$35 per tape. For home users with a few tapes in good condition, the DIY approach in this guide is faster, cheaper, and gives you more control over the output format.
Frequently Asked Questions
How can I play my old MiniDV tapes?
The most reliable way to play old MiniDV tapes is with a used Canon MiniDV camcorder in playback (VCR) mode. Connect the camcorder to your computer via a FireWire adapter chain, then use free capture software like iMovie (Mac) or WinDV (Windows) to record the footage as a digital file. There is no dedicated “MiniDV player” sold as a consumer product — the camcorder is the player. Budget $40–$90 (according to eBay sold listings) for a used Canon ZR series camcorder and $30–$60 for the adapter chain.
Is there a MiniDV player?
There is no consumer MiniDV player sold as a standalone product. Dedicated MiniDV VTRs (Video Tape Recorders) exist, but these are professional broadcast devices that cost $300–$800 or more on used marketplaces and are increasingly difficult to find in working condition. A used Canon MiniDV camcorder is the practical, affordable alternative for home users.
Is MiniDV obsolete?
MiniDV is obsolete as an active recording format. No manufacturer has produced new MiniDV camcorders since the early 2010s, and blank MiniDV tape production has largely ceased. However, the cameras themselves are not obsolete for playback. Millions of MiniDV tapes containing irreplaceable home footage still exist, and used Canon camcorders remain the most accessible way to play them.
How can I play MiniDV tapes without a camcorder?
Playing MiniDV tapes without a camcorder is extremely difficult and generally not recommended. The only realistic alternative is a dedicated MiniDV VTR, which is expensive and hard to find. Avoid services that claim to transfer MiniDV tapes via “USB only” — digital DV transfer requires FireWire, not USB.
What is the best way to convert MiniDV tapes to digital?
The best DIY method is FireWire capture using a used Canon MiniDV camcorder, the correct adapter chain, and free capture software. FireWire transfers the footage digitally, with no quality loss from analog conversion. The alternative — using the camcorder’s analog AV output and a video capture card — introduces a generation of quality loss and is not recommended. For tapes with visible damage, a professional digitization service is the better choice.
Does Walmart convert MiniDV to digital?
Yes, some Walmart photo centers offer tape-to-digital conversion through third-party partners, but MiniDV support can be inconsistent. Standard VHS and 8mm tape conversion is more widely available than MiniDV conversion at retail services. Before shipping tapes to any Walmart location, call ahead to confirm MiniDV is supported.
What can I play MiniDV tapes on?
MiniDV tapes can be played on any camcorder designed for the MiniDV format. Canon, Sony, JVC, and Panasonic all made compatible camcorders, and the format is standardized, so cross-brand playback generally works. Canon ZR, Optura, HV30, GL1, and GL2 models are all reliable choices available on the used market.
Why is Gen Z using old cameras?
Gen Z creators use old MiniDV camcorders specifically for their distinctive visual aesthetic. The interlaced scan lines, limited dynamic range, and characteristic color saturation produce a look that digital filters can’t fully replicate. The appeal is authenticity: footage “shot on MiniDV” carries a tactile, time-stamped quality that resonates in an era of hyper-polished digital video.
Canon Model Decision Framework
Not every user needs the same camcorder. Use this matrix to identify the best Canon model for your specific situation.
| Your Situation | Best Canon Model | Why |
|---|---|---|
| First-time digitizer, budget under $100 | Canon ZR Series (ZR700 or ZR830) | Most affordable, widely available, reliable for tapes in good condition |
| Tapes from multiple camcorder brands | Canon Optura Series | Best cross-brand playback compatibility in mid-range price |
| Want to shoot new footage + digitize old tapes | Canon HV30 | Only model here that records HD and plays back SD MiniDV |
| Digitizing 20+ tapes, some in uncertain condition | Canon GL2 | Professional-grade transport handles marginal tapes reliably |
| Moderate budget, step up from ZR | Canon GL1 | Better build than ZR at a modest premium, good reliability |
Rescuing Your Tapes
For anyone holding a box of old MiniDV tapes, the path forward is clearer than it might have seemed. A used mini dv player canon equivalent — the right camcorder in VCR mode — is available on eBay right now for $40–$350, depending on the model and condition. The digitization process, once the adapter chain is assembled, is straightforward: press play on the camcorder, press record in your software, and wait.
The Tape Rescue Trio is the framework that makes this reliable. The right Canon camcorder (ZR series for most beginners, GL2 for larger or more challenging archives), the right adapter chain (FireWire 4-pin → 6-pin → FireWire 800 → Thunderbolt 3), and the right software (iMovie for Mac, WinDV for Windows) — all three must align for a clean, lossless transfer. Skipping or substituting any component is where most DIY digitization attempts fail.
Start with the Canon ZR830 if you’re new to this. It covers the widest range of beginner scenarios at the lowest price. If your tapes are in uncertain condition or you’re working through a large archive, move up to the GL2 — the transport reliability is worth the extra cost. Either way, the footage on those tapes is recoverable. The only question is how soon you start.
