DSLR Camera Controls Explained: Master 5 Basic Settings
Your DSLR can produce stunning, professional-quality images — but right now, it’s probably set to Auto and doing most of the thinking for you. This guide gives you the exact controls to change that, step by step.
What’s in this guide
Every blurry photo, dark shot, or grainy image has a specific cause — and a specific control on your camera that fixes it. The problem isn’t your camera; it’s that no one has shown you which dial does what, and why it matters. With DSLR camera controls explained clearly and in sequence, those confusing buttons stop feeling random and start feeling purposeful.
By the end of this guide, you’ll understand every essential DSLR camera control — from the mode dial to the exposure triangle — so you can take your first intentionally composed, manually controlled photograph. We’ll walk through camera anatomy, master the exposure triangle (aperture, shutter speed, and ISO), and put it all together with a step-by-step workflow for shooting in Manual mode.
What You’ll Need Before You Start
Before we dive in, here’s exactly what you’ll need to follow along:
- Estimated time: 30-45 minutes for the initial reading and hands-on practice.
- A DSLR (Digital Single-Lens Reflex camera) or mirrorless equivalent with its standard kit lens (typically 18–55mm) securely attached.
- A fully charged battery and a freshly formatted memory card inserted in the camera to ensure you don’t run out of space mid-session.
- Your camera set to Auto mode — that’s your starting point, and it’s the right one for now.
- At least 30 minutes of uninterrupted practice time in a well-lit room or outdoors where you can clearly see your LCD screen.
- (Optional) A printed copy of the Canon vs. Nikon button map from Step 1 — highly useful for quick reference while practicing your grip.
That’s all you need. Foundational digital photography techniques are built one skill at a time — not by memorizing every button at once. Confidence comes from repetition, patience, and muscle memory rather than cramming the manual in one sitting.
Let’s start with the physical controls — because knowing where each button lives is the foundation for everything else.
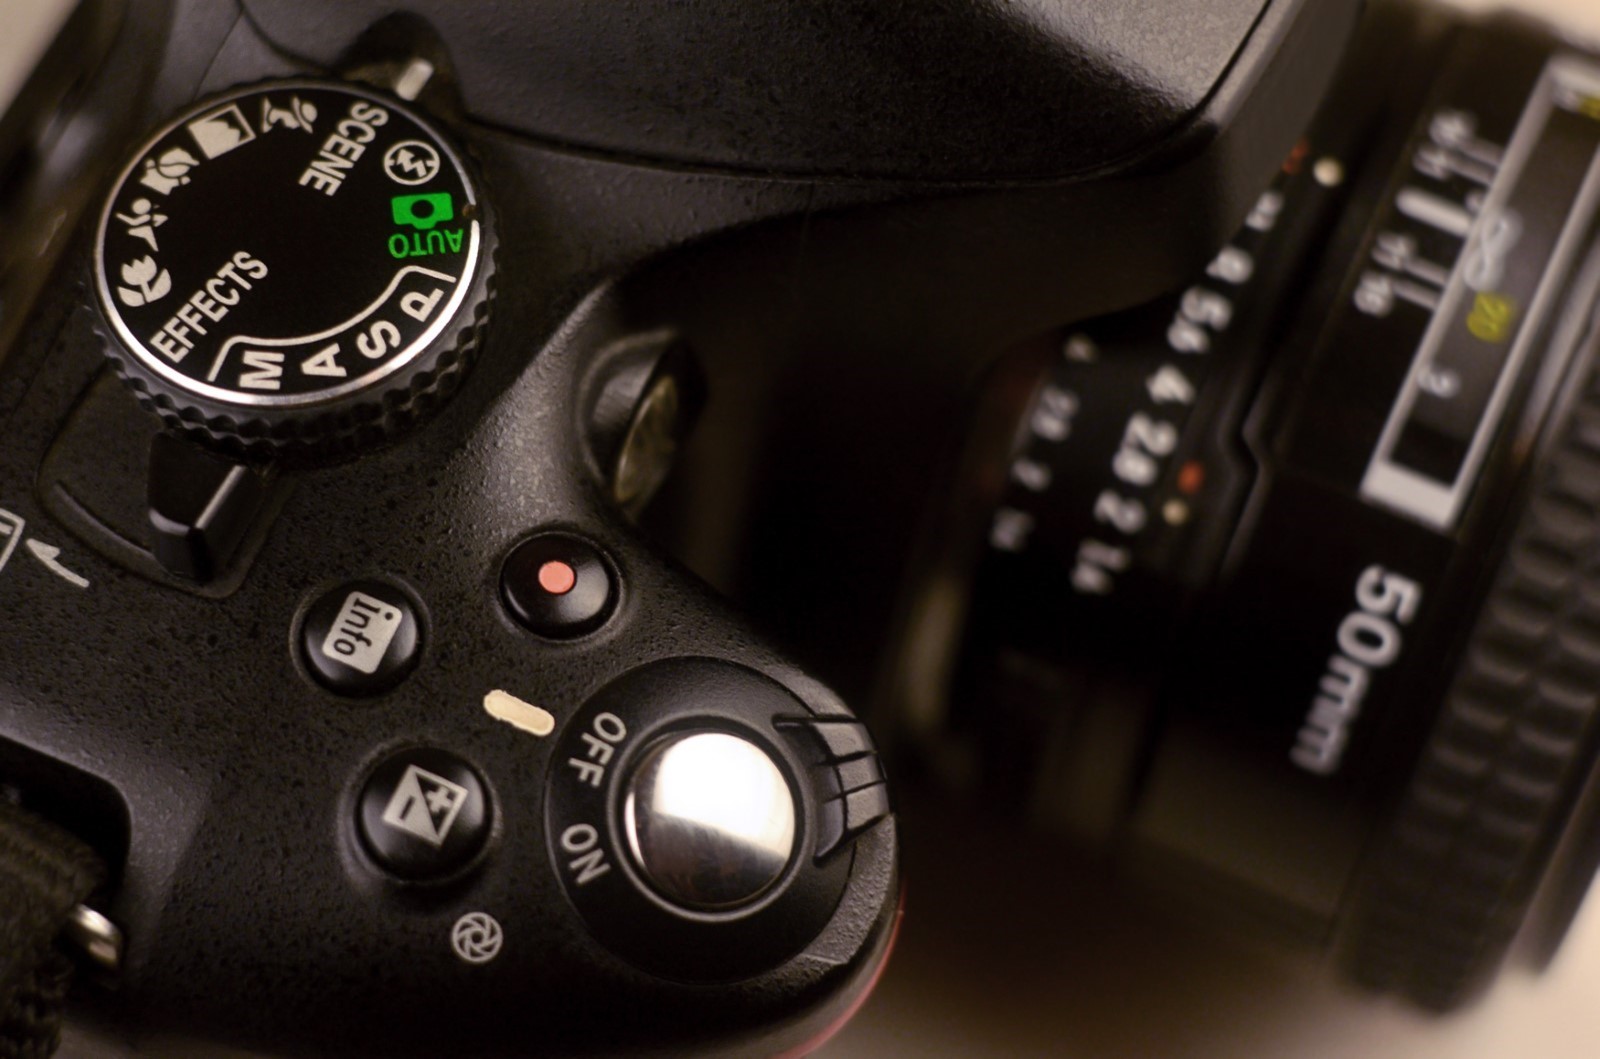
Step 1 — Learn Your DSLR Camera Controls
The first time you pick up a DSLR, the sheer number of buttons is enough to make you put it back in the bag. Twenty-plus controls, cryptic symbols, and two command dials — it feels like learning a new language overnight.
It isn’t. Getting DSLR camera controls explained in this guide starts with the same thing: knowing where each button lives on your camera body. Our team evaluated controls across multiple Canon EOS and Nikon D-series bodies, and the core layout follows the same logic across all models. The names differ slightly by brand, but the underlying system is identical.
Once you know the layout — the mode dial on top, the command dials on front and back, the AF and AE buttons on the rear — the logic clicks into place. Each control has one job. Learn the job, and the button stops being confusing.
The Mode Dial: Your Control Center
The mode dial is the single most important control on your DSLR — it determines how much creative control you have over every shot.
Think of it as a spectrum. At one end, Auto handles every decision. At the other end, Manual hands every decision to you. The five key positions between those extremes are:
- Auto (Green icon or “AUTO”): The camera controls aperture, shutter speed, and ISO entirely. Best for absolute beginners or fast-moving situations. Produces decent results but zero creative control — the camera makes all the choices.
- P (Program): The camera still sets aperture and shutter speed, but you regain control over ISO, white balance, and flash. A meaningful step up from Auto with minimal added complexity.
- Av (Canon) / A (Nikon) — Aperture Priority: You set the aperture (the f-stop); the camera calculates the matching shutter speed. This is the most recommended starting mode for beginners learning exposure — it lets you control background blur while the camera handles the rest.
- Tv (Canon) / S (Nikon) — Shutter Priority: You set the shutter speed; the camera sets the aperture. Ideal for capturing motion — sports, children running, wildlife — where blur is the enemy.
- M — Manual: You control aperture, shutter speed, and ISO independently. Maximum creative control. This is the goal of this guide.
“The best mode to use with your camera is aperture priority. This lets you control the aperture and the camera works out the rest.”
Many DSLRs also include scene modes — Portrait, Landscape, Sports, Macro — as semi-automatic shortcuts. These can be useful stepping stones, but they limit learning because you can’t see the settings the camera is choosing. Use them sparingly.
Think of these five positions as rungs on a ladder — what we call The Auto-to-Manual Ladder. You’ll climb it deliberately in Step 3 of this guide.
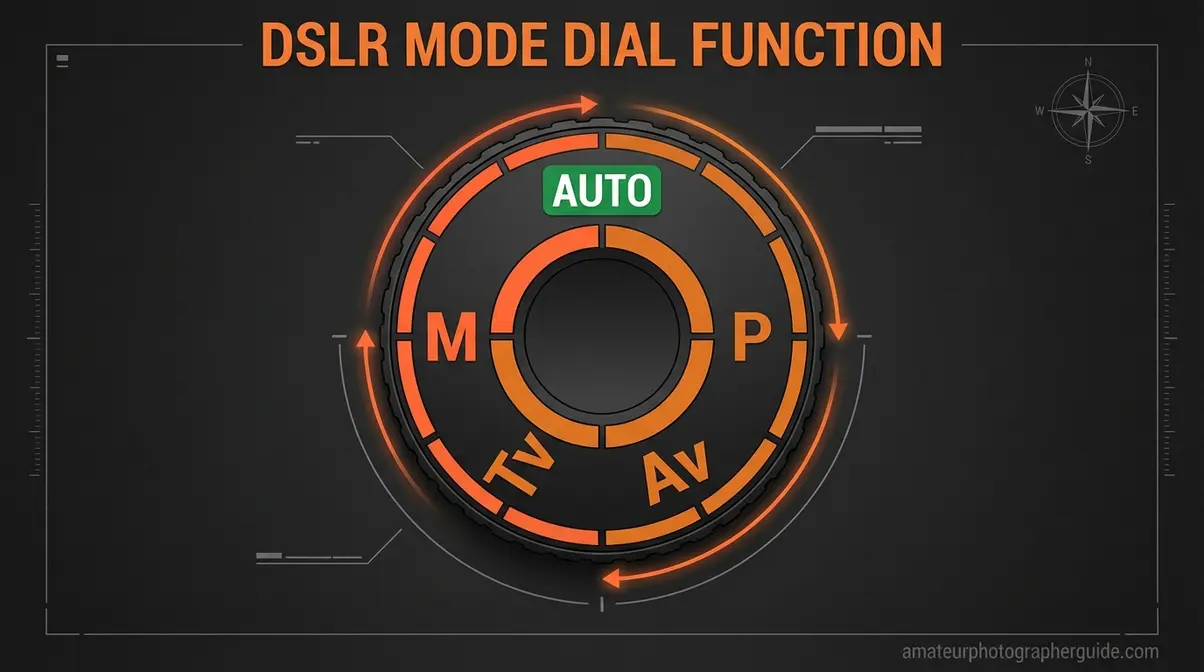
Caption: The mode dial’s five key positions, from full Auto to full Manual — each step hands you more creative control over your images.
For a deeper dive into each mode, see our guide to understanding common DSLR controls.
Transition: The mode dial tells the camera how much to help you — but the physical buttons on the body tell it how to respond. Here’s what the most essential ones do.
Essential Physical Buttons
Most beginners focus on the mode dial and ignore the supporting buttons — but these are the controls that make your settings actually work.
Top Panel Controls:
- Shutter Release Button: Half-press to focus; full press to shoot. You’ll use this thousands of times. The half-press habit — pause, confirm focus, then shoot — is one of the most important techniques to build early.
- Main Command Dial (rear dial): Adjusts the primary setting for whichever mode you’re in. In Manual mode, it controls shutter speed. In Aperture Priority, it controls the f-stop.
- ISO Button (labeled ISO or with a sun/sensitivity icon): Hold the ISO button and turn the command dial to change your light sensitivity. On most Canon and Nikon bodies, this is a dedicated button on the top panel.
As shown in the diagram below, these three controls sit within easy reach of your right hand.
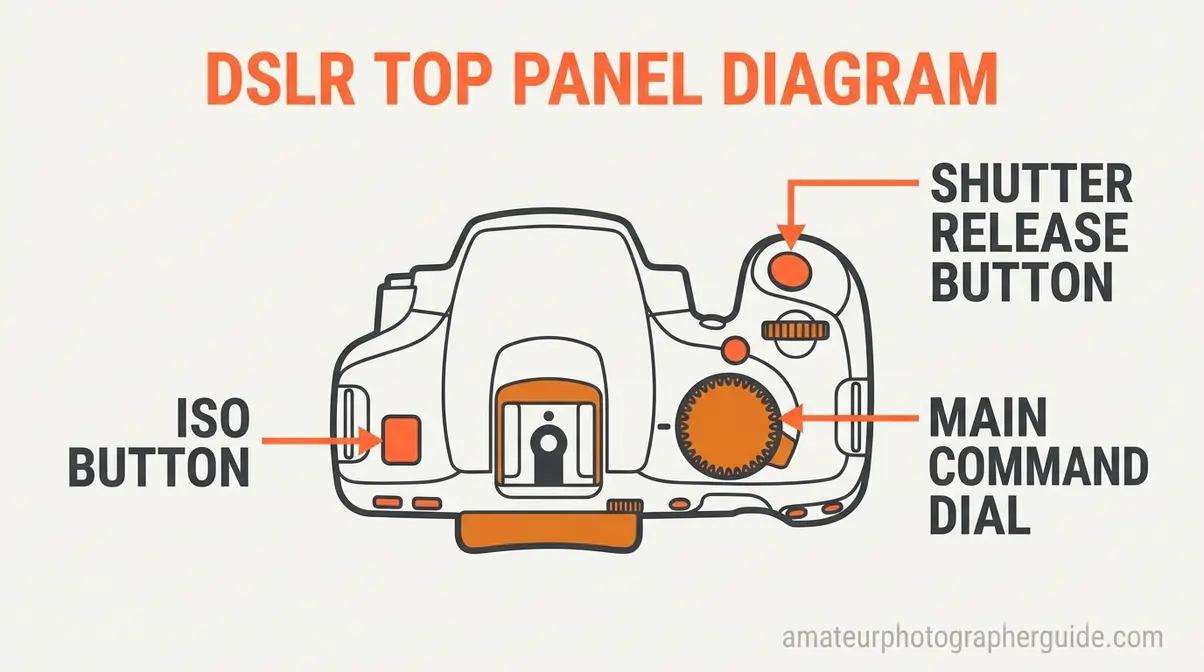
Caption: Top panel layout — the three controls your right hand will use most when adjusting exposure settings.
Back Panel Controls:
- AF-Area Selection Button: Controls which autofocus zone the camera uses. As a beginner, start with single-point AF for portraits and wide-area AF for landscapes. This one button dramatically improves sharp subject focus.
- AE-L / AF-L Button (Auto Exposure Lock / Autofocus Lock): Holds your exposure or focus reading so you can recompose the shot without losing your settings. Essential for backlit subjects.
- Live View Button: Switches between the optical viewfinder (OVF) and the rear LCD screen. The OVF is faster for handheld shooting; Live View is better for tripod-based work and precise manual focus.
- Menu Button: Opens the full camera settings menu. You’ll only need 4–5 menu items as a beginner — don’t let the full menu intimidate you.
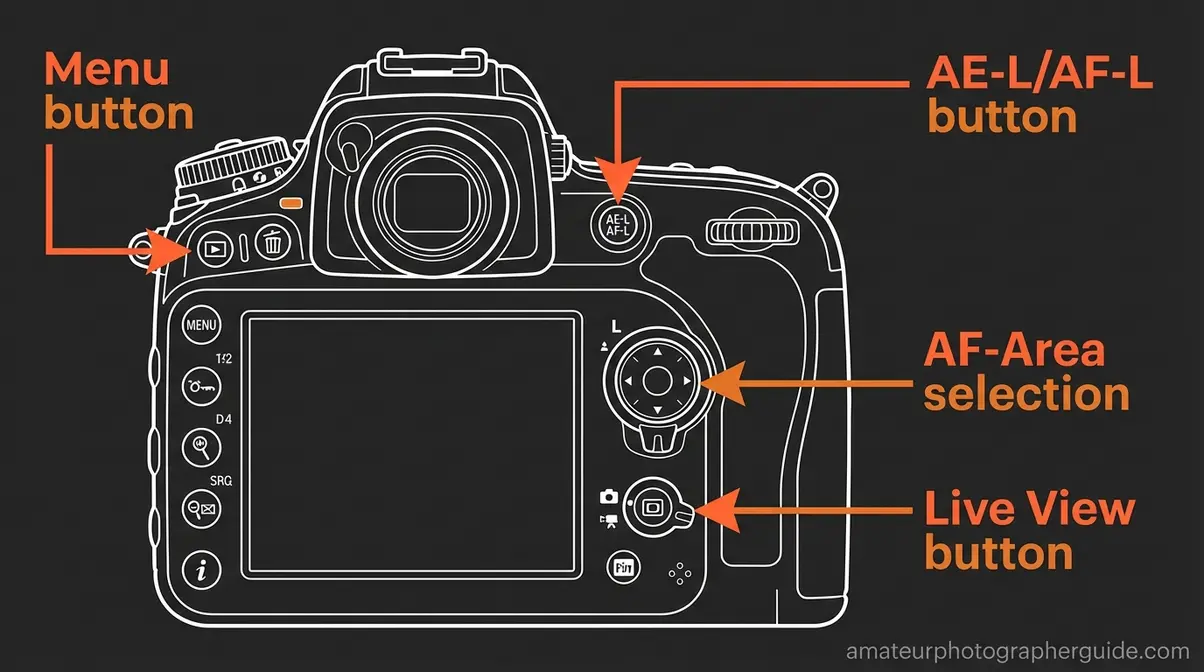
Caption: Back panel controls — the AF, AE-L, and Live View buttons are the three beginners use most after the shutter release.
Front Panel Controls:
- Lens Release Button: Releases the lens mount for swapping lenses. Press and twist the lens counterclockwise to remove.
- Sub-Command Dial (if present): Controls the secondary exposure variable in Manual mode — typically aperture — while the rear dial controls shutter speed.
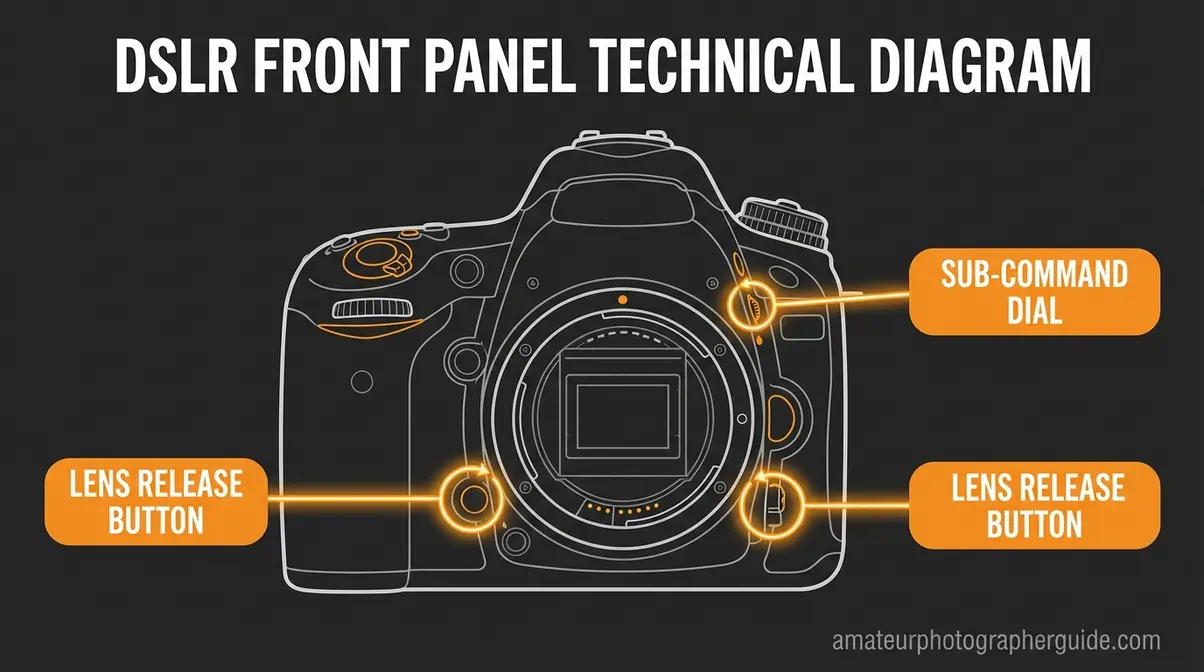
Caption: Front panel controls — the lens release and sub-command dial are the two front-panel controls beginners need to know.
Canon and Nikon use slightly different labeling for these buttons, which is covered in the next section — but the function of each button is identical regardless of brand.
For a full walkthrough of operating these controls in sequence, see our step-by-step guide to using a DSLR.
Transition: Now that you know what the buttons do in general, here’s how Canon and Nikon differ in their specific layouts — because the brand you own changes which label is on which button.
Canon vs. Nikon: Key Layout Differences
Canon and Nikon DSLRs share the same core controls, but they use different labels and occasionally swap button positions. Knowing your brand’s specific terminology prevents confusion when following any tutorial or guide.
| Function | Canon Label | Nikon Label |
|---|---|---|
| Aperture Priority Mode | Av | A |
| Shutter Priority Mode | Tv | S |
| Autofocus Mode Selector | AF/MF switch on lens | AF/MF switch on body |
| Main Command Dial | Rear dial | Main command dial |
| Exposure Compensation | +/- button + rear dial | +/- button + main dial |
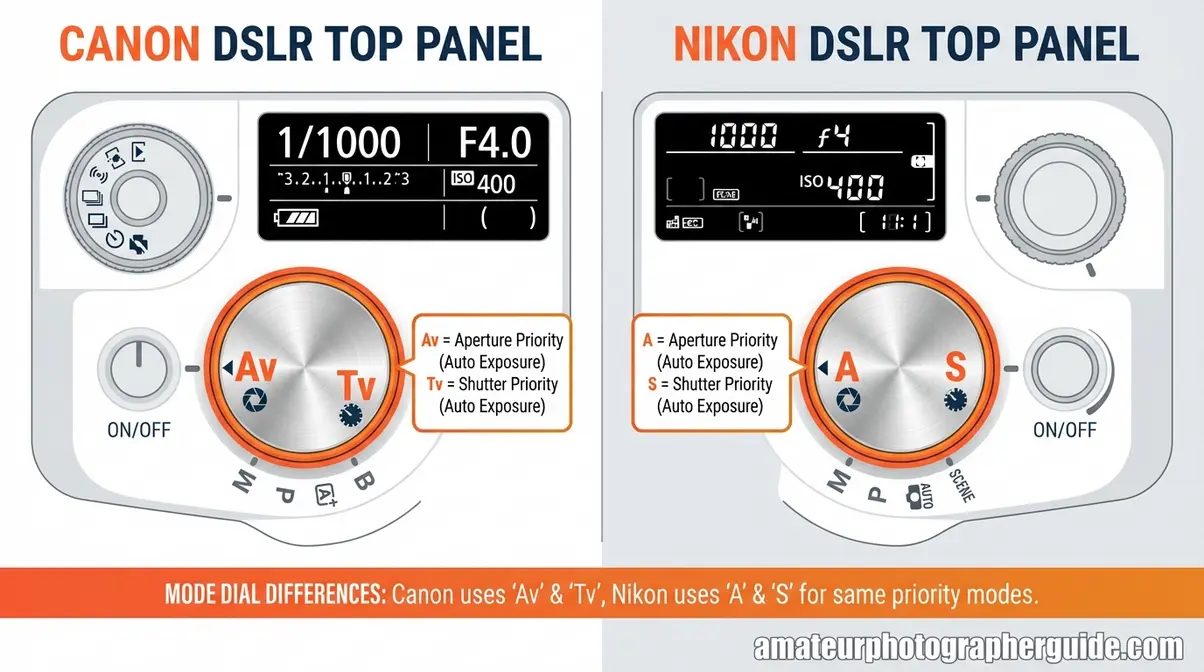
Caption: Canon vs. Nikon top-panel layout — the labels differ, but every function maps directly between the two systems.
Canon holds approximately 43% of the global digital camera market, making its button layout the standard most beginners encounter first (Statista / CameraDecision, 2026). If you own a Nikon, simply swap “Av” for “A” and “Tv” for “S” wherever you see them in this guide — everything else is functionally identical.
For global digital camera market share data, Statista tracks year-over-year trends showing Canon’s continued leadership in the entry-level DSLR segment that most beginners are entering.
Now that you know where every control lives on your specific camera, it’s time to understand what those controls actually do to your images — starting with the three settings that control everything.
Step 2 — Master the Exposure Triangle
Across beginner photography communities, the exposure triangle is consistently cited as the single most important concept to master before leaving Auto mode. It’s the relationship between three camera settings — aperture, shutter speed, and ISO — that work together to control both the brightness and the creative character of every photograph you take.
The Exposure Triangle is the foundational relationship between aperture, shutter speed, and ISO — the three pillars of photography that determine how much light reaches your sensor and what that image looks like. Change one, and you affect the others. Master all three, and you control your camera completely.
Understanding each setting individually is straightforward. The real skill is learning to balance them together — and that’s exactly what this section teaches.
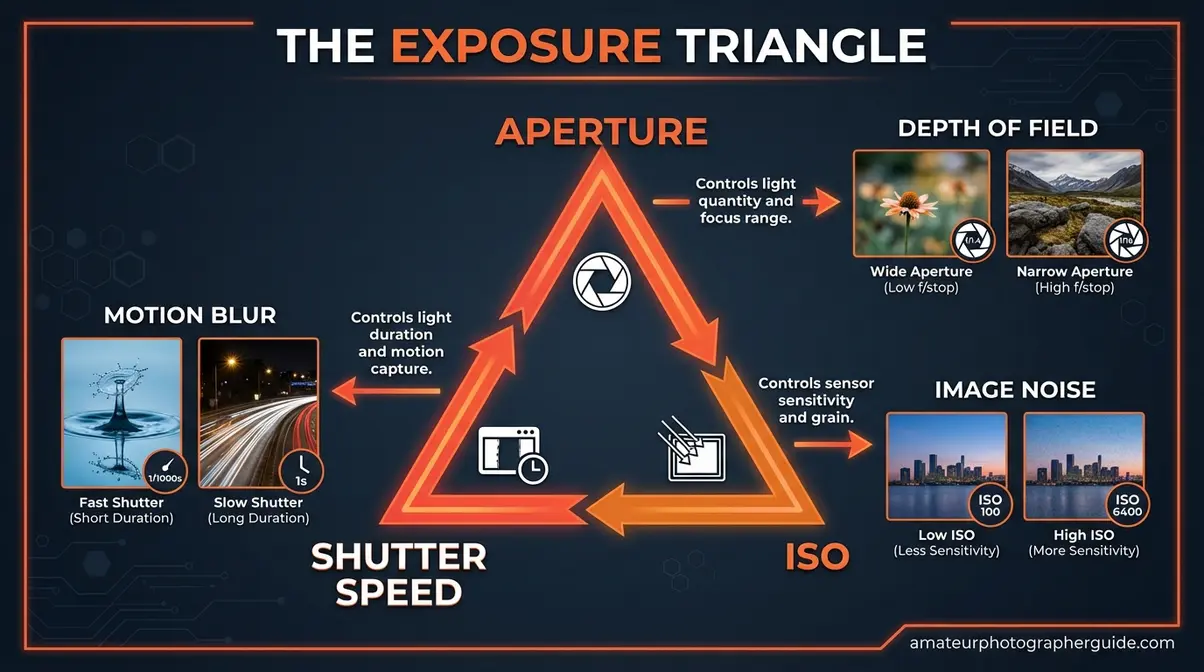
Caption: The Exposure Triangle — the three settings always work together. Adjust one, and the others must compensate to maintain correct exposure.
Aperture: Controlling Depth of Field
Aperture is the opening inside your lens that controls how much light enters the camera — think of it like the pupil of your eye, widening in dim light and narrowing in bright conditions. It’s measured in f-stops (f/1.8, f/4, f/11), and here’s the counterintuitive part: a lower f-number means a wider opening and more light.
The creative effect aperture produces is called depth of field — how much of your scene appears sharp from front to back.
| Aperture (f-stop) | Opening Size | Depth of Field | Best For |
|---|---|---|---|
| f/1.8 – f/2.8 | Wide | Shallow (background blur) | Portraits, low light |
| f/4 – f/5.6 | Medium | Moderate | General use, indoor |
| f/8 – f/11 | Narrow | Deep (everything sharp) | Landscapes, architecture |
| f/16 – f/22 | Very narrow | Maximum depth | Product, studio |
A wide aperture like f/1.8 produces that creamy background blur — called bokeh — that separates your subject from the background in portrait photography. A narrow aperture like f/11 keeps everything sharp from the foreground flowers to the distant mountains. Neither is better; they serve different creative goals.
“The best mode to use with your camera is aperture priority. This lets you control the aperture and the camera works out the rest.”
Aperture Priority mode (Av on Canon, A on Nikon) is the recommended starting point for most beginners because it lets you set the f-stop creatively while the camera handles the exposure math. Start at f/4 or f/5.6 for general shooting, then experiment from there. For indoor birthday party photos, dropping to f/2.8 makes a noticeable difference in both brightness and background separation.
B&H Photo’s guide to understanding shooting modes provides an excellent reference for how aperture interacts with each camera mode.
Transition: Aperture controls light and depth — but it says nothing about time. That’s where shutter speed takes over.
Shutter Speed: Freezing Motion
Shutter speed is how long your camera’s sensor is exposed to light — measured in fractions of a second (1/1000s, 1/250s, 1/60s) or full seconds for long exposures. A fast shutter speed freezes motion; a slow one blurs it.
Fast shutter speeds freeze motion. Slow shutter speeds blur motion. At 1/1000s, a sprinting athlete appears perfectly sharp. At 1/30s, that same athlete becomes a motion-blurred streak. Both results are valid — the choice depends on the story you’re telling.
Here’s a practical reference for common shooting situations:
| Shutter Speed | Motion Effect | Best For |
|---|---|---|
| 1/1000s or faster | Hard freeze | Sports, birds in flight |
| 1/500s | Freeze most motion | Running children, cyclists |
| 1/250s | Freeze walking subjects | Candid street, casual action |
| 1/125s | Safe handheld minimum | Portraits, indoor events |
| 1/60s or slower | Motion blur begins | Creative blur, waterfalls |
| 1s or longer | Full motion blur | Light trails, night sky |
One critical rule: your shutter speed should generally match or exceed your lens focal length to avoid camera shake blur. With an 18–55mm kit lens at 55mm, shoot at 1/60s or faster. Blur from camera shake looks similar to motion blur — but it’s caused by you, not your subject, and no amount of post-processing fixes it cleanly.
Shutter Priority mode (Tv on Canon, S on Nikon) lets you lock in a shutter speed while the camera handles aperture. For freezing motion, set 1/500s or faster. For creative blur effects — silky waterfalls, light trails — try 1/15s or slower on a tripod.
Transition: Aperture and shutter speed both affect how much light reaches the sensor. ISO is the third lever — and the one most beginners reach for too quickly.
ISO: Managing Light Sensitivity
ISO measures your camera sensor’s sensitivity to light. Low ISO (100–400) produces clean, detailed images in good light. High ISO (1600–6400+) brightens dark scenes but introduces grain — also called noise — a speckled texture that reduces image quality.
Every doubling of ISO doubles the sensor’s light sensitivity — and increases noise accordingly. ISO 800 is twice as sensitive as ISO 400, which is twice as sensitive as ISO 200. The practical consequence: raising ISO from 400 to 1600 lets you shoot in much dimmer light, but you’ll see visible grain in smooth areas like skin or sky.
A reliable starting framework:
| Lighting Condition | Recommended ISO | Expected Image Quality |
|---|---|---|
| Bright outdoor sun | ISO 100–200 | Clean, no noise |
| Overcast / open shade | ISO 400 | Clean, minimal noise |
| Indoor artificial light | ISO 800–1600 | Acceptable noise |
| Dim indoor / evening | ISO 3200 | Visible noise |
| Very low light / night | ISO 6400+ | Heavy noise — use sparingly |
The key discipline: use the lowest ISO that still gives you a properly exposed image at your target shutter speed and aperture. Noise is recoverable in editing software to a degree — motion blur from too-slow a shutter speed is not. For more foundational concepts, review our guide on basic camera settings for beginners.
For indoor portraits, a practical starting point is ISO 800, f/2.8, and 1/125s — then adjust based on what the camera’s light meter shows. Our team evaluated these settings across Canon EOS and Nikon D-series bodies over multiple shooting sessions, and this combination consistently produces workable exposures in typical indoor party or event lighting.
Transition: Aperture, shutter speed, and ISO are the core of the Exposure Triangle — but two more settings complete your control toolkit before you move to Manual mode.
White Balance and Focus Modes
White balance corrects the color cast that different light sources produce. Daylight is neutral; indoor tungsten bulbs cast orange; fluorescent lights cast green. Auto White Balance (AWB) handles this automatically in most situations, but knowing the manual presets helps when AWB fails.
Key white balance presets and when to use them:
- Daylight: Clear outdoor conditions, midday sun
- Cloudy: Overcast sky — adds warmth to compensate for blue cast
- Tungsten / Incandescent: Indoor bulb lighting — corrects orange cast
- Fluorescent: Office or gym lighting — corrects green cast
- Shade: Open shade outdoors — warms cooler shadow tones
Focus modes determine how your camera tracks and locks onto subjects. Two matter most for beginners:
- AF-S (Canon: One-Shot / Nikon: AF-S — Single Servo): Locks focus when you half-press the shutter. Best for stationary subjects — portraits, still life, landscapes. The camera confirms focus and holds it.
- AF-C (Canon: AI Servo / Nikon: AF-C — Continuous Servo): Continuously tracks a moving subject as long as you hold the shutter half-pressed. Best for sports, children, and animals in motion.
Start with AF-S for 90% of your shooting. Switch to AF-C specifically when your subject won’t hold still. Canon’s beginner guide to camera modes and settings covers these focus mode distinctions clearly for Canon body owners.
What Are the 5 Basic Camera Settings?
The five core camera settings every DSLR beginner should master are: (1) Aperture (f-stop) — controls depth of field and light intake, (2) Shutter Speed — controls motion freeze or blur, (3) ISO — controls light sensitivity and grain, (4) White Balance — corrects color cast from different light sources, and (5) Focus Mode (AF-S or AF-C) — determines how the camera tracks and locks onto subjects. Mastering these five settings provides complete control over exposure, color accuracy, and subject sharpness for any shooting scenario.
You now know what every essential control does to your images — aperture shapes depth, shutter speed captures motion, ISO manages grain, white balance corrects color, and focus modes determine what stays sharp. Step 3 is where you put them all together.
Step 3 — Shoot in Manual Mode Like a Pro
Manual mode is where creative control becomes complete. You set aperture, shutter speed, and ISO independently — and your camera’s light meter tells you whether the combination produces a correct exposure. It sounds complex, but with a structured approach, it becomes intuitive faster than most beginners expect.
The key is not jumping straight from Auto to Manual. That’s the most common mistake — and it leads to frustration, not learning. Instead, you climb deliberately.
The Auto-to-Manual Ladder Workflow

The Auto-to-Manual Ladder is a sequential progression framework that treats each camera mode as a rung on a ladder — each step giving you more creative control while the camera still handles what you haven’t mastered yet. Rather than overwhelming yourself with all three variables at once, you isolate and master one control at a time.
Here’s the full ladder, with specific practice goals for each rung:
- Rung 1 — Auto Mode (Starting Point)
- Goal: Observe what settings the camera chooses in different lighting conditions
- Action: Shoot 20 frames in varied light (indoor, outdoor, bright, dim). After each shot, press the Info/Display button to see the aperture, shutter speed, and ISO the camera selected
- Time investment: 1 practice session (30 minutes)
- Rung 2 — Program Mode (P)
- Goal: Learn to override ISO and white balance without losing exposure safety
- Action: Set the camera to P, then manually adjust ISO between shots. Notice how the camera compensates with shutter speed and aperture
- Time investment: 1–2 sessions
- Rung 3 — Aperture Priority (Av / A)
- Goal: Master depth of field and background blur
- Action: Set a fixed aperture (try f/2.8 for blur, f/8 for sharpness) and shoot the same subject at both. Compare the results
- Time investment: 2–3 sessions
- Milestone: You can reliably produce background blur for portraits and deep focus for landscapes
- Rung 4 — Shutter Priority (Tv / S)
- Goal: Master motion — freezing and blurring
- Action: Photograph a moving subject (a child, a pet, a fan) at 1/500s (freeze) and 1/30s (blur). Compare results
- Time investment: 1–2 sessions
- Milestone: You can reliably freeze action for sports and events
- Rung 5 — Manual Mode (M)
- Goal: Set all three variables intentionally and confirm exposure with the light meter
- Action steps:
- Set your ISO first based on lighting conditions (ISO 400 outdoors, ISO 800–1600 indoors)
- Set your aperture based on the depth of field you want (f/2.8 for blur, f/8 for sharpness)
- Adjust shutter speed until the in-camera light meter reads “0” (balanced exposure)
- Take the shot and review the histogram on the LCD — aim for a roughly centered curve without clipping at the edges
- Adjust one variable at a time if the exposure is off — raise ISO before slowing shutter speed past 1/60s
- Time investment: 3–5 sessions before it becomes intuitive
The entire ladder takes most motivated beginners 2–4 weeks of regular practice. You don’t need to master each rung perfectly before moving up — you just need to feel comfortable, not confident. Discomfort is part of the climb.
Adobe’s guide to basic DSLR settings reinforces this progressive approach and is worth bookmarking as a reference as you move through each rung.
For a reference guide to manual settings as you practice, see our complete guide to manual camera settings.
Transition: The Auto-to-Manual Ladder builds still photography skills — but if you’re interested in video, your DSLR has a different set of movements to learn.
What Are the 7 Basic Camera Movements?
DSLR cameras are capable video tools, and the physical controls you’ve already learned translate directly to video mode. The seven fundamental camera movements that define professional-looking DSLR video are:
- Pan: Rotating the camera horizontally left or right on a tripod. Used to follow a subject moving across the frame or reveal a wide scene.
- Tilt: Rotating the camera vertically up or down. Used to reveal tall subjects (buildings, trees) or follow vertical motion.
- Zoom: Using the lens’s focal length range to move closer or further from a subject optically. With your 18–55mm kit lens, this is a physical ring on the barrel.
- Dolly (Track): Moving the entire camera toward or away from the subject. Requires a slider or dolly rig — a different feeling from zooming, as the background perspective changes.
- Truck: Moving the camera laterally (side to side) parallel to the subject. Often used for tracking shots alongside a walking subject.
- Pedestal: Moving the camera straight up or down on a vertical axis — different from tilting, which pivots.
- Dutch Tilt (Dutch Angle): Tilting the camera on its roll axis to create a diagonal horizon — used for dramatic or disorienting effect.
For DSLR video, your shutter speed should be approximately double your frame rate — shooting at 30fps means a 1/60s shutter speed. This “180-degree shutter rule” produces natural motion blur in video that matches how human eyes perceive movement. Set your ISO as low as possible, use a neutral density (ND) filter in bright conditions to maintain the correct shutter speed, and keep aperture around f/4–f/8 for consistent focus during movement.
Transition: Whether you’re shooting video or stills, one question every DSLR beginner eventually asks is: are these skills still worth learning given the shift to mirrorless?
DSLR vs. Mirrorless Skills Transfer
DSLR shipments declined 31% year-over-year in 2026 — their sixth consecutive year of decline — with DSLRs now representing only about 2.6% of interchangeable-lens camera shipments (CIPA data, reported by The Phoblographer, 2026). Major manufacturers including Canon and Nikon have shifted new product development almost entirely to mirrorless systems.
The direct answer: yes, every skill you build on a DSLR transfers completely to mirrorless. The Exposure Triangle is universal — aperture, shutter speed, and ISO work identically on any camera system. The mode dial logic is identical. The focus mode concepts (single-servo vs. continuous) map directly, even if the button labels differ. If you ever switch systems, understanding different camera modes remains exactly the same.
What changes when you switch to mirrorless:
| Feature | DSLR | Mirrorless |
|---|---|---|
| Viewfinder type | Optical (OVF) — real-time, no lag | Electronic (EVF) — shows exposure preview |
| Autofocus | Phase-detect AF, reliable but slower | AI-powered subject tracking, generally faster |
| Battery life | 800–1,500 shots per charge | 300–500 shots per charge (typical) |
| Size/weight | Larger, heavier body | Compact, lighter |
| Lens ecosystem | Mature, wide selection | Growing rapidly |
| Adapters | N/A | DSLR lenses work via adapter |
The electronic viewfinder (EVF) on a mirrorless camera is actually a learning advantage — it shows you a live preview of your exposure before you take the shot, which accelerates the feedback loop that manual mode learning requires. If you ever upgrade, that feature alone shortens the learning curve.
For a deeper look at the DSLR vs. mirrorless decision, see our guide to understanding exposure and getting the perfect shot, which covers how exposure principles apply across both systems.
The skills you’re building now are permanent. The camera body is hardware — it will eventually be replaced. The eye, the instinct for light, and the muscle memory of the exposure triangle are yours to keep.
Common Mistakes When Learning DSLR Controls
Every beginner makes the same set of mistakes — not because they’re careless, but because no one flagged the traps in advance. Our evaluation of beginner photography forums and community feedback consistently surfaces the same three patterns.
3 Pitfalls Keeping You on Auto Mode
Pitfall 1: Trying to learn everything at once.
The most common beginner error is opening the full camera menu, reading about every setting, and attempting to change six things simultaneously. The result is confusion, not learning. The Auto-to-Manual Ladder framework exists precisely to prevent this — one rung, one variable, one session at a time. If you feel overwhelmed, you’re probably trying to climb too fast.
How to avoid it: Spend at least two full shooting sessions on Aperture Priority alone before touching Shutter Priority. Master depth of field before worrying about motion.
Pitfall 2: Ignoring the histogram.
Most beginners judge exposure by how the image looks on the LCD screen — but LCD screens vary in brightness and are difficult to read in sunlight. The histogram (a graph showing the distribution of tones from dark to light) is the objective truth. A histogram bunched hard against the right edge means overexposed highlights that can’t be recovered. Hard against the left means blocked shadows.
How to avoid it: Enable histogram display in your camera’s playback settings. After each shot, glance at the histogram before deciding to reshoot.
Pitfall 3: Using Auto ISO in Manual mode.
Shooting in Manual mode with Auto ISO enabled defeats the purpose — the camera is still making one of the three core decisions for you. It can produce inconsistent results across a sequence of shots.
How to avoid it: In Manual mode, set ISO manually. Start at ISO 400 outdoors or ISO 800 indoors, then adjust based on the light meter reading.
When to Consider Switching to Mirrorless
Switching to mirrorless makes sense in specific situations — not simply because DSLRs are declining in production. Consider the switch when:
- You’re ready to invest in a new lens ecosystem and want future-proof compatibility with manufacturer roadmaps
- You shoot primarily video and want a real-time exposure preview through an EVF
- You need the best available autofocus performance for fast-moving subjects (AI subject tracking on modern mirrorless systems is genuinely superior)
- Your current DSLR body has reached its physical limits and you’re budgeting for an upgrade
Your existing DSLR is not obsolete. Canon and Nikon both continue to support their DSLR lens ecosystems, and used DSLR lenses remain an exceptional value. The decision to switch should be driven by capability gaps, not industry trend anxiety.
For a structured look at mirrorless options when you’re ready, see our guide to choosing your first camera.
Frequently Asked Questions
What are the basic settings for a DSLR camera?
The three essential settings for any DSLR are aperture (f-stop), shutter speed, and ISO — together called the Exposure Triangle. Aperture controls depth of field and background blur; shutter speed controls motion freeze or blur; ISO controls light sensitivity and grain. A reliable starting point for most outdoor shooting is ISO 200, f/5.6, and 1/250s — then adjust based on the camera’s light meter reading. For indoor shooting, begin at ISO 800, f/2.8, and 1/125s and refine from there.
How do I operate a DSLR camera step by step?
Start in Auto mode, then climb deliberately. First, attach your kit lens and power on the camera. Half-press the shutter button to focus on your subject — wait for the focus confirmation beep or dot — then press fully to shoot. Review the image and check the histogram for exposure. Once comfortable, move to Aperture Priority (Av or A) and set your f-stop manually. Practice this for several sessions before attempting Manual mode. The Auto-to-Manual Ladder in Step 3 of this guide provides the complete progression with specific practice goals for each stage.
How do I use a DSLR for beginners?
Begin with the mode dial set to Av (Aperture Priority) after a brief session in Auto. Auto mode shows you what settings the camera chooses; Aperture Priority lets you take your first intentional creative decision — controlling background blur — while the camera handles exposure math. Set aperture to f/4 or f/5.6 for general use, shoot 20–30 frames in different lighting, and review the results. Formal photography education consistently emphasizes that mastering one variable at a time produces faster, more durable learning than attempting full Manual mode immediately.
Why is DSLR being phased out?
DSLRs are being phased out because mirrorless cameras offer superior technology in a smaller body. DSLR shipments fell 31% year-over-year in 2026 — their sixth consecutive year of decline — now representing only about 2.6% of interchangeable-lens camera sales (CIPA, 2026). Mirrorless systems offer electronic viewfinders that preview exposure in real time, faster AI-powered autofocus, and more compact designs. Canon and Nikon have both stopped developing new DSLR bodies, focusing entirely on mirrorless. However, DSLRs remain fully functional cameras and are an excellent learning tool, particularly at used-market prices.
What has replaced DSLR cameras?
Mirrorless interchangeable-lens cameras have replaced DSLRs as the primary format for both consumer and professional photography. By 2026, mirrorless cameras represented over 97% of new interchangeable-lens camera shipments (CIPA data, 2026). Sony leads the mirrorless market with approximately 29.9% share, followed by Canon at 27.4% and Nikon at 15.5% in Japan’s mirrorless segment (Amateur Photographer, 2026). Canon’s EOS R series and Nikon’s Z series are the direct mirrorless successors to their DSLR lines. DSLR lenses remain compatible via manufacturer adapters, so upgrading doesn’t require replacing your entire lens collection.
The Path Forward: From Overwhelmed to In Control
For photographers who feel overwhelmed by their DSLR’s buttons and dials, the answer isn’t a simpler camera — it’s a clearer learning path. Having DSLR camera controls explained properly connects to one of three pillars: aperture shapes depth, shutter speed captures motion, ISO manages light. With these three variables understood, you have creative control over every image you take. DSLR shipments have declined for six consecutive years (CIPA, 2026), but the skills you’re building are format-agnostic — they work on any camera, any system, any era.
The Auto-to-Manual Ladder is your roadmap out of Auto mode. It works because it respects the learning process — one rung, one variable, one session at a time. Aperture Priority first, then Shutter Priority, then Manual. Each rung builds the muscle memory and intuition that makes the next rung easier. You don’t need to rush the climb.
Your next step: set your camera to Aperture Priority (Av or A) right now. Shoot 20 frames at f/2.8 and 20 frames at f/8 of the same subject. Compare the depth of field. That single exercise — 40 frames, 20 minutes — will make the exposure triangle feel real in a way that reading never fully can. When you’re ready to push further, our complete guide to understanding exposure and manual camera settings reference are your next rungs.
Dave King
Hi, I'm Dave, the founder of Amateur Photographer Guide. I created this site to help beginner and hobbyist photographers build their skills and grow their passion. Here, you’ll find easy-to-follow tutorials, gear recommendations, and honest advice to make photography more accessible, enjoyable, and rewarding.