
Table of Contents
- What Is Depth of Field in Photography?
- What is Shallow Depth of Field?
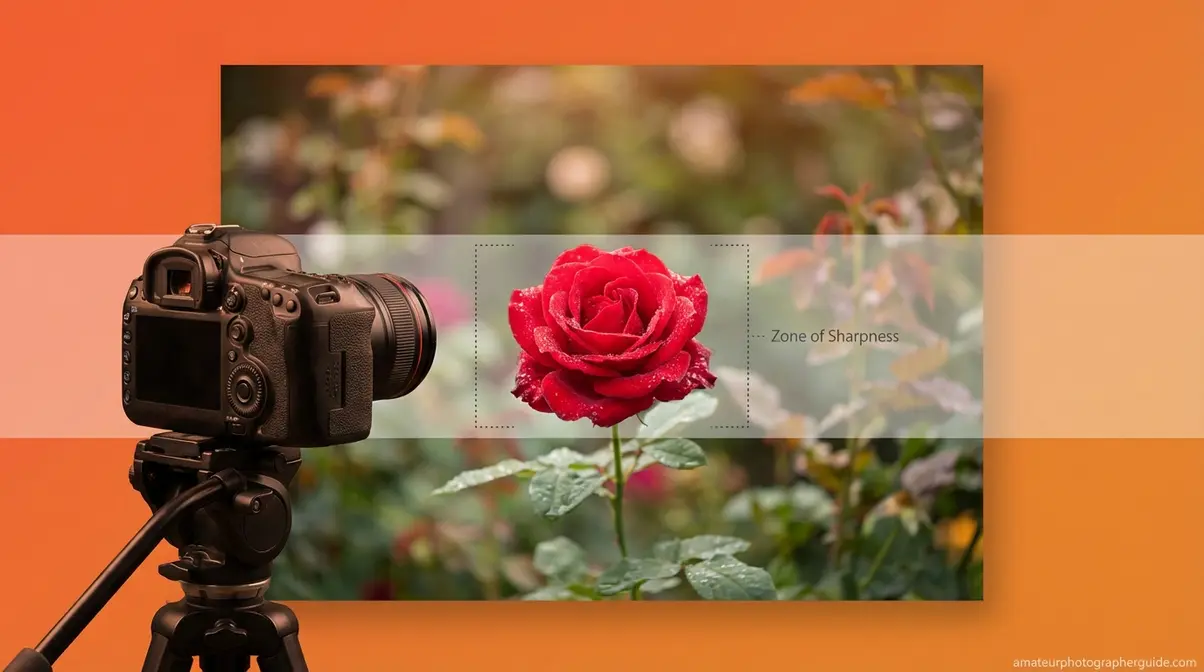
- Achieving Full Sharpness (Deep DoF)
- The 3 Controls of Depth of Field
- Depth of Field Examples by Photography Style
- Advanced Tools and Techniques for Sharper Images
- Common DoF Mistakes and How to Fix Them
- Frequently Asked Questions
- The Clearest Path Forward
This blog post may contain affiliate links. As an Amazon Associate I earn from qualifying purchases.
You’ve seen it: a stunning portrait where the subject is razor-sharp and the background dissolves into a creamy blur. You try the same shot, but your photo comes out flat—the subject and the busy background competing for attention.
Without understanding depth of field photography, your camera makes focus decisions for you. Every cluttered portrait or accidentally soft landscape is the result of letting focus happen by chance instead of by choice.
By the end of this guide, you’ll know the three camera settings that control depth of field and how to use them for any creative effect. We’ll cover the definition, shallow versus deep DoF, the three controls, practical examples, and advanced tools for pinpoint precision.
What You’ll Need:
1. A camera with manual or aperture-priority (Av/A) mode
2. A lens with adjustable aperture (even a kit lens works)
3. A subject and a background separated by at least 3–5 feet
Depth of field photography controls which part of your image appears sharp—and you decide how wide or narrow that zone of sharpness is.
- For a blurry background: Wide aperture (f/1.8–f/2.8) + close to subject + 85mm+ lens
- For sharp scenes: Narrow aperture (f/8–f/16) + step back + wide-angle lens
- The Focus Intention Framework: First decide what SHOULD be sharp—the blur is a byproduct of that sharpness decision, not a goal in itself
- Aperture is the most powerful lever: It creates the biggest depth-of-field change of any single setting
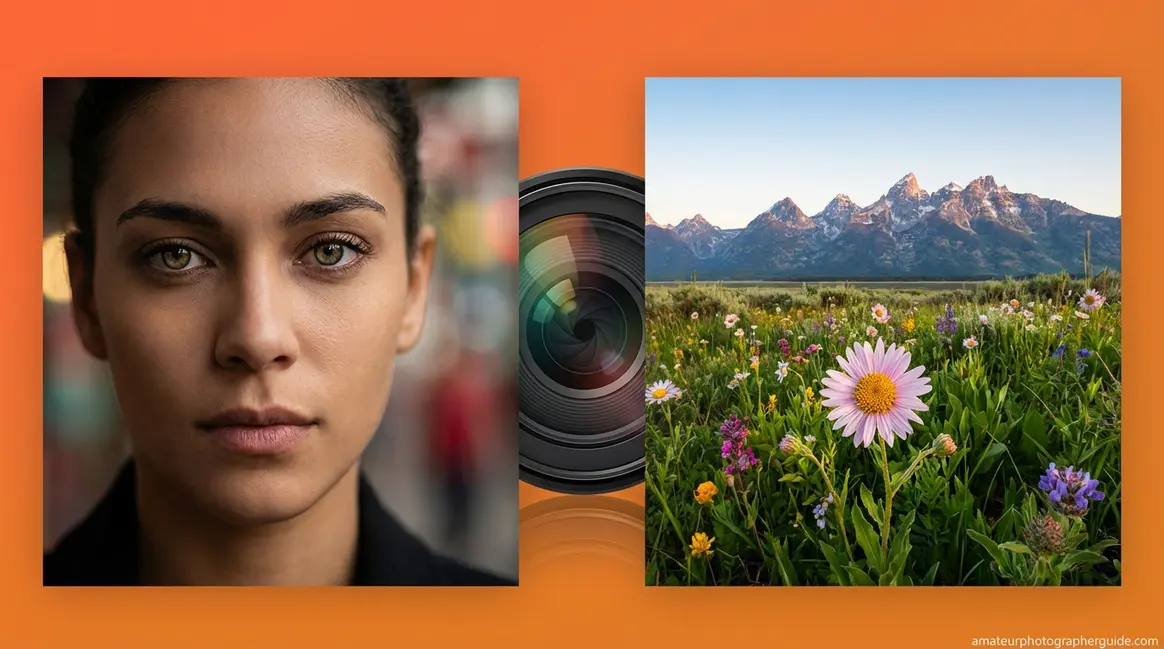
What Is Depth of Field in Photography?
Depth of field photography is the practice of controlling which parts of your image appear acceptably sharp and which fall into artistic blur. As CUNY Pressbooks defines it, depth of field is “the distance between the closest and farthest objects that appears acceptably sharp in a photograph.” That “zone of sharpness” can be wide, covering an entire landscape, or narrow, covering only a subject’s eyes.
“Acceptably sharp” simply means sharp enough that your eye reads it as in-focus at a normal viewing size. It’s not a binary switch but a spectrum you control.
Our photography team found that most guides define depth of field accurately but fail to reframe the mental model beginners need. That reframe is what we call The Focus Intention Framework.
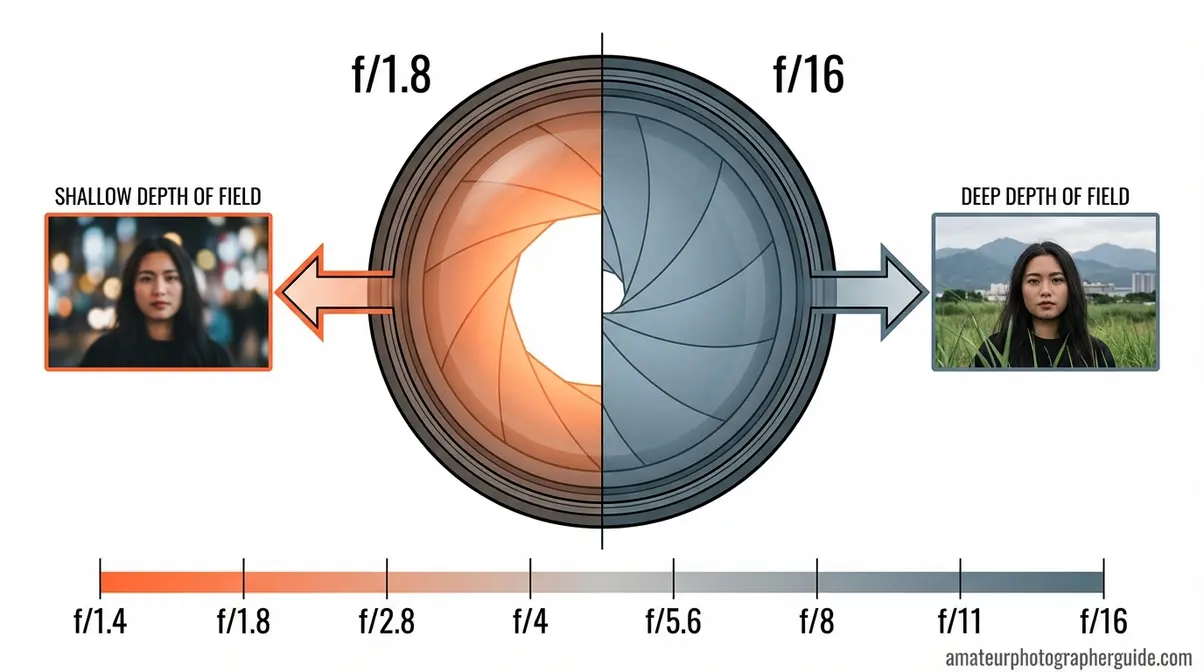
Shallow vs. Deep Depth of Field
Shallow depth of field creates a narrow zone of sharpness, blurring everything in front of and behind your subject. Think of a portrait where the model’s eyes are sharp, but the wall behind them is a soft wash of color. That’s shallow DoF.
Deep depth of field is the opposite, creating a vast zone of sharpness. In a landscape photo, a wildflower in the foreground and a mountain on the horizon can be equally sharp. That’s deep DoF.
Think of shallow DoF as a narrow spotlight of sharpness—dramatic and isolating. Deep DoF is a broad floodlight—illuminating everything at once. Both are valid creative choices.
| Shallow Depth of Field | Deep Depth of Field | |
|---|---|---|
| Visual Effect | Subject sharp, background/foreground blurred | Everything sharp, front to back |
| Typical Settings | f/1.4–f/2.8, close distance, long lens | f/8–f/16, farther distance, wide lens |
| Best For | Portraits, macro, product shots | Landscapes, architecture, group photos |
| Notable Example | Creamy bokeh portrait | Sweeping mountain panorama |
As the CUNY Pressbooks guide notes, understanding the range of sharpness is the foundation for controlling it deliberately.
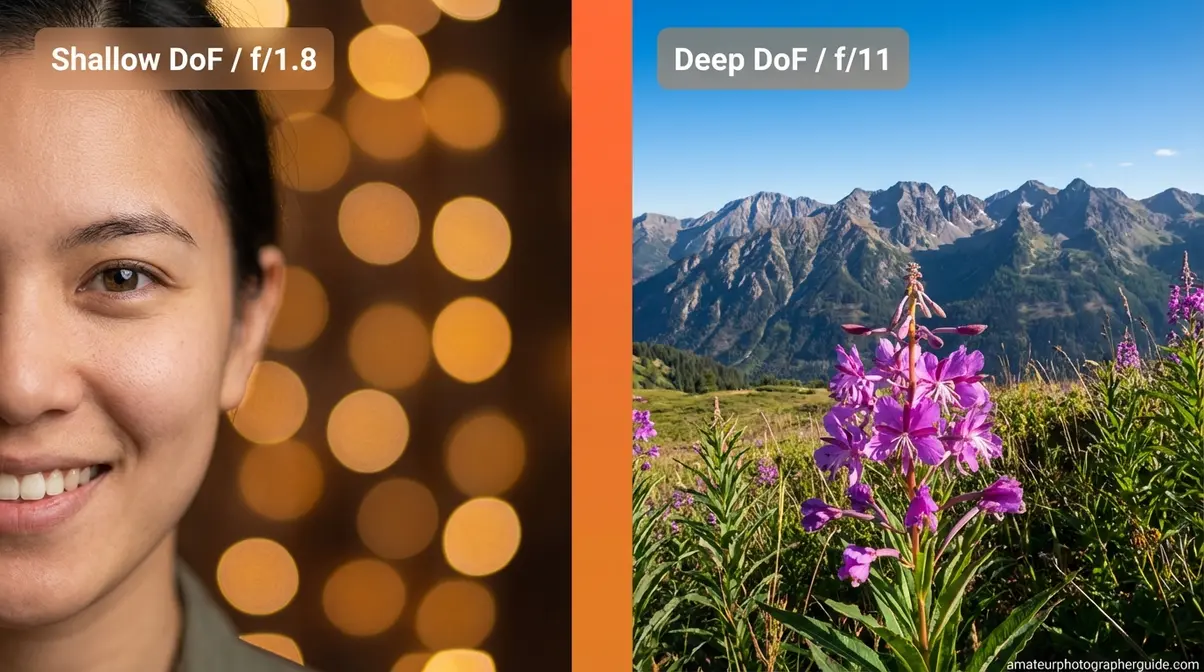
Caption: The spotlight of shallow DoF (left) versus the floodlight of deep DoF (right)—two tools on the same creative dial.
Depth of Field vs. Bokeh Explained
Many beginners confuse two key terms: depth of field and bokeh.
Depth of field is how much of your image is sharp. It’s a technical decision you control with your camera settings. Bokeh (from the Japanese word for blur) is the quality of the out-of-focus areas. Bokeh is a characteristic of your lens, not a setting you can change.
Two lenses set to f/1.8 will produce identical depth of field. However, a budget lens might render background highlights as harsh hexagons, while a high-end lens creates smooth, creamy circles. Same DoF, but completely different bokeh.
“Depth of field is to get what you want in focus, it has nothing to do with making things ‘pop’ — that is a completely backwards way of looking at it…”
— Real feedback from the photography community
That “pop” is a consequence of your sharpness decision, not the goal itself.
Why Controlling DoF Matters
Depth of field is what separates a deliberate photograph from a snapshot. By controlling it, you tell the viewer exactly where to look.
This is the core of The Focus Intention Framework: instead of asking “how do I blur the background?” start by asking “what do I want to be sharp?” Your subject’s eyes? The whole wedding party? Once you decide what to keep sharp, your settings for aperture, distance, and lens choice become clear, and the blur takes care of itself.
What is Shallow Depth of Field?

Shallow depth of field is a photography technique where only a narrow zone of the image appears sharp, while areas in front of and behind the subject blur into soft, out-of-focus regions. It’s achieved by using a wide aperture (f/1.4–f/2.8), getting close to your subject, and using a longer focal length such as 85mm or 135mm. Portrait photographers rely on shallow DoF to isolate faces from busy backgrounds—the viewer’s eye is drawn immediately to the sharp subject. As Adobe’s photography guide explains, shallow DoF means “having a plane that’s in focus, and everything else is out of focus.”
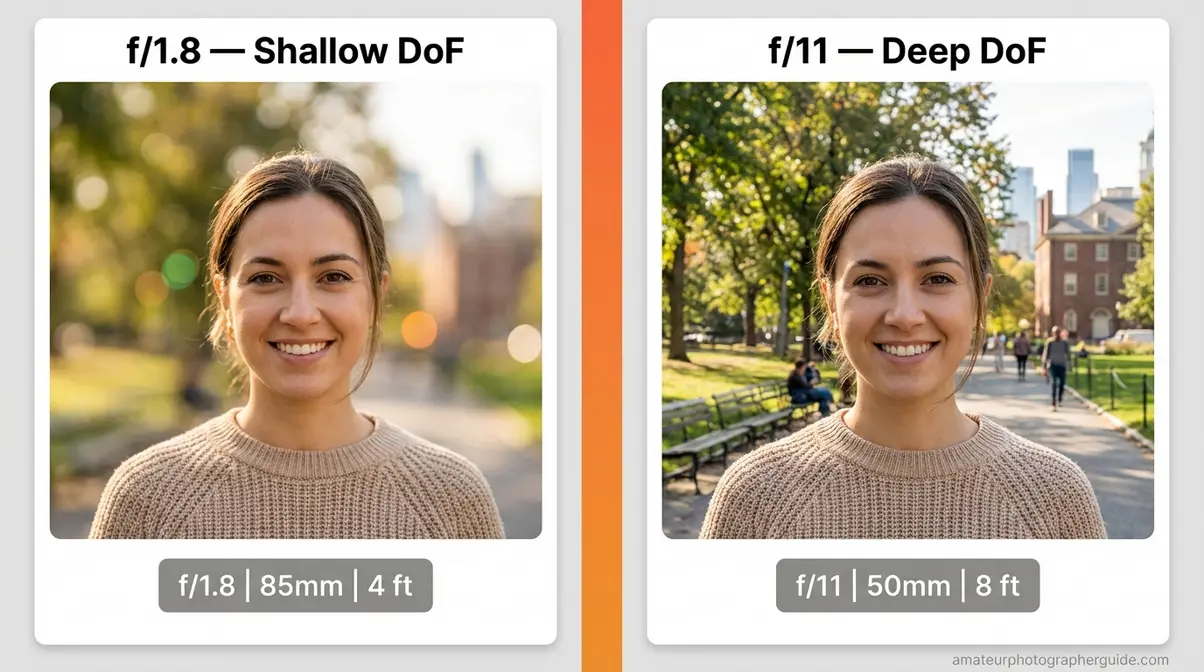
Caption: The same portrait subject at f/1.8 (left) and f/11 (right)—only the aperture changed, but the entire visual story shifted.
What “Shallow” Really Means
Most beginners approach this technique backward, asking, “How do I blur the background?”
The Focus Intention Framework flips that question. Ask instead: “What do I want sharp?” For a portrait, the answer is usually the subject’s near eye. That single decision locks in a narrow zone of sharpness. The background blurs because you committed to making one thing sharp.
Adobe’s photography guide reinforces this: photographer Jeff Carlson describes shallow DoF as “having a plane that’s in focus, and everything else is out of focus.” The plane comes first. This mental shift is the difference between nailing focus and wondering why your “blur” shot missed the mark. For a step-by-step practical walkthrough, see our guide on how to achieve a beautiful blurry background.
Settings for a Blurry Background

Here’s the exact process you can try immediately.
- Set your camera to Aperture Priority mode (Av on Canon, A on Nikon/Sony). This mode lets you control the aperture while the camera handles shutter speed, giving you direct DoF control.
- Choose a wide aperture: f/1.8, f/2.0, or f/2.8. The lower the f-number, the wider the aperture and the shallower the zone of sharpness. A wide aperture creates a very narrow focus plane.
- Get physically close to your subject. Stand 3–5 feet away for headshots. Closer distances dramatically compress the zone of sharpness, increasing background blur.
- Use a longer focal length. A 50mm, 85mm, or longer lens compresses the background more than a wide-angle, making blur more pronounced.
- Focus on the most important feature. For portraits, lock focus on the near eye. Shallow DoF provides only inches of sharpness, so precise focus is everything.
| Scenario | Aperture | Focal Length | Distance to Subject |
|---|---|---|---|
| Portrait (headshot) | f/1.8–f/2.0 | 85mm–135mm | 3–5 feet |
| Portrait (half body) | f/2.0–f/2.8 | 50mm–85mm | 5–8 feet |
| Product shot | f/2.8–f/4.0 | 50mm–100mm | 1–3 feet |
Using a kit lens? An 18–55mm f/3.5–5.6 lens can still produce blur. Set it to 55mm, open to f/5.6, and get as close as possible to your subject.
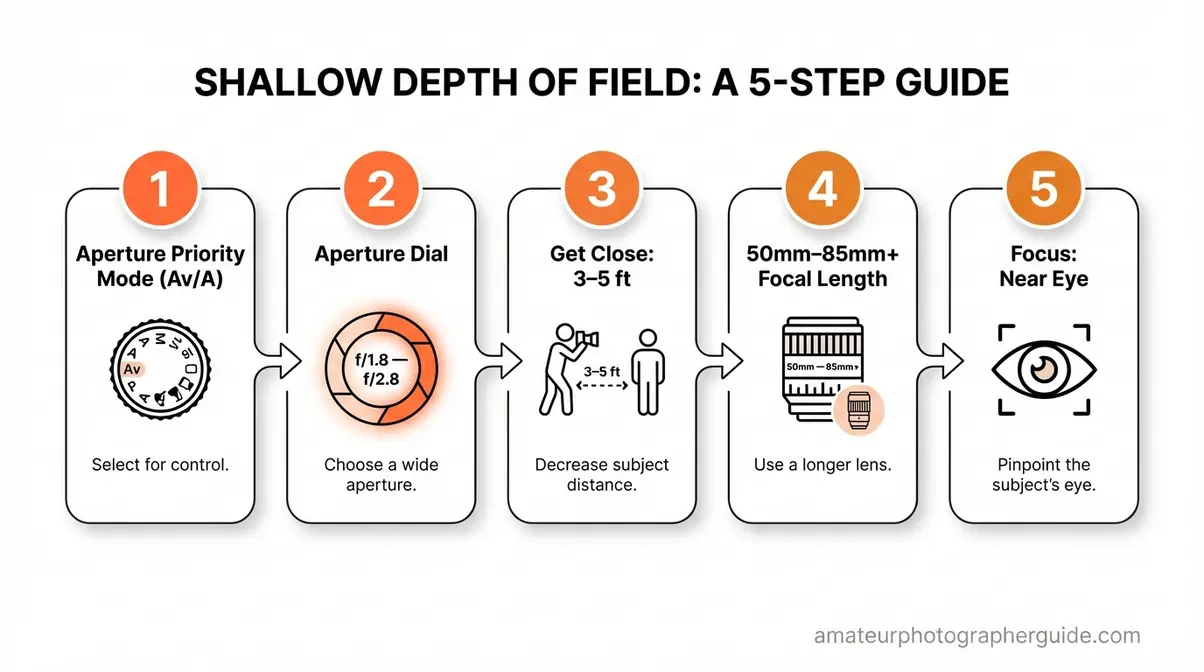
Caption: Aperture Priority + f/1.8 + 5 feet from subject = the combination for immediate background blur.
Bokeh and the Quality of Your Blur
Not all blur is equal. Bokeh—the aesthetic quality of out-of-focus areas—varies by lens.
Good bokeh renders light sources as smooth, round circles. Bad bokeh creates harsh, distracting shapes like hexagons. The difference is in the lens’s aperture blade design: lenses with 7–9 rounded blades produce smoother bokeh.
To maximize bokeh quality on a budget, look for a 50mm f/1.8 prime lens. It’s often the most affordable lens in any lineup and is a great tool for learning shallow DoF. To learn more, see our full guide on the quality of the blur, known as bokeh.
Achieving Full Sharpness (Deep DoF)
You’ve hiked to a perfect viewpoint with a wildflower at your feet and mountains on the horizon. You take the shot, but either the flower or the mountain is soft. The photo doesn’t match the scene.
Deep depth of field solves this problem, keeping everything sharp from front to back. For landscape photographers, architects, and anyone shooting groups, mastering deep DoF is essential.
When You Need Deep Depth of Field
When the Focus Intention Framework’s answer to “What do I want sharp?” is “everything,” you need deep depth of field.
This technique is crucial for: landscape photography, architecture, and group portraits. For a wedding group photo, f/1.8 would only keep the front row sharp. Choosing f/8 or higher ensures everyone is in focus. This is a deliberate, practical choice.
This approach is fundamental to the craft of landscape photography. For pinpoint control over front-to-back sharpness, see our complete guide on mastering the hyperfocal distance technique.
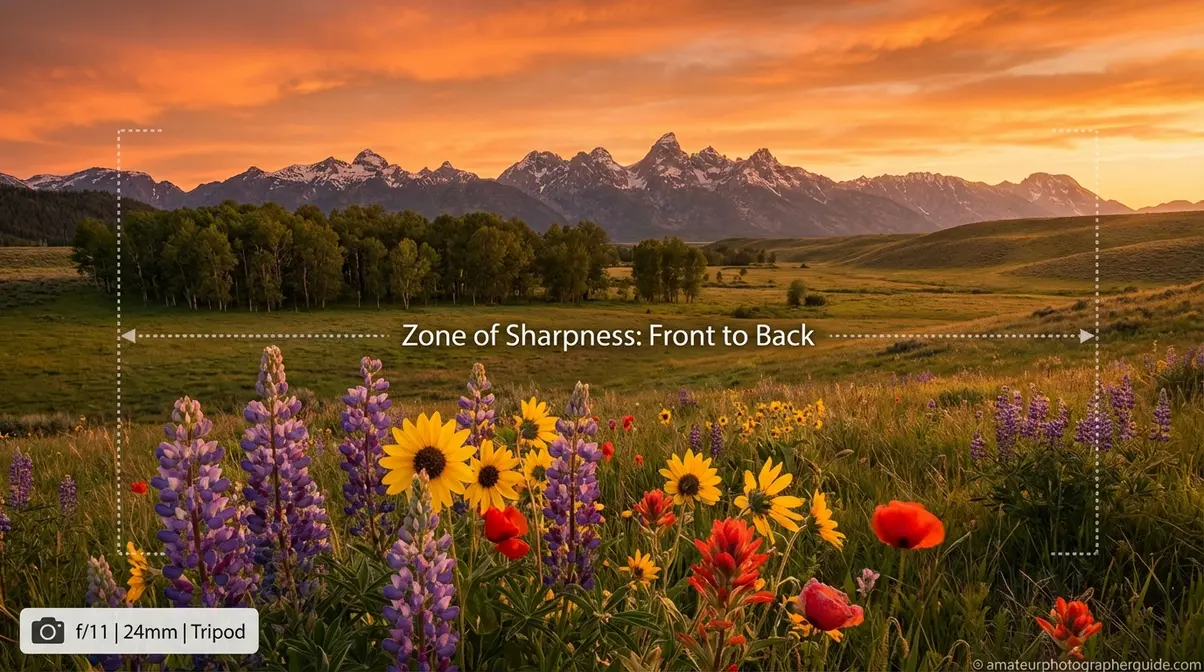
Settings for Maximum Sharpness
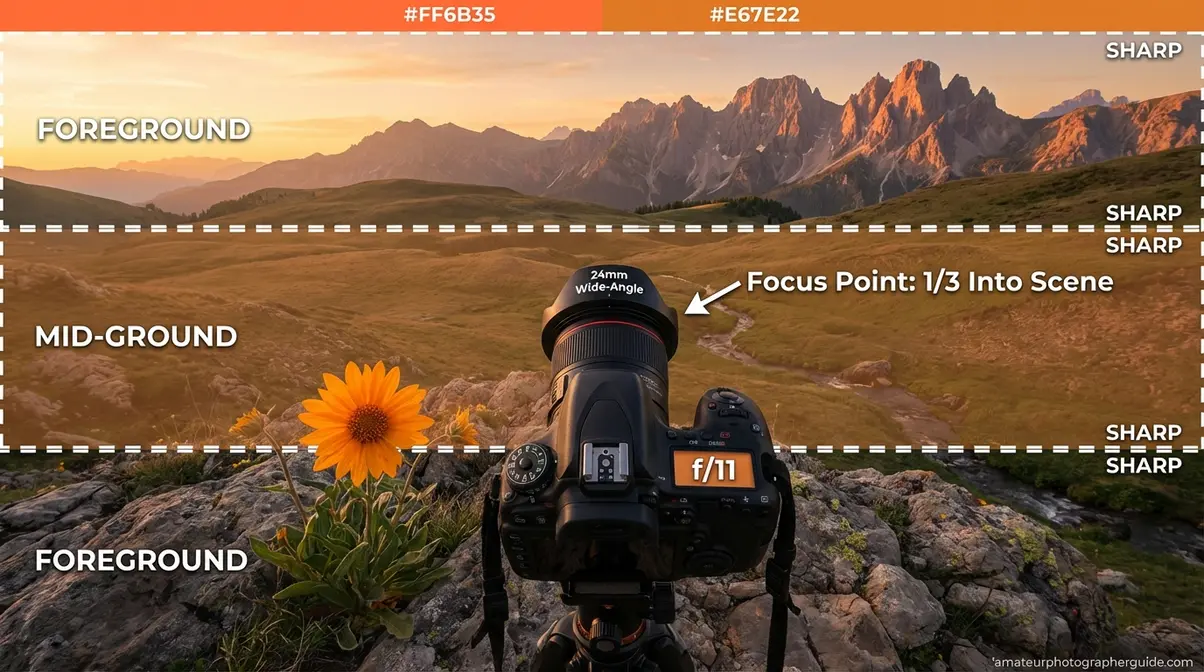
- Switch to Aperture Priority (Av/A) or Manual mode. Direct aperture control gives you predictable DoF results.
- Choose a narrow aperture: f/8, f/11, or f/16. This is the sweet spot for most lenses, as it extends the zone of sharpness.
- Use a wide-angle lens: 16mm, 24mm, or 35mm. These lenses naturally capture more of a scene and maintain greater depth of field than telephoto lenses.
- Focus one-third of the way into your scene, not on the horizon or foreground. Depth of field extends roughly one-third in front of your focus point and two-thirds behind it. The North American Nature Photography Association suggests a shortcut: if your nearest subject is 2 feet away, focus at 4 feet for balanced sharpness (NANPA, 2021).
- Use a tripod. Narrow apertures require slower shutter speeds, and any camera movement will undermine the sharpness you’re achieving.
Caption: Wide-angle lens + f/11 + one-third focus rule = the formula for front-to-back landscape sharpness.
The Diffraction Warning for f/22
At very small apertures like f/16 or f/22, a phenomenon called diffraction occurs. Light bends as it squeezes through the tiny opening, causing a subtle but measurable softening of the entire image.
The practical takeaway: Most lenses hit their sharpness sweet spot between f/8 and f/11. At f/22, the DoF is technically wider, but the image may look softer overall due to diffraction. Shoot the same scene at f/11 and f/22 and compare them at 100% zoom; you’ll likely see the difference.
| Aperture Range | Depth of Field | Sharpness Level |
|---|---|---|
| f/1.4–f/4 | Shallow | Very sharp |
| f/5.6–f/11 | Medium to deep | Sweet spot—peak sharpness |
| f/16–f/32 | Deep | May show diffraction softening |
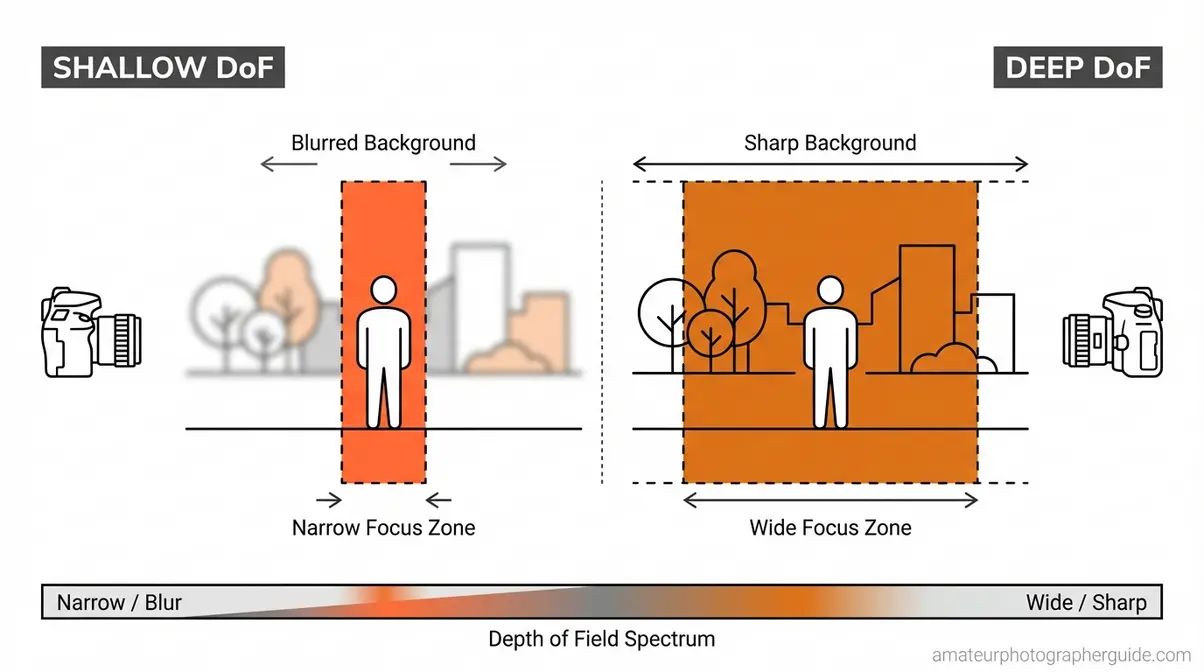
The 3 Controls of Depth of Field

Three settings directly control your depth of field. Once you understand these levers, you have complete command of focus.
| Control | Shallower DoF (More Blur) | Deeper DoF (More Sharp) | Magnitude of Effect |
|---|---|---|---|
| Aperture | Wide aperture: f/1.4, f/1.8, f/2.8 | Narrow aperture: f/8, f/11, f/16 | Very High |
| Subject Distance | Move closer to subject | Step away from subject | High |
| Focal Length | Wide-angle lens (24mm, 35mm) | Telephoto lens (85mm, 200mm) | Moderate |
| Sensor Size | Larger sensor (full-frame) | Smaller sensor (crop, phone) | Low–Moderate |
Caption: Three levers, infinite creative combinations—this diagram shows how aperture, distance, and focal length shift your zone of sharpness.
Control #1: Aperture (f-stop)
Aperture is the adjustable opening inside your lens that controls how much light enters. Think of it like the pupil of your eye: it opens wide in the dark and contracts in bright light. You control your lens’s aperture with the f-stop number.
The counter-intuitive part is that a lower f-number (like f/1.8) means a wider opening, which creates a shallow DoF. A higher f-number (like f/16) means a tiny opening, creating a deep DoF. The “f” in photography stands for “focal ratio,” which describes how wide the aperture is relative to the lens’s focal length.
As explained by camera manufacturer Canon, aperture is the most significant single factor for controlling depth of field. For a complete explanation, see our guide on how aperture controls depth of field.
Control #2: Your Distance to the Subject
The closer you are to your subject, the shallower your depth of field. This is why macro photographers work with razor-thin focus zones—they are often just centimeters away from their subject.
Reducing your distance to a subject substantially shrinks the depth of field (Photography Life, 2024). A small change in position can create a dramatic visual impact. Test this with a household object: at f/4, stand 10 feet away, then move to 3 feet away. The background blur will increase significantly.
Control #3: Focal Length of Your Lens
Focal length, measured in millimeters, determines how “zoomed in” your lens is and affects depth of field.
Longer focal lengths (85mm, 200mm) produce shallower depth of field than shorter ones (24mm, 35mm) at the same aperture and distance. Telephoto lenses also compress the background, making distant elements appear larger and amplifying the impression of blur.
Wide-angle lenses do the opposite, extending depth of field, which is why they are ideal for landscape photography. See our guide on how focal length affects your photography to learn more.
How Sensor Size Affects DoF
Sensor size also impacts depth of field. With equivalent framing, a full-frame camera produces a shallower depth of field than an APS-C (crop sensor) camera, which is shallower than a smartphone sensor (The Slanted Lens, 2024).
This is why smartphone portraits, even with software-based blur, often can’t match the natural background blur from a full-frame camera.
| Sensor Type | Relative DoF Characteristic |
|---|---|
| Full-frame (35mm) | Shallowest DoF potential |
| APS-C (crop) | Moderate—1 stop deeper than full-frame |
| Micro Four Thirds | Deeper DoF—2 stops deeper than full-frame |
| Smartphone | Deepest natural DoF—blur often simulated |
Depth of Field Examples by Photography Style
Understanding how to apply depth of field across different genres is where theory becomes instinct. Professional photographers match their DoF to the story they’re telling, not to a default setting (Photography Life, 2024).
Portraits: Isolating Your Subject
Portraiture is the main reason beginners learn shallow depth of field. A sharp subject against a soft background removes distractions and draws the viewer’s eye to the face. For an in-depth look at this genre, explore our complete guide to what portrait photography is.
For a headshot, try f/1.8–f/2.0 with an 85mm lens, standing 3–5 feet away. Lock focus on the near eye. For group portraits, the math changes. To keep two rows of people sharp, you may need an aperture of f/5.6 or f/8.
- Quick settings for portraits:
- Solo headshot: f/1.8–f/2.0, 85mm, 4 feet, focus on near eye
- Half-body: f/2.8, 50–85mm, 6–8 feet
- Group of 5+: f/5.6–f/8, 35–50mm, 10+ feet
Landscapes: Foreground to Horizon
Landscape photography usually requires deep depth of field. The power of a great landscape image often comes from the sense that everything is crisp and present.
The standard approach is a wide-angle lens (16–35mm) at f/8–f/11, with focus placed one-third into the scene. A tripod is essential for the longer shutter speeds required by a narrow aperture.
Macro: Razor-Thin Depth of Field
Macro photography, or extreme close-ups, presents the most challenging DoF scenario. At these distances, even f/16 can yield a zone of sharpness measured in millimeters.
This is why macro photographers often use focus stacking: taking multiple shots at slightly different focus distances and blending them in post-processing to achieve an image with complete front-to-back sharpness.
Street Photography: Balanced Focus
Street photography often requires a “zone focusing” approach for speed. Many photographers preset their lens to a moderate aperture (f/5.6–f/8) and focus to a distance of 10–15 feet, accepting that anything within that range will be sharp.
The goal is to capture the decisive moment, not perfect bokeh. However, some street photographers use shallow DoF to isolate a face from a crowd. Both approaches are valid.
Advanced Tools and Techniques for Sharper Images
Once you’re comfortable with the three controls, you can use advanced tools to calculate your DoF precisely and achieve sharpness beyond a single exposure (Digital Photography School, 2024).
Circle of Confusion, Explained
Depth-of-field calculators use a value called the circle of confusion (CoC). When a point of light is slightly out of focus, it renders as a tiny circle on your sensor. The CoC is the maximum size that circle can be before your eye perceives it as blurry in the final image.
The CoC value varies by sensor size because smaller sensors require more enlargement, making any blur more visible. Common values are 0.029mm for full-frame cameras and 0.018mm for APS-C (StudioBinder, 2024). DoF calculators set this automatically when you select your camera.
How to Use a Depth of Field Calculator
A DoF calculator tells you the exact limits of your sharp zone before you shoot. Recommended tools include PhotoPills (iOS/Android) and DOFMaster.com (web-based).
- How to use one:
- Select your camera model.
- Enter your focal length (e.g., 85mm).
- Enter your aperture (e.g., f/2.8).
- Enter your focus distance (e.g., 6 feet).
The calculator will return your near limit, far limit, and total DoF. For landscapes, it also provides the hyperfocal distance.
Hyperfocal Distance Explained
Hyperfocal distance is the closest point at which you can focus while keeping objects at infinity acceptably sharp. When you focus at the hyperfocal distance, your entire scene—from roughly half that distance to the horizon—will be crisp.
For example, with a 24mm lens at f/11, your hyperfocal distance might be 8 feet. Focus there, and everything from 4 feet to infinity is sharp. If you focus on infinity instead, you lose useful foreground sharpness. For more, see our full guide on mastering this technique.
Using the DoF Preview Button
Most DSLRs and many mirrorless cameras have a Depth of Field Preview button, usually near the lens mount.
When you look through your viewfinder, the camera keeps the aperture wide open for a bright view. Pressing the DoF Preview button stops the aperture down to your chosen f-stop, letting you see the actual depth of field your final image will have. The view will be darker, but you’ll see exactly what will be sharp.
Common DoF Mistakes and How to Fix Them
Our team has observed three common pitfalls that photographers face when learning depth of field.
3 Common Beginner Pitfalls
1. Focusing on the wrong part of the subject.
With shallow DoF, your focus zone can be just inches deep. If you focus on a person’s ear instead of their eye, the eye will be soft. Fix: Use single-point autofocus and manually place the focus point over the subject’s near eye.
2. Overcorrecting after learning about shallow DoF.
Beginners often apply f/1.8 to every situation, then wonder why their group photos have only one person in focus. Fix: Use the Focus Intention Framework: decide what needs to be sharp before choosing your aperture.
3. Shooting at f/22 for maximum landscape sharpness.
As covered in the diffraction warning, f/22 does not guarantee maximum sharpness. Fix: For most lenses, f/8–f/11 delivers both deep DoF and peak resolution.
When to Avoid Shallow DoF
Shallow DoF is a powerful tool, but it’s not always the right choice.
Group photos. With multiple people, f/1.8 will leave some individuals soft. Start at f/5.6 for small groups and move to f/8 or higher for larger ones.
Environmental portraits. If the setting is as important as the person—like a chef in their kitchen—blurring the background removes important context. Try f/4–f/5.6 to keep the subject sharp while retaining background detail.
Documentation. For real estate, e-commerce, or food photography, where every detail must be visible, use a narrower aperture to ensure complete clarity.
Frequently Asked Questions
How do you adjust the depth of field?
Adjust depth of field using three camera controls: aperture, subject distance, and focal length. Aperture is the most powerful: a lower f-stop number (e.g., f/1.8) shallows the DoF, while a higher one (e.g., f/11) deepens it. Moving closer to your subject also reduces DoF. Using a longer focal length (85mm vs. 35mm) has a similar effect. For quick results, use Aperture Priority mode (Av/A) and experiment.
What lenses are best for depth of field?
The best lenses for creative DoF control are fast prime lenses with wide maximum apertures. A 50mm f/1.8 (“nifty fifty”) is a highly affordable starting point, capable of beautiful background blur. The 85mm f/1.8 is a classic portrait prime. For deep DoF in landscapes, a wide-angle lens (16–35mm) set to f/8–f/11 is standard.
The Clearest Path Forward
For beginners, depth of field photography is the skill that most quickly transforms snapshots into intentional photographs. Depth of field is your zone of sharpness, controlled by aperture, subject distance, and focal length. For portraits, f/1.8 with an 85mm lens creates a silky blurred background. For landscapes, f/11 on a wide-angle lens keeps everything sharp.
The Focus Intention Framework makes it all stick. When you stop chasing blur and start choosing sharpness, the settings become logical. Aperture has the biggest impact. Distance matters more than you think. Focal length refines the look. Together, they give you complete creative control.
Here’s your next step: set your camera to Aperture Priority, pick a subject, and take two shots—one at the widest aperture and one at f/11. That 10-minute experiment will teach you more than hours of reading and start you on the path to seeing your camera as a creative tool.
