
Table of Contents
This blog post may contain affiliate links. As an Amazon Associate I earn from qualifying purchases.
Your camera is smart — but it makes the same mistake on almost every tricky scene. Whether you’re photographing bright white snow or a friend standing against a sunny window, it tries to render everything as a neutral grey tone, and your photo pays the price.
Every time you fire the shutter in a difficult lighting situation without adjusting exposure compensation, you’re handing creative control back to an algorithm that doesn’t know what you want the image to look like. The principles of exposure compensation explained in this guide are your way of taking back control. Your snow scene comes back dull and grey. Your backlit subject turns into a silhouette. Your stage performer disappears into murky shadows.
By the end of this guide, you’ll understand exactly what exposure compensation does, when to use it, and how it behaves differently in every camera mode — so you can take control of your images in any situation. We’ll cover the core concept, practical shooting scenarios, a mode-by-mode breakdown, the EC versus ISO debate, and how to find the control on your specific camera.
Exposure compensation lets you override your camera’s automatic meter to make photos brighter (+) or darker (−) — the camera’s meter aims for middle grey, which fools it on bright or dark scenes.
- Use +EC for bright scenes (snow, sand, white backgrounds) that come out dull or grey
- Use −EC for predominantly dark scenes or subjects on dark backgrounds that come out washed out
- EC adjusts shutter speed in Aperture Priority, aperture in Shutter Priority — it does NOT work in standard Manual mode with a fixed ISO
- “The Meter Correction Mindset”: Think of EC as correcting your camera’s guess about brightness, not fighting your settings — the meter isn’t broken, it’s just predictably wrong
What Is Exposure Compensation? (The Simple Truth)
Exposure compensation is a camera setting, available on virtually all DSLRs and mirrorless cameras, that lets you override the automatic light meter to make your photos brighter (+) or darker (−). It works in semi-automatic modes — Aperture Priority, Shutter Priority, and Program mode. You use it when the camera’s meter gets fooled by extremely bright or dark scenes, like white snow or a dark cat on a black sofa. It’s measured in EV, short for exposure value — a standardized unit of brightness — typically in 1/3-stop increments.
This is exposure compensation explained in its simplest form. But to use it with confidence, you need to understand why the meter gets things wrong in the first place.
How Your Camera’s Light Meter Actually Works
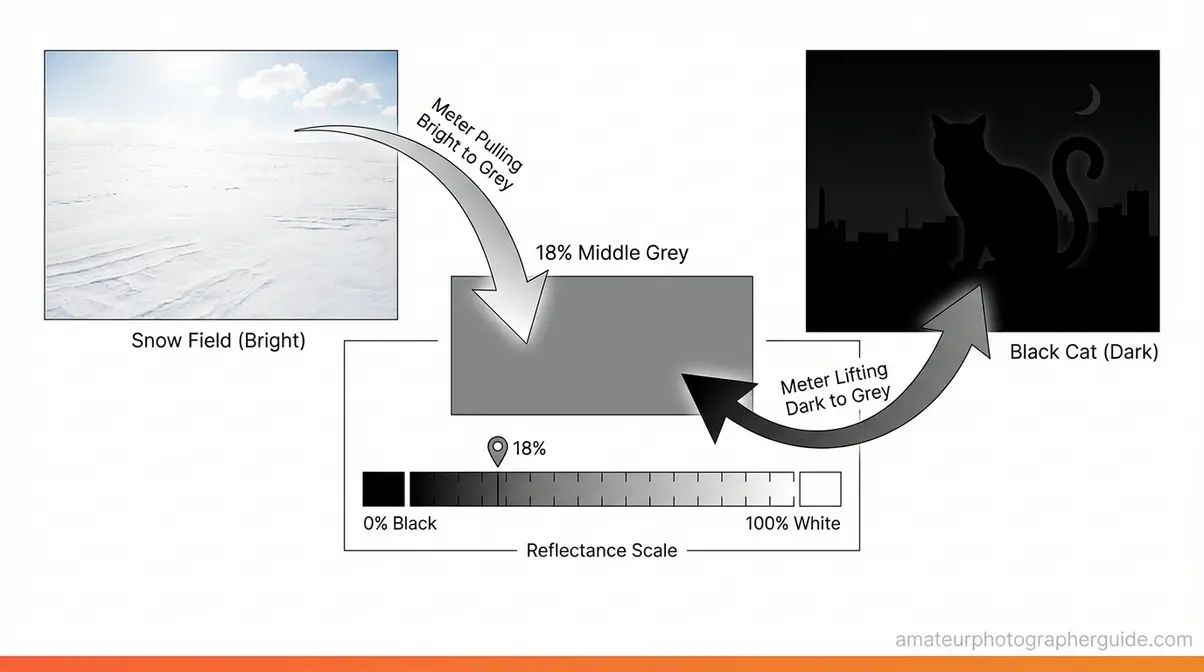
The camera’s light meter — the built-in sensor that measures light and calculates the “correct” exposure — does something very specific: it calibrates every scene to render as approximately 18% grey, also called middle grey. This is the mid-point between pure black and pure white, and it works perfectly for average scenes with a typical mix of tones.
The problem is that not every scene is average.
“Exposure compensation is just an adjustment to the meter.”
That quote unlocks everything. When the meter fails, EC is your correction instruction — not a fight against your camera, but a simple conversation with it.
Consider white snow: freshly fallen snow has a reflectance (albedo) of up to 95% in visible light (WSL Institute for Snow and Avalanche Research). The meter sees all that reflected brightness, assumes the scene is overexposed, and stops down — dragging your white snow to a flat, muddy grey. Now consider the opposite: a black cat on a dark sofa. The meter sees a very dark scene and opens up to compensate, overexposing the image into a washed-out, murky mess. Neither result is what you wanted. Both are predictable. And The Meter Correction Mindset is the insight that makes them fixable: the meter isn’t broken — it’s just consistently wrong in specific, recognizable situations.
According to the Nikon D7500 manual, “Exposure compensation is used to alter exposure from the value suggested by the camera, making pictures brighter or darker.” That’s the complete job description.
Caption: The camera’s meter renders both snow and a dark cat as middle grey — EC is the correction that puts brightness back where it belongs.
The +/- Dial: What You’re Telling Your Camera
The exposure compensation dial is typically marked in stops — the unit that describes how much brighter or darker you want the image to be. Most cameras offer a range of −3 to +3 EV in increments of 1/3 EV, though Nikon Z fc official documentation confirms this range for that model specifically. Some Sony bodies extend even further, offering −5.0 to +5.0 EV on select Alpha cameras.
Here’s what the numbers mean in plain terms:
- +1 EV = make the image one stop brighter than the camera’s calculation (the camera lets in twice as much light)
- −1 EV = make the image one stop darker (the camera lets in half as much light)
- 0 EV = accept the camera’s recommendation as-is
A quick mental reference for the scale:
−3 ——— −2 ——— −1 ——— 0 ——— +1 ——— +2 ——— +3
Dark stage Black subject Standard Overcast Snowy field
performance on dark sofa daylight white sky midday sun
One important habit: exposure compensation does not automatically reset between shots on most cameras. Per Digital Photography School, this is one of the most common beginner errors — you dial in +1.5 EV for a snow scene, then move inside, and your next 30 portraits are all overexposed. Get into the habit of checking the EC indicator every time you change scenes.
How Metering Modes Affect the Baseline
Before you use EC, it’s worth knowing which metering mode your camera is using — because EC overrides the result of that metering mode, and different modes produce different starting points.
The three primary modes are:
- Evaluative/Matrix metering: Analyses the entire scene and calculates a balanced average
- Centre-Weighted metering: Prioritises the centre of the frame but considers the surrounding area
- Spot metering: Reads only a tiny area — typically 1-5% of the frame — usually where the AF point is placed
The practical implication is significant. Per the Nikon D780 manual on metering, “Metering determines how the camera sets exposure” — which means it directly shapes the baseline that EC then overrides. A backlit portrait may need −1 EV with Evaluative metering, but 0 EV with Spot metering locked on the subject’s face. The amount of EC you need depends on which metering mode is active.
With the theory in place, let’s look at the real situations where you’ll actually reach for the EC dial.
When to Use Exposure Compensation (+ vs. −)
Knowing when to use EC — and in which direction — is the practical skill that separates photographers who get the shot from those who chimp through a dozen bad frames. Here are the three most common scenarios, with specific EV values that competitors simply don’t provide.
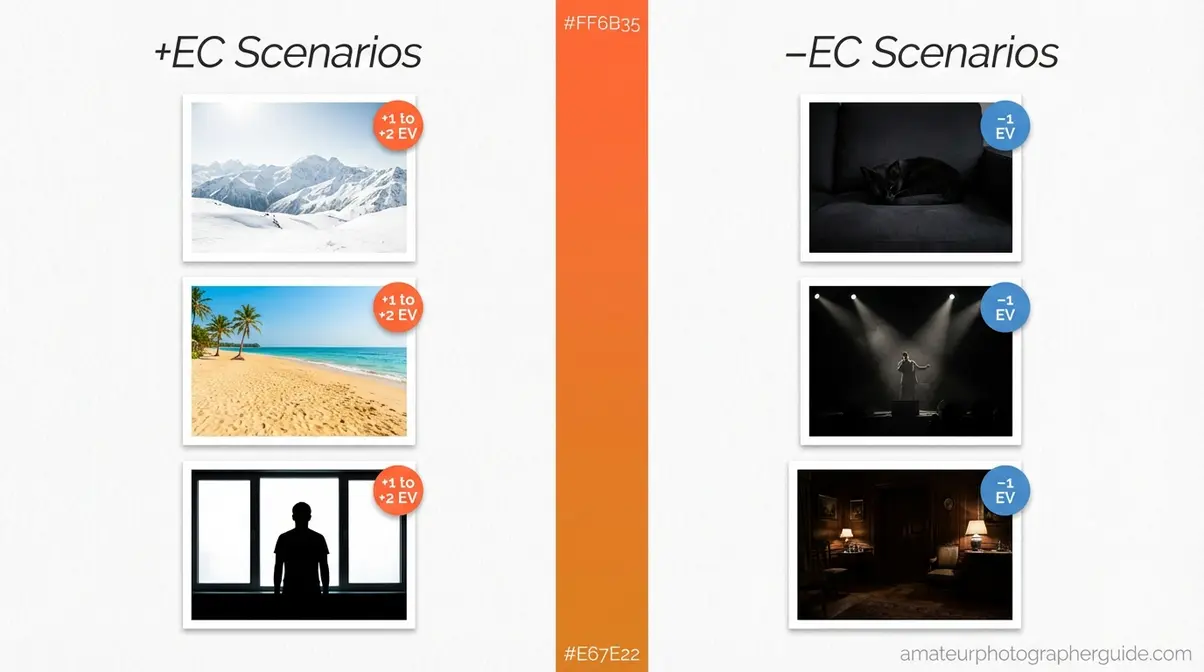
- Common exposure compensation scenarios:
- Bright white scenes (snow, sand, white walls): use +1 to +2 EV
- Dark subjects or dark-background scenes (black cat, stage performer): use −1 to −2 EV
- Backlit portraits (subject against bright window or sky): use +1 to +2 EV with Evaluative metering
These aren’t guesses — they’re derived from the meter’s predictable 18% grey bias. Once you know the meter’s pattern, the correction becomes automatic.
Bright Scenes (Snow, Sand, White Backgrounds)
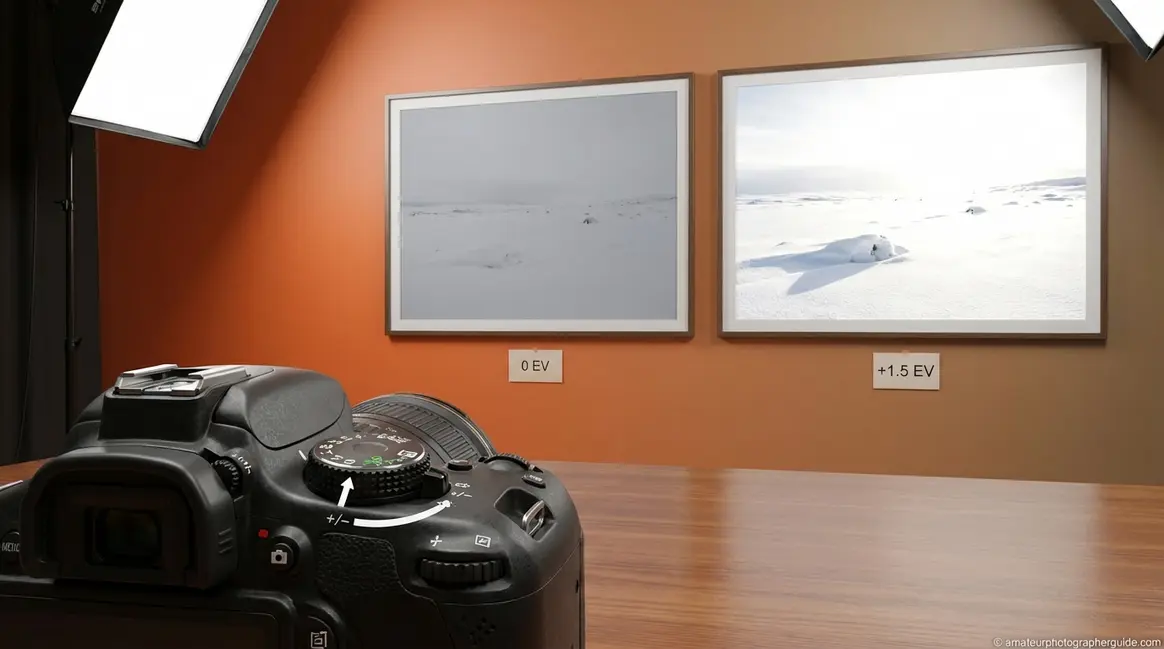
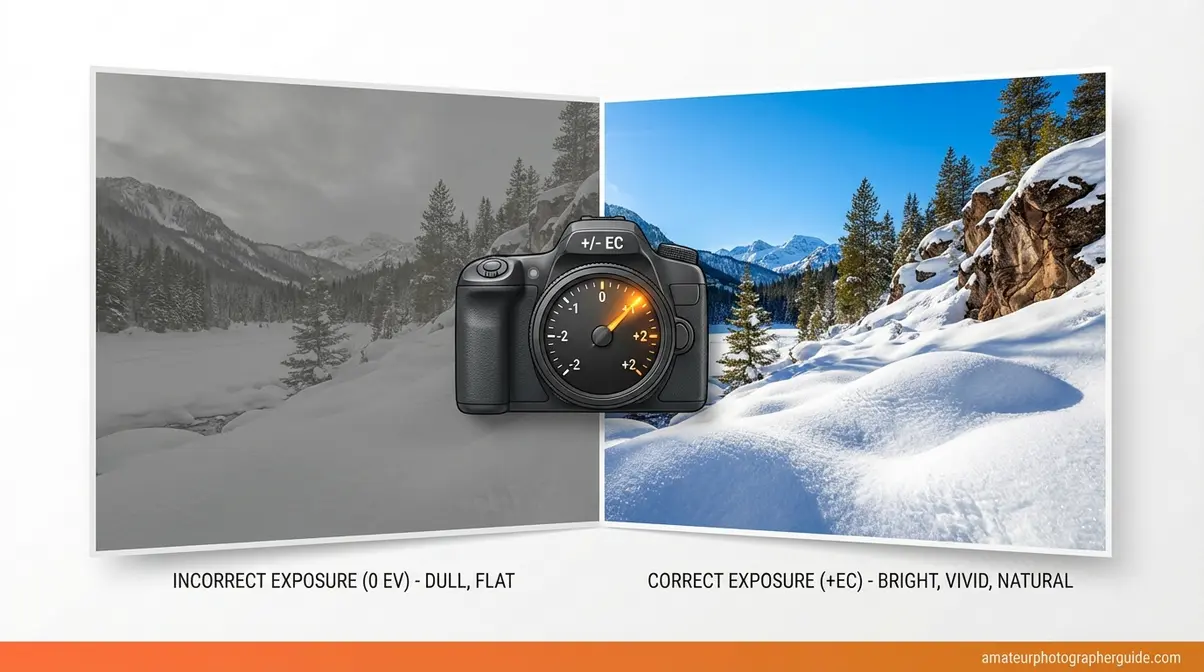
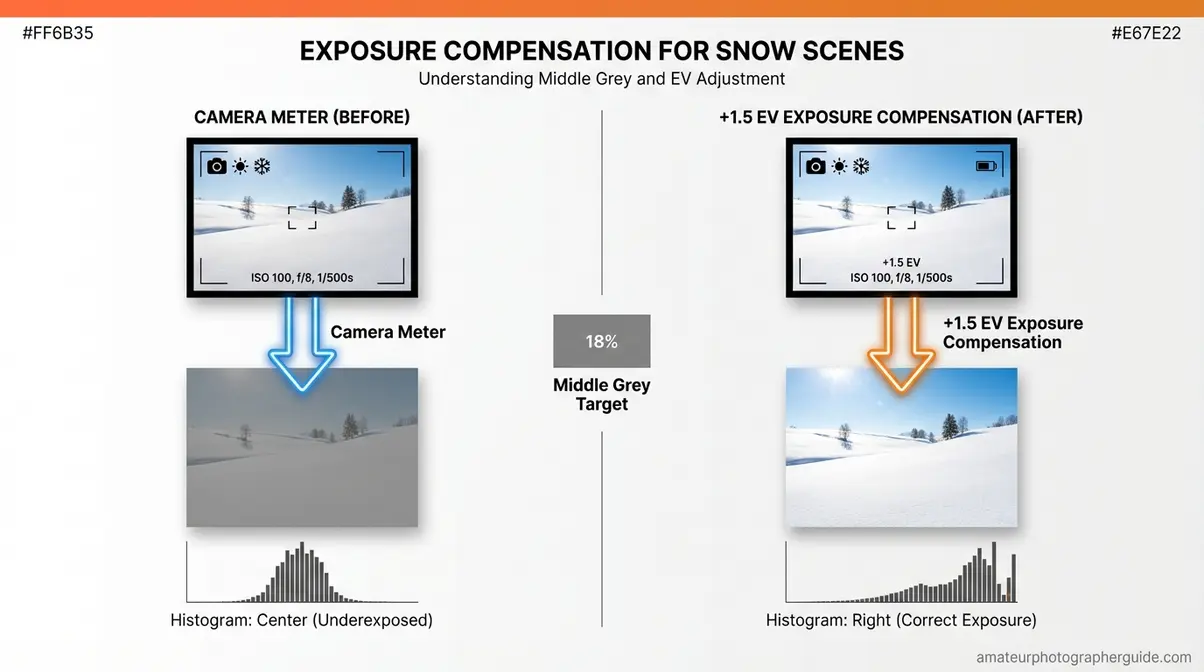
Positive exposure compensation rescues any scene dominated by bright white or high-key tones. Snow-covered fields, white sand beaches, bright overcast skies, and white-walled rooms all trigger the same metering error: the camera sees enormous reflected brightness, decides the scene must be overexposed, and reduces the exposure to drag everything back to grey.
The rule: Start with +1 EV. If the scene is extremely bright — midday sun on white sand or a field of fresh powder — try +1.5 or +2 EV. Take a shot, then review the histogram. For a snow scene, the histogram should be pushed toward the right half without clipping at the far right edge. That right-edge clipping means pure white with no detail — highlights “blown out” and unrecoverable.
As Canon Europe’s EC guide recommends, always pair EC adjustments with a histogram review in bright scenes to avoid underexposure.
Freshly fallen snow reflects up to 95% of visible light (WSL Institute for Snow and Avalanche Research, 2026) — one of the highest reflectance values of any natural surface. That extreme brightness is precisely why the meter gets it so wrong.
[ORIGINAL PHOTO: snow-before-after | Before: 0 EV — camera rendered snow as dull grey. After: +1.5 EV — snow appears white and natural.]
Bright white scenes like snow typically need +1 to +2 EV to appear correctly exposed — without compensation, the camera renders them grey.
Where positive EC rescues overly bright scenes, negative compensation handles the opposite problem — subjects so dark the camera tries to overcompensate for them.
Dark & Backlit Scenes
This is where an important distinction saves a lot of confusion. There are two different situations that photographers often group together — and they require different EC responses.
Situation 1 — Predominantly dark subjects (true −EC territory): A black cat on a dark sofa. A performer on a stage with a dark background. A dark-skinned subject photographed against a dark background. In each case, the scene is mostly dark, the meter tries to “lift” everything toward middle grey, and the result is a washed-out, muddy image that loses shadow detail. Here, −1 EV is your starting point; adjust toward −2 EV for very dark subjects against very dark backgrounds.
[ORIGINAL PHOTO: black-cat-before-after | Before: 0 EV — cat appears washed out and grey. After: −1 EV — black tones restored with proper shadow detail.]
Situation 2 — Backlit portraits (counterintuitive +EC territory): When your subject stands in front of a bright window or sunlit sky and you’re using Evaluative metering, the camera meters the bright background and exposes for it — leaving your subject underexposed and dark. The fix here is actually +EC (or switching to Spot metering aimed at the subject’s face). Only switch to −EC when the dark background genuinely dominates the frame.
[ORIGINAL PHOTO: stage-performer-before-after | Before: 0 EV — blown highlights, flat detail. After: −1 EV — balanced tones, preserved background detail.]
As Digital Photography School notes, EC must be consciously reset after use — a critical detail many beginners miss when moving from a dark stage environment into standard daylight.
Once you’ve identified the right direction (+/−), how do you decide how much to dial in? Your camera’s histogram gives you the answer in real time.
What Should I Set My Exposure Compensation To?
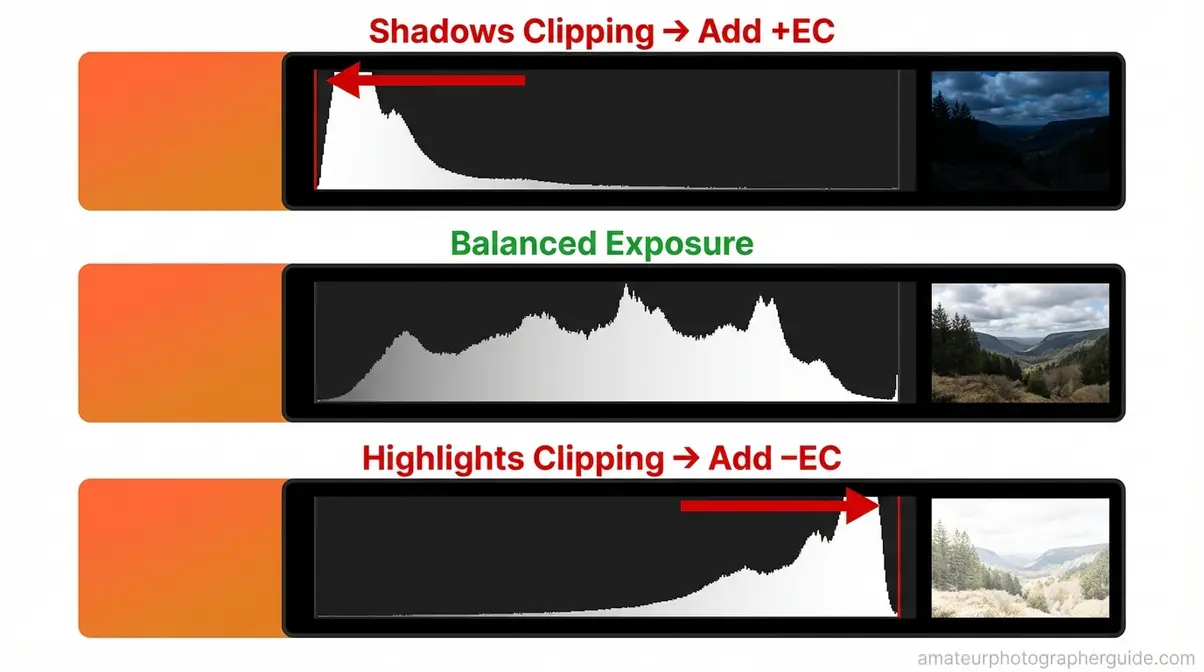
The histogram is a bar graph — displayed on your camera’s review screen — showing the distribution of tones in your image from pure black on the left to pure white on the right. It’s the most reliable feedback tool you have for evaluating exposure compensation.
The rule is simple:
- Histogram piled hard against the left edge (shadows clipping) → add +EC
- Histogram pushing off the right edge (highlights clipping) → add −EC
- Tones distributed across the graph with no hard clipping → exposure is balanced
For a snow scene, you want the histogram leaning right — but not spilling over the edge. For a dark subject, you want tones sitting in the left half without hard clipping. Use this as your real-time feedback loop: adjust EC, take a shot, review the histogram, repeat.
As a more advanced technique, Photography Life provides custom EV adjustment charts showing how histogram feedback correlates with specific EC values across different modes — a useful reference when you’re refining beyond the ±1 EV rule of thumb.
Auto Exposure Bracketing (AEB) is worth a brief mention here: it automatically fires a burst of shots at different EC values simultaneously, useful for uncertain lighting situations where you want to hedge your bet. It’s a more advanced technique, but most DSLRs and mirrorless cameras support it in the shooting menu.
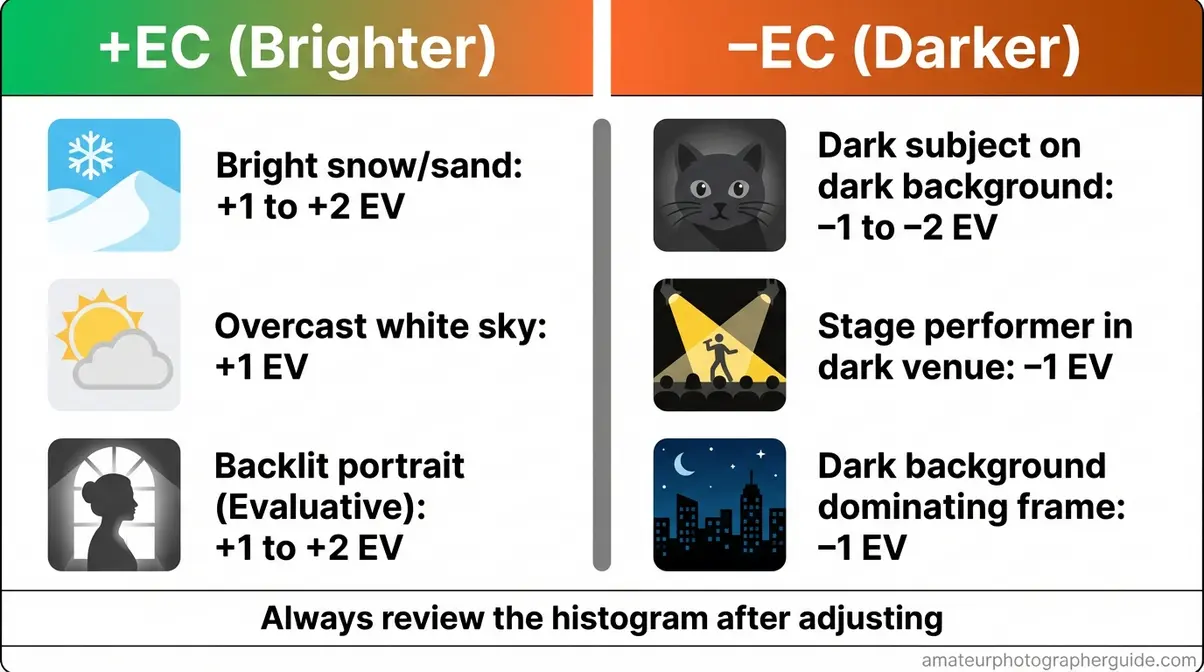
Caption: Use this cheat sheet as a quick reference before any challenging lighting situation — bright scenes always need +EC, predominantly dark scenes need −EC.
Knowing when to use EC is half the equation. The other half is understanding what your camera actually changes when you move that dial — and that depends entirely on which shooting mode you’re in.
How EC Works: A Mode-by-Mode Analysis
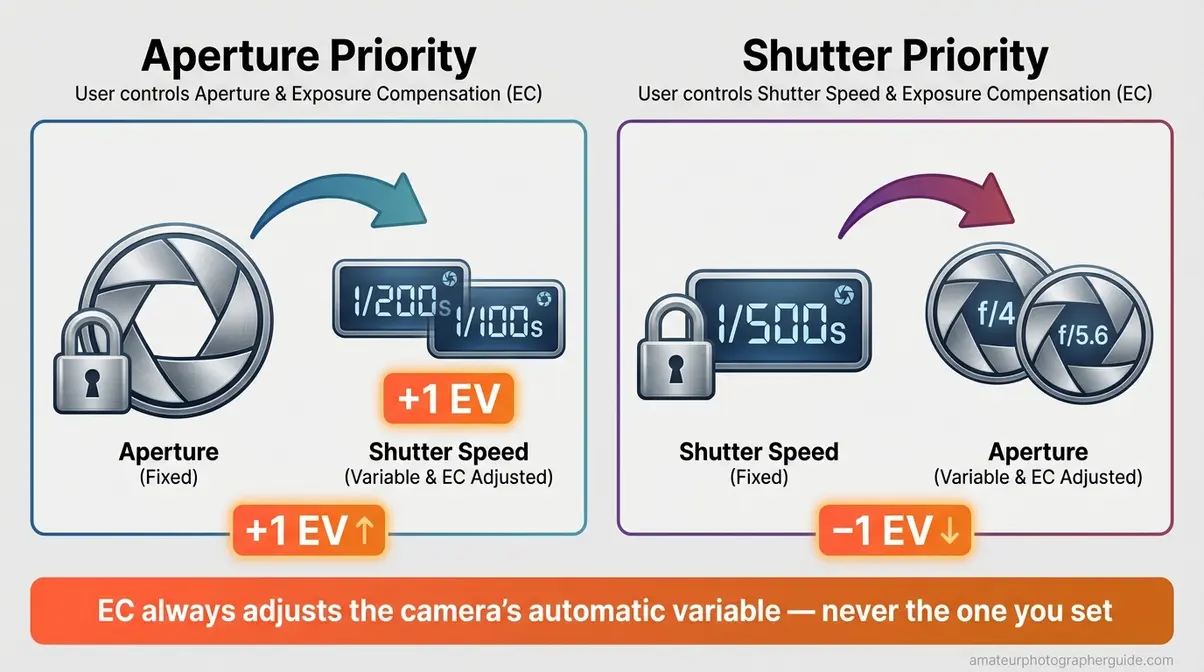
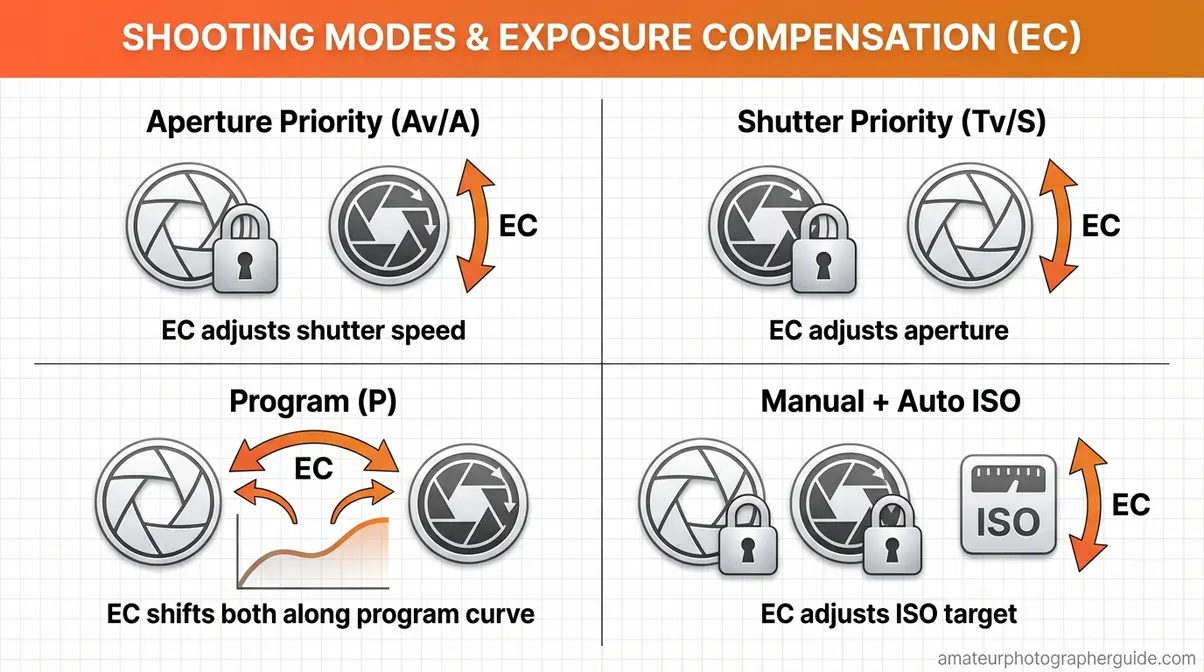
Caption: EC applies the same correction principle in every mode — only the variable the camera adjusts changes.
This is the section that 100% of competing guides skip entirely — and it’s the one that actually answers the question photographers are searching for: what does the camera change when I move that dial?
The answer depends on which mode you’re in. The Meter Correction Mindset stays consistent — you’re always telling the camera to target a different brightness. But in each mode, the camera applies that correction to whichever variable it already controls automatically.
Aperture Priority (Av/A) Mode
In Aperture Priority, the semi-automatic mode where you set the aperture and the camera controls shutter speed, EC changes the shutter speed — your chosen aperture remains fixed.
Here’s a concrete example: you’re shooting at f/4, ISO 400. The camera calculates 1/200s to achieve what it considers correct exposure (0 EV). You apply +1 EV — the camera adjusts to approximately 1/100s, one stop slower, letting in twice as much light. Your aperture stays at f/4 throughout. Depth of field is unchanged.
In Aperture Priority mode, exposure compensation changes the shutter speed — your chosen aperture remains fixed. Photography Life’s EC charts confirm this behaviour with detailed EV adjustment tables showing shutter speed shifts while aperture holds constant.
The practical implication to watch: in bright outdoor conditions, heavy positive EC (say, +2 EV) can push the shutter speed so slow that you risk camera shake or motion blur. If your shutter drops below 1/focal length, raise ISO to compensate rather than sacrificing sharpness.
[ORIGINAL PHOTO: backlit-portrait-av-mode-before-after | Before: 0 EV in Av mode, shutter 1/200s — subject underexposed. After: +1 EV in Av mode, shutter slows to 1/100s — subject correctly exposed, aperture unchanged.]
In Shutter Priority, the logic flips — you control the shutter speed, so EC adjusts the aperture instead.
Shutter Priority (Tv/S) Mode
In Shutter Priority, the semi-automatic mode where you set the shutter speed and the camera controls aperture, EC changes the aperture — your chosen shutter speed remains fixed.
Concrete example: at 1/500s, ISO 400, the camera picks f/4 for 0 EV. Apply −1 EV — the camera closes down to approximately f/5.6, reducing the light by one stop. Your 1/500s shutter stays put, so motion-freezing capability is unaffected.
There is one important limitation to know about. If you’re already at your lens’s maximum aperture (widest opening) and you apply positive EC, the camera may have no wider aperture to select. At that point, EC loses its effect — or in some cases, the camera may slow the shutter despite your Shutter Priority setting. Watch your viewfinder for warning indicators (blinking aperture values on Nikon bodies, for example) that signal the camera has run out of range.
| Mode | You Set | Camera Controls | EC Changes | Key Limitation |
|---|---|---|---|---|
| Aperture Priority (Av/A) | Aperture | Shutter speed | Shutter speed | Risk of camera shake at slow speeds |
| Shutter Priority (Tv/S) | Shutter speed | Aperture | Aperture | No effect if aperture is already at maximum |
Program mode works similarly, but EC has a slightly different effect — it shifts the entire combination of shutter speed and aperture.
Program (P) Mode
In Program mode, the fully automatic mode where the camera sets both aperture and shutter speed but allows overrides, EC shifts the camera’s brightness target up or down and the camera adjusts both settings together to meet it. Rather than fixing one variable and adjusting the other, the camera shifts along a predefined “program curve” — a set of aperture/shutter combinations calibrated for typical scenes.
Program mode is the most common default mode for beginners stepping off full Auto — which makes this explanation particularly valuable despite no competitor covering it. Note one important distinction: Program mode is not the same as Auto mode. On most DSLRs, fully automatic (scene-auto) mode ignores EC entirely. Program mode (P) responds to it normally.
The most-asked question about EC is about Manual mode. Here’s why it behaves differently — and the one exception that changes everything.
Why Doesn’t Exposure Compensation Work in Manual Mode?
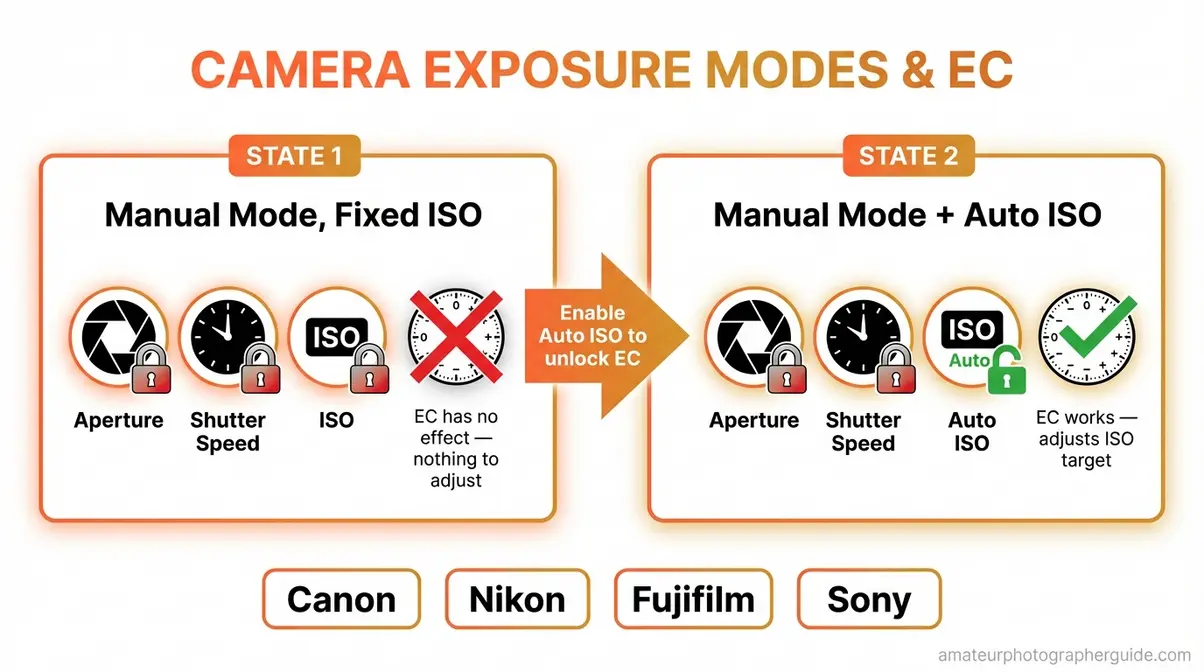
In standard Manual mode, you control aperture, shutter speed, and ISO directly. There is nothing left for the camera to automatically adjust — so exposure compensation in manual mode with a fixed ISO has no effect whatsoever. Moving the EC dial simply doesn’t change your exposure because you’ve already locked all three variables.
This confuses a lot of photographers. The EC indicator may move on the display, but the image will come out identically. That’s not a camera malfunction — it’s the correct behaviour given your settings.
The exception — Auto ISO in Manual mode: If you enable Auto ISO while in Manual mode, the camera regains control of one variable. In this state, EC does work — adjusting EC tells the camera to target a higher or lower ISO value to meet your new brightness target, while your chosen aperture and shutter speed remain untouched.
This combination is supported on most current Canon DSLRs, Nikon bodies including the D7500 and Z-series, Fujifilm X-series cameras, and Sony Alpha bodies. As Sony USA Support confirms, EC in this context adjusts “the exposure that the camera judges to be appropriate, to make it closer to the brightness you want” — which applies equally to Auto ISO in Manual mode.
How to adjust exposure compensation in manual mode, practically: enable Auto ISO in your camera’s ISO menu, return to Manual mode, set your aperture and shutter speed as needed, then use EC to fine-tune brightness. The camera adjusts ISO within the range you’ve defined. Canon exposure compensation in manual mode and Nikon exposure compensation in manual mode both follow this same Auto ISO logic.
Before you reach for the EC dial, it’s worth knowing whether to use it at all — or whether adjusting ISO directly is the better choice.
Exposure Compensation vs. ISO
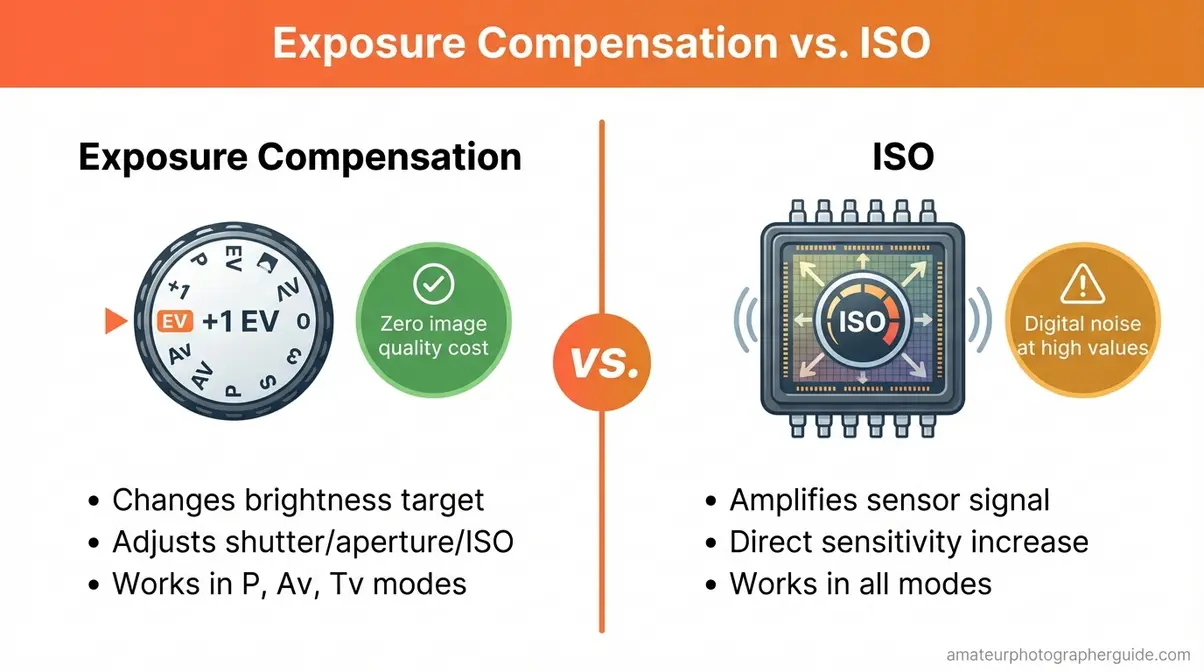
Both exposure compensation and raising ISO can make your image brighter. This leads many photographers — especially those moving off Auto — to treat them as interchangeable. They’re not, and the difference matters for image quality.
Exposure compensation changes your camera’s brightness target without degrading image quality; raising ISO increases sensor sensitivity but introduces digital noise at higher values. One line captures the practical decision rule: exposure compensation is free — it costs no image quality. ISO always costs something at higher values.
What Each Setting Actually Controls
ISO — the setting that controls your camera sensor’s sensitivity to light — works at the hardware level. Increasing ISO amplifies the signal from the sensor, which brightens the image. The side effect is amplified noise: the digital noise (graininess and speckled artifacts) that appears in high-ISO images.
EC, by contrast, works at the calculation level. It says: “Camera, I want the image to be X% brighter than what you calculated.” The camera then adjusts shutter speed, aperture, or ISO (depending on mode) to reach that new target. EC itself doesn’t touch sensor sensitivity — it changes the exposure target.
| Exposure Compensation | ISO | |
|---|---|---|
| What it does | Changes camera’s brightness target | Changes sensor signal amplification |
| Image quality cost | None (EC itself) | Digital noise at high values |
| When to use | Tricky lighting (bright/dark scenes) | Low light needing a faster shutter speed |
| Works in which modes | P, Av, Tv (and M with Auto ISO) | All modes |
| Resets automatically? | No — must reset manually | Stays at set value |
The Fujifilm X Series Learning Centre explains that in aperture or shutter priority modes with a fixed ISO, the camera relies on only one remaining variable for exposure — which is exactly why EC and ISO interact differently depending on the mode.
Knowing the difference is only useful if you know which to reach for in a given moment.
When to Use EC vs. When to Raise ISO
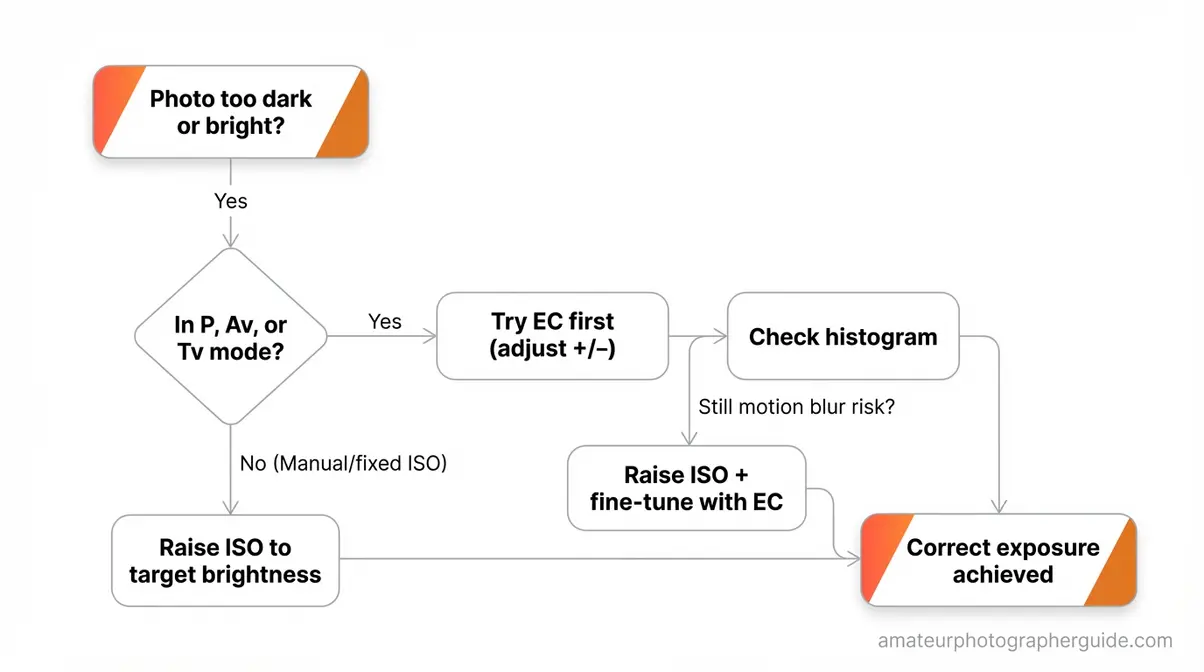
Default rule: try EC first. It costs nothing in image quality and handles any lighting imbalance effectively in P, Av, or Tv mode.
Raise ISO when: you’re in low light and EC alone has pushed your shutter speed too slow — risking camera shake or motion blur. At that point, raise ISO to reclaim a workable shutter speed, then use EC to fine-tune the overall brightness. The two controls work together, not against each other.
One brand-specific note worth knowing: Fujifilm X-series cameras — including the X-T5, X-T4, X-S10, and X100 series — often feature a dedicated physical EC dial on the camera’s top plate. The exposure compensation setting on Fujifilm cameras is faster to access than on cameras requiring a button-and-dial combination, which naturally encourages the EC-first workflow described here.
Now that you understand what EC does and when to use it, let’s look at how to physically find and activate it on your specific camera.
Finding the EC Control on Your Camera
Based on our team’s hands-on evaluation across Canon, Nikon, Fujifilm, and Sony bodies, the most common frustration isn’t understanding EC — it’s finding the control in the first place. Scroll to your brand below for an immediate answer.
⚡ Canon EOS / Rebel Series
On Canon EOS Rebel DSLRs (T7, T7i, T8i, and similar), the EC button is located on the camera’s back, near the top-right corner — labelled Av +/− and often marked with a small +/− symbol.
To apply EC: press and hold the Av +/− button with your right thumb while rotating the main dial (top-right dial, near the shutter) with your right index finger. The EC value appears in the viewfinder and on the rear LCD.
Canon-specific warning: Canon DSLRs include an “Auto Lighting Optimizer” feature that can partially counteract negative EC. If you apply −1 or −2 EV and the image still looks brighter than expected, check the shooting menu and disable Auto Lighting Optimizer for consistent results.
Canon Europe’s exposure guide confirms the Av button + main dial method and notes the role of Auto Lighting Optimizer in Canon EOS cameras.
Caption: The Av +/− button on Canon Rebel models sits near the top-right of the camera back — hold it while rotating the main dial to adjust EC.
⚡ Nikon D-Series and Z-Series
On Nikon DSLRs — including the D3500, D7500, and D780 — press and hold the +/− button (located in the top-left area of the camera back, near the AF area selector) while rotating the main command dial (rear thumb dial). The EC value appears in the viewfinder and on the top LCD display.
On Nikon Z-series mirrorless cameras, button placement varies by model — the Z50 and Zfc feature a dedicated EC dial, while the Z5 II and Z6 III use a button-and-dial combination similar to the D-series.
Per the official Nikon D7500 manual, EC range on this body is ±5 EV in steps of 1/3 EV — a wider range than many entry-level bodies offer.
Caption: On the Nikon D7500, the +/− button sits near the top-left of the camera back — hold it and rotate the rear command dial to apply EC.
⚡ Fujifilm X-Series
Fujifilm X-T series cameras — including the X-T5, X-T4, X-T30 II — have a dedicated physical EC dial on the top plate of the camera body. Rotate it directly to the EV value you need. No button-holding required; the tactile feedback makes EC adjustments faster and more intuitive than on any other major brand.
On Fujifilm X-S10, X-E4, and X100-series cameras, EC is accessed via a rear dial or through the Q (Quick menu) button.
The Fujifilm X-Pro2 manual advises using the EC dial specifically “when photographing very bright, very dark, or high-contrast subjects” — the exact scenarios this guide addresses throughout.
Caption: The Fujifilm X-T series’ dedicated top-plate EC dial is the fastest exposure compensation control of any major mirrorless system.
⚡ Sony Alpha Series
Sony Alpha cameras — including the A6000-series APS-C bodies and the A7-series full-frame mirrorless — typically assign EC to the rear control dial or make it accessible via the Fn (Function) menu button.
Sony’s official definition of EC: “an adjustment to the exposure that the camera judges to be appropriate, to make it closer to the brightness you want.” That’s a clear statement of The Meter Correction Mindset built directly into Sony’s documentation.
Per the Sony Help Guide, Sony’s EC range on select Alpha bodies reaches −5.0 to +5.0 EV — the widest standard range of the four major brands covered here.
Caption: On most Sony Alpha mirrorless cameras, EC is assigned to the rear control dial — check the Fn menu if no dedicated dial is present on your model.
Before you head out to practice, there are a few common mistakes worth knowing about — they’ll save you significant frustration.
Common Mistakes and When EC Has Its Limits
Common Pitfalls When Using Exposure Compensation
User consensus across photography communities — including r/AskPhotography and Digital Photography School’s forums — points to four mistakes that trip up photographers repeatedly.
Pitfall 1 — Forgetting to reset EC between scenes. Most cameras retain the EC value when you power off and back on. You shoot snow at +1.5 EV, move indoors for a portrait session, and fire 30 overexposed frames before noticing. Check your EC indicator every time you change lighting conditions. It costs nothing to glance at the top LCD or viewfinder display.
Pitfall 2 — Using EC in Manual mode with fixed ISO. The dial moves. The display changes. Nothing happens to the exposure. If EC seems unresponsive in Manual mode, check whether Auto ISO is enabled. Without it, there’s no variable for the camera to adjust, and EC has no effect.
Pitfall 3 — Applying heavy positive EC without checking highlights. At +2 EV on an already-bright beach scene, you risk blowing out the sky completely — pure white with zero recoverable detail. Review the histogram after any EC adjustment above +1 EV. If tones are spilling off the right edge, reduce EC in 1/3-stop steps until clipping stops.
Pitfall 4 — Confusing EC with the AEL (Auto Exposure Lock) button. EC shifts the camera’s brightness target up or down. AEL locks the current metered exposure value so it doesn’t change as you recompose. They serve entirely different purposes and are not interchangeable.
When to Choose Alternatives to EC
Alternative 1 — Switch metering mode instead. If you consistently need heavy positive EC for backlit subjects, consider switching to Spot metering and metering directly on the subject’s face. This may eliminate the need for EC entirely, because the baseline exposure is now calculated from the subject’s tones rather than the bright background.
Alternative 2 — Switch to full Manual mode. If you need precise control over every exposure variable without camera automation in the mix, full Manual mode with fixed ISO gives you complete creative control. EC with Auto ISO in Manual is a useful middle-ground, but it’s not a substitute for learning manual exposure when the situation demands it.
Frequently Asked Questions
What is exposure compensation in simple terms?
Exposure compensation is a camera setting that lets you manually override the camera’s automatic light meter to make your photos brighter (+) or darker (−). Your camera’s meter always tries to expose every scene to a neutral grey tone — which works well in average light but fails on bright white snow or predominantly dark subjects. EC corrects that mistake by giving the camera a new brightness target. On most cameras, you can dial in values from −3 to +3 EV in 1/3-stop increments. It works in Program, Aperture Priority, and Shutter Priority modes, but not in standard Manual mode with a fixed ISO.
What is the difference between ISO and exposure compensation?
Exposure compensation tells your camera the brightness level you want; ISO directly changes how sensitive your camera’s sensor is to light. EC adjusts the camera’s internal exposure target, which it achieves by changing shutter speed or aperture — at no cost to image quality. ISO amplifies the sensor signal, which brightens the image but introduces digital noise (graininess) at higher values. As a practical rule, try EC first for tricky lighting situations; raise ISO only when you need to reclaim a faster shutter speed in low light. Results vary depending on your camera’s sensor generation and the available light.
Taking Control of Your Exposure
For any photographer shooting in semi-automatic modes, exposure compensation is the single most effective tool for rescuing difficult exposures without switching to full Manual mode. The meter’s middle-grey calibration is entirely predictable — freshly fallen snow reflects up to 95% of visible light and will always fool the meter without your intervention. Once you understand which scenes trigger the meter’s mistakes, the correction becomes instinctive: bright white scenes are an automatic trigger for +1 to +2 EV, and predominantly dark scenes are a trigger for −EC, eliminating guesswork and wasted shots.
The Meter Correction Mindset is the reframe that makes all of this click. Your camera’s meter isn’t broken — it’s doing exactly what it was designed to do, which is render every scene as middle grey. That’s predictably wrong in extreme lighting situations, and now you know how to correct it. The grey snow in your winter shots, the silhouetted subject at the window, the confusing +/− button — all of these resolve when you stop thinking of EC as a mysterious override and start thinking of it as your side of a simple conversation with your camera.
Pick one situation where your camera routinely fools its own meter — a snow scene, a backlit window, a stage performer — and deliberately practice using EC before and after. Review the histogram after each adjustment. Within a single session, the Meter Correction Mindset will start to feel automatic.
