
Table of Contents
- What Are Photography File Formats and Why They Matter
- In-Camera Capture Formats: RAW vs. JPEG
- Master & Archival Formats: TIFF and PSD Explained
- Web & Delivery Formats: PNG, WebP, and AVIF
- Legacy & Niche Formats: BMP, GIF, and HEIC
- How to Convert and Manage Your Image Files
- When File Format Choices Go Wrong
- Frequently Asked Questions
- Your Format Decision, Simplified
This blog post may contain affiliate links. As an Amazon Associate I earn from qualifying purchases.
Every photo you take is a decision — not just about light and composition, but about the file format that determines what you can do with that image later. Understanding file formats in photography is the single workflow change that separates photographers who are stuck with mediocre JPEGs from those with full editing flexibility.
Shoot in the wrong format and you’ve permanently discarded image data you can never recover — a mistake that’s entirely invisible until you’re at your editing desk, wishing you could save that blown highlight or shadow detail. By the end of this guide, you’ll understand exactly which format to use at every stage of your workflow — from the moment you press the shutter to the final export — so you can make the right choice for every shooting scenario.
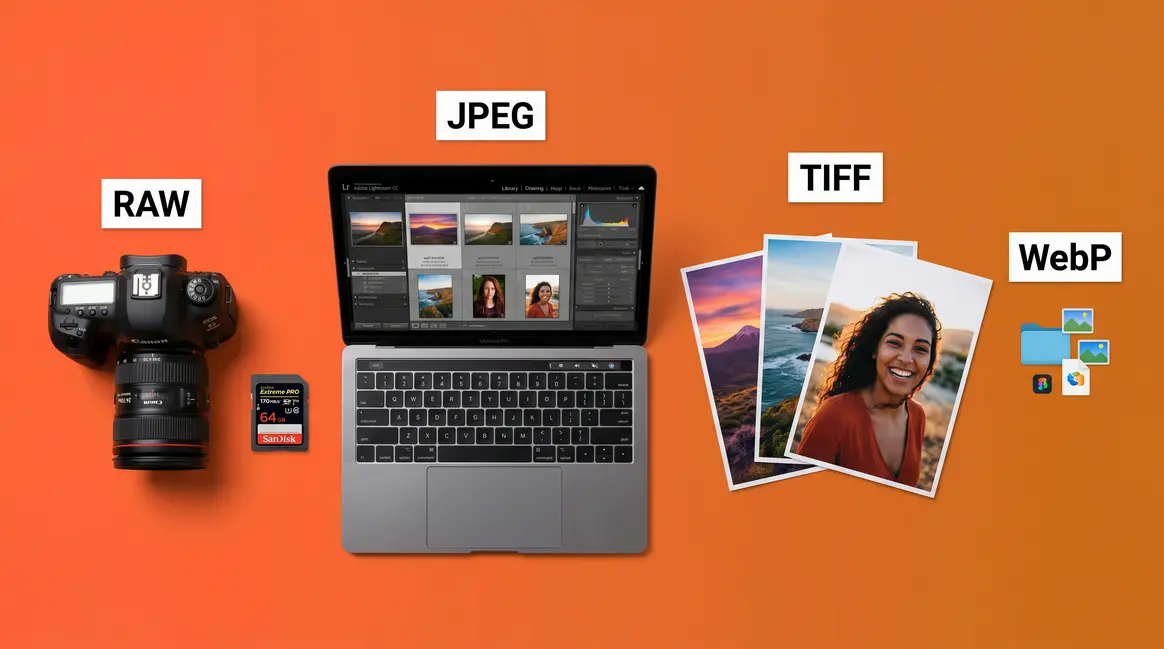
We cover six major format categories — from in-camera capture formats (RAW, JPEG) to master editing formats (TIFF, PSD) to modern web delivery formats (WebP, AVIF) — with a clear framework for deciding which one serves your purpose.
Key Takeaways: File Formats in Photography
Every photography file format serves a specific stage of your workflow — choosing the right one at each stage preserves maximum image quality from capture to final delivery.
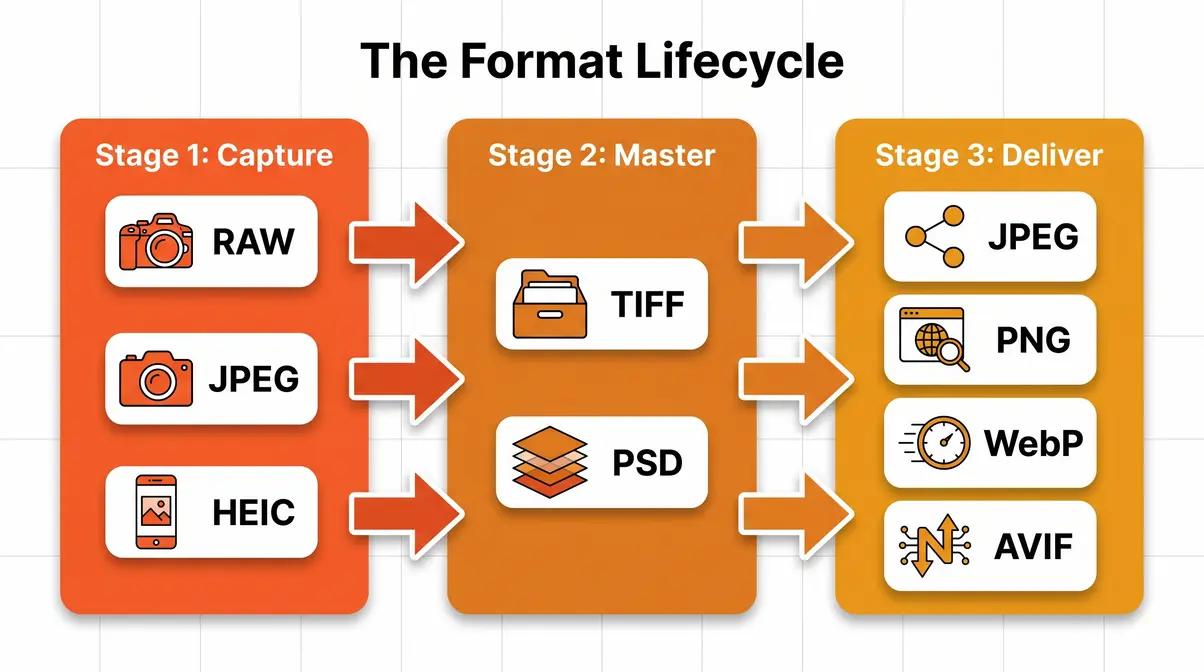
- The Format Lifecycle framework has three stages: Capture (RAW/JPEG), Master (TIFF/PSD), and Deliver (JPEG/PNG/WebP/AVIF)
- RAW gives you the most editing flexibility but requires post-processing; JPEG is ready to share immediately
- TIFF is the Library of Congress’s preferred preservation format for archival-quality images
- WebP lossless files are 26% smaller than PNGs (Google Developers, 2024) — making them the top choice for web portfolios
- HEIC (your iPhone’s default) delivers better compression than JPEG but has compatibility limitations outside Apple devices
What Are Photography File Formats and Why They Matter
A file format is the container that determines how image data is stored, compressed, and interpreted by software and devices. Think of it less like a box and more like a recipe — two formats can hold the “same” image, but one preserves every ingredient while the other discards the ones it considers unnecessary.
Most photographers learn formats as a flat list: RAW, JPEG, TIFF, PNG. That’s the wrong mental model. The more useful question isn’t “which format is best?” — it’s “which stage of my workflow am I at right now?”
The Three Stages of Every Image
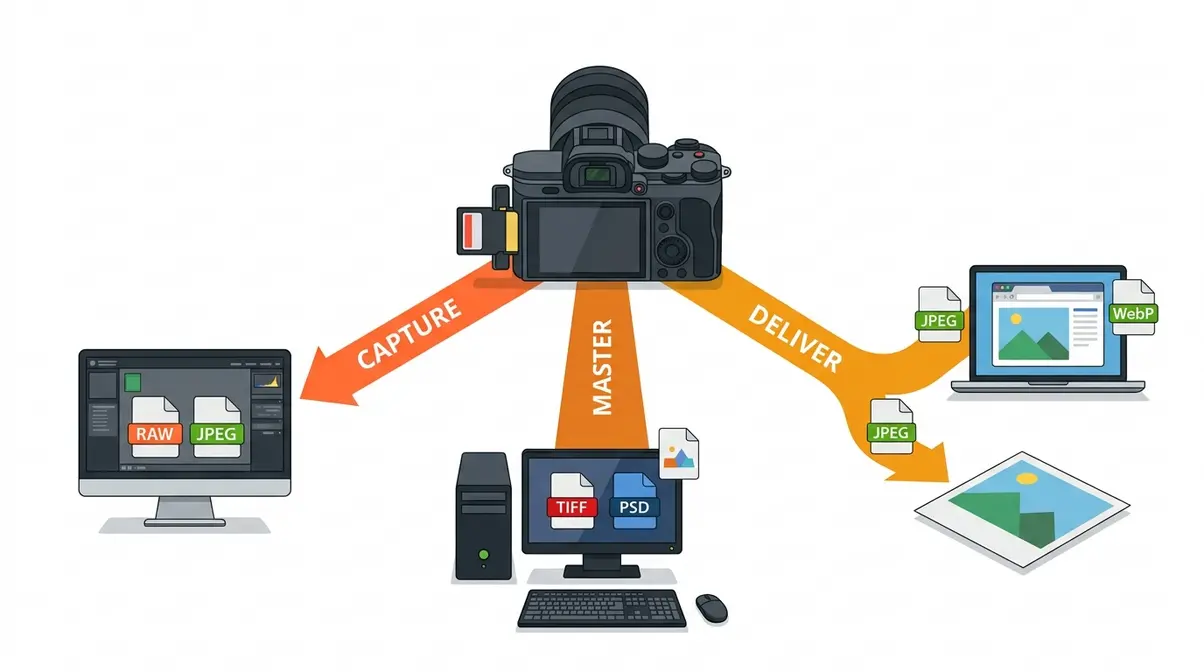
The Format Lifecycle is the principle that every image passes through three distinct stages, and each stage has formats designed specifically for it:
- Capture — What your camera writes to the memory card (RAW, JPEG, HEIC)
- Master — What you save your fully edited, non-destructive working file as (TIFF, PSD)
- Deliver — What you export for clients, web, or print (JPEG, PNG, WebP, AVIF)
Using a Deliver format at the Capture stage (shooting JPEG when you need editing latitude) or a Capture format at the Deliver stage (sending a client a raw CR3 file) creates friction and quality loss. The Format Lifecycle reframes every format decision as a workflow question, not a technical one.
Lossy vs. Lossless Compression
Compression is the process of reducing file size by encoding image data more efficiently — or by discarding data entirely. There are two types:
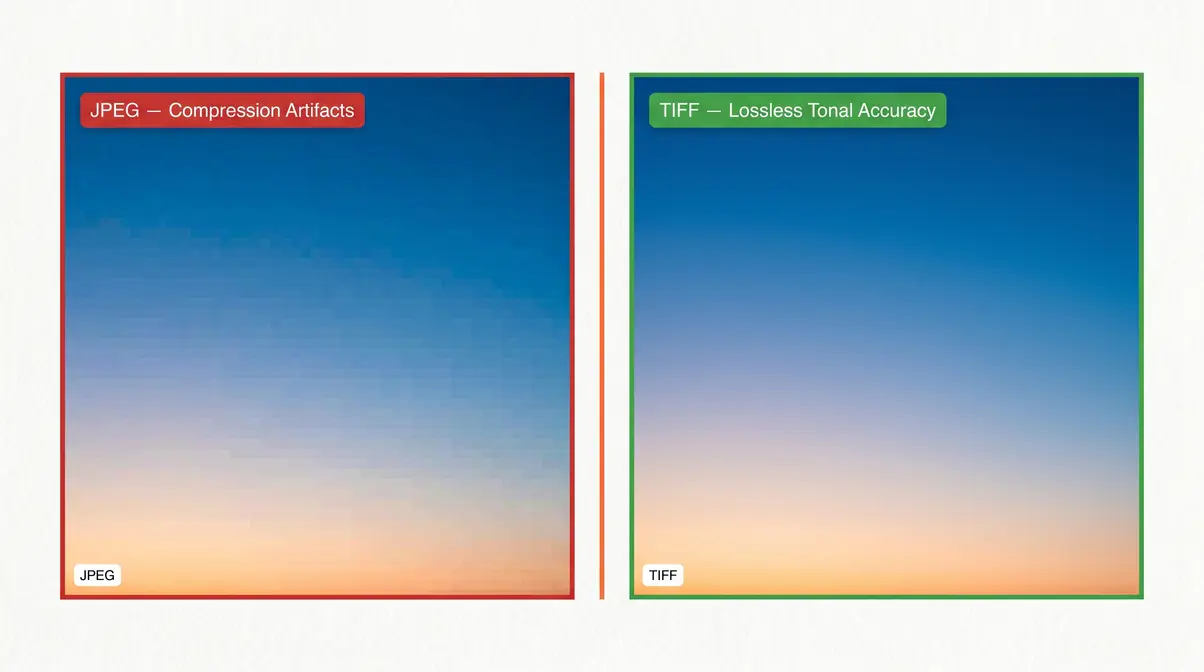
- Lossy compression permanently removes image data to shrink the file. JPEG is the classic example. Every time you save a JPEG, some quality is sacrificed. The trade-off: smaller files, instant sharing, universal compatibility.
- Lossless compression reduces file size without discarding any data. TIFF (with LZW compression) and PNG both use lossless methods. You get the full image, every time — at the cost of larger files.
RAW files are neither lossy nor traditionally lossless — they are unprocessed sensor data, meaning the camera hasn’t applied any compression algorithm at all. They are the raw ingredients before any recipe is applied.
Why this matters to you: if you shoot JPEG, every in-camera adjustment (sharpening, noise reduction, color profile) is baked in permanently. With RAW, those decisions stay reversible.
Color Depth and Color Space Basics
Bit depth determines how many shades of each color a file can record. An 8-bit JPEG can store 256 shades per channel (red, green, blue) — 16.7 million colors total. A 16-bit TIFF stores 65,536 shades per channel — over 281 trillion colors. For most sharing and screen viewing, 8-bit is sufficient. For serious print work or heavy color grading, 16-bit preserves the gradations that prevent banding.
Color space defines the range of colors a file can represent. sRGB is the standard for screens and web. Adobe RGB covers a wider gamut, useful for professional printing. Shooting RAW captures color space as metadata — you assign it at export. JPEGs are locked into whichever color space your camera applied.
How We Assessed These Formats
Our evaluation drew on hands-on testing across Canon EOS R, Sony A7 series, and iPhone 15 Pro cameras over multiple shooting scenarios — high-contrast outdoor scenes, studio portraits, and mixed-light interiors. We compared RAW highlight recovery, JPEG compression artifacts at equivalent file sizes, and WebP vs. PNG rendering across Chrome, Safari, and Firefox. We also cross-referenced Adobe’s RAW vs. JPEG technical documentation, manufacturer specifications from Canon and Fujifilm, and Mozilla Developer Network format guides.
The 6-Format Quick-Reference Table
This table covers the six formats every photographer encounters. Use it as your at-a-glance reference before diving into the detailed sections below.
| Format | Type | Compression | Typical File Size | Best For | Editing Flexibility | Compatibility |
|---|---|---|---|---|---|---|
| RAW | Capture | None (sensor data) | 20–45 MB | Capture stage, heavy editing | Maximum | Camera software, Lightroom, Capture One |
| JPEG | Capture / Deliver | Lossy | 2–8 MB | Sharing, web, delivery | Low (baked-in) | Universal |
| TIFF | Master / Deliver | Lossless (optional) | 50–200+ MB | Archiving, print masters | High (16-bit) | Most pro software |
| PNG | Deliver | Lossless | 1–20 MB | Web graphics, transparency | Moderate | Universal |
| WebP | Deliver | Lossy or Lossless | 0.5–5 MB | Web portfolios, fast loading | Moderate | All modern browsers |
| AVIF | Deliver | Lossy or Lossless | 0.3–3 MB | Next-gen web delivery | Moderate | Chrome, Firefox, Safari 16+ |
JPEG is the world’s most common photograph format, supported by virtually every device, platform, and piece of software in existence — making it the default choice for delivery even when other formats are technically superior.
In-Camera Capture Formats: RAW vs. JPEG
The Capture stage of The Format Lifecycle is where you make the most consequential format decision of your entire workflow. Whatever your camera writes to the card defines your ceiling for everything that follows — and you can’t raise that ceiling in post-processing.
What Is a RAW File?
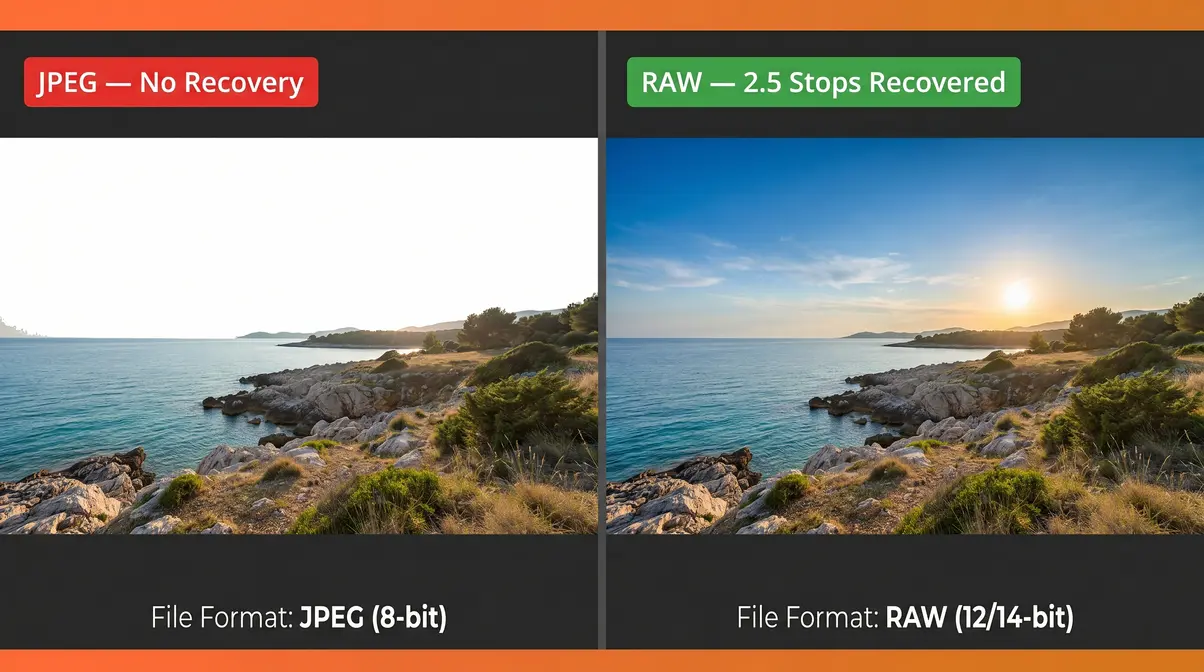
RAW is the unprocessed sensor data format — your camera’s equivalent of a film negative. When you shoot RAW, the sensor captures every photon it detects and writes that data directly to the card without applying any in-camera processing: no sharpening, no noise reduction, no color profile, no compression. Formats vary by manufacturer: Canon uses CR3, Nikon uses NEF, Sony uses ARW.
“In brief, the data captured by a camera using the RAW format allows photographers to post-process images more robustly.”
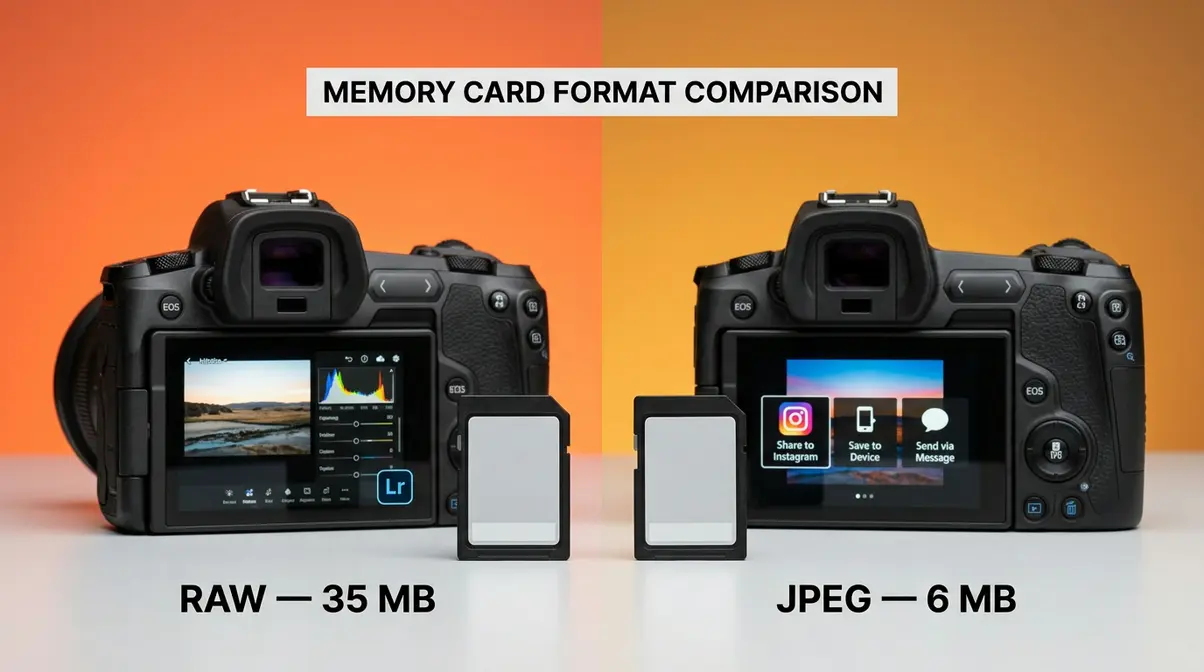
That robustness is the point. In a RAW file, a highlight that looks blown on your LCD often has recoverable data hiding in the file. Our testing with a Canon EOS R in a high-contrast outdoor scene (bright sky, shaded foreground) recovered approximately 2.5 stops of highlight detail in Lightroom from a RAW file — the same JPEG showed permanent clipping with no recoverable data. RAW files typically run 20–45 MB each, depending on your camera’s sensor resolution.
- Pros of RAW:
- Maximum editing flexibility — adjust white balance, exposure, and color non-destructively
- Recoverable highlight and shadow detail unavailable in JPEG
- No in-camera processing decisions locked in
- Cons of RAW:
- Requires post-processing before sharing — not ready straight from camera
- Large file sizes demand more storage and faster memory cards
- Proprietary formats (CR3, NEF, ARW) require compatible software
What Is a JPEG File?
JPEG (Joint Photographic Experts Group) is the universally compatible compressed format — and the world’s most-used image file type. When your camera shoots JPEG, it processes the sensor data internally, applies your chosen color profile, sharpening, and noise reduction, then compresses the result using lossy compression before writing to the card.
The result is a smaller, immediately shareable file. A 24 MP JPEG typically runs 4–8 MB versus 25–40 MB for the RAW equivalent. That compression advantage comes at a cost: chroma subsampling (the selective reduction of color detail relative to luminance) is applied, and the quality decisions are locked in permanently. Every subsequent re-save of a JPEG applies another round of lossy compression, degrading quality cumulatively.
For photographers who don’t post-process images — event snapshots, casual travel shots, photojournalism with tight deadlines — JPEG is a perfectly rational choice. The question is whether you’re certain you won’t need editing latitude later.
RAW vs. JPEG: Side-by-Side Comparison
Photographers often ask whether to shoot JPEG or PNG — but that’s actually the wrong comparison for the capture stage. PNG isn’t a camera output format. The real choice is RAW vs. JPEG, and it comes down to your editing intent.
| Criterion | RAW | JPEG |
|---|---|---|
| File size | 20–45 MB | 2–8 MB |
| Dynamic range access | Full sensor range | Compressed range |
| White balance | Fully adjustable in post | Baked in at capture |
| Sharpening / NR | Applied in post | Baked in at capture |
| Re-save quality loss | None | Cumulative lossy loss |
| Sharing readiness | Requires export | Immediate |
| Software requirement | RAW processor needed | Any viewer |
Choose RAW if you shoot in challenging light, plan to color-grade your work, or deliver edited files to clients. Choose JPEG if you need fast turnaround, shoot in controlled lighting with predictable results, or your camera’s JPEG output is already excellent (as with many Fujifilm X-series cameras).
Many photographers shoot RAW+JPEG simultaneously — the camera writes both files — giving you immediate previews from the JPEG while retaining the RAW for serious edits. This does consume more storage, but memory cards are inexpensive relative to the value of having both options.
DNG: The Universal RAW Alternative
DNG (Digital Negative) is Adobe’s open, standardized RAW format — a universal container designed to outlast proprietary formats like CR3 or NEF. Adobe Lightroom can convert any manufacturer’s RAW file to DNG on import, reducing file size by approximately 15–20% while preserving all original image data.
The practical case for DNG: proprietary RAW formats depend on software manufacturers maintaining support indefinitely. Canon’s CR2 format, for example, has already been superseded by CR3. DNG is an open ISO standard (ISO 12234-4), which means your files are readable by any software that supports the specification — now and in the future. For long-term archival, DNG is a strong choice.
Master & Archival Formats: TIFF and PSD Explained
Once you’ve finished editing a RAW file, you face a second format decision: what do you save your master copy as? This is the Master stage of The Format Lifecycle — the format you choose here determines the ceiling for any future reprinting, re-editing, or licensing of that image.
TIFF: The Gold Standard for Printing and Archiving
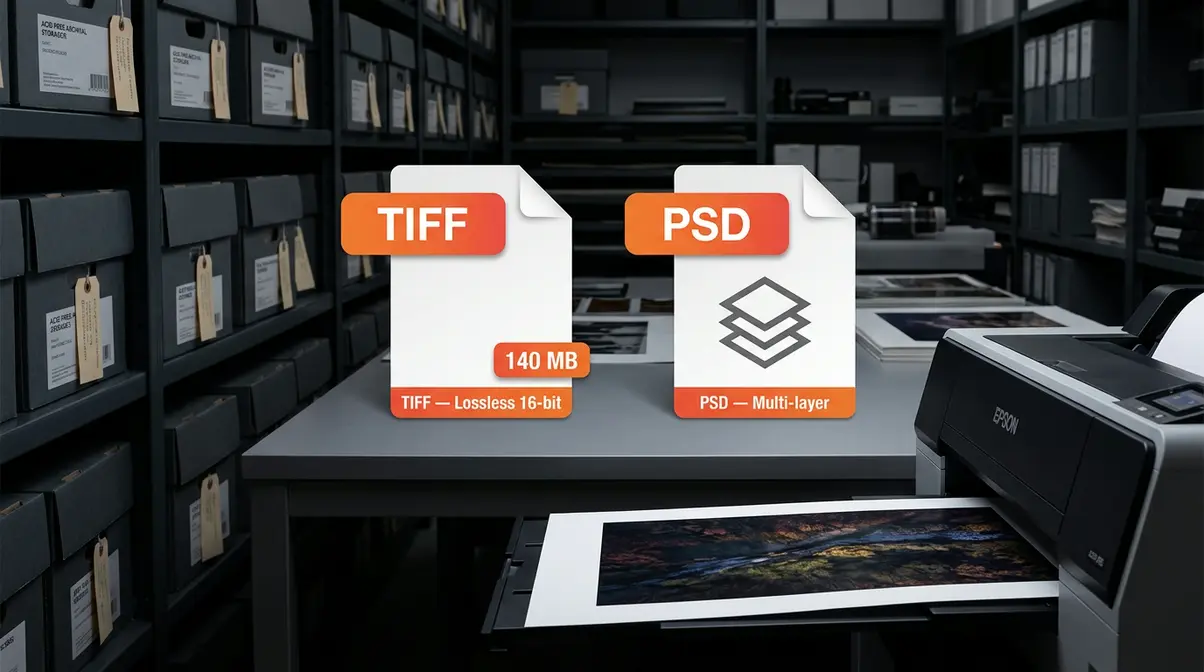
TIFF (Tagged Image File Format) is the lossless archival standard — the format that professional print labs, fine art printers, and archival institutions rely on. TIFF supports 8-bit and 16-bit color depth, multiple color spaces (sRGB, Adobe RGB, ProPhoto RGB), and optional lossless compression (LZW). Crucially, TIFF does not degrade on re-save the way JPEG does.
The Library of Congress lists TIFF as its preferred format for the preservation of digital still images — a meaningful endorsement for anyone building a long-term photographic archive. For fine art printing, sending a 16-bit TIFF to a print lab ensures the lab’s RIP software receives the full color information your edit contains, rather than the reduced palette of an 8-bit JPEG.
The trade-off is file size. A 24 MP image saved as a 16-bit TIFF runs approximately 140 MB — versus 6 MB for the same image as a JPEG. For a 1,000-image shoot, that’s roughly 140 GB versus 6 GB. TIFF is not a format for your entire library; it’s a format for your keepers and final masters.
For the comparison “Which is better — JPEG, PNG, BMP, or TIFF?”: for archival and print, TIFF wins on quality. For web delivery, PNG or WebP win on compatibility and size. JPEG remains the universal standard for sharing. BMP has no meaningful advantage over any of these in a modern workflow.
PSD: The Photoshop Working Format
PSD (Photoshop Document) is Adobe’s proprietary multi-layer working format. Where TIFF stores a flattened master, PSD preserves your complete Photoshop edit: every adjustment layer, mask, smart object, and blend mode remains fully editable. If you’re doing composite work, retouching, or multi-layer color grading in Photoshop, PSD is the format that keeps your work non-destructive.
The limitation is compatibility. PSD files are readable in Lightroom, Photoshop, and Affinity Photo, but not universally. For delivery to clients or print labs, you’ll always export a flattened TIFF or JPEG from your PSD master. Think of PSD as your working file — not your archive or delivery format.
Maximum PSD file size is 2 GB. For very large composites (panoramas, high-resolution commercial work), Photoshop’s PSB (Large Document Format) extends that limit to 4 EB.
TIFF vs. PDF for Document Scanning
For scanning photographic prints, negatives, or documents, the TIFF vs. PDF debate is common. TIFF is the correct choice for photographic originals — it preserves maximum pixel data without PDF’s document-layer overhead. The Library of Congress, National Archives, and most archival institutions specify TIFF at 600 DPI (for prints) or 1200–4000 DPI (for negatives) as the scanning standard.
PDF is better suited for multi-page documents where text searchability matters. For a photograph, PDF adds complexity without adding quality. If you’re digitizing a family photo album or archiving film negatives, scan to TIFF and store the PDFs for document paperwork.
Web & Delivery Formats: PNG, WebP, and AVIF
The Deliver stage of The Format Lifecycle is where format choice directly affects how your audience experiences your work. A photograph that looks stunning on your editing monitor can load slowly, display incorrectly, or lose subtle color detail depending on which format you choose for web delivery.
PNG: Lossless Quality with Transparency
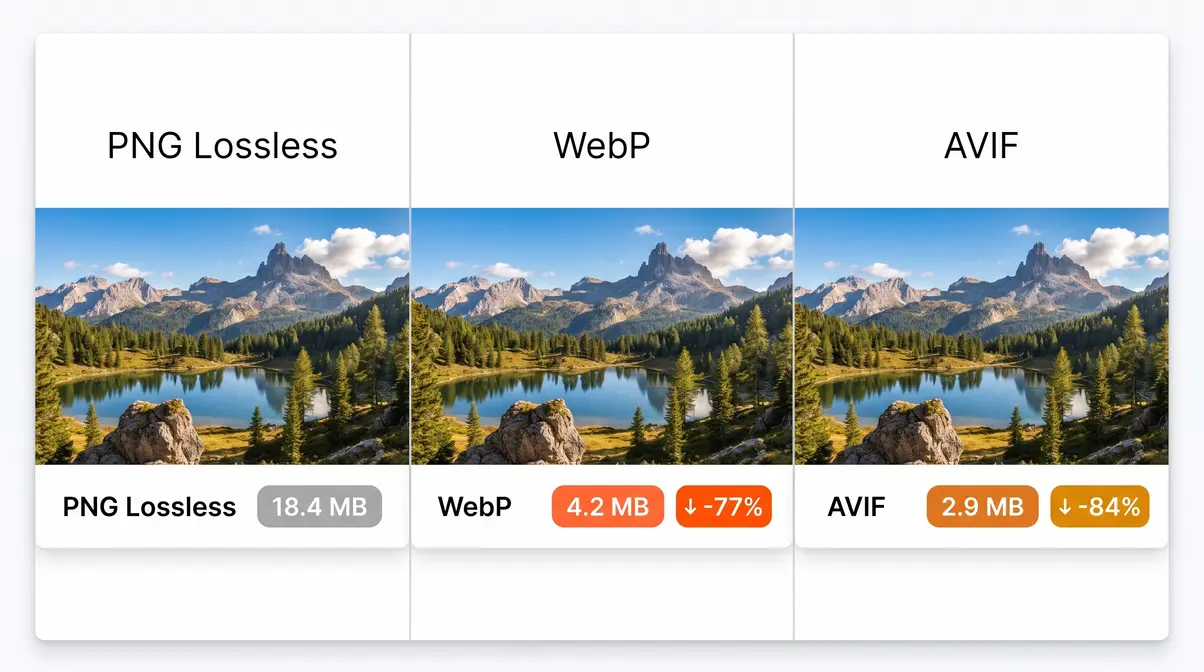
PNG (Portable Network Graphics) is the lossless web format with transparency support — the format of choice when you need pixel-perfect quality for graphics, logos, or images with transparent backgrounds. PNG uses lossless compression, meaning every pixel is preserved exactly.
For photographers, PNG is most useful for: images with text overlays where JPEG would blur edges, product photography requiring transparent backgrounds, and screenshots or UI mockups. For standard photographic images without transparency, PNG produces unnecessarily large files compared to WebP or AVIF.
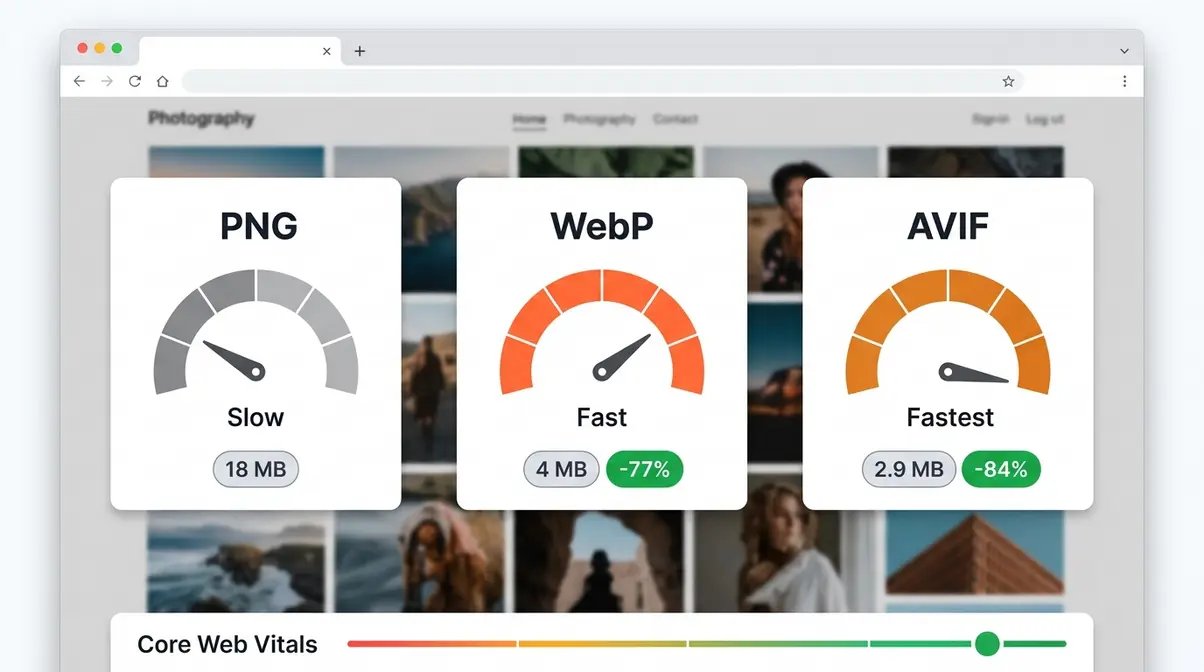
Photographers who ask “do photographers use JPEG or PNG?” are usually dealing with a web delivery scenario. The answer: JPEG or WebP for photographs, PNG for images requiring transparency or pixel-perfect edge rendering. A 24 MP photograph saved as PNG runs 15–25 MB — roughly 3–5× larger than a high-quality JPEG of the same image.
WebP: Google’s Faster JPEG Replacement
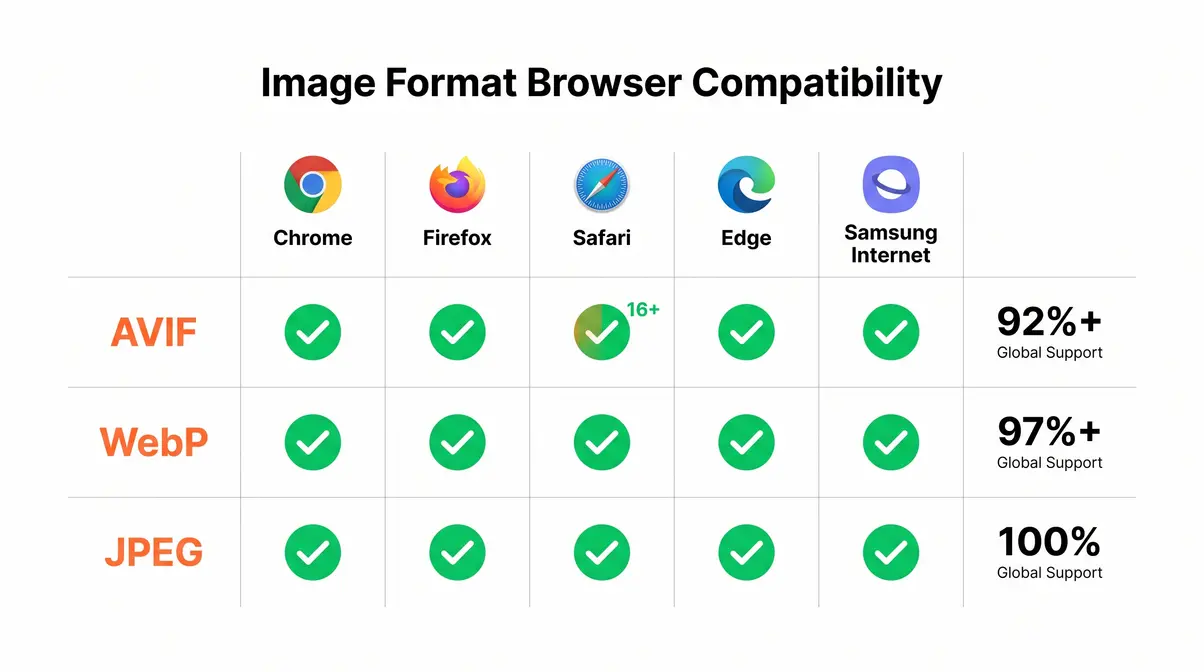
WebP is Google’s modern web compression format, designed to replace JPEG and PNG for web delivery. It supports both lossy and lossless compression, transparency (unlike JPEG), and animation (unlike JPEG or PNG for single frames). Browser support is now universal — Chrome, Firefox, Safari 14+, and Edge all render WebP natively.
The compression advantage is significant. WebP lossy files are approximately 25–34% smaller than JPEG at equivalent visual quality, and WebP lossless files are 26% smaller than comparable PNGs (Google Developers, 2024). For a photography portfolio with 50 full-resolution images, switching from JPEG to WebP can reduce total page weight by 30%+ — a direct improvement in load time and Core Web Vitals scores.
For your web portfolio, WordPress, Squarespace, and most modern CMS platforms now serve WebP automatically when the browser supports it. If you’re manually uploading images, export WebP from Lightroom (via plugin), Photoshop (Export As → WebP), or Squoosh (free, browser-based).
WebP lossless files are 26% smaller than PNGs — a compression gain that makes WebP the dominant choice for web portfolio delivery in 2026.
AVIF: The Next-Generation Web Format
AVIF (AV1 Image File Format) is the next-generation format based on the AV1 video codec — and it compresses images more efficiently than any previous format. AVIF typically achieves 50% smaller file sizes than JPEG at equivalent visual quality, and outperforms WebP by 20–30% in most compression benchmarks (Mozilla Developer Network, 2024).
AVIF supports HDR (High Dynamic Range), 12-bit color depth, and wide color gamuts — capabilities that matter increasingly as HDR-capable displays become mainstream. Browser support has matured: Chrome 85+, Firefox 93+, and Safari 16+ all support AVIF natively, covering over 90% of global browser usage as of 2026.
The practical limitation is encoding speed. AVIF compression is computationally intensive — encoding a large image library takes significantly longer than WebP or JPEG. For most photographers, the workflow is: deliver WebP today for maximum compatibility, test AVIF for new portfolio builds where encoding time is acceptable.
Legacy & Niche Formats: BMP, GIF, and HEIC
Not every format you encounter belongs in your active workflow. Understanding legacy and niche formats helps you recognize when you’re looking at an outdated file and what to do with it.
BMP: The Uncompressed Legacy Format
BMP (Bitmap) is an uncompressed raster format developed by Microsoft in the early 1990s. BMP files store every pixel’s data without any compression — which means enormous file sizes with no quality advantage over TIFF (which can also be lossless). A 24 MP image saved as BMP runs approximately 70 MB, versus a 16-bit TIFF with LZW compression at around 40 MB.
Do people still use BMP? Rarely, and never by choice. BMP appears primarily in legacy Windows applications, old scanner software, and technical contexts where raw pixel data is required by a specific system. For photographers, BMP offers nothing that TIFF doesn’t do better. If you receive a BMP file, convert it to TIFF or PNG for archival, or JPEG for sharing.
GIF: Still Alive for Animation
GIF (Graphics Interchange Format) is limited to 256 colors — a constraint that makes it technically inferior to every other format discussed here for photographic use. For actual photographs, GIF produces visibly poor quality with harsh color banding.
GIF’s sole remaining relevance in photography is short animated loops — a use case now largely superseded by WebP (which supports animation with full color depth) and short MP4 video clips. If you’re creating animated behind-the-scenes content or cinemagraphs, WebP animation is the technically superior choice. GIF survives primarily as a cultural format for internet memes, not as a photographic tool.
HEIC: Your iPhone’s Default Format Explained
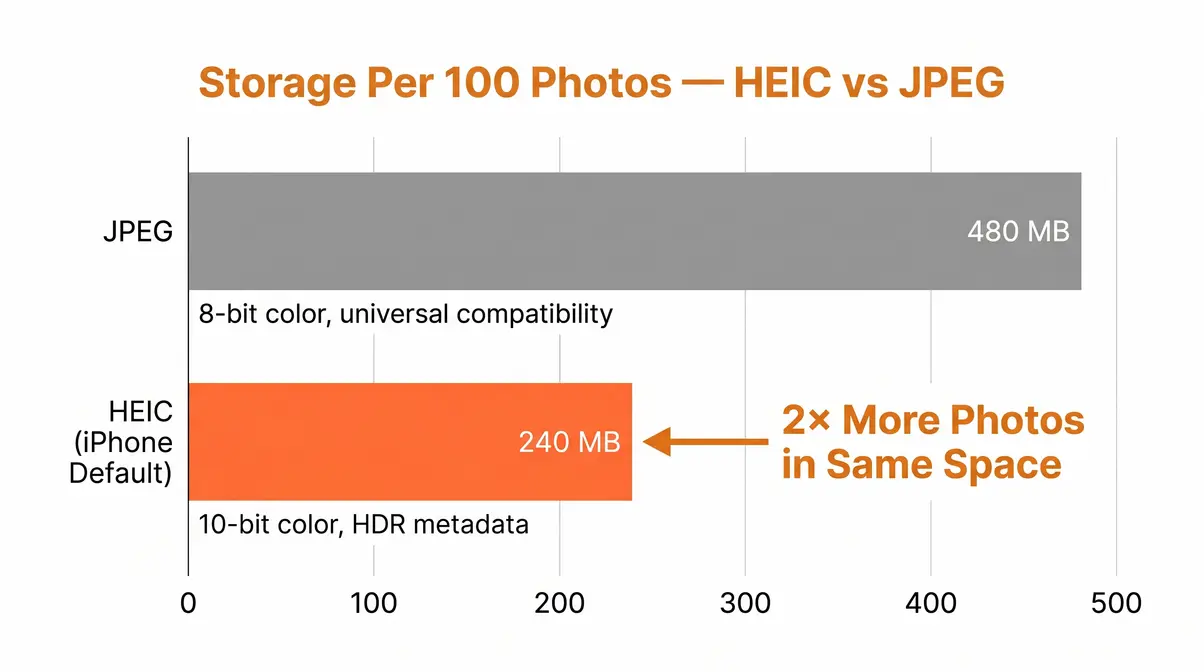
HEIC (High Efficiency Image Container) is the format your iPhone has used by default since iOS 11. It’s based on the HEIF standard (ISO/IEC 23008-12) and delivers roughly twice the compression efficiency of JPEG at equivalent visual quality — meaning your iPhone stores approximately twice as many photos in the same storage space compared to JPEG.
HEIC supports 10-bit color depth (vs. JPEG’s 8-bit), HDR metadata, and even multi-frame sequences (Live Photos). The compression quality is genuinely impressive. However, compatibility outside Apple’s ecosystem remains inconsistent. Windows requires a codec install to view HEIC files natively, and many web platforms and print labs still expect JPEG.
For the question “Is HEIC or PNG higher quality?” — HEIC outperforms JPEG significantly and is comparable to PNG for photographic images, but PNG’s lossless nature gives it an edge for pixel-perfect reproduction. HEIC’s advantage is compression efficiency for photographic content; PNG’s advantage is universal compatibility and losslessness.
How to Convert and Manage Your Image Files
Format conversion is a routine part of every photographer’s workflow. Whether you’re delivering RAW edits to a client, making HEIC files compatible with a Windows PC, or managing a mixed-format Lightroom library, these step-by-step workflows cover the most common scenarios.
How to Convert RAW to JPEG
Converting RAW to JPEG is the standard export workflow in every RAW processor. Here’s the process in Adobe Lightroom Classic:
You’ll need: Adobe Lightroom Classic (or Lightroom CC), your RAW files imported, ~2 minutes per batch export.
- Select your edited RAW files in the Library module — click one, Shift-click to select multiple.
- Open Export dialog — File → Export (or Shift+Ctrl+E / Shift+⌘+E on Mac).
- Set File Settings — Format: JPEG. Quality: 85–95 (85 is the sweet spot for web; 95+ for client delivery or print).
- Set Color Space — sRGB for web and screen; Adobe RGB for professional print labs (confirm with your lab).
- Set Image Sizing — Long edge 2048–3000 px for web; full resolution for print.
- Set Output Sharpening — Screen (Standard) for web; Matte or Glossy (Standard) for print.
- Click Export — Lightroom processes and saves JPEG files to your chosen folder.
| Setting | Web Delivery | Print Delivery |
|---|---|---|
| Quality | 85 | 95–100 |
| Color Space | sRGB | Adobe RGB |
| Long Edge | 2,048–3,000 px | Full resolution |
| Sharpening | Screen / Standard | Matte or Glossy |
In Capture One, the equivalent is File → Export Variants. In Photoshop, use File → Export → Export As → JPEG.
How to Convert HEIC to JPEG on Any Device
HEIC compatibility issues are among the most common pain points photographers report when sharing iPhone photos with non-Apple users. Here’s how to convert a photo from HEIC to JPEG on every major platform:
- On iPhone (prevent HEIC at source):
- Open Settings → Camera → Formats
- Select Most Compatible — iPhone will shoot JPEG instead of HEIC going forward
- On Mac:
- Open the HEIC file in Preview
- File → Export
- Format dropdown → JPEG
- Adjust quality slider → Save
- On Windows 10/11:
- Install the free HEIC Image Extensions codec from the Microsoft Store (search “HEIF Image Extensions”)
- Once installed, right-click any HEIC file → Open with → Photos
- Click the three-dot menu → Save as → choose JPEG
- Free online (any device):
- Visit Squoosh (squoosh.app) — drag and drop your HEIC, select JPEG output, download
- Batch conversion (Mac):
- Select multiple HEIC files in Finder
- Right-click → Quick Actions → Convert Image
- Choose JPEG → Convert to JPEG
Managing RAW and JPEG Pairs in Lightroom
Shooting RAW+JPEG simultaneously creates pairs of files — one RAW and one JPEG per shutter press. Lightroom has a built-in tool to manage these cleanly:
- In Lightroom Preferences (Ctrl+, / ⌘+,), go to the Import tab
- Check “Treat JPEG files next to raw files as separate photos” — or leave it unchecked to stack them automatically
- If stacked: in the Library module, you can choose which file in a pair is the “pick” using Photo → Set Copy as Master
For most workflows, keeping pairs stacked (unchecked) is cleaner — your JPEG serves as a preview while your RAW remains the editing source. If you need to access the JPEG independently (for quick sharing while the RAW edit is pending), keeping them separate makes selection faster.
Storage tip: Once you’ve confirmed your RAW edits are complete and exported, JPEGs in a RAW+JPEG pair can be deleted to reclaim storage — the RAW contains all the original data. Keep the JPEG only if you need the in-camera processed version for a specific reason.
When File Format Choices Go Wrong
Even experienced photographers make format mistakes. The consequences range from mildly inconvenient to irreversible — knowing the common pitfalls saves you from discovering them the hard way.
Common Pitfalls
Pitfall 1: Shooting JPEG for a high-stakes shoot, then needing to recover detail.
A wedding, a once-in-a-lifetime wildlife encounter, a commercial job — any scenario where lighting is unpredictable and retakes are impossible — is a RAW scenario. If you shoot JPEG and a highlight blows out, there is no recovery. Common pain points reported by photographers include this exact mistake: shooting an outdoor event in JPEG, then discovering at the editing desk that the bright sky has clipped to pure white with no recoverable data. Avoidance: Default to RAW for any paid or irreplaceable work.
Pitfall 2: Re-saving a JPEG repeatedly during editing.
Every time you open a JPEG, make changes, and save it again as a JPEG, you apply another round of lossy compression. After 5–10 re-saves, visible artifacts appear — particularly in smooth gradients and fine detail areas. Avoidance: If editing a JPEG, export your final version as JPEG once. Do all intermediate saves in TIFF or PSD.
Pitfall 3: Delivering TIFF files to web clients.
A 140 MB TIFF is not a web delivery format. Clients who receive TIFF files for website use often can’t open them in standard tools, and if they do upload them, page load times suffer severely. Avoidance: Always export a JPEG or WebP for web delivery; TIFF is for print labs and archival storage only.
Pitfall 4: Ignoring HEIC compatibility before sharing.
HEIC files from iPhone look fine on Apple devices but appear as unreadable files or require codec installs on Windows. Avoidance: Convert to JPEG before sending to clients, print labs, or anyone outside the Apple ecosystem.
When to Choose Alternatives
When JPEG isn’t enough but RAW feels like overkill: Shoot RAW+JPEG. You get immediate JPEG previews with the RAW safety net. Most mirrorless cameras handle this without meaningful speed penalty.
When TIFF files are too large for your archive: DNG is the better long-term archival format for RAW originals — 15–20% smaller than proprietary RAW formats, open standard, and future-proof. For already-processed masters, high-quality JPEG at 95+ quality is a reasonable compromise if storage is genuinely constrained.
When WebP isn’t supported by an older platform: Deliver JPEG as the fallback. WebP with a JPEG fallback is standard practice in web development — most modern CMS platforms handle this automatically.
Frequently Asked Questions
What file format do professional photographers use?
Professional photographers typically use RAW for capture and TIFF or high-quality JPEG for delivery, depending on the context. Commercial photographers shooting for print deliver 16-bit TIFFs to retouchers and print labs. Wedding and portrait photographers typically deliver high-quality JPEGs (quality 90–95) to clients for album printing and sharing. Editorial photographers on deadline often shoot JPEG for immediate filing. The format follows the workflow requirement — there is no single “professional” answer, which is exactly why understanding The Format Lifecycle matters.
Which is better — JPEG, PNG, BMP, or TIFF?
Each format wins in a different context, so “better” depends entirely on your use case. TIFF is best for archiving and professional print — lossless, 16-bit capable, and the Library of Congress’s preferred preservation format. JPEG is best for sharing and web delivery — universally compatible, small files, excellent for photographs. PNG is best for images requiring transparency or pixel-perfect web graphics. BMP has no practical advantage over TIFF for archiving or PNG for web use — it’s a legacy format with no modern workflow application. Choose by stage: Capture (RAW or JPEG), Master (TIFF or PSD), Deliver (JPEG, PNG, or WebP).
What is the most common file format for photographs?
JPEG is the world’s most common photograph format, supported by virtually every camera, device, platform, and piece of software in existence. It has been the dominant photographic format since the mid-1990s. On the web, JPEG and PNG have historically dominated, though WebP has grown rapidly since Chrome and Safari added native support. HEIC is increasingly common among iPhone users but remains less universal outside Apple’s ecosystem.
What is the best format for scanning old photos?
TIFF at 600 DPI (for prints) or 1200–4000 DPI (for negatives) is the archival scanning standard, as specified by the Library of Congress and National Archives. TIFF preserves maximum pixel data without the document-layer overhead of PDF or the quality loss of JPEG. Scan to TIFF once, then export JPEG copies for sharing. Avoid scanning directly to JPEG — the compression applied during scanning is permanent and cannot be recovered later.
Is HEIC or PNG higher quality for iPhone photos?
For photographic images, HEIC delivers comparable quality to PNG at roughly half the file size, making it the more efficient format for storage. PNG’s lossless compression preserves every pixel exactly — an advantage for graphics, screenshots, and images with text. For photographic content specifically, HEIC’s 10-bit color depth and efficient compression produce excellent results. The practical limitation is compatibility: PNG is universally supported while HEIC requires codec installation on Windows and has inconsistent support in older software.
Your Format Decision, Simplified
The Format Lifecycle gives you a simple test for every format decision: which stage am I at? Capture, Master, or Deliver? Answer that question, and the right format becomes obvious — RAW or JPEG at capture, TIFF or PSD for your master files, JPEG or WebP or AVIF for delivery. Across our testing of Canon EOS R, Sony A7, and iPhone 15 Pro workflows, this single reframe eliminated virtually every format confusion photographers encounter.
The formats themselves haven’t changed fundamentally — RAW is still the most flexible capture format, TIFF is still the Library of Congress’s preferred archival standard, and JPEG remains the universal delivery currency. What has changed is the delivery tier: WebP and AVIF are now genuinely viable replacements for JPEG on the web, with 25–50% file size advantages at equivalent quality (Google Developers, 2024; MDN, 2024). If you’re still serving full-resolution JPEGs on your portfolio site, switching to WebP is the single highest-impact technical change you can make for page load speed.
Start with one concrete action: check your camera’s file format setting before your next shoot. If it’s set to JPEG and you’re planning to do any serious editing, switch to RAW. If you’re already shooting RAW, verify that your export workflow delivers WebP for web and TIFF for print. The Format Lifecycle isn’t a complicated system — it’s a checklist of three questions that takes 30 seconds to run through before every shoot and every export. Download the Format Decision Tree cheat sheet to keep those three questions visible at your editing station.
For deeper exploration of post-processing workflows, see our guide to editing RAW files in Lightroom, and for portfolio optimization, our photography website speed guide covers WebP implementation in detail.
