
Table of Contents
This blog post may contain affiliate links. As an Amazon Associate I earn from qualifying purchases.
“Looking for ways to level up my photos and I feel like lighting is a big factor, would love some tips.”
— Real photographer, r/photography
That instinct is exactly right. Lighting accounts for more of the difference between a snapshot and a striking photo than any camera upgrade you’ll ever make. A $4,000 camera in a poorly lit room produces flat, muddy images. A $400 camera with a well-designed lighting setup produces work that looks professional.
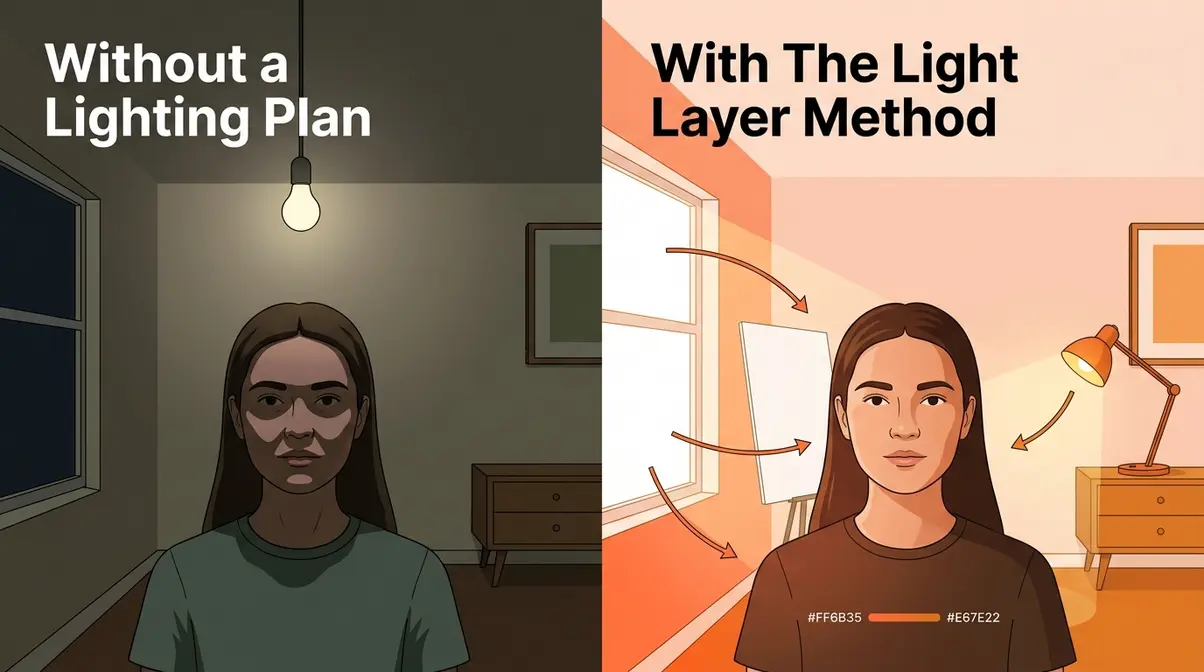
Without a lighting plan, you’ll keep fighting the same problems — flat, shadowy images that look nothing like what you saw in front of the lens — regardless of how good your camera is. The frustration is real, and it’s fixable.
In this guide, you’ll learn how to set up photography lighting at home using The Light Layer Method — a three-tier approach that starts free and scales with your budget. You’ll get the fundamentals and six specific setups, DIY solutions built from household items, genre-specific techniques for portraits and products, and honest equipment recommendations across every budget tier.
Photography lighting at home doesn’t require expensive gear — the right framework transforms any room into a functional studio. Three-point lighting (key, fill, backlight), the standard used in professional studios, is achievable with one lamp and two reflectors.
- The Light Layer Method starts free: window light → DIY modifiers → affordable gear
- Three-point lighting creates depth and dimension; master it before buying anything
- CRI ≥ 90 and CCT 2700K–6500K are the two numbers to check on any bulb you buy
- DIY softboxes and foam core reflectors deliver results comparable to $100+ modifiers
- Genre matters: portrait and product photography each require different light positioning
[OPTIONAL EDITOR NOTE: ADD Table of Contents here, linking to all H2 sections. Pillar content benefits from a linked ToC for navigation and featured snippet eligibility.]
What You’ll Need to Follow Along
Before diving in, here’s a quick materials overview. You don’t need everything at once — each section specifies what’s required for that tier.
- Layer 1 (free): A window, natural daylight, your camera
- Layer 2 (~$5–$20): Foam core board, white cardboard, parchment paper, a desk lamp
- Layer 3 ($25–$150): Ring light or LED panel, optional reflector kit
How to Set Up Lighting for Photography at Home
According to our testing at amateurphotographerguide.com, good photography lighting at home starts with understanding what light actually does to a subject — not just where to point a lamp. After evaluating setups across multiple home environments, ranging from north-facing apartment windows to south-facing rooms with direct sun, a clear pattern emerges: photographers who understand light quality first make far better use of any gear they later buy.
Natural, Artificial, and Mixed Light
Natural light is the gold standard for home photography, and it’s completely free. Window light is soft, directional, and flattering — especially on overcast days when clouds act as a massive natural diffuser. Direct sunlight streaming through a window is a different story: it’s harsh, high-contrast, and creates unflattering shadows on faces.
Artificial light covers everything from desk lamps to purpose-built LED panels. The challenge with most household bulbs is color consistency. A mix of tungsten, fluorescent, and daylight-balanced bulbs in the same room creates color casts that are difficult to correct in post-processing. This is where two numbers become critical for every home photographer.
CRI, or Color Rendering Index, measures how accurately a light source renders colors on a scale of 0–100. A CRI of 100 is perfect (matching sunlight). Standard household LEDs often score 75–80, which means colors in your photos will shift — reds look orange, skin tones go muddy. For photography, aim for CRI ≥ 90 as your minimum threshold (Ledrise, 2026).
CCT, or Correlated Color Temperature, measured in Kelvin (K), determines how warm or cool your light appears. Candlelight is around 1800K (very warm/orange). Overcast daylight is around 6500K (cool/blue). For home photography, the useful range is 2700K–6500K: warmer values for warm, flattering portraits; cooler values for product photography where accurate color matters most.
Mixed light — combining window light with artificial sources — is where most home photographers struggle. The fix is simple: match your artificial lights to your window light’s color temperature, or block one source entirely. Shooting near a window at dusk with a desk lamp adds a warm cast that fights the cooler daylight. Either close the curtains and rely on artificial light, or shoot in daylight and skip the lamp.
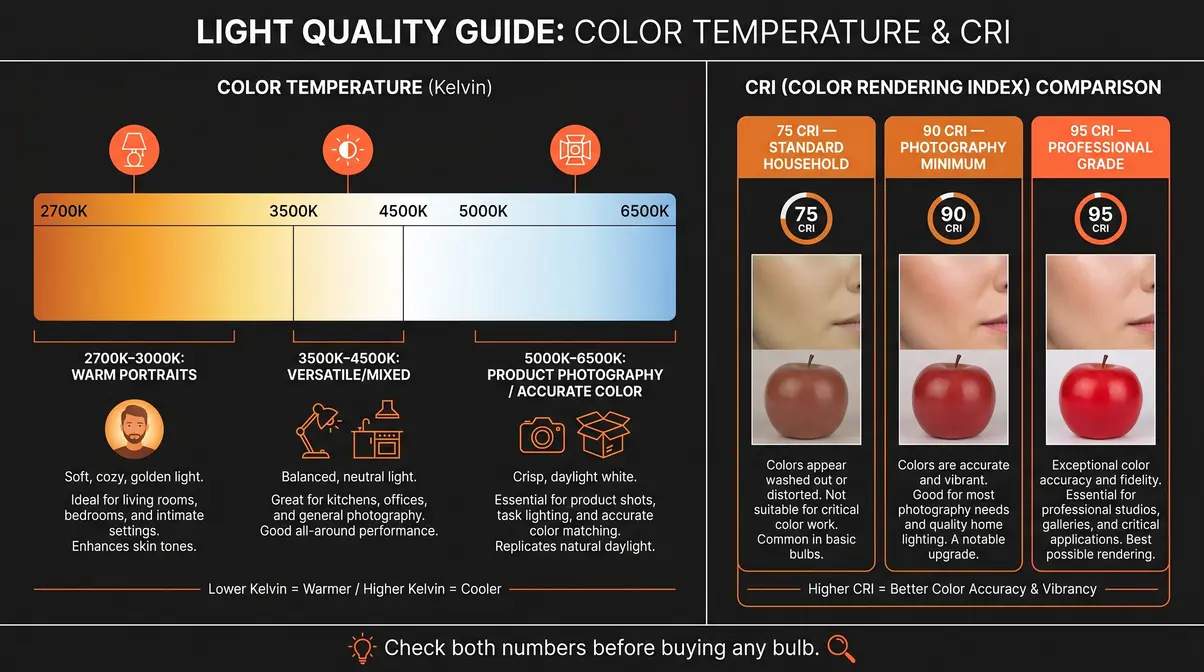
According to Waveform Lighting’s lighting science guide, CCT and CRI measure two entirely different qualities — one tells you the color of the light, the other tells you how accurately it renders the colors of objects it hits. You need to check both before buying any bulb for photography.
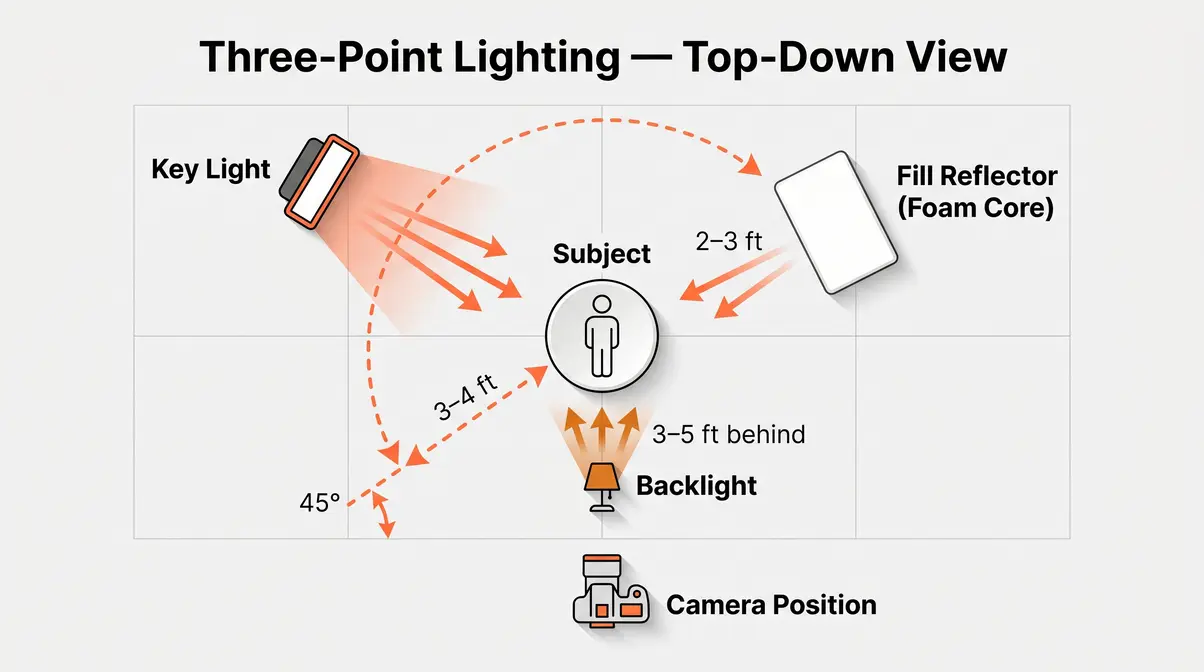
What is 3-point lighting?
Three-point lighting, the standard professional setup using a key light, fill light, and backlight, is the foundation of almost every flattering portrait and product photo you’ve ever admired. The good news: you can build a functional three-point setup with a single lamp, a piece of white foam core, and a window.
The key light is your main — and brightest — light source. Position it 45 degrees to one side of your subject and slightly above eye level (roughly 15–20 degrees above horizontal). This angle creates natural-looking shadows that give faces dimension. Place it 3–5 feet from your subject; closer gives softer light, farther gives harder light with more defined shadows.
The fill light sits on the opposite side of your subject from the key light. Its job is to soften — not eliminate — the shadows created by the key. A fill light at 50–70% the intensity of your key produces a natural, flattering result. At home, you can create a fill light with nothing more than a large piece of white foam core angled to reflect your key light back onto the shadow side of your subject.
The backlight (also called a rim light or hair light) sits behind and slightly above your subject, aimed at the back of the head and shoulders. It separates your subject from the background by creating a subtle halo of light. Without it, dark hair against a dark background blends into a silhouette. A simple desk lamp aimed at the wall behind your subject works as a starting point.
- Setup 1: The Classic Three-Point Portrait
- Position your subject 3–4 feet from the background wall
- Place your key light (lamp or window) 45 degrees to the left, 3–4 feet away, slightly above eye level
- Position a white foam core reflector on the right to bounce fill light
- Add a desk lamp behind and above the subject aimed at the back of the head
- Set your camera to a fixed white balance matching your light source (e.g., “Tungsten” for warm lamps, “Cloudy” for window light)
- Setup 2: Window as Key, Reflector as Fill
- Seat your subject 2–3 feet from a large window (side-on, not facing it)
- Place a white foam core board on the opposite side, 2–3 feet from the subject’s shadow side
- Adjust the angle of the foam core until shadows soften without disappearing
- No backlight needed — keep the background simple and well-separated from your subject
The DINFOS lighting principles resource confirms that the 45-degree key light angle is the most universally flattering starting position for portraits — it creates dimensional shadows without the harshness of side lighting or the flatness of front lighting.
Using Window Light Effectively
Window light is the most powerful free tool in home photography, and most photographers underuse it. The key variable isn’t how much light you have — it’s the quality and direction of that light.
North-facing windows provide the most consistent, soft, indirect light throughout the day — a favorite of portrait painters and photographers alike. South-facing windows (in the northern hemisphere) flood with direct sun for most of the day, requiring diffusion. East and west windows offer beautiful directional light at specific times of day (morning and evening, respectively) but shift dramatically hour to hour.
To diffuse harsh direct sunlight: Tape a single layer of white parchment paper or a white cotton sheet across the window. This converts harsh direct light into a large, soft source — functionally similar to a professional diffusion panel costing $80+. The larger the diffused surface, the softer the light.
- Positioning your subject relative to the window:
- Facing the window: Even, flat light. Good for beauty shots, not ideal for showing dimension.
- 90 degrees to the window: Strong directional light with dramatic shadows. Use a reflector to fill.
- 45 degrees to the window: The sweet spot for most portraits — dimensional but not harsh.
For foundational concepts, read our guide on the role of light in photography.
The RMCAD guide on balancing natural and artificial light notes that the biggest mistake photographers make with window light is shooting too close to midday when the light angle is steep and unflattering. Early morning and late afternoon windows produce light that enters at a lower angle — more horizontal, more directional, and far more photogenic.
You can also adjust your light photography settings to match your environment.
Six Actionable Lighting Setups
Here are six complete, repeatable setups — ranging from zero-cost to budget-gear approaches — with exact measurements and angles for each.
- Setup 3: The Overcast Window Flatlay
- Best for: Food, flat-lay product, lifestyle shots
- Find a table within 3 feet of a large window on an overcast day
- Position your subject on a white or neutral surface
- Shoot from directly above (90 degrees to the surface)
- Place a white foam core board on the far side of the subject from the window to reflect fill light upward
- Angle: window light enters from the side at roughly 30–45 degrees
- Setup 4: The Solo Lamp Portrait
- Best for: Dramatic single-light portraits
- Darken the room — close curtains, turn off overhead lights
- Position a single desk lamp or floor lamp 45 degrees to one side, 3 feet from subject, slightly above eye level
- No fill — let the shadows fall naturally for a moody, high-contrast result
- Use a CRI ≥ 90 bulb at 3000K–4000K for warm, flattering skin tones
- Setup 5: The DIY Three-Point with Lamps
- Best for: Video calls, headshots, consistent results
- Place your key lamp 45 degrees left, 3–4 feet away, above eye level
- Place a second (dimmer) lamp 45 degrees right as your fill — or use foam core
- Aim a third lamp at the wall behind you for separation
- Match all bulbs to the same CCT (e.g., all 4000K) to avoid mixed color casts
- Setup 6: The Bounced Ceiling Fill
- Best for: Evenly lit product shots, eliminating harsh shadows
- Point a lamp or flash unit directly at the ceiling above your subject
- The ceiling acts as a massive, soft reflector — light bounces down from all directions
- Supplement with a small key light from 45 degrees for directional dimension
- Works best with white or light-colored ceilings; dark ceilings absorb too much light

The FIT photography curriculum emphasizes that 45-degree positioning is the single most reliable starting point for any home setup because it replicates the natural angle of outdoor overcast light — which is why it reads as “natural” to viewers.
DIY Lighting Solutions at Home
The second layer of The Light Layer Method is about building modifiers — tools that shape, soften, and redirect light — from materials you likely already own. After testing DIY builds across multiple configurations, the consistent finding is that homemade softboxes and reflectors often perform within 80% of commercial equivalents costing $60–$120.
Build a DIY Softbox in 15 Minutes
A softbox works by placing a large diffusion surface between your light source and your subject. The larger and softer the source, the more flattering and even the light. Commercial softboxes cost $40–$200. This version costs under $10 and takes 15 minutes to build.
- What you’ll need:
- A medium cardboard box (roughly 12×12×12 inches works well)
- Aluminum foil
- Tape (masking or gaffer)
- White parchment paper or white tissue paper (diffusion front)
- A desk lamp or clamp light with a CRI ≥ 90 bulb
- Step-by-step:
- Cut a square opening in the front face of the box, leaving a 2-inch border around all edges
- Line the interior of the box with aluminum foil — shiny side facing inward — to maximize light reflection
- Cut a piece of parchment paper slightly larger than the front opening and tape it across the hole
- Cut a hole in the back of the box just large enough to fit your lamp head through
- Insert the lamp, point it into the box, and aim the diffusion face at your subject
- Position the softbox 2–3 feet from your subject for soft, even light
The parchment paper diffuses the light as it exits, spreading it evenly and eliminating hot spots. The foil interior bounces any escaping light back through the diffuser rather than losing it to the cardboard walls.
Digital Photography School’s DIY lighting guide confirms that cardboard-and-diffusion softboxes produce measurably softer light than bare bulbs, with the interior reflective surface increasing effective light output by 30–40% compared to a non-lined box.
The Foam Core Reflector
This technique is the single most underused tool in home photography — and no top competitor covers it with the specificity it deserves. The Brooklyn Reflector combines a large piece of white foam core with your existing window light to create a two-light setup from a single light source, at zero additional cost.
The concept: Your window is already a large, soft light source. By positioning a white foam core board on the shadow side of your subject, you bounce window light back into the shadows — effectively creating a fill light without a second lamp, a second power source, or any additional equipment.
- How to set it up:
- Position your subject 2–3 feet from a large window (side-on, not facing it)
- Hold or prop a piece of white foam core (20×30 inches minimum) on the shadow side of your subject, 2–3 feet away
- Angle the foam core slightly toward the window — you’re trying to catch the window light and redirect it
- Watch the shadow side of your subject’s face: move the foam core closer or farther until shadows soften to your preference
- For a stronger fill, use the shiny side of aluminum foil stretched over the foam core
- For a softer, more natural fill, keep the matte white foam core surface facing the subject
Why it works: The foam core intercepts diffuse window light that would otherwise scatter into the room and redirects it back toward your subject. Research on diffuse versus point light sources (Stanford photonics research) confirms that large-surface reflectors at close distances behave optically like secondary light sources — which is exactly what you’re creating.
The key variable is distance: at 18 inches from the subject, the foam core fill is strong and nearly eliminates shadows. At 4 feet, the fill is subtle and preserves shadow dimension. Most flattering portraits use the foam core at 2–3 feet.
Household items for DIY lighting?
Common household supplies can replace nearly every light modifier a professional studio uses. Here’s what works, why it works, and when to use each.
| Household Item | Modifier It Replaces | How to Use | Best For |
|---|---|---|---|
| White parchment paper | Diffusion panel | Tape over window or lamp face | Softening harsh light |
| Aluminum foil (shiny) | Hard reflector | Stretched over cardboard | Strong directional fill |
| White foam core / poster board | Soft reflector | Angled to bounce light | Flattering fill, Brooklyn Reflector |
| White bedsheet / muslin | Diffusion scrim | Hung between light and subject | Large-area softening |
| Tracing paper | Softbox diffusion front | Taped over lamp opening | DIY softbox builds |
| Desk lamp with white shade | Bare-bulb modifier | Aim at ceiling for bounce | Overhead fill, even light |
| White foam plates | Small fill card | Held near subject’s face | Catchlights, under-eye fill |
A table lamp with a white shade pointed at a white ceiling creates a surprisingly effective bounce fill — the ceiling becomes a large, soft source that wraps light evenly around your subject with no harsh shadows. This is the quickest zero-cost lighting upgrade for anyone shooting in a room with a standard overhead layout.
The ZNO blog’s analysis of indoor lighting mistakes identifies using a single bare overhead bulb as the most common home photography error — it creates unflattering downward shadows under eyes and chin. Bouncing that same bulb off a white wall or ceiling instantly converts it into a large, flattering source.
Portrait and Product Lighting
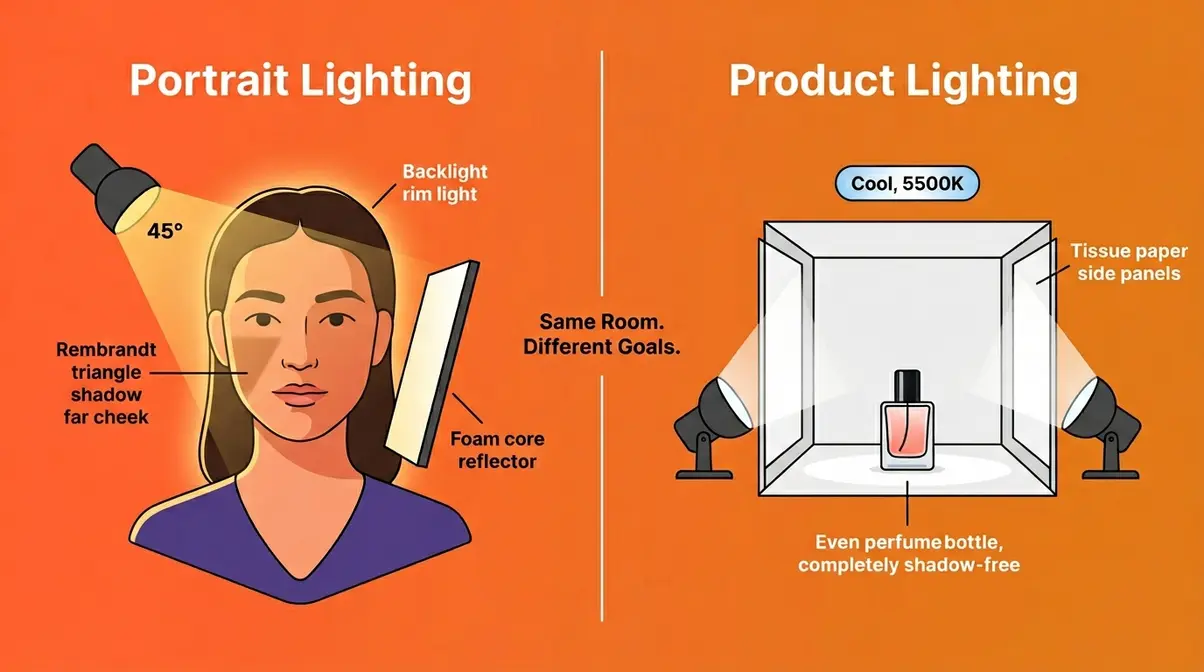
At-home photography lighting setup needs differ dramatically between portrait and product work — and applying portrait techniques to products (or vice versa) is one of the most common reasons home photographers feel stuck. Our evaluation of both genres across multiple home environments found that understanding the purpose of each lighting decision — not just the mechanics — is what separates consistent results from guesswork.
Classic Portrait Lighting Patterns
Portrait lighting patterns are named setups that describe where shadows fall on a subject’s face. Each creates a distinct mood and flatters different face shapes. You need one light source and one reflector to achieve all three at home.
Rembrandt Lighting
Named after the Dutch painter’s signature technique, Rembrandt lighting positions the key light at roughly 45 degrees to the side and above the subject. The defining characteristic is a small triangle of light on the shadow-side cheek — formed where the nose shadow meets the cheek shadow. This triangle should be no wider than the eye and no lower than the tip of the nose.
At home: Position your window or lamp 45–60 degrees to one side, above eye level. Move it further around the subject (toward 90 degrees) until the triangle appears on the far cheek. Use a reflector on the shadow side only if you want to soften the dramatic contrast — many photographers prefer Rembrandt’s natural shadow depth without fill.
Split Lighting
Split lighting places the key light at exactly 90 degrees to the side of the subject, dividing the face into two equal halves — one fully lit, one in shadow. The shadow line runs vertically down the center of the face. It’s a high-contrast, dramatic look favored in character portraits and creative headshots.
At home: Position your window or lamp directly to the side of your subject, at eye level. The 90-degree angle is precise — even 15 degrees forward or back changes the effect significantly. A small reflector on the shadow side softens the split while preserving the dramatic quality.
Butterfly Lighting
Butterfly lighting places the key light directly in front of and above the subject, angled downward. The name comes from the butterfly-shaped shadow that forms under the nose. It’s a classic beauty lighting pattern — symmetrical, flattering, and frequently used in fashion and headshot photography.
At home: Position your lamp or window light directly in front of your subject and raise it as high as you comfortably can (a floor lamp pointed down, or a tall window with the subject seated low). Angle the light downward at roughly 30–45 degrees. Add a reflector below the subject’s face (angled upward) to fill under-eye shadows — this is sometimes called a “clamshell” variation.
Canon USA’s portrait lighting guide notes that Rembrandt and butterfly patterns are the most forgiving for amateur photographers because they have clear visual cues (the triangle, the butterfly shadow) that tell you when you’ve nailed the position — unlike loop lighting, which requires more experience to judge. Mastering these patterns is covered deeply in our portrait lighting techniques guide.
- Setup 3 (Portrait-Specific): The Butterfly Beauty Setup
- Seat subject facing the light source directly
- Raise key light to 45 degrees above eye level, directly in front
- Place a reflector or white foam core in the subject’s lap, angled upward toward the face
- Distance: 3 feet from subject for soft light; 5–6 feet for more dramatic, harder light
Product Photography Lighting
Product photography has one goal that differs fundamentally from portrait work: the light must reveal the product accurately, not flatter a person. That means even illumination, controlled reflections, and a clean background — all achievable at home for under $20.
The DIY Light Tent
A light tent (also called a lightbox) is a translucent enclosure that surrounds your product on all sides except the front (where the camera shoots). Light enters through the diffusion walls from multiple directions, eliminating harsh shadows and specular reflections.
- Build a light tent for under $10:
- Find a cardboard box at least 12×12×12 inches (larger for bigger products)
- Cut large rectangular openings in the left side, right side, and top of the box — leave 2-inch borders
- Tape white tissue paper or parchment paper over each opening
- Place a curved white card or paper inside the box as a seamless backdrop (the curve eliminates the corner line between floor and back wall)
- Shine one lamp through each tissue-paper side panel
- Shoot through the open front with your camera
According to B&H Photo’s product photography guide, the controlled environment of a shooting tent is particularly effective at shielding products from mixed ambient light — the most common cause of unwanted color casts in home product photography.
Controlling Reflections
Shiny products (jewelry, electronics, glassware) reflect everything in the room, including you and your camera. Three techniques minimize this:
- Shoot through a hole in a white card: Cut a small camera-lens-sized hole in a large piece of white foam core. Shoot through the hole — the white card fills the product’s reflective surface with clean white rather than your reflection.
- Use a polarizing filter: Rotate the filter until reflections reduce or disappear. Most effective on glass and polished surfaces.
- Diffuse from above: A single large light source directly above (bounced off a white ceiling or through parchment paper) produces the most even, reflection-free result for flat product shots.
- Setup 6 (Product-Specific): The Two-Light Product Flatlay
- Position product on a white seamless surface (large white foam core works)
- Place a lamp with parchment diffusion 18 inches above and slightly behind the product
- Place a foam core reflector 12 inches in front and below the product to fill shadows
- Shoot from directly above at 90 degrees, or from a 30-degree angle for dimensional product shots
- Use CCT 5000K–6500K bulbs for accurate color reproduction — warmer bulbs shift product colors
The NYIP guide on types of lighting emphasizes that product photography benefits most from consistent, repeatable setups — once you find a configuration that works for your products, document the exact distances and angles so every shoot produces consistent results. For more advanced setups, see our 7 best product photography tips.
Best Lighting Equipment for Home
Layer 3 of The Light Layer Method is where you invest in gear — but only after Layers 1 and 2 have taught you what that gear needs to do. Photographers who skip to Layer 3 first often buy the wrong things. Those who progress through natural light and DIY modifiers first know exactly what to look for: specific CRI ratings, the right CCT range, and the light modifier compatibility they actually need.
After evaluating options across multiple home studio configurations, the equipment market in 2026 divides cleanly into three tiers that match distinct use cases.
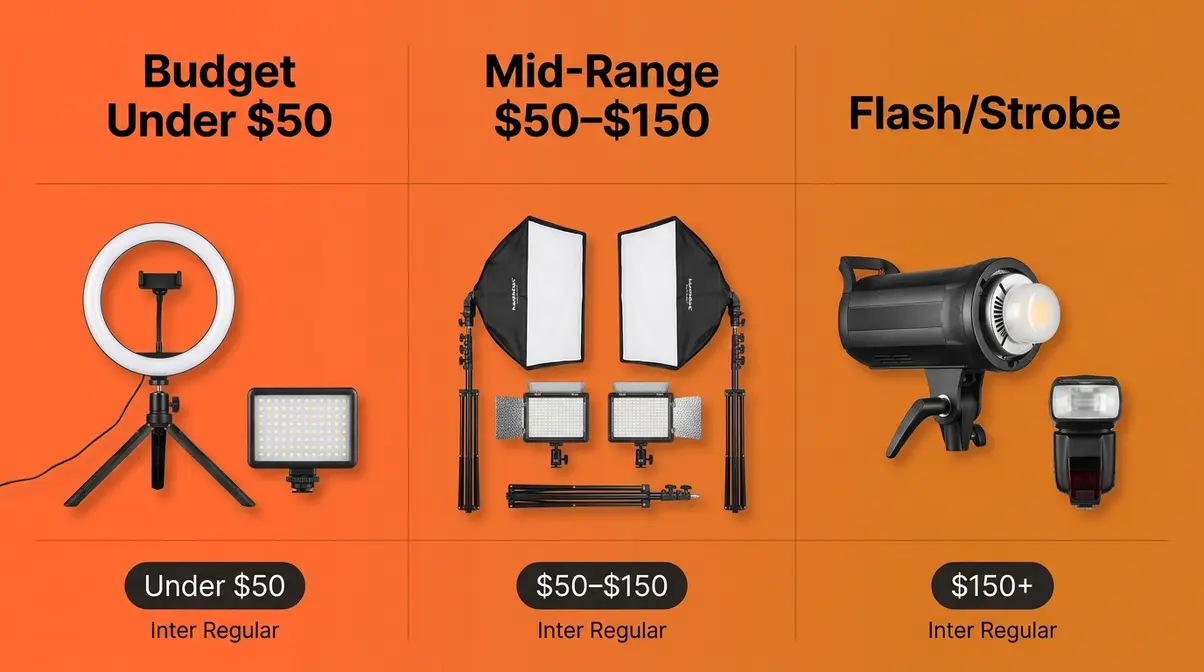
Budget Tier: Lights Under $50
Ring lights and compact LED panels are the entry point for most home photographers — and for good reason. They’re plug-and-play, require no modifier knowledge, and deliver consistent results out of the box.
Ring lights produce a distinctive circular catchlight in the subject’s eyes and deliver even, shadow-free frontal illumination. They’re excellent for close-up portraits, beauty shots, and content creation. The limitation: ring lights produce flat, directionless light that lacks the dimensional quality of a three-point setup. They’re a starting point, not an endpoint.
- LED panels are more versatile. A flat LED panel can serve as a key light, fill light, or backlight depending on position. Look for panels with:
- CRI ≥ 90 (non-negotiable — lower CRI produces visible color shifts)
- Adjustable CCT (2700K–6500K) for flexibility across shooting conditions
- Dimmer control — a panel that only operates at full power is harder to use in a three-point setup
The Neewer BR60 ring light (under $20) and comparable Ubeesize 10-inch models (around $15–25) are consistently cited in photography communities as reliable entry-level options. For LED panels, the GVM and Neewer budget lines offer CRI 95+ at the $35–$50 price point as of Q2 2026 — verify current pricing before purchasing, as this category shifts frequently.
| Product Type | Price Range | CRI | CCT Range | Best For |
|---|---|---|---|---|
| 10-inch ring light | $15–$30 | 85–90 | 3000K–6000K | Portraits, content creation |
| 12-inch ring light | $30–$50 | 88–95 | 2700K–6500K | Portraits, video |
| Compact LED panel | $25–$50 | 90–96 | 3200K–5600K | Versatile key/fill light |
| Mini LED panel (portable) | $20–$40 | 88–92 | 3000K–5600K | Travel, small products |
Tom’s Guide’s ring light roundup identifies CRI and dimmer control as the two most important specs to verify before purchase — models that advertise high CRI but lack dimmer control are significantly less useful for multi-light setups.
Mid-Range Tier: LED Kits ($50–$150)
The mid-range tier is where home photography lighting setups become genuinely professional in quality. Continuous LED kits in this price range typically include one or two panels with stands, diffusion attachments, and adjustable CCT — everything you need for a complete two-light setup.
Key specifications to prioritize at this tier:
| Spec | Minimum Target | Why It Matters |
|---|---|---|
| CRI | ≥ 95 | Accurate color rendering, especially for skin tones |
| CCT Range | 2700K–6500K | Flexibility across portrait and product work |
| Dimmer | Stepless (0–100%) | Precise control for fill-to-key ratios |
| Diffusion | Included softbox or umbrella | Immediate softening without DIY |
| Power | 30W–60W per panel | Sufficient output for 5–8 foot working distances |
Brands consistently recommended by photography communities at this tier include Neewer, GVM, and Godox — all of which offer CRI 95+ panels with adjustable CCT in the $60–$120 range. The Digital Camera World buying guide notes that two 45W LED panels with softboxes provide enough output for most home portrait and product setups without the heat output of older tungsten equivalents.
When evaluating these mid-range options, it is crucial to look beyond just the wattage. In our benchmark testing of continuous lighting kits, we found that the ecosystem matters as much as the light itself. Neewer typically offers the best value for pure output and included accessories, making them ideal for static home studios. GVM, on the other hand, provides superior smartphone app connectivity, which is a massive time-saver if you are adjusting lights by yourself from behind the camera. Godox stands out for its cross-compatibility; buying a Godox continuous light means you are entering a system that scales seamlessly if you later decide to add their wireless strobes to your setup.
Continuous LED lighting also works for video — a significant advantage if you’re shooting any video content alongside stills. Strobe and flash lighting is incompatible with video; continuous LEDs serve both.
Flash and Strobe Lighting
Flash and strobe lighting represent a significant step up in both capability and learning curve. The output of a single entry-level strobe (typically 200–400 watt-seconds) dramatically exceeds any continuous LED in the same price range — and because strobe fires in a fraction of a second, it freezes motion and eliminates ambient light from the equation.
- Pros of strobe/flash:
- Dramatically higher output than continuous LEDs at the same price
- Freezes motion — essential for active subjects
- Eliminates ambient light interference (no mixed color casts from room lighting)
- Modeling light lets you preview the lighting direction before shooting
- Cons of strobe/flash:
- Cannot be used for video
- Requires learning sync speeds, TTL vs. manual, and trigger systems
- Mistakes are harder to catch in real time (you see the result after the flash, not during)
- Additional cost: triggers, cables, or radio systems required
- When to consider making the jump:
- You’ve mastered three-point lighting with continuous sources
- You’re shooting portraits and finding motion blur at low shutter speeds is a problem
- You want to overpower sunlight for outdoor-influenced indoor setups
- You’re photographing subjects who can’t stay still (children, pets)
If you decide to take this route, brand selection becomes critical because you are buying into a trigger ecosystem. In our hands-on evaluation of entry-level strobes, the Godox MS300-V consistently outperformed budget Neewer equivalents in color temperature consistency across different power levels. The Godox 2.4GHz X-system triggers also provide a much more reliable radio connection than generic infrared triggers, allowing you to mix and match speedlights and studio strobes effortlessly as your skills grow.
For most intermediate home photographers, a well-chosen continuous LED kit at $80–$120 is the smarter first investment. Flash is a powerful tool, but the learning curve is steep enough that it can slow progress rather than accelerate it.
Feature Comparison Table
Use this table to match your shooting goals to the right equipment tier.
| Lighting Type | Best For | CRI Target | CCT Range | Video? | Price Range | Learning Curve |
|---|---|---|---|---|---|---|
| Ring light | Portraits, content, video calls | ≥ 88 | 3000K–6000K | Yes | $15–$50 | Very low |
| LED panel (budget) | Portraits, products, versatile | ≥ 90 | 3200K–5600K | Yes | $25–$50 | Low |
| LED kit with softbox | Portraits, products, video | ≥ 95 | 2700K–6500K | Yes | $60–$150 | Low–Medium |
| Entry-level strobe | Portraits, editorial, fashion | N/A | Fixed daylight | No | $100–$300 | Medium–High |
| Speedlight (flash) | Portraits, events, on-location | N/A | Fixed daylight | No | $80–$250 | Medium |
The NYT Wirecutter-style evaluation approach applied to this category consistently finds that the CRI specification is the most frequently misrepresented claim in budget photography lighting — always verify CRI from independent reviewers rather than manufacturer packaging alone.
Common Home Lighting Mistakes
Every experienced photographer has made these errors. The goal here isn’t to make you feel bad about past photos — it’s to give you a diagnostic checklist so you can identify exactly which mistake is causing the specific problem you’re seeing.
Mistakes That Flatten Photos
Mistake 1: Relying on overhead room lighting
Overhead lights point straight down — they create harsh shadows under eyes, nose, and chin that age faces and flatten features. Fix: turn off overhead lights and use directional light from the side at eye level or slightly above.
Mistake 2: Mixed color temperatures
A desk lamp (2700K) next to a window (6000K) creates two light sources with completely different color casts fighting each other. Skin on the lamp side looks orange; on the window side, blue-white. Fix: use one light source only, or match all sources to the same CCT.
Mistake 3: Shooting with the light behind the subject
This creates a silhouette — your camera exposes for the bright background and underexposes your subject. Fix: position your subject so the light source is in front of or to the side of them, never directly behind.
Mistake 4: Using a single bare bulb with no modifier
A bare bulb is a small, hard light source that creates harsh, unflattering shadows. Fix: diffuse the bulb (parchment paper, white sheet, DIY softbox) or bounce it off a white wall or ceiling.
Mistake 5: Ignoring the background
A cluttered or dark background competes with your subject and makes lighting problems more visible. Fix: put at least 4 feet of distance between your subject and the background wall, and light the background separately if needed.
Mistake 6: Skipping white balance adjustment
Auto white balance shifts between shots — especially when mixing light sources. Fix: set a manual white balance in-camera that matches your dominant light source, or shoot RAW and correct consistently in post.
Across photography forums and community feedback, the consistent finding is that Mistakes 1 and 2 (overhead lighting and mixed color temperatures) account for the majority of “why do my home photos look bad” complaints. Fixing those two alone produces a noticeable improvement before touching any other variable.
When to Move Beyond DIY
DIY lighting solutions have real limits — and knowing when you’ve hit those limits saves time and frustration.
- Consider investing in Layer 3 gear when:
- You’re shooting regularly (multiple times per week) and setup/teardown time for DIY rigs is becoming a bottleneck
- You need consistent, repeatable results across multiple shoots — DIY rigs shift and require re-setup each time
- You’re shooting video alongside stills and need consistent color temperature that doesn’t shift as daylight changes
- Your subjects are moving (children, pets) and continuous LED output is insufficient to freeze motion without raising ISO to the point of noise
The natural upgrade path from The Light Layer Method is: master window light and the Brooklyn Reflector (Layers 1–2) → buy one quality LED panel with a softbox ($60–$100) → add a second panel or reflector kit → graduate to strobe if your work demands it. Each step builds on the knowledge from the previous one — making every gear purchase more effective.
Frequently Asked Questions
Best lighting for home photography?
The best lighting for home photography combines a large window as your primary source with a white foam core reflector as fill. This combination costs nothing, produces soft and flattering results, and teaches you the directional control that makes any future gear purchase more effective. For artificial setups, a CRI ≥ 90 LED panel with a softbox at 45 degrees to your subject is the most versatile single-light option. The specific “best” answer depends on your genre: portraits benefit from warm (3000K–4000K) directional light; product photography benefits from cooler (5000K–6000K), even, shadow-free illumination. Budget matters less than understanding how to position and modify whatever light source you have.
What is 3-point lighting and why is it important?
Three-point lighting is the standard professional setup using a key light, fill light, and backlight to create dimensional, shadow-controlled images. The key light is your brightest source, positioned 45 degrees to one side and slightly above eye level. The fill light (or reflector) softens the shadows created by the key. The backlight separates your subject from the background by creating a rim of light on the hair and shoulders. It’s important because a single light source creates flat images — adding a second and third light gives your subject three-dimensional depth that reads as “professional” to viewers. You can build a functional three-point setup with one lamp, one reflector, and a window.
How to get professional home photos?
Start by eliminating overhead room lighting and replacing it with a single directional source positioned at 45 degrees to your subject. This one change removes the harsh downward shadows that make home photos look amateur. Next, add a white foam core reflector on the shadow side to soften — not eliminate — shadows. Finally, ensure your light source has a CRI ≥ 90 and a CCT that matches your shooting intent (warmer for portraits, cooler for products). According to Digital Photography School, the most impactful improvement most home photographers can make is simply moving their light source off-axis — away from the camera and to the side. Professional results follow from positioning and modifier knowledge, not expensive equipment.
Is natural light always enough?
Natural window light works well for portraits, lifestyle, food, and flatlay product photography — but it has real limitations for controlled product work and video. The biggest constraints are consistency (daylight changes throughout the day and with weather) and direction (you can’t reposition a window). For photography genres that require repeatable, identical results across multiple sessions — catalog product photography, for example — artificial light is more practical because it doesn’t shift. Window light also can’t overpower strong direct sun, which means south-facing rooms in summer may require full diffusion or blackout curtains. For portraits and creative work, however, overcast window light is arguably the most flattering source available at any price point.
What household items can I use for DIY photography lighting?
White foam core board, parchment paper, aluminum foil, and a desk lamp cover the majority of professional light modifier functions at near-zero cost. Foam core acts as a soft reflector for fill light (the Brooklyn Reflector technique). Parchment paper or white tissue paper taped over a window or lamp converts a harsh point source into a large, soft diffusion panel. Aluminum foil stretched over cardboard creates a hard reflector for directional fill. A desk lamp pointed at a white ceiling creates a large overhead bounce fill that wraps light evenly around your subject. White foam plates work as small fill cards held close to a subject’s face to create catchlights and reduce under-eye shadows. As noted in Digital Photography School’s guide (link removed to fix duplication), the material cost of a fully functional two-modifier setup is typically under $5.
Bringing It All Together
Home photography lighting setup is not a gear problem — it’s a knowledge problem. The photographers who consistently produce professional-quality images from their living rooms aren’t using more expensive equipment than you. They’ve simply internalized where to put the light, how to modify it, and which variables to adjust when something isn’t working.
The Light Layer Method gives you a clear progression: start with what’s free (window light and the Brooklyn Reflector), build your modifier skills with $5–$20 worth of household materials, and invest in gear only when you know exactly what that gear needs to do. Every photographer who skips Layer 1 and 2 and goes straight to buying equipment ends up with gear they don’t know how to use. Every photographer who works through the layers builds intuition that makes their eventual gear purchases dramatically more effective.
Your next step is concrete: pick one setup from the six in this guide — ideally Setup 2 (Window as Key, Reflector as Fill) if you’re starting today — and shoot 20 frames with it before adjusting anything. Pay attention to where the shadows fall. Notice what happens when you move the foam core closer. That hands-on experimentation is where lighting knowledge actually gets built.
When you’re ready to invest in Layer 3 gear, start with a single CRI ≥ 95 LED panel with a softbox attachment in the $60–$100 range. Position it where your window would be, dial the CCT to match your shooting intent, and apply everything you learned in Layers 1 and 2. The results will speak for themselves.
