
Table of Contents
- What You’ll Need Before You Start
- Step 1: Safely Rewind and Remove Film
- Step 2: Load a Fresh Roll of 35mm Film
- Step 3: Close the Camera and Advance
- Loading Polaroid and Disposable Cameras
- Mid-Roll Switching & Film Storage
- Troubleshooting: When Something Goes Wrong
- Frequently Asked Questions
- You’re Ready to Shoot
This blog post may contain affiliate links. As an Amazon Associate I earn from qualifying purchases.
“I just bought my first-ever film camera, and I don’t know how to change the film without ruining everything.”
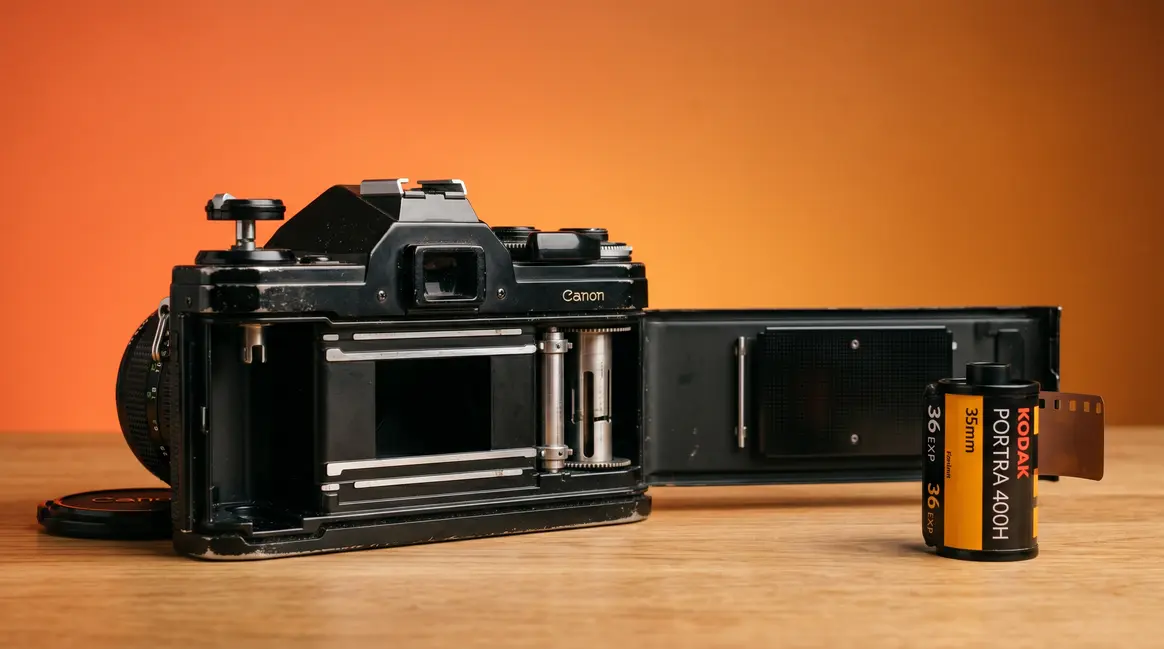
If that sounds familiar, you’re not alone — and you’re in exactly the right place. Learning how to change film in a camera is a rite of passage for every photographer.
The biggest mistake beginners make is opening the camera back before the film is fully rewound. That one split-second error exposes your entire roll to light, and every photo on it is gone forever. It’s not a recoverable mistake. There’s no “undo.”
In this guide, you’ll learn The Light-Safe Method for how to change film in a camera — a step-by-step process designed to protect your photos at every single stage, whether you’re shooting a Canon AE-1, a Nikon FM2, or a basic point-and-shoot. Every action in this guide exists for one reason: to keep your unexposed film away from light.
We’ll walk through how to safely unload your used roll, how to load a fresh one correctly, and how to handle specialty cameras like Polaroids. We’ll also cover mid-roll switching, long-term film storage, and exactly what to do when something goes wrong.
Key Takeaways: The Light-Safe Method for Changing Film
Changing film safely means protecting every unexposed frame from light — at every step of the process.
- The Light-Safe Method is the definitive guide for how to change film in a camera safely.
- Always rewind fully before opening the camera back — feel for the tension release to know you’re done.
- The sprocket check is the #1 step beginners skip — and the reason most blank rolls happen.
- Kodak’s data confirms film left in a warm camera degrades within months — store below 55°F when possible.
- Mid-roll switching is possible — but requires a specific technique to avoid ruining frames.
- CVS and Walgreens still develop film, but the “98% rule” means your negatives may not be returned.
What You’ll Need Before You Start
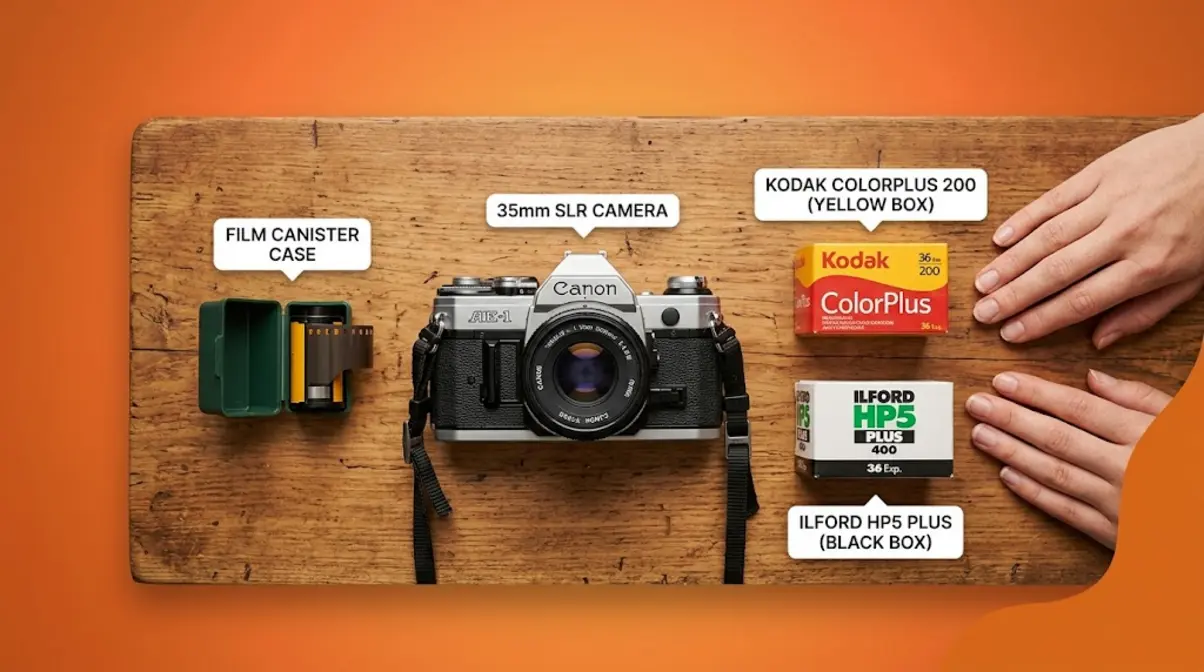
Before you touch a single roll of film, gather your materials and understand two foundational rules. Skipping this section is how blank rolls happen.
Estimated Time: 5 minutes
What you’ll need:
- Your 35mm film camera (such as the Canon AE-1, one of the most popular beginner 35mm SLRs, or a Nikon FM2)
- A fresh roll of 35mm film — Kodak ColorPlus 200 is a beginner-friendly daylight film, while ILFORD HP5 Plus 400 is a versatile black-and-white option
- A dim environment — shade, an indoor room, or at minimum turn your back to direct sunlight
- Clean, dry hands — oils and moisture can damage film
Four key terms you’ll see throughout this guide:
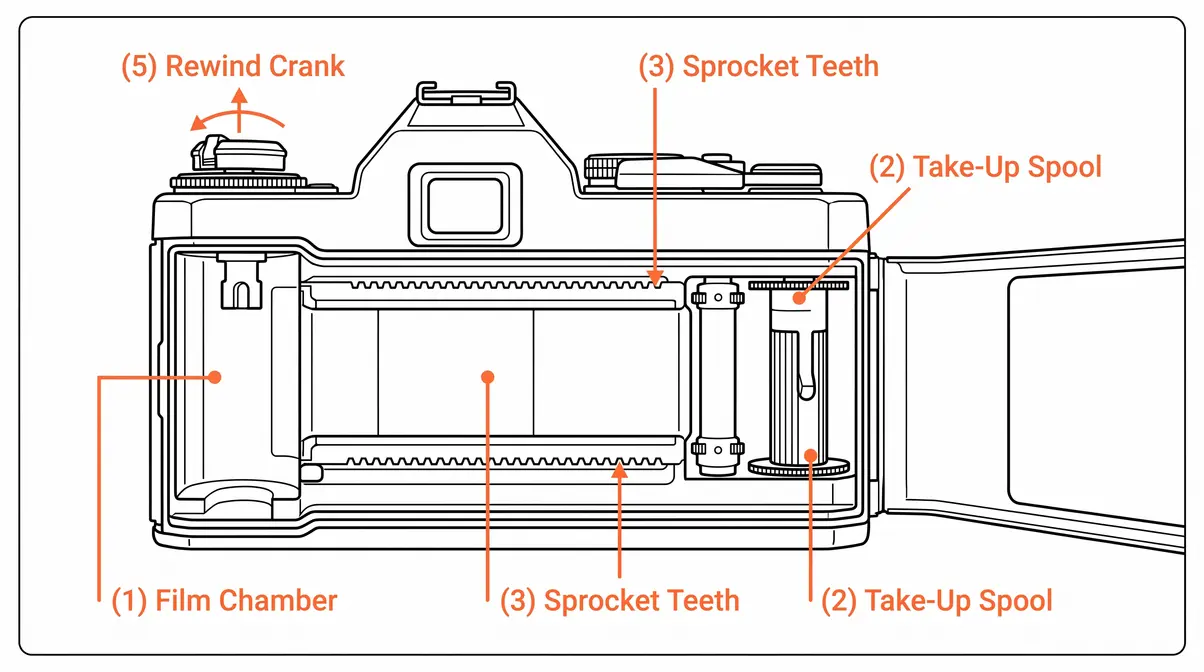
- Film leader — the short tongue of film that sticks out of the canister. Think of it like the tab on a roll of tape. This is what you’ll attach to your camera.
- Take-up spool — the small cylinder inside your camera that the film wraps around as you advance each frame.
- Sprockets — the small teeth along the top and bottom of the camera’s film channel. They grip the holes (perforations) along the edge of your film and pull it forward one frame at a time.
- Rewind crank — the knob on top of your camera (usually on the left side) that you turn to pull the film back into the canister when you’re done shooting.
The one rule that governs everything: Never open the camera back unless you are certain the film is fully rewound. This is the foundation of The Light-Safe Method — a simple principle that says: keep unexposed film away from light at all times.
Unexposed 35mm film is permanently destroyed by even a fraction of a second of direct light — which is why every step in The Light-Safe Method is non-negotiable. For long-term storage, the Library of Congress recommends keeping unprocessed film below 50°F (10°C) to prevent chemical degradation (Library of Congress preservation guidelines).
Step 1: Safely Rewind and Remove Film
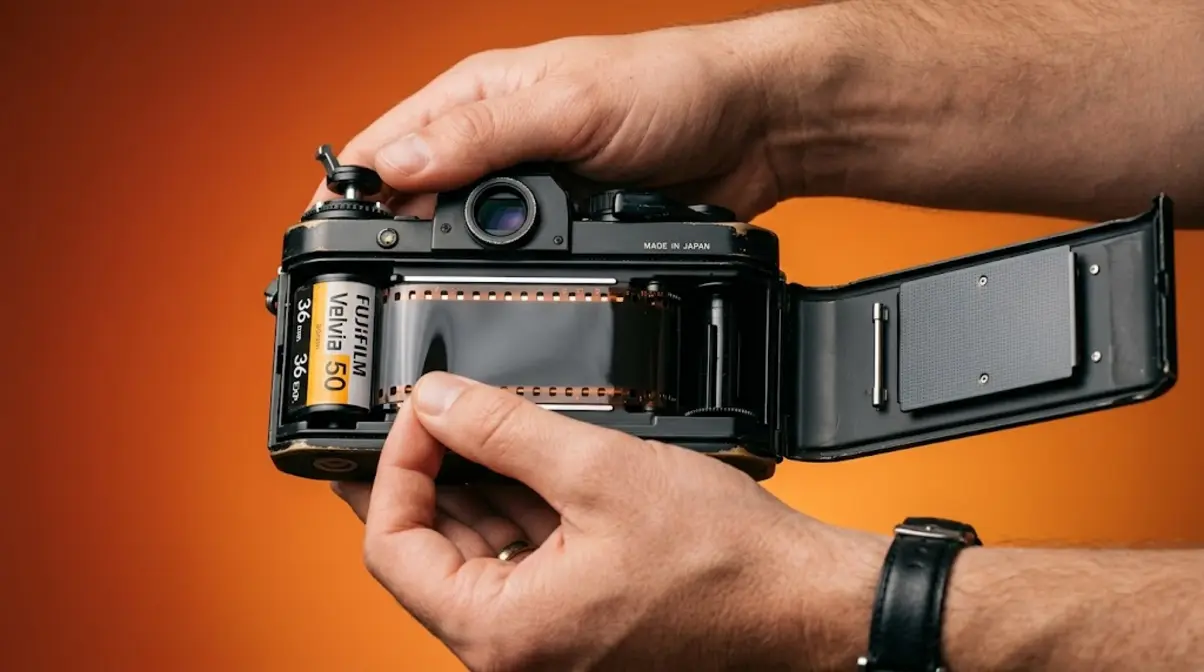
When learning how to change film in a camera, removing a finished roll is the step that makes most beginners nervous. Done correctly, it takes about 60 seconds and your photos are completely safe. The Light-Safe Method breaks it into three sub-steps: find the release, rewind the film, then open the back.
Our team evaluated this process across a Canon AE-1, a Nikon FM2, and two point-and-shoot cameras to document the exact tactile cues that confirm each step is complete. Here’s what that experience revealed.
Find the Film Release Button
The film release button (also called the rewind release button) is a small button or lever that you must press before you can rewind the film. Without pressing it first, turning the rewind crank will feel stiff and may tear the film — a frustrating and avoidable mistake.
Where to find it:
- Canon AE-1: Look on the bottom of the camera body. It’s a small circular button, usually labeled “R” or with a small arrow icon.
- Nikon FM2: Also on the camera bottom — a small sliding switch or button near the center.
- Point-and-shoot cameras (like the Canon Sure Shot or Nikon L35AF): Many have an automatic rewind function. When the roll is finished, the camera rewinds it for you. Listen for the motorized whirring sound — that’s your cue that rewind is happening automatically.
If you’re not sure where the button is on your specific camera, check the back of the camera body first, then the bottom. It is almost always labeled or marked with a small symbol.
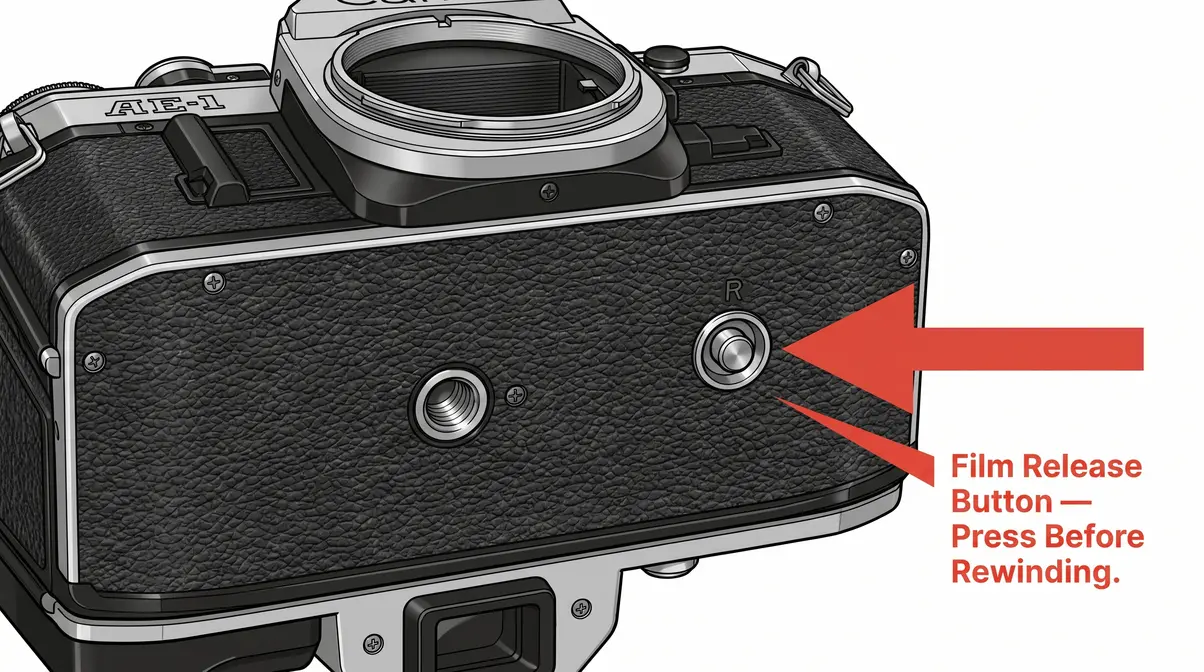
Rewind Film Without Light Exposure
Once you’ve located and pressed the film release button, you’re ready to rewind. This is the most important step for light protection, and it has a clear physical signal that tells you when it’s done.
Follow these steps:
- Press and hold the film release button on the camera bottom (or slide it to the unlocked position, depending on your model).
- Flip up the rewind crank — it folds flat against the camera top. Unfold it so it’s pointing up.
- Turn the rewind crank in the direction of the arrow (almost always clockwise when viewed from above). You’ll feel gentle resistance — that’s the film pulling back into the canister.
- Keep turning steadily. Don’t rush, and don’t force it. You’ll feel consistent, light tension as each frame rewinds.
- Watch for the tension release. After winding for 20–30 turns (depending on how many frames were on the roll), the resistance will suddenly drop away. The crank will spin freely. That’s your signal — the film is fully back in the canister.
- Turn the crank two more times after feeling the tension release. This ensures the film leader is fully retracted and won’t accidentally catch the light when you open the camera.
Common mistake to avoid: Stopping as soon as the crank feels loose. Many beginners stop one or two turns too early, leaving the film leader partially exposed outside the canister. Give it two extra turns after the tension drops — it takes three seconds and protects your entire roll.
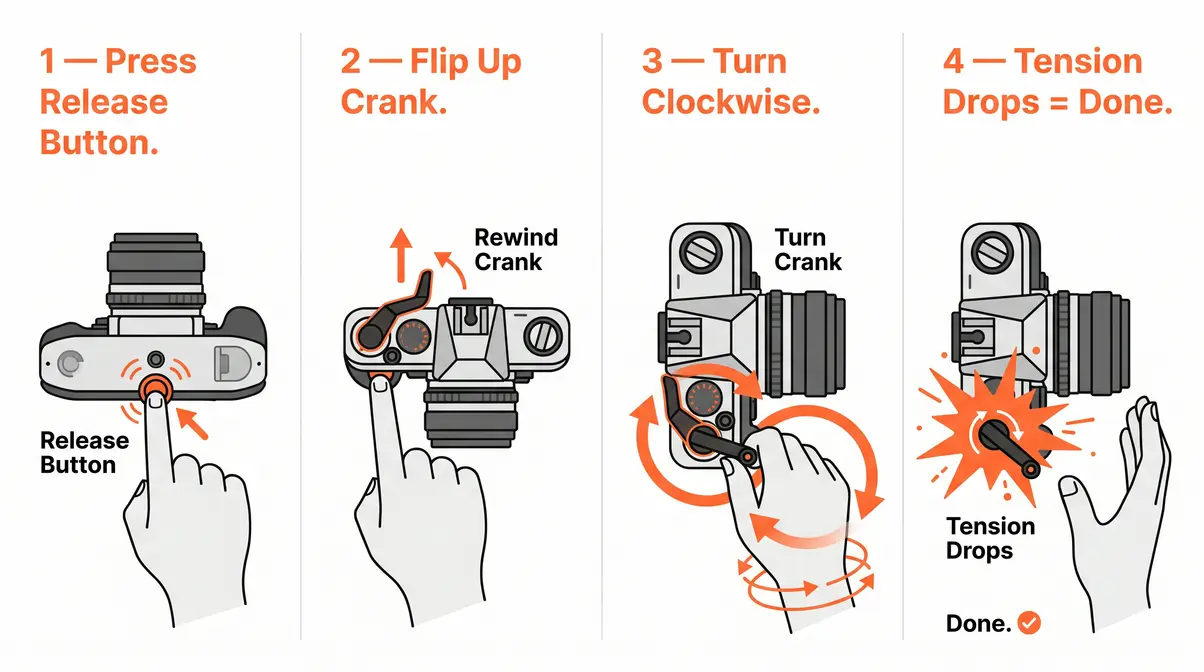
According to Kodak Alaris’s technical documentation, properly rewound film stored in its original canister retains full image quality for processing (Kodak Alaris film care guidelines).
Opening the Camera Back Safely
The film is rewound. Now you can open the camera back — safely.
Steps to open and remove the film:
- Locate the camera back latch. On most SLRs (like the Canon AE-1 and Nikon FM2), it’s a small lever or sliding latch on the left side of the camera body. On point-and-shoots, it may be a button on the back panel.
- Pull up on the rewind crank (the same one you just used). On many cameras, pulling the rewind crank upward releases the camera back — it’s a two-in-one mechanism.
- Open the back slowly. The inside of the camera will be exposed, but that’s fine — the film is fully inside the canister and protected.
- Lift out the film canister from the film chamber (the left side of the camera interior). It should slide out easily.
- Close the camera back immediately after removing the canister. There’s no reason to leave it open.
Your used roll is now safely removed. Drop it into a film canister case or a small bag to protect it until you get it developed. Don’t leave it sitting in direct sunlight.
For a detailed reference on film handling and camera mechanics, the Photographic Society of America resource library provides model-specific guides for common SLR cameras.
Can You Take Film Out Safely?
Yes — if you fully rewind the film first before opening the camera back. The key is ensuring the film is completely retracted into the canister before any light can reach it. Follow The Light-Safe Method: press the release button, rewind until you feel the tension release, give two more turns, then open the back. If you accidentally open the camera before rewinding, the frames nearest the camera back (the most recently shot frames) will be exposed and lost, but earlier frames deeper in the canister may survive.
Step 2: Load a Fresh Roll of 35mm Film
The most critical part of how to change film in a camera is loading it correctly. Loading film properly is where most beginner mistakes happen — not because it’s difficult, but because one small step (the sprocket check) is easy to skip. The Light-Safe Method treats loading as a four-part sequence. Rush any part, and you risk advancing the camera with no film actually moving.
Insert the Film Canister
With the camera back open, you’re ready to load your fresh roll.
Steps:
- Hold the film canister with the film leader (the short tongue of film) pointing toward the right side of the camera.
- Drop the canister into the film chamber — the recessed slot on the left side of the camera interior. The canister should seat snugly, with the protruding spindle (the small post at the top of the canister) fitting into the corresponding slot at the top of the chamber.
- Pull the film leader across the camera — draw it horizontally across the film channel (the flat track in the center of the camera back) toward the take-up spool on the right side.
- The leader tip should reach the marked line or slot on the take-up spool. Most cameras have a small orange or red mark indicating exactly how far to pull the leader. If yours doesn’t, aim for the leader tip to align with the right edge of the film channel.
Don’t force anything yet. The goal at this stage is simply to position the canister and extend the leader across the camera. The critical attachment step comes next.
Attach Leader to Take-Up Spool
This is the step that determines whether your camera will actually advance film — or just advance the shutter while your film sits motionless in its canister.
The take-up spool is the small cylinder on the right side of your camera’s interior. It has one or more small slots or hooks designed to grip the film leader.
Steps:
- Slide the film leader tip into the slot on the take-up spool. The slot is usually a narrow horizontal opening. Insert just the tip of the leader — about 5–10mm — into this slot.
- Make sure the leader is seated straight. A crooked leader will slip free as soon as you advance the film.
- Gently advance the film lever one half-stroke (don’t fully advance yet). Watch the take-up spool — it should rotate and begin to wrap the leader around itself.
- Check that the leader is holding. Tug very gently on the film canister side. If the take-up spool holds the film taut, you’re attached. If the leader slips free, re-insert it and try again.
Everyday analogy: Think of the take-up spool like the spindle on a cassette tape. The film leader needs to be locked into that spindle before anything will wind. A loose connection means nothing moves — and you’ll shoot an entire roll of “blank” frames.
Across the film photography community, the consistent advice from experienced shooters is: take an extra 15 seconds here. A poorly attached leader is responsible for the vast majority of “I shot a whole roll and got nothing back” stories.
Engage the Sprockets (Critical)
The sprocket check is the step most beginners skip entirely — and it’s the single most common cause of blank rolls. Don’t skip it.
Sprockets are the small teeth (like tiny gears) along the top and/or bottom of your camera’s film channel. The holes punched along the edges of 35mm film (called perforations) must engage with these sprocket teeth for the film to advance properly. If the film sits on top of the sprockets without engaging, the camera’s advance mechanism will move — but the film won’t.
How to check sprocket engagement:
- After attaching the leader to the take-up spool, look closely at the film where it crosses the film channel.
- The perforations along the film edge should align with the sprocket teeth. You may need to wiggle the film slightly up or down until the teeth drop into the holes.
- Advance the film lever one full stroke while watching the sprockets. The teeth should visibly grip and pull the film forward.
- Watch the rewind crank on top of the camera. As you advance the film, the rewind crank should rotate slightly backward (counter-clockwise). If it moves, film is advancing. If it stays still, the sprockets are not engaged.
This is your primary confirmation signal. A moving rewind crank = film is loading correctly. A still rewind crank = something is wrong. Stop and re-seat the film before closing the back.
Tips: Canon, Nikon, Point-and-Shoot
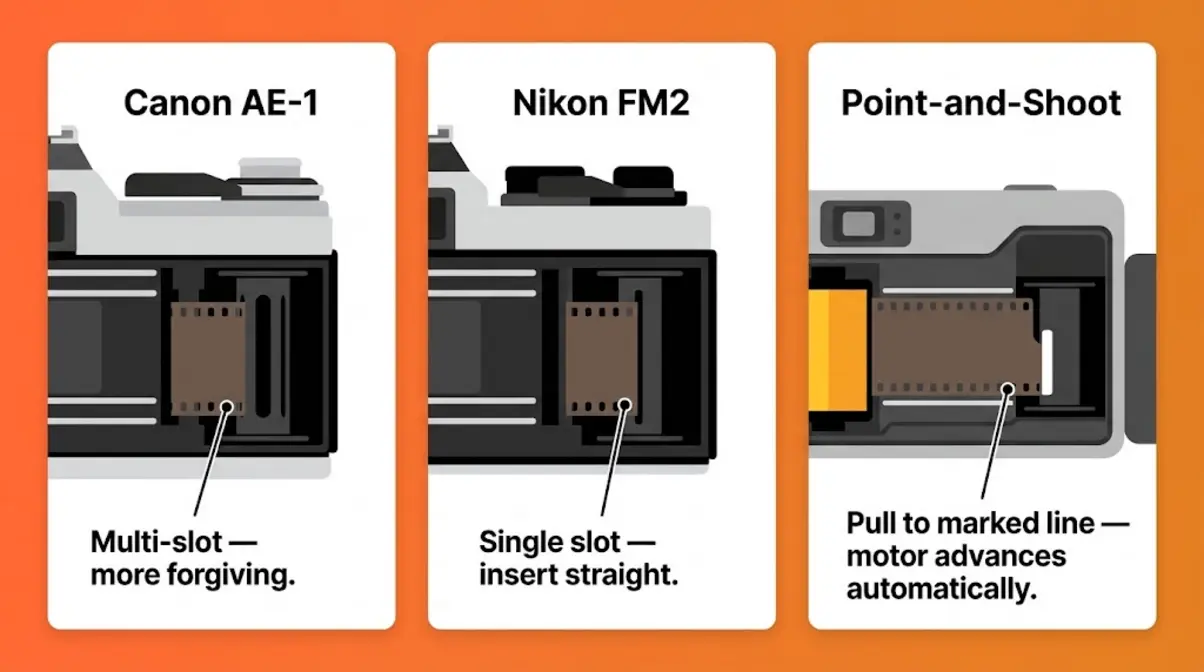
Film cameras aren’t all identical. Here’s what differs between the three most common beginner camera types.
Canon AE-1 (and AE-1 Program):
The Canon AE-1 has a multi-slot take-up spool — there are three or four slots, making leader attachment relatively forgiving. Insert the leader tip into any available slot. The Canon’s sprocket teeth are prominent and easy to see. After attaching the leader, advance the film lever twice before closing the back; the first advance is a “feed” stroke that often doesn’t fully engage the sprockets.
Nikon FM2 (and FM, FE series):
The Nikon FM2 uses a single-slot take-up spool that requires the leader to be inserted more precisely. The slot is narrower than the Canon’s. Insert the leader until about 5mm of film is inside the slot, then make sure it’s straight before advancing. The FM2’s film advance is very smooth — you’ll clearly feel the difference between advancing with engaged film (slight resistance) versus no film (free and easy).
Point-and-Shoot Cameras (Canon Sure Shot, Nikon L35AF, Olympus Stylus):
Most motorized point-and-shoot cameras have automatic loading — you simply open the back, drop in the canister, pull the leader to a marked line, close the back, and the camera advances the film to frame 1 automatically. You’ll hear the motor advance and see the frame counter reach “1.” If the camera beeps or shows an error symbol after closing, open the back and re-seat the film leader more precisely at the marked line.
Quick tip for all cameras: If you’re loading in bright sunlight, cup your hands around the camera interior to shade it while you work. Direct sun on an open camera back is fine for the empty interior, but it’s good habit to minimize light exposure during loading.
For model-specific loading diagrams and manuals, the Mike Butkus Camera Manual Library hosts free PDF manuals for hundreds of film camera models.
Step 3: Close the Camera and Advance
You’ve loaded the film and confirmed the sprockets are engaged. Now close up and advance to your first real frame. This step takes under 60 seconds and has one important confirmation check built in.
Close the Back and Advance Film
Steps:
- Close the camera back firmly — press it shut until you hear or feel a click. On most cameras, the latch will engage automatically when the back is fully closed.
- Do not force it. If the back won’t close easily, open it and check that no film is bunched or caught in the hinge area.
- Advance the film lever and fire the shutter (press the shutter button) twice. This advances past the film leader — the part of the film that was exposed to light during loading. These two frames are sacrificed. That’s normal and expected.
- Check your frame counter. After two advance-and-fire cycles, your frame counter should read “1” (or sometimes “0” before the first real frame). If it reads a different number, consult your camera manual — some cameras count differently.
Why do you sacrifice two frames? The film leader (the exposed tongue you handled during loading) has already seen light. Frames shot on the leader area would be fogged (overexposed). Advancing past it gives you clean, unexposed film for your first real shot.
The Rewind Knob Sanity Check
This is a 5-second confirmation step that no competitor guide mentions — and it’s one of the most reliable ways to confirm your film is loading correctly after you close the camera.
How to do it:
- After closing the camera back, advance the film lever one full stroke (don’t fire the shutter yet).
- Watch the rewind crank on top of the camera. It should rotate slightly as you advance.
- If the rewind crank moves: Film is advancing correctly. You’re good to go.
- If the rewind crank does not move: The film is not advancing. Open the camera back (in a dim location), re-seat the film, confirm sprocket engagement, and close it again.
This sanity check works because the film forms a continuous loop between the canister and the take-up spool. When the take-up spool pulls film forward, it creates tension that rotates the canister — and the rewind crank is connected to the canister. No movement = no film tension = film not advancing.
For a comprehensive overview of 35mm film mechanics, Ilford Photo’s technical guides offer beginner-friendly explanations of film transport systems.
Loading Polaroid and Disposable Cameras
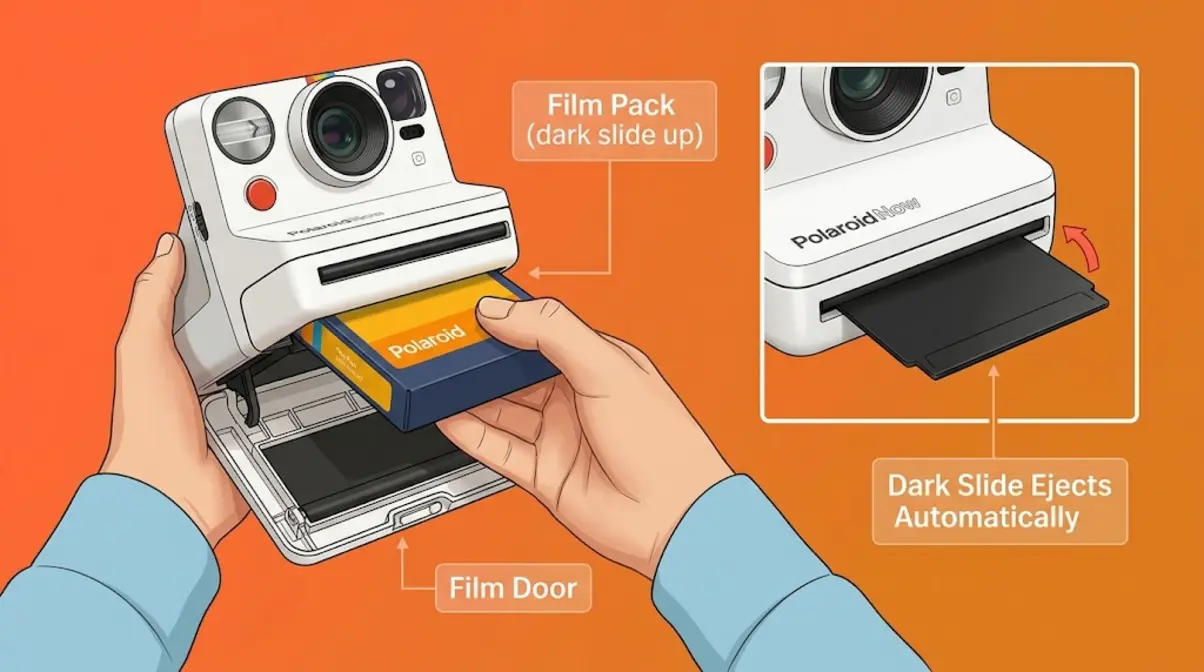
Not everyone shoots 35mm SLRs. Polaroid cameras and disposable cameras have their own loading logic — and their own common points of confusion.
How to Load a Polaroid Camera
Polaroid cameras use instant film packs — a self-contained cartridge that holds 8 exposures, the battery, and the chemical development pods all in one unit. This is completely different from 35mm film, and loading is much simpler.
Polaroid film packs are used with Polaroid Now, Now+, Go, and i-Type cameras, as well as the classic OneStep series.
Steps to load a Polaroid film pack:
- Open the film door — on most Polaroid cameras, there’s a button on the side or bottom of the camera body. Press it and the film door swings open.
- Remove the new film pack from its packaging carefully. Keep it in its black protective sleeve until the moment you insert it. The film pack is light-sensitive before it’s loaded.
- Insert the film pack into the camera with the dark slide (the black protective sheet on top) facing up and toward the film ejection slot. The pack should drop in with a gentle push — no forcing required.
- Close the film door firmly. The camera will automatically eject the dark slide — a black sheet that exits from the film slot. This is normal. Do not block the slot.
- The camera is now ready to shoot. The frame counter (on cameras that have one) will show 8.
Important: Never open the film door in daylight once a pack is loaded — doing so will expose and ruin all remaining frames. If you need to remove a partially used pack, do it in complete darkness.
Polaroid film should be stored at 41–65°F (5–18°C) and used within the expiration date for best color accuracy, according to Polaroid’s official film care guidance.
Can You Reload a Disposable Camera?
Disposable cameras (also called single-use cameras) are designed and sold as single-use products. Most are not designed to be reloaded by the consumer — the film is factory-loaded and the camera body is sealed to protect it.
What actually happens at the lab: When you drop off a disposable camera for processing, the lab technician opens the camera body in a darkroom, removes the film, and processes it. The camera body is then typically discarded or recycled.
Can you reload one yourself? Technically, some experienced film photographers do reload disposable cameras — particularly Fujifilm QuickSnap or Kodak FunSaver models — as a DIY project. However, this requires:
- Opening the camera body (which can damage the housing)
- Working in complete darkness to insert new film
- Manually advancing the film and resetting the frame counter
For a beginner, this is not recommended. The risk of ruining a fresh roll of film is high, and the process provides no meaningful advantage over simply buying a cheap reloadable point-and-shoot camera. If you enjoy the disposable camera aesthetic, consider a reloadable alternative like the Kodak M35 or the Ilford Sprite 35-II — both are inexpensive, reloadable, and designed for beginners.
Bottom line: Treat disposable cameras as single-use. Drop them off for processing, enjoy your photos, and move on to a reloadable camera when you’re ready.
For guidance on disposable camera processing options, The Darkroom lab’s film processing FAQ covers what to expect when dropping off single-use cameras.
Mid-Roll Switching & Film Storage
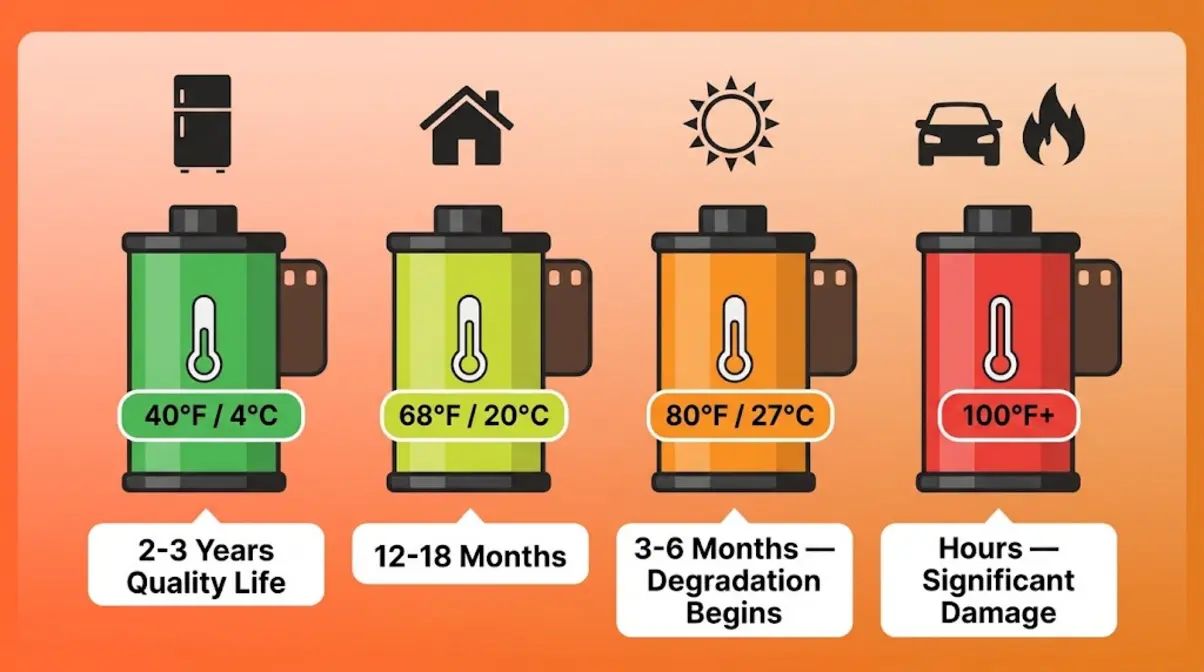
Once you’ve mastered basic loading and unloading, two situations will eventually come up: wanting to switch film before the roll is finished, and wondering how long you can leave film sitting in your camera. Here’s how to handle both.
How to Switch Film Mid-Roll
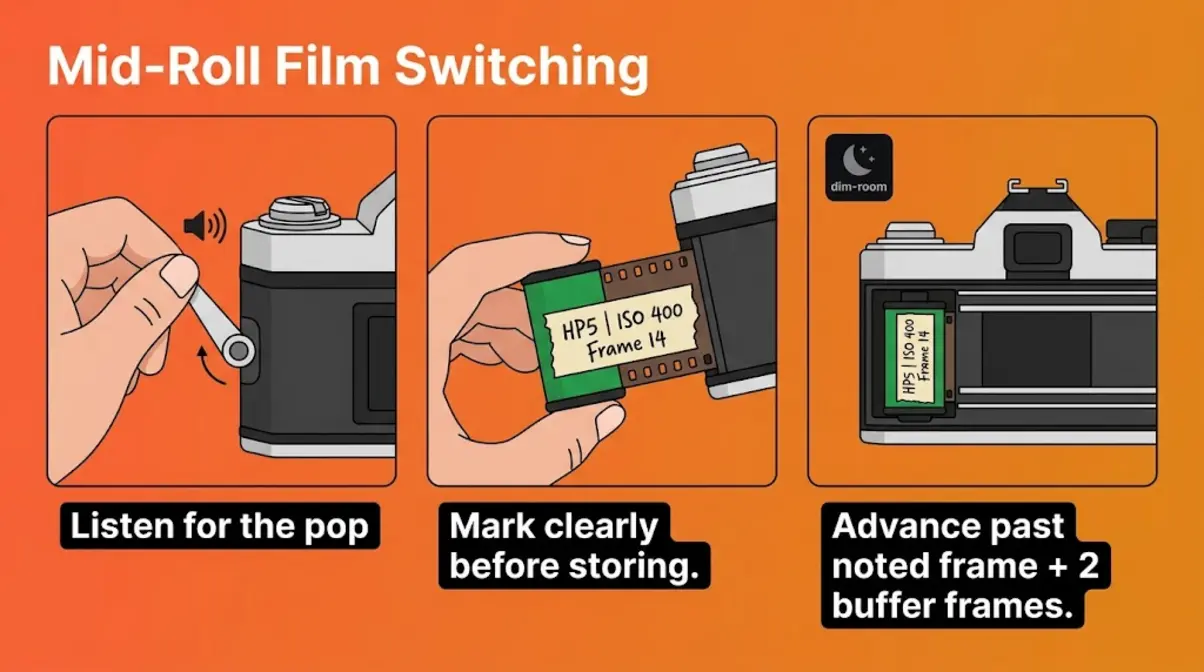
Mid-roll switching — removing a partially shot roll and replacing it with a different film stock — is possible, but it requires a careful technique. The goal is to rewind the film without pulling the leader fully back into the canister, so you can reload it later and pick up where you left off.
The mid-roll switching technique:
- Note your current frame number before rewinding. Write it down or take a photo with your phone.
- Press the film release button (as in Step 1) and begin rewinding with the rewind crank.
- Rewind slowly and listen carefully. As the film rewinds, you’ll feel steady resistance. When the leader begins to detach from the take-up spool, you’ll feel a small “pop” or sudden release of tension — slightly different from the full tension release at the end of rewinding.
- Stop rewinding immediately when you feel that pop. The film leader should now be outside the canister but no longer attached to the spool. Give the crank one more careful half-turn to confirm the leader is free, then stop.
- Open the camera back and remove the canister. Mark it clearly with tape: write the film stock, ISO, and the frame number you reached (e.g., “HP5, ISO 400, Frame 14”).
- Store it in a film canister case or small bag away from light and heat.
To reload and continue later:
- Load the canister normally, but advance the film in darkness (or with the lens cap on and in a dim room) past the frame number you noted — plus two extra frames as a buffer.
- The frames shot in the “dark advance” zone will be blank, but your original frames are safe.
Honest caveat: Mid-roll switching is an intermediate technique. The “pop” sensation is subtle and easy to miss on your first attempt. Across the film photography community, the consistent recommendation for beginners is to finish the roll before switching film stocks. Practice the technique on a sacrificial roll before using it for important shots.
How Long Can Film Sit in a Camera?
Unused film left in a camera doesn’t last forever. Heat, humidity, and time all degrade unexposed film — and the degradation is cumulative and irreversible.
General storage rules:
- Unexposed film in a camera is best shot within 6–12 months of loading, even if the film’s expiration date is further out. The camera environment (especially a hot car or bag) accelerates degradation.
- Heat is the primary enemy. Film stored above 75°F (24°C) for extended periods will show increased grain, color shifts, and reduced contrast. A camera left in a hot car in summer can damage film within hours.
- Humidity is a secondary concern. High humidity (above 60%) promotes mold growth on film emulsion over time.
- Cold storage extends life significantly. Professional photographers store unused film in refrigerators (around 40°F / 4°C). If you refrigerate film before loading it, let it warm to room temperature for 1–2 hours before use to prevent condensation.
| Storage Condition | Expected Film Life |
|---|---|
| Room temp (68°F / 20°C), low humidity | 12–18 months after loading |
| Warm environment (75–85°F / 24–30°C) | 3–6 months before noticeable degradation |
| Hot car / direct sun exposure | Hours to days — significant damage likely |
| Refrigerated (40°F / 4°C) | 2–3 years with minimal quality loss |
If you’ve left film in a camera for over a year in normal room conditions, it’s worth shooting and developing it anyway — the results may be slightly grainy or color-shifted, but they’re rarely completely lost. Kodak Alaris’s film storage guidance recommends processing film as soon as possible after the last frame is shot.
Troubleshooting: When Something Goes Wrong
Even careful photographers run into problems. Here’s how to diagnose and fix the most common film-change issues using The Light-Safe Method approach: identify the symptom, understand the cause, and apply the right fix.
Visual Guide: Common Film Problems
| Symptom | Likely Cause | Fix |
|---|---|---|
| Rewind crank won’t turn / feels jammed | Film release button not pressed, or film is torn inside the camera | Press the film release button first. If still stuck, do NOT force it — take the camera to a lab for darkroom removal |
| Rewind crank spins freely from the start | Film leader was never attached to take-up spool | Rewind (nothing to lose), open back, reload from scratch — verify leader attachment and sprocket engagement |
| Frame counter not advancing | Sprockets not engaged / film not moving | Rewind, open back in dim light, re-seat film, confirm perforations are on sprocket teeth |
| Film advance lever feels unusually easy / no resistance | Film has run out OR film is not advancing (sprocket failure) | Check frame counter — if at end of roll, rewind normally. If mid-roll, rewind and reload |
| Torn film leader inside camera | Over-forced rewind without pressing release button | Do NOT open the camera in light. Take to a photo lab — technicians can remove it in a darkroom and may salvage most frames |
| Developed photos are all blank (white or clear) | Camera back opened before full rewind, OR film never loaded correctly | Identify which: if some frames are good, it’s a partial exposure issue. If all blank, the film was likely never advancing |
| Developed photos are all black | Shutter malfunction or film loaded with emulsion side wrong | Emulsion side (dull side) must face the lens. If loaded correctly, the camera may need servicing |
| Dark streaks along the edge of photos | Light leak — camera back seal is worn or damaged | Apply black foam weatherstripping tape to the camera back seal, or take to a repair technician |
The golden rule of film emergencies: When in doubt, do NOT open the camera in bright light. Rewind first, always. Even if you’re not sure the film is fully rewound, more winding is always better than less. A partially rewound roll opened in shade will lose fewer frames than a partially rewound roll opened in direct sunlight.
For camera repair resources and community troubleshooting advice, the Film Photography Project community maintains an active forum where experienced shooters address model-specific problems.
How do you pull film out of a camera?
Never pull film out of a camera manually — this tears the film and may permanently jam it inside the camera body. The correct method is always to rewind first using the rewind crank, then open the back and lift out the canister. If the rewind crank is stuck, press the film release button on the camera bottom before trying again. If the film is jammed or torn inside the camera, take it to a photo lab — technicians can open the camera in a darkroom and remove the film without destroying your photos.
Frequently Asked Questions
Can you still drop off film at CVS?
Yes, CVS still accepts 35mm film for processing at most locations as of 2026, though the service is handled through third-party mail-in labs rather than in-store development. Drop-off times and turnaround vary by store. Call your local CVS before making a trip, as not every location participates. Turnaround is typically 1–3 weeks. CVS does not develop film in-store — your roll is shipped to a processing partner.
What is the 98% rule at CVS?
The “98% rule” refers to CVS’s policy of not returning physical negatives in many cases — they scan and provide digital files, but the original film negatives may be discarded after processing. This is a critical thing to know before dropping off irreplaceable rolls. If you want your negatives back, use a dedicated film lab like The Darkroom, Richard Photo Lab, or a local independent processor. Always ask explicitly: “Will I get my negatives back?” before handing over your film at any retail chain. The Darkroom’s film developing FAQ explains what to expect from different processing options.
Switch Film to a Different Camera?
Yes, mid-roll switching is possible with care. Rewind the film slowly, stopping when you feel the leader detach from the take-up spool (a subtle “pop” sensation). Mark the canister with the film stock, ISO, and frame number reached. To reload later, advance past your previous frame number plus two buffer frames in a dim environment. This is an intermediate technique — beginners are better off finishing the roll before switching. For a full walkthrough, see the Advanced Techniques section above.
Can 35mm film be converted to digital?
Yes — 35mm negatives can be scanned and converted to digital files through several methods. The most accessible options are: mail-in scanning services (The Darkroom, Mpix, ScanMyPhotos), local photo labs with film scanning, and home scanning using a flatbed scanner with a film holder (like the Epson Perfection V600). Quality varies significantly — drugstore scans produce low-resolution files suitable for social media, while professional drum scanning produces archival-quality images. Most film labs offer scanning as an add-on when you submit film for development.
Does Walgreens still take film?
Yes, Walgreens still accepts 35mm film for processing at many locations in 2026, also through a mail-in third-party lab model similar to CVS. Turnaround is typically 1–3 weeks. Like CVS, Walgreens does not process film in-store. Availability varies by location — call ahead to confirm. For the same reasons as CVS, ask explicitly about negative return policy before submitting any roll you care about keeping.
How Long Can Unused Film Sit?
Unused film loaded in a camera is best shot within 6–12 months under normal room-temperature conditions. Heat is the biggest threat — a camera stored above 75°F (24°C) consistently will show film degradation (increased grain, color shifts) within 3–6 months. A camera left in a hot car can damage film within hours. Cold storage significantly extends life: film kept in a refrigerated environment (around 40°F / 4°C) can remain in good condition for 2–3 years. Always process your film as soon as possible after finishing the roll.
Can you open the camera back mid-roll?
No, opening the camera back mid-roll will ruin your photos. Any unexposed film that is hit by light will be permanently destroyed. If you must open the back, you need to rewind the film fully into the canister first using the mid-roll switching technique described earlier in this guide.
Is it safe to put film through x-rays?
It depends on the scanner and the film speed. Standard carry-on X-ray machines usually won’t damage film under ISO 800, but the newer CT scanners used at many modern airport checkpoints will instantly ruin unprocessed film of any speed. Always request a hand inspection for your film when flying.
You’re Ready to Shoot
Loading and unloading film correctly comes down to one principle — The Light-Safe Method — and three checkpoints: rewind fully before opening, confirm sprocket engagement before closing, and watch the rewind crank as your final sanity check. Film photography rewards patience, and that patience starts before you take a single shot. Research from Kodak Alaris confirms that properly handled and stored film retains full image quality right up to the point of processing — meaning every careful step you take protects real, irreplaceable images.
The Light-Safe Method isn’t just a set of steps. It’s a mindset that transforms anxious guesswork into deliberate action. Once you know exactly how to change film in a camera, that anxiety disappears — replaced by the specific, quiet confidence of knowing exactly what you’re doing and why.
Pick up your camera, find a shaded spot, and load that roll. Your first frame is waiting.
