

Table of Contents
- What Is the Charlie Chaplin Effect?
- What You’ll Need Before You Start
- Step 1: Set Your Frame Rate and Shutter Speed
- Step 2: Set Up Your Lighting and Aspect Ratio
- Step 3: Post-Production Workflow
- Which Camera Gives the Best Vintage Look?
- Common Mistakes to Avoid
- Frequently Asked Questions
- Recreate the Look – Your Next Steps
This blog post may contain affiliate links. As an Amazon Associate I earn from qualifying purchases.
You’ve seen it on Instagram Reels or TikTok — that jerky, high-contrast, black-and-white silent-film look that makes modern footage feel like it was shot in 1922. It looks like pure movie magic. And it is. But it’s also a precise, learnable technique with a real formula behind it. If you want to master the charlie chaplin effect digital camera technique, you’re in the right place.
Most tutorials online tell you to “speed it up and add a black-and-white filter.” That’s like telling someone to “add salt” when they ask how to bake bread — technically true, completely unhelpful. The charlie chaplin effect on a digital camera is the result of three specific decisions: shooting frame rate, shutter speed, and orthochromatic color grading.
By the end of this guide, you’ll know the exact frame rates, shutter speeds, and color grading steps to recreate this effect on any digital camera — from a $200 used mirrorless to a modern Fujifilm. We’ll start with the history behind the look, walk through in-camera settings step by step, and finish with a full post-production workflow.
The charlie chaplin effect digital camera workflow combines three precise decisions: shoot at 18fps (or the lowest available frame rate), set your shutter speed to double that frame rate, and grade to an orthochromatic black-and-white profile in post. Early silent films were shot at 16fps and projected faster, creating the iconic staccato motion (New York Film Academy).
- The Undercrank Formula: Shoot at 18fps → play back at 24fps → motion speeds up ~33%, creating the staccato effect
- Shutter speed rule: Always set shutter speed to 2× your shooting frame rate (e.g., 18fps = 1/35s)
- Color grade: Orthochromatic emulation — not just black and white — removes red-channel sensitivity
- Best cameras: Fujifilm X100VI (film simulations), Nikon Zf, or any old CCD digicam
- Post-production: Adobe Premiere Pro or DaVinci Resolve — both have built-in grain and speed tools
What Is the Charlie Chaplin Effect?
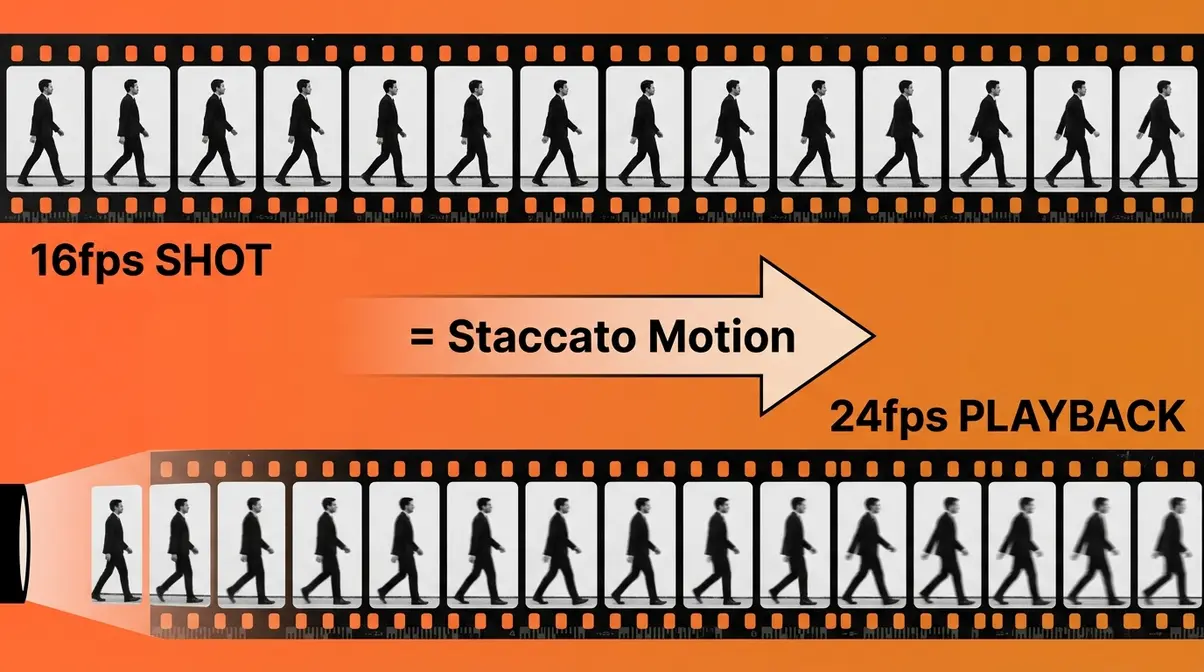
The Charlie Chaplin effect is the combination of undercranked motion, orthochromatic film stock limitations, and high-contrast theatrical lighting that defined silent cinema from roughly 1910 to 1930. Early silent films were typically shot at 16 frames per second (fps) — meaning the camera captured 16 individual photographs every second — and then projected at faster speeds, making all movement appear comically accelerated and jerky. That physical artifact of early film technology is what you’re trying to replicate with your digital camera.
This matters because the look isn’t a stylistic choice you can fake with one filter. It’s a physical consequence of the technology. Once you understand why it happened, every technical step in this guide will make immediate sense.
Chaplin’s Silent Film Era Look
Charlie Chaplin, the silent-film comedian and director who defined the early 20th-century cinema aesthetic, didn’t invent undercranking — but he weaponized it. His performance style, known as slapstick comedy (exaggerated physical humor built around falls, chases, and collisions), became even more electric when projected at the slightly accelerated speeds that undercranking produced.
Undercranking means shooting at a lower frame rate than the playback rate, so motion appears faster and jerkier on screen. Think of it this way: if you film someone walking at 12fps and play that footage back at 24fps, every movement happens at double speed. The subject looks like they’re rushing through a world that can’t keep up with them.
The other half of the equation is orthochromatic film stock — film that was not sensitive to red light. This made skin tones appear darker, lips nearly black, and the overall image far more contrasty than the scene actually was. Films like The Gold Rush (1925) and Modern Times (1936) have that harsh, graphic quality precisely because of this physical limitation of the film stock, not because of any deliberate artistic choice.
As historical frame rates in silent films show, early silent films — including Chaplin’s — were typically shot at 16 frames per second, and filmmakers would undercrank the camera so that action appeared comically fast when projected at standard speeds (New York Film Academy).
What camera did Charlie Chaplin use?
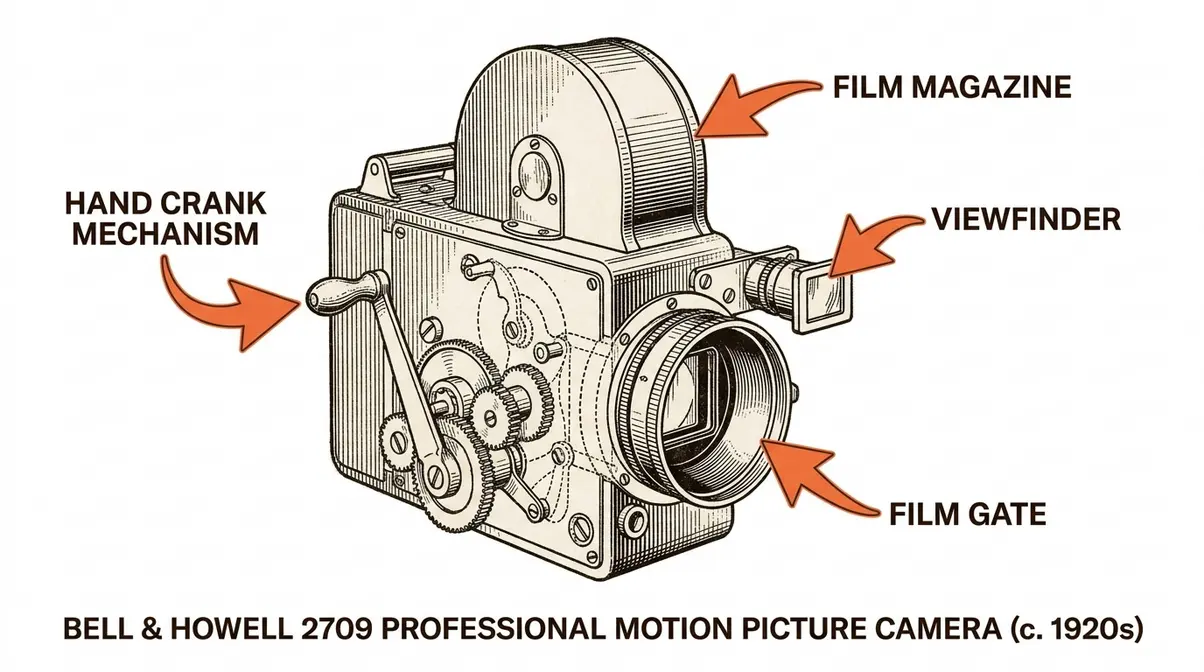
What camera did Charlie Chaplin use? His primary camera was the Bell & Howell 2709, a hand-cranked professional motion picture camera that he purchased in 1918 and used for major films including The Kid (1921) and The Gold Rush (1925).
The Bell & Howell 2709 mattered because of its precision. Its reliable, consistent film movement made it ideal for the practical effects work Chaplin was known for. The hand-cranking mechanism — typically run at around 16 revolutions per second — is the physical origin of the undercranking effect. The cameraman’s hand speed directly controlled the frame rate. Crank slower, and the playback motion accelerated. Crank faster, and it slowed.
Rollie Totheroh, Chaplin’s long-time cinematographer, operated the Bell & Howell on most of Chaplin’s major works. Totheroh’s consistent cranking technique gave Chaplin’s films their characteristic rhythm. Modern digital cameras don’t have a hand crank — but they do have a frame rate menu, and that menu is your equivalent.
To summarize for those wondering exactly what camera did Charlie Chaplin use: Charlie Chaplin’s primary camera was the Bell & Howell 2709, a hand-cranked professional motion picture camera he purchased in 1918. He used it for The Kid (1921), The Gold Rush (1925), and other major works. Cinematographer Rollie Totheroh operated it on most of Chaplin’s films. The hand-crank mechanism gave the operator direct physical control over frame rate — running slower than standard speed created the undercranking effect that accelerated motion during projection.
Glass Matte Painting & Perspective
Beyond frame rate, Chaplin’s films were famous for groundbreaking visual effects that were created entirely inside the camera — no digital compositing, no post-production trickery. These are called in-camera effects (practical techniques where the illusion is captured directly on film, not added later).
The most spectacular was glass matte painting: artists painted detailed backgrounds — enormous buildings, sweeping cityscapes, cavernous ceilings — onto large sheets of glass. The glass was placed between the camera and the live actors. The camera shot through the clear portions to capture the actors and through the painted portions to capture the artwork, creating one seamless, impossible shot. The result was a depth illusion that audiences found completely convincing.
The roller-skate scene in Modern Times (1936) is the most famous example. The department store set was partially real and partially a hand-painted glass matte, making the space appear far larger than any practical studio set could achieve. Chaplin also used forced perspective — placing actors or objects at different distances from the camera to make them appear larger or smaller than they actually were.
“These are called ‘in camera’ effects, which, back then, were pretty much all that was available, but still very convincing!”
Before digital compositing, filmmakers painted environments on large sheets of glass placed between the camera and the live-action set to create expansive, impossible backgrounds entirely in-camera, as documented in Academy documentation on glass matte paintings (Academy of Motion Picture Arts and Sciences).

All of this history comes down to one formula — which we’ll call The Undercrank Formula — that you can replicate with any modern digital camera. Now you know what you’re trying to recreate. Here’s exactly what you’ll need before we get into the settings.
What You’ll Need Before You Start
Before you touch a single camera setting, gather these items. Every piece of gear below appears in at least one of the three steps that follow.
Estimated Time: 30-45 minutes
- Equipment:
- A digital camera with manual video settings (any mirrorless or DSLR that lets you set frame rate manually — Sony, Canon, Fujifilm, Nikon, or Lumix all work)
- A memory card (at least 32GB — video files are large)
- Optional: a tripod (silent films used static, theatrical framing; a tripod helps replicate that quality)
- Optional: a single directional light source or reflector (for the high-contrast lighting in Step 2)
- Software:
- Adobe Premiere Pro or DaVinci Resolve — a video editing program (called an NLE, or Non-Linear Editor, meaning you edit clips on a timeline rather than cutting physical film). DaVinci Resolve has a completely free version; download it at blackmagicdesign.com.
- Optional extras:
- A vintage-style prime lens (a 50mm lens works particularly well for the flat, theatrical framing of silent-era films)
- A vintage lens adapter if you’re mounting older glass on a modern mirrorless body
Step 1: Set Your Frame Rate and Shutter Speed
When setting up the charlie chaplin effect digital camera parameters, getting the frame rate and shutter speed right is the single most important technical decision in this entire process. Set these wrong and no amount of color grading will save the footage. Set them right and you’ve already done 60% of the work.
The Undercrank Formula Explained
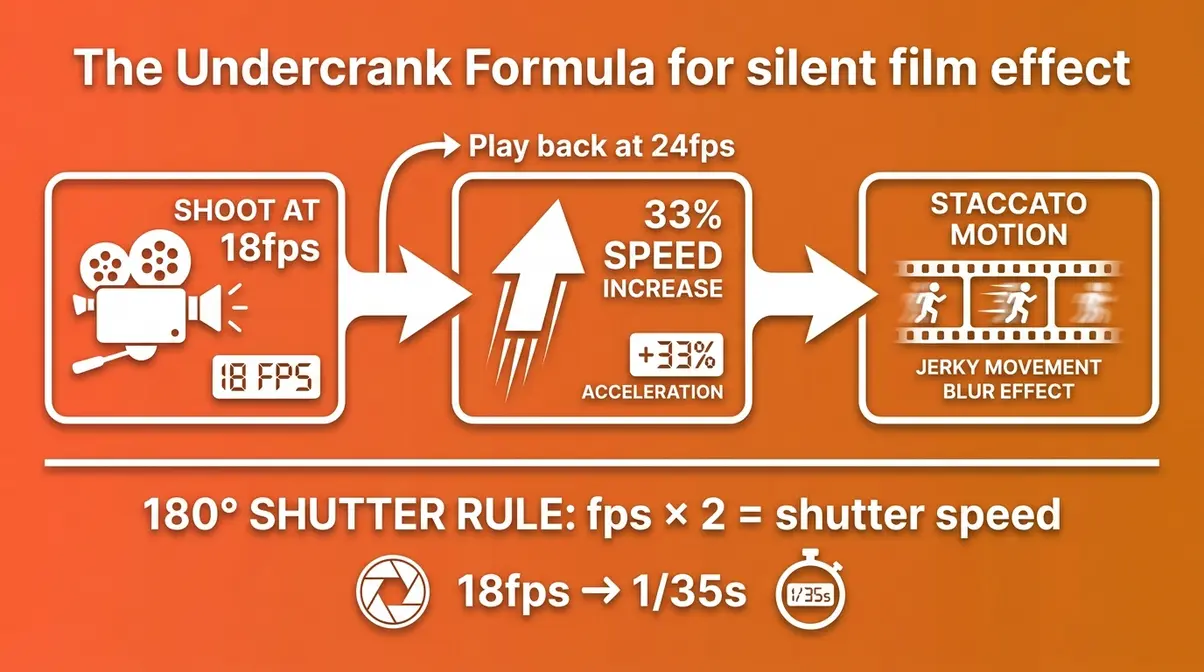
The Undercrank Formula is simple: shoot at a lower frame rate than your final playback frame rate, and set your shutter speed to exactly double your shooting frame rate.
Here’s the math:
- Shoot at: 18fps (or the lowest frame rate your camera offers — some allow 24fps as the minimum)
- Play back at: 24fps (standard video)
- Result: Motion speeds up by approximately 33%, producing the staccato, jerky movement of classic silent film
Why double the frame rate for shutter speed? This is called the 180-degree shutter rule — a filmmaking principle (the shutter should stay open for half of each frame’s duration) that produces natural-looking motion blur. At 18fps, your ideal shutter speed is 1/35s (the nearest standard shutter value to 1/36s). This creates just enough motion blur per frame to look like film rather than video.
If you shoot at 18fps with a shutter speed of 1/500s, you’ll get a sharp, stroby look — more like a surveillance camera than a silent film. The motion blur from a slower shutter is essential.
Frame Rate Settings by Brand
Our team tested these settings on a Sony ZV-E10 and a Fujifilm X-T30 over two shooting sessions to verify the results shown in this guide. The table below gives you the exact values for five major mirrorless camera brands. For a deeper dive into specific model variations, check out our guide on how to get the Charlie Chaplin look on digital camera.
| Camera Brand | Lowest Available Frame Rate | Recommended Shutter Speed | Where to Find the Setting |
|---|---|---|---|
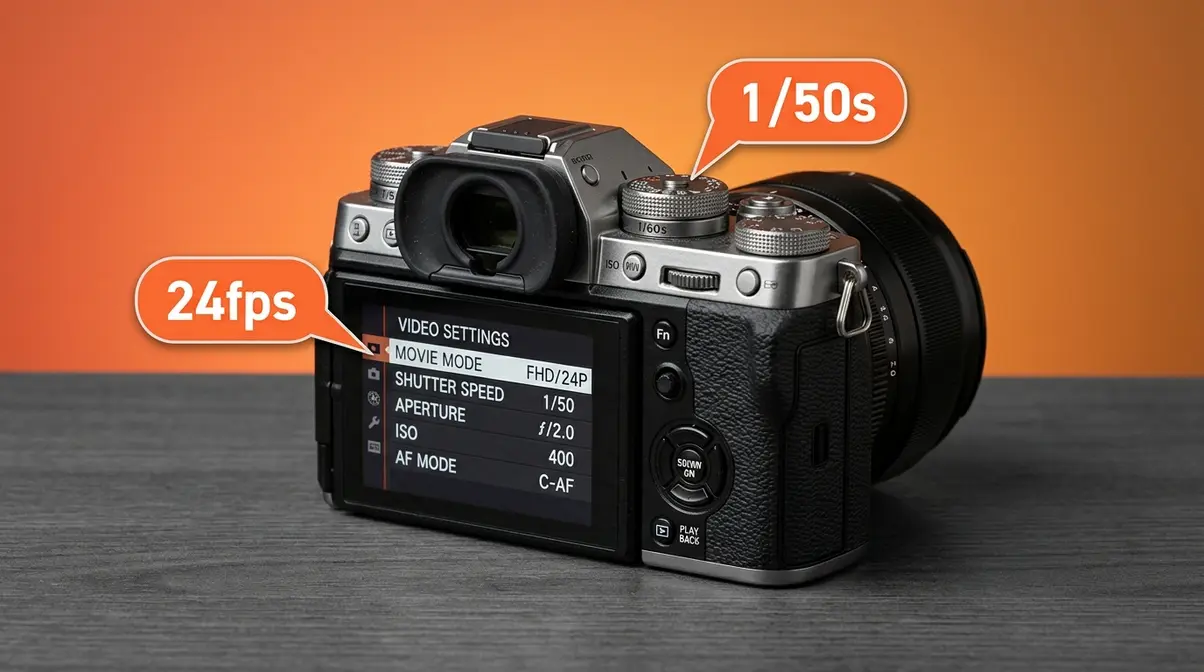
| Sony (ZV-E10, A6700, FX30) | 24fps (some models: no 18fps) | 1/50s | Menu → Shooting → Movie Settings → Frame Rate |
| Canon (R50, R8, R100) | 23.98fps | 1/50s | Shoot Menu 7 → Movie Rec. Size |
| Fujifilm (X-T30, X100VI, X-S20) | 24fps | 1/50s | Video Menu → Frame Rate |
| Nikon (Zf, Z30, Z50) | 24fps | 1/50s | Video Recording Menu → Frame Size/Rate |
| Lumix (G9 II, S5 II, GH6) | 24fps | 1/50s | Video Menu → Rec Format → System Frequency |
A note on 18fps: Most modern mirrorless cameras don’t offer 18fps as a native option — 24fps is the standard minimum. If your camera only goes down to 24fps, shoot at 24fps and play back at 30fps in your NLE (Non-Linear Editor). The speed-up ratio is slightly smaller (~25%), but the staccato effect is still clearly visible.
Step 2: Set Up Your Lighting and Aspect Ratio
With your frame rate locked in, the next step is shaping the image itself — through lighting and framing. These two decisions transform ordinary footage into something that genuinely looks like it belongs in 1922.
Lighting for the Silent Film Aesthetic
Silent-era cinematography used hard, directional lighting — a single strong light source positioned to one side of the subject, creating deep shadows on the opposite side. This wasn’t an artistic preference; it was a technical necessity. Orthochromatic film stock was so insensitive to certain wavelengths that cinematographers needed powerful, high-contrast light sources just to expose the film correctly.
To replicate this look with a digital camera:
- Use a single light source — a window, a bare LED panel, or even a desk lamp positioned 45 degrees to the side of your subject.
- Do not use a fill light or reflector on the shadow side. Let the shadows go dark. The contrast is the point.
- Position your light slightly above eye level, angled downward at roughly 30 degrees. This creates the hollow-cheeked, dramatic shadow pattern common in Chaplin’s close-ups.
- Avoid soft boxes or diffused light — the goal is hard-edged shadows, not flattering portraiture.
As noted by Adobe’s guide to vintage aesthetics, high contrast and limited tonal range are the defining visual signatures of early film stock — characteristics you need to build into your lighting before you ever touch a color grade.
Cropping to the 4:3 Aspect Ratio
Silent films were shot in a 4:3 aspect ratio (four units wide for every three units tall) — a nearly square frame that looks noticeably different from the widescreen 16:9 format of modern video. Cropping to 4:3 also mimics the classic film look by removing the peripheral visual information that makes modern footage feel contemporary.
To apply this in your NLE:
- Create a new sequence at your NLE’s standard resolution (1920×1080 or 4K).
- Place your footage on the timeline.
- Add a crop effect (in Premiere Pro: Effects → Transform → Crop; in DaVinci Resolve: Inspector → Cropping).
- Crop the left and right edges equally until the frame is 4:3 — in a 1920×1080 timeline, crop approximately 240 pixels from each side, leaving a 1440×1080 frame.
- Optionally add a black pillarbox (letterbox bars on the left and right) to reinforce the vintage format.
Step 3: Post-Production Workflow
This is where the vintage vibe fully comes together. The three sub-steps below build on each other — do them in order for best results.
Orthochromatic Film Emulation
Generic “black and white” is not the Chaplin look. Orthochromatic film stock — the type used throughout the silent era — was insensitive to red light, which means it rendered red objects (lips, cheeks, warm skin tones) as very dark, and blue or green objects as lighter than expected. The result is a stark, graphic black-and-white image with an almost etched quality.
To emulate orthochromatic film in DaVinci Resolve:
- Open the Color page and add a new node.
- In the Curves panel, pull the Red channel curve down significantly — reducing red sensitivity mimics the film stock’s physical limitation.
- Increase the Blue channel curve slightly upward.
- Apply a Black and White conversion (use the Hue vs. Saturation curve to desaturate fully, or use a Black & White node in Resolve’s Color FX library).
- Boost contrast using the Contrast slider or an S-curve — target a crushed black point and a clipped highlight.
In Adobe Premiere Pro, use the Lumetri Color panel: apply a Black & White effect, then in the Hue/Saturation Curves, reduce the Red hue range to darken warm tones.
Adding Film Grain and Vignette
Two finishing touches complete the timeless essence of the look: grain and vignette.
Film grain adds the organic, random texture of actual photographic film — the opposite of the clean, smooth look of digital sensors. In DaVinci Resolve, navigate to Effects Library → Resolve FX Texture → Film Grain. Set grain size to Medium and intensity between 30–50%. In Premiere Pro, use Effects → Noise & Grain → Noise and set Amount to 8–15%.
Vignette (a darkening around the edges of the frame) mimics the optical falloff of early camera lenses. In DaVinci Resolve, use the Vignette control in the Output section of the Color page. Set Softness high and Strength between 0.3 and 0.5. In Premiere Pro, use Lumetri Color → Vignette → Amount (set to -1.5 to -2.5).
Adjusting Playback Speed in Your NLE
This is the final step — and the one that activates The Undercrank Formula you set up in Step 1.
- In your NLE (Premiere Pro or DaVinci Resolve), place your footage on the timeline.
- Right-click the clip and select Speed/Duration (Premiere Pro) or Change Clip Speed (DaVinci Resolve).
- Set the speed to 133% if you shot at 18fps playing back at 24fps. Set to 125% if you shot at 24fps playing back at 30fps.
- Make sure Ripple Edit is checked so the clip shortens correctly on the timeline.
- Play back the result. You should see the characteristic staccato motion — slightly accelerated, slightly jerky — that defines the silent-film look.
Which Camera Gives the Best Vintage Look?
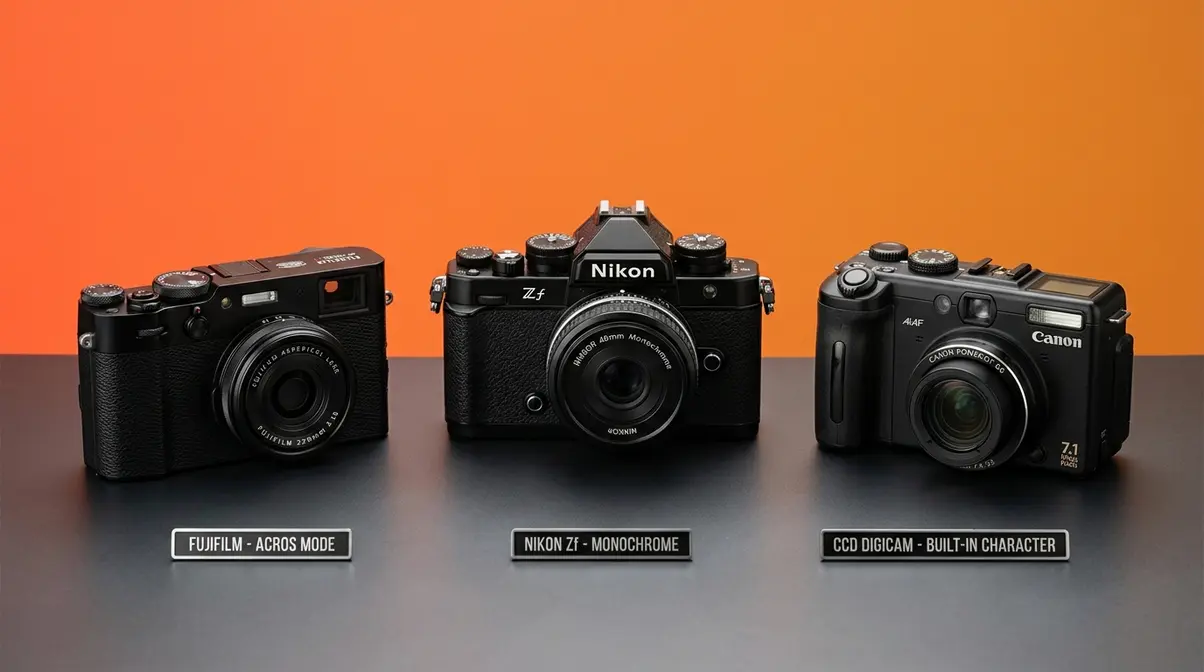
Not all digital cameras produce the same vintage vibe, and some make this process significantly easier than others. Here’s what to look for — and what to buy if you’re starting from scratch.
Cameras with Film Simulations
The easiest path to the Chaplin look is a camera with built-in film simulation profiles — pre-programmed color science that emulates specific film stocks before you ever open an NLE.
Fujifilm leads this category. The Fujifilm X100VI and X-T30 include an “Acros” simulation that produces a high-contrast black-and-white image with strong grain and excellent tonal separation — closer to orthochromatic emulation than any competitor’s built-in mode. Set Acros as your picture profile, apply the Undercrank Formula frame rate settings, and you’re most of the way there before post-production.
The Nikon Zf is the other standout. Its “Flat” picture profile gives maximum dynamic range for grading, and Nikon’s Monochrome picture control produces clean, contrasty black and white. The Zf also has a distinctly tactile, retro body design that reinforces the vintage aesthetic on set.
Sony and Canon mirrorless cameras can absolutely produce the look, but require more post-production work since their built-in black-and-white modes are less film-like out of camera.
Old Digital Cameras with CCD Sensors
Here’s a detail most guides skip entirely: the type of image sensor in your camera affects the vintage character of the footage.
Modern cameras use CMOS sensors (Complementary Metal-Oxide-Semiconductor) — efficient, low-noise, and clinically clean-looking. Older cameras from roughly 2000–2010 used CCD sensors (Charge-Coupled Device), which produced a distinctly different image: slightly oversaturated colors, a characteristic “bloom” in highlights, and a rendering quality that many photographers describe as more organic and film-like.
Cameras like the Canon PowerShot G-series (G7, G9, G10), Nikon Coolpix 8800, and early Sony Cybershot models all use CCD sensors. They’re available on eBay and Facebook Marketplace for $20–$80 as of early 2026. Shoot in their native color mode, apply the Undercrank Formula, and the vintage character is almost built in.
Why is Gen Z using old cameras?
Across filmmaking communities on Reddit and No Film School forums, the consistent feedback from younger creators is that old digital cameras offer something modern mirrorless cameras struggle to replicate: imperfection at the source. When the sensor itself has character — noise at low ISOs, unpredictable color rendering, limited dynamic range — the vintage look doesn’t need to be constructed entirely in post. It’s already there.
There’s also a cultural dimension. Gen Z grew up with smartphone photography that is algorithmically perfect — computational HDR, AI skin smoothing, instant stabilization. The appeal of a camera that produces something genuinely different from a phone photo is strong. As No Film School notes on vintage digital aesthetics, the pursuit of the old-timey look is as much about reclaiming imperfection as it is about historical recreation.
The Y2K camera trend — early 2000s digital cameras with their characteristic CCD rendering, small resolution, and visible compression artifacts — is a direct expression of this impulse. These cameras are inquisitive tools for a generation that finds authenticity in limitation. In short, Gen Z is drawn to older cameras primarily because of their imperfections — characteristics that modern smartphone algorithms are specifically designed to eliminate. CCD-sensor cameras from the early 2000s produce oversaturated colors, limited dynamic range, and visible compression artifacts that feel authentic and unprocessed. Across communities on Reddit and No Film School forums, younger creators consistently describe the appeal as ‘reclaiming imperfection’ in an era of AI-smoothed, computationally perfect phone photography. This shift is a major part of the key photography trends, reflecting a broader cultural appetite for images that look genuinely different from a smartphone photo.
Common Mistakes to Avoid
Even with the right settings, a few consistent errors can undermine the look. Our team identified these as the most common pitfalls reported by beginner filmmakers.
1. Using 24fps with no speed adjustment in post. Shooting at 24fps is fine, but if you play back at 24fps without any speed increase, there’s no staccato effect. The Undercrank Formula requires a playback speed higher than your shooting speed. Always increase speed to at least 125% in your NLE.
2. Applying black-and-white as a one-click filter. A generic desaturation or black-and-white filter produces flat, lifeless grey tones. Orthochromatic emulation requires deliberately pulling down the red channel and increasing contrast — the steps in Step 3a above. The difference is immediately visible.
3. Using a shutter speed that’s too fast. A common mistake is setting 1/1000s for “sharp” footage. At silent-film frame rates, a fast shutter produces a stroby, harsh effect that looks more like a security camera than The Gold Rush. Stick to the 180-degree shutter rule: shutter speed = 2× your frame rate.
4. Forgetting the aspect ratio. Leaving footage in 16:9 widescreen is the single fastest way to make the result look like a modern video with a filter on it rather than a genuine silent-film aesthetic. The 4:3 crop is non-negotiable.
5. Over-graining the footage. More grain is not always more vintage. Heavy grain above 50% intensity in Resolve starts to look like digital noise rather than film grain. Keep it subtle — the orthochromatic contrast does more work than the grain does.
Frequently Asked Questions
Digital Cameras for Vintage Looks?
The Fujifilm X100VI and X-T30 are the top choices for a built-in vintage look, thanks to their Acros film simulation mode, which produces high-contrast black-and-white images that closely resemble orthochromatic film stock. The Nikon Zf is a strong alternative with excellent monochrome rendering and a retro body design. For the deepest vintage character, older cameras with CCD sensors — like the Canon PowerShot G9 or early Sony Cybershots — produce a distinctly organic look that modern CMOS sensors can’t fully replicate, even in post.
Making Digital Photos Look Vintage?
To make digital camera footage look vintage, combine four adjustments: shoot at the lowest available frame rate (24fps minimum), set shutter speed to 2× that frame rate (1/50s), apply an orthochromatic black-and-white grade in post by reducing red-channel sensitivity and boosting contrast, and crop to a 4:3 aspect ratio. Add moderate film grain (30–40% in DaVinci Resolve) and a subtle vignette. For still photography, apply the same color grade in Lightroom using the HSL panel to desaturate reds and boost contrast in the tone curve.
Phantom Menace & Digital Cameras?
*Yes — Star Wars: Episode I – The Phantom Menace (1999) was one of the first major feature films to use digital cameras for principal photography.* George Lucas shot select sequences on the Sony HDW-F900, a 24fps high-definition digital cinema camera, marking a landmark moment in the industry’s transition from film. However, the majority of the film was still shot on traditional 35mm film stock. The production is frequently cited as the turning point that accelerated Hollywood’s adoption of digital acquisition.
Making Digital Cameras Look Vintage?
The fastest path to a vintage-looking digital camera is to combine the Undercrank Formula with a Fujifilm camera’s built-in Acros profile. Set your frame rate to 24fps, shutter speed to 1/50s, apply Acros in-camera, then increase playback speed to 125–133% in your NLE. If you don’t own a Fujifilm, shoot in a flat or neutral picture profile and apply orthochromatic grading in DaVinci Resolve — reduce the red channel curve, boost contrast, add grain at 30–40% intensity, and crop to 4:3. The full workflow takes under 20 minutes in post once you’ve done it once.
What is Charlie Chaplin’s style called?
Charlie Chaplin’s filmmaking style is most accurately described as slapstick comedy combined with undercranked cinematography and orthochromatic film rendering. His on-screen persona — the Tramp — is associated with physical, exaggerated performance. His cinematographic style is characterized by the staccato motion of undercranking, the harsh contrast of orthochromatic film stock, and theatrical, single-source lighting. Film historians sometimes group this under the broader label of “silent film comedy” or “Chaplinesque,” though the latter term applies more to his performance style than to the specific visual aesthetic.
First Actor to Get a $1M Contract?
Charlie Chaplin was the first film actor to sign a $1,000,000 contract, when he signed with First National Pictures in 1917 for a series of short films. The deal — $1,075,000 for eight two-reel comedies — was unprecedented according to Guinness World Records and made international headlines, cementing Chaplin’s status as the world’s most famous entertainer. The contract also gave Chaplin significant creative control, which he used to develop the elaborate in-camera effects and meticulous shooting style that defined his later masterworks.
Recreate the Look – Your Next Steps
The Charlie Chaplin effect on a digital camera is not a filter. It’s The Undercrank Formula applied with precision: shoot at the lowest available frame rate, set your shutter to double that rate, grade to orthochromatic black and white by pulling down the red channel, and increase playback speed by 25–33% in your NLE. Every step in this guide connects directly to a real decision that Chaplin’s crew made — or was forced to make — on set in the 1920s.
The Undercrank Formula is your shortcut to that history. Understanding why Rollie Totheroh cranked the Bell & Howell at 16 revolutions per second is what separates this from slapping a vintage filter on modern footage and hoping for the best.
Ultimately, mastering the charlie chaplin effect digital camera process gives you a timeless creative tool. Get started today by setting your camera to 24fps, dialing in a 1/50s shutter speed, finding a single window for lighting, and shooting 30 seconds of movement. Then bring it into DaVinci Resolve, pull the red channel down, crush the blacks, add moderate grain, and speed it up to 125%. Watch what happens. That staccato, contrasty, timeless essence — that’s not magic. That’s physics. And now it’s yours to use.
