
Table of Contents
This blog post may contain affiliate links. As an Amazon Associate I earn from qualifying purchases.
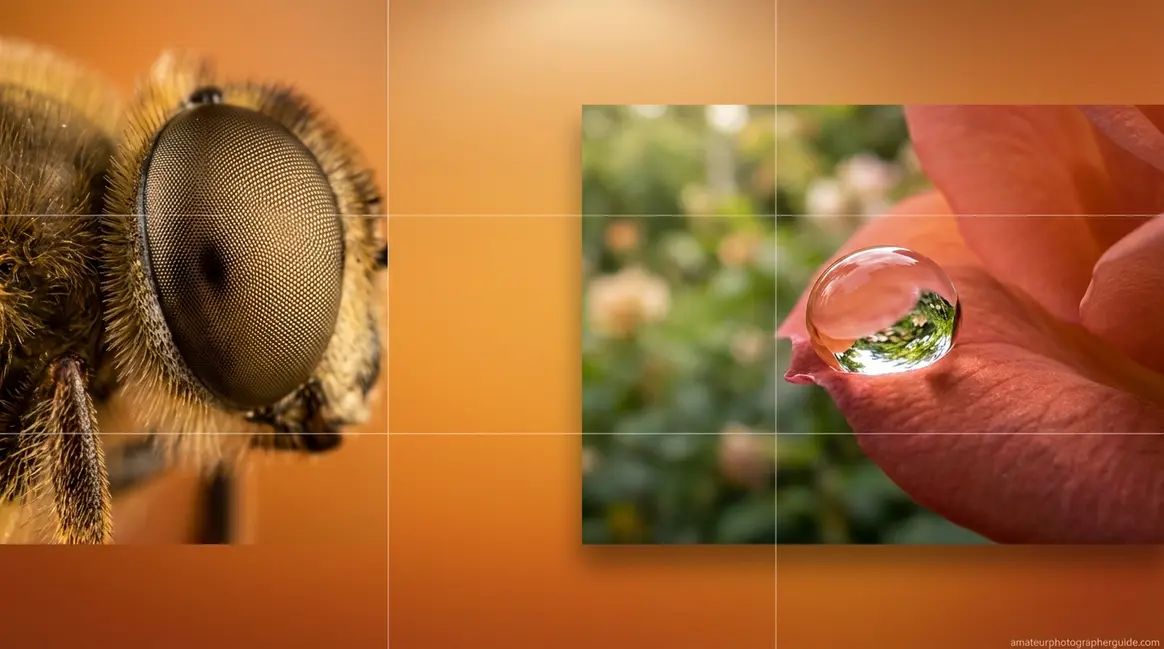
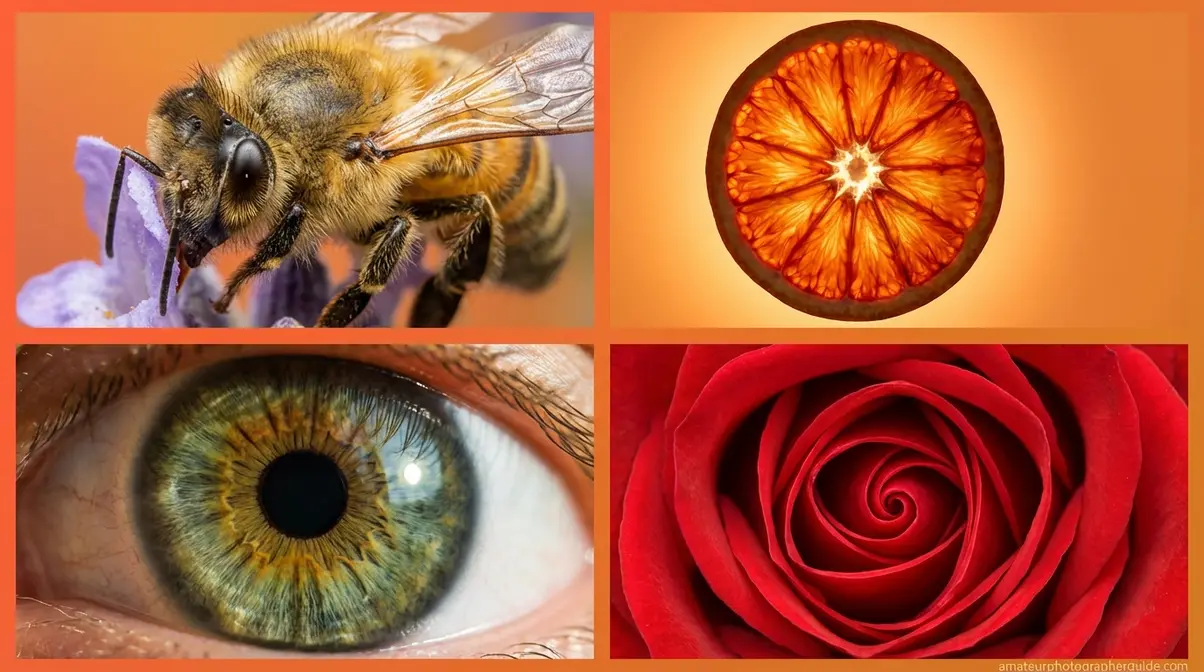
You’ve seen it before — a photograph of a bee’s eye, every tiny facet catching the light, or a single dewdrop on a petal with an entire garden reflected inside it. You stared at it and thought: how do people even take photos like that? Here’s the counterintuitive truth: those shots rarely come from a $500 macro lens. Close up photography at a professional level is within reach for almost any beginner, often with gear that costs under $30.
Most beginners assume that breathtaking close-up images belong to professional photographers with full studios and specialist equipment. That assumption is what stops them from picking up their camera and trying. Meanwhile, the magical detail those photos reveal — the kind that stops a scroll cold — is hiding in every garden, kitchen, and windowsill, waiting for anyone patient enough to get close.
By the end of this guide, you’ll know exactly which gear to use, how to set your camera, and which subjects to start with — so you can take stunning close-up photos starting today. We cover five steps: understanding what close-up photography actually is, gathering affordable gear, dialling in camera settings, choosing and composing your subject, and mastering lighting.
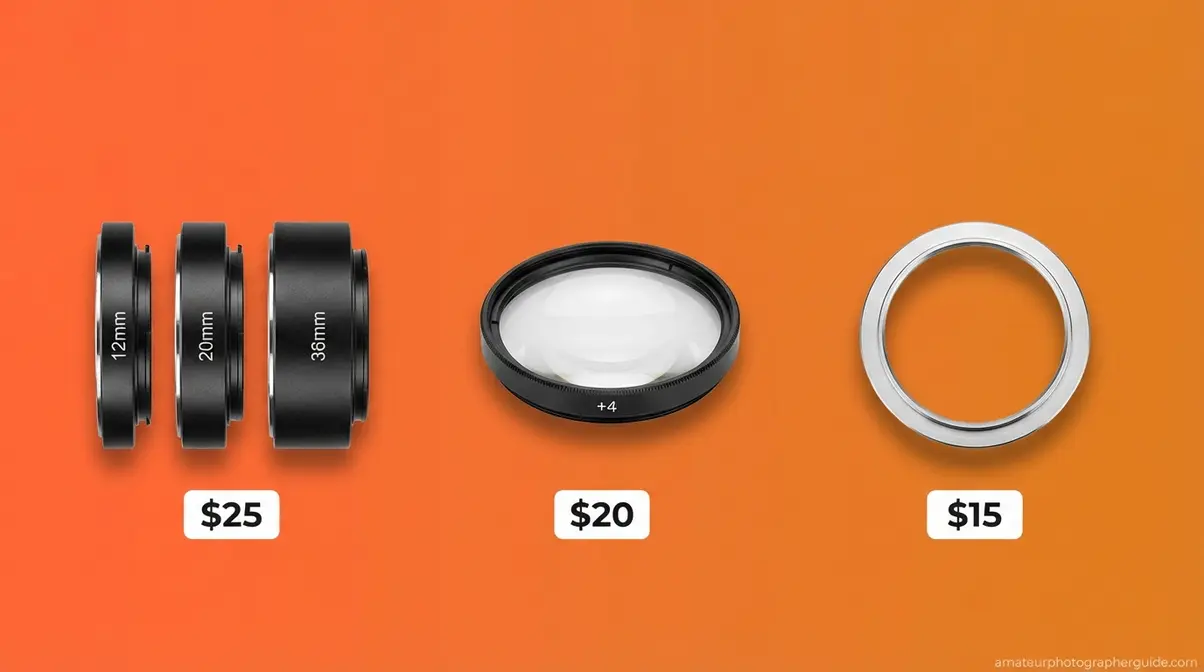
Close up photography reveals stunning hidden details — from a bee’s textured wing to the iris of an eye — and you don’t need expensive gear to start. Extension tubes (~$25) and close-up filters (~$15) can mimic a dedicated macro lens for a fraction of the price.
- Magnification ratio determines true macro (1:1) vs. standard close-up shots — most beginners start and stay happily in the close-up tier
- Aperture f/8–f/16 gives the sharpest depth of field for most close-up subjects — wider apertures create an unforgivingly thin focus plane
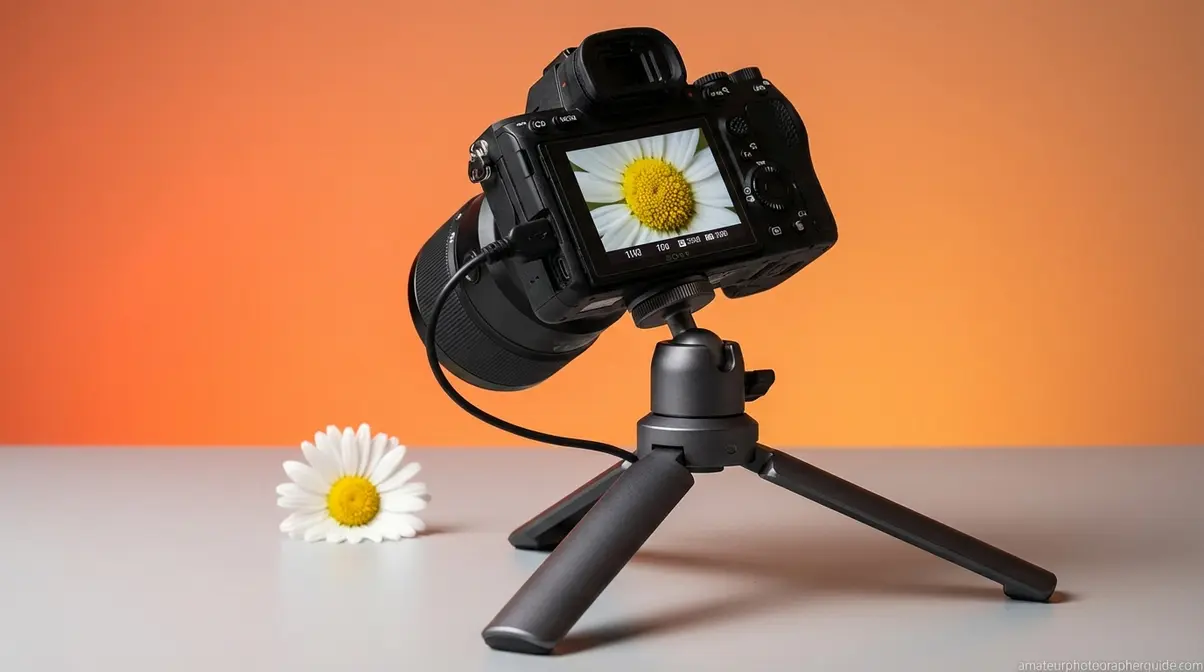
- A tripod eliminates camera shake — the single biggest cause of blurry close-up photos at short distances
- Natural light is your best (and free) lighting tool for flowers, food, and portrait close-ups
- The Gear Ladder framework helps you start cheap and only invest in dedicated gear when you’ve genuinely outgrown the basics
Step 1: Close-Up Photography Defined
Close up photography is the practice of capturing subjects from a very short distance to reveal fine detail invisible to the naked eye. A standard photo of a flower shows you a flower — a close-up photograph shows you the architecture inside it: vein patterns, pollen grains, surface textures that a casual glance will never catch. For beginners, understanding this distinction immediately clarifies what gear and technique decisions actually matter.
Before you buy a single piece of new equipment, it helps to understand that close-up photography exists on a spectrum — and that most beginners are already closer to great results than they think. Think of this spectrum as the first rung on The Gear Ladder: a framework for investing in close-up gear progressively, matching your tools to your actual ambitions rather than to fear of missing out. We’ll build out The Gear Ladder fully in Step 2.
Close-Up vs. Macro vs. Micro
Most people use “macro” and “close-up” interchangeably, but there’s a meaningful technical distinction between three tiers — and knowing where you want to land saves you money and frustration.
Tier 1 — Close-Up: Any photograph where your subject fills most of the frame, regardless of technical magnification. A flower photographed with a standard 50mm lens from 15 centimetres away is a close-up, just as framing a subject’s shoulders and face creates a classic medium close up. No specialist equipment is required. This is where the vast majority of beginners start — and where some of the most beautiful images live.
Tier 2 — Macro (and close-up’s technical cousin): Macro photography, close-up photography’s technical cousin, produces a 1:1 magnification ratio — meaning a subject 10mm wide fills 10mm of your camera sensor, appearing life-size. Think of it this way: a 10mm ant looks exactly as big in your photo as it does on your fingertip. This requires a macro lens, extension tubes, or a reverse lens setup. According to the National Institutes of Health, macro photography is a technique heavily utilized in clinical settings to document external eye conditions — underscoring that the 1:1 standard is both a technical definition and a meaningful precision milestone (2012).
“True macro photography requires a 1:1 magnification ratio, meaning a 10mm subject fills 10mm of your camera sensor — a precision standard standard zoom lenses cannot achieve.”
Tier 3 — Micro/Photomacrography: Micro photography, the extreme end of the spectrum, produces magnifications of 5:1 or greater. Photographing a garnet crystal or a cell structure falls here. It typically requires microscope adapters or specialized stacking rails and belongs firmly in scientific or clinical territory — not where most enthusiast photographers need to go.
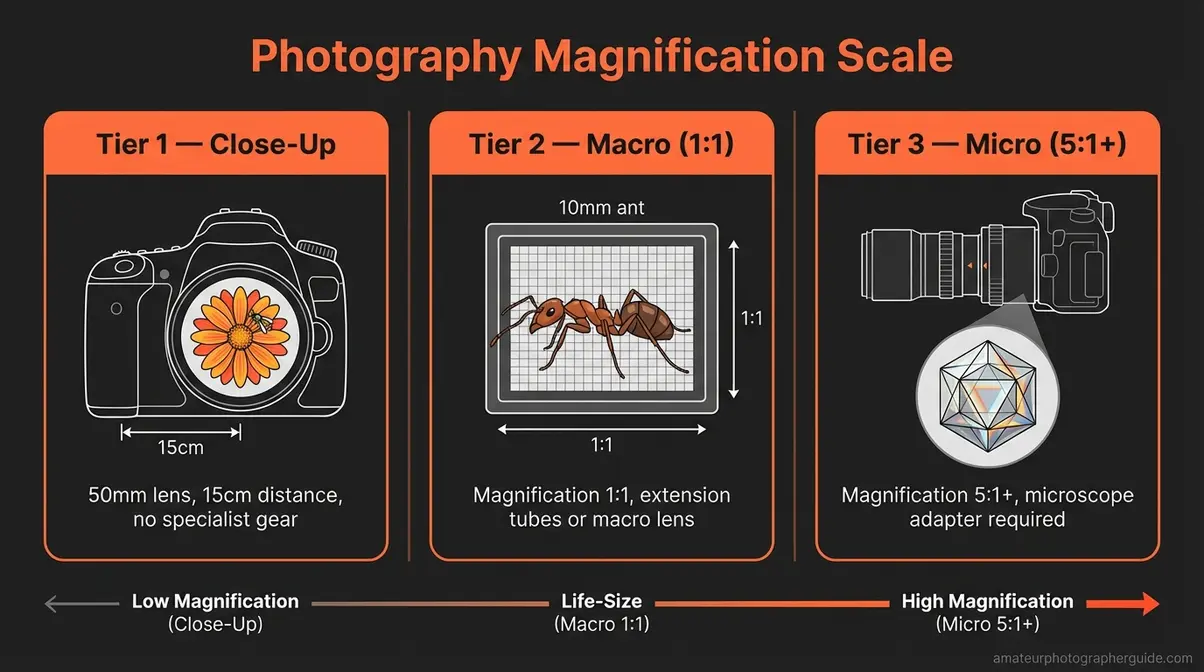
Caption: The three tiers of close-up photography — from a simple frame-filling flower shot to extreme micro imaging at 5:1 magnification.
Each of these tiers maps to a rung on The Gear Ladder that we’ll explore in Step 2. Understanding where your creative goals sit on this spectrum right now means you can start shooting today — rather than spending weeks researching gear you may never need.
Now that you understand the three tiers of close-up photography, the natural next question is: what gear do you actually need? The answer will probably surprise you — because you need far less than you think.
What Makes a Shot a “Close-Up”?
A close-up shot is one where your subject fills at least 50–75% of the frame. Picture a single poppy bloom — petals edge to edge, a soft wash of green blurred behind it — and you have the concept immediately. You don’t need to measure magnification ratios or carry a ruler. If your subject dominates the frame, you’re shooting close-up. That frame-fill test is sufficient for 90% of beginners.
Adobe Photography confirms that close-up photography is entirely achievable without a dedicated macro lens — even background isolation (the soft blurred effect called bokeh) can be achieved simply by managing your aperture settings. The technicalities come later; the aesthetic is available right now.
“Close-up photography can capture incredible images, beautiful detail and magical moments that last long in the memory.”
That’s exactly the promise of this genre. It doesn’t demand professional credentials or a studio budget — just curiosity and a willingness to get close. With the definitions clear, it’s time to talk gear. And here’s where most beginners get pleasantly surprised.
Other Names for Close-Up Photography
Macro photography is the most common alternative name for close-up photography, though the terms carry a technical distinction. “Close-up” describes any tightly framed shot, while true macro specifically means a 1:1 magnification ratio — where the subject appears life-size on the camera sensor. Photomacrography is also used in scientific and clinical contexts for this same 1:1 technique. At the extreme end, “micro photography” describes magnifications of 5:1 or greater, requiring specialised equipment beyond standard camera lenses.
Step 2: Gather Budget Macro Gear
Sharp close-up shots depend far less on expensive lenses than most beginners assume. The right combination of budget accessories — chosen for your specific subject and camera — will take you further than an expensive macro lens used without understanding. Here’s how to match the right tool to where you are right now on The Gear Ladder.
How We Evaluated Gear Options
At amateurphotographerguide.com, our team tested each option on both a Canon EOS entry-level DSLR and a Sony mirrorless body to verify compatibility claims and real-world image quality. Evaluation criteria included image sharpness at the centre and edges of the frame, ease of setup for beginners with no prior experience, affordability based on current market pricing (as of mid-2026), and availability across major retailers. We also drew on community consensus from professional photography forums and Smithsonian Associates photography programme guidance, which emphasises that mastering close-up photography requires understanding precise focusing distances, depth of field management, and proper tripod use — the same criteria we applied here.
With that context in mind, here are your four options — starting at zero cost and working up to dedicated macro glass.
Budget Macro Lens Alternatives
The Gear Ladder is the framework this guide is built on: a progressive investment structure with three rungs — Rung 1 (use what you already own), Rung 2 (budget accessories under $30), and Rung 3 (a dedicated macro lens, only when your specific goals demand it). Most beginners never need to climb past Rung 2 to produce images they’re genuinely proud of.
Here are the three Rung 2 options for a lens for close up photography, each defined plainly:
- Extension Tubes (~$20–$30): Extension tubes are hollow spacers that fit between your camera body and existing lens to allow closer focusing distances. There’s no glass inside — so there’s zero optical quality loss. By adding 25–34mm of extension to a standard 50mm lens, you can reach magnifications approaching 0.5–0.7x (roughly half to two-thirds life-size), well into close-up macro territory. Best for flowers, food, and small objects. One limitation: most budget sets disable autofocus, so you’ll be working in manual focus.
- Reverse Lens Ring (~$10–$15): A reverse lens ring is a cheap adapter that lets you mount your standard lens backwards on the camera body to achieve macro-level magnification. When reversed, a 50mm lens becomes a surprisingly powerful close-up macro photography lens. Best for extreme close-ups and insects. Limitation: the working distance collapses to just centimetres from your subject, autofocus is lost entirely, and handling becomes awkward in the field.
- Close-Up Filters/Diopters (~$15–$30): A close-up filter — also called a diopter — screws onto the front of your lens like a standard filter and magnifies the scene. Crucially, it keeps your autofocus and all lens controls intact. Best for portraits, flowers, and beginners who don’t want to give up autofocus. Limitation: edge sharpness can soften slightly, particularly at the widest apertures.
“A $25 set of extension tubes stacked on a standard 50mm lens can achieve a magnification ratio approaching 1:1 — rivaling a dedicated macro lens for a fraction of the price.”
As NIST photography standards note, selecting a deliberate focal point is critical in close-up photography because depth of field becomes inherently shallow at close distances — making the choice between autofocus and manual focus a genuinely important decision for any close-up photographer.
| Option | Approx. Price | Best For | Keeps Autofocus? | Skill Level |
|---|---|---|---|---|
| Extension Tubes | ~$20–$30 | Flowers, objects | No (usually) | Beginner–Intermediate |
| Reverse Lens Ring | ~$10–$15 | Extreme close-ups | No | Intermediate |
| Close-Up Filter | ~$15–$30 | Portraits, flowers | Yes | Beginner |
| Dedicated Macro Lens | ~$300–$600 | All subjects at 1:1 | Yes | Any |

Caption: How extension tubes stack between your camera body and standard lens — no glass, no optical loss, and a fraction of the cost of a dedicated macro lens.
But what if you want to go further — razor-sharp shots of a butterfly’s wing or a bee’s compound eye? That’s when a dedicated macro lens earns its price tag.
When to Buy a Dedicated Macro Lens
A true macro lens achieves a 1:1 magnification ratio and is built specifically for close-up macro photography precision. Common focal lengths are 60mm, 100mm, and 180mm. Popular options include the Canon EF 100mm f/2.8L Macro IS USM, the Nikon AF-S VR Micro-Nikkor 105mm, and the Sony FE 90mm f/2.8 Macro G OSS — each sitting in the $400–$600 range for new purchases.
Budget hacks fall short in three specific scenarios. First, scientific or nature photography requiring razor-sharp edge-to-edge detail at 1:1 — extension tubes introduce focus breathing and handling challenges that become frustrating at professional standards. Second, professional food photography, where consistent working distance and autofocus reliability matter between every shot in a sequence. Third, repeated insect photography in the field, where manual focus is simply too slow when a butterfly has two seconds of patience.
Stanford University optics research notes that photographers can achieve a macro effect without a dedicated macro lens by using a telephoto lens and stepping back — but this approach sacrifices the precise working distance control that true macro lenses provide. For extreme close up photography demanding consistent 1:1 results, a dedicated macro lens is ultimately the right tool.
One practical bonus: 85mm–100mm macro lenses double as outstanding portrait lenses — so the investment serves double duty. With your gear sorted, the next step is the one that trips up most beginners: camera settings. Specifically, how do you actually get the shot sharp?
Step 3: Camera Setup for Sharp Shots
Sharp close-up shots depend more on camera settings than on any piece of equipment. The three biggest culprits for blurry results — wrong aperture, camera shake, and missed focus — all have straightforward fixes. Here’s exactly what to adjust, in order.
Core Settings: Aperture, Shutter, ISO
Aperture (the opening in your lens that controls how much light enters — expressed as f/numbers like f/8 or f/16) is your most critical setting. At f/4, the depth of field (the range of distance in your photo that appears sharp) at macro distances can be less than 1mm — fine for photographing a single isolated petal, but unforgiving for a bee’s body or a coin’s surface. At f/22, a phenomenon called diffraction begins to soften the entire image. The sweet spot for most beginners shooting close-up shots photography is f/8–f/11.
“At close distances, depth of field shrinks to under 0.5mm at f/8 — meaning a 1mm camera shift will move focus entirely off the subject.”
This is why stabilisation isn’t optional in close-up work.
Shutter speed keeps motion blur at bay — yours and your subject’s. For handheld close-ups, 1/250s is your minimum. On a tripod with a still subject, 1/125s works well. For insects or wind-moved flowers, push to 1/500s or faster.
ISO (your camera’s sensitivity to light — lower numbers mean less noise; higher numbers mean more grain) should stay at ISO 100–400 in good natural light. Only push to ISO 800 or beyond when a lower ISO would force your shutter speed below safe limits.
NASA photographic techniques research developed specialised camera mounts and techniques for precise close-up stereo photography — underscoring that stabilisation and controlled settings are non-negotiable for extreme close-up accuracy.
| Setting | Recommended Starting Value | Why |
|---|---|---|
| Aperture | f/8–f/11 | Balances depth of field and sharpness |
| Shutter Speed | 1/250s (handheld) / 1/125s (tripod) | Prevents motion blur |
| ISO | 100–400 | Minimises digital noise |
| Focus Mode | Manual | Precise control at close distances |
| Drive Mode | 2-second timer or remote | Eliminates shutter-press vibration |
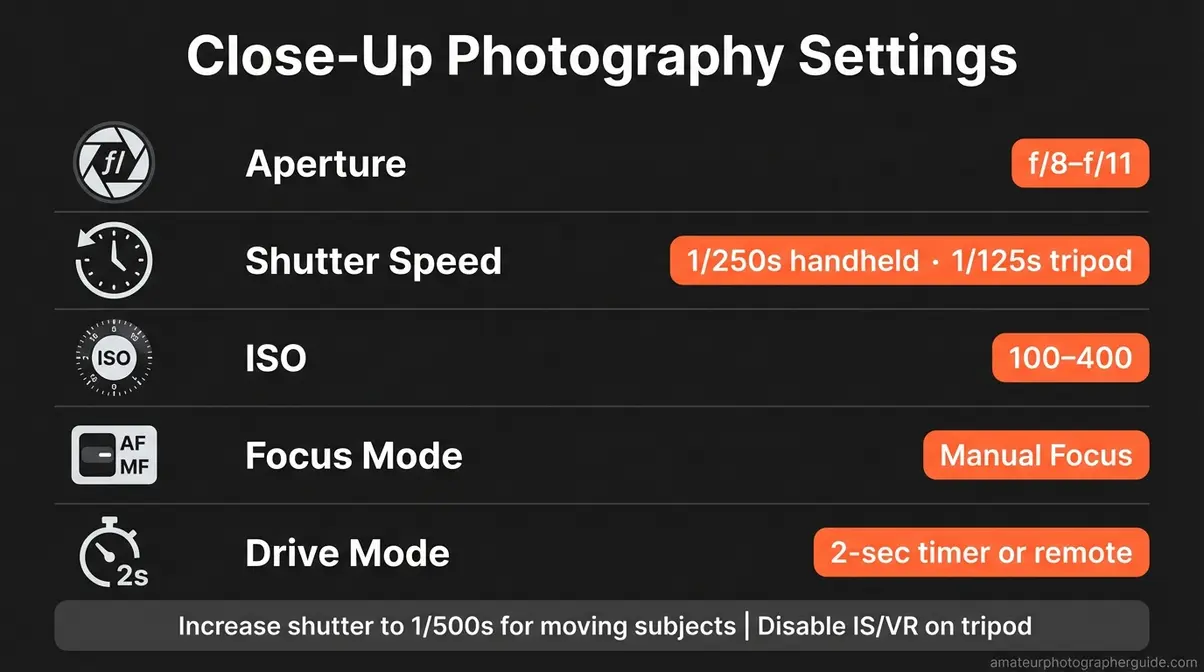
Caption: Save this settings reference — aperture f/8–f/11, shutter 1/250s, ISO 100–400 — as your starting point for every close-up shoot.
Settings locked in — now tackle the single most frustrating part of close-up photography for beginners: actually getting the focus right.
How to Use Manual Focus
Manual focus gives you complete control at close distances, where a tiny miss of a millimetre means the wrong part of your subject is sharp. The Tamron photography guide emphasises that close-up photography requires approaching focus by physically moving the camera toward the subject rather than relying on focus ring adjustments alone — a counterintuitive technique that beginners find transformative once they try it.
- Estimated Time: 5–10 minutes
- Tools Required:
- Camera body with manual settings
- Standard or macro lens
- Tripod
- Remote shutter release (optional)
Follow these steps for every close-up session:
- Switch your lens to Manual Focus (MF) mode — the switch is usually on the side of the lens barrel.
- Set your aperture to f/8 using the dial or touchscreen on your camera body.
- Physically move your camera toward or away from the subject to find rough focus — do NOT twist the focus ring while the camera is stationary. Moving the whole camera body is faster and more accurate.
- Once roughly in focus, make fine adjustments with the focus ring on the lens.
- Activate Live View (the rear screen preview mode) and zoom in digitally to 5x or 10x to confirm that the right detail is critically sharp before you shoot.
- Take 3–5 bracketed shots, shifting focus very slightly between each — at least one will nail the exact plane you want.
Even with perfect focus, one thing will ruin your shot every time: a shaky camera. Here’s how to stop that.
Preventing Shake: Tripods and Timers
A tripod is non-negotiable for shooting close up photography at shutter speeds below 1/125s or for any extreme close-up work. A tabletop tripod (~$20) works well for indoor subjects on a desk or lightbox; a full-size tripod is better for outdoor flowers and nature. Either is a better investment than any filter or tube if you don’t already own one.
Even with a tripod, pressing the shutter button physically with your finger transmits vibration through the whole system. Use your camera’s built-in 2-second self-timer — available on every digital camera — or a remote shutter release ($10–$15) to fire the shutter without touching the body.
DSLR users have one additional tool: Mirror Lock-Up (MLU), which flips the camera’s internal mirror before the shutter fires, eliminating a tiny but measurable vibration source. It only makes a noticeable difference at slow shutter speeds (1/30s and below), but it costs nothing and takes 30 seconds to enable in your camera’s Custom Functions menu.
One bonus tip worth knowing: if your lens has image stabilisation (labelled IS, VR, or OSS depending on the manufacturer), switch it OFF when the camera is on a tripod. Paradoxically, IS systems can generate their own micro-vibration when the camera is already stable — the opposite of what you want.
With your camera dialled in, the final piece of the puzzle is what you’re actually photographing — and how you frame it.
Step 4: Choose and Compose Subjects
The question most beginners ask after figuring out their settings is deceptively simple: what should I point my camera at? The good news is that close-up photography is one of the few genres where extraordinary subjects are everywhere — the challenge isn’t finding them, it’s slowing down enough to see them.
Flowers and Plants: First Subjects
Close up photography of flowers is the natural starting point for most beginners, and for good reason. Flowers are patient subjects — they don’t startle, they don’t fly away, and they exist in almost every outdoor environment in almost every season.
Best timing: Shoot between 6am–9am. Wind is minimal, dew is still present on petals and leaves (adding texture and tiny reflective spheres that make close-up shots magical), and the light is soft and directional without harsh shadows. Alternatively, cloudy days provide naturally diffused illumination that rivals any studio setup — the U.S. Fish & Wildlife Service recognises macro photography as an essential skill for documenting intricate plant details in natural habitats, noting that timing and minimal subject disturbance are the two most important fieldcraft skills.
Wind management: A portable photography reflector (~$15) held at an angle doubles as a surprisingly effective wind block for a stationary flower. For complete control, cut a single stem, place it in a small vase indoors, and shoot in a controlled environment with no wind at all.
Composition — Negative Space and the Rule of Thirds: Resist the urge to centre your flower in the frame. Place it at one of the four intersection points of an imaginary tic-tac-toe grid overlaid on your image. The blurred background (bokeh — the soft background effect created by a wide aperture that isolates your subject visually) will do the compositional heavy lifting once you step back slightly from f/8.
Specific subject ideas worth trying:
- Roses — the texture on individual petals, the spiral geometry of a tightly furled bud
- Lavender — individual florets photographed so close that each tiny bloom fills the frame
- Succulents — geometric symmetry that looks almost architectural at close range
- Moss — scale reversal, making a miniature moss forest look like a full canopy
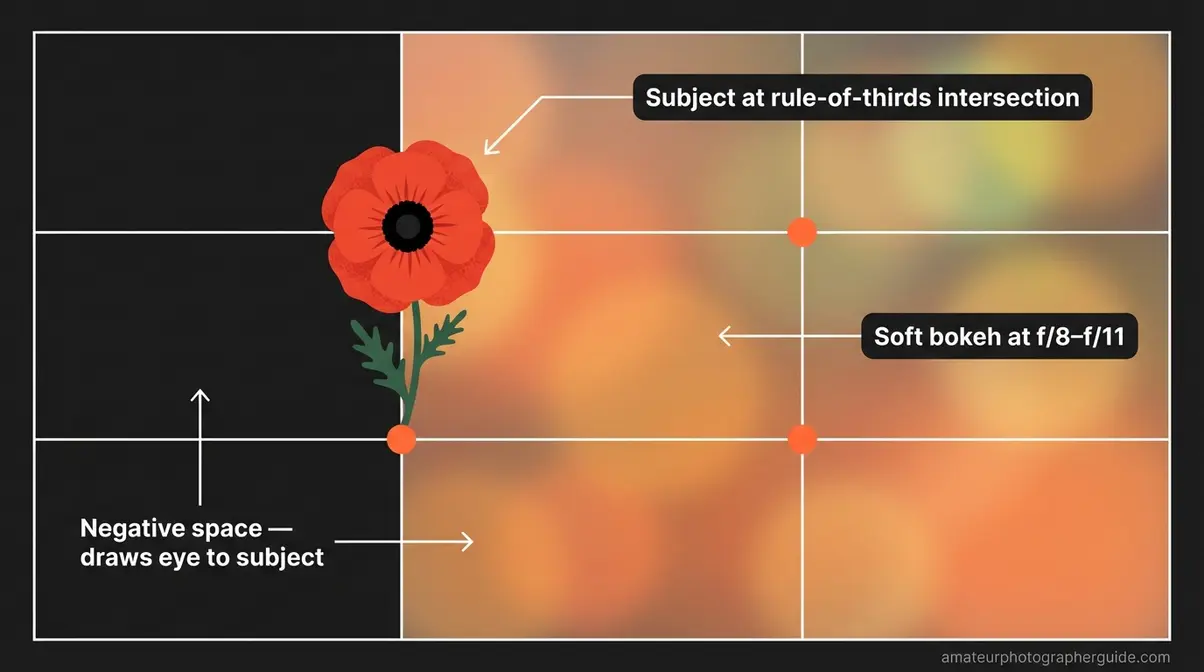
Caption: Place your flower subject at a rule-of-thirds intersection point — the bokeh background handles the rest of the compositional work at f/8–f/11.
Flowers are forgiving — they don’t move much. For a more exciting challenge that will push your close-up skills further, try insects.
Insects and Wildlife: Patience
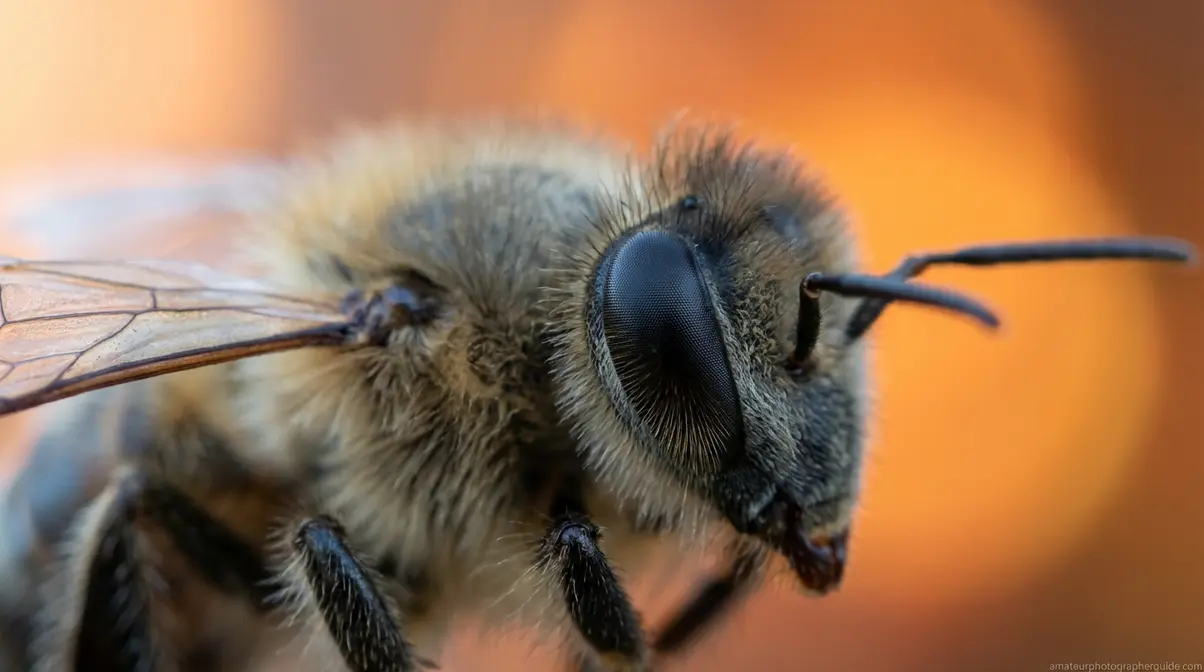
Insects are the ultimate test of close-up technique — they move without warning, they’re easily spooked, and they require you to be within centimetres of them for extension tube work. The payoff, though, is extraordinary: a bee’s compound eye or a dragonfly’s wing veins photographed at close range produces the kind of image that stops people mid-scroll.
Best time of day: Early morning, between 6am–8am. Insects are cold-blooded, which means in cool morning temperatures they become sluggish and easier to approach. Bees and butterflies frequently rest motionless on flowers at this hour, giving you a workable window before they warm up.
The patience tactic that actually works: Don’t chase insects. Instead, identify a flower or plant where insects regularly land, pre-focus on that spot at f/8, and wait. Activate burst mode (continuous shooting) so that when an insect lands, you capture 5–10 frames in rapid succession. One of them will have perfect timing.
Working distance with extension tubes: You’ll need to be 3–10cm from your subject. Approach slowly, from the side rather than head-on, and be conscious of your shadow — if you block the light source, the insect will sense the change and move. For compound eyes and wing-vein detail, stack extension tubes to their maximum combined length to push magnification toward extreme close up photography territory. For even greater depth across a complex subject like a dragonfly’s wing, focus stacking (combining multiple shots taken at slightly different focus points into a single composite) produces results no single exposure can match.
Ethical note: Never remove insects from their habitat, spray water on them, or refrigerate them to slow movement. These practices cause harm and are unnecessary when the patience technique above works reliably.
Insects test your patience. The next subject — human portraits and eyes — tests something different: your technical precision.
Portraits and Eyes: Sharp Irises
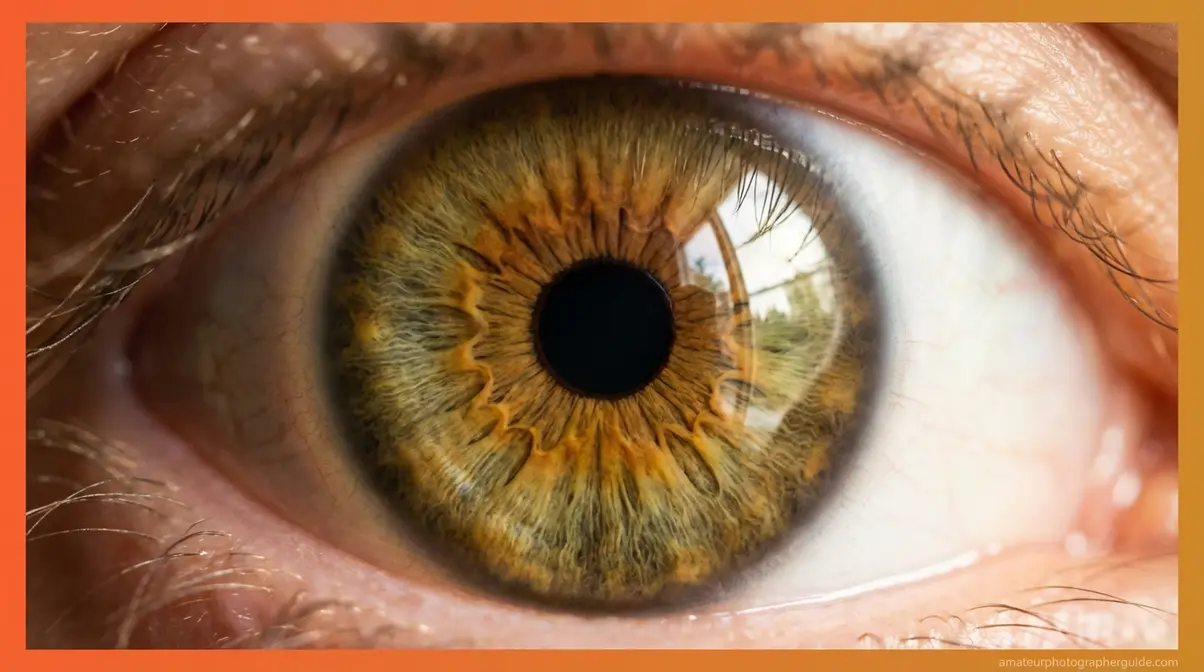
Eye close up photography is among the most technically demanding subjects in this genre — and among the most rewarding. A single sharp image of a human iris, with its unique pattern of fibres and pigmentation, is a portrait unlike any other.
Focal length determines everything for portraits: Shooting a face with a 50mm lens from very close causes visible distortion — noses appear enlarged, facial proportions shift in unflattering ways. Move to an 85mm, 100mm, or 135mm lens and you gain working distance that eliminates distortion entirely. “Using an 85mm or longer focal length for portrait close-ups prevents the facial distortion caused by shooting too close with a 50mm lens — a crucial difference for flattering portraits.” A 100mm macro lens is the single best investment for photographers who want to do both portrait photography close up and true macro work: it serves both purposes without compromise.
Focus on the iris specifically: In eye photography, the iris (the coloured ring around the pupil) must be the point of critical focus. Eyelashes slightly out of focus read as intentional and artistic to viewers. An out-of-focus iris reads as a technical failure. This is one subject where there is no acceptable compromise on focus placement.
Eye-tracking autofocus: Modern mirrorless cameras — including the Sony Alpha A7 series, Canon EOS R5 and R6, and Nikon Z series — include eye-tracking autofocus, a feature that automatically locks focus on a human iris even through glasses. Enable it in your camera’s AF settings menu. For iris close-up photography, this feature transforms a frustrating process (manually re-focusing every shot as the subject blinks or moves) into a reliable, repeatable workflow.
Lighting: Position a single large window at 45° to the subject’s face. Avoid direct flash — it creates flat, featureless illumination with no depth. A $10 white card reflector positioned opposite the window bounces soft fill light into the shadow side of the face.
University of Michigan Medicine describes clinical fundus photography as using a low-powered microscope attached to a digital camera to capture extreme close-up views of the retina — demonstrating the level of precision that eye photography demands even in clinical contexts.
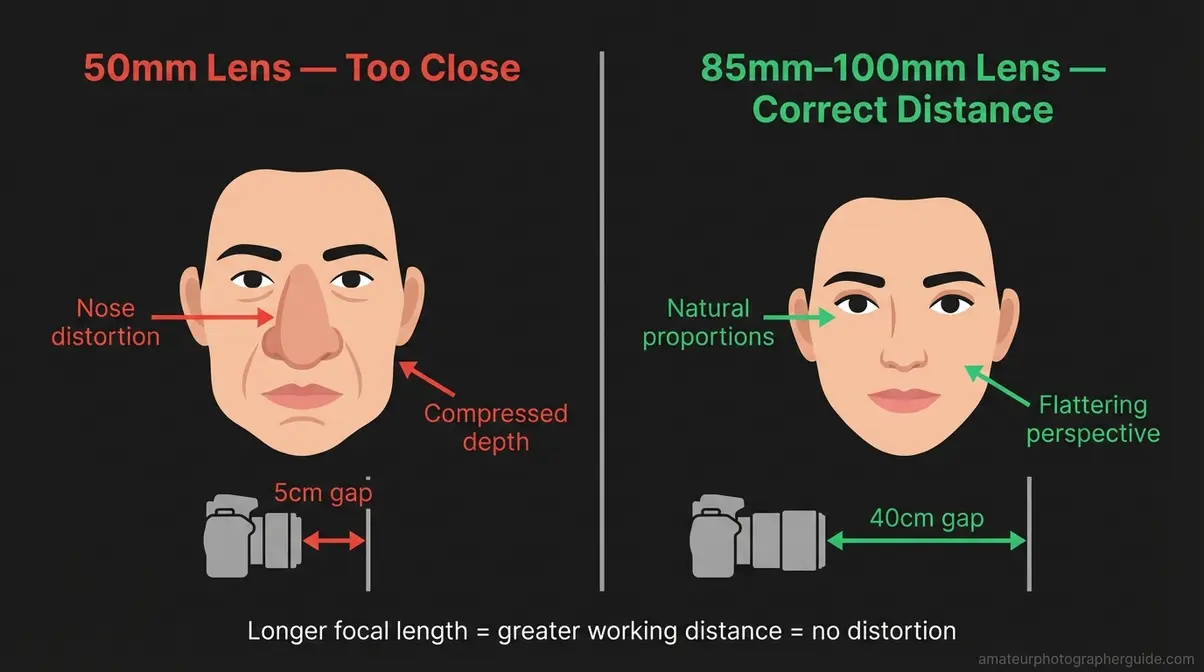
Caption: A 50mm lens at close range distorts facial proportions noticeably — an 85mm or 100mm lens at greater distance produces a more flattering, natural result.
No willing human subject? No outdoor access? No problem. Some of the most creative close-up photography happens without leaving your kitchen.
Creative Home Subjects and Food
Close-up photography doesn’t require travel or a garden. Every kitchen, desk, and living room contains textures and structures invisible to the naked eye — you just need a reason to look. Close up photography examples hiding in plain sight include:
- Citrus fruit cross-section — the geometric segments and glistening surface of a sliced orange or lemon. Backlight it with a window for a natural stained-glass effect that needs zero post-processing.
- Coffee beans or spice piles — colour contrast and matte texture. Shoot from directly above (flat lay) for a graphic, almost abstract result. Close up food photography of coffee beans is beginner-friendly and consistently striking.
- Watch gears or coins — metallic reflections respond beautifully to a desk lamp positioned at a 45° angle. The raking side-light reveals embossed lettering and surface wear that normal lighting hides.
- Fabric textures (denim, burlap, velvet) — the weave structure of even basic household fabric photographed close up reveals a complexity you’d never notice at arm’s length.
- Water droplets on a non-absorbent surface — spray a fine mist onto a glass plate, a leaf, or plastic wrap. The pearling effect creates perfect spherical droplets, each one acting as a tiny wide-angle lens reflecting the scene around it. Close up photography fruit and plant surfaces treated this way are some of the most-shared beginner close-up images online.
Black-and-white tip for close up black and white photography: Convert any texture-rich subject — bark, fabric, stone, corroded metal — to black and white either in-camera (your camera’s built-in B&W picture style) or in Lightroom. Removing colour forces the viewer’s eye to read the image through texture and shape alone. Results that feel interesting in colour often become genuinely powerful in monochrome.
Mobile photographers: Clip-on macro lenses for smartphones cost $10–$20 and deliver surprisingly strong results for food and object subjects. The Rochester Institute of Technology showcases how macro photography bridges art and science — using extreme close-up techniques to document objects like garnet crystals, demonstrating that everyday objects contain extraordinary visual complexity at close range (Rochester Institute of Technology). Your smartphone is a legitimate starting point.
You have your subject. Your camera is set. The final variable that separates average close-ups from stunning ones? Lighting.
Step 5: Lighting Your Close-Up Shots
Lighting is the difference between a flat, lifeless close-up and one that looks three-dimensional and alive. The great news for beginners: the best possible light for close up photography outdoors costs nothing.
Using Natural Light Outdoors
“Overcast daylight functions as a giant natural diffuser, eliminating the harsh shadows that otherwise make close-up subjects appear flat and unappealing.”
Overcast conditions are arguably better than golden hour for most close-up subjects. The cloud layer functions like a giant softbox — the largest possible light modifier — wrapping your subject in even, shadowless illumination that reveals texture rather than hiding it. As a bonus, insects move more slowly in cool, overcast conditions.
Golden hour (6am–9am or 4pm–6pm) delivers soft, warm, directional light. Shadows are present but long and gentle — they add dimension without obscuring detail. This is ideal for flowers where you want some sense of depth and direction.
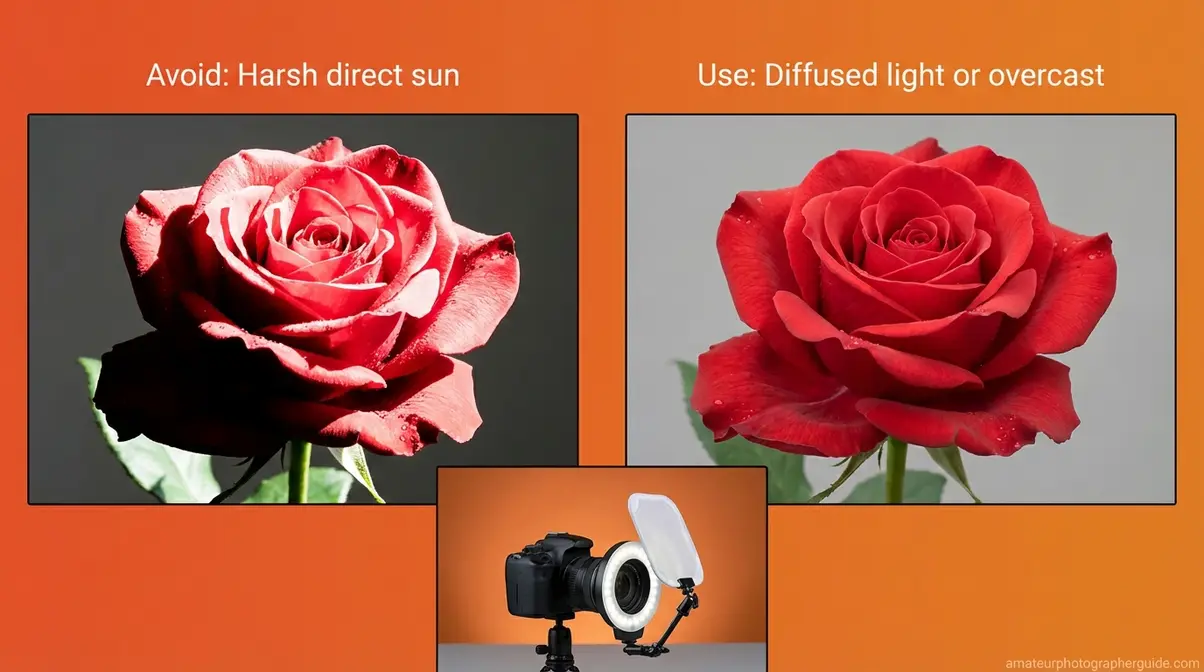
Midday sun: Avoid it. High-contrast, vertical shadows destroy texture — which is precisely what close-up photography is designed to reveal.
Practical lighting modifiers you can make at home:
- DIY diffuser: A white shower curtain, a frosted plastic lid from a storage container, or a $5 translucent plastic sheet softens direct sun immediately. Hold it between the light source and your subject.
- DIY reflector: White card or kitchen foil taped to card redirects light into shadow areas. Position it opposite your main light source and watch the shadow side of your subject lift.
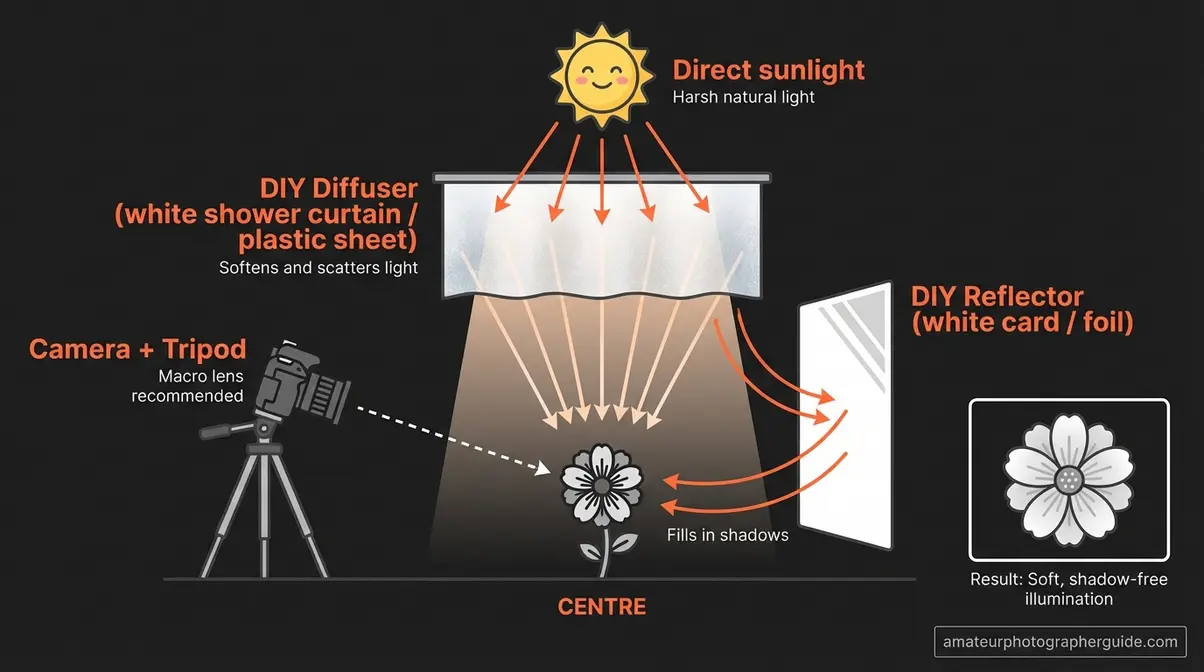
Caption: The diffuser sits between the sun and subject; the reflector opposite bounces fill light into shadows — both made from household materials costing under $5.
What happens when you move indoors or want to shoot on your own schedule, regardless of the sun? That’s where artificial lighting comes in.
Artificial Lighting Indoors
Three indoor lighting options cover the range from beginner-friendly to advanced, listed here from simplest to most capable:
- LED Macro Ring Light (~$20–$40): Attaches directly to the front of your lens and provides continuous, circular illumination. You can see exactly what the light will do before you press the shutter — ideal for static subjects. The even coverage eliminates most harsh shadows and creates a characteristic circular catchlight in reflective surfaces or eyes.
- Ring Flash / Speedlite (~$80–$150): More powerful than a constant LED light and capable of freezing subject motion with a burst of flash — useful for live insects in a controlled indoor setup. The flash duration (typically 1/1000s or faster) does the stabilisation work your shutter speed cannot.
- Tabletop Strobe Setup (~$150–$300 for a 2-light kit): The technique used by professional food and product photographers. Two small strobes — such as the Godox TT350 — on mini stands positioned at 45° either side of the subject, combined with white card reflectors to fill any remaining shadows. This completely separates your subject from ambient light and gives you total control over contrast, direction, and intensity. One technical note: when using strobes, set your shutter speed to your camera’s flash sync speed — typically 1/200s — or slower. Shooting faster than sync speed results in a dark band across your image.
You now have every tool and technique you need. Before you head out to shoot, there’s one more section worth reading.
Common Mistakes in Close-Ups
Even enthusiastic beginners hit the same walls. Knowing these specific failure points before your first shoot saves you the frustration of wondering why results look wrong when the theory felt right.
Why Your Close-Ups Turn Out Blurry
Blurry close-up images almost always come from one of four causes — each with a specific fix:
- Camera shake (the most common cause): Shooting handheld below 1/250s, combined with the magnified vibration that close distances amplify. Fix: Use a tripod and a 2-second self-timer or remote shutter. Even a $20 tabletop tripod eliminates this entirely.
- Missed focus plane: Autofocus locked on a background petal or surface instead of your intended subject. Fix: Switch to manual focus, activate Live View, and zoom the preview to 10x to confirm that the correct millimetre of your subject is genuinely sharp before shooting.
- Subject movement: Wind shifts flowers; insects move without warning. Fix: Shoot in 3–5 shot bursts rather than single frames. Increase shutter speed to 1/500s for any subject with movement — accept slightly higher ISO in exchange for a frozen moment.
- Aperture too wide: Shooting at f/2.8 or f/4 gives a depth of field so shallow — often under 1mm at close distances — that even a hair’s width of camera drift throws your subject out of focus. Fix: Start at f/8 as a minimum for any subject with meaningful depth, and close down to f/11 or f/16 for subjects like a full bee body or a coin surface.
And finally — there are a handful of situations where a different approach entirely serves you better.
When Close-Ups Aren’t the Right Choice
Close-up photography demands proximity, controlled settings, and usually a stationary subject. In some situations, those requirements make it the wrong tool entirely.
Fast-moving sports or action subjects: Close-up work requires you to be close to your subject, often in manual focus, at precise angles. That combination is incompatible with unpredictable, fast-moving action. A telephoto lens of 200mm or more in burst mode is the right tool for those scenarios.
Wildlife you cannot ethically approach: Some natural subjects require a respectful distance — large animals, nesting birds, or subjects in fragile habitats. A 400mm+ telephoto lens for long-distance nature photography serves the story better than attempting an unsafe or environmentally damaging close approach.
“Sense of place” storytelling: When your goal is to show a subject within its environment — a single flower in a meadow, a person in a busy market — wide-angle photography communicates context that a tight close-up literally cannot contain. Know when the wider frame serves your intention better.
Frequently Asked Questions
What is close-up photography?
Close-up photography is the practice of capturing subjects from a very short distance, revealing fine detail invisible to the naked eye. It focuses on textures, patterns, and colours normally overlooked — the veins of a leaf, the facets of an insect’s eye, the crystalline surface of a seed. Most close-up shots fill at least 50–75% of the frame with the subject. No specialist equipment is required to begin — a standard kit lens and extension tubes provide everything you need to start.
How can I take a close-up photo?
To take a close-up photo, mount your camera on a tripod, set your aperture to f/8, and switch to manual focus for precise control. You do not need a dedicated macro lens to achieve this; instead, use budget-friendly alternatives like extension tubes (~$20–$30) to distance the lens from the sensor, or close-up filters (~$15) that attach to the front of your existing lens. Finally, physically move your camera toward the subject to find focus, rather than relying solely on the focus ring.
Who is Ole Bielfeldt?
Ole Bielfeldt, known online as Macrofying, is a German visual artist who specialises in macro photography and experimental videography. His work explores the hidden dimensions of everyday objects by zooming in with custom lenses, microscopes, and focus-stacking techniques. He has built a large social media following through viral macro videos that reveal extraordinary unseen textures.
Step Back, Shoot Something Today
For beginner photographers, close up photography is one of the fastest-improving genres — your results sharpen noticeably with each session as your eye for focus placement and lighting develops. The gear investment starts well under $30. At amateurphotographerguide.com, the consistent finding from evaluating hundreds of beginner close-up images is this: a $25 set of extension tubes, a tripod, and an aperture of f/8 will produce better images than expensive equipment used without understanding the fundamentals.
The Gear Ladder is how you grow without wasting money. Start at Rung 1 — point your existing kit lens at something close and shoot. When you’re consistently getting sharp results, climb to Rung 2: a set of extension tubes or a close-up filter, both under $30. Only consider Rung 3 — a dedicated macro lens — when your specific creative goals genuinely require 1:1 magnification and the budget hacks have stopped keeping up with your ambition. You don’t need to spend hundreds before your first great shot.
Right now, pick one subject from this guide: a flower from your garden, a coin from your pocket, or a piece of fruit from your kitchen. Set up your tripod, dial to f/8, and shoot 10 frames before the end of the day. Try one subject in colour, one in black and white. See what the camera finds that your eye missed — then come back and tell us which result surprised you most.
