What Is Overexposure in Photography? A Beginner’s Guide
Learn what overexposure is in photography, types, causes, and key effects. Discover mistakes to avoid and practical tips to achieve balanced images.
You took the shot. The preview on your camera screen looked perfect — golden light, sharp subject, beautiful sky. Then you opened it on your laptop, and the whole image is blindingly bright. The sky is pure white. Your subject’s face is washed out. The photo looks ruined.
What’s in this guide
- What Is Overexposure in Photography?
- How to Spot an Overexposed Photo
- Causes of Overexposure: Exposure Triangle
- How to Prevent and Fix Overexposure
- Overexposure in Digital vs. Film Photography
- Intentional Overexposure Techniques
- Common Mistakes to Avoid
- Overexposure Photography FAQs
- Putting It All Together: From Mistake to Mastery
That feeling is more common than you think, and it has a name: overexposure. Understanding what is overexposure photography — and why it happens — is the single fastest way to stop it from stealing your best shots. The examples and comparisons in this guide are drawn from common beginner scenarios reported across photography communities and validated against technical documentation from Adobe and Nikon.
In this guide, you’ll learn exactly what overexposure is, how to spot it using your camera’s built-in tools, how to fix it in Adobe Lightroom, and — perhaps surprisingly — why professionals sometimes choose it on purpose.
What Is Overexposure in Photography?
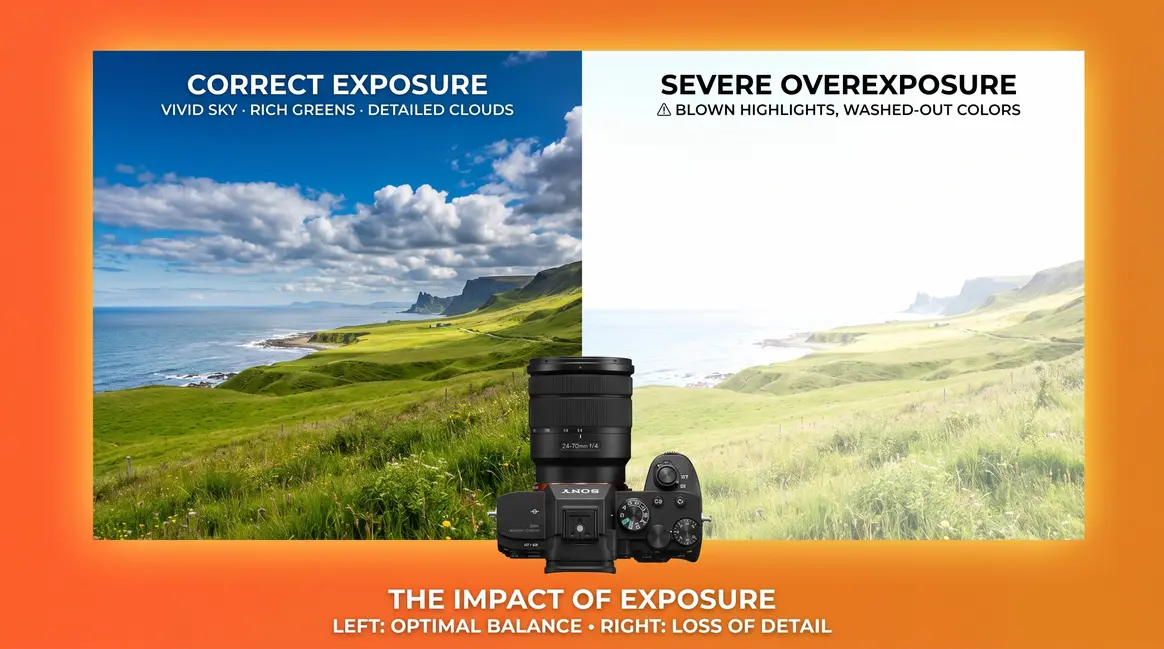
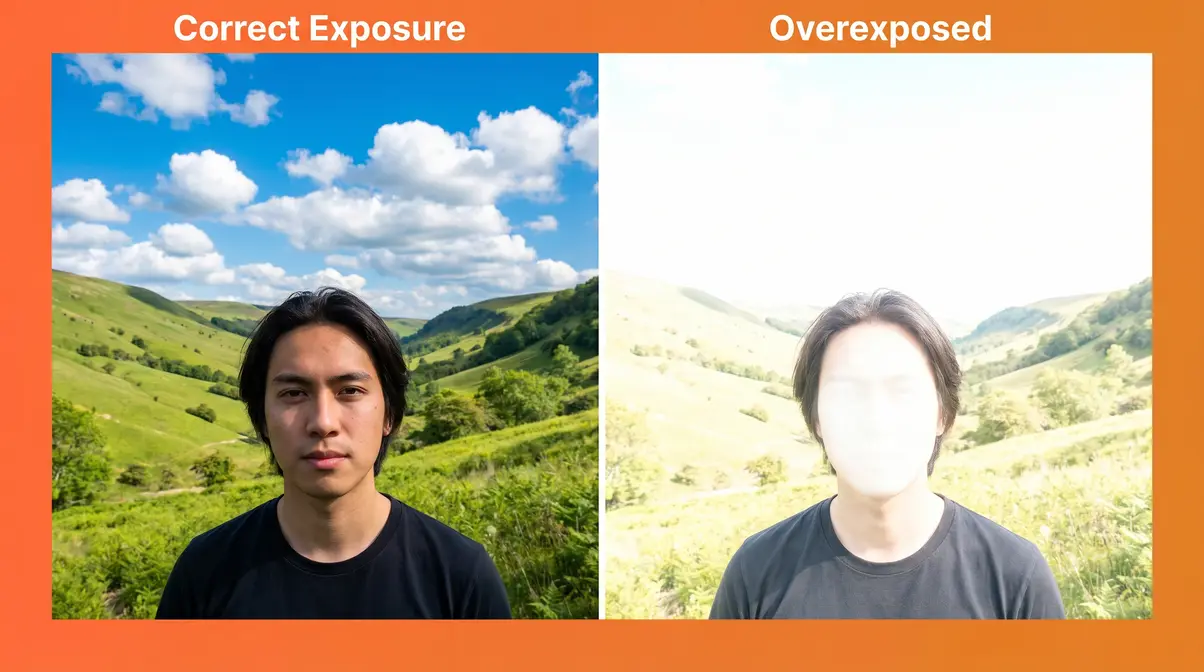
Overexposure in photography is a condition where too much light reaches your camera sensor, causing the brightest areas of your image to turn pure white. The result is a photo that looks washed out, bleached, or artificially bright — with entire zones of the image reduced to featureless white. The critical consequence: once those bright areas are lost at the moment of capture, you cannot recover them from a JPEG file.
What Does Overexposure Mean?
Overexposure in photography means too much light reached your camera sensor, causing the brightest parts of your image to turn pure white with no recoverable detail. This happens when your aperture, shutter speed, or ISO — or a combination of all three — allows more light than the sensor can record.
Think of your camera as a piggy bank for light. Every photo you take is a transaction. Your sensor can hold only so much light before it overflows. Overexposure happens when too much light floods in at once — the piggy bank spills over, and the “overflow” becomes pure white in your photo. For most scenes, a correctly exposed image has detail across both shadows and highlights, with no large zones of pure white.
This is the teaser for a concept we’ll develop fully in the next section: The Light Budget. For now, the core idea is simple. Light has a limit. Exceed it, and you lose information.
A slightly overexposed photo — where highlights are just a little bright — can actually be a deliberate creative choice. A severely overexposed photo, where large zones turn pure white, is a technical error. Overexposure is a spectrum, not a simple pass-or-fail. That nuance matters as you develop your eye.
Blown-Out Highlights and Clipping
When a photo is overexposed, two specific things happen that photographers refer to constantly:
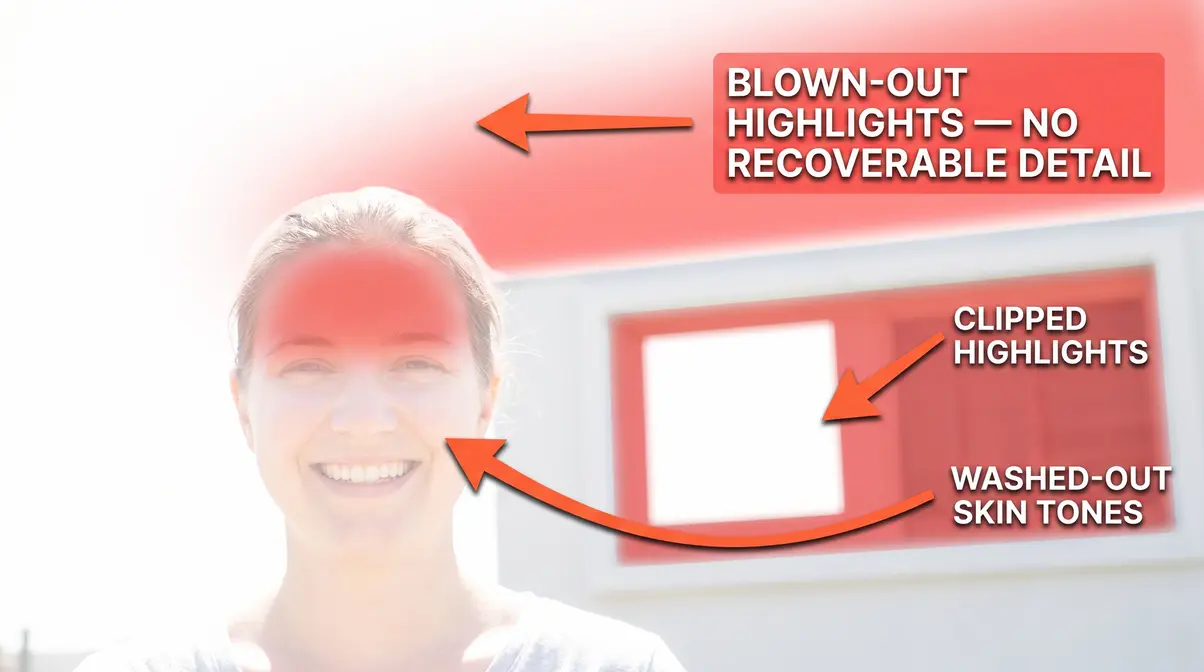
Blown-out highlights are the bright white patches in your image where detail has been permanently lost. If you photograph a bright blue sky and it comes out pure white with no cloud texture, those are blown-out highlights.
Clipping is the technical term for the moment a pixel reaches its maximum brightness value (pure white) and can record no further information. Think of a measuring cup filled past the rim — the cup can’t tell you how much water overflowed. Your sensor is the same. According to technical documentation from Cambridge in Colour, digital sensors clip highlights abruptly when they reach saturation, unlike the human eye, which adapts across a much wider range. Once a pixel clips, that detail is gone — it cannot be recovered, even in editing.
This irreversibility is what makes overexposure different from underexposure (too dark). Shadows can usually be lifted in editing software. Clipped highlights cannot. That asymmetry is one of the most important practical lessons in photography.
How to Spot an Overexposed Photo
Spotting overexposure early — ideally before you leave the scene — saves you the frustration of discovering ruined photos at home. Your camera gives you two powerful tools for this. Most beginners never use either one.
What an Overexposed Photo Looks Like
An overexposed photograph looks washed out, bleached, or artificially bright, with areas of pure white where detail should be visible. The most obvious signs of an overexposed photo are visible to the naked eye:
- Washed-out colors — Vivid colors like blue sky or green grass appear pale, bleached, or white
- Lost facial detail — Skin tones turn uniformly pale with no texture or shadow
- Featureless white zones — Large areas of the image (sky, windows, reflective surfaces) become pure white
- Flat, low-contrast image — The overall photo looks hazy or milky, without the contrast between light and dark areas that gives an image depth
A common frustration reported by beginner photographers is that photos look fine on the camera’s small LCD screen but appear overexposed on a laptop or desktop monitor. The camera screen is often brighter than your monitor, making exposures look better than they are. Use your histogram rather than the screen preview for accurate assessment.
Reading Your Camera’s Histogram
The histogram is a graph built into your camera that shows how bright or dark different parts of your photo are. It looks like a mountain range or a series of bars. The left side represents pure black (shadows); the right side represents pure white (highlights). The height of the bars shows how many pixels in your image fall at each brightness level.
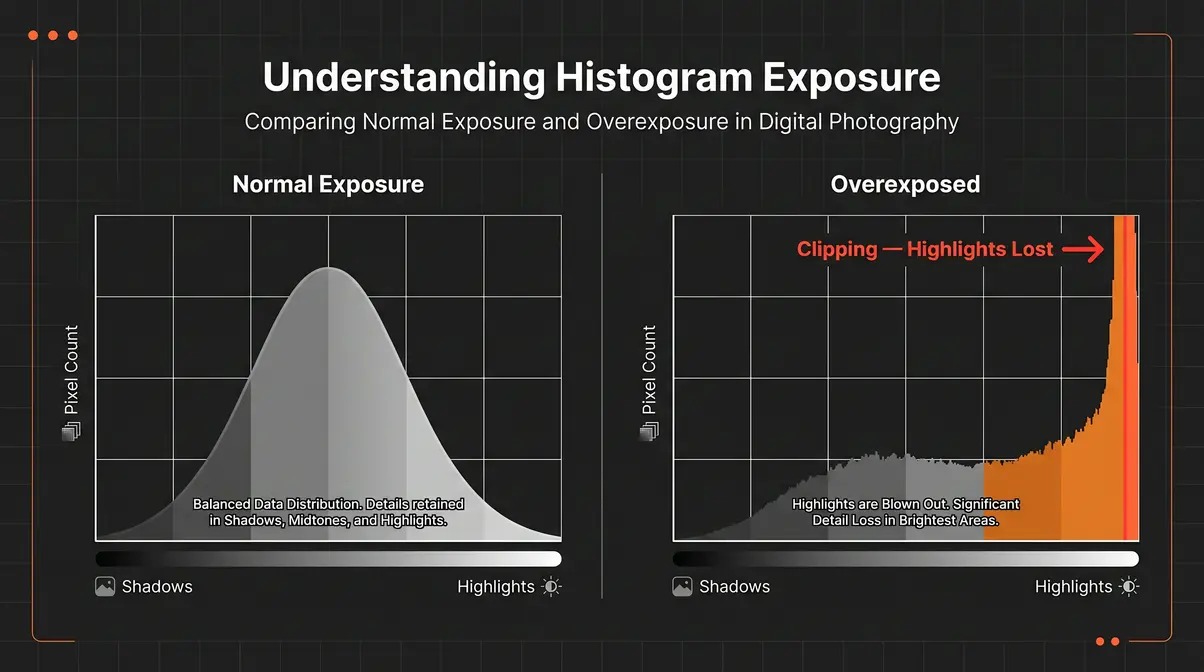
How to spot overexposure on a histogram:
- Look at the right edge of the histogram
- If the bars are crammed against the right wall and appear to be cut off — this is called “clipping”
- A small spike on the far right is normal for bright light sources (like the sun). A large pile-up against the right edge means you have significant overexposure
- The ideal histogram for most scenes has data spread across the middle, with no major pile-up at either extreme
According to Nikon’s official histogram guide, reading the histogram is more reliable than judging exposure by eye on a camera LCD screen — and it’s a habit that professional photographers use on every single shoot.
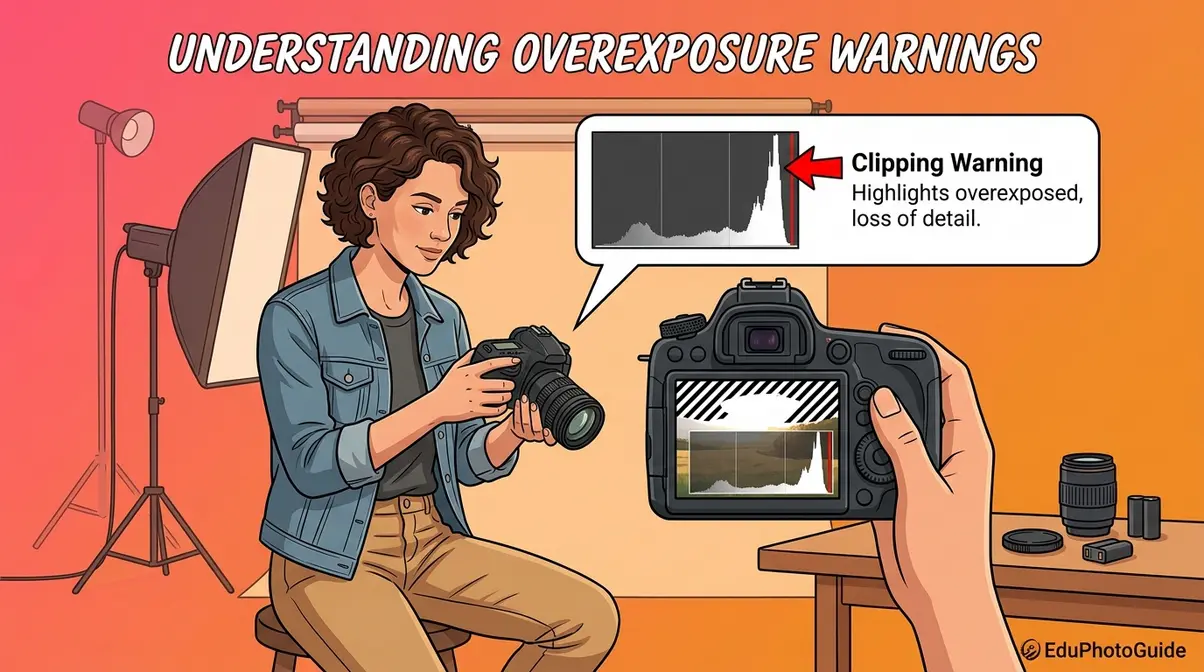
Using the Clipping Warning
Most digital cameras and smartphones include a clipping warning (sometimes called “blinkies” or “highlight alert”) that flashes the overexposed areas of your image directly on the preview screen. It’s one of the fastest ways to catch overexposure in the field.
How to enable it (general steps — check your camera’s manual for exact menu location):
- Enter your camera’s playback or review mode
- Look for a menu option called “Highlight Warning,” “Overexposure Warning,” or “Blinkies”
- Turn it on
- Review your photos — any flashing or zebra-striped zones are overexposed and clipping
Once enabled, this tool turns your camera into a real-time exposure checker. If you see large flashing areas in important parts of your scene (a person’s face, key landscape features), you know to adjust before moving on.
Causes of Overexposure: Exposure Triangle
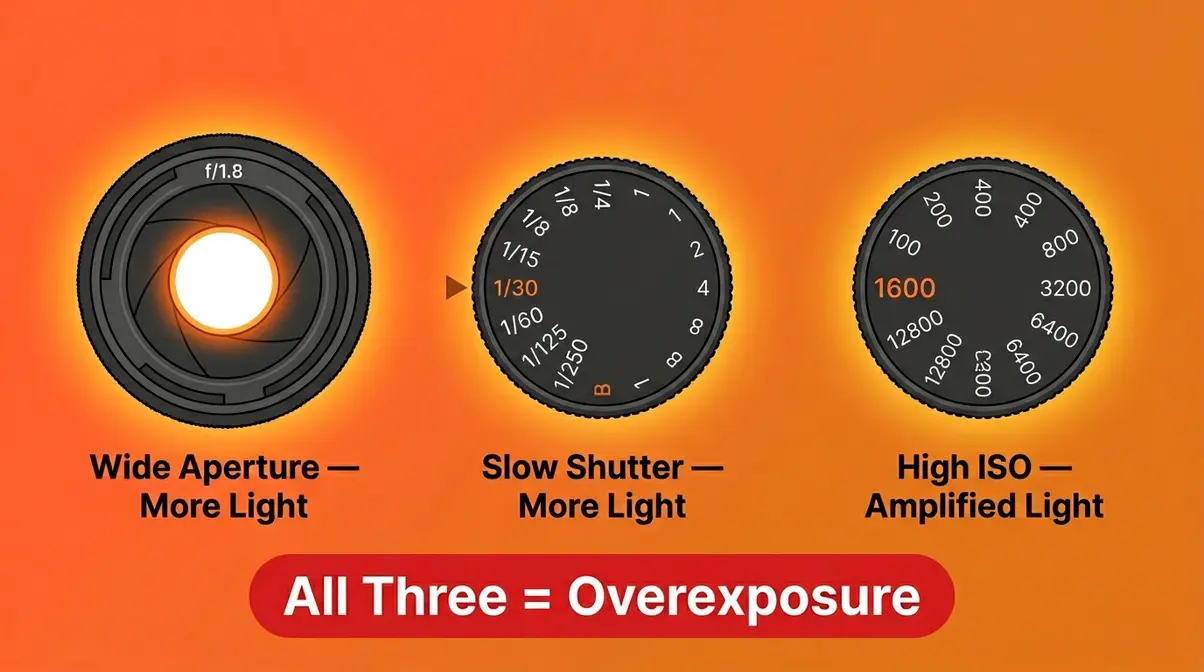
Every overexposed photo comes down to the same root cause: too much light reached the sensor. But how that happens depends on three camera settings that work together as a system. Photographers call this the exposure triangle (the three-part relationship between aperture, shutter speed, and ISO that controls how much light your camera captures).
Aperture: How Wide Your Lens Opens
Aperture is the opening inside your lens that lets light through — think of it like the pupil of an eye. A wide pupil lets in more light; a narrow pupil lets in less. Aperture is measured in f-stops (e.g., f/1.8, f/5.6, f/16). Confusingly, a lower f-number means a wider opening and more light.
Shooting at f/1.8 on a bright sunny day without adjusting your other settings is a fast route to overexposure. Wide apertures are powerful in low light — but in bright conditions, they can flood your sensor before it has a chance to compensate.
Shutter Speed: Sensor Exposure Time
Shutter speed controls how long your camera’s sensor is exposed to light — it’s measured in fractions of a second (1/60, 1/500, 1/2000). A slow shutter speed (like 1/30 sec) keeps the sensor open longer, letting in more light. A fast shutter speed (like 1/2000 sec) cuts exposure time short.
This is especially relevant for long exposure photography, where intentionally slow shutter speeds are used for creative effects like light trails or silky waterfalls. In bright daylight, however, a shutter speed that’s too slow will overexpose your shot in a fraction of a second.
ISO: Your Sensor’s Light Sensitivity
ISO measures how sensitive your camera sensor is to light. A low ISO (100 or 200) means the sensor is less sensitive — ideal for bright conditions. A high ISO (1600, 3200, or above) amplifies the sensor’s sensitivity — useful in dark environments, but dangerous in bright ones.
Beginners often crank up the ISO to “brighten” a photo when they actually need more light for a different reason (like freezing motion). In a well-lit scene, a high ISO will push your exposure into overexposed territory quickly. Feeling overwhelmed by these three controls together is completely normal — the next section gives you a simple mental model to tie them together.
Settings Working Together: Light Budget
Here is where the three settings click into place. Think of your total exposure as a Light Budget — a fixed amount of light your sensor needs for a correct exposure. Aperture, shutter speed, and ISO are three different “spending” channels. You can distribute your budget however you like, but the total must stay within limits.
- The Light Budget model:
- Aperture = how wide you open the wallet
- Shutter speed = how long you hold it open
- ISO = how much each unit of light is amplified
If you widen the aperture (spend more via aperture), you need to compensate by closing down another channel — speed up the shutter or lower the ISO. Overexposure happens when you spend too much across all three channels simultaneously, and the total exceeds what your sensor can handle.
This mental model — The Light Budget — makes every exposure decision concrete. Instead of abstract numbers, you’re managing a budget. You can be generous in one area, but only if you’re conservative elsewhere.
| Setting | Overexposure Risk | Compensation |
|---|---|---|
| Wide aperture (f/1.8–f/2.8) | High in bright light | Use faster shutter or lower ISO |
| Slow shutter (1/30–1/125 sec) | High outdoors | Use narrower aperture or lower ISO |
| High ISO (800+) | High in daylight | Use faster shutter or narrower aperture |
| All three set “bright” | Critical overexposure | Reset at least two settings |
How to Prevent and Fix Overexposure
When asking what is overexposure photography going to ruin next, remember that prevention is always easier than fixing it after the fact — especially with JPEG files, where recovery is limited. The good news: a few quick habits will dramatically reduce overexposed shots.
Preventing Overexposure In-Camera
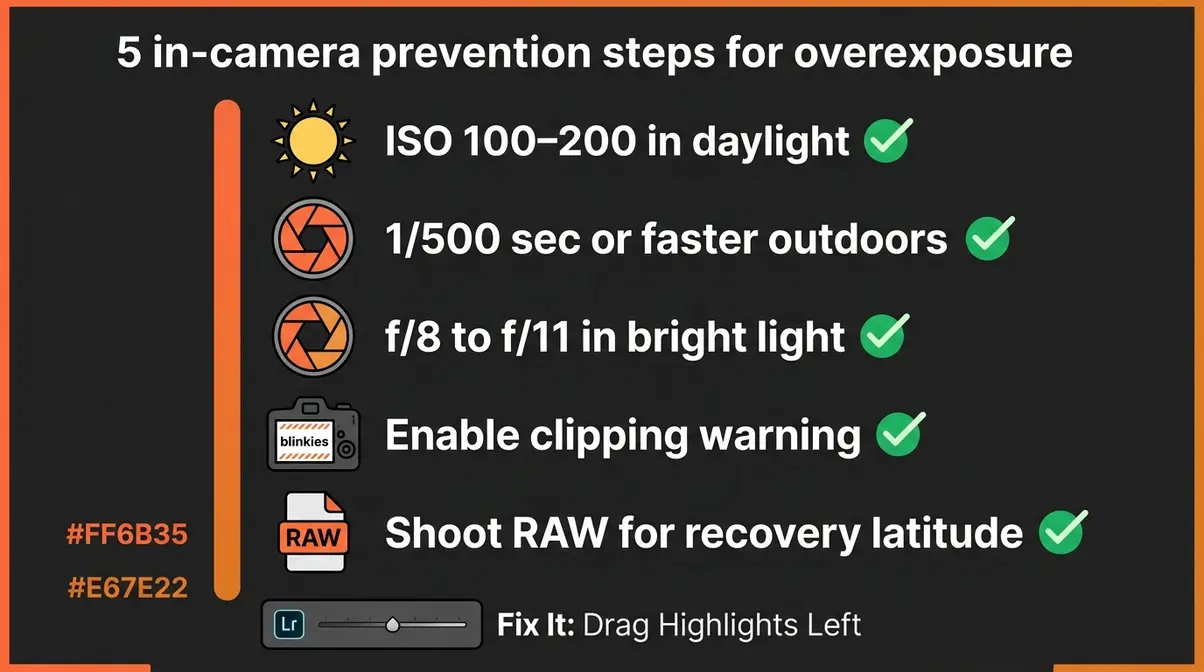
Use this checklist before shooting in bright conditions:
- [ ] Check your ISO — In daylight, start at ISO 100 or 200. Raise it only if your scene is dark.
- [ ] Use a faster shutter speed — Outdoors on a sunny day, 1/500 sec or faster is a safe starting point.
- [ ] Narrow your aperture — In bright light, f/8 to f/11 gives you a good exposure margin without sacrificing depth of field.
- [ ] Enable the clipping warning — Turn on “blinkies” so you can see overexposed zones instantly on playback.
- [ ] Shoot in RAW format — RAW files retain far more recoverable highlight data than JPEGs. This gives you a safety net in post-processing.
- [ ] Use exposure compensation — Most cameras have a dial or button marked with a “±” symbol. Dial it down (toward the minus side) to intentionally darken your exposure in challenging light.
Adjusting Your Settings on the Spot
When you’re in the field and your shots are coming out overexposed, follow these steps in order:
- Speed up your shutter — This is usually the fastest fix. Double your shutter speed (e.g., from 1/250 to 1/500) and check the histogram again.
- Lower your ISO — Drop to the lowest native ISO your camera offers (typically ISO 100). This reduces amplification and brings exposure down.
- Narrow your aperture — Increase your f-number (e.g., from f/2.8 to f/5.6). This halves the light entering the lens.
- Use exposure compensation — In Auto or semi-automatic modes (Aperture Priority, Shutter Priority), dial in -1 or -2 stops of exposure compensation to darken the shot.
- Recheck your histogram — After each adjustment, take a test shot and confirm the histogram data is no longer piling against the right edge.
Another advanced technique is exposure bracketing, which takes multiple shots at different brightness levels to ensure at least one is perfectly exposed. Each step above halves (roughly) the amount of light reaching your sensor. You rarely need more than two adjustments to bring an overexposed shot back under control.
Fixing Overexposure in Adobe Lightroom
Even with the best in-camera habits, some shots will still come out too bright — especially in mixed or rapidly changing light. Adobe Lightroom’s editing tools can recover a surprising amount of highlight detail from RAW files.
Step 1: Open your RAW file in Lightroom Classic or Lightroom (cloud version).
Step 2: Check the histogram in the top-right panel — look for clipping indicators (small triangles in the top corners of the histogram will light up if highlights or shadows are clipping).
Step 3: Drag the Highlights slider left — Start here. Pull it to around -50 and check your image. This recovers the most detail in moderately bright areas.
Step 4: Drag the Whites slider left — If highlights alone aren’t enough, bring Whites down to -30 or -50. This targets the absolute brightest pixels.
Step 5: Adjust Exposure — If the whole image is too bright (not just the highlights), drag the Exposure slider left by -0.5 to -1.0 stops.
Step 6: Check with the “J” key — Press J on your keyboard to toggle the clipping overlay. Blue areas = recovered shadows; red areas = still-clipping highlights. Aim to eliminate red.
Step 7: Use the Tone Curve for fine control — If sliders alone can’t fix it, the Tone Curve lets you pull down specific brightness ranges with precision.
| Lightroom Slider | What It Affects | Starting Point |
|---|---|---|
| Highlights | Bright (but not pure white) areas | -40 to -60 |
| Whites | Pure white / clipping pixels | -20 to -50 |
| Exposure | Overall brightness of the whole image | -0.5 to -1.0 |
| Tone Curve | Precise brightness range control | Upper-right region |
According to Adobe’s official Lightroom documentation, Highlights and Whites adjustments in RAW files can recover up to 2–3 stops of overexposed data, depending on the camera sensor’s dynamic range. JPEGs have far less recovery latitude — another strong reason to shoot RAW whenever possible.
Overexposure in Digital vs. Film Photography
The way overexposure behaves is fundamentally different depending on whether you’re shooting digital or shooting film. Understanding this difference helps you choose the right approach — and explains why advice that works for film photographers can actively hurt a digital shooter.
Why Digital Sensors Clip Abruptly
A digital camera sensor is made of millions of tiny photosites (light-collecting cells). Each photosite can hold a limited number of photons (light particles) before it reaches its maximum capacity. When that maximum is hit, the photosite records pure white — regardless of how much additional light falls on it. This is clipping, and it happens in a hard, abrupt step.
The result: in a digital photo, you can go from “slightly bright highlight” to “pure white with no detail” very quickly, sometimes within a single stop of additional exposure. StudioBinder’s photography guide notes that modern full-frame digital sensors typically offer 12–15 stops of dynamic range, which sounds generous — but the highlight end of that range clips sharply, while the shadow end degrades more gradually.
This abruptness is why digital photographers are taught to “protect the highlights.” Recovering shadow detail in editing is relatively easy. Recovering clipped highlights is impossible.
Why Film Handles Overexposure Better
Film works differently. Instead of a hard clip, film’s chemical emulsion responds to overexposure with a gradual highlight roll-off — the transition from bright to white is softer, more like the way human vision works. This is why old film photographs often look “warm” and “gentle” even in very bright conditions.
Film photographers often intentionally overexpose negative film by 1–2 stops to push shadow detail, knowing the highlights will roll off gracefully rather than clip hard. This latitude — the range of exposure over which film produces acceptable results — is a characteristic that digital photographers have long envied.
This is also the origin of a digital technique called ETTR (Exposing to the Right) — a method where you intentionally expose your digital shot as bright as possible without clipping, then pull the exposure down in editing. Because digital sensors capture more tonal data in the brighter ranges, ETTR can yield cleaner, less noisy images — particularly in the shadows. It’s an advanced technique that mimics film’s approach to light management.
Digital vs. Film: Which to Overexpose?
| Digital | Film (Negative) | |
|---|---|---|
| Highlight behavior | Hard clip — abrupt pure white | Gradual roll-off — soft, gentle |
| Overexpose by 1 stop? | Risky — highlights may clip | Generally safe — shadow benefit |
| Overexpose by 2+ stops? | Likely unrecoverable | Still manageable |
| Underexpose tolerance | Better — shadows recoverable in RAW | Worse — shadow noise compounds |
| Post-processing latitude | Good (RAW) / Poor (JPEG) | Moderate (during development) |
| Best practice | Protect highlights; use ETTR carefully | Expose for shadows; let highlights roll |
For digital photographers, the direct answer to “is it better to overexpose or underexpose?” is: err toward slight underexposure. You can lift shadows in editing. You cannot recover clipped highlights. Film photographers often do the opposite — slight overexposure is forgiving on negative film. The medium changes the math.
Intentional Overexposure Techniques
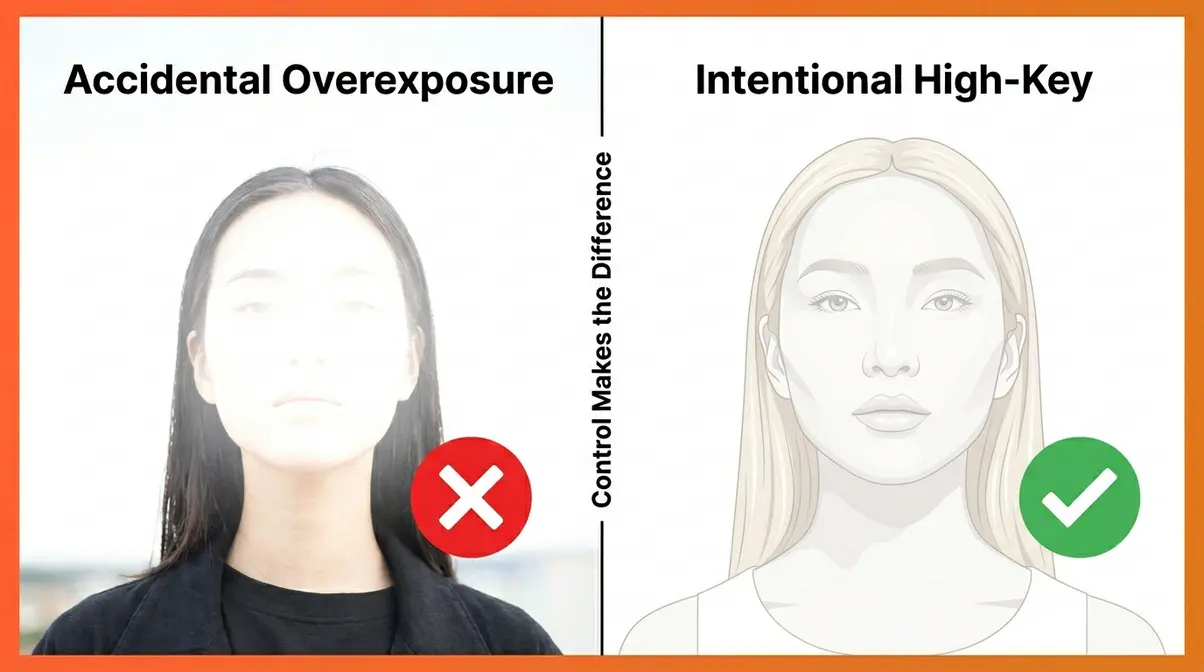
Not every bright photo is a mistake. Some of the most striking images in fashion, portrait, and lifestyle photography are intentionally overexposed — and knowing the difference between an accident and an artistic choice is what separates a beginner from a confident photographer.
High-Key Photography: Bright & Clean
High-key photography is a style that uses intentionally bright exposure — often with overexposed backgrounds — to create a clean, airy, positive mood. Think of product photography on a pure white background, or a newborn portrait bathed in soft window light. The brightness is the point.
- High-key images typically share these characteristics:
- Predominantly light tones — most of the image is in the upper half of the brightness range
- Minimal or soft shadows — shadows are either absent or very gentle
- Intentional blown backgrounds — the background is often pure white by design
- Controlled subject exposure — the subject is properly exposed even as the background blows out
The key technical difference between high-key photography and accidental overexposure is control. In high-key work, the photographer chooses which areas blow out and protects the areas that matter (like a subject’s face or eyes). Accidental overexposure destroys everything indiscriminately.
Achieving a Light and Airy Style
“Light and airy photography is one of those styles that gets misunderstood because people reduce it to ‘make it brighter.’ That’s not what it is.”
That quote captures a frustration shared by many photographers learning this style. Light and airy refers to a specific aesthetic — soft, pastel tones, gentle contrast, and a feeling of warmth and openness — that is often confused with simply turning up the brightness slider. The difference is in the quality of light, not just its quantity.
- To achieve a genuine light and airy style:
- Use soft, directional light — window light or open shade, not direct midday sun
- Expose slightly above the meter reading — typically +0.3 to +0.7 stops, not +2 or +3
- Preserve detail in skin tones — the subject’s face should retain texture; only the background and non-essential highlights blow out
- Use a light color palette — light backgrounds, light clothing, pastel environments reinforce the style
This is controlled brightness — not careless overexposure. The distinction matters because one is repeatable and intentional; the other is an accident waiting to happen.
Backlit Subjects and Blown Backgrounds
Backlighting — where your light source is behind your subject — is one of the most beautiful and most challenging lighting situations for beginners. When you expose for your subject’s face, the bright background will almost certainly blow out. This can be a creative choice or a technical problem, depending on how you handle it.
How to handle backlit subjects:
- Expose for the subject’s face — Use spot metering or exposure lock on your subject’s skin. Accept that the background will overexpose.
- Use fill flash or a reflector — A small flash or a white reflector bounced toward your subject’s face balances the exposure between subject and background, reducing the gap.
- Embrace the blown background intentionally — If the background is a cluttered street or distracting environment, letting it blow out to white or light gray can actually simplify and strengthen the image.
- Shoot in RAW — Even if the background blows, RAW files give you more latitude to balance the image in post.
User consensus across photography forums indicates that intentional backlighting with a blown background is one of the most popular and sought-after portrait styles — particularly in golden-hour and outdoor lifestyle photography.
Common Mistakes to Avoid
Even experienced photographers make exposure mistakes. The difference is they recognize them faster and know how to respond. Here at amateurphotographerguide.com, we often see beginners encounter the same pitfalls — and knowing when it makes sense to step back and change your approach entirely is crucial.
Common Pitfalls When Learning Exposure
Relying on the LCD screen instead of the histogram. Camera screens are bright and flattering. They make overexposed photos look acceptable in the field. Always confirm your exposure using the histogram — not your eye on a three-inch screen.
Shooting JPEG when you intend to recover highlights. JPEG files compress and discard data at capture. If a JPEG is overexposed, most of that highlight information is gone permanently. If recovery is part of your workflow, shoot RAW.
Overcorrecting in editing. Beginners who discover the Highlights slider often drag it all the way to -100 on every photo. This creates a flat, dull look with crushed highlights. Use the minimum correction needed to recover detail — check the clipping overlay (press J in Lightroom) rather than dragging blindly.
Confusing “bright” with “overexposed.” A well-exposed photo can be bright and beautiful. Overexposure specifically means lost detail in the highlights. Brightness without clipping is fine — even desirable in some styles.
When to Choose a Different Approach
Sometimes the right answer isn’t to fix overexposure — it’s to rethink the shot entirely. Consider a different approach when:
- You’re in extremely high-contrast light (harsh midday sun with deep shadows) — no single exposure setting will capture both extremes. Use HDR techniques, fill flash, or shoot at a different time of day.
- Your subject is strongly backlit and you lack fill lighting — rather than fighting the exposure, reposition to a different angle where the light works with you, not against you.
- You’re shooting JPEG and recovery is critical — switch to RAW before the shoot, not after.
According to Digital Photography School, most exposure problems that frustrate beginners are actually lighting problems in disguise. Fixing the light source or your position relative to it is more effective than fighting with settings after the fact.
Overexposure Photography FAQs
Better to Overexpose or Underexpose?
For digital photography, slight underexposure is generally safer than overexposure. Clipped highlights (pure white zones) cannot be recovered in editing, even from RAW files. Shadow detail, by contrast, can often be lifted by 1–2 stops in Lightroom or Photoshop with manageable noise. Film photographers often follow the opposite rule — negative film’s gradual highlight roll-off means slight overexposure protects shadow detail without hard clipping. The medium changes the answer significantly (Digital Photography School, 2026).
What is considered overexposure?
A photo is considered overexposed when important areas of the image — particularly highlights — have clipped to pure white, losing all tonal detail. Technically, overexposure occurs when a pixel reaches its maximum brightness value (255 in an 8-bit image) and can record no further information. Mild overexposure — a slightly bright image with no clipping — is often acceptable or even intentional. Severe overexposure, where faces, skies, or key subjects turn featureless white, is a technical error that cannot be fixed after capture.
Putting It All Together: From Mistake to Mastery
Every photographer — beginner and professional — has taken an overexposed photo. The difference between a beginner and a confident shooter isn’t that one never makes exposure mistakes. It’s that the confident shooter can read the mistake instantly, diagnose the cause, and correct it before the moment is gone.
The Light Budget mental model is your foundation. When you think of exposure as a budget — with aperture, shutter speed, and ISO as three spending channels — overexposure stops being a mysterious accident and becomes a predictable, manageable outcome. Spend too much in all three channels, and the budget overflows. Keep the total within limits, and your sensor records exactly what you intended.
The practical path forward is straightforward: enable your histogram and clipping warning today, switch to RAW format for any shoot where exposure matters, and spend 10 minutes in Lightroom with the Highlights and Whites sliders on your next overexposed shot. Now that you know exactly what is overexposure photography, you can stop fearing it and start controlling it. Those three habits will eliminate the majority of overexposure frustration — and free you to start experimenting with intentional brightness when you’re ready to explore high-key and light-and-airy styles.
Dave King
Hi, I'm Dave, the founder of Amateur Photographer Guide. I created this site to help beginner and hobbyist photographers build their skills and grow their passion. Here, you’ll find easy-to-follow tutorials, gear recommendations, and honest advice to make photography more accessible, enjoyable, and rewarding.