
Table of Contents
- What Is Panning Photography? (And Why It Works)
- What You’ll Need Before You Start
- How to Do Panning Photography: Step-by-Step
- Best Camera Settings for Panning Photography
- Panning Photography Ideas: 7 Subjects to Try
- Panning Different Subjects: Cars, Wildlife & More
- Panning Photography on Your iPhone or Android
- Common Mistakes and How to Fix Them
- Frequently Asked Questions
- Caveats, Limitations, and Common Pitfalls
- Conclusion
This blog post may contain affiliate links. As an Amazon Associate I earn from qualifying purchases.
Most beginners get one sharp panning shot per burst — if they’re lucky. Sound familiar?
“I’m getting one shot out of a burst where it may be sharp and then the rest are slightly blury and not tac sharp.”
Here’s the truth: the problem almost certainly isn’t your camera. It’s that nobody has shown you the actual physical method — the precise body movement that makes panning photography feel smooth and repeatable instead of random. And without that foundation, even perfect settings won’t save your shots.
By the end of this guide, you’ll understand exactly how to move your camera, which settings to dial in, and which subjects to practice on — so you can walk outside today and come back with your first tac-sharp panning shot. We’ll cover the fundamentals, the right camera settings, seven subject ideas with exact starting points, smartphone techniques, and how to rescue slightly blurry shots in post-processing.
Panning photography keeps a moving subject sharp while blurring the background into streaks — mastering it requires the right shutter speed (typically 1/30s–1/60s) and a smooth, synchronized body movement.
- The Swing Sequence (Acquire → Track → Follow Through) is the single most important physical skill to practice
- Start at 1/60s for cyclists and runners; slow to 1/30s for more dramatic blur
- Continuous autofocus (AI-Servo/AF-C) is non-negotiable — never use single-shot AF for panning
- Burst mode raises your keeper rate dramatically — expect 1–3 sharp shots per 10-shot burst as a beginner
- Smartphones can pan — you just need a manual camera app (Pro Camera, Camera FV-5)
What Is Panning Photography? (And Why It Works)
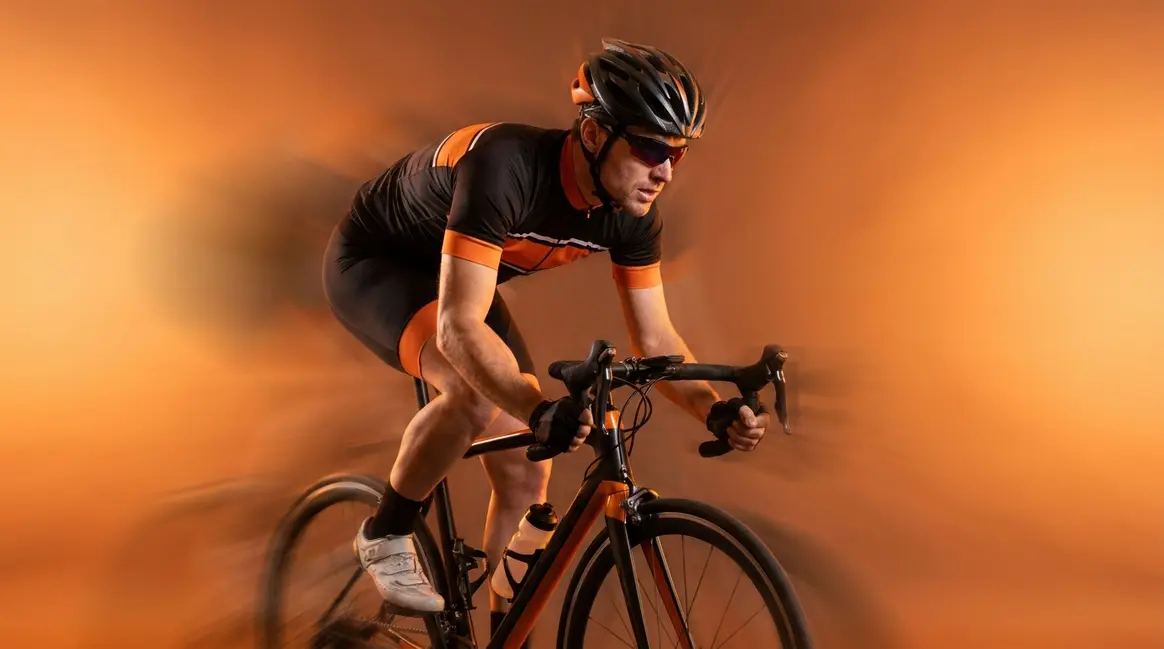
Panning photography is a motion technique where you move your camera lens in sync with a moving subject — using a slow shutter speed (typically 1/30s–1/60s) to blur the background into horizontal streaks while keeping the subject sharp. The result is a still image that communicates speed, energy, and motion in a way that a frozen action shot simply cannot. This guide will teach you a three-phase method called The Swing Sequence that makes this movement learnable from day one.
The Effect: Sharp Subject, Blurred Background
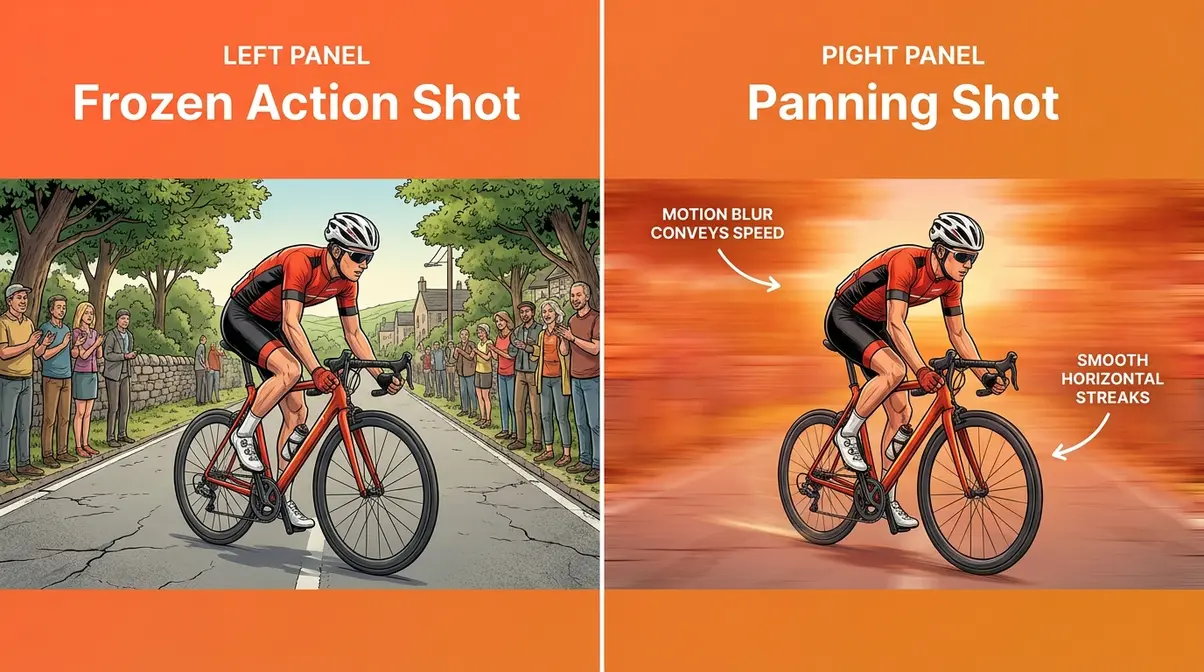
In a successful panning shot, the subject — a cyclist, a car, a sprinting dog — is crisp and in focus. The background becomes a horizontal streak of colour and light. Photographers call this the “panning effect,” and it’s what separates a dynamic action shot from a frozen snapshot that feels lifeless.
The easiest way to understand it is through an analogy. Imagine watching a racing car pass in front of you. Your eyes naturally follow it, so the car looks clear while the grandstand behind it blurs. Panning photography replicates exactly this experience — your camera becomes your eye.
As you can see in the comparison image above, the difference between a frozen action shot and a panning shot is dramatic — and it all comes down to one technique.
Here’s why the physics works: when your camera moves at the same speed as the subject, the subject’s position on your sensor barely changes during the exposure. Relative motion between lens and subject approaches zero, so the subject records sharply. The background, however, IS moving relative to your lens — so it smears into those characteristic streaks.
The Physics Behind the Blur
The core principle is relative motion. During your exposure, your camera tracks the subject, so the subject moves very little across the sensor. Relative motion between lens and subject ≈ zero — which means a sharp subject. The background, by contrast, is moving relative to the lens (because you’re panning), so it smears as horizontal streaks. The slower your shutter speed (the longer the exposure), the more dramatic those streaks become.
This is fundamentally different from camera shake. Camera shake is random, multi-directional blur caused by an unsteady hold. Panning blur is intentional, directional (horizontal), and controlled. Understanding this distinction helps you diagnose your shots: if the blur is going in every direction, that’s camera shake. If it’s a clean horizontal streak, you’re panning — just perhaps at the wrong speed.
Think of it this way: photograph a stationary car at 1/30s and you get a sharp car. Photograph a moving car at 1/30s without panning and you get a blurry car. Pan WITH the car at 1/30s and you get a sharp car with a blurred background. Same shutter speed — completely different result, because of the movement.
The 7-Second Panning Rule Explained
Before you press the shutter, pre-track your subject in your viewfinder for approximately 7 seconds — or as long as possible — before it reaches your chosen shooting position. This pre-tracking period allows your body to learn the subject’s speed and rhythm before you fire.
Why does this work? Your arms and torso naturally synchronise to the subject’s pace during pre-tracking. When you finally press the shutter, your panning motion is already smooth and matched — rather than starting from a jerky standstill. Across photography communities, the consistent feedback is that beginners who skip pre-tracking fire too early and get a stuttering, uneven pan every time.
Practically, position yourself so the subject enters your frame from one side. Start tracking as early as you can see it. Fire when it reaches the centre of your frame, then keep moving after you shoot. If you’re photographing a cyclist on a road, start tracking them 50 metres before they reach you. By the time they’re in your ideal shooting zone, your panning technique is already smooth and matched to their pace. Note: 7 seconds is a guideline, not a strict timer — some photographers pre-track for 3–5 seconds, others up to 10. The point is to start early.
Now you know what panning photography is and how to set yourself up for success. Before we get into the physical steps, let’s make sure you have everything you need.
What You’ll Need Before You Start
Panning photography doesn’t require expensive gear. If your camera — or your smartphone — lets you set the shutter speed manually, you have everything you need to start today. The biggest barrier for most beginners isn’t equipment; it’s not knowing what settings to use or where to stand.
Camera and Lens Requirements
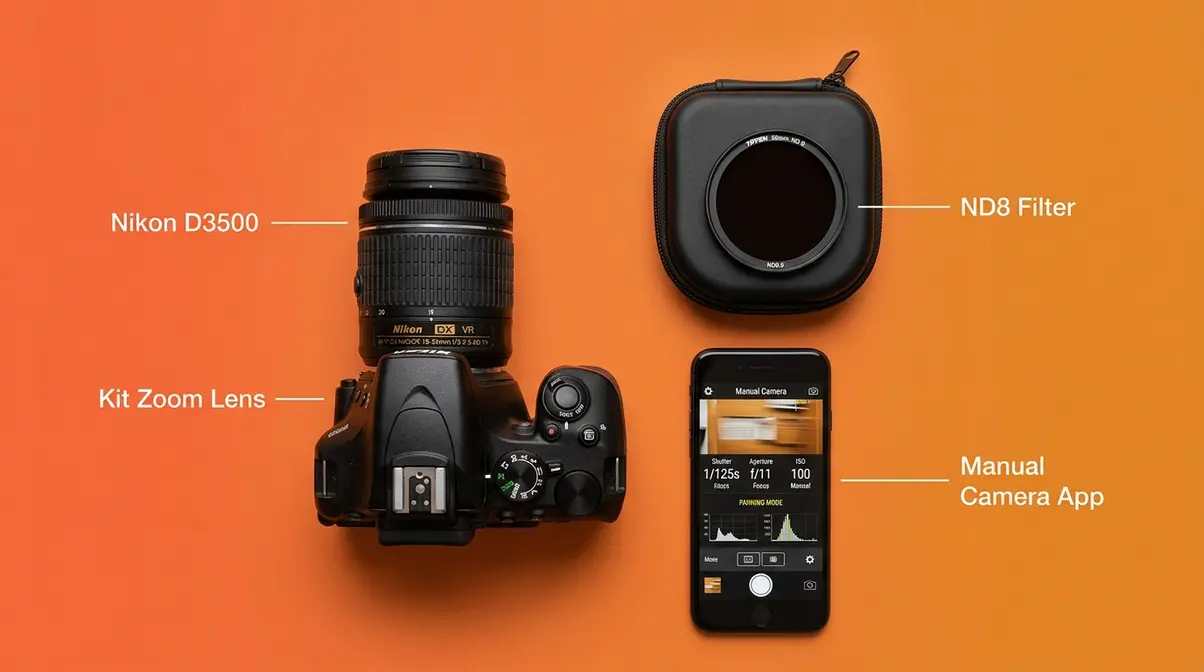
Any camera with a manual shutter speed setting will work: entry-level DSLRs (like the Canon Rebel series or Nikon D3500), mirrorless cameras (Sony a6000, Fujifilm X-T30), or even a bridge camera. You do NOT need a full-frame sensor, an expensive telephoto lens, or image stabilisation — though image stabilisation (IS/OIS/VR, depending on your brand) does help smooth out your pan.
For lenses, a kit zoom (18–55mm or 18–135mm) is perfectly fine. A longer focal length (70–200mm) compresses the background more dramatically and can make the blur effect more pronounced, but it’s not a requirement for your first sessions. A tripod isn’t needed either — panning is a handheld technique. What you DO need is the ability to pivot smoothly from the waist.
One useful optional accessory: a neutral density (ND) filter — a piece of glass that reduces the amount of light entering your lens. This lets you use slower shutter speeds in bright daylight without overexposing your image. A 3-stop ND filter (ND8) is a practical starting point and costs under $30 for most filter sizes.
Choosing Your Location and Subject
The ideal panning location has a clean, uncluttered background — a row of trees, a plain wall, an open field, or a blurred cityscape all work beautifully. Avoid backgrounds with stationary people or signs that look distracting when blurred.
For your first session, pick a subject with a predictable, linear path — a cyclist on a bike path, cars on a straight road, or a runner on a track. Predictable movement means you know where to aim before the subject arrives, giving you more time to pre-track. Avoid subjects that change direction unpredictably (like dogs at a park) until you’ve built confidence with the technique.
Lighting matters more than you’d think. Bright, overcast daylight is ideal — it gives you enough light to expose correctly at slow shutter speeds without needing a very high ISO (ISO sensitivity — how responsive your sensor is to light). Direct harsh sunlight can overexpose your shots at 1/30s–1/60s, which is where an ND filter comes in handy.
How to Do Panning Photography: Step-by-Step
This is where most beginner guides fall short — they explain settings but skip the physical technique entirely. Across photography forums and communities, the consistent feedback is that body movement accounts for at least as much of your keeper rate as your camera settings. The framework below — The Swing Sequence — breaks the physical motion into three learnable phases: Acquire, Track, and Follow Through.
The 20-60-20 rule maps directly onto The Swing Sequence: spend roughly 20% of your time acquiring and locking onto the subject, 60% tracking smoothly as you shoot, and 20% following through after the shutter fires. Internalise this rhythm and your keeper rate will climb noticeably from your very first session.
- What You’ll Need:
- Your camera set to Shutter Priority (Tv/S) mode or Manual mode
- Continuous autofocus (AI-Servo on Canon / AF-C on Nikon, Sony, Fujifilm)
- Burst mode activated
- A subject with a predictable path
- Approximately 15–30 minutes of practice time
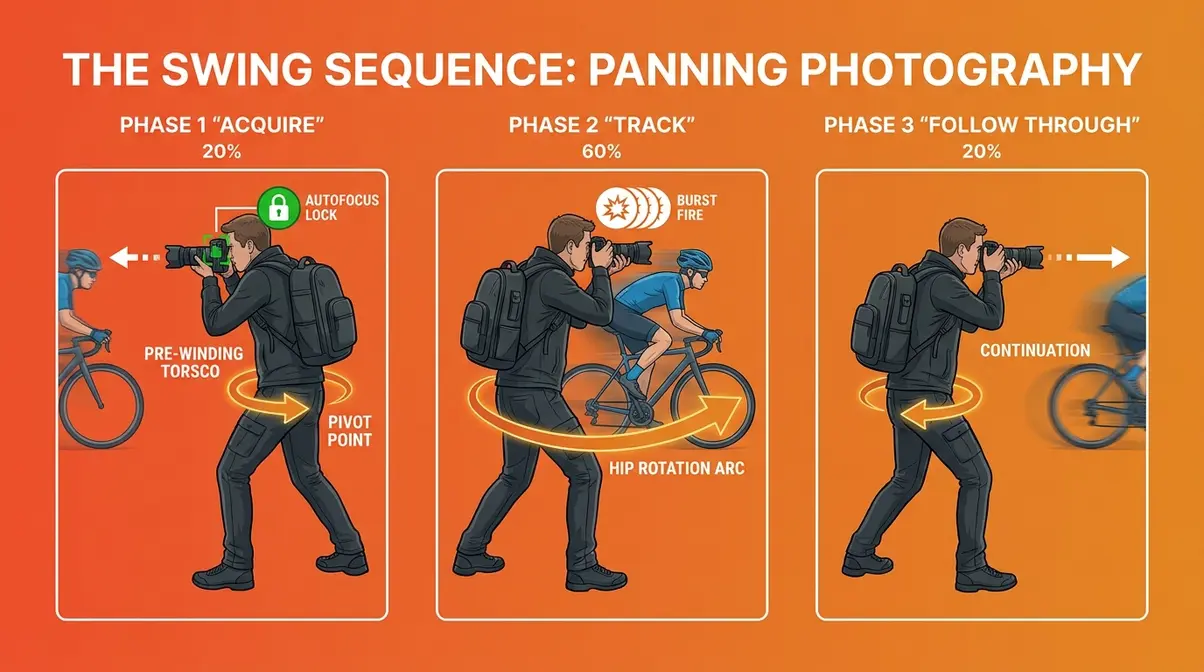
Step 1 — Set Your Stance (Acquire Phase)
Stand with your feet shoulder-width apart, perpendicular to the direction your subject will travel. Keep your elbows tucked close to your body — this stabilises the camera and reduces wobble. Your knees should be slightly bent, not locked. Think of your hips as the pivot point, not your arms.
Before the subject arrives, acquire it in your viewfinder. Press your shutter button halfway down to activate autofocus. This is the Acquire phase — you’re locking your autofocus onto the subject while your body is still stationary. Make sure your camera sees the subject before you start moving.
Pre-wind your upper body slightly in the direction the subject is coming FROM. If the subject is travelling left-to-right, twist your torso slightly to the left. This gives you full range of motion to follow through in the direction of travel, rather than running out of swing halfway through the shot.
Canon guide tip: Keep your eye pressed firmly against the viewfinder, not hovering above it. A solid contact point between camera and face reduces camera shake significantly (Canon Europe, 2024).
Step 2 — Track and Shoot (The 60% Phase)
This is the heart of The Swing Sequence — the 60% phase where the critical shooting happens. As the subject moves into your frame, begin pivoting smoothly from your hips (not your shoulders, not your wrists). Your upper body rotates as a single unit, keeping the camera level.
Start tracking the subject in your viewfinder as early as possible — apply the 7-second rule here. Keep the subject centred in your frame as you rotate. When the subject reaches the centre of your field of view — your pre-chosen “sweet spot” — press the shutter fully and hold it down. Keep the burst firing for 1–2 full seconds.
The key insight here: do not slow down or hesitate when you fire. Many beginners unconsciously pause at the moment of shutter press, which introduces a jerk in the pan and ruins sharpness. Think of the shutter press as happening inside a continuous, uninterrupted swing — not as the end point of the motion.

Step 3 — Follow Through (Don’t Stop Moving)
The follow-through is the most neglected phase — and the most common reason beginners get a sharp shot at the start of a burst and blurry shots at the end. After the shutter fires, keep pivoting in the direction of travel for at least one full second. Do not stop. Do not lower the camera. Keep moving.
This mirrors the follow-through in a golf swing or a tennis stroke — stopping abruptly at the moment of impact (or in this case, at the moment of firing) introduces a deceleration jerk that shows up as blur. The follow-through ensures your pan speed is consistent before, during, and after the exposure.
Across photography communities, the consistent feedback is that follow-through is the correction that produces the most immediate improvement in keeper rate — often doubling the number of sharp shots per burst within a single practice session.
Burst Mode: Your Secret Weapon
Burst mode (also called continuous shooting or drive mode) fires multiple frames per second while you hold the shutter button down. For panning, it’s not optional — it’s essential. As a beginner, expect to get 1–3 sharp shots per 10-shot burst. That’s not a failure; that’s the reality of learning a physical skill.
Set your camera to its fastest burst speed — typically 5–10 frames per second (fps) for most entry-level cameras. Shoot a burst of at least 10 frames each time. Review the sequence: usually the sharpest shots fall in the middle of the burst (after your pan has smoothed out but before fatigue sets in). The shots at the very beginning (before the pan is smooth) and the very end (after you’ve started to decelerate) are typically the weakest.
Pro tip: Don’t spray and pray. Review your burst sequences critically. Identify which frame in each sequence was sharpest — then work backwards to understand what your body was doing at that moment. This deliberate review process is how your keeper rate climbs from 10% to 30% within a few sessions.
Best Camera Settings for Panning Photography
Getting your settings right is the second pillar of consistent panning results. The physical technique (The Swing Sequence) and the camera settings work together — neither alone will produce tac-sharp keepers reliably.
Shutter Speed: Your Most Important Setting
Shutter speed — the length of time your camera’s sensor is exposed to light — is the single most critical setting for panning photography. Too fast, and the background won’t blur enough to create the panning effect. Too slow, and even a perfect pan won’t keep the subject sharp.
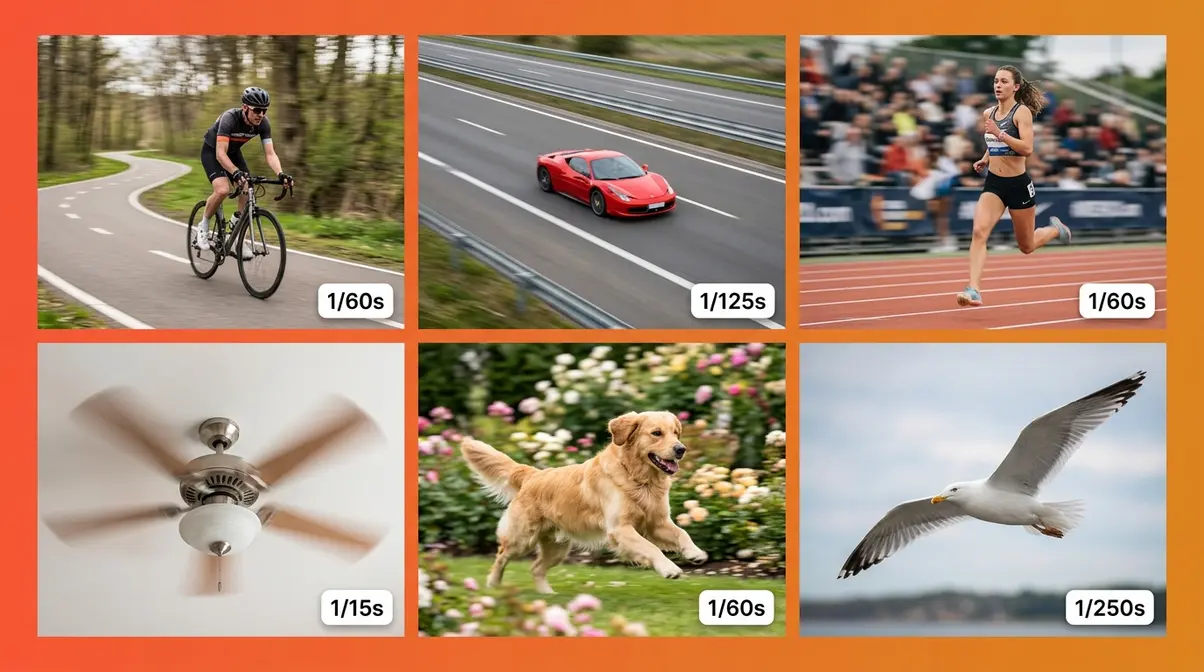
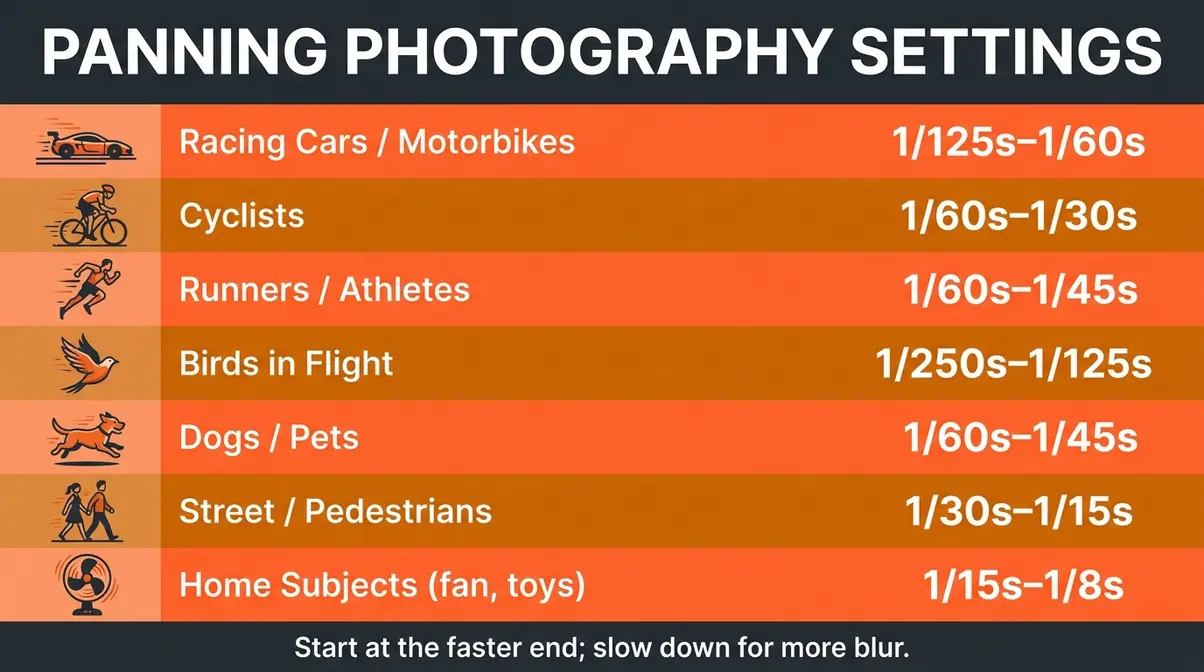
Starting points by subject:
| Subject | Recommended Shutter Speed | Notes |
|---|---|---|
| Racing cars / motorbikes | 1/125s – 1/60s | Start at 1/125s; slow down for more blur |
| Cyclists | 1/60s – 1/30s | Classic panning range |
| Runners / athletes | 1/60s – 1/45s | Faster subjects need slightly faster shutter |
| Birds in flight | 1/250s – 1/125s | Wings can blur even at faster speeds |
| Dogs / pets | 1/60s – 1/45s | Unpredictable movement; keep shutter higher |
| Street scenes / pedestrians | 1/30s – 1/15s | Dramatic blur; requires very smooth pan |
| Home subjects (fan, toys) | 1/15s – 1/8s | Very slow; use a tripod head for stability |
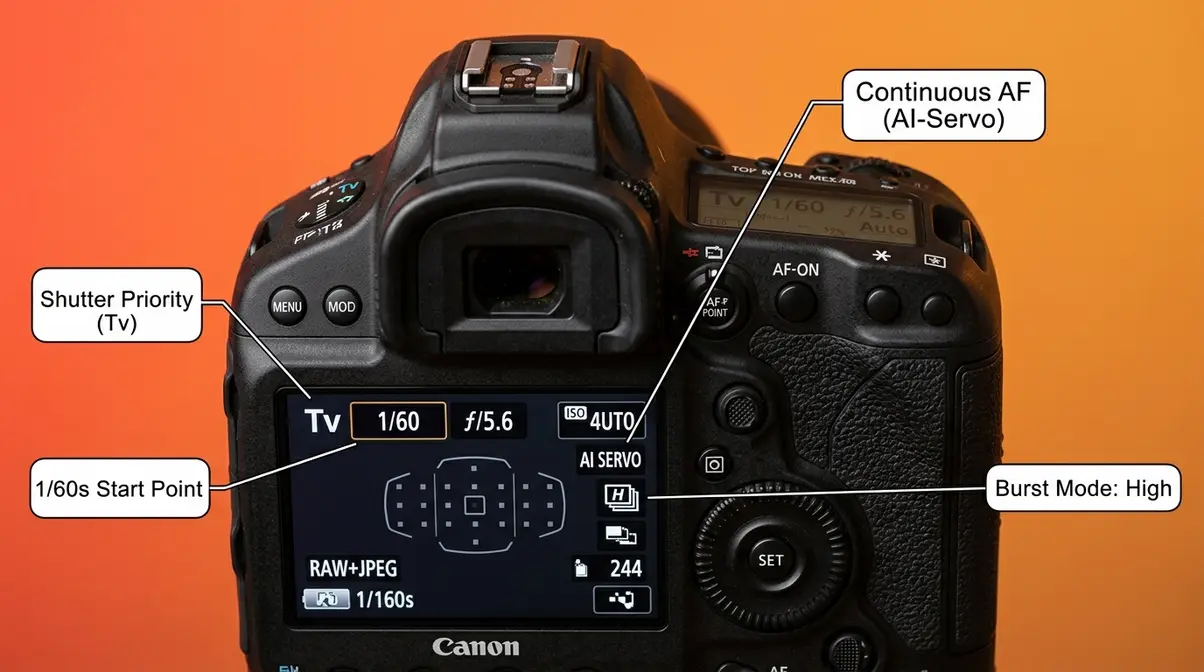
Shutter speeds between 1/30s and 1/60s are widely recommended as the core panning range for most subjects (National Geographic, 2024). Use Shutter Priority mode (labelled “Tv” on Canon, “S” on Nikon and Sony) — you set the shutter speed, and the camera automatically adjusts aperture to maintain correct exposure. This frees you to focus entirely on the physical technique.
Autofocus Mode: Continuous Tracking
Continuous autofocus — called AI-Servo on Canon, AF-C on Nikon, Sony, and Fujifilm — continuously recalculates focus as your subject moves. This is non-negotiable for panning photography. Single-shot autofocus (AF-S or One-Shot) locks focus once and stops tracking, which means your moving subject will be out of focus before you even fire.
Set your autofocus area mode to a wide zone or tracking mode (not a single small point) so the camera can follow the subject even if it drifts slightly in the frame. On newer cameras, use subject-tracking or eye-tracking AF if available — these modes dramatically improve keeper rate for human subjects.
Half-press your shutter button to engage continuous AF before the subject enters your frame. Keep that half-press held throughout the entire Swing Sequence — acquiring, tracking, and following through. Releasing and re-pressing mid-pan causes AF hunting (where the camera searches for focus) and almost guarantees a missed shot.
Aperture, ISO, and Drive Mode
In Shutter Priority mode, your camera handles aperture automatically. However, if you’re shooting in Manual mode, a mid-range aperture (f/5.6 – f/8) is a safe starting point — it gives you a workable depth of field without being so narrow that slight focus errors ruin the shot.
ISO (your camera’s sensitivity to light — higher ISO = brighter image but more grain) should be set to Auto ISO for your first panning sessions. This lets the camera compensate for changing light while you concentrate on technique. Once you’re more comfortable, set ISO manually: ISO 100–400 in bright daylight, ISO 400–800 in overcast conditions.
Set your drive mode to continuous high (the fastest burst setting your camera offers). Most entry-level DSLRs shoot 3–5 fps; mirrorless cameras often reach 10–20 fps. The faster the burst, the more frames you have to work with per pass.
Canon vs. Nikon vs. Sony: Brand Settings Quick Reference
| Setting | Canon | Nikon | Sony |
|---|---|---|---|
| Shutter Priority | Tv | S | S |
| Continuous AF | AI-Servo | AF-C | AF-C |
| Burst Mode | High Speed Continuous | Continuous H | Hi+ |
| Subject Tracking | Servo + Zone AF | 3D Tracking | Real-time Tracking |
| Image Stabilisation | IS (in-lens) | VR (in-lens) | OSS (in-lens) / IBIS (in-body) |
On Fujifilm cameras, look for AF-C in the AF mode menu and set the drive dial to CH (continuous high). Fujifilm’s Film Sim modes won’t affect your panning results — but shooting in RAW gives you more flexibility to recover slightly soft shots in post.
Panning Photography Ideas: 7 Subjects to Try
One of the most common frustrations for beginners is not knowing what to shoot. The good news: panning subjects are everywhere, and you don’t need to visit a racetrack to practice. Here are seven specific subjects — from the classic to the surprising — with exact starting settings for each.
Classic Motion Subjects (Cars, Cyclists, Runners)
These three subjects are the foundation of panning practice because they move predictably in a straight line, giving you maximum time to pre-track.
1. Cyclists on a bike path or road
Cyclists travel at 15–25 mph — fast enough to create blur, slow enough that your autofocus can keep up. Start at 1/60s, f/5.6, ISO Auto. Position yourself at a bend or a straight section where they’ll pass within 5–10 metres. The relatively low speed makes this the single best subject for your very first panning session.
2. Cars on a straight road
A busy road with a 30 mph speed limit is ideal. Try 1/125s to begin, then work down to 1/60s as your technique improves. Stand back 10–15 metres from the road for safety and to get a more compressed, streaked background. Avoid shooting directly into the sun — side lighting reveals the motion blur most dramatically.
3. Runners on a track or path
Running pace (8–12 mph for recreational runners) is slower than cycling, so you can use a slightly slower shutter: 1/45s–1/60s. Runners also offer a bonus: you can practice following facial expressions and upper body detail, which is harder with cars. A local park on a Saturday morning is ideal.
Creative Subjects at Home
You don’t need to leave your house to practice. These subjects let you build muscle memory and dial in settings in a controlled environment.
4. A ceiling fan
Set your fan to medium speed and position yourself so the blades move horizontally across your frame. Try 1/15s–1/30s and pan to follow a single blade. It sounds absurd, but this is genuinely one of the most effective ways to practice smooth, controlled panning motion without any time pressure.
5. A child or pet running in the garden
A dog chasing a ball or a child running across the lawn is the perfect low-stakes practice subject. Use 1/60s and track them across the frame. The unpredictability compared to a cyclist actually trains your reaction speed — which translates directly to faster, harder subjects later.
Unexpected Subjects Worth Trying
6. Skateboarders at a skate park
Skateboarders travel at variable speeds and directions, but a straight run gives you excellent panning opportunities at 1/60s–1/125s. The urban background — rails, ramps, concrete — blurs into graphic shapes that look striking in a panning shot.
7. Pigeons or seagulls taking off
Birds in flight at close range (within 10–15 metres) are surprisingly accessible panning subjects. Use 1/250s–1/125s — wing movement is fast even when the bird’s body moves relatively slowly. Parks, harbours, and seafronts all offer regular opportunities. This also builds the tracking skills you’ll need for wildlife panning later.
Panning Different Subjects: Cars, Wildlife & More
Once you’ve built confidence with cyclists and runners, these subject-specific sections give you the precise adjustments needed to tackle more challenging scenarios.
Cars and Motorsport
Cars at speed demand faster shutter speeds than most beginners expect. At a track day or motorsport event, racing cars travel at 60–120 mph — meaning even 1/250s can produce significant blur on the body of the car if your pan isn’t perfectly matched. Start at 1/250s for your first motorsport session and work down toward 1/125s as your technique improves.
Key adjustment: At motorsport events, use a longer focal length (100mm–200mm) if possible. This compresses the background and makes the motion blur more dramatic even at relatively faster shutter speeds. Set autofocus to the widest tracking zone your camera offers — race cars move fast and can drift across the frame quickly.
For road cars at 30–40 mph, 1/60s–1/125s is the practical range. Position yourself at a slight angle to the road (rather than perfectly perpendicular) — this gives the car a slight diagonal in the frame that adds dynamism to the composition.
Wildlife and Birds
Wildlife panning is the most technically demanding application of the technique — subjects move unpredictably, at varying speeds, and often against cluttered backgrounds. However, the rewards are extraordinary: a sharp bird in flight against a blurred sky is one of the most compelling images you can make.
For birds in flight, use 1/250s–1/125s depending on species. Smaller, faster birds (swallows, starlings) need 1/250s or faster. Larger, slower birds (herons, swans) can be captured at 1/125s. Enable your camera’s subject-tracking AF (if available) and set the AF area to the widest zone. Pre-track birds on the horizon before they reach your frame — the 7-second rule applies here too.
For running animals (dogs, horses, deer), 1/60s–1/125s works well. The challenge is that four-legged animals have a more complex motion pattern than humans — individual legs move at different speeds. Focus on the animal’s eye or head as your tracking target, not the body as a whole.
Night and Indoor Panning
Low-light panning is genuinely challenging — and genuinely rewarding. At night, you can use very slow shutter speeds (1/8s–1/30s) to capture car headlights and tail lights streaking through the frame while the car body stays relatively sharp. This requires a very smooth, controlled pan.
For night car panning, try 1/15s–1/30s, ISO 800–1600, and f/5.6. The light trails from headlights and tail lights add a dramatic element that daytime panning can’t replicate. Find a straight road with regular traffic and experiment with position — shooting slightly into the approaching headlights versus shooting the tail lights creates completely different moods.
For indoor panning (sports halls, skating rinks, concert venues), artificial lighting often flickers at the mains frequency (50Hz in the UK/Europe, 60Hz in the US). At certain shutter speeds, this causes uneven banding across your image. Avoid 1/50s and 1/100s in 50Hz environments; use 1/60s or 1/30s instead.
Panning Photography on Your iPhone or Android
Smartphone panning is entirely possible — but the native camera apps on both iPhone and Android are actively working against you. Here’s why, and exactly how to fix it.
Why Smartphones Struggle (And How to Fix It)
The native camera apps on most smartphones automatically select shutter speed based on available light. In good daylight, they default to very fast shutter speeds (1/500s–1/2000s) to produce sharp, noise-free images. This is the opposite of what panning requires. You need manual control over shutter speed — and native apps don’t offer it.
Additionally, smartphone computational photography (the AI processing that runs on every shot) can introduce motion-sharpening algorithms that fight against intentional motion blur. Some phones even actively apply optical flow stabilisation that works against a deliberate panning motion.
The fix is straightforward: use a third-party manual camera app that gives you direct control over shutter speed, ISO, and autofocus mode. These apps bypass the computational processing pipeline and give you the same manual control you’d have on a dedicated camera.
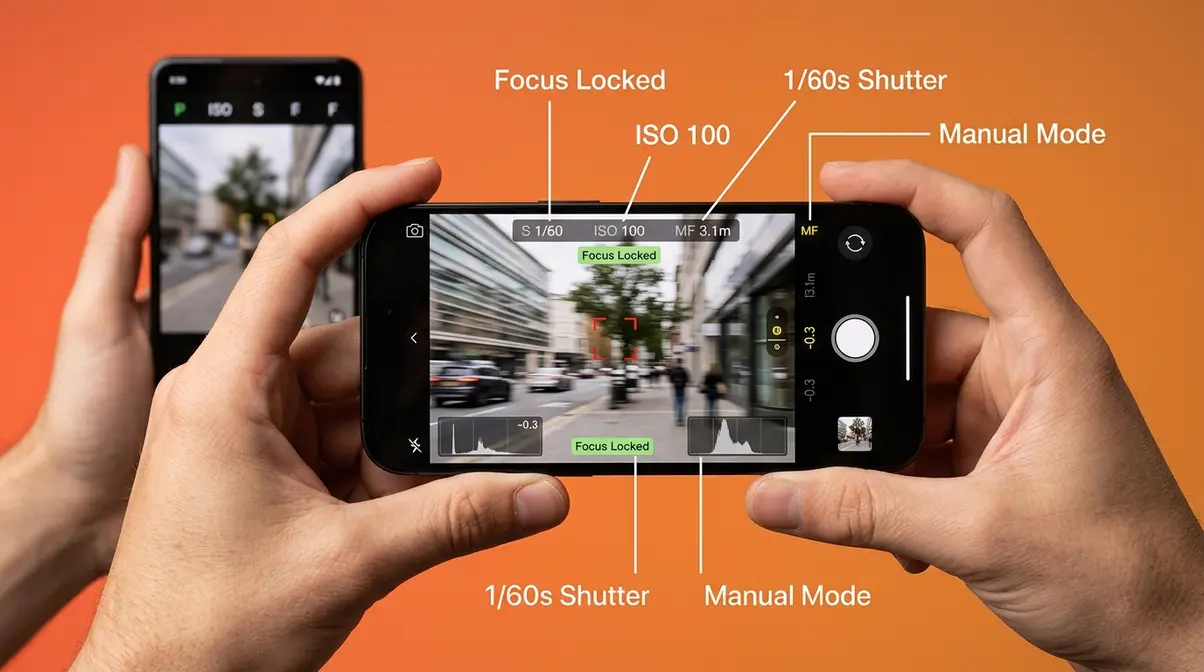
Step-by-Step: iPhone Panning Settings
The best manual camera apps for iPhone panning are Halide Mark III and ProCamera — both offer direct shutter speed control and RAW capture.
Step 1: Download Halide Mark III or ProCamera from the App Store.
Step 2: Open the app and switch to Manual mode (labelled “M” in both apps).
Step 3: Set shutter speed to 1/60s as your starting point.
Step 4: Set ISO to ISO 100–200 in daylight (to avoid overexposure at slow shutter speeds).
Step 5: Tap your subject in the viewfinder to set focus, then lock focus by pressing and holding (this prevents the iPhone’s autofocus from hunting during the pan).
Step 6: Enable burst mode by holding the shutter button down (in both Halide and ProCamera, this fires continuous frames).
Step 7: Execute The Swing Sequence — Acquire, Track, Follow Through — exactly as you would with a dedicated camera.
iPhone-specific tip: The iPhone’s optical image stabilisation (OIS) can interfere with a deliberate panning motion at very slow shutter speeds. In Halide, you can lock OIS off in settings. This gives you cleaner, more intentional motion blur.
Android and Third-Party App Settings
For Android users, Camera FV-5 is the most capable manual camera app available (BBC News has highlighted it as a leading third-party camera solution for Android). It offers direct shutter speed control down to 30 seconds and full manual ISO.
- Settings for Android panning:
- Shutter speed: 1/60s (start here)
- ISO: 100–200 in daylight
- Focus mode: Manual focus, set to the distance where your subject will be when you shoot
- Drive mode: Continuous (available in Camera FV-5 under the drive settings)
Google Pixel users have an additional option: the native camera app’s Action Pan mode (available on Pixel 7 and later) is specifically designed for panning photography. It automatically selects an appropriate shutter speed and applies motion blur to the background in post-capture processing. It’s not as flexible as a full manual approach, but it’s an excellent starting point for smartphone panning.
Common Mistakes and How to Fix Them
Even photographers who understand the theory make consistent, predictable errors when they first try panning. Recognising these mistakes is the fastest way to eliminate them.
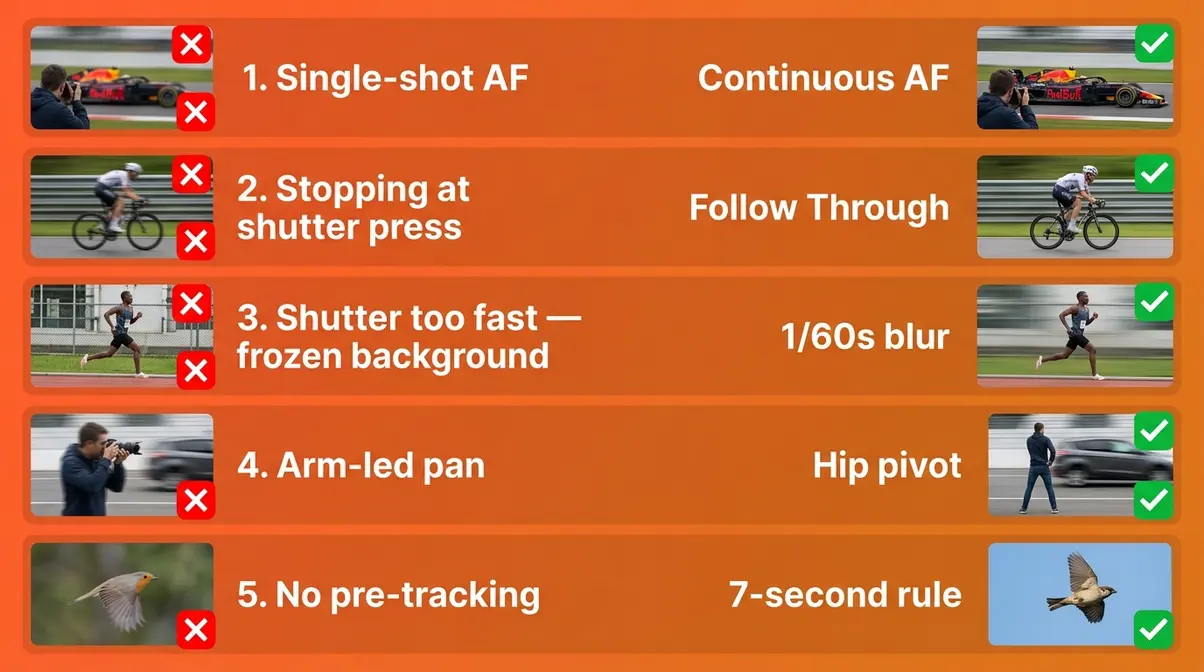
The 5 Most Common Panning Mistakes
Mistake 1: Using single-shot autofocus (AF-S / One-Shot)
Single-shot AF locks focus once, then stops tracking. Your subject moves — your focus doesn’t. Result: consistently soft shots. Fix: switch to continuous AF (AI-Servo / AF-C) before every panning session. Make this a habit you check before you raise the camera.
Mistake 2: Stopping the pan when you press the shutter
This is the most common physical error. Beginners unconsciously pause at the moment of shutter press, introducing a deceleration jerk that shows up as blur. Fix: practice the follow-through phase of The Swing Sequence deliberately — keep moving for a full second after the burst ends.
Mistake 3: Shutter speed too fast
Using 1/500s or faster produces no background blur — the image looks like a frozen action shot, not a panning shot. Fix: work down to 1/60s–1/30s. Yes, your keeper rate will drop initially. That’s expected and normal.
Mistake 4: Panning with arms and wrists instead of hips
Arm-led panning is jerky and inconsistent. Your arms fatigue quickly and introduce wobble. Fix: keep elbows tucked, pivot from the hips, and let your upper body rotate as a single unit. The hip pivot is the foundation of The Swing Sequence for a reason.
Mistake 5: Not pre-tracking (firing too early)
Firing the moment the subject enters your frame — before you’ve pre-tracked — means your pan speed is still accelerating when you shoot. Fix: apply the 7-second rule. Start tracking early and fire only when the subject reaches the centre of your frame and your pan is already smooth.
Fixing Blur in Post-Processing
Sometimes a shot is almost there — the pan was good, the timing was right, but the subject has just a hint of softness. Modern AI editing tools can recover these near-misses.
- In Adobe Lightroom (2026):
- Open your image and go to the Detail panel
- Increase Sharpening Amount to 60–80 for motion-blurred images (higher than you’d use for static shots)
- Set Masking to 60–80 — hold Alt/Option while dragging to see the mask. This applies sharpening only to the subject edges, not the blurred background (which you want to keep smooth)
- Use AI Denoise (under Detail → Denoise) if you shot at high ISO in low light. Run Denoise BEFORE sharpening for best results
- The Texture slider (+15 to +25) can recover fine detail on slightly soft subjects without introducing the halos that heavy sharpening creates
In Lightroom Mobile, the same Denoise and Sharpening tools are available under the Detail section. The workflow is identical.
A note of honesty: post-processing can improve a near-miss, but it cannot rescue a badly blurred shot. The goal is to nail the technique in-camera and use editing as a refinement tool, not a rescue operation.
Frequently Asked Questions
What is panning in photography?
Panning photography is a technique where you move your camera in sync with a moving subject during a slow-shutter exposure, keeping the subject sharp while blurring the background into horizontal streaks. The key word is “sync” — the camera movement must match the subject’s speed and direction. Unlike a simple slow-shutter shot, panning requires deliberate, controlled camera motion. The result is a still image that conveys speed and energy. It works on any camera that allows manual shutter speed control.
What is the 7-second panning rule?
The 7-second panning rule means you should pre-track your subject for approximately 7 seconds before pressing the shutter. This pre-tracking period allows your body to match the subject’s speed and rhythm, so your panning motion is already smooth when you fire. It’s a guideline rather than a strict timer — some photographers use 3–5 seconds, others up to 10. The principle is simply to start tracking early rather than firing the moment the subject enters your frame. Early tracking is the single biggest improvement most beginners can make immediately.
How do I set up panning photography?
Set your camera to Shutter Priority mode (Tv on Canon, S on Nikon/Sony) and dial in 1/60s as your starting shutter speed. Switch autofocus to continuous mode (AI-Servo on Canon, AF-C on Nikon/Sony). Enable burst mode (continuous high drive). Position yourself perpendicular to your subject’s path, feet shoulder-width apart, and pre-wind your torso slightly in the direction the subject is coming from. Follow The Swing Sequence: Acquire the subject in your viewfinder, Track smoothly from the hips, and Follow Through after you fire.
What is the best shutter speed for panning?
The best starting shutter speed for panning photography is 1/60s for cyclists and runners, slowing to 1/30s for more dramatic background blur. For faster subjects like cars at 40 mph, start at 1/125s. For birds in flight, try 1/250s–1/125s. The right shutter speed depends on the subject’s speed — slower subjects need slower shutter speeds to create visible background blur. Shutter speeds between 1/30s and 1/125s cover the majority of panning scenarios (National Geographic, 2024). Always shoot a burst of frames rather than a single shot.
How hard is panning photography?
Panning photography has a steeper learning curve than most beginner techniques, but it’s absolutely learnable with deliberate practice. Most photographers report getting their first usable keeper within 1–2 sessions. The physical technique (smooth hip pivot, consistent pan speed, follow-through) takes longer to master than the camera settings. Across photography communities, the consistent feedback is that beginners improve fastest by reviewing their burst sequences critically after each session — identifying which frame was sharpest and working out why. Expect a 10–20% keeper rate as a beginner; experienced photographers typically achieve 30–50%.
What is the 20-60-20 rule in photography?
The 20-60-20 rule describes how to distribute your effort across the three phases of a panning shot. Spend roughly 20% of your motion acquiring and locking onto the subject before it reaches your shooting zone, 60% tracking smoothly while you fire your burst, and 20% following through after the shutter has fired. This maps directly onto The Swing Sequence framework (Acquire → Track → Follow Through). The rule prevents the two most common errors: firing too early (before the pan is smooth) and stopping too abruptly (causing a deceleration blur at the end of the burst).
How do I get sharp panning photos?
Sharp panning photos require three things working together: continuous autofocus, a smooth hip-pivot pan, and the right shutter speed. Enable AF-C or AI-Servo and keep the half-press held throughout the entire sequence. Pivot from your hips — not your wrists or shoulders — and keep moving for one full second after the burst ends. Start at 1/60s and adjust based on subject speed. Use burst mode and expect 1–3 sharp frames per 10-shot burst as a beginner. Review your sequences critically: the sharpest frames usually fall in the middle of the burst, after the pan has smoothed out.
What is the best technique for panning?
The most effective panning technique is The Swing Sequence: Acquire, Track, and Follow Through. First, pre-track your subject for at least 5–7 seconds before firing — this smooths your pan speed before you shoot. Second, pivot from your hips (not arms or wrists) and keep the subject centred in your frame throughout. Third, do not stop moving when you press the shutter — follow through for a full second after the burst ends. Combine this with continuous autofocus and burst mode, and your keeper rate will improve significantly from your very first practice session.
Caveats, Limitations, and Common Pitfalls
Common Pitfalls to Watch For
Pitfall 1 — Expecting perfection on day one. Panning is a physical skill, like learning to ride a bike. Your first session will likely produce a 5–10% keeper rate. This is normal and expected — not a sign that you’re doing it wrong. Commit to at least three dedicated practice sessions before evaluating your progress.
Pitfall 2 — Chasing the “perfect” shutter speed. There is no single correct shutter speed for panning. The right speed depends on your subject’s velocity, your distance from the subject, and the focal length you’re using. Start with the settings in the cheat sheet above and adjust based on what you see in your results — not based on what someone online tells you is “correct.”
Pitfall 3 — Shooting in the wrong light. Bright midday sun makes it genuinely difficult to use slow shutter speeds without overexposing. If you’re struggling to shoot at 1/60s without blown highlights, you need either an ND filter or a smaller aperture (f/11–f/16). Overcast days are actually ideal for panning beginners — softer light, lower ambient brightness, and more flexibility with shutter speed.
When to Choose a Different Approach
If your subject moves unpredictably (dogs at a park, children at play), panning becomes much harder. Consider freezing the action at 1/500s–1/1000s instead and returning to panning when you have a more predictable subject.
If you’re shooting in very low light (concert venues, indoor sports arenas), the shutter speeds needed for panning will require very high ISO (3200+), which introduces significant noise. Evaluate whether a sharp, noisy panning shot serves the image better than a frozen action shot at a faster shutter speed.
When to Seek Expert Help
If you’ve completed five or more dedicated practice sessions and your keeper rate hasn’t improved beyond 5%, consider attending a photography workshop focused on motion photography. Hands-on feedback from an experienced photographer — watching your physical technique in real time — is far more effective than any written guide for diagnosing persistent issues with body movement and timing.
Conclusion
For any beginner frustrated by blurry bursts and missed keepers, panning photography becomes dramatically more manageable once you separate the physical technique from the camera settings — and treat each as a learnable skill in its own right. Shutter speeds between 1/30s and 1/60s cover the majority of panning scenarios, and continuous autofocus (AI-Servo/AF-C) is the non-negotiable foundation of every sharp panning shot (National Geographic, 2024).
The Swing Sequence — Acquire, Track, Follow Through — is the framework that ties everything together. The 20-60-20 rule gives you a mental model for how to distribute your effort across each phase, and the 7-second pre-tracking habit smooths your pan before you even fire. Together, these tools transform panning from a lucky accident into a repeatable, deliberate skill.
Your next step is simple: pick one subject from the seven ideas above — a cyclist, a runner, a ceiling fan — set your camera to 1/60s and AF-C, and go shoot 10 bursts. Review the sequences, identify your sharpest frame per burst, and work out what your body was doing at that moment. That deliberate review loop is how your keeper rate climbs from 10% to 30% within a few sessions. Go outside today and get your first tac-sharp keeper.
