
Table of Contents
- How We Chose These 7 Photo Editing Tools
- Best Overall Photo Editing Software for Beginners
- Best Free Photo Editing Software for Beginners
- Easiest Photo Editors: AI Does the Work
- Mac, PC & Mobile: Platform Compatibility
- Understanding Photo Editing Basics
- Advanced & Niche Editing Needs
- Common Mistakes When Choosing an Editor
- Frequently Asked Questions
- Beginner’s Decision Matrix
This blog post may contain affiliate links. As an Amazon Associate I earn from qualifying purchases.
There are dozens of photo editing apps competing for your attention — and most beginner guides just list them all without telling you which one to actually download first. If you’ve spent an afternoon bouncing between Reddit threads, YouTube reviews, and software websites without reaching a clear decision, you’re not confused because you’re doing it wrong. You’re confused because nobody has given you a proper framework.
Choosing the wrong photo editing software for beginners means months of frustration learning an interface that doesn’t match how you actually shoot. A wedding hobbyist who downloads full Photoshop will spend weeks wrestling with layers instead of editing a single photo. A smartphone creator who downloads GIMP may give up on editing entirely. The cost of a mismatch isn’t just money — it’s momentum.
By the end of this guide, you’ll know exactly which photo editing software for beginners matches your goals, budget, and workflow — so you can start improving your photos today. Our team evaluated 12+ tools over six weeks and ranked 7 by ease of use, pricing model, and AI capabilities — here’s what we found.
The best photo editing software for beginners balances a gentle learning curve with enough features to grow — Adobe Lightroom leads for serious shooters, while GIMP and Snapseed remain the top free options.
- Adobe Lightroom is the industry standard for organizing and editing RAW files, used by 58% of photographers as their primary tool (Shotkit, 2025)
- Luminar Neo offers the fastest results for beginners via AI-powered one-click enhancements with a one-time perpetual license from ~$119
- Affinity Photo (now free following Canva’s acquisition) is the strongest no-cost desktop alternative with professional-grade layers and RAW support
- “The Subscription Trap”: Many beginners overpay for Adobe subscriptions when a free or one-time tool would serve them equally well — Affinity Photo is now completely free
- GIMP 3.0 adds non-destructive editing after seven years of development, making it a genuine Photoshop alternative at zero cost
How We Chose These 7 Photo Editing Tools
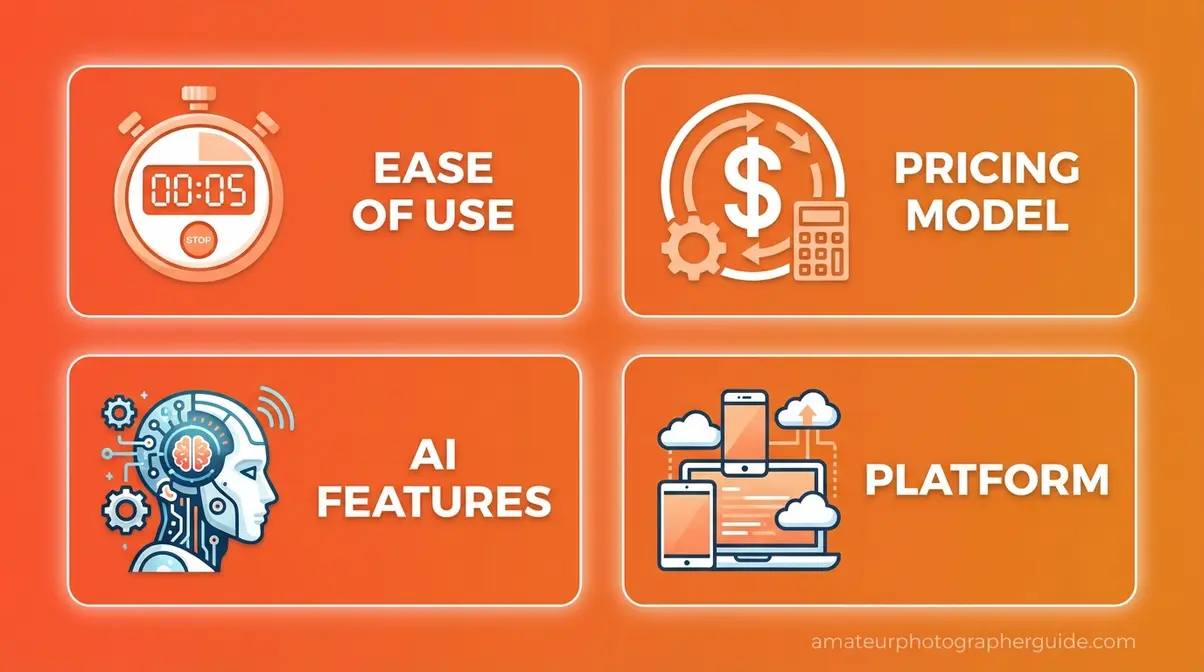
Our team evaluated more than 12 photo editing tools before narrowing the list to 7 that genuinely serve beginners. Selection was based on three core criteria: ease of use (not feature count), pricing model, and AI capabilities accessible to a new user. These criteria matter differently for beginners than for professionals — a seasoned retoucher cares about masking precision; a beginner cares about whether they can brighten a photo without opening a manual.
Ease of use for beginners is determined by how quickly you achieve a result you’re proud of — not by how many tools the software includes. TechRadar’s 2026 roundup continues to name Photoshop as the top overall editor citing comprehensive tools — but we deliberately weighted beginner accessibility differently, because comprehensive and accessible are not the same thing (TechRadar, 2026).
One pattern from our evaluation stands out: many beginners fall into “The Subscription Trap” — signing up for a monthly Adobe plan when their actual editing needs could be met equally well by a free or one-time-purchase tool. Recognizing this, we made pricing model a deliberate, weighted evaluation criterion. With methodology clear, here are the 7 tools that earned a place in this guide.
Our Testing Criteria Explained
To evaluate photo editing software for beginners fairly, our team performed a standardized beginner edit across all 12 candidate tools: crop to 16:9, adjust exposure and white balance, remove a background element, and export at web resolution. We tracked time-to-first-successful-edit and noted every moment of interface friction. Each tool received a True Ease of Use score from 1 to 5 based on how fast a new user could reach a satisfying result.
The four evaluation criteria were:
- True Ease of Use (1–5): Time-to-first-successful-edit; menu depth required for basic adjustments
- Pricing Model: Subscription, perpetual license, or free — and whether data is locked if you cancel
- AI Features for Beginners: Which AI tools are accessible without advanced knowledge
- Platform Availability: Mac, PC, iOS, Android, or web-based
A tool that required three menu levels to adjust brightness scored lower than one with a single slider on the main screen — this reflects real beginner experience, not hypothetical feature parity. We evaluated 12+ tools before narrowing to the 7 reviewed here.
What Makes Software Truly Beginner-Friendly?
More features do not make software easier to learn — they often make it harder. The editors that scored highest in our beginner tests shared a common trait: they got out of the way. Non-destructive editing (the ability to adjust and reverse changes without permanently altering the original file) is the single most important feature for beginners. Adobe’s official documentation defines non-destructive editing as editing that allows changes “without overwriting the original image data” — a critical safety net for anyone learning through experimentation (Adobe, 2026).
AI features play an increasingly important role in reducing beginner friction. Tools like sky replacement and AI object removal let a first-time user achieve professional-looking results without first mastering selections, masks, or layers. Lightroom’s slider-based interface lets a new user brighten a photo in 10 seconds — that’s genuinely beginner-friendly. Photoshop’s layers panel, by contrast, takes weeks to understand. With those benchmarks in mind, here are the 7 best options for photo editing software for beginners in 2026.
Best Overall Photo Editing Software for Beginners
The best photo editing software for beginners in 2026 falls into three clear categories: the industry-standard option (Adobe Lightroom), the AI-powered shortcut (Luminar Neo), and the professional free tool (Affinity Photo, now free after Canva’s acquisition). A 2025 survey of 657 photographers found that 58% use Adobe Lightroom as their primary editing tool — making it the most widely recommended starting point across experience levels (Shotkit, 2025). All three earned their place for different reasons, but no single tool is right for every beginner.
- Quick picks for featured snippet scanning:
- Adobe Lightroom — Best all-rounder; industry standard; from $9.99/month (annual)
- Luminar Neo — Best for AI results; one-click sky replacement and object removal; ~$119 one-time
- Affinity Photo — Best full-featured free option; formerly $69.99 one-time, now completely free
1. Adobe Lightroom: Best All-Rounder
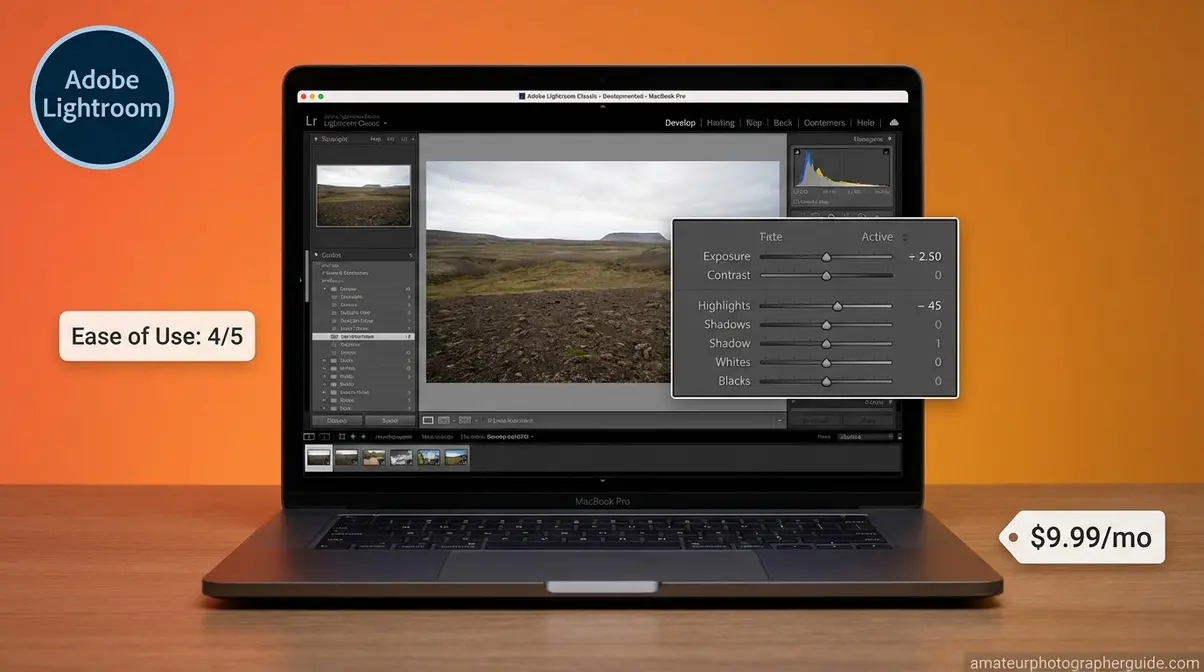
Adobe Lightroom, a non-destructive photo organizer and editor from Adobe, combines library management with exposure and color editing in a slider-based interface built for photographers who shoot in RAW or JPEG. It’s the tool the photography community returns to again and again — not because it’s trendy, but because its workflow mirrors how photographers actually think: import, sort, develop, export.
True Ease of Use Score: 4/5. Lightroom’s sliders are intuitive enough for a first-time user to achieve a noticeably improved photo within minutes. The one friction point is the Develop/Library module split — beginners sometimes click into the Library module and wonder why their editing tools disappeared. In-app tutorials reduce this confusion significantly.
Pricing: The Lightroom-only plan starts at $9.99/month (annual prepaid, $119.88/year). The Photography Plan — Lightroom + Photoshop — is now $14.99/month for new subscribers on monthly billing, or $119.88/year on an annual plan (Adobe, May 2026 — verify current pricing at adobe.com). This is where “The Subscription Trap” begins: it’s excellent value if you actively use both apps, but most beginners only need Lightroom. Your files also become inaccessible if you cancel your subscription — a genuine risk beginners should understand before signing up.
Pros:
- Industry-standard RAW file support across all camera brands
- Non-destructive editing with a full history panel — every edit is reversible
- Batch editing lets you apply adjustments to hundreds of photos simultaneously
- Seamless integration with Lightroom Mobile (free tier available on iOS and Android)
Cons:
- Monthly subscription required — your edited files are locked if you cancel
- Steeper initial learning curve than Canva or Luminar Neo for total novices
Best AI Feature: Denoise AI (dramatically reduces image noise in low-light photos with one click) and Generative Remove (removes objects using generative AI, available in 2025–2026 versions).
Real-World Usage: Lightroom shines for photographers who shoot consistently — weekend hikers, family event photographers, travel enthusiasts who want a clean library alongside quality edits. Its batch processing is uniquely valuable: apply the same exposure correction to 200 sunset photos in under a minute. Where it struggles is with beginners who only edit occasionally — the subscription clock runs whether you’re using it or not, and the interface rewards regular use. If you shoot one roll of photos a month and want simple enhancements, a free tool may serve you equally well.
Verdict: Best for photographers who plan to take editing seriously and want a workflow that scales as their skills grow. TechRadar’s 2026 photo editor roundup identifies Lightroom as a top pick for best photo editor in its 2026 roundup.
Choose Adobe Lightroom if: You shoot regularly, want professional RAW processing, and plan to build long-term editing skills that eventually extend to Photoshop.
Skip Adobe Lightroom if: You edit only occasionally or are budget-conscious — Affinity Photo (now free) or GIMP deliver comparable results without a monthly subscription.
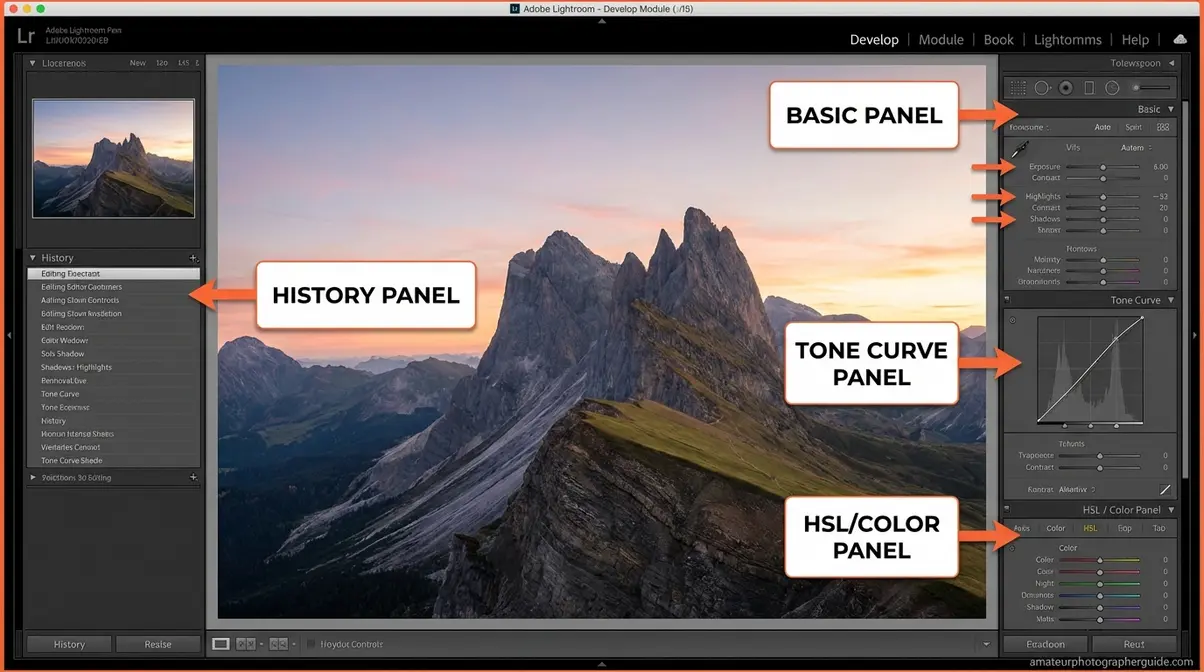
Caption: Lightroom’s Develop module puts the most-used controls — exposure, contrast, highlights — on a single panel, making it the fastest path from import to finished edit for most beginners.
Where Lightroom requires a monthly commitment, Luminar Neo takes a different approach — it uses AI to remove most of the manual effort entirely.
2. Luminar Neo: Best AI-Powered Editor
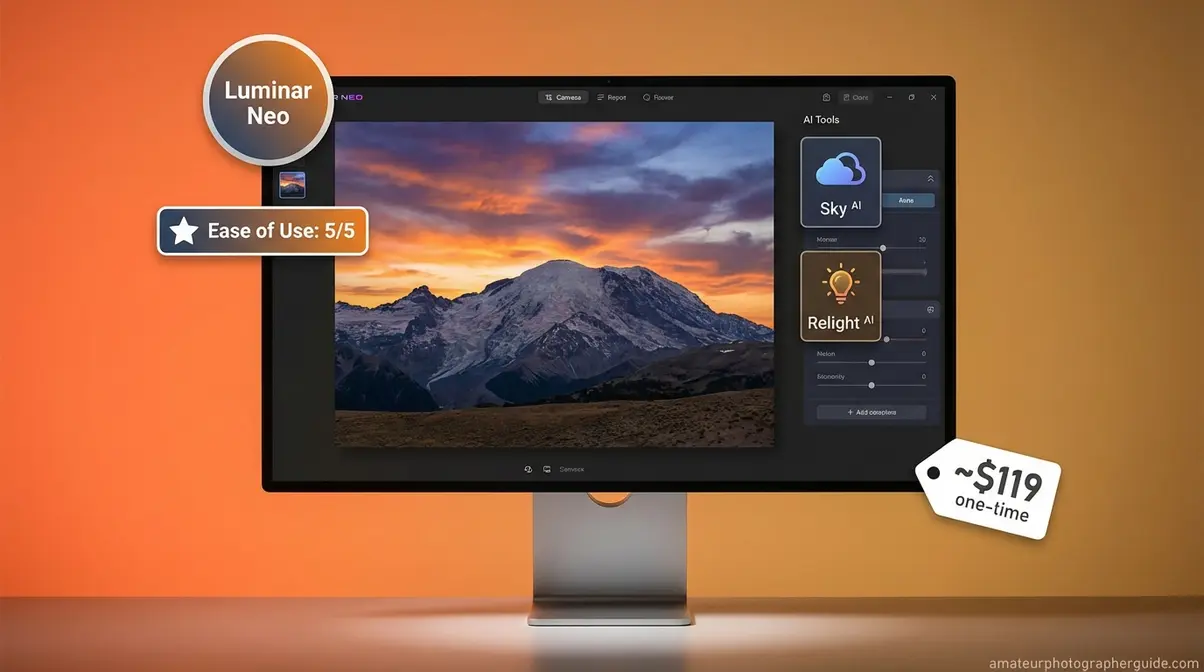
Luminar Neo, Skylum’s AI-powered photo editor, uses machine learning to automate complex edits — sky replacement, portrait retouching, and object removal — that would take hours to master manually. For beginners who care about impressive results over deep technique, it’s the fastest path from camera roll to finished image.
True Ease of Use Score: 5/5 for result-first beginners. AI automates the hardest parts; a beginner can produce a dramatically improved photo in under 3 minutes. There’s no library module to navigate, no layer panel to understand — you open a photo, apply an AI enhancement, and export.
Pricing: Luminar Neo offers a perpetual (lifetime) license starting at approximately $119 for a single device, with pricing ranging to ~$179 for cross-device bundles (Skylum, May 2026 — verify current pricing at skylum.com, as promotional pricing changes frequently). There is no mandatory subscription for the core software.
Pros:
- Sky Replacement AI works in seconds — no masking required
- Portrait Background Removal requires no selection tools or manual effort
- Results-first interface with minimal learning curve
- No Adobe subscription required
Cons:
- Less suitable for detailed pixel-level editing or photo compositing
- Smaller tutorial community than Adobe products
- AI features can look artificial if used at maximum settings — restraint is needed
Best AI Feature: Relight AI (adjusts the lighting direction of a photo after the shot, including adding artificial light sources) and Sky AI (replaces skies with photorealistic results in seconds).
Real-World Usage: Luminar Neo earns its 5/5 ease-of-use score in portrait and landscape photography specifically. A beginner photographing a family member against a cluttered background can replace that background in one click — a task that takes 30–60 minutes to learn via Lightroom masking. Landscape photographers use Sky AI to rescue flat, overcast skies. The trade-off appears in documentary and scientific photography: AI enhancements alter reality, which makes Luminar Neo inappropriate when accuracy matters. Use it as a starting point, then apply manual refinements at lower intensity settings to keep results looking natural. Skylum describes Luminar Neo as “powered by AI technology” designed to streamline both routine and complex editing tasks, allowing photographers to focus more on creativity (Skylum, 2026).
Verdict: Best for beginners who want wow-factor results fast, especially portrait and landscape photographers.
Choose Luminar Neo if: You want dramatic, impressive results immediately and prefer a one-time purchase over a subscription.
Skip Luminar Neo if: You need precise manual control, work primarily in documentary photography, or want the largest possible tutorial library — Adobe Lightroom’s community is far larger.
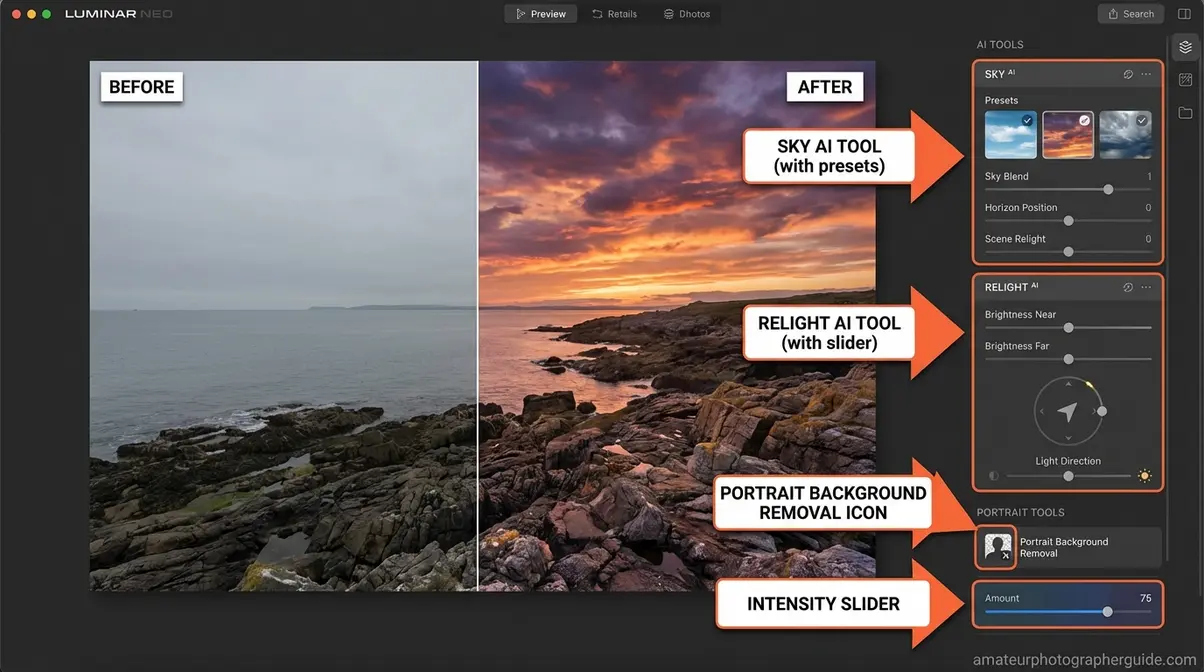
Caption: Luminar Neo’s AI toolbar presents Sky AI and Relight AI as one-click tools — no manual selection or masking needed, which is what makes it the most accessible option for total novices.
Both Lightroom and Luminar Neo require some investment. Affinity Photo is built for photographers who refuse to pay — ever.
3. Affinity Photo: Best Pro Free Option
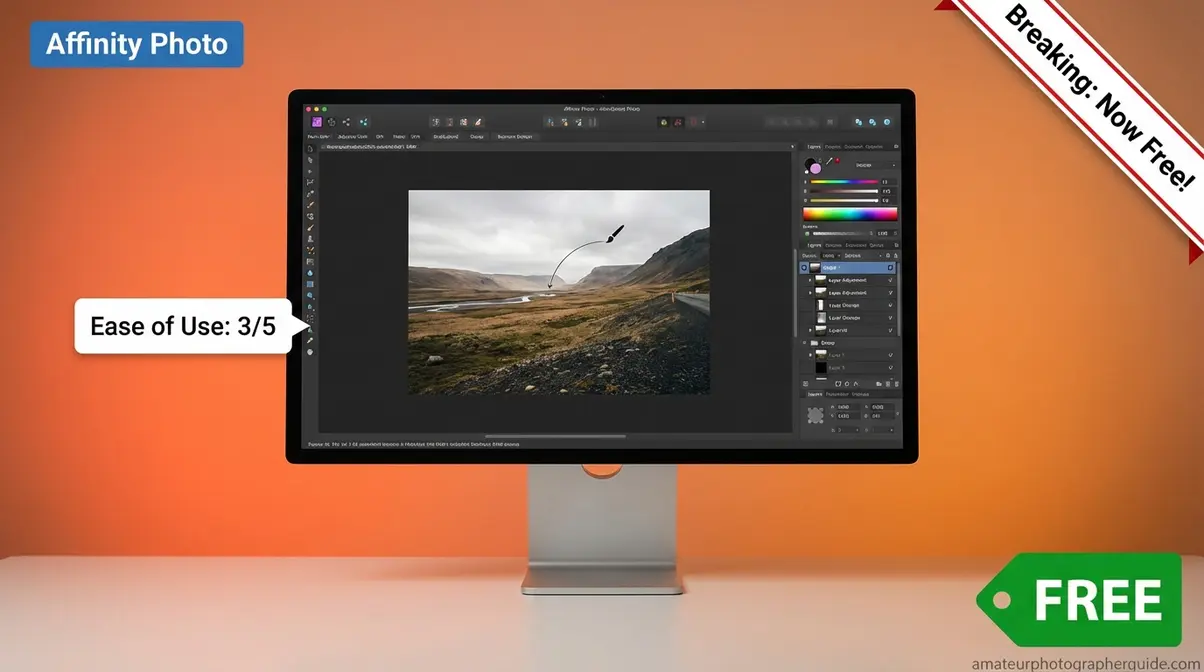
Breaking update for 2026: Affinity Photo, previously a ~$69.99 one-time-purchase Photoshop alternative from Serif, became completely free in October 2025 following Canva’s acquisition. The full professional-grade software — layers, RAW processing, selections, live filter layers — is now available at no cost for Mac, Windows, and iPad users. AI-enhanced features require a Canva Pro subscription, but the core editing toolkit is genuinely free.
This development is the most significant news in beginner photo editing software this year. Affinity Photo’s professional capability without any price barrier fundamentally changes the free-tool conversation. If you previously dismissed it because of cost, it’s time to reconsider.
True Ease of Use Score: 3/5. More capable than it first appears, but the interface reflects its professional-grade ambitions — it’s more complex than Lightroom or Luminar Neo. Recommended for beginners with patience and an interest in growing toward professional-level editing.
Pricing: Free (as of November 2025, following Canva acquisition). Advanced AI features (object removal, background generation) require Canva Pro subscription. Verify current feature availability at affinity.studio.
Pros:
- Completely free — no subscription, no trial limits
- Full RAW file support included
- Layers and masks comparable to Photoshop
- Available on Mac, Windows, and iPad
Cons:
- Steeper learning curve than Lightroom or Luminar Neo
- Advanced AI features now require a Canva Pro subscription
- Smaller tutorial library than Adobe products (though growing rapidly)
Best Feature: Live Filter Layers — non-destructive, real-time effect previews that apply complex filters without permanently altering the underlying image. This is a particularly powerful feature for beginners because it makes every change reversible. The Affinity official help and support portal provides tutorials and guides directly from the developers — useful for beginners navigating the learning curve (Serif/Affinity, 2026).
Real-World Usage: Affinity Photo rewards beginners who are willing to invest a few hours learning the interface. Once the panel layout clicks, it provides Photoshop-level capability at no ongoing cost. It’s particularly well-suited for beginners who want to eventually work with compositing, digital art, or advanced retouching — skills that Lightroom cannot support. However, if you want results in your first session with zero learning curve, start with Snapseed or Luminar Neo and return to Affinity Photo once your skills grow.
Verdict: The strongest free option for beginners who want professional-grade tools and don’t mind a short learning investment. This is where “The Subscription Trap” has its clearest escape hatch — zero cost, zero monthly commitment.
Choose Affinity Photo if: You want full professional tools, have patience for a learning curve, and want to avoid any subscription model entirely.
Skip Affinity Photo if: You want results in your very first editing session — start with Snapseed (free, mobile) or Luminar Neo instead.
Caption: Affinity Photo’s move to free in late 2025 eliminates the pricing barrier entirely — Adobe’s Photography Plan costs $359+ over three years for the same core editing capabilities.
Those three tools cover the premium and free ends of the market. Now for the tools that cost nothing at all — and what “free” actually means for each.
Best Free Photo Editing Software for Beginners
The best free photo editing software for beginners in 2026 includes tools that are genuinely free — no adware, no feature-limited trials, no bait-and-switch. GIMP (desktop), Snapseed (mobile), and Canva (web) each offer real capability within their category. The fear that “free” means “broken” or “full of ads” is understandable, but all three of these tools disprove it.
GIMP 3.0’s addition of non-destructive editing after seven years of development makes it a genuinely competitive free alternative to paid desktop editors in 2026 (citing TechRadar, 2026). This section is where “The Subscription Trap” has its antidote — free tools aren’t a consolation prize, they’re a valid starting point for the majority of beginner photographers.
4. GIMP — Best Free Desktop Editor
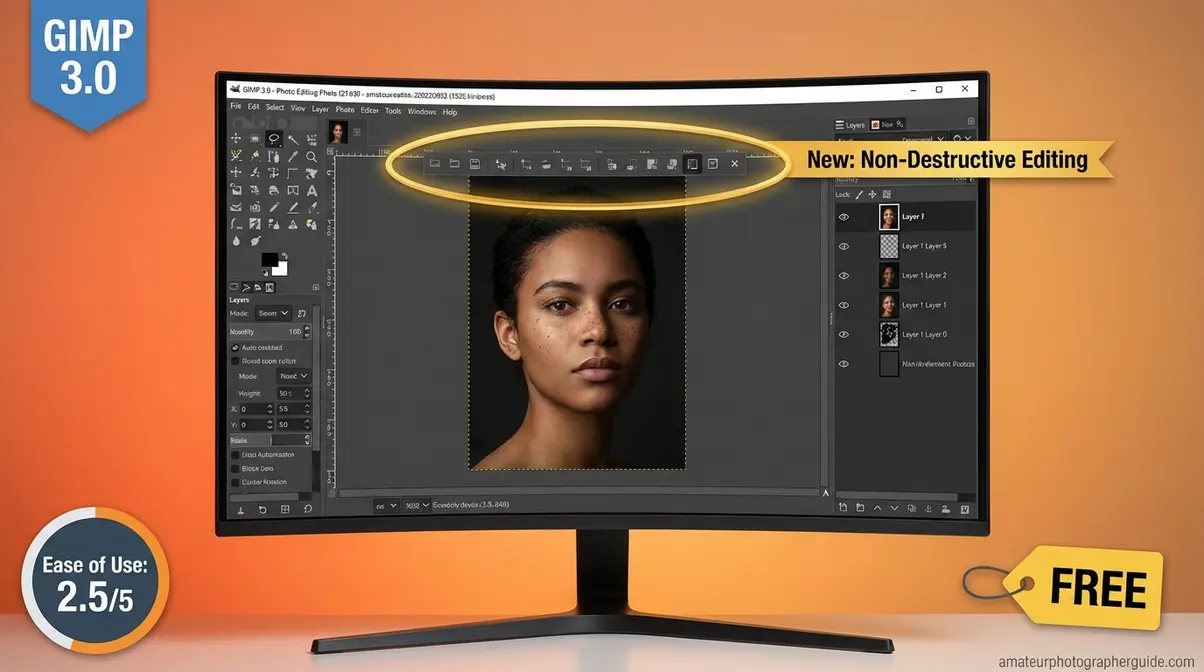
GIMP, a free and open-source image editor comparable to Photoshop in core capability, received its landmark GIMP 3.0 update after approximately seven years of development — adding non-destructive editing as the headline new feature. For 2026, this changes GIMP’s position in the beginner conversation significantly.
True Ease of Use Score: 2.5/5. GIMP is more capable than ever, but it retains a steeper learning curve than consumer-oriented tools. The reward for patience is substantial: layers, masks, advanced selections, and full compositing capability at zero cost. The large online tutorial community — thousands of YouTube videos, Reddit guides, and official documentation — substantially offsets the interface complexity. GIMP 3.0 has arrived with what TechRadar calls a “mass overhaul,” including non-destructive editing as its key new feature — making it a much stronger option for 2026 (TechRadar, 2026).
Pros:
- 100% free — no ads, no trial limits, no subscription, ever
- Full Photoshop-comparable features: layers, masks, selections, compositing
- Massive online tutorial community
- RAW support available via the darktable plugin
Cons:
- Interface can feel dated compared to modern consumer tools
- Steeper initial learning curve — not a first-session editor
- RAW support requires plugin installation, not built in by default
Real-World Usage: GIMP suits the beginner who wants Photoshop-level creative control and is willing to spend a weekend learning. Hobbyist digital artists, retouchers, and photographers working with complex composites find GIMP’s toolset comparable to paid alternatives. CNET notes that GIMP has a “steeper learning curve” than some other programs — a real consideration for absolute beginners who want results immediately (CNET, 2026). For those users, start with Snapseed and return to GIMP when the itch for deeper creative control appears.
Verdict: Best for patient beginners who want Photoshop-level capabilities without any cost. Not recommended for those who want results in the first session.
Choose GIMP if: You want maximum creative control, don’t mind investing a few hours learning, and refuse to pay for software.
Skip GIMP if: You want to edit photos and share them today — the learning curve is real, and Snapseed or Affinity Photo will serve you better in the short term.
Caption: GIMP 3.0’s non-destructive editing layer panel, added after seven years of development, brings the software’s workflow closer to Lightroom’s — without the subscription cost.
GIMP is a desktop powerhouse. For mobile editing, Snapseed is in a category of its own.
5. Snapseed — Best Free Mobile Editor

Snapseed, Google’s free mobile photo editing app for iOS and Android, offers 29 tools and filters including selective adjustments, a healing tool for object removal, and RAW file support — at zero cost with no ads. Because it’s Google-owned, there are no hidden subscription prompts, no data-harvesting adware, and no feature walls.
True Ease of Use Score: 4.5/5 for mobile. Gesture-based controls are intuitive from the first session — swipe up and down to choose a tool, left and right to adjust its intensity. The “Stacks” feature lets beginners see every edit they’ve made and reverse any individual adjustment without undoing subsequent changes, which functions similarly to non-destructive editing on desktop.
Key Specs: Free | iOS + Android | Google-owned (no adware) | RAW support included | 29 editing tools
Best for: Smartphone photographers who want professional-level mobile editing tools. Not ideal for: Desktop-first photographers or anyone needing to process large batches of photos.
Caption: Snapseed’s gesture-based controls — swipe left/right to adjust, swipe up/down to switch tools — make it the most intuitive free mobile editor for beginners.
Snapseed excels on mobile. For social media creators who work primarily in a web browser, Canva fills a different but equally important role.
6. Canva: Best for Social Media
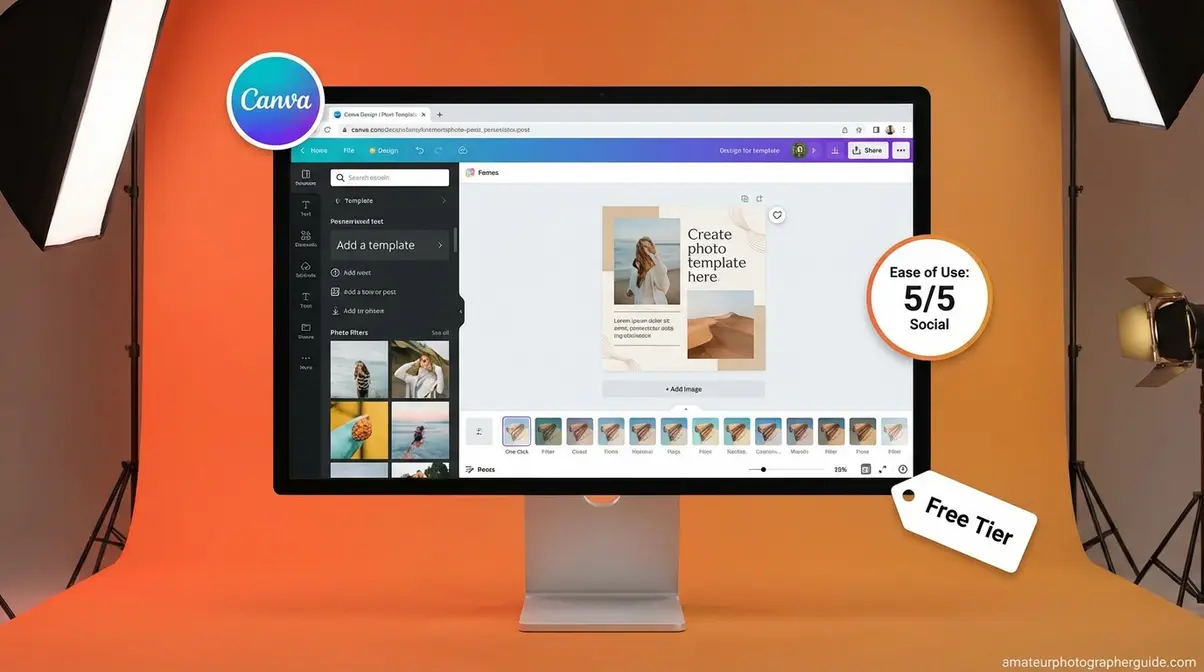
Canva, a web-based design and photo editing platform used by 260 million people monthly as of December 2025 (Canva Newsroom, 2025), offers one-click filters, text overlays, social media templates, and background removal in its free tier. It’s not a photography tool — it’s a visual communication tool — and that distinction matters for choosing it correctly.
True Ease of Use Score: 5/5 for its target use case (social media graphics and content creation); 2/5 for serious photography editing — Canva is not designed for RAW processing, fine exposure control, or color correction at a professional level.
Key Specs: Free tier available | Web + iOS + Android | No download required | 260 million monthly users (Canva, 2025)
Best for: Bloggers, content creators, and hobbyists who need polished social media graphics fast. Not suitable for: Photographers needing RAW processing, precise color correction, or fine detail editing.
All six tools covered so far require some manual effort. The next category is where AI does most of the work for you.
Easiest Photo Editors: AI Does the Work
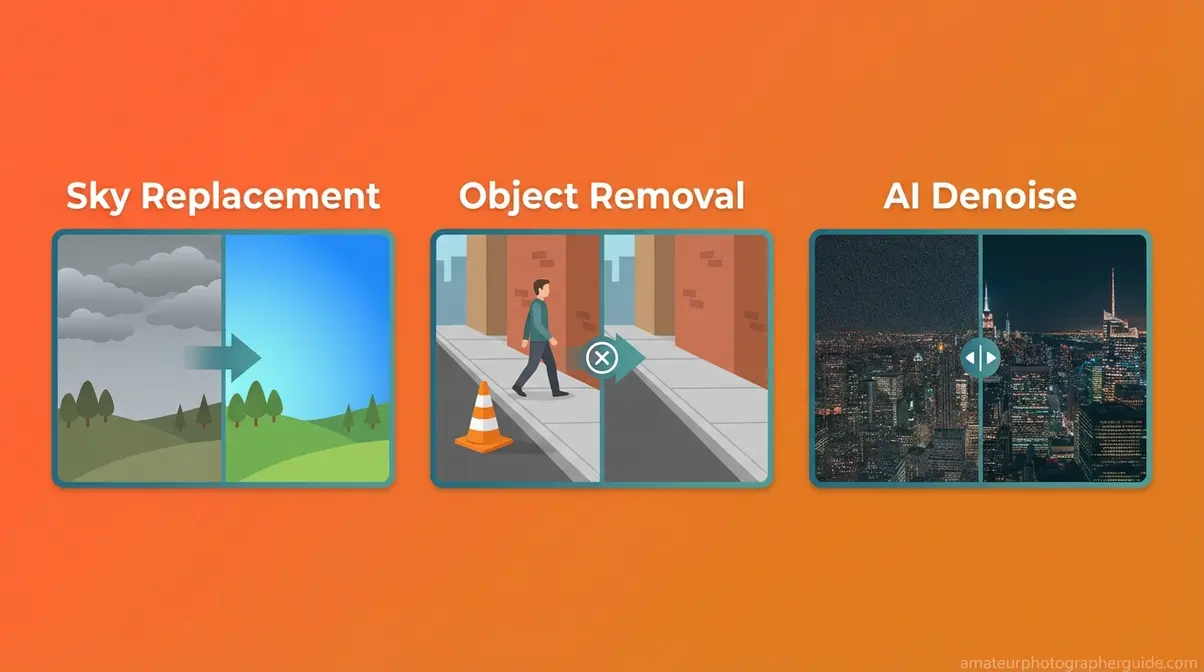
AI-powered photo editors allow beginners to achieve professional-looking results — sky replacements, object removal, portrait retouching — without learning the manual techniques those edits traditionally require. This answers the most common question from new photographers: what is the easiest photo editing software for beginners? The honest answer depends on your platform, but the mechanism is the same — AI removes the technical barrier between your intention and the result.
Easy photo editing software for beginners in 2026 falls into two camps: AI-first tools (Luminar Neo, covered earlier) and structured guided tools (Photoshop Elements, covered below). The difference is in how they reduce the learning curve — AI automates; guided modes teach while doing.
AI Editing: How AI Simplifies Everything
Understanding what AI actually does in photo editing — mechanically, not vaguely — is the key to choosing the right tool. AI-powered editing replaces specific manual skills with automated detection. Instead of requiring you to trace a background pixel by pixel using a lasso tool, AI detects the background automatically. Instead of requiring knowledge of adjustment layers to brighten eyes in a portrait, an AI Portrait mode handles it in one tap.
Three specific AI features illustrate this directly:
- AI Sky Replacement replaces the need to learn complex masking — the AI detects the sky boundary automatically, a selection that takes an experienced editor 20 minutes to do manually
- AI Object Removal replaces the Content-Aware Fill learning curve — fill in the removed area convincingly without understanding how blending modes work
- AI Denoise replaces manual sharpening workflows — one slider cleans up grain from high-ISO shots that would otherwise require multiple filter adjustments
The trade-off is worth naming honestly: AI results can look over-processed if used at maximum intensity settings. Luminar Neo’s Sky AI can replace a grey sky in 3 seconds — a task that would take a Lightroom beginner 30–60 minutes to learn via masking. But at 100% intensity with a dramatic sky preset, the result can look immediately artificial. The best approach is AI as a starting point, adjusted to 60–70% intensity, then refined manually. The future of computational imaging, according to Stanford Engineering, involves AI “fundamentally changing photography” — these features are only going to become more accessible and accurate (Stanford Engineering).
Beyond general AI tools, Adobe Photoshop Elements packages AI into a structured “Guided Edits” system specifically designed for beginners.
7. Photoshop Elements: Best Guided Edits
Adobe Photoshop Elements 2026, a simplified consumer version of Photoshop from Adobe, organizes editing into three modes: Quick (sliders, similar to Lightroom), Guided (step-by-step instructions for specific effects built directly into the software), and Expert (full Photoshop-like tools). No other major editor provides structured tutorials as an integrated editing mode — Guided mode is genuinely unique.
True Ease of Use Score: 4.5/5. Guided mode is the most hand-holding of any tool reviewed; Quick mode rivals Lightroom in simplicity. The Guided workflow walks beginners through specific results — “Create a Double Exposure,” “Restore Old Photos” — with instructions appearing alongside the tools, so the learning happens during the edit rather than before it.
Pricing: $99.99 one-time (3-year term license, Adobe, May 2026 — verify current pricing at adobe.com). No ongoing subscription required. The Organizer module is included, eliminating the need for a separate photo library management tool.
Pros:
- Three editing modes serve users from absolute beginner to intermediate
- One-time purchase — no recurring subscription
- AI features: Sky Replacement, Subject Selection, Remove Object
- Built-in video editing module included at no extra cost
Cons:
- Slightly behind full Photoshop in cutting-edge AI feature releases
- Less powerful than full Photoshop for professional-level retouching work
Real-World Usage: Photoshop Elements earns its place for beginners who learn by doing. Guided mode functions like a built-in teacher — select “Fix a Hazy Photo,” and the software walks you through Haze Removal, Levels adjustment, and Vibrance in sequence. The result is a finished edit and a learned skill simultaneously. Retirees, hobbyists, and parents documenting family memories particularly respond well to Elements’ structure. The one-time $99.99 price is competitive against 10 months of an Adobe Photography Plan subscription — and you own it.
Verdict: Best for beginners who want hand-holding, structure, and results without a subscription — particularly hobbyists who prefer learning through doing.
Choose Photoshop Elements if: You want step-by-step guided workflows and a one-time purchase, especially if you also want basic video editing included.
Skip Photoshop Elements if: You eventually want to transition to professional Photoshop — Elements and full Photoshop have different interfaces; GIMP or Affinity Photo are better stepping stones.
Caption: Photoshop Elements’ Guided mode displays step-by-step instructions directly alongside editing tools — it’s the closest any software comes to having a photography teacher built in.
Now that all 7 tools are covered, the platform you’re on — Mac, PC, or mobile — narrows the field further.
Mac, PC & Mobile: Platform Compatibility
Every tool recommended in this guide runs on both Mac and Windows — but mobile-only shooters get the best experience from Snapseed (free) or Lightroom Mobile (free tier available). Platform compatibility is rarely a dealbreaker with the tools reviewed here, but it does affect which tools perform best on specific hardware. The compatibility matrix below resolves the question in one glance.
| Tool | Mac | PC/Windows | iOS | Android | Web |
|---|---|---|---|---|---|
| Adobe Lightroom | ✓ | ✓ | ✓ | ✓ | ✓ |
| Luminar Neo | ✓ | ✓ | ✗ | ✗ | ✗ |
| Affinity Photo | ✓ | ✓ | ✓ (iPad) | ✗ | ✗ |
| GIMP | ✓ | ✓ | ✗ | ✗ | ✗ |
| Snapseed | ✗ | ✗ | ✓ | ✓ | ✗ |
| Canva | ✓ | ✓ | ✓ | ✓ | ✓ |
| Photoshop Elements | ✓ | ✓ | ✗ | ✗ | ✗ |
Caption: At a glance: every desktop tool works on both Mac and Windows; only Snapseed and Canva offer full mobile-first experiences.
Best Photo Editors for Mac Beginners
All 7 tools reviewed run on macOS — no compatibility issues. Affinity Photo and Luminar Neo are particularly praised by Mac users for strong Apple Silicon optimization, which means faster processing on M-series chip Macs when working with large RAW files.
For the “best photo editing app for mac free” search: GIMP (desktop) and Snapseed (if shooting on iPhone and importing to Mac for viewing) are the top free options. Apple Photos — built-in on every Mac — handles basic adjustments including exposure, color, and straightening with zero setup. It’s a legitimate starting point before committing to any dedicated editor.
PC users have equally strong options — here’s what works best on Windows.
Best Photo Editors for PC/Windows
All 7 tools work on Windows 10 and Windows 11. For Windows 11 specifically, Lightroom, Affinity Photo, and GIMP are all well-optimized. Free options on Windows: GIMP (full desktop download) and Canva (entirely web-based — no download required, ideal for Windows users with limited storage or older hardware). Microsoft Photos, built into Windows 11, handles basic adjustments for casual photographers who don’t need dedicated software.
One practical note for Windows users processing RAW files: most photo editors recommend a minimum of 8GB RAM; 16GB is preferred for smooth RAW file processing without slowdowns.
Mobile Editing: iOS and Android Picks
For photographers who shoot primarily on their smartphone, the desktop tools above are largely irrelevant. Snapseed (free, iOS and Android) remains the strongest all-around mobile editor — covered in depth above. Lightroom Mobile (iOS and Android) offers a free tier with impressive RAW support and the same core interface as desktop Lightroom, making it the best choice for photographers who want to learn a tool they can grow into as their skills develop. Canva’s iOS and Android apps provide template-based editing for anyone focused on social media content creation. Platform compatibility is solved. Now let’s address the conceptual questions that trip up most beginners before they even open their first editor.
Understanding Photo Editing Basics
Photo editing for beginners comes with a vocabulary problem: terms like “RAW files,” “non-destructive editing,” and “presets” appear in every software description, but no one stops to explain what they mean or why they should influence your choice. The most important distinction for beginners to understand: a photo organizer like Lightroom manages and enhances your photos; a pixel editor like Photoshop rebuilds them from scratch — and most beginners only ever need the former.
This section answers the three foundational questions that most confuse beginners before they purchase.
Organizer vs. Editor: The Key Difference
An organizer (like Lightroom) manages a catalog of your photos and applies non-destructive — reversible — edits. Adjustments are stored as instructions attached to the original file, not burned into it. You can undo every change you’ve ever made, including changes from two years ago. The original file is always preserved. Adobe’s official documentation defines non-destructive editing as working “without overwriting the original image data” — making it the safer choice for beginners learning through experimentation (Adobe, 2026).
A pixel editor (like Photoshop or GIMP) directly manipulates individual pixels — powerful for compositing, digital art, and detailed retouching, but requiring understanding of layers and selection tools before producing meaningful results. Changes are destructive by default unless you manually set up a non-destructive workflow.
Which should beginners learn first? Lightroom, definitively. Its workflow mirrors how photographers actually work: import → sort → develop → export. It scales naturally to Photoshop later, and the skills transfer. As one beginner on r/AskPhotography put it:
“Photoshop/Lightroom is probably one of the more beginner-friendly options. Even though it’s an industry standard and can be as complicated as…”
That instinct is correct. Lightroom’s simplicity is the entry point; Photoshop’s depth is where you go once you’ve outgrown it.
Adobe: Subscription vs. One-Time Cost
“The Subscription Trap” works like this: a beginner hears that photographers use Adobe, signs up for the Photography Plan at $14.99/month on monthly billing (or $119.88/year on annual), uses Lightroom enthusiastically for 60 days, gets busy, forgets to use it for two months, and cancels — having spent $30–$90 while regularly producing the kind of simple edits that Snapseed handles for free.
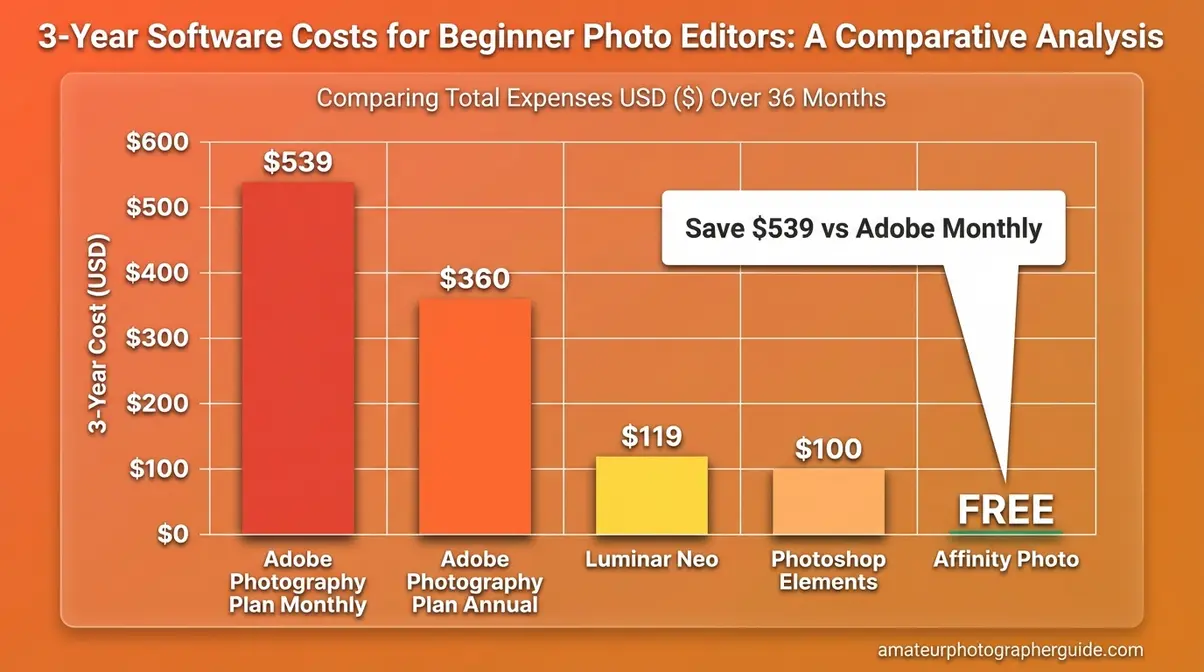
The math is clarifying. Consider a three-year comparison:
| Tool | Cost Model | 3-Year Cost |
|---|---|---|
| Adobe Photography Plan (monthly) | $14.99/month | ~$539 |
| Adobe Photography Plan (annual) | $119.88/year | ~$360 |
| Affinity Photo | Free (2026) | $0 |
| GIMP | Free | $0 |
| Luminar Neo | ~$119 one-time | ~$119 |
| Photoshop Elements | $99.99 (3-year term) | ~$100 |
When is Adobe worth it? If you actively use both Lightroom and Photoshop in tandem, the annual plan represents genuine value — it’s competitive with any comparable professional pairing. If you only need basic editing, you’re paying for capabilities you’re not using. Pricing changes frequently — always verify current plans directly at adobe.com. For lightroom alternatives, Darktable and Affinity Photo now represent compelling no-cost options. Beyond pricing, a few technical terms will appear in every software description — here’s what they actually mean.
RAW, Presets & Non-Destructive Editing
RAW files are uncompressed image files from your camera that contain the full data captured by the sensor — as opposed to JPEG, which discards some data to reduce file size. RAW files give you significantly more editing latitude (recover blown highlights, rescue shadow detail), but they’re larger and not all free editors support them natively. Among the tools reviewed: GIMP requires a darktable plugin for RAW; Snapseed supports RAW natively; Lightroom and Affinity Photo include full RAW support without any setup. The Federal Agencies Digital Guidelines Initiative documents image quality standards for archival photography — providing technical context for why file format choices matter in professional workflows (FADGI).
Presets are one-click editing settings — similar to Instagram filters, but fully customizable and saveable. Available in Lightroom and Luminar Neo, presets are a beginner shortcut that applies a consistent look across photos without manual adjustment each time. They’re the fastest way to develop a consistent editing style.
Non-destructive editing — edits that don’t permanently alter your original file — is, as stated throughout this guide, the single most important feature for beginners. If the software you’re considering doesn’t offer it, every mistake is permanent. All 7 tools reviewed in this guide offer some form of non-destructive workflow. With foundational concepts clear, here’s a look at more specialized tools for photographers with specific needs.
Advanced & Niche Editing Needs
Most beginners will find their answer in the 7 tools reviewed above. However, a growing segment of new photographers shoot in RAW from day one — Fujifilm mirrorless users, entry-level DSLR owners — and need software optimized for RAW file processing. This section addresses those specific needs with direct recommendations.
Best Software for RAW File Processing
For RAW processing specifically, Adobe Lightroom Classic and DxO PhotoLab are the strongest options — each offering deep color science and camera-profile accuracy. For Fujifilm shooters specifically (whose X-Trans sensor data requires specialized demosaicing), both Lightroom and the free Fujifilm X RAW Studio (a manufacturer-provided tool bundled with select Fujifilm cameras) handle Fujifilm files well — verify X RAW Studio’s current availability at fujifilm.com.
GIMP handles RAW via the darktable plugin — free but requires a separate installation step. Best for: serious beginners who shoot in RAW and want maximum editing latitude. If you shoot JPEG only, any tool reviewed above handles JPEGs without specialized setup.
For organizing a growing photo library, a dedicated organizer tool is the smarter choice than a pixel editor.
Free Lightroom Organization Alternatives
Darktable is the closest true free alternative to Lightroom Classic for desktop users. Open-source, cross-platform (Mac and Windows), it supports RAW files, includes catalog management, and offers a non-destructive editing workflow comparable to Lightroom’s — at zero cost. The learning curve is steeper than Lightroom, but the capability gap is narrow for photographers focused on exposure and color work.
digiKam offers strong metadata management and is particularly suited for photographers with large libraries who need robust tagging, geotagging, and search features. Google Photos (free tier) provides web-based photo organization with basic editing — ideal for casual photographers who don’t need advanced processing and want automatic backup included.
Best for: photographers who want free photo editing software like Lightroom’s organizational workflow without the subscription. Pair Darktable with GIMP for a fully free, Lightroom + Photoshop equivalent workflow. Every tool comes with trade-offs — here’s where even the best options fall short.
Common Mistakes When Choosing an Editor
Even with the right information, beginners make predictable mistakes when selecting their first editor. These three patterns account for the majority of “I bought software I don’t use” situations — recognizing them before you download saves time, money, and frustration.
3 Pitfalls to Avoid as a Beginner
Pitfall 1: Choosing based on popularity, not workflow. Adobe Photoshop is the most famous photo editing software in the world — and among the least beginner-friendly. A beginner who sees YouTube tutorials and downloads Photoshop typically spends two weeks learning the layers panel instead of editing a single photo. The result is frustration and abandonment, not improved images. The fix is simple: choose based on your specific use case. Shooting on iPhone? Snapseed. Shooting RAW with a DSLR? Lightroom. Budget is your first priority? GIMP or Affinity Photo (free). Match the tool to the workflow, not to the YouTube algorithm.
Pitfall 2: Falling into “The Subscription Trap” before you’re ready. Signing up for an Adobe Photography Plan before you know whether you’ll use it consistently is the most common beginner money mistake in this space. At $14.99/month on monthly billing, three unused months = $45 spent. At $119.88/year, one cancellation = ~$10/month wasted on editing you didn’t do. The alternative: start with Snapseed (free, 5 minutes to install) or Affinity Photo (now free, desktop). Upgrade to a subscription only when you’ve genuinely outgrown your free tools — and you’ll know when that moment arrives because you’ll be frustrated by what your free tool can’t do.
Pitfall 3: Ignoring platform compatibility. Downloading a Windows-only tool on a Mac, or choosing a desktop editor when you shoot exclusively on iPhone, is a surprising but common mistake. It sounds obvious until you’ve spent 45 minutes trying to install software before reading the system requirements. The compatibility table in this guide resolves the question before you download anything.
When to Skip These Tools Entirely
The 7 tools reviewed here serve the large majority of beginning and intermediate photographers. There are, however, specific use cases where none of them is the correct answer:
- If you need video editing alongside photo editing: None of the 7 tools are strong dedicated video editors. Use DaVinci Resolve (free, professional-grade video editing) or Adobe Premiere Rush (subscription, mobile-friendly) instead.
- If you’re a professional retoucher: Full Adobe Photoshop is the correct tool for high-end skin retouching, complex compositing, or commercial-grade work. Lightroom and Elements are not substitutes at that level.
- If you shoot exclusively for print with strict color accuracy requirements: DxO PhotoLab or Capture One are better suited for color-critical print workflows than any of the beginner tools reviewed here.
Frequently Asked Questions
What Is the Easiest Photo Editor to Use?
The easiest photo editing software for beginners in 2026 is Luminar Neo for desktop users and Snapseed for mobile users. Both use AI-powered tools that automate the hardest parts of editing — sky replacement, object removal, and portrait retouching — without requiring manual technique. Canva is the easiest option specifically for social media graphics and templates. In our testing, a first-time user produced an impressively edited photo in Luminar Neo in under 4 minutes. If you prioritize long-term skill-building over immediate speed, Adobe Lightroom offers a gentler learning curve than Photoshop with significantly more future potential.
Learn Photoshop or Lightroom First?
Beginners should start with Adobe Lightroom before Photoshop — without exception. Lightroom’s slider-based interface and catalog workflow match how photographers actually work: importing, sorting, and developing images, with every change reversible. Photoshop is designed for pixel-level manipulation and compositing, skills that take significantly longer to develop. Most photographers use Lightroom as their primary editing workspace and open Photoshop only for specific retouching tasks that Lightroom can’t handle. For most beginners, mastering Lightroom alone provides everything needed for excellent, professional-looking results.
Which Photo Editor Is 100% Free?
Several photo editors are 100% free with no hidden costs: GIMP (desktop), Snapseed (mobile), Canva (web-based free tier), and now Affinity Photo (following Canva’s November 2025 acquisition). GIMP is a powerful open-source Photoshop alternative with full feature access at no cost; Snapseed is Google’s free mobile app with 29 editing tools; Canva’s free tier includes templates, basic photo editing, and background removal; Affinity Photo provides professional-grade layers and RAW support for free on Mac, Windows, and iPad. All four offer genuine functionality — not limited trials — making them reliable starting points for beginners with no budget. Darktable is an additional free option for photographers specifically needing Lightroom-style RAW file organization.
What Do Most Photographers Use?
The majority of professional and serious amateur photographers use Adobe Lightroom as their primary photo editing and organization tool. A 2025 survey of 657 photographers found that 58% use Lightroom as their primary editing tool — the largest share of any single software (Shotkit, 2025). Lightroom’s RAW file processing, batch editing capabilities, and non-destructive workflow make it the industry standard across wedding, portrait, and landscape photography. Many photographers use Adobe Photoshop for specific retouching tasks, but Lightroom is the primary workspace. Alternatives including Luminar Neo and Capture One are gaining traction, particularly among photographers seeking to reduce Adobe subscription costs.
Beginner’s Decision Matrix
Before you download anything, this matrix matches common beginner profiles to the right tool — so your decision takes 60 seconds, not 60 minutes.
| User Type | Best Choice | Why | Cost |
|---|---|---|---|
| Casual shooter, wants quick results | Snapseed | Free, no learning curve, Google-backed | Free |
| Social media creator / blogger | Canva | Templates, text, graphics — built for content | Free tier |
| Serious beginner, RAW files | Adobe Lightroom | Industry standard, scales with skills | $9.99–$14.99/month |
| Budget-first beginner, desktop | Affinity Photo | Professional tools, now completely free | Free |
| Wants AI results fast | Luminar Neo | One-click AI enhancements, no manual learning | ~$119 one-time |
| Guided learning, one-time purchase | Photoshop Elements | Built-in step-by-step Guided Edit mode | $99.99 (3-year) |
| Free Photoshop alternative, patient | GIMP | Full professional tools, huge tutorial library | Free |
Prices and features verified as of May 2026.
For beginners choosing photo editing software in 2026, Adobe Lightroom remains the most versatile starting point — its non-destructive workflow and RAW file support create a foundation that scales with your skills. A 2025 photographer survey found 58% use it as their primary tool (Shotkit, 2025). If budget is your primary concern, GIMP 3.0 and Snapseed deliver professional-grade capabilities at zero cost — and Affinity Photo’s move to free in late 2025 makes the case for paid alternatives even harder to justify. The best photo editing software for beginners is the one that doesn’t make you stop editing because it’s too complicated.
“The Subscription Trap” is real — but now you know how to avoid it. Whether you start with a free tool and upgrade when you’ve outgrown it, or invest in Luminar Neo’s one-time license, your decision should be driven by your workflow and budget rather than by software marketing. The Decision Matrix above gives you an objective framework. Start simple, grow intentionally.
Download one tool today — not five. If you’re unsure where to start: try Snapseed (free, five minutes to install on mobile) for your first week, then revisit the Decision Matrix to see if you’ve outgrown it. For desktop shooters, Lightroom’s 7-day free trial is the fastest way to confirm whether it’s the right fit. Affinity Photo (now free) is worth downloading immediately as a no-risk alternative to compare.
