
Table of Contents
- Quick Summary
- 1. Choose the Right Background for Clean Product Shots
- 2. Optimize Lighting Using Natural or Artificial Sources
- 3. Master Camera Settings for Sharp, Clear Images
- 4. Use a Tripod to Achieve Professional Stability
- 5. Showcase Key Product Details with Close-Up Shots
- 6. Edit Photos for a Polished, Consistent Look
- 7. Experiment with Angles to Enhance Visual Appeal
- Elevate Your Product Photography Skills with Expert Guidance
- Frequently Asked Questions
- Recommended
This blog post may contain affiliate links. As an Amazon Associate I earn from qualifying purchases.
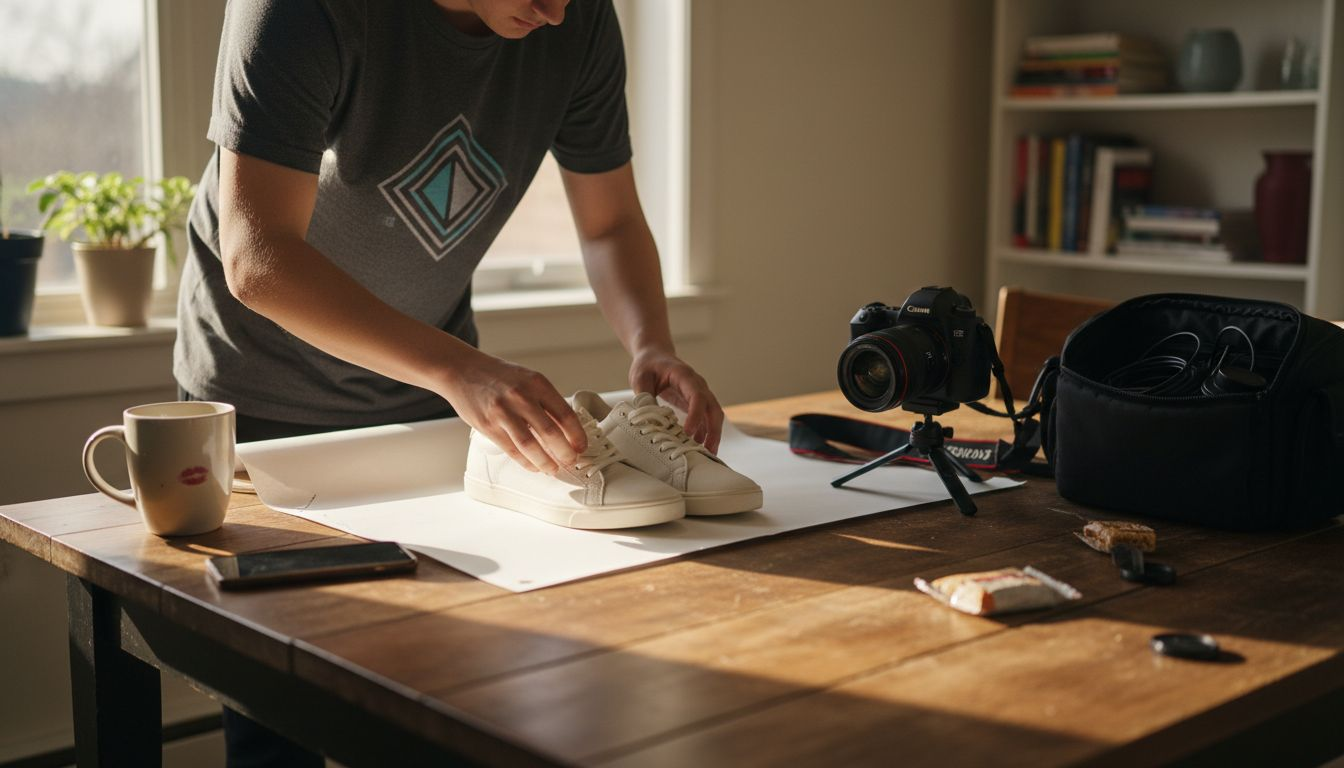
Making your product look its best in photos is tougher than most people think. The wrong background or camera setting can distract buyers or make your products appear unprofessional. If you want each image to impress your customers and build trust in your brand, paying attention to these details is a must.
The right choices can turn everyday product shots into powerful selling tools. You will learn how to choose backgrounds that highlight your items, master camera controls for sharp images, and use proven techniques to create clear, enticing photos. Each practical tip brings you closer to polished, professional product photography that gets results.
Get ready to discover actionable steps that make your products stand out—no advanced gear or photo studio required.
Quick Summary
| Takeaway | Explanation |
|---|---|
| 1. Choose a Neutral Background | A neutral background, such as white or gray, enhances product visibility and reduces distractions during product photography. |
| 2. Utilize Proper Lighting Techniques | Effective lighting, whether natural or artificial, is crucial for highlighting product details and achieving a professional look in product photos. |
| 3. Use Manual Camera Settings | Adjusting camera settings like ISO, aperture, and shutter speed in manual mode ensures sharper, clearer product images. |
| 4. Incorporate a Tripod for Stability | A tripod eliminates camera shake, ensuring consistent framing and clarity for high-quality product images. |
| 5. Experiment with Angles | Different camera angles can reveal unique product features, making your product more appealing to potential buyers. |
1. Choose the Right Background for Clean Product Shots
When it comes to product photography, your background can make or break the shot. A well-selected background transforms an ordinary image into a professional marketing asset that draws viewers directly to your product.
The foundation of great product photography starts with selecting a background that complements and highlights your item. Professional photographers understand that backgrounds aren’t just empty spaces—they’re strategic visual tools that communicate product quality and brand identity.
Why Background Matters:
- Creates visual focus on the product
- Reduces distractions for potential buyers
- Supports consistent brand aesthetics
- Simplifies post-processing editing
A clean background doesn’t just showcase your product—it tells a story about your brand’s professionalism and attention to detail.
For most e-commerce and product shots, neutral backgrounds reign supreme. White backgrounds remain the gold standard because they provide maximum clarity and versatility. Gray and off-white options also work wonderfully for creating a sophisticated, minimalist look that keeps the product as the central focus.
When selecting your background, consider these key factors:
- Product color and texture
- Intended marketing platform
- Lighting conditions
- Brand style guide requirements
Alternative background materials like seamless paper, muslin fabric, or vinyl offer different visual textures. Seamless paper provides a perfectly smooth surface ideal for professional product catalogs, while textured backgrounds can add warmth for lifestyle or creative product shots.
Pro tip: Keep multiple background options in your photography toolkit and experiment with different surfaces to discover which best highlights your specific products.
2. Optimize Lighting Using Natural or Artificial Sources
Lighting can transform an ordinary product photo into a stunning visual masterpiece. Understanding how to manipulate both natural and artificial light sources is crucial for creating professional quality product images that capture attention and showcase your items in the best possible way.
Types of Lighting Sources:
- Natural daylight
- Studio continuous lights
- LED panels
- Softbox lighting
- Ring lights
- Speedlights
Effective lighting isn’t about having the most expensive equipment—it’s about understanding how light interacts with your product.
Natural Lighting Techniques:
Natural light offers incredible versatility for product photographers. Soft window light provides a gentle illumination that works wonderfully for many product types. Position your items near a large window with indirect sunlight to create soft shadows and highlight product details.
For studio-quality lighting techniques, amateur photographers can experiment with different approaches. Artificial lighting gives you precise control over intensity direction and mood.
Key considerations for lighting setup include:
- Light direction
- Shadow intensity
- Color temperature
- Light diffusion
Artificial Lighting Benefits:
- Consistent light quality
- Complete control over illumination
- Reproducible results
- Independent of weather conditions
Studio lighting allows you to create repeatable product images with professional polish. Softboxes and diffusers help eliminate harsh shadows and create even illumination across your subject.
Pro tip: Invest in a basic lighting kit with adjustable power settings and experiment with different configurations to understand how light transforms your product images.
3. Master Camera Settings for Sharp, Clear Images
Capturing crisp professional product photos requires more than just point and shoot. Understanding your camera settings is the secret weapon that separates amateur snapshots from stunning product images.
Key Camera Settings for Product Photography:
- Low ISO (100-200)
- Narrow aperture (f/8 to f/11)
- Fast shutter speed (1/125s or faster)
- Manual mode for precise control
- RAW file format
Camera settings are your paintbrush—each adjustment reveals more detail and professional quality in your product shots.
The foundation of sharp images starts with manual camera mode. This allows you to control three critical elements: aperture shutter speed and ISO. By understanding how these interact you can create consistently professional product photographs.
Aperture and Depth of Field:
Aperture controls how much of your product remains in sharp focus. A narrow aperture between f/8 and f/11 ensures most of your product looks crisp and detailed. Wider apertures like f/2.8 create shallow depth which can highlight specific product features.
Important considerations for camera settings include:
- Maintaining low ISO to reduce image noise
- Selecting appropriate shutter speed
- Choosing optimal aperture
- Shooting in RAW format
For product photography techniques, shooting in RAW provides maximum flexibility during post processing. This format captures more image data allowing you to adjust exposure white balance and colors without losing quality.
Practical Camera Setting Tips:
- Always use a tripod for stability
- Enable camera grid lines for composition
- Check image sharpness using zoom preview
- Use remote shutter or timer to minimize camera shake
Pro tip: Practice your camera settings with consistent lighting and a stationary object to understand how small adjustments dramatically impact image quality.
4. Use a Tripod to Achieve Professional Stability
A tripod might seem like a simple tool but it’s the unsung hero of professional product photography. Camera stability transforms ordinary images into sharp crystal clear masterpieces that showcase your products with incredible precision.
Tripod Benefits:
- Eliminates camera shake
- Provides consistent framing
- Allows precise composition
- Enables longer exposure times
- Supports heavy camera equipment
Stability isn’t just about keeping your camera still—it’s about creating consistently professional images every single time.
Product photographers understand that sharp images start with stability. Even the slightest hand movement can blur details and reduce image quality. A solid tripod ensures your camera remains perfectly still allowing you to capture intricate product features with remarkable clarity.
Key considerations when selecting and using a tripod include:
- Weight capacity matching your camera
- Leg stability and material
- Height adjustability
- Head type for smooth movements
For professional photography techniques, tripods offer more than just stability. They enable advanced shooting methods like time lapse bracketing and long exposure shots that are impossible with handheld photography.
Advanced Tripod Techniques:
- Use center column hook to add extra weight
- Extend legs fully for maximum stability
- Level tripod head using built-in bubble level
- Avoid raising center column too high
- Use remote shutter release to minimize vibrations
Types of Tripod Heads:
- Ball head for quick adjustments
- Pan-tilt head for precise movements
- Gimbal head for video and action shots
- Fluid head for smooth video transitions
Pro tip: Invest in a tripod with adjustable leg angles to work seamlessly on uneven surfaces and maximize your shooting flexibility.
5. Showcase Key Product Details with Close-Up Shots
Close-up photography transforms ordinary product images into compelling visual stories that speak directly to potential buyers. Macro shots reveal the hidden character of your product in ways standard images simply cannot.
Benefits of Close-Up Photography:
- Highlights intricate product features
- Builds customer trust
- Demonstrates product quality
- Creates emotional connection
- Reduces purchase hesitation
Close-up shots are your secret weapon for telling a product’s story without saying a word.
When potential customers cannot physically touch an item macro photography becomes their sensory experience. These detailed images allow shoppers to examine textures materials and craftsmanship up close giving them confidence in their purchasing decision.
Key strategies for effective close-up product photography include:
- Focus on unique design elements
- Use proper lighting
- Select appropriate macro lens
- Maintain sharp focus
- Show multiple detailed angles
For professional macro photography techniques, understanding which features matter most is crucial. Jewelry makers might emphasize stone settings while electronics brands could showcase intricate circuit details or sleek material finishes.
Macro Photography Equipment:
- Dedicated macro lens
- Extension tubes
- Tripod with precise positioning
- Ring light for even illumination
- Focusing rail for precise adjustments
Product Detail Shooting Techniques:
- Capture texture variations
- Highlight unique manufacturing processes
- Show material quality
- Demonstrate functional design elements
- Reveal small but significant features
Pro tip: Experiment with different lighting angles and use a white or neutral background to make your product details pop without distracting from the main subject.
6. Edit Photos for a Polished, Consistent Look
Photo editing transforms good product images into professional marketing assets. Post-processing skills are the secret weapon that elevates your photography from amateur to exceptional.
Essential Editing Goals:
- Maintain consistent color balance
- Remove background distractions
- Enhance product details
- Create uniform visual brand identity
- Optimize images for web display
Professional editing isn’t about changing your image—it’s about revealing your product’s true potential.
Key Editing Techniques focus on preserving image authenticity while highlighting your product’s most compelling features. Shooting in RAW format provides maximum flexibility during post-processing allowing precise adjustments without losing image quality.
Critical editing considerations include:
- Color correction
- Background refinement
- Shadow and highlight adjustment
- Image resizing
- Maintaining consistent style
For professional photo editing techniques, understanding subtle adjustments makes all the difference. Slight modifications in exposure contrast and color can transform an ordinary image into a stunning visual representation of your product.
Recommended Editing Software:
- Adobe Lightroom
- Capture One
- Photoshop
- GIMP
- Affinity Photo
Image Optimization Steps:
- Adjust white balance
- Correct exposure
- Eliminate color cast
- Sharpen key details
- Resize for different platforms
Pro tip: Create a consistent editing preset that you can quickly apply across multiple product images to maintain a unified visual brand style.
7. Experiment with Angles to Enhance Visual Appeal
Product photography is an art form where camera angle becomes your storytelling tool. The right perspective can transform an ordinary object into a compelling visual narrative that captures potential buyers’ attention.
Strategic Photography Angles:
- Front view
- Profile perspective
- Angled shots
- Flat lay
- Low angle
- Dutch tilt
- Macro close-ups
Your camera angle is not just a technical choice—it’s a strategic decision that communicates your product’s personality.
Different angles reveal unique product characteristics that standard shots might miss. A well-chosen perspective can highlight texture craftsmanship and design elements that make your product stand out in a crowded marketplace.
Key considerations when selecting product angles include:
- Showcasing key features
- Maintaining visual interest
- Representing product functionality
- Creating emotional connection
- Supporting brand storytelling
For creative product photography techniques, understanding how angles influence perception is crucial. An angled shot might reveal intricate design details while a flat lay could emphasize symmetry and overall form.
Angle Selection Strategies:
- Highlight unique product features
- Create visual dynamism
- Demonstrate product scale
- Reveal multiple perspectives
- Support brand aesthetic
Impact of Different Angles:
- Front view: Classic product representation
- Profile: Shows product dimension
- 45-degree angle: Creates depth and interest
- Overhead: Ideal for flat products
- Low angle: Adds drama and importance
Pro tip: Create a shot list before your photoshoot that includes multiple angles to ensure comprehensive product visual storytelling.
Below is a comprehensive table summarizing key techniques and strategies for achieving professional product photography quality as discussed in the article.
| Photography Aspect | Implementation Techniques | Expected Benefits |
|---|---|---|
| Selecting Background | Choose neutral backgrounds such as white, gray, or off-white; consider product attributes and brand aesthetics; experiment with materials like seamless paper or vinyl. | Creates visual focus, supports consistent branding, enhances editing flexibility. |
| Optimizing Lighting | Utilize natural light from windows or artificial light sources like softboxes and LED panels; diffuse light for balanced illumination. | Ensures precise product representation, enhances detail visibility, minimizes harsh shadows. |
| Camera Settings | Use low ISO values, narrow apertures like f/8–f/11, fast shutter speeds; shoot in RAW format for editing flexibility. | Achieves sharp, detailed images with minimal noise and maximum editing capabilities. |
| Using a Tripod | Select stable tripods with appropriate weight capacities; utilize features like adjustable legs and remote shutter triggers. | Prevents camera shake, enables precise framing, supports advanced techniques like long exposure. |
| Macro Shots | Focus on intricate product details; employ macro lenses and proper lighting to reveal texture and craftsmanship. | Highlights quality, builds customer trust, creates an emotional purchasing connection. |
| Photo Editing | Use software tools to correct colors, refine backgrounds, adjust shadows, and resize images for branding consistency. | Presents polished visuals, enhances product appeal, optimizes images for varied display platforms. |
| Experimenting Angles | Combine perspectives—front view, profile, angled shots, flat lays—to emphasize product features and aesthetic. | Strengthens visual storytelling, showcases functionality, adds dynamic interest. |
Elevate Your Product Photography Skills with Expert Guidance
Mastering product photography involves overcoming challenges like selecting the perfect background lighting setup and camera settings that reveal every fine detail. The article highlights key pain points such as achieving sharp images through proper camera controls using manual mode capturing compelling close-up shots and ensuring consistent editing for professional quality. Understanding concepts like aperture depth of field and using a tripod for stability are essential steps toward showcasing your products with clarity and style.
Ready to transform your photography from amateur snapshots to polished visual storytelling Explore practical tutorials detailed gear advice and expert editing tips at Amateur Photographer Guide. Dive deeper into professional photo editing techniques and discover how perfect lighting makes a difference with our studio-quality lighting techniques. Take control of your camera settings today and start creating product images that truly captivate. Visit us now and unlock your photography potential.
Frequently Asked Questions
What background should I use for product photography?
Choose a clean, neutral background like white, gray, or off-white to emphasize your product. This approach minimizes distractions and enhances visual focus. Start by experimenting with different background materials, such as seamless paper or fabric, to see which best complements your items.
How can I optimize lighting for my product photos?
To optimize lighting, use natural light from a window or invest in a basic artificial lighting kit. Position your product near a large window for soft light, or use softboxes to eliminate harsh shadows. Adjust lighting conditions to create even illumination and avoid unwanted glare.
What camera settings should I use for sharp product images?
Set your camera to manual mode, using a low ISO of 100-200, a narrow aperture of f/8 to f/11, and a fast shutter speed of 1/125 seconds or faster. By controlling these settings, you can ensure your images are sharp and clear. Practice with a stationary object to grasp how adjustments impact the final result.
How does using a tripod improve my product photography?
A tripod stabilizes your camera, eliminating shake and providing consistent framing for your shots. This is crucial for achieving sharp images, especially in lower light conditions. Make it a habit to use a tripod for every shoot to enhance overall image quality.
What are some tips for effective close-up shots in product photography?
Focus on unique details of your product using a macro lens to capture textures and features. Ensure proper lighting and maintain sharp focus to highlight these elements, which can boost customer trust and interest. Experiment with different angles to showcase the best aspects of your items.
How can I edit my product photos for a professional look?
Use photo editing software to adjust elements like color balance and exposure, ensuring consistency across all images. Aim to remove distractions from the background and enhance product details. Start by creating a preset that you can apply to all your photos for a uniform brand style.
Recommended
- Product Photography Tutorial: Capture Pro-Quality Images Easily – Amateur Photographer Guide
- 7 Tips For Better Still Life Photography – Amateur Photographer Guide
- 7 Essential Travel Photography Tips for Beginners – Amateur Photographer Guide
- 7 Essential Travel Photography Tips for Beginners
- 7 przykładów fotografia wizerunkowa – praktyczne inspiracje – Coolheads – Fotografia biznesowa