
Table of Contents
- Before You Start: What You’ll Need
- What Is Shutter Speed? A Beginner’s Guide
- The Exposure Triangle Explained
- Controlling Motion: Fast vs. Slow
- Practical Shutter Speed Settings Chart
- Video Shutter Speed: 180-Degree Rule
- Common Mistakes and How to Avoid Them
- Frequently Asked Questions
- The Bottom Line: Start With One Setting
This blog post may contain affiliate links. As an Amazon Associate I earn from qualifying purchases.
“Can someone explain ISO, shutter speed, and aperture? Like with example photos? People explaining on YouTube isn’t registering in my brain.”
— Real question from a beginner photographer on Reddit
Sound familiar? You’re not alone — and you’re not the problem. Camera settings are genuinely confusing, and most explanations make them worse by drowning you in numbers before you understand the concept.
Here’s the good news: shutter speed explained simply is just one idea. It’s a dial between two creative outcomes — freeze a moment or let motion flow. Master that single idea, and the numbers stop feeling like a foreign language. By the end of this guide, you’ll know exactly how shutter speed works, have exact settings for six common shooting situations, and walk away with a free cheat sheet for every shoot — all through a mental model called The Freeze-Flow Spectrum.
Shutter speed — the setting that controls how long your camera’s sensor is exposed to light — is your most powerful tool for controlling both brightness and motion in any photo. Having shutter speed explained in simple terms is your first step to mastering manual mode.
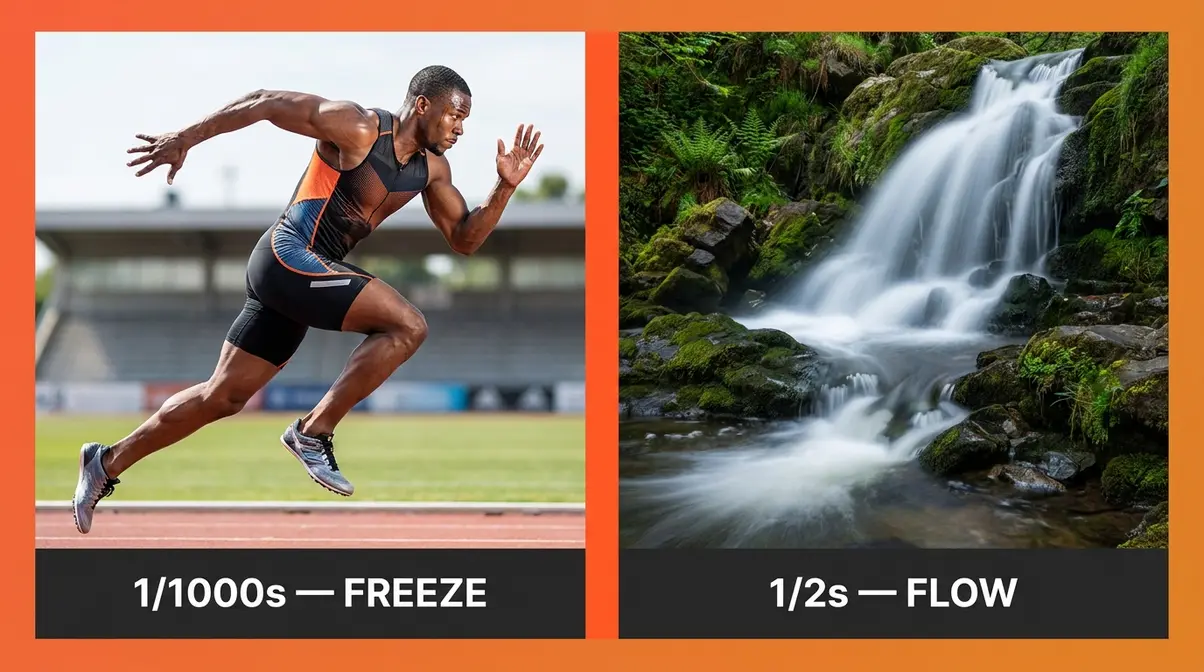
- Faster = Freeze: A speed of 1/500s or faster stops moving subjects in their tracks
- Slower = Flow: Speeds of 1/30s and below create silky, artistic motion blur
- The Reciprocal Rule: Your minimum handheld shutter speed equals 1 ÷ your focal length (e.g., 1/50s on a 50mm lens) to avoid camera shake
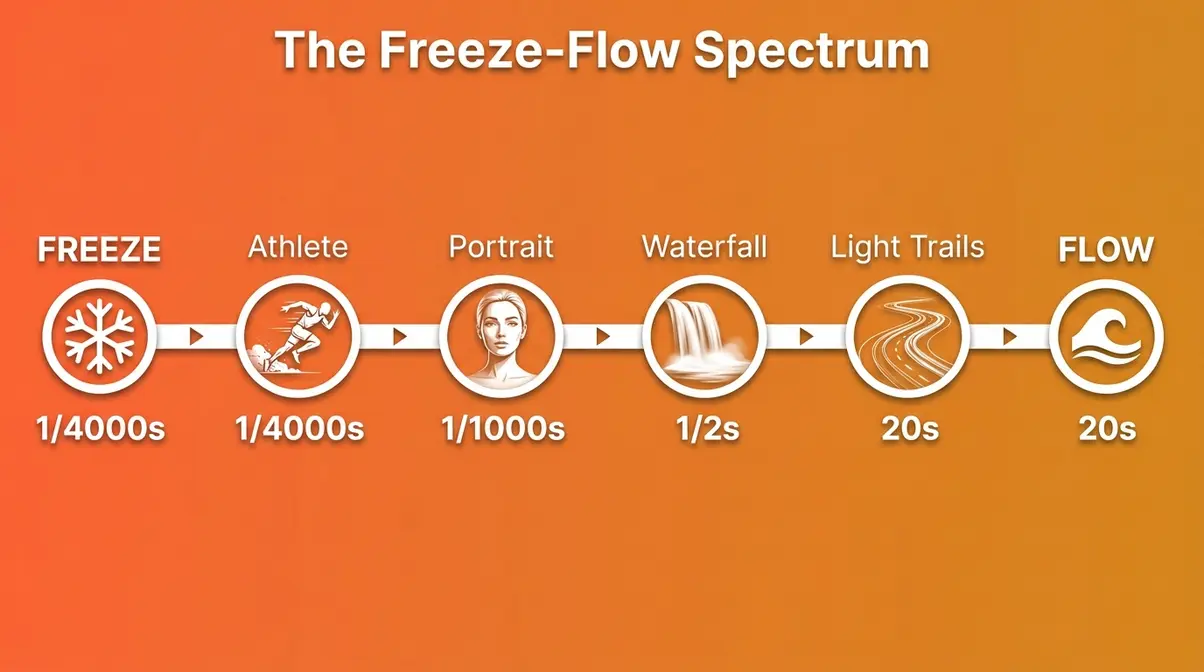
- The Freeze-Flow Spectrum is your mental model: every shutter speed choice is a creative position between stopping action and painting movement
Before You Start: What You’ll Need
- Estimated Time: 15-30 minutes of practice
- Tools/Materials:
- A camera with Manual (M) or Shutter Priority (S/Tv) mode (DSLR or mirrorless)
- A standard lens (e.g., 50mm or kit lens)
- A basic travel tripod (essential for slow shutter speed experiments)
What Is Shutter Speed? A Beginner’s Guide
When getting shutter speed explained to you, the easiest way to understand it is simply how long your camera’s shutter stays open when you press the button. Think of it like blinking your eye — a fast blink captures a frozen split-second, while keeping your eye open longer lets you take in more movement. When the shutter opens, light hits the sensor and records your image. When it closes, the exposure stops. That duration — measured in fractions of a second — is your shutter speed. It controls two things simultaneously: how bright your photo is, and whether moving subjects look sharp or blurred. If you want a deeper dive into the physics, our comprehensive shutter speed explained photography guide breaks down the mechanical curtain movements in detail.
How Shutter Speed Controls Brightness
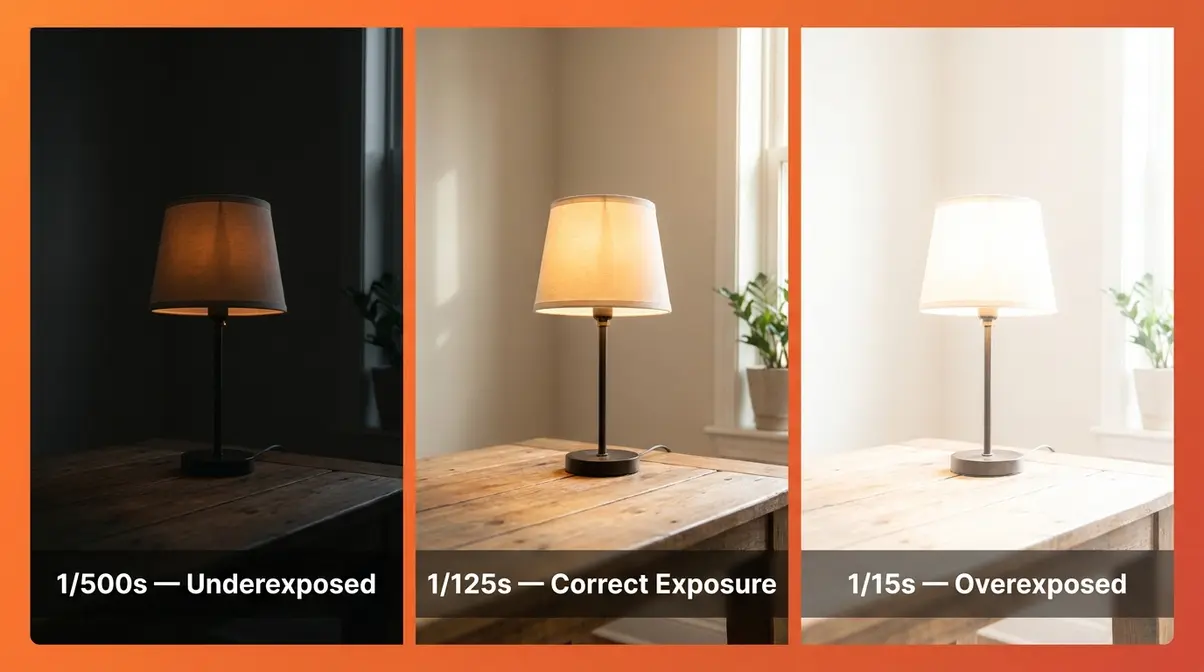
When your shutter stays open longer, more light reaches the sensor — making your photo brighter. A shorter opening lets in less light, producing a darker image. This is the same principle as opening a window curtain: crack it for a second and a little light enters; leave it open for ten seconds and the room fills with light.
In practical terms: shooting in a dim room at 1/30s lets in four times more light than shooting at 1/125s. That difference can mean the gap between a properly exposed portrait and a dark, muddy shot. This relationship is why shutter speed is one of the three pillars of exposure — alongside aperture (the opening in your lens) and ISO (your camera’s sensitivity to light).
How Shutter Speed Controls Motion
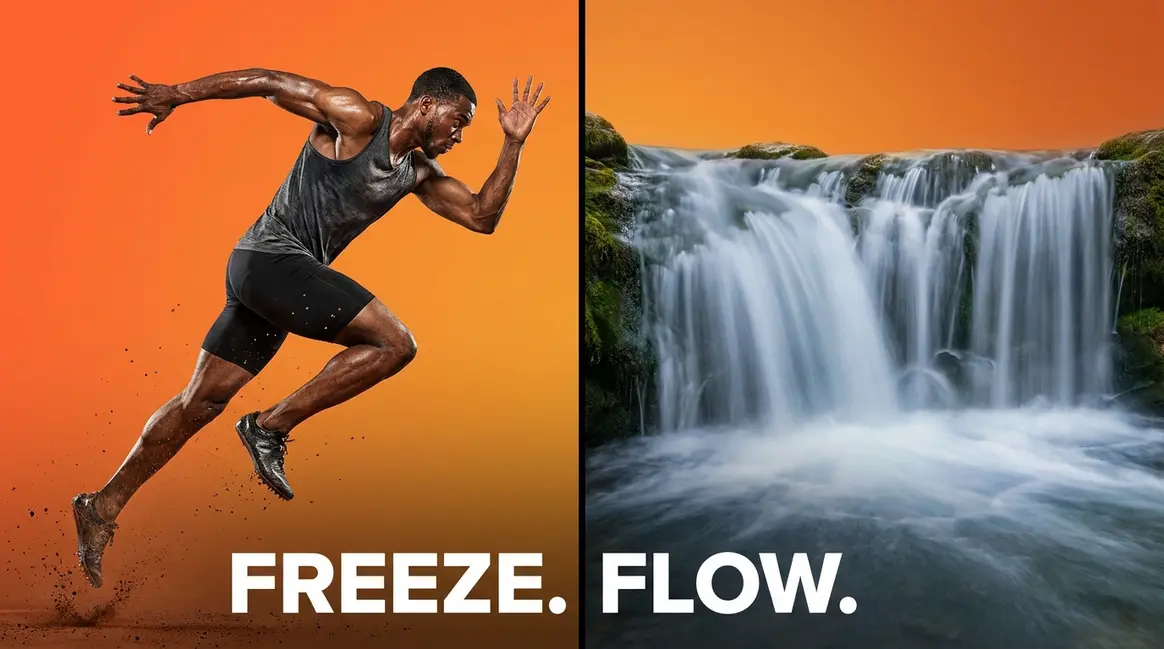
Here’s where shutter speed becomes genuinely exciting. A fast shutter speed freezes motion — your camera blinks so quickly that a hummingbird’s wings look completely still. A slow shutter speed records motion as blur — the shutter stays open long enough for a moving subject to travel across the sensor, painting a streak of movement.
Neither outcome is wrong. They’re creative choices. A sharp, frozen athlete feels dynamic and powerful. A silky waterfall feels serene and dreamlike. Understanding that both are valid — and that you control which one you get — is the core insight behind The Freeze-Flow Spectrum.
Common pain points reported by beginner photographers include the frustration of getting motion blur when they wanted a sharp shot, and not realizing that the reverse is equally possible: deliberately choosing blur for artistic effect.
Reading Shutter Speed Numbers
Shutter speeds are written as fractions of a second. This trips up almost every beginner — and it’s the culprit for the confusion about which number means “faster.”
Here’s the key: a larger denominator means a faster shutter speed. Think of it like pizza slices. 1/1000 of a pizza is a much thinner slice than 1/60 of a pizza — so 1/1000s is a much shorter (faster) exposure than 1/60s.
| Shutter Speed | Exposure Time | Effect |
|---|---|---|
| 1/4000s | 0.00025 seconds | Freeze fast sports, bright sunlight |
| 1/1000s | 0.001 seconds | Freeze athletes, birds in flight |
| 1/500s | 0.002 seconds | Freeze children playing |
| 1/125s | 0.008 seconds | Freeze walking subjects, portraits |
| 1/60s | 0.017 seconds | Stationary subjects, minimum handheld (50mm) |
| 1/30s | 0.033 seconds | Slight blur on moving subjects |
| 1/2s | 0.5 seconds | Silky waterfall effect |
| 5s | 5 seconds | Light trails, star movement visible |
| 30s | 30 seconds | Star trails, full night scenes |
The general rule: anything faster than 1/500s lives on the “Freeze” end of the spectrum. Anything slower than 1/30s lives on the “Flow” end. Everything in between is a creative middle ground.
Electronic vs. Mechanical Shutters
Most beginner guides ignore this entirely — but if you own a modern mirrorless camera (like a Sony Alpha, Fujifilm X-series, or Canon R-series), you likely have two shutter types available.
A mechanical shutter uses physical curtains that physically open and close in front of the sensor. It’s the classic “click” sound you associate with cameras. A electronic shutter reads the sensor line-by-line without any moving parts — it’s completely silent and can reach speeds of 1/32,000s or faster.
The trade-off: electronic shutters can produce a “rolling shutter” distortion effect on very fast-moving subjects (you may notice a leaning or wobbling effect on fast horizontal motion, like a race car). For most beginner situations — portraits, landscapes, casual street photography — the electronic shutter works perfectly. For sports and action, the mechanical shutter remains the safer choice.
On most mirrorless cameras, you’ll find this setting under Menu → Shutter Type → Electronic / Mechanical / Auto. Setting it to “Auto” lets the camera choose intelligently based on your shutter speed selection.
The Exposure Triangle Explained
Shutter speed doesn’t work alone. Every exposure decision you make involves three interconnected settings — and changing one always affects the others. Understanding how they interact is what separates photographers who take intentional shots from those who leave everything to Auto mode. As Photography Life explains, mastering the relationship between these three elements is the foundation of exposure control. For a complete breakdown of how light is measured, refer to our exposure in photography guide.
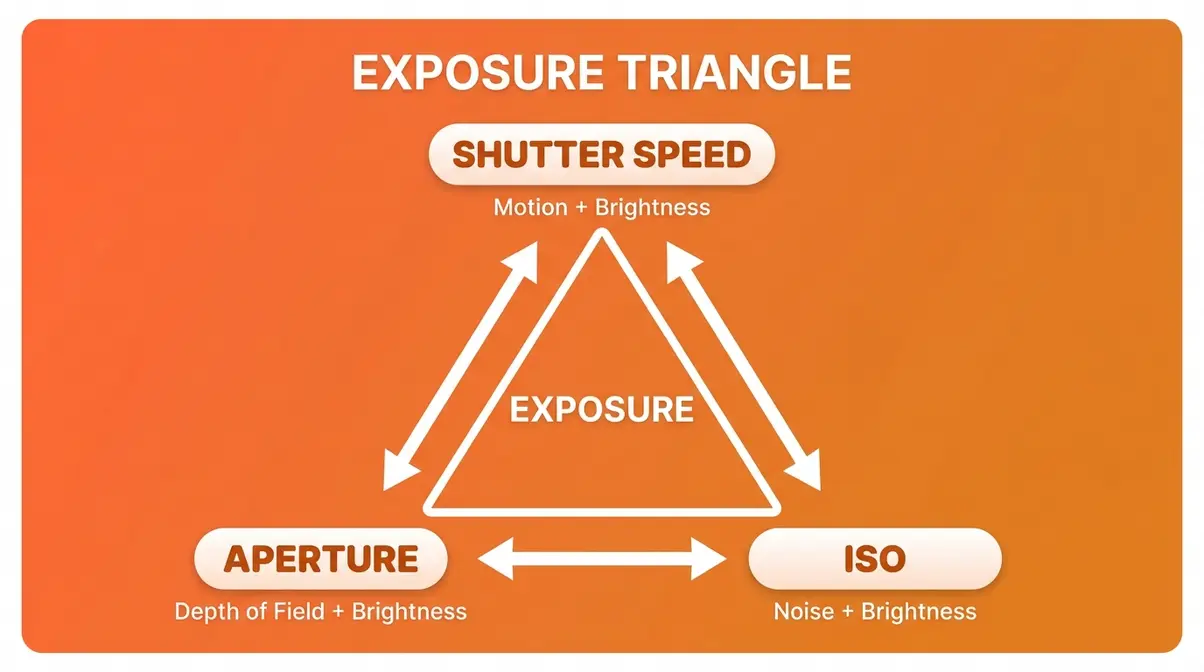
What Is the Exposure Triangle?
The Exposure Triangle is the relationship between three camera settings — shutter speed, aperture, and ISO — that together determine the brightness and look of every photo you take.
Think of it as a three-legged stool. Each leg holds up the final image. Change one leg’s length and the stool tips — unless you adjust the other two to compensate.
- Shutter speed (how long the shutter is open) controls motion and brightness
- Aperture (the opening in your lens, measured in f-stops) controls depth of field (how much of your scene is in focus) and brightness
- ISO (your camera’s light sensitivity) controls how much the sensor amplifies light — higher ISO means brighter images but also more grain, called “noise”
The key insight: these three settings always trade off against each other. You can’t change one without affecting the overall exposure — which means you’ll always need to compensate with the other two.
How to Balance the Three Settings
Balancing the triangle comes down to a simple principle: if you change one setting to get a creative effect, you must compensate with the others to maintain correct brightness.
A practical example: You want to freeze a running child (requires 1/500s or faster). But your current exposure at 1/125s is correctly exposed. Moving to 1/500s cuts the light by two full stops. To compensate, you have two options:
- Open your aperture (go from f/8 to f/4) — this doubles the light entering the lens
- Raise your ISO (go from ISO 200 to ISO 800) — this makes the sensor more sensitive
In practice, most photographers do both: open the aperture slightly and raise the ISO moderately. The goal is to keep ISO as low as possible (to minimize grain) while using aperture for depth-of-field control. Shutter speed handles the motion — the other two clean up the exposure.
A useful shorthand: every time you double your shutter speed (making it faster), you need to either double your ISO or open your aperture by one f-stop to maintain the same exposure.
A practical example in low light: Imagine you are shooting a dimly lit indoor concert. You want to freeze the lead singer moving across the stage, which requires a shutter speed of at least 1/250s. However, the venue is dark, and your current exposure at 1/60s is already slightly underexposed. Moving to 1/250s cuts the light by two full stops, making the image completely black. To compensate and rescue the exposure, you must adjust the other two legs of the triangle. First, you open your aperture to its maximum width (e.g., from f/5.6 to f/2.8), which doubles the light entering the lens twice. Next, you raise your ISO from ISO 800 to ISO 3200, making the sensor significantly more sensitive to the limited light available. The result is a properly exposed, sharp image of the singer, albeit with a bit more digital grain from the high ISO. This is the constant push-and-pull of the exposure triangle in action.
6 Real-World Exposure Examples
After evaluating these scenarios across common shooting situations, here are six complete exposure combinations that demonstrate how the triangle works in practice:
| Scenario | Shutter Speed | Aperture | ISO | Why |
|---|---|---|---|---|
| Outdoor portrait, sunny day | 1/250s | f/8 | ISO 100 | Bright light; small aperture for sharpness |
| Indoor portrait, window light | 1/60s | f/2.8 | ISO 400 | Dim light; wide aperture + moderate ISO |
| Freezing a soccer player | 1/1000s | f/4 | ISO 800 | Fast action; compensate with aperture + ISO |
| Silky waterfall, tripod | 1/2s | f/11 | ISO 100 | Slow shutter; small aperture prevents overexposure |
| Night sky / Milky Way | 15s | f/2.8 | ISO 3200 | Very long exposure; wide aperture; high ISO needed |
| Concert / Live Music | 1/250s | f/2.8 | ISO 3200 | Fast enough to freeze performers; wide aperture and high ISO compensate for dark venue |
These scenarios illustrate why there is no single ‘correct’ setting for any environment. If you were shooting that same outdoor portrait but wanted to blur the background of a moving bicyclist instead, your entire triangle would shift. You would select a slower shutter speed, which would force you to close your aperture to f/16 and drop your ISO to 100 to prevent overexposure. To truly master exposure, you must learn to let your creative intent dictate the first setting, and let the environment dictate the remaining two. Notice how every scenario is a triangle — shutter speed drives the creative decision, and aperture + ISO follow to compensate. This is the practical rhythm of manual photography.
Controlling Motion: Fast vs. Slow
This is where shutter speed becomes your creative superpower. Every motion in front of your camera — a sprinting athlete, a crashing wave, a candle flame — falls somewhere on The Freeze-Flow Spectrum. Seeing shutter speed explained through motion is where the concept truly clicks. Your job is simply to decide which end of the spectrum serves your story, then dial in the right number. As Adobe’s photography guide notes, deliberate motion control is what separates snapshots from intentional photographs. Learning how to capture motion effectively is one of the most rewarding skills you can develop.
Freeze Action with Fast Shutter Speed
A fast shutter speed — typically 1/500s and above — is your tool for stopping motion cold. The shutter opens and closes so quickly that even a fast-moving subject barely has time to move across the sensor. The result: crisp, sharp, frozen action.
When to use fast shutter speeds:
- Sports and athletes: 1/1000s–1/2000s captures a soccer kick or basketball jump at peak action
- Children and pets: 1/500s–1/1000s freezes unpredictable, fast movement
- Birds in flight: 1/2000s–1/4000s stops wing motion — even hummingbirds
- Splashing water: 1/1000s freezes individual water droplets in mid-air
- Step-by-step: Freeze a running child
- Set your camera to Shutter Priority mode (marked “S” on Nikon/Sony, “Tv” on Canon)
- Dial in 1/500s as your starting shutter speed
- Set your ISO to Auto — let the camera handle brightness compensation
- Half-press the shutter to check the exposure meter; if the meter shows overexposure, raise your shutter speed to 1/1000s
- Shoot in burst mode (hold the shutter button) to capture the peak moment
EXIF reference: Frozen athlete shot — 1/1000s | f/4 | ISO 400 | 85mm lens
One important note on ISO: if you’re shooting in bright sunlight, ISO 100–200 is sufficient. Move indoors or into shade, and you’ll need ISO 400–800 to compensate for the fast shutter speed eating into your available light.
Motion Blur with Slow Shutter Speeds
Slow shutter speeds — generally 1/30s and below — do the opposite: they record movement as a beautiful, intentional blur. This isn’t a mistake. It’s a creative technique used by professional photographers to convey speed, tranquility, or the passage of time.
The key is keeping your camera completely still while the subject moves. This is why a tripod is essential for slow shutter work. The camera must be stationary — only the subject should be in motion.
When to use slow shutter speeds:
- Silky waterfalls: 1/4s–2s transforms choppy water into smooth, flowing silk
- Light trails from cars: 5s–30s paints streaks of red and white light across city streets
- Star trails: 30s–several minutes (with a remote shutter release) traces the arc of stars
- Panning a moving subject: 1/30s–1/60s (see next section)
- Step-by-step: Shoot a silky waterfall
- Mount your camera on a tripod — this is non-negotiable for exposures longer than 1/60s
- Set to Shutter Priority (S/Tv) and dial in 1/2s as your starting point
- Set ISO to 100 (lowest available) to prevent overexposure
- Use a small aperture (f/11–f/16) to reduce light further and allow the slow shutter
- Use your camera’s 2-second self-timer (or a remote trigger) to avoid camera shake from pressing the button
- Review the shot: if the water looks frozen, slow down to 1/4s or 1s; if it’s blown out (too bright), increase aperture to f/16 or f/22
EXIF reference: Waterfall shot — 1/2s | f/11 | ISO 100 | 24mm lens | Tripod
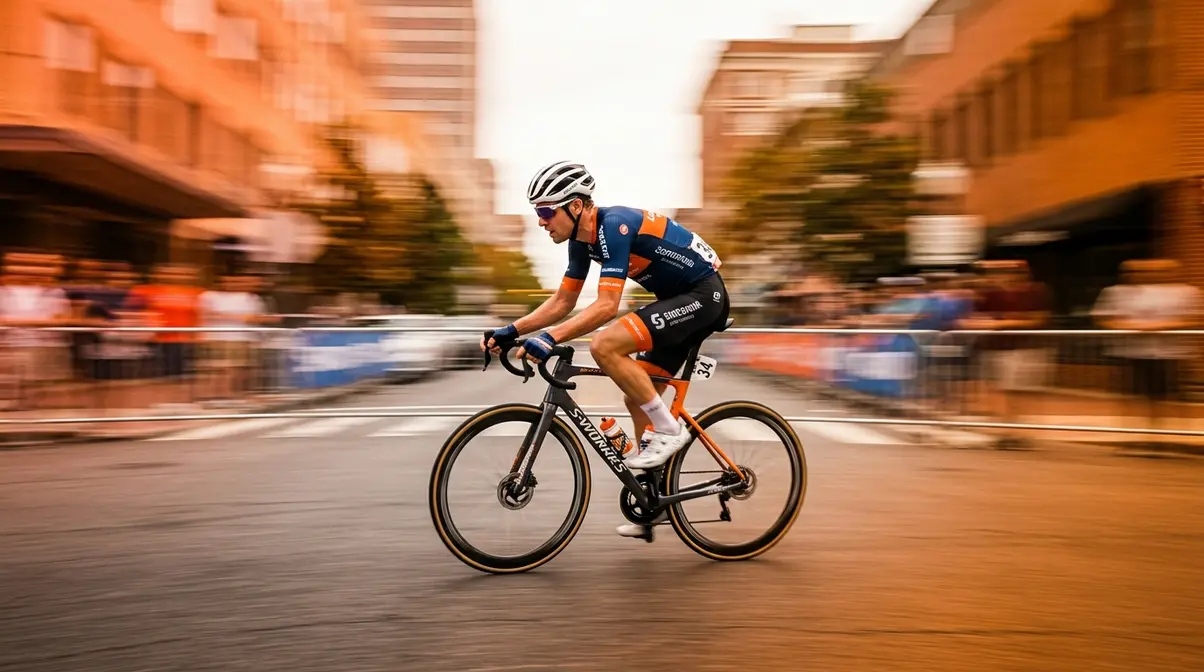
Panning for Blurred Backgrounds
Panning is a technique that sits in the middle of the Freeze-Flow Spectrum — and it’s one of the most visually striking effects in photography. You move the camera to track a moving subject while using a moderate shutter speed. The result: the subject is relatively sharp, but the background blurs into horizontal streaks that convey incredible speed. For a dedicated walkthrough of this technique, check out our panning photography beginners guide.
- Step-by-step: Pan a cyclist
- Set shutter speed to 1/60s–1/125s (slower than you’d use to freeze, faster than you’d use for full blur)
- Pre-focus on the spot where the subject will pass
- As the subject enters the frame, rotate your body smoothly from the hips — tracking the subject’s movement
- Press the shutter while continuing the rotation — don’t stop moving when you shoot
- Follow through: keep rotating even after the shot fires
Panning takes practice. Expect to shoot 20–30 frames before getting a clean result. The general rule is that a slower shutter speed creates more dramatic background blur — but also makes it harder to keep the subject sharp. Start at 1/125s and work slower as your technique improves.
Practical Shutter Speed Settings Chart
Knowing the theory is one thing. Knowing exactly which number to dial in when you’re standing in front of a waterfall — or watching your kid sprint across a soccer field — is another. This section gives you the practical reference tools to make those decisions fast. Canon’s technique guide recommends building a mental library of go-to settings for your most common shooting situations, which is exactly what this section provides.
Reciprocal Rule: Avoid Camera Shake
Camera shake is one of the most common culprits for shots that aren’t sharp — and it has nothing to do with your subject moving. It’s caused by the tiny vibrations of your own hands while holding the camera. The Reciprocal Rule is the general rule photographers use to find the minimum safe handheld shutter speed.
The rule: Your minimum shutter speed should be 1 ÷ your focal length.
- Shooting with a 50mm lens? Minimum safe handheld speed = 1/50s (use 1/60s, the nearest standard stop)
- Shooting with a 200mm telephoto? Minimum = 1/200s
- Shooting with a 24mm wide-angle? Minimum = 1/24s (use 1/30s)
Why focal length matters: Longer lenses magnify both your subject and any camera shake. A tiny hand tremor that’s invisible at 24mm becomes a blurry mess at 200mm.
Important adjustment for crop-sensor cameras: If your camera has an APS-C sensor (common in entry-level DSLRs and mirrorless cameras), multiply your focal length by 1.5x (Nikon/Sony) or 1.6x (Canon) to find the effective focal length. A 50mm lens on a crop-sensor Canon behaves like an 80mm lens — so your minimum safe speed becomes 1/80s.
If your camera or lens has image stabilization (IS/VR/OIS): You can typically go 2–4 stops slower than the reciprocal rule suggests. A stabilized 50mm lens might be safely handheld at 1/15s in good conditions.
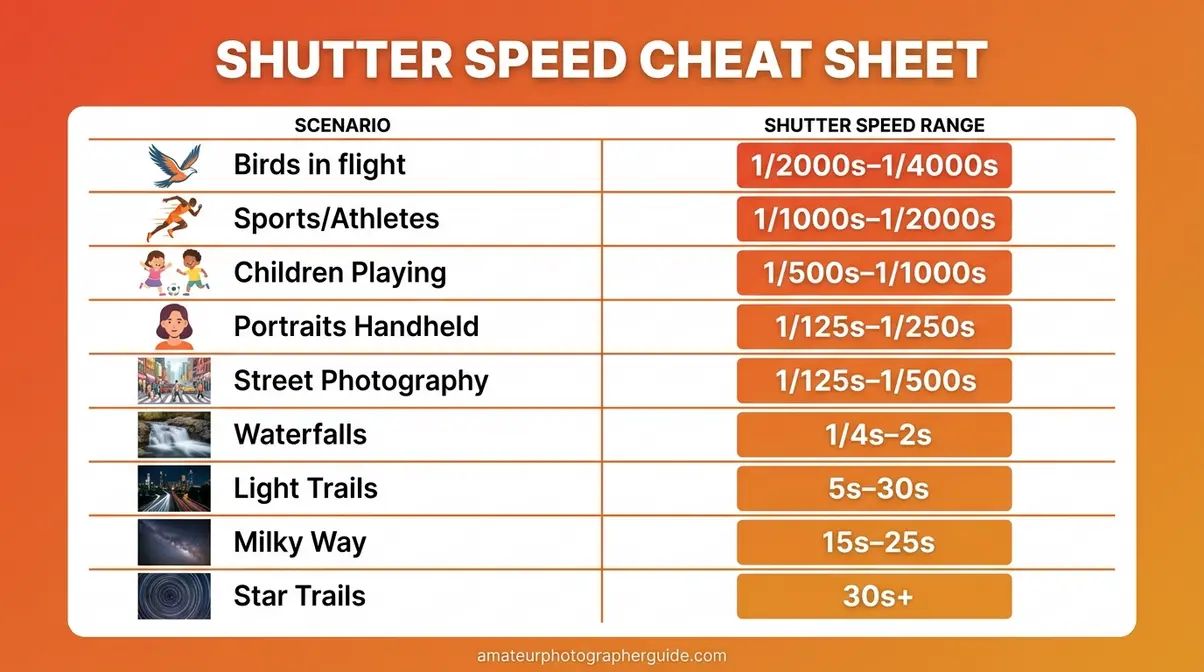
Shutter Speed Settings Cheat Sheet
Our team compiled this reference guide across common photography scenarios — use it as your go-to field reference:
| Situation | Recommended Speed | Freeze-Flow Position |
|---|---|---|
| Birds in flight | 1/2000s–1/4000s | Full Freeze |
| Sports / athletes | 1/1000s–1/2000s | Full Freeze |
| Children playing | 1/500s–1/1000s | Freeze |
| Handheld portraits | 1/125s–1/250s | Neutral |
| Street photography | 1/125s–1/500s | Neutral–Freeze |
| Silky waterfall | 1/4s–2s | Flow |
| Car light trails | 5s–30s | Full Flow |
| Milky Way | 15s–25s | Full Flow |
| Star trails | 30s+ | Full Flow |
Using Shutter Priority Mode (S/Tv)
Shutter Priority mode is the fastest way to practice controlling motion without worrying about every setting at once. You set the shutter speed; the camera automatically adjusts aperture to maintain correct exposure. It’s the ideal training mode for beginners experimenting with the Freeze-Flow Spectrum. If you are unsure where this dial is located, see our tutorial on how to change the shutter speed on a Canon camera (the process is similar for Nikon and Sony).
- How to activate it:
- Nikon / Sony / Fujifilm: Rotate the mode dial to S
- Canon: Rotate the mode dial to Tv (Time Value)
- Step-by-step workflow in Shutter Priority:
- Turn the mode dial to S or Tv
- Rotate the main command dial to select your target shutter speed
- Set ISO to Auto initially — the camera handles sensitivity
- Half-press the shutter to check the exposure; if the aperture readout shows a warning (or blinks), the camera can’t achieve correct exposure — adjust ISO or move to better light
- Take the shot and review on the LCD screen; adjust shutter speed up or down based on the motion result
One limitation worth knowing: in very bright conditions, Shutter Priority can push your aperture to its minimum (e.g., f/22), which can actually reduce sharpness due to a phenomenon called diffraction. If you notice soft images in bright light, switch to Manual mode and add a neutral density (ND) filter — a dark piece of glass that reduces light without affecting color — to allow slower shutter speeds outdoors. Once you are comfortable with Shutter Priority, you can transition to full manual camera settings for total creative control.
Video Shutter Speed: 180-Degree Rule
Video shutter speed follows completely different rules than photography — and getting it wrong is the single most common reason beginner video footage looks “off” without the creator knowing why. Understanding the 180-Degree Rule takes about two minutes to learn and immediately makes your footage look more cinematic. B&H Photo’s exposure guide covers this relationship as a fundamental principle of video production.
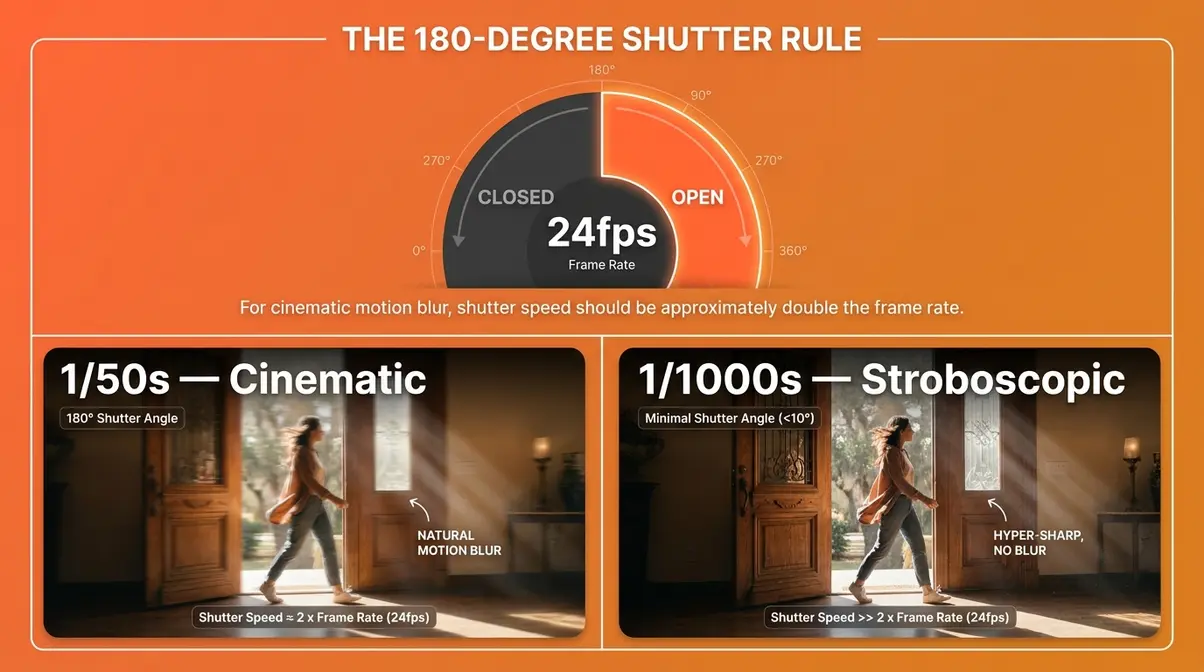
The 180-Degree Shutter Rule
The 180-Degree Rule is a filmmaking convention that states your shutter speed should be set to approximately double your frame rate. This produces the natural motion blur that human eyes perceive as smooth, cinematic motion.
The rule comes from the physical design of film cameras, where the shutter was a rotating disc. A 180-degree opening meant the shutter was open for exactly half of each frame’s duration — creating the motion blur that films have used for over a century. Digital cameras inherited this standard because it matches what audiences expect from “cinematic” footage (The American Society of Cinematographers, ASC, cites this as a foundational exposure principle for motion picture production).
Why it matters: Shoot video at a shutter speed that’s too fast (like 1/1000s at 24fps) and your footage looks hyper-sharp and stroboscopic — the “soap opera effect” that makes everything look cheap. Too slow, and motion becomes excessively blurry and disorienting.
Frame Rate and Shutter Speed Table
Use this table to find your correct video shutter speed for every frame rate:
| Frame Rate | 180° Shutter Speed | Use Case |
|---|---|---|
| 24fps | 1/50s | Cinematic films, narrative video |
| 25fps | 1/50s | PAL standard (Europe, Australia) |
| 30fps | 1/60s | YouTube, social media, news |
| 60fps | 1/120s | Slow-motion playback at 24/30fps |
| 120fps | 1/250s | High-speed slow motion |
Practical challenge: In bright daylight, a shutter speed of 1/50s lets in a lot of light — far more than you’d use for a still photo. The solution is a Neutral Density (ND) filter: a dark glass filter that reduces incoming light by 2–10 stops without affecting color. Variable ND filters (around $50–$150 for a quality option) screw onto your lens and let you dial in exactly the right light reduction for any shooting condition.
- Step-by-step: Set up cinematic video
- Set your camera to Manual video mode (M)
- Set your frame rate first (24fps for cinematic look, 30fps for YouTube)
- Set shutter speed to double the frame rate (24fps → 1/50s; 30fps → 1/60s)
- Attach an ND filter if shooting outdoors in daylight
- Adjust ISO and aperture to achieve correct exposure with the shutter speed locked
Common Mistakes and How to Avoid Them
Even with the right knowledge, a few predictable mistakes trip up almost every beginner. Our evaluation of common beginner photography pain points — drawn from photography community forums and user reports — identified these as the most frequent issues:
Common Pitfalls
1. Using a slow shutter speed without a tripod
This is the most common culprit for shots that aren’t sharp. Any shutter speed below 1/60s requires camera support. Even the steadiest hands introduce enough camera shake to ruin your photo at slow speeds. Fix: always carry a small travel tripod or use a stable surface (wall, table, bag) for slow shutter work.
2. Forgetting to compensate the exposure triangle
You set a fast shutter speed to freeze action — and get a dark, underexposed image. This happens when you change shutter speed without adjusting aperture or ISO. Fix: use Shutter Priority mode (S/Tv) while learning, or check your exposure meter before every shot in Manual mode.
3. Confusing “faster number” with “faster speed”
1/60 is NOT faster than 1/1000. This confusion is extremely common and is the culprit for many accidental blurry shots. Remember the pizza slice rule: larger denominator = thinner slice = shorter (faster) exposure.
4. Ignoring the Reciprocal Rule
Shooting a 200mm telephoto lens at 1/60s will almost always produce a blurry mess from camera shake — even if your subject is perfectly still. The minimum safe speed for 200mm is 1/200s. Fix: always check your focal length before choosing a handheld shutter speed.
When to Seek Expert Help
If you’re consistently getting technically correct exposures but your photos still feel flat or uninteresting, that’s usually a composition or light issue — not a shutter speed problem. Consider a structured beginner photography course or workshop where an instructor can review your specific shots and identify the real culprit.
Frequently Asked Questions
Is 1/60 or 1/1000 Faster?
1/1000s is significantly faster than 1/60s. Shutter speeds are fractions — 1/1000 means one one-thousandth of a second, while 1/60 means one sixtieth of a second. Since 1/1000 is a much smaller fraction of time, the shutter opens and closes far more quickly. In practical terms, 1/1000s freezes fast action like athletes and birds, while 1/60s is closer to the minimum safe handheld speed for a standard lens. Think of it like pizza slices: a 1/1000 slice is much thinner than a 1/60 slice.
What Is Shutter Speed Used For?
Shutter speed controls two things simultaneously: brightness and motion. A faster shutter speed (1/500s or above) lets in less light and freezes moving subjects — ideal for sports, wildlife, and children. A slower shutter speed (1/30s or below) lets in more light and records movement as artistic blur — perfect for waterfalls, light trails, and night photography. Every shutter speed you choose is a position on the Freeze-Flow Spectrum, from completely frozen action to flowing, painterly motion. It’s also one leg of the Exposure Triangle alongside aperture and ISO.
What is the rule for handheld shooting?
The Reciprocal Rule states that your minimum safe handheld shutter speed equals 1 divided by your focal length. For example, a 50mm lens requires at least 1/50s (use 1/60s in practice); a 200mm telephoto requires at least 1/200s. This rule exists because longer lenses magnify camera shake along with your subject. If your camera or lens has image stabilization, you can typically go 2–3 stops slower than the rule suggests. On crop-sensor cameras, multiply your focal length by 1.5x or 1.6x first, then apply the rule.
Is f/2.8 or f/4 better?
Neither is universally better — they serve different purposes. f/2.8 lets in twice as much light as f/4, which is valuable in low light and creates a shallower depth of field (more background blur, or “bokeh”). f/4 gives you slightly more of your scene in focus and is often sharper edge-to-edge on most lenses. For portraits in dim light, f/2.8 is the stronger choice. For landscape or group shots where you need everything sharp, f/4 (or smaller) is more appropriate. Your shutter speed choice will often drive which aperture you need to compensate the exposure.
The Bottom Line: Start With One Setting
Every concept in this guide — the Exposure Triangle, the Reciprocal Rule, the 180-Degree Rule — connects back to one core idea: The Freeze-Flow Spectrum. You’re not managing confusing fractions. You’re making a creative choice between stopping time and letting it flow. Shutter speed is the setting that makes that choice real.
The Freeze-Flow Spectrum is your mental shortcut for every shooting situation you’ll face. Ask yourself: do I want this moment frozen or flowing? The answer tells you which end of the dial to reach for — and the cheat sheet in this guide tells you exactly which number to use.
Now that you’ve had shutter speed explained from top to bottom, here’s your first assignment: put your camera in Shutter Priority mode (S or Tv), find a moving subject — a fan, a running pet, water from a tap — and shoot the same subject at 1/1000s and then at 1/10s. Compare the two images. That contrast, experienced firsthand, will teach you more than any explanation. Start there — one setting, one subject, two shots — and the rest of manual photography will begin to click into place.
