
Table of Contents
- What Is Golden Hour & Why Is It Magical?
- When Is Golden Hour? How to Find Your Window
- Your Camera Settings Cheat Sheet for Golden Hour
- Creative Techniques for Great Golden Hour Shots
- Golden Hour Photography by Genre
- Golden Hour vs. Blue Hour Photography
- When Golden Hour Fails (& What to Do)
- Frequently Asked Questions
This blog post may contain affiliate links. As an Amazon Associate I earn from qualifying purchases.
The light turns gold. Your heart rate spikes. You’re shooting — adjusting, reframing, firing the shutter — and then it’s gone. One moment the scene looked like something off a gallery wall, and the next it’s flat and ordinary again. If that panicky feeling sounds familiar, you’re not alone. Every photographer who has ever raced against the light knows the frustration of guessing through it.
The problem isn’t your eye or your camera — it’s the absence of a clear system. Other photographers post dreamy golden hour portraits while yours come back overexposed or lifeless. They seem to nail the shot effortlessly; you feel like you’re reacting to the light rather than using it. This guide changes that.
By the end of this field guide, you’ll have specific, tested camera settings for every golden hour scenario, a planning system that eliminates the pre-shoot panic, and creative techniques that transform good light into pure magic. You’ll cover the science behind why the light behaves the way it does, how to find your exact window every time, genre-specific applications, and what to do when conditions don’t cooperate.
Golden hour photography delivers soft, warm, directional light that flatters subjects and adds depth — but only if you know how to capture it before the window closes.
- Start at ISO 100–400 and raise it only as the light fades toward the horizon
- Portraits: f/2.8, 1/500s | Landscapes: f/11–f/16, 1/30s | Silhouettes: f/14, 1/1000s
- Use a planning app (PhotoPills, The Photographer’s Ephemeris) to calculate exact golden hour times for your location
- The Settings Triangle — ISO, aperture, and shutter speed — is your proportional anchor when the light shifts unexpectedly mid-shoot
What Is Golden Hour & Why Is It Magical?
Golden hour photography is the practice of shooting during the first and last hour of sunlight — the brief window after sunrise and before sunset when the light is soft, warm, and directional. Those three qualities work together to create images that feel cinematic and emotionally resonant. For photographers, it’s one of the few times the natural world does the heavy lighting work for you.
Understanding why the light behaves this way turns it from a happy accident into something you can anticipate and control.
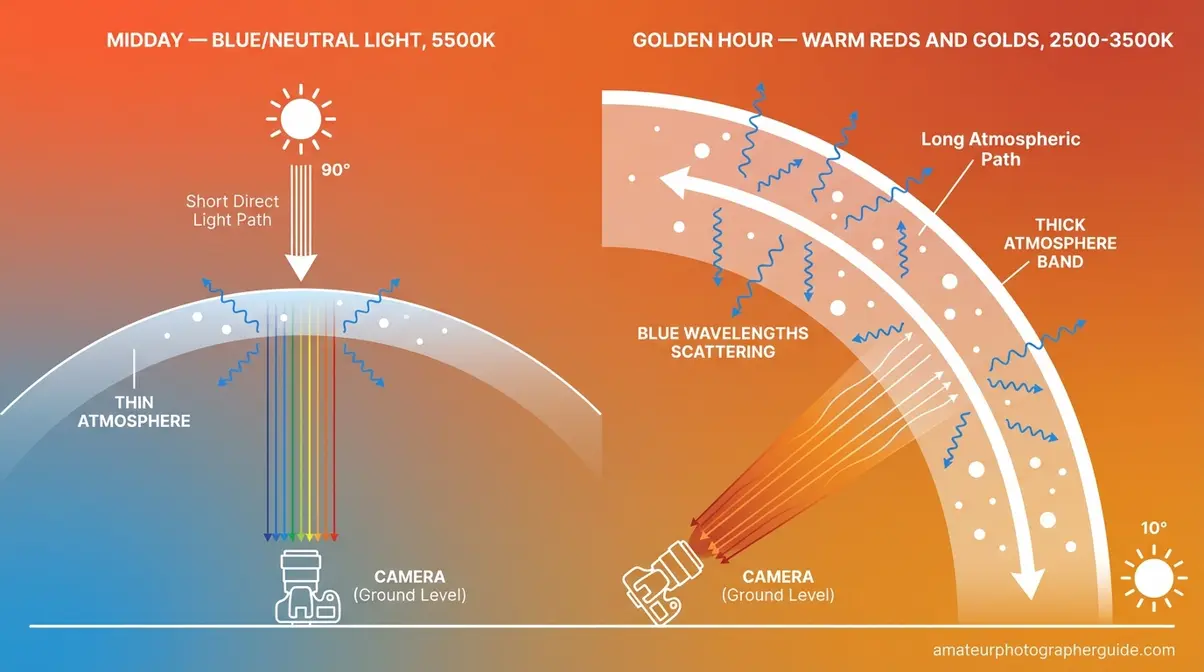
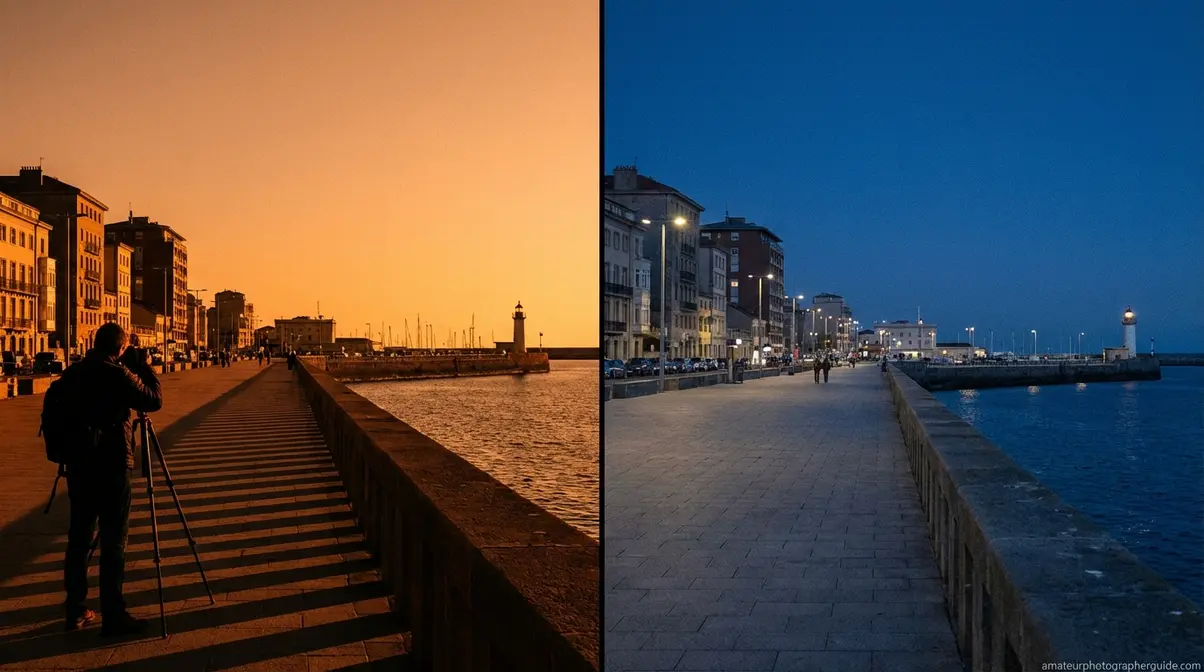
Caption: When the sun sits low on the horizon, its light travels through far more atmosphere than at midday — scattering blue wavelengths and leaving warm reds and golds to reach your sensor.
The Physics Behind the Warmth
At midday, sunlight travels through a relatively thin slice of atmosphere to reach your camera. At golden hour, the sun sits at a low angle — roughly 5–15° above the horizon — and its light must pass through a dramatically longer atmospheric path. During that extended journey, blue and violet wavelengths scatter away through a process called Rayleigh Scattering, the optical phenomenon that explains why sunset and sunrise skies glow warm. What remains is a concentration of warm reds, oranges, and yellows that registers beautifully on any sensor. Utah State University research confirms that Rayleigh Scattering filters out blue wavelengths when sunlight travels through more atmosphere at low angles, leaving warm tones dominant at sunrise and sunset (Utah State University, 2023).
Golden hour light is warm because Rayleigh Scattering filters out blue wavelengths when sunlight travels through more atmosphere at low angles, leaving the warm reds and yellows that make photographs look magical.
The lower angle also softens the light. Instead of a direct overhead beam, you get a broad, raking source that wraps around subjects gently — think of it as a natural softbox positioned at a 10–20° angle. That’s the directional quality professional photographers spend thousands of dollars replicating in a studio.
Golden Hour vs. Midday Light
Shoot the same person at noon and at 6:45 pm with identical camera settings, and you’ll get two completely different photographs. Adobe’s photography guide describes golden hour light as soft, warm, and directional — all qualities that midday light conspicuously lacks.
| Quality | Midday Light | Golden Hour Light |
|---|---|---|
| Direction | Overhead (90°) | Low angle (5–15°) |
| Hardness | Harsh, creates deep shadows | Soft, diffused, flattering |
| Color Temperature | Cool/neutral (5500–6000K) | Warm (2500–3500K) |
| Shadow Length | Short, unflattering | Long, dramatic, adds depth |
| Dynamic Range Challenge | Extreme — very hard to expose | Manageable with technique |
At midday, faces develop dark raccoon shadows under the eyes and chin. Reflective surfaces blow out. Landscapes look compressed and flat because there’s no raking light to reveal texture. Golden hour light sculpts rather than flattens — the same scene gains dimension simply because the sun moved 75° lower in the sky.
Once you notice the difference, you genuinely can’t unsee it.
Morning vs. Evening Golden Hour
Both produce scientifically similar light — warm, low-angle, Rayleigh-filtered. Color temperature may vary slightly based on atmospheric particulate in your location. The real distinctions are practical.
Morning golden hour tends to offer cleaner air, fewer people at popular spots, and a serene stillness that benefits landscape composition. However, the window can be shorter in many seasons, and convincing portrait clients to arrive before sunrise is a hard sell. Evening golden hour is more predictable: you can scout the location during the afternoon, the light arrives on schedule, and clients are awake.
A useful rule of thumb for golden hour morning photography: if stillness and empty foregrounds matter, go at dawn. If client sessions or street photography are your goal, stay for sunset — the light is equivalent and the logistics are far simpler.
When Is Golden Hour? How to Find Your Window

Golden hour doesn’t start at the same time every day, every week, or every season — and it doesn’t last the same duration. Understanding this is the difference between arriving ready and arriving late. Golden hour can last anywhere from 20 minutes near the equator in winter to 90+ minutes at higher latitudes in summer — making app-based planning essential for any serious shoot.
A Simple Formula for Your Golden Window
The baseline rule: golden hour begins approximately one hour after official sunrise and ends approximately one hour before official sunset. But “golden hour” is a loose term — the peak warmth window is often 20–40 minutes of richest color, bookended by softer transitional light on either side.
Season and latitude reshape that window dramatically. A photographer in Seattle in June can expect 90+ minutes of warm, usable golden hour photography time. The same photographer visiting Miami in December may have 25 intense minutes before the light transitions. This is precisely why a golden hour photography calculator app isn’t a luxury — it’s the difference between a productive shoot and a scramble.
The formula gives you a starting point. The apps give you precision. Precision is what separates a photographer who “gets lucky” from one who consistently nails the shot.
Top 3 Golden Hour Planning Apps
Testing across multiple pre-shoot planning sessions confirms that the right app changes how you work. Rather than guessing the optimal time and position, you know — exactly. The evaluation criteria for each app: map accuracy, AR visualization, push notification timing alerts, platform availability, and price-to-capability ratio.
| App | Platform | Key Feature | AR Mode? | Price | Best For |
|---|---|---|---|---|---|
| The Photographer’s Ephemeris | iOS, Android, Web | Map-based sun/moon angle overlay | No | Free (web); paid app | Landscape pre-planning from home |
| PhotoPills | iOS, Android | AR sun visualizer + push alerts | Yes | ~$10.99 one-time | Advanced, field-level planning |
| Sun Surveyor | iOS, Android | Visual sun path + AR camera view | Yes | ~$9.99 one-time | Intermediate users, visual learners |
Golden hour calculator app reviews from FixThePhoto consistently recommend PhotoPills and The Photographer’s Ephemeris as the top tools for precise golden hour planning.
The Photographer’s Ephemeris (TPE) is the standard for landscape photographers. The web version is free and shows sun and moon positions overlaid on a map for any location and date — ideal for planning from your desk before you leave the house. You can see exactly which direction the light will come from and where shadows will fall.
PhotoPills, an advanced planning app used by professional landscape photographers, adds a real-time AR view: hold your phone up at the location and see the sun’s path projected onto the scene in front of you. Push notifications alert you when golden hour begins for your location. At $10.99, it’s the closest thing to a dedicated photography co-pilot.
Sun Surveyor hits the sweet spot for intermediate users. Its AR camera overlay shows the sun’s path visually, and the interface is more approachable than PhotoPills without sacrificing essential features.
Here’s a concrete workflow using TPE: open the web app and enter your planned location. Select your shoot date. TPE shows you the exact sun angle and direction at any time you choose. Identify when the sun will be 5–15° above the horizon. Mark that window, then work backward to set your arrival time.
Location Scouting: The Vital Step
Annie Leibovitz on natural light — world-renowned photographer Annie Leibovitz recommends observing how natural light changes throughout the day at your specific location before a shoot. This is the planning step every competitor guide glosses over, and it’s the one that most directly affects results.
Use your planning app’s map view at home to identify potential vantage points. Then complete one physical pre-visit during golden hour — not to shoot, but to observe. Notice where buildings or tree lines block the light. Find the angles that face west with a clean horizon. Mark two or three positions.
For finding golden hour photography near me on a practical level, the three-step scout works reliably:
- Use your app to check the sun angle and direction for your specific location and date
- Visit the location during golden hour once before your actual shoot to observe obstructions and light movement
- Mark 2–3 shooting positions and plan your sequence in advance
You’re now early, you’re in position, and the light is starting to turn golden. The question becomes: what do you actually dial in on your camera?
Your Camera Settings Cheat Sheet for Golden Hour
“You don’t fully know why it worked one second ago and doesn’t now.”
— A common frustration shared across photography communities
That feeling has a fix. It’s not luck — it’s understanding how ISO, aperture, and shutter speed work together as a triangle, not as three independent dials. The moment you treat them as a proportional system, the “why did it stop working” problem dissolves.
The Settings Triangle: Your Starting Point
The Settings Triangle — the proportional relationship between ISO, aperture, and shutter speed — is your adjustable anchor when golden hour light shifts rapidly. Change one element and at least one other must compensate. This is the framework that replaces guessing.
Here’s how each point of the triangle behaves in golden hour conditions:
- ISO: Keep it at 100–400 while light is good. ISO controls sensor sensitivity — lower means cleaner images with no digital grain. Raise it only as the light fades.
- Aperture: Wide (f/1.8–f/4) for portraits — separates your subject from the background. Narrow (f/8–f/16) for landscapes — keeps everything sharp from foreground to horizon.
- Shutter Speed: Fast (1/250s or higher) for handheld shooting and subject motion. Slow (1/30s or below, on a tripod) for landscapes and long-exposure water effects.
The adjustment chain works like this: the sun drops 10° and light falls by roughly half. Your first move is to open the aperture one stop — f/2.8 becomes f/2.0. If that’s not enough, bump ISO from 100 to 200. Only as a last resort do you slow the shutter, and only if camera shake and motion aren’t concerns.
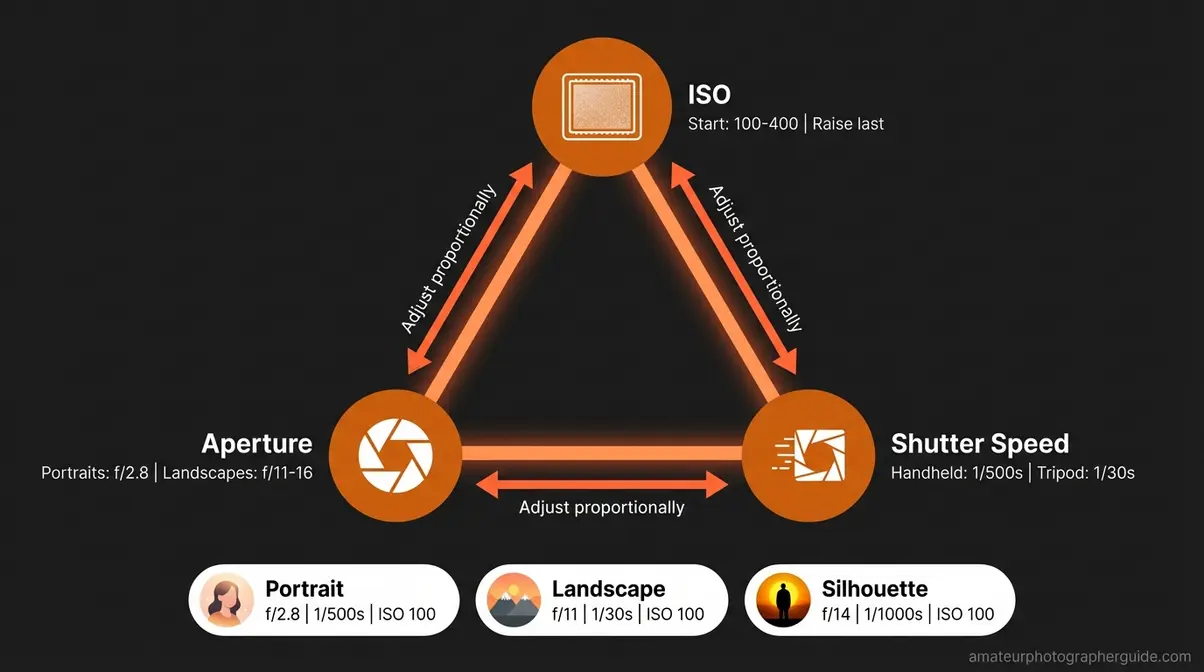
Caption: The Settings Triangle keeps your three exposure variables moving together — adjust one, and the other two respond proportionally.
With the Triangle in mind, here are the exact starting settings for the three most common golden hour scenarios.
Settings for Portraits
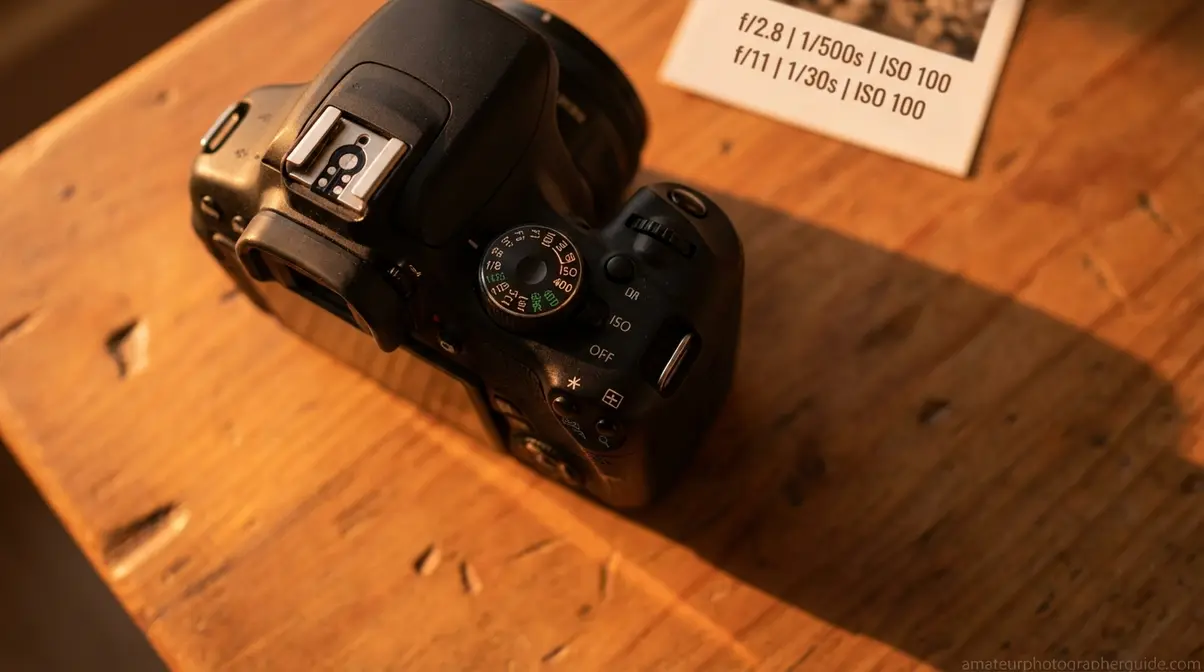
For golden hour portrait photography, start at f/2.8, 1/500s, and ISO 100 — a triangle that delivers sharp, properly exposed images and can be adjusted proportionally as the light fades.
SLR Lounge portrait guidance recommends wide apertures and careful metering mode selection for portrait backlighting during golden hour — both are baked into this starting triangle.
| Setting | Value | Why |
|---|---|---|
| Aperture | f/2.8 (or widest lens allows) | Separates subject from background; creates smooth bokeh |
| Shutter Speed | 1/500s | Freezes subject movement; sharp results handheld |
| ISO | 100 (raise to 400 max as light fades) | Maximum image quality, minimal digital noise |
| White Balance | Cloudy or Shade preset | Enhances warm tones; or set manually to ~3200K |
| Metering Mode | Evaluative/Matrix | Reads whole scene; switch to Spot if backlighting is strong |
The key portrait challenge at golden hour is backlighting — the sun behind your subject means the face can go dark. Switch to Spot metering pointed at the face, or use fill flash set to -1 to -2 EV to balance the exposure without killing the rim-light effect.
When you’re genuinely unsure, use exposure bracketing — shooting 3 frames at -1, 0, and +1 EV gives you insurance. In Lightroom, you pick the best or blend them. A golden hour portrait session at f/2.8, 1/500s, ISO 100 on a 50mm f/1.8 lens produces exactly the shot that makes clients say “dreamy” — a sharp subject, beautifully separated background, glowing skin tones.
Portraits need speed and sharpness. Landscapes need the opposite.
Settings for Landscapes
The philosophy shifts entirely for landscapes. Where portraits prioritize subject isolation, landscapes demand maximum depth of field — everything crisp from the nearest rock to the furthest mountain.
| Setting | Value | Why |
|---|---|---|
| Aperture | f/11–f/16 | Maximum depth of field — everything sharp from foreground to horizon |
| Shutter Speed | 1/30s or slower (tripod required) | Maximizes light intake; enables silky water and motion effects |
| ISO | 100 | Always lowest native ISO for cleanest result; tripod eliminates blur risk |
| White Balance | Auto or ~3500K manual | Captures warm tones accurately; fine-tune in Lightroom |
| Metering Mode | Evaluative/Matrix | Good overall read; watch highlight warning on sky |
The Nikon School landscape guide recommends f/11 to f/16 at the lowest native ISO for landscape photography — this represents the “sweet spot” for most lenses where diffraction hasn’t yet softened the image, and depth of field covers your entire scene.
Dynamic range is your main technical hurdle. At golden hour, the sky is often 3–5 stops brighter than the foreground. Use a 3-stop graduated ND filter over the sky, or bracket your exposures at -1, 0, and +1 EV, then merge them in Lightroom’s HDR module. Never let the sky blow out — expose for the highlights and recover the shadows in post.
A practical golden hour landscape workflow: tripod set, f/16, 1/30s, ISO 100, graduated ND on the sky, bracketed exposures fired. Merge in Lightroom. This produces a technically clean image that competitor guides — shooting handheld at f/5.6 and guessing — simply can’t match.
Settings for Silhouettes
Silhouettes require a counterintuitive mindset shift: you are intentionally underexposing your subject. The sky is your canvas; the person or object in front of you becomes a dark, graphic shape defined entirely by outline.
| Setting | Value | Why |
|---|---|---|
| Aperture | f/11–f/16 | Sharp sky detail; subject sharpness is secondary |
| Shutter Speed | 1/500s–1/1000s | Captures a sharply defined subject outline against the sky |
| ISO | 100 | Maximum quality; bright sky conditions don’t require sensitivity |
| Metering Mode | Spot — meter on the sky | Never meter on the subject — they become dark by design |
Meter on the sky, not the subject. If your subject is properly exposed, you’ve done it wrong. Aim for the sky to be 1–2 stops under your usual “correct” exposure — this saturates the orange and gold tones dramatically.
Stand your subject between you and the sun. Lock exposure on the bright sky to the left of the sun. Recompose and fire. The subject becomes a dramatic, dark shape against a rich gradient of color. The best camera settings for golden hour photography in silhouette mode are the ones that serve the sky, not the person.
What ISO Should I Use for Golden Hour?
Start with ISO 100 for golden hour photography to achieve maximum image quality and minimal digital noise. This low setting works because golden hour provides generous natural light, so your sensor doesn’t need elevated sensitivity. As the sun drops further toward the horizon and light levels fall, gradually raise your ISO — first to 200, then 400 — only as needed to maintain a sharp handheld shutter speed. Keep raising ISO as a last resort after you’ve already opened the aperture.
WB, Metering & iPhone Settings
Three remaining controls that photographers consistently overlook — and each one meaningfully affects the final image.
White Balance: Set your white balance to “Cloudy” or “Shade” preset (approximately 6000–7000K) to enhance the warm golden tones. Auto White Balance is your enemy here — the camera is designed to neutralize color casts, which means it actively works to remove the warmth you’re trying to capture. The cleaner solution: shoot RAW and adjust white balance in Lightroom after the shoot, where you have full non-destructive control.
Metering Mode: Evaluative or Matrix metering handles most golden hour scenarios reliably. Switch to Spot metering when strong backlighting creates extreme contrast between your subject and the background — the camera’s broad-scene averaging will otherwise underexpose the subject significantly.
iPhone/Smartphone Settings (golden hour photo settings iPhone): Use Portrait mode for a shallow depth-of-field effect. Long-press on your subject to lock AE/AF — this prevents the camera from continuously re-exposing as clouds move or you reframe. Swipe down on the exposure slider if highlights are clipping. For maximum post-processing control on iPhone 12 Pro and later, enable Apple ProRAW in Camera settings — the dynamic range advantage over JPEG is substantial during the high-contrast conditions of golden hour.
Creative Techniques for Great Golden Hour Shots
The light starts to shift. You’ve checked your Settings Triangle, your histogram looks clean, and the exposure is dialed. Here’s where most photographers stay in “technical mode” — reviewing screens, adjusting settings, checking focus. The photographers who get the exceptional shots are already thinking about what they’re pointing the camera at and why.
When your Settings Triangle is second nature, your mental energy moves from “how am I exposing this” to “what am I actually composing.” That transition is when golden hour photography stops feeling like a scramble and starts feeling like creative work.
Essential Golden Hour Photography Tips
These seven tips represent the highest-impact actions across any genre or experience level. Follow them to act on your knowledge immediately:
- Arrive 30 minutes before golden hour begins. Setup, metering checks, and location adjustments eat the first 10–15 minutes. Arrive late and you’re reacting instead of shooting.
- Start with your Settings Triangle. ISO 100, f/2.8 for portraits or f/11 for landscapes, 1/500s handheld or 1/30s on tripod. Adjust from there as light changes.
- Use the sun as a deliberate light source. Position it behind or beside your subject — not in front. The sun is a second lighting instrument, not an obstacle.
- Shoot in RAW format. White balance adjustments that would destroy a JPEG are non-destructive in RAW. This alone recovers shots that would otherwise be discarded.
- Take far more frames than you think you need. The light changes meaningfully every 2–3 minutes. A 30-minute window is 10+ distinct lighting conditions — each worth capturing.
- Adjust your settings proactively. Don’t wait until shots are dark to react. Watch the light with your eye, not just through the viewfinder, and adjust every few minutes.
- Scout your location before the actual shoot. Use PhotoPills or TPE to plan; visit once during golden hour to observe the light in person before your real session.
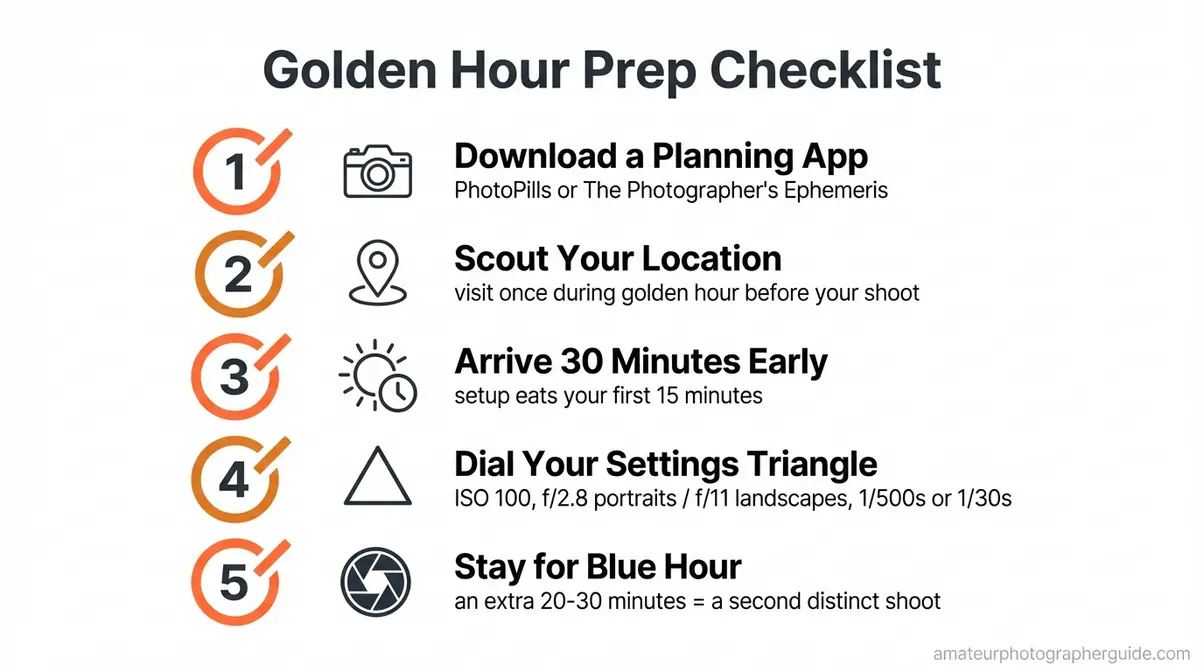
Caption: A pre-shoot checklist eliminates the setup scramble and protects the most valuable minutes of the golden hour window.
Using Backlighting and Rim Light
Backlighting during golden hour creates a natural rim-light effect around subjects that studio photographers spend thousands of dollars replicating with artificial lighting. This is the technique behind every glowing hair portrait you’ve admired online — and it requires nothing more than positioning.
Place your subject so the sun sits directly behind them, or at a 45° angle behind and to one side. The sun rim-lights the edges — hair, shoulders, the outline of skin — creating a luminous glow that is physically impossible to achieve in any other lighting condition. The physics of light polarization confirms why natural light at low angles produces this distinctive visual quality — the polarization and directional coherence of low-angle sunlight creates specular highlights that diffuse artificial light cannot replicate (AIP Conference Proceedings, 2022).
The exposure challenge: your camera wants to expose for the bright background, leaving the face dark. Switch to Spot metering and point it at the face. If the face still looks dark, use fill flash at -2 EV or a gold reflector bounced toward the face. The goal is to lift the face without eliminating the rim-light effect.
Practical shot: position your subject facing you, sun at their back, shoot at 200mm from 15 feet away. Spot-meter on the face. The result is an editorial-quality portrait with a natural light glow that no preset can manufacture.
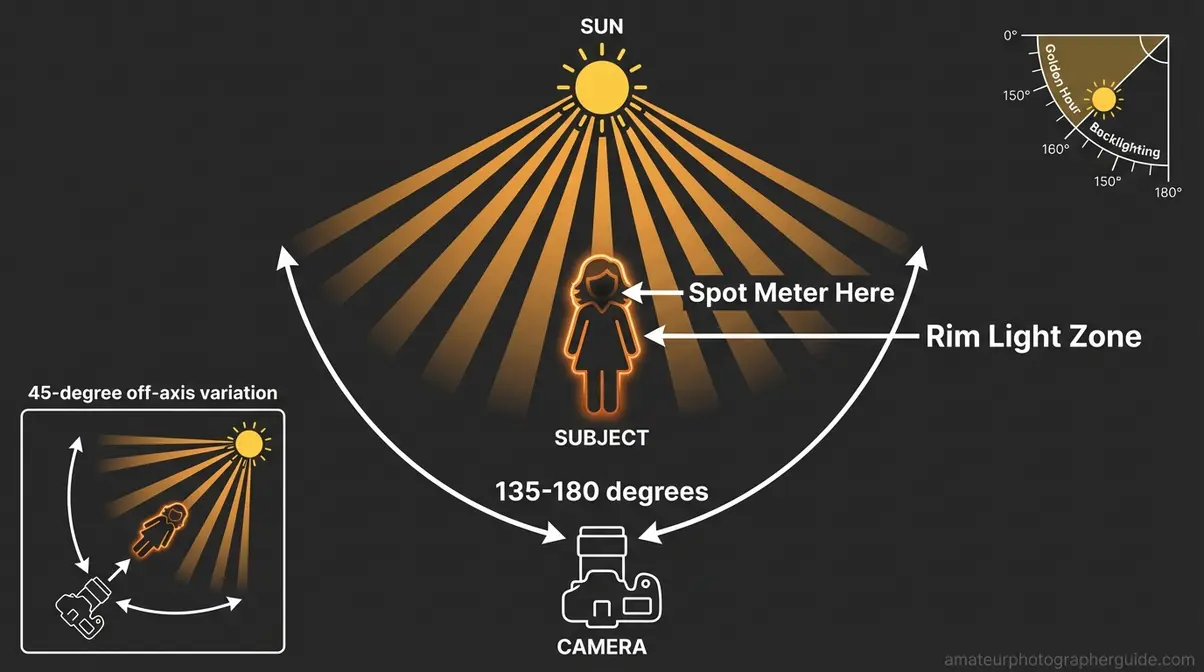
Caption: Rim light is created by positioning the sun 135–180° behind your subject — the farther back, the more defined the glow along the edges.
Backlighting is one technique. Silhouettes take it further — removing all subject detail and letting shape do the storytelling.
Silhouettes, Sun Flare & Long Shadows
Three distinct creative approaches, each exploiting the low sun angle in a different way — golden hour photography ideas that reward deliberate intent over accidental discovery.
Silhouettes are about shape selection before they’re about camera technique. Choose subjects with a strong, recognizable outline: a person jumping, a bicycle, a lone tree against the sky, architectural geometry. The stronger and cleaner the outline, the more powerful the silhouette. Pair with the settings from the cheat sheet section and expose for the sky.
Sun flare is achieved by positioning the sun just at the edge of the frame, or partially obscured behind a subject or thin element like a leaf or fence post. A clean lens front element reduces chaotic, unwanted flare; a lens with some internal element complexity creates beautiful multi-colored geometric flare polygons. The key is compositional intent — include the sun deliberately or not at all. Accidental sun inclusion with no compositional purpose looks like a mistake.
Long shadows at golden hour stretch 3–5 times the height of the object casting them. This is compositional material, not a nuisance. Use shadow lines as leading lines toward your main subject. Photograph the shadow itself as the primary subject — a lone figure on a flat pavement with its shadow stretching dramatically away can be more striking than the person alone.
Composition & Working Changing Light
Golden hour creates ready-made compositional tools that midday light simply doesn’t offer. Long shadows become instant leading lines. Low-raking warm light rewards shooting from a low angle — get down to ground level and the warm light skims across textured surfaces (wet sand, grass, cobblestones) in a way no other light condition produces.
Frame for both shadow and lit areas in the same composition. The contrast between long dark shadow areas and warmly lit surfaces is the defining visual tension of golden hour landscape work — cropping either element out weakens the image.
Work the light actively rather than statically. As the sun drops, reposition relative to your subject every 3–5 minutes. Rotate 90°, change elevation, move closer or further. The best golden hour photographers are constantly in motion — they know the light transforms on a 3-minute cycle and treat each shift as a new frame rather than waiting for a single “perfect” moment.
Golden Hour Photography by Genre
The Settings Triangle is your foundation across every genre — what changes is the starting values and the creative priorities. A portrait photographer and a landscape photographer might stand in the same golden hour light and dial in completely different numbers, because they’re solving different problems with the same beautiful raw material.
Golden Hour Portrait Photography
Golden hour portrait photography rewards a specific approach to subject positioning. Rather than placing subjects facing the sun (which causes squinting and harsh front-lighting), work with the warm directional light at a 45–90° angle to the face. This produces side lighting that sculpts facial features — high cheekbones, strong jawlines — with a warmth that flatters virtually every skin tone.
Posing guidance: have your subject tilt their chin slightly toward the light source. This catches the warm light on the face without triggering a squint. Avoid asking subjects to look directly at the sun — it’s uncomfortable and the resulting expression reads as discomfort, not serenity.
Clothing matters more than photographers typically acknowledge. Neutral and warm tones (cream, tan, rust, blush) photograph beautifully against the warm color palette of golden hour. Cool-tone whites and blues fight the warmth of the scene — they create color discord that takes significant post-processing to resolve.
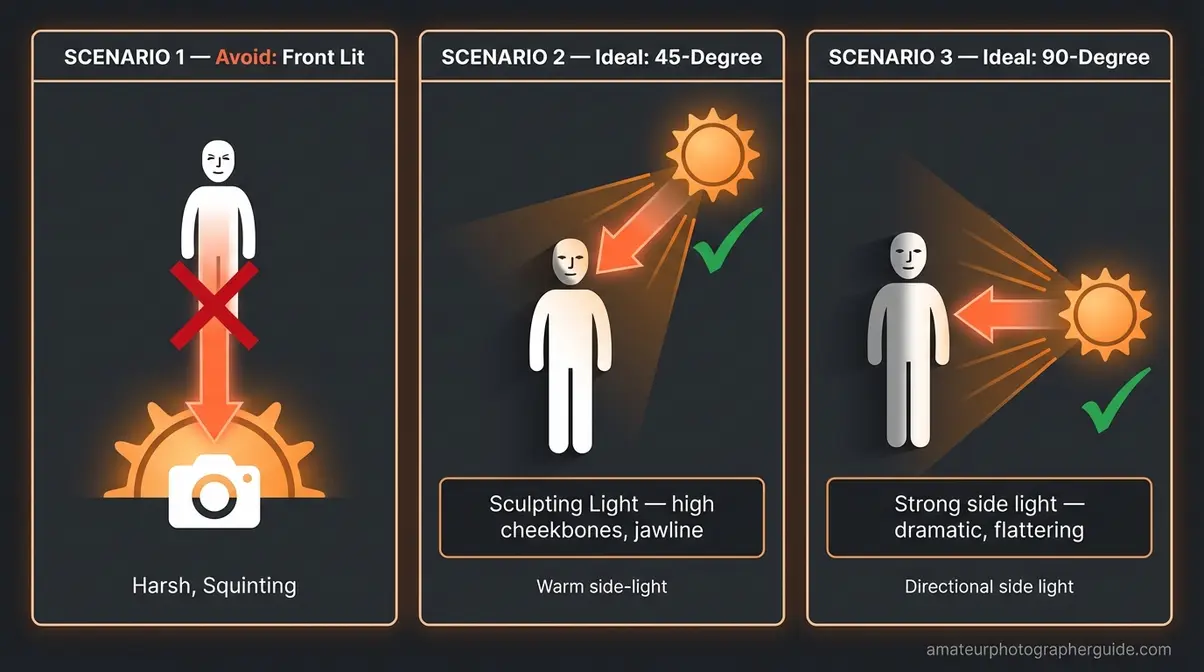
Caption: Positioning your subject at 45–90° to the sun produces flattering side light — avoid front-lit portraits, which flatten facial features.
Golden Hour Landscape Photography
Landscape work at golden hour is about texture and contrast management. Look for foreground elements that catch the low, raking light — wet sand, rocks, wildflowers, textured bark, or anything with surface detail. The warm light skims across these surfaces and reveals extraordinary texture that overhead midday light simply buries.
Compositionally, include both shadow zones and warmly lit areas in the same frame. The interplay between those long dark shadows and the sunlit surfaces creates the dynamic tension that defines golden hour landscape photography. Resist the instinct to expose for shadows and blow the highlights — expose for the highlights and recover the shadows in post, where the detail is recoverable.
Plan your compositions before the light peaks. Know where you want to shoot the orange sky, the deep-gold middle phase, and the blue-hour transition. Setting up mid-shoot eats time you don’t have — arrive with three compositions already planned and execute them in sequence as the light moves through its phases.
For Weddings, Street & Other Genres
Weddings: The most common mistake is letting the golden hour window pass without scheduling time for it. Coordinate with the couple and planner to carve out a firm 15–20 minute block for golden hour couple portraits — communicate the timing explicitly: “We need 15 minutes starting at 7:15 pm.” Across wedding photography communities, golden hour couple portraits are consistently among the most-requested images from a wedding day, and they require less artificial light and post-processing than any other lighting scenario.
Street photography: Golden hour transforms ordinary urban scenes into cinematic ones. Commuters backlit by the setting sun, storefronts bathed in warm orange, long personal shadows trailing across pavement — the same city block looks completely different. A 35mm or 50mm prime lens, set to f/5.6 or f/8 with a 1/500s shutter, covers most street scenarios without fuss.
Beach, architecture, cars: Each benefits from the same fundamental quality — low-angle warm light revealing surface texture and creating depth through shadow. Reference the appropriate settings from the cheat sheet section and apply the same Triangle logic.
Golden Hour vs. Blue Hour Photography
Understanding both windows makes you a significantly more intentional natural-light photographer. Blue hour produces a cool, even, shadowless light — the opposite of golden hour’s warm directional glow — making it ideal for architecture and cityscapes rather than portraits.
How Blue Hour Is Different
Blue hour, the short period immediately after sunset when the sky turns a deep, even blue and ambient light levels drop rapidly, begins approximately 20–30 minutes after the golden hour window closes (and precedes it at sunrise). The sun is below the horizon, but the sky is still illuminated by refracted light — producing a cool, even, shadowless blue glow that reads as serene, cinematic, and moody.
| Quality | Golden Hour | Blue Hour |
|---|---|---|
| Color Temperature | Warm (2500–3500K) | Cool (7000–10000K) |
| Light Direction | Low-angle, directional | Even, shadowless |
| Shadow Length | Long and dramatic | Minimal to none |
| Best For | Portraits, landscapes, silhouettes | Architecture, cityscapes, reflections |
| Mood | Warm, romantic, dramatic | Moody, calm, cinematic |
| Tripod Required? | Optional | Essential |
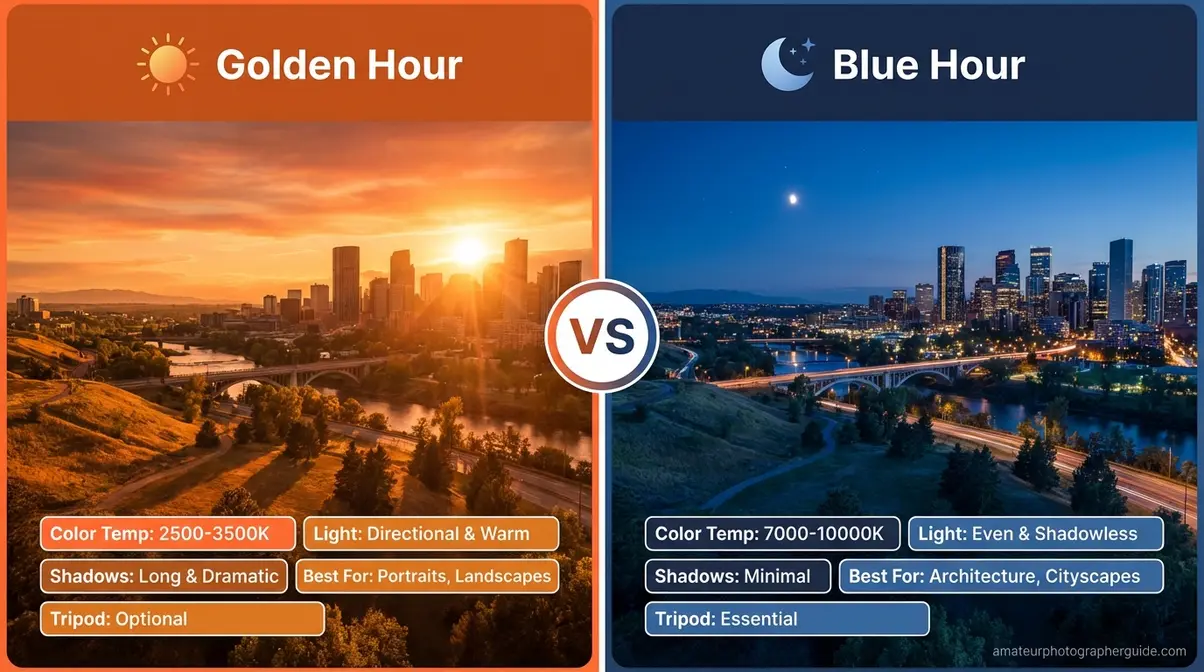
Caption: Golden hour (left) produces warm, directional light with long shadows; blue hour (right) replaces it with even, cool-toned light that eliminates shadows entirely.
The technical demands of blue hour are higher: light levels drop fast, so ISO climbs and a tripod becomes non-negotiable. Exposures of 5–30 seconds are common. The reward is an image quality and mood that golden hour simply can’t produce.
Choosing Blue Hour vs. Golden Hour
Choose golden hour when shooting people (portraits, weddings, families), when you want warm and romantic mood, when working handheld, or when landscape foreground texture is part of your composition.
Choose blue hour when shooting architecture with lit interiors (the ambient exterior light and interior artificial light reach equal brightness for about 10–15 minutes — the ideal exposure window for architectural interiors), urban cityscapes, reflections in water (the even light reduces surface glare dramatically), or when you’re working toward minimalist, abstract, or fine-art images with a cool palette.
The smartest move: don’t choose. Shoot both. Arrive for golden hour; stay for blue hour. Forty-five minutes of continuous shooting covers both windows and produces two completely distinct sets of images from a single location visit.
When Golden Hour Fails (& What to Do)
Overcast skies during golden hour remove the warm tones and dramatic shadows — but the diffused light they create is often more flattering for portrait photography than even clear golden hour conditions. That’s the perspective shift that transforms a “ruined shoot” into a productive one.
When the Conditions Aren’t Cooperating
Three environmental situations that consistently underdeliver — and what to do in each:
Overcast skies: Cloud cover blocks direct sunlight and scatters the warm wavelengths. Golden tones disappear, replaced by flat, neutral-grey light. The silver lining — genuinely — is that overcast clouds act as a massive natural diffuser. The resulting even, soft light is clinically flattering for portraits: no harsh shadows under eyes, no squinting, zero dynamic range challenge. Reframe the overcast session as a portrait opportunity rather than a failed golden hour.
Urban obstructions: Buildings, hills, and dense tree lines can block the low-angle sun before it ever reaches your subject. Golden hour at ground level in a dense city can be 30–40 minutes shorter than the calculated window. If golden-toned light matters for your shoot, prioritize locations with an unobstructed western horizon.
Seasonal and latitude issues: Higher latitudes in winter mean golden hour arrives cold and short — sometimes 20 minutes of usable light in near-freezing conditions. This isn’t a reason to avoid winter shooting; it’s a reason to have your settings pre-dialed before you leave the car.
Common Golden Hour Mistakes to Avoid
These five mistakes cost photographers great shots every single day. Luckily, all of them are preventable:
- Arriving at golden hour instead of before it. Setup, metering tests, and repositioning consume the first 10–15 minutes. Arrive 30 minutes early and those minutes become shooting time.
- Leaving when the sun disappears. Blue hour starts immediately after golden hour ends. Stay another 20–30 minutes — you’ll leave with an entirely different set of images.
- Leaving Auto White Balance on. The camera’s job is to neutralize color casts — it will actively remove the warm golden tones you came for. Set WB manually to Cloudy/Shade, or shoot RAW and control it in post.
- Staying in one position. Light shifts every 2–3 minutes. Move around your subject, change angles, change elevation. Static positioning produces static images.
- Forgetting to protect highlights. When in doubt, slightly underexpose — modern sensors recover shadow detail cleanly. Blown highlights are unrecoverable, regardless of format.
When to Shoot at Other Times Instead
Not every creative goal is best served by golden hour — and recognizing that is part of developing real photographic judgment:
- Overcast midday for portraits requiring even, shadow-free light that flatters all skin tones equally
- Blue hour for architecture, cityscapes, and any scene where lit interiors need to balance exterior ambient light
- Harsh midday light (deliberately) for high-contrast, gritty street photography where deep shadows are part of the aesthetic
- Indoor or studio settings when outdoor weather is consistently poor — artificial lighting is controllable in a way weather never is
Frequently Asked Questions
Are golden hour photos worth it?
Yes, golden hour photos are absolutely worth the planning. The soft, warm, directional light is naturally flattering, reduces harsh contrast, and adds a cinematic warmth that’s difficult to replicate. The low sun angle also creates long, dramatic shadows that add depth and dimension to landscapes and portraits. A short 20-minute window can produce an entire session’s worth of keeper images.
What shutter speed for golden hour?
For handheld golden hour photography, use a shutter speed between 1/250s and 1/500s as your starting point. This range freezes subject movement and eliminates camera shake reliably. If you’re shooting landscapes on a tripod, slow down to 1/30s or longer to maximize depth of field at a narrow aperture like f/16 and allow silky water effects in motion elements. Adjust your shutter speed proportionally whenever you change aperture or ISO — that’s the Triangle at work.
Why do photographers like golden hour?
Photographers love golden hour because the light is simultaneously soft, warm, and directional — a combination that’s nearly impossible to achieve with artificial lighting. The softness minimizes unflattering shadows on faces, the warm color adds mood, and the low-angle directional quality creates depth and natural rim-light effects. It is, functionally, a free and location-independent studio light upgrade available to anyone who shows up at the right time.
For amateur and enthusiast photographers, golden hour photography delivers the most flattering and dramatic natural light available — but only to those who plan and prepare for it. The warm, directional quality produced by Rayleigh Scattering at low sun angles creates soft, cinematic images that take significant artificial equipment to replicate in any other context. The most reliable approach: use a planning app to identify your exact window, apply The Settings Triangle as your starting point, stay through blue hour for a bonus session, and arrive 30 minutes early every time.
The Settings Triangle isn’t a rigid formula — it’s a proportional system. When the light shifts (and it shifts every 2–3 minutes), adjusting one variable tells you exactly what the other two need to do. That relational thinking is the specific insight that eliminates the “guessing” feeling described by photographers everywhere. ISO drops, aperture opens, shutter adjusts — the Triangle moves as a unit, not as three separate decisions made under pressure.
This week: download PhotoPills or The Photographer’s Ephemeris, open the app, and find the next golden hour time for your exact location. Screenshot the Settings Triangle infographic and save it to your phone. Then go — intentionally, with a scouted location and a planned starting exposure. One deliberate shoot with a clear framework produces more learning than a dozen panicked sessions chasing the light.
