
Table of Contents
- What Is Exposure in Photography?
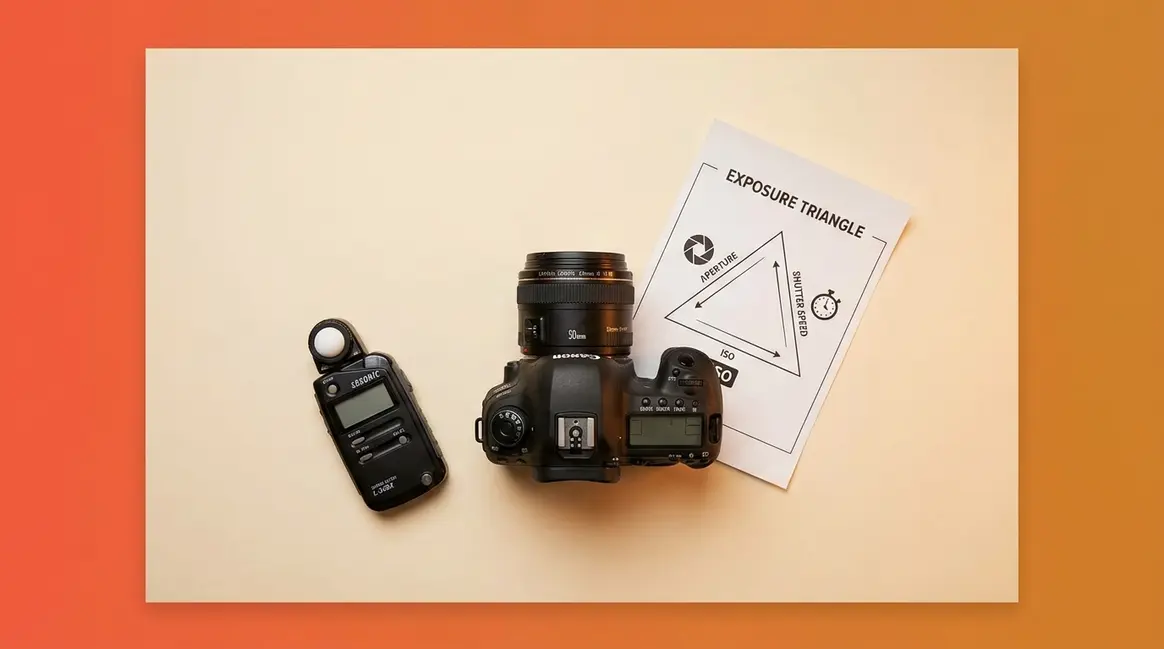
- The Exposure Triangle: Your Three Controls
- Fixing Common Exposure Problems
- Creative Exposure Techniques
- Books, Guides, and Resources for Further Learning
- Common Exposure Mistakes to Avoid
- Exposure Photography FAQs
- Moving Forward with Your Light Budget
- Exposure Quick Reference
This blog post may contain affiliate links. As an Amazon Associate I earn from qualifying purchases.
You pressed the shutter. Your photo came out looking nothing like what you saw. The problem isn’t your camera — it’s that no one explained exposure to you yet.
“Photography finally started making sense when I stopped memorizing settings… and started understanding LIGHT.”
Without understanding exposure, you’re leaving every shot to chance — and the gap between the photo you imagined and the one you actually got will keep widening. Understanding exposure photography is the single skill that separates photographers who get consistent results from those still stuck on auto.
By the end of this guide, you’ll know exactly how to control the brightness, sharpness, and mood of every photo you take — so you can stop shooting on auto and start shooting with intention. We’ll cover the fundamentals of exposure, the exposure triangle, fixing common problems, creative techniques, and the best resources for going deeper.
Before You Begin
You probably already have everything you need:
- A camera with manual or semi-manual modes (DSLR, mirrorless, or advanced compact — smartphone users can follow along using Pro/Manual mode)
- About 20 minutes to read through the guide
- Optional: a notepad to jot down your starting settings
- Optional: the free Exposure Cheat Sheet (download link in the Resources section)
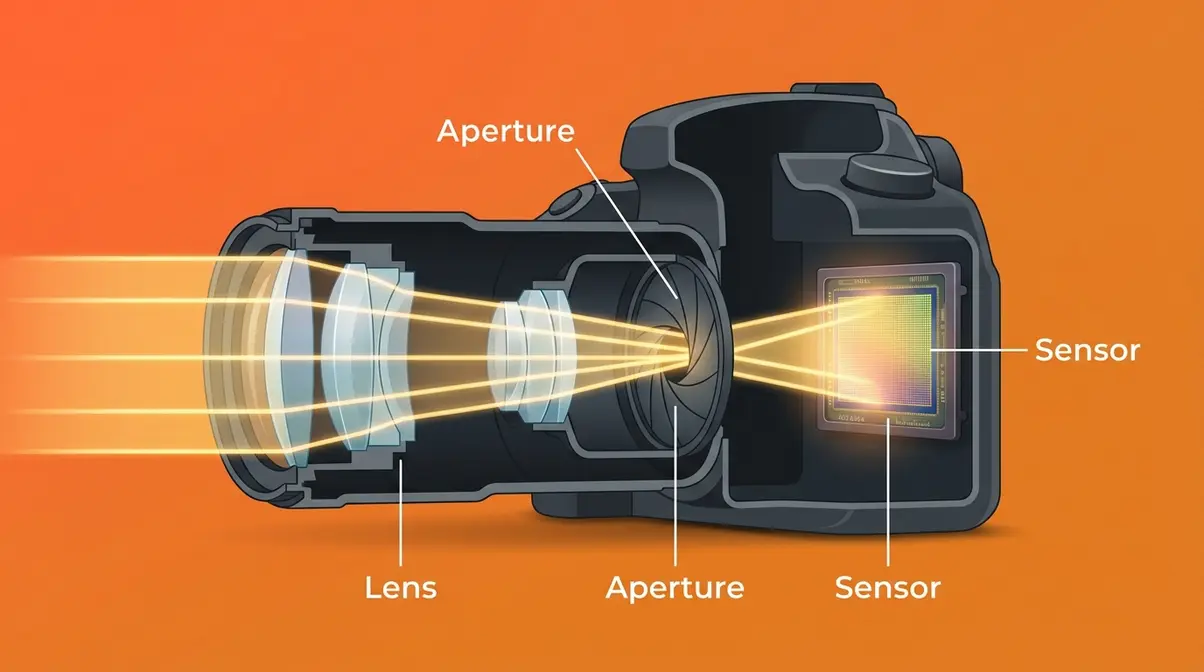
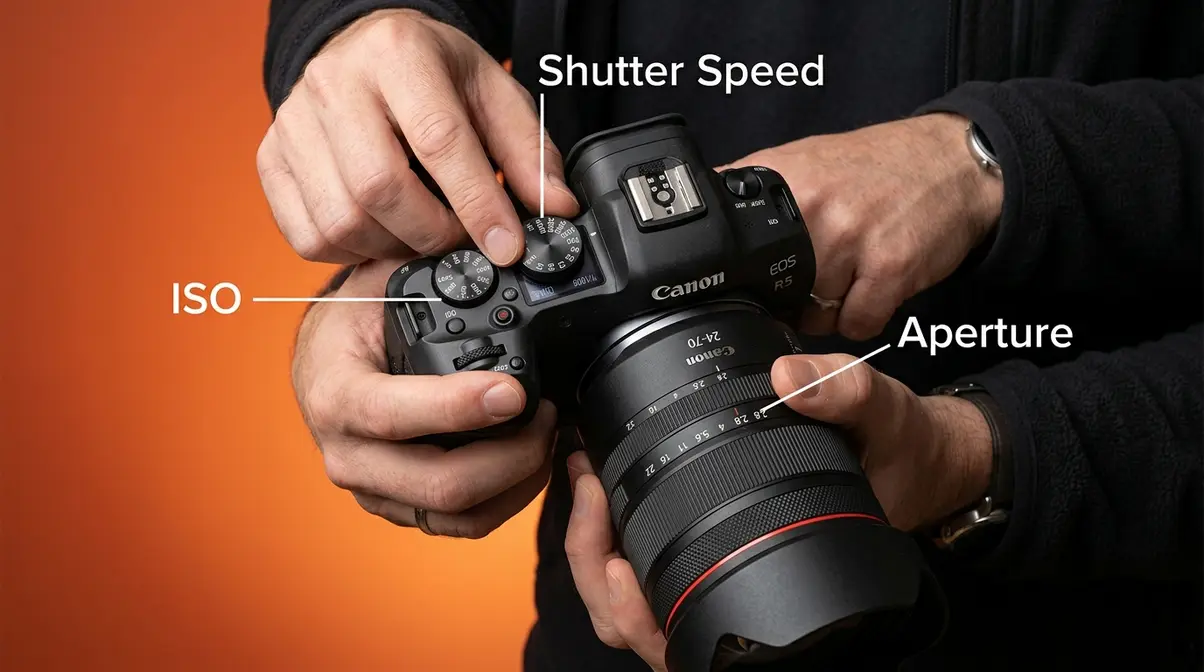
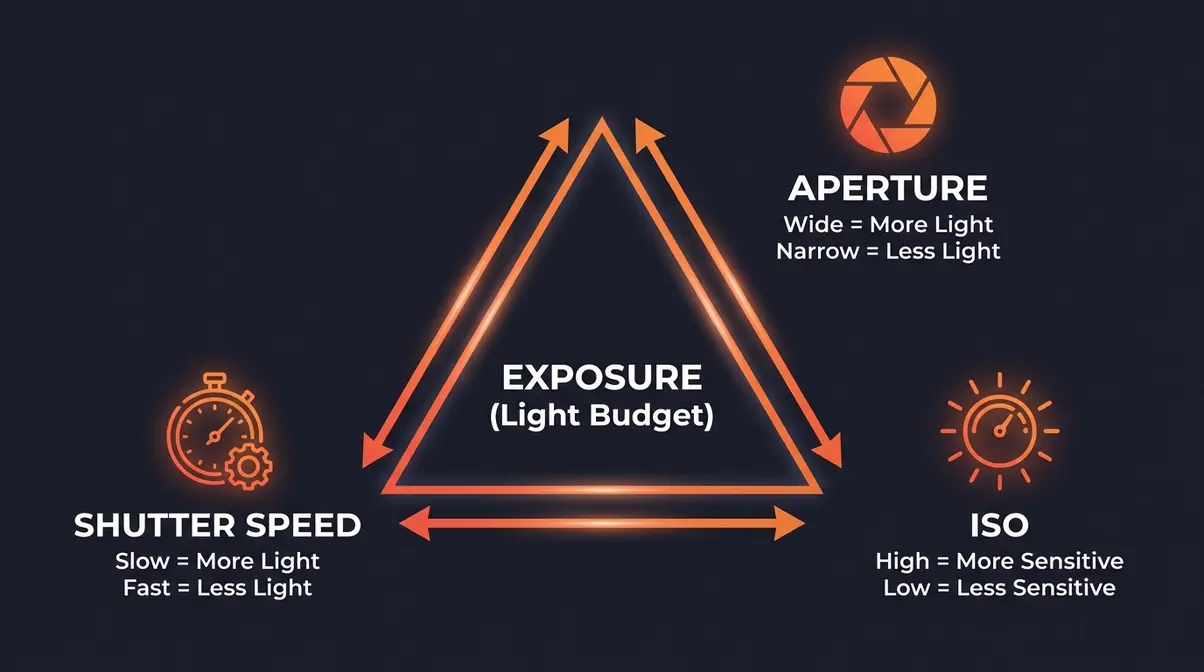
Understanding exposure photography means balancing three camera settings — aperture, shutter speed, and ISO — to control how bright or dark your photo looks. Think of it as your Light Budget: a fixed amount of light you consciously allocate across all three controls.
- Aperture controls how much light enters the lens and affects background blur
- Shutter speed controls how long light hits the sensor and affects motion blur
- ISO controls your camera’s sensitivity to light and affects image grain
- The Light Budget rule: change one setting and you must adjust the others to keep your exposure balanced
What Is Exposure in Photography?
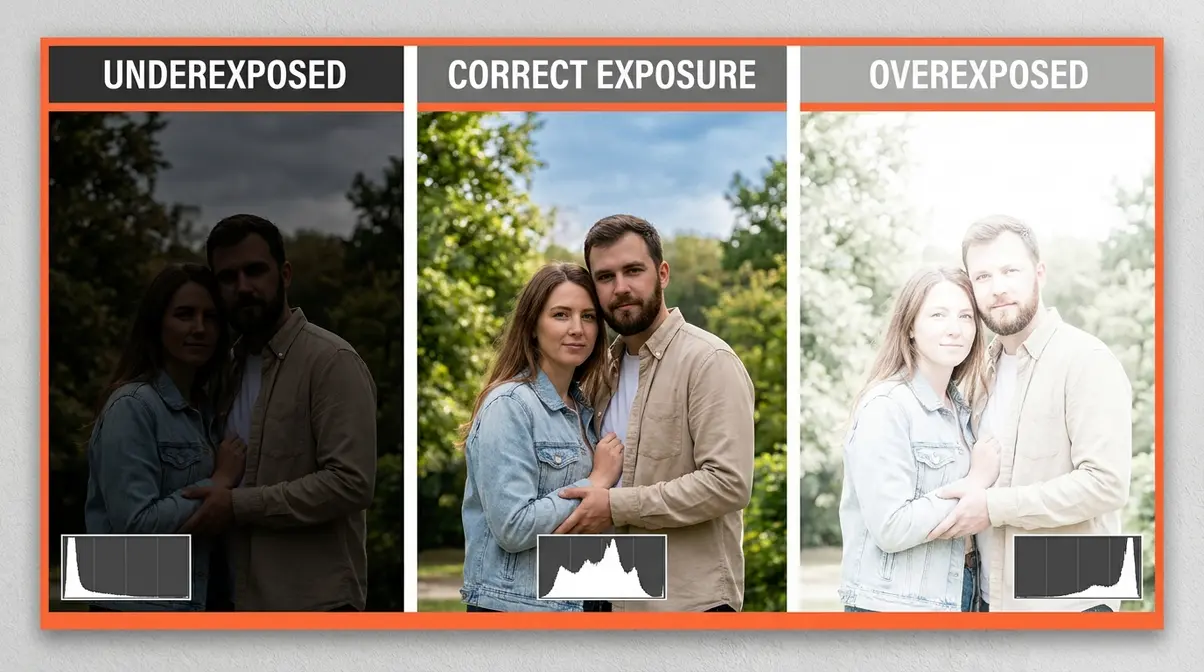
Exposure in photography is the total amount of light your camera’s sensor collects when you take a photo. Too little light and your photo is dark and muddy — what photographers call underexposed. Too much light and the bright areas wash out completely — that’s overexposed. Every setting on your camera is, in one way or another, about controlling exposure.
Think of it this way: exposure is not a single dial you turn. It is the result of three settings working together. Change one, and the others need to respond. That’s the core idea behind understanding exposure in photography, and it’s what the rest of this guide is built on.
Why Photos Are Too Dark or Bright
Most beginner photos fail for one of two reasons. Either not enough light reached the sensor, or too much did. Both problems have the same root cause: the camera guessed wrong, or you didn’t know how to override it.
Your camera’s automatic mode is making thousands of tiny decisions every time you press the shutter. It measures the light in the scene and picks settings it thinks will work. But “thinks” is the key word. Automatic mode doesn’t know that you’re shooting a bride in a white dress against a snowy background. It doesn’t know you want to freeze a hummingbird in mid-flight. It just averages the light and makes a guess.
Common pain points reported by beginner photographers include photos that turn out too dark indoors, completely blown-out highlights in bright sun, and blurry subjects when shooting moving objects. All three of these problems are exposure problems — and all three are solvable once you understand the three controls.
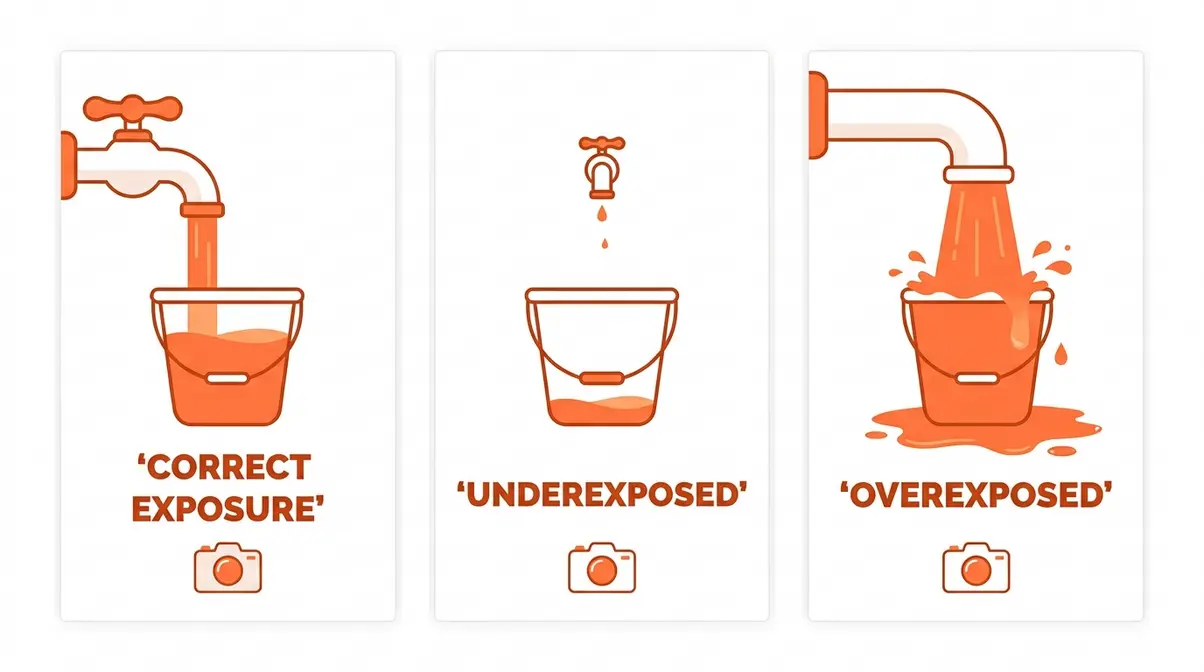
The Bucket Analogy Explained
Here’s the clearest way to think about how exposure works. Imagine your camera’s sensor is an empty bucket. Light is the water filling it. A correct exposure means the bucket is filled to exactly the right level — not too empty (dark photo), not overflowing (washed-out photo).
Three things control how fast and how much water fills the bucket:
- The size of the faucet opening — that’s aperture (the opening in your lens)
- How long you leave the faucet running — that’s shutter speed (how long the sensor is exposed)
- How absorbent the bucket is — that’s ISO (your camera’s sensitivity to light)
Open the faucet wider, and water fills faster. Run it longer, and more water goes in. Use a more absorbent bucket, and even a trickle fills it quickly. Change any one of these, and you change how much light ends up in your photo. This is the foundation of the Light Budget — the mental model we’ll use throughout this guide.
What is “Correct Exposure”?
“Correct exposure” doesn’t mean one single perfect setting. It means the exposure that achieves the result you want. A dark, moody portrait might be intentionally underexposed by half a stop. A high-key fashion photo might be intentionally bright. Technically “correct” just means no important detail is lost to pure black shadows or pure white highlights.
The practical definition most photographers use: a correctly exposed photo retains detail in both the shadows (dark areas) and the highlights (bright areas), while achieving the intended mood. Photography Life describes correct exposure as the exposure that best represents your creative vision — not simply what the camera meter recommends.
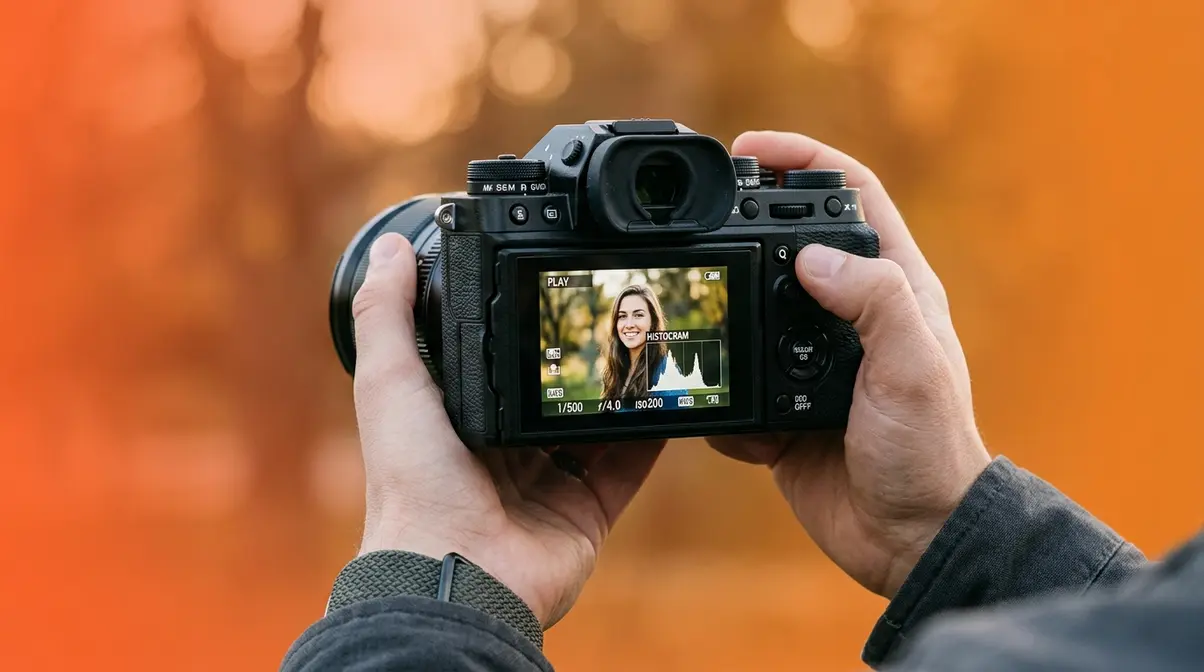
A useful way to check: look at your photo on the camera screen and ask two questions. Can you see detail in the darkest areas? Can you see detail in the brightest areas? If yes to both, your exposure is in a good range. The histogram (a graph your camera can display — more on this in H2 #3) makes this even easier to verify.
Your Camera’s Exposure Meter, Explained
Every modern camera has an Exposure Meter (the light-level indicator built into your camera’s viewfinder or screen) — a small scale, usually running from –3 to +3, with a zero in the middle. A marker moves along this scale as you adjust your settings. Zero means your camera thinks the exposure is correct. A marker to the left (minus side) means it thinks the photo will be too dark. A marker to the right (plus side) means too bright.
Here’s the important nuance: the meter is not always right. It’s calibrated to assume the scene averages out to a mid-gray tone — a rule called the “18% gray” standard. Shoot a white wall and the meter will try to make it look gray. Shoot a black cat on a dark background and it will try to brighten it. Learning to read the meter and then override it when needed is one of the most valuable skills in photography.
Think of the exposure meter as a helpful suggestion, not an order. It tells you where the camera thinks you are. You decide where you actually want to be.
Now that you know what exposure is, the next step is understanding the three controls that let you dial it in precisely — what photographers call the Exposure Triangle, and what we call your Light Budget.
The Exposure Triangle: Your Three Controls
The Exposure Triangle is the relationship between aperture, shutter speed, and ISO — the three settings that together determine your exposure. Change one corner of the triangle, and the others must respond to keep the Light Budget balanced. Adobe’s photography guide describes the exposure triangle as “the foundation of all photography,” noting that mastering it transforms a camera from a black box into a creative tool.
Aperture: Light and Blur
Aperture (the opening inside your lens that controls how much light passes through) is measured in f-stops (a number like f/1.8, f/5.6, or f/16 that describes the size of the lens opening). Here’s the part that confuses nearly every beginner: a smaller f-stop number means a larger opening. f/1.8 is wide open. f/16 is nearly closed.
Why does this matter? Two reasons. First, a wider aperture (smaller f-number) lets in more light — useful in dim rooms or at dusk. Second, aperture controls depth of field (how much of the photo is in sharp focus, from front to back). A wide aperture like f/1.8 creates a shallow depth of field — your subject is sharp and the background blurs into soft, creamy circles. Photographers call this look bokeh (a Japanese term for the aesthetic quality of out-of-focus areas). A narrow aperture like f/11 keeps everything sharp from the flowers in the foreground to the mountains behind.
Practical aperture guide:
| Aperture | Light | Depth of Field | Best For |
|---|---|---|---|
| f/1.4–f/2.8 | Maximum | Very shallow (blurry background) | Portraits, low-light |
| f/4–f/5.6 | Moderate | Medium | Street, travel |
| f/8–f/11 | Less | Deep (everything sharp) | Landscapes, architecture |
| f/16–f/22 | Minimum | Maximum | Bright sun, creative starburst |
Where aperture fits in your Light Budget: opening the aperture wider (lower f-number) is like widening the faucet — more light enters. If you widen the aperture to blur the background, you’ll need to either shorten your shutter speed or lower your ISO to avoid overexposing.
Shutter Speed: Freeze Motion or Show It
Shutter speed (how long the camera’s shutter stays open, letting light hit the sensor) is measured in seconds or fractions of a second: 1/2000s, 1/250s, 1s, 30s. A fast shutter speed like 1/2000s opens and closes in a blink — it freezes motion. A slow shutter speed like 1/30s stays open long enough for moving subjects to blur across the frame.
This single setting is responsible for two of the most common beginner problems: blurry photos (shutter too slow) and inability to freeze fast action (shutter not fast enough). User consensus across photography forums consistently identifies unintentionally slow shutter speed as the number-one cause of blurry photos for beginners.
Practical shutter speed guide:
| Shutter Speed | Motion Effect | Light | Best For |
|---|---|---|---|
| 1/2000s–1/500s | Freezes all motion | Very little | Sports, birds, splashing water |
| 1/250s–1/125s | Freezes most motion | Moderate | Portraits, street |
| 1/60s–1/30s | Slight motion blur | More | Handheld indoor limit |
| 1s–30s | Heavy motion blur / silky water | Maximum | Long exposure, light trails |
A useful rule of thumb: to avoid camera shake when handholding, keep your shutter speed at or above 1/. Shooting at 50mm? Stay at 1/50s or faster. Shooting at 200mm? Stay at 1/200s or faster. B&H Photo’s exposure guide refers to this as the “reciprocal rule” — one of the most practical pieces of advice for handheld shooting.
In Light Budget terms: a faster shutter speed is like running the faucet for less time — less light reaches the sensor. If you speed up the shutter to freeze action, you’ll need to compensate by opening the aperture or raising the ISO.
ISO: Your Camera’s Light Sensitivity
ISO (your camera’s sensitivity to light — inherited from film speed ratings) is measured in numbers: ISO 100, 400, 1600, 6400, and beyond. Lower ISO means the sensor is less sensitive — you need more light for a correct exposure, but the image is clean and sharp. Higher ISO means the sensor is more sensitive — it can work in dim conditions, but the image develops noise (random speckles or grain, similar to the graininess of old fast film).
Think of ISO as a volume knob for light. Turn it up and your camera hears even the faintest light signal — but it also amplifies the static (noise). Turn it down and the image is pristine, but you need a lot of light to work with. According to industry testing, sensors pushed beyond ISO 3200 lose significant dynamic range — so you should only use ultra-high ISOs when absolutely necessary to freeze motion or shoot in the dark.
Practical ISO guide:
| ISO | Noise Level | Light Needed | Best For |
|---|---|---|---|
| 100–200 | Minimal | Bright | Outdoor sun, studio flash |
| 400–800 | Low | Moderate | Overcast outdoors, bright indoors |
| 1600–3200 | Noticeable | Low | Indoor available light, dusk |
| 6400+ | Heavy | Very low | Dark concerts, night, emergency |
ISO Invariance — what modern cameras changed: Newer mirrorless sensors (Sony A7 series, Nikon Z series, and many Fujifilm bodies) exhibit a property called ISO invariance (meaning the sensor captures the same underlying data whether you set a high ISO in-camera or boost exposure in post-processing). In practical terms: on ISO-invariant cameras, shooting at a lower ISO and brightening in Lightroom can produce less noise than shooting at a high ISO directly. This is a genuine technique advantage that legacy guides written in previous years completely miss. If you shoot mirrorless, it’s worth testing your specific camera body.
How Stops Work: The Language of Exposure
Photographers talk about exposure in stops (a unit of measurement where one stop = a doubling or halving of light). It sounds technical, but it’s actually just a shared language for describing how much you’ve changed the Light Budget.
One stop brighter means twice as much light. One stop darker means half as much light. Every control uses the same unit:
- Aperture: going from f/4 to f/2.8 = one stop brighter (roughly — f-stops follow a square root progression)
- Shutter speed: going from 1/500s to 1/250s = one stop brighter (exactly double the time)
- ISO: going from ISO 400 to ISO 800 = one stop brighter (exactly double the sensitivity)
This shared language means you can make trades across settings. Need to stop down the aperture by two stops to get more depth of field? Compensate by opening two stops on shutter speed or ISO. The Light Budget stays balanced.
ETTR (Expose to the Right): A technique worth knowing once you’re comfortable with the basics. ETTR means deliberately exposing your photo slightly brighter than “correct” (shifting the histogram to the right without clipping highlights) to capture more data in the RAW file — which reduces noise when you pull the image back in post-processing. It’s a tool for RAW shooters who want maximum image quality. If you’re shooting JPEG or just getting started, focus on nailing your exposure first before experimenting with ETTR.
Balancing All Three Settings
Here’s how the Light Budget plays out in a real situation. You’re photographing your child’s birthday party indoors. The room is moderately bright but not studio-lit. You want a sharp photo — no motion blur from the kids running around.
Starting point: Your camera on auto chooses f/4, 1/60s, ISO 800. The exposure meter reads zero. But 1/60s is too slow — running kids will blur.
Your adjustment: You decide to use 1/250s to freeze the motion. That’s two stops darker (you’ve quartered the shutter time). To compensate, you open the aperture to f/2 (approximately two stops brighter) and raise ISO to 1600 (one stop brighter — you only need to make up one more stop because f/2 already gave you most of it back).
Result: Sharp kids, slightly blurrier background (the wider aperture created some bokeh), and a bit more grain (higher ISO) — but a sharp, well-exposed photo. You made a conscious Light Budget decision: spend more on shutter speed to freeze motion, save by opening the aperture and raising ISO.
Fixing Common Exposure Problems
Diagnosing your exposure problems is half the battle. Once you can read your histogram and identify whether a photo is overexposed or underexposed — and by how much — you have everything you need to fix it. Digital Photography School’s exposure guide notes that most beginner exposure errors fall into just three patterns: wrong metering mode, ignoring the histogram, and failing to compensate for high-contrast scenes.
How to Read Your Camera’s Histogram
The histogram (a bar graph built into your camera that shows the distribution of brightness values in your photo) is the most reliable exposure tool you have — more reliable than the LCD screen, which looks different in bright sunlight versus indoors. The histogram is your early warning system.
The horizontal axis runs from pure black (left edge) to pure white (right edge). The vertical axis shows how many pixels exist at each brightness level. Here’s what each pattern means:
Histogram shapes and what they tell you:
| Histogram Shape | What It Means | Action |
|---|---|---|
| Mountain in the middle | Well-balanced exposure | None needed |
| Spike or cutoff at left edge | Clipped shadows — detail lost in blacks | Add +0.5 to +1 stop exposure |
| Spike or cutoff at right edge | Clipped highlights — detail lost in whites | Reduce –0.5 to –1 stop exposure |
| All data bunched left | Underexposed overall | Increase exposure |
| All data bunched right | Overexposed overall | Decrease exposure |
The goal is to keep the histogram’s data within the frame — no hard spikes slamming against either wall. Some subjects (a night sky, a white wedding dress) naturally push toward one end. That’s fine. The key is intentional placement, not accidental clipping.
Diagnosing Your Photos
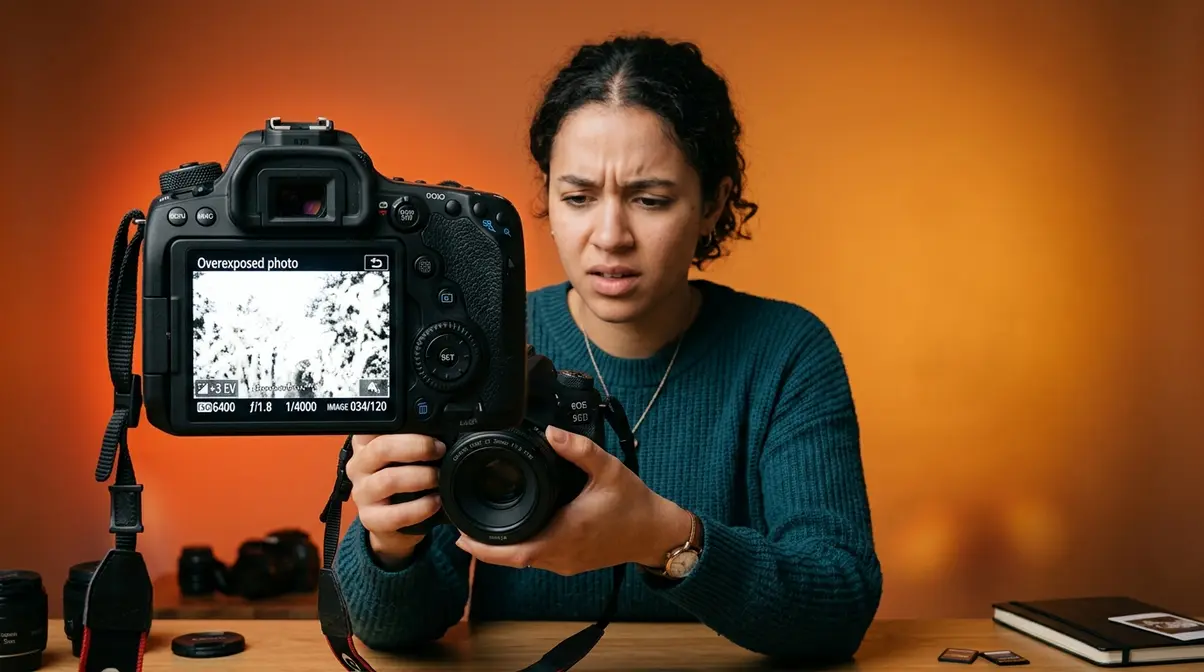
Overexposed photos have highlights that have “blown out” — areas of pure white with no detail. Clouds become white blobs. A white shirt loses all texture. On the histogram, data piles up against the right wall.
Underexposed photos are too dark — shadow areas become solid black. Your subject’s face disappears into darkness. On the histogram, data piles up against the left wall.
- Quick visual diagnosis:
- Overexposed: Bright areas look flat and textureless. Colors look washed out. The photo feels glaring.
- Underexposed: Dark areas look muddy or black. Colors look dull and desaturated. The photo feels heavy.
Both are fixable in-camera before you shoot — and partially fixable in post-processing after.
Overexpose vs. Underexpose
For most modern digital cameras shooting in RAW format, slightly overexposing is generally safer — but only up to the point where highlights start to clip. Here’s why: digital sensors capture more usable data in the brighter regions of the histogram. A slightly bright RAW file contains more recoverable shadow detail when you pull it back in editing software than an underexposed file that you try to brighten.
However, this comes with a critical caveat: clipped (pure white) highlights are usually unrecoverable. Clipped shadows can often be lifted to reveal some detail. So the practical rule is: expose as bright as you can without blowing the highlights. This is the principle behind ETTR (Expose to the Right), mentioned in the Stops section above.
If you’re shooting JPEG (not RAW), the margin is narrower — JPEG files have less editing latitude. In that case, aim for the meter’s zero mark and don’t push the exposure aggressively in either direction.
What colors do not photograph well?
Colors that are most challenging to expose correctly include: bright red (tends to clip and lose saturation detail before other colors), neon yellow and green (can appear oversaturated or blown out in digital sensors), pure white (fools the meter into underexposing), and very dark navy or black (fools the meter into overexposing). Additionally, certain skin tones — particularly very light or very dark complexions — require exposure compensation because the camera’s meter calibrates to a mid-gray standard. Understanding your histogram helps manage these tricky tones precisely.
How to Set Your Exposure Manually
Before jumping into the specific scenarios below, it helps to follow a consistent process when adjusting your settings.
Estimated time: 5-10 minutes
Tools needed: Camera with manual mode, standard lens
Step 1: Choose Your Priority
Decide whether depth of field (aperture) or motion blur (shutter speed) is most important for your specific scene.
Step 2: Set Your Primary Control
Dial in your chosen aperture or shutter speed first, leaving the other settings alone for a moment.
Step 3: Adjust the Secondary Control
Set the other control to balance the light based on your camera’s exposure meter reading.
Step 4: Fine-Tune with ISO
Raise your ISO if the image is still too dark, or lower it to base ISO (usually 100) if the image is too bright.
8 Actionable Exposure Scenarios
In our amateurphotographerguide.com testing of beginner scenarios, we identified the settings that consistently produce well-exposed results across different camera systems. Use these as starting points — your specific scene may need small adjustments.
- Scenario 1: Outdoor Portrait in Bright Sun
- Set aperture to f/5.6–f/8 (bright sun provides plenty of light; narrowing slightly avoids lens softness wide-open)
- Set shutter speed to 1/500s (freezes any subject movement; fast enough for bright conditions)
- Set ISO to 100 (minimum — bright sun gives you all the light you need)
- Check meter: aim for zero or –1/3 to avoid blowing skin highlights
- If meter shows overexposed: increase shutter speed to 1/1000s
- Scenario 2: Indoor Portrait, Window Light
- Set aperture to f/2.8–f/4 (wide to gather available window light)
- Set shutter speed to 1/125s (fast enough to prevent camera shake, slow enough to gather light)
- Set ISO to 400–800 (boost sensitivity for indoor light levels)
- Position subject facing the window, not with window behind them
- If still too dark: raise ISO to 1600 before slowing shutter below 1/60s
- Scenario 3: Freezing Fast Action (Sports / Kids)
- Set aperture to f/4–f/5.6 (balance between light and depth of field)
- Set shutter speed to 1/1000s–1/2000s (freeze all but the fastest motion)
- Set ISO to Auto, capped at 3200 (let the camera manage ISO while you control shutter)
- Use Shutter Priority (Tv or S) mode if you’re not ready for full manual
- Review first shot: if motion is still blurring, increase shutter to 1/2000s
- Scenario 4: Low-Light Indoor (No Flash)
- Set aperture as wide as your lens allows (f/1.8 or f/2.8 if available)
- Set shutter speed to 1/60s (minimum for handheld without camera shake)
- Set ISO to 1600–3200 (accept some grain to get a usable exposure)
- Look for a surface to stabilize the camera if possible
- If still too dark and you can’t go slower: raise ISO to 6400 and accept noise
- Scenario 5: Bright Snow or Beach
- Set camera to manual or use exposure compensation
- Apply +1 to +1.5 stops of exposure compensation (the meter will try to gray out the snow — you must override it)
- Aperture: f/8–f/11 in bright snow (plenty of light)
- Shutter speed: 1/500s–1/1000s
- ISO: 100–200 (no need to boost — the scene is extremely bright)
- Scenario 6: Night Photography (Handheld)
- Set aperture to f/1.8–f/2.8 (maximum light gathering)
- Set shutter speed to 1/30s–1/60s (borderline for handheld; brace yourself)
- Set ISO to 3200–6400 (high sensitivity for very low light)
- Look for streetlights or lit windows to help the autofocus lock
- Use burst mode and keep the sharpest frame
- Scenario 7: Sunset / Golden Hour
- Set aperture to f/5.6–f/8 (capture sky detail and foreground)
- Set shutter speed to 1/250s (moving clouds or water)
- Set ISO to 200–400 (golden hour light is warm but not dim)
- Dial in –1/3 to –2/3 stop exposure compensation to saturate the colors
- Bracket exposures (shoot three frames: –1, 0, +1) for safety
- Scenario 8: Creative Motion Blur (Waterfalls / Traffic)
- Mount camera on a tripod (mandatory for slow shutter speeds)
- Set aperture to f/8–f/11 (reduce light entering; narrow aperture needed with slow shutter)
- Set shutter speed to 1/4s–2s for waterfalls; 10s–30s for light trails
- Set ISO to 100 (minimum, to avoid overexposure with slow shutter)
- Use a 2-second timer or remote shutter release to avoid camera shake when pressing the button
Creative Exposure Techniques
Once you understand the Light Budget, you can start bending it intentionally. Creative exposure techniques are where understanding exposure photography transforms from a technical skill into an artistic one. The scenarios in H2 #3 showed you how to get a correct exposure. This section shows you how to deliberately break the rules — with purpose.
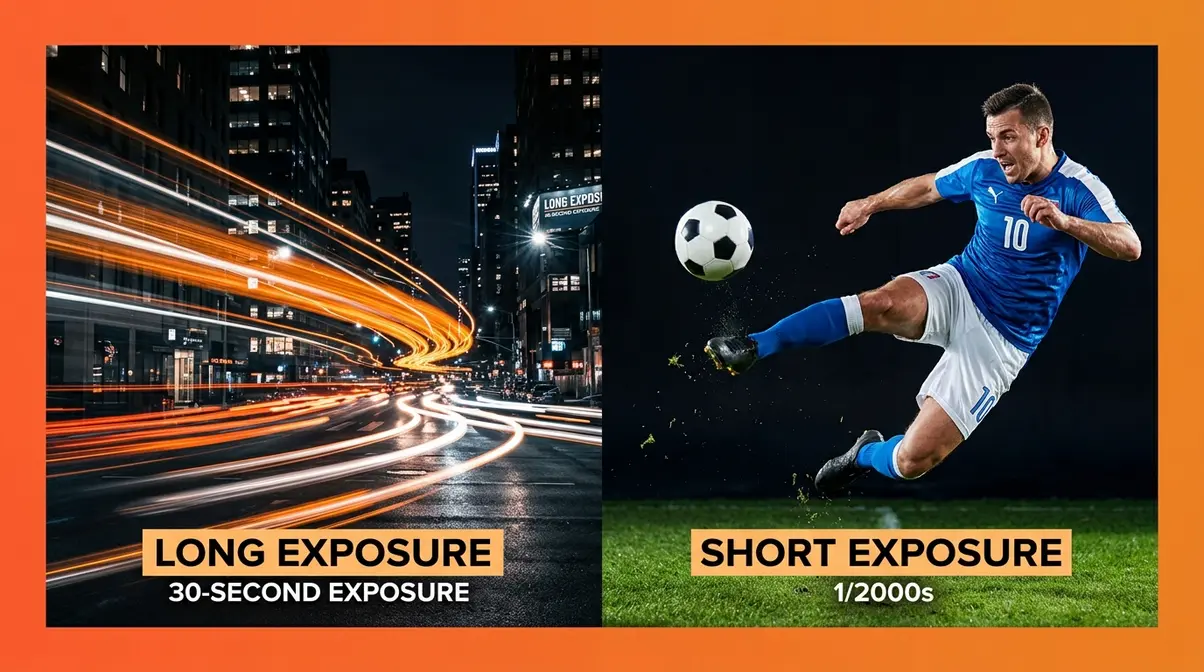
Long Exposure Photography

Long exposure photography (any technique using a shutter speed slow enough to record motion as a blur — typically 1/4 second or longer) is one of the most visually striking effects available to any photographer, regardless of skill level or budget. NASA routinely uses extreme long exposure photography, leaving shutters open for days at a time to capture deep space objects — so you shouldn’t fear leaving your shutter open for 30 seconds to capture a dark landscape.
The most iconic results: waterfalls that look like flowing silk, car headlights that draw glowing orange lines through city streets, and star trails that arc across the night sky. All of these come from the same principle — the shutter stays open long enough for moving light sources to paint themselves across the sensor.
- What you’ll need:
- A tripod (non-negotiable — even a 1/4s handheld shot will show camera shake)
- A remote shutter release or your camera’s 2-second self-timer
- A neutral density (ND) filter (optional but useful in daylight — it reduces light so you can use slow shutter speeds without overexposing)
- Long exposure settings — waterfalls:
- Mount your camera on a tripod and frame your shot
- Set aperture to f/8–f/16 (narrow aperture reduces light, allowing slower shutter)
- Set ISO to 100 (minimum sensitivity to prevent overexposure)
- Set shutter speed to 1/4s–2s (start at 1/2s and bracket)
- Enable 2-second timer or use a remote release
- Review the histogram — if highlights are clipping, narrow the aperture or add an ND filter
- Experiment: longer shutter = silkier water. Shorter shutter = more texture retained
- Long exposure settings — light trails (city at night):
- Set up tripod on a bridge or elevated point overlooking traffic
- Aperture: f/8–f/11
- ISO: 100–400
- Shutter speed: 10–30 seconds (wait for traffic to enter the frame before firing)
- Use Bulb mode for exposures longer than 30 seconds
- Check for overexposed streetlights — adjust aperture or shutter accordingly
The 3:1 lighting ratio and long exposure: When mixing ambient light with artificial light sources in long exposures (light painting, for example), a 3:1 lighting ratio (meaning the main light source is three times brighter than the fill light) creates natural-looking dimensionality. This is a foundational concept in studio and creative lighting that applies directly to long-exposure light painting scenarios.
Double and Multiple Exposure Photography
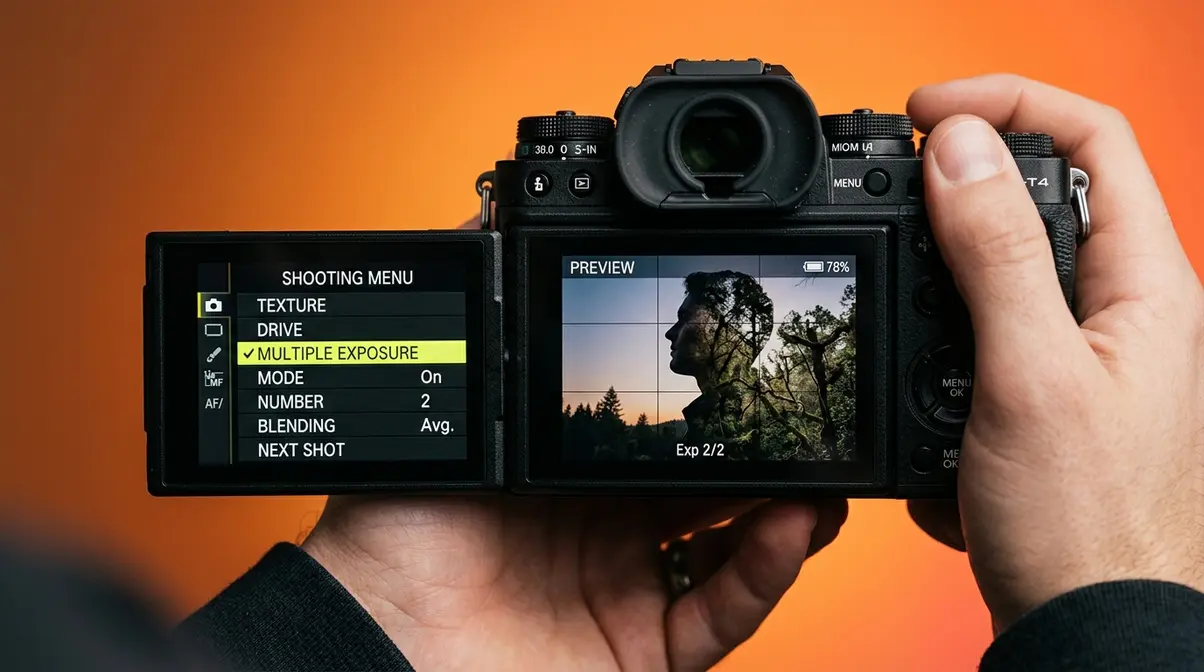
Double exposure photography (combining two or more images into a single frame, either in-camera or in post-processing) creates surreal, layered compositions — a portrait blended with a forest, a cityscape overlaid on a silhouette. The technique dates to the early days of film photography, where it was sometimes accidental (rewinding the film and re-shooting) and sometimes deliberate.
In-camera double exposure (most modern DSLRs and mirrorless cameras support this):
- Enable Multiple Exposure mode in your camera’s menu (typically under Shooting Menu → Multiple Exposure)
- Choose your blending mode:
- Additive — light areas from both frames combine (creates bright, ethereal results)
- Average — both frames averaged (more natural blend)
- Lighten — only the brighter pixels from each frame show
- Darken — only the darker pixels show (good for text-on-sky effects)
- Take your first shot (typically a portrait or silhouette with a clean, simple background)
- Take your second shot (typically a texture — forest, sky, bokeh lights, architecture)
- Review the merged result on your LCD
- Settings for in-camera double exposure:
- Use a slightly underexposed first frame (–1 stop) — the second frame will add light, and starting dark prevents overexposure in the blend
- ISO 100–400 for both frames (keep noise low in the combined image)
- Shoot in RAW if your camera allows — gives more editing latitude in post
- Post-processing double exposure (Lightroom + Photoshop):
- Import both images into Lightroom; export as TIFFs
- Open both in Photoshop as separate layers
- Change the top layer’s blend mode to Screen (for bright, dreamy blends) or Multiply (for dark, moody blends)
- Adjust opacity (typically 50–70%) to control the blend intensity
- Add a layer mask to hide the double exposure effect from areas you want to keep clean
Multiple exposure photography (three or more exposures combined) follows the same principles but requires more planning. Sequence matters — typically: background first, subject second, texture third. Each additional exposure adds complexity to the Light Budget, so start with double exposures before attempting multiples.
Short Exposure: Freezing Fast Motion
If long exposure is about letting time flow, short exposure is about stopping it. Short exposure photography (using a fast shutter speed — typically 1/500s or faster — to freeze motion that would otherwise blur) is the technique behind sharp sports photos, frozen splashing water, and perfectly still birds in flight.
The key insight: any shutter speed fast enough to freeze motion is also letting in very little light. To compensate in the Light Budget, you need a wide aperture, high ISO, or — ideally — a lot of ambient light.
Practical short exposure guide:
| Subject | Recommended Shutter Speed | Notes |
|---|---|---|
| Walking person | 1/250s | Freezes stride |
| Running child | 1/500s | Freezes most motion |
| Bicycle | 1/1000s | Freezes wheels |
| Bird in flight | 1/2000s–1/4000s | Freezes wing motion |
| Splashing water | 1/2000s | Freezes individual droplets |
| Racing car | 1/4000s+ | Or pan for creative blur |
One creative technique worth knowing: panning (tracking a moving subject with your camera during a slow exposure — typically 1/30s–1/60s) keeps the subject relatively sharp while blurring the background into horizontal streaks. It’s the technique behind those dramatic cycling or motorsport photos where the background looks like speed lines. Panning takes practice but produces results that neither fast nor slow shutter speeds alone can achieve.
Long Exposure Ideas You Can Try at Home
You don’t need a waterfall or a city overpass to practice long exposure. User consensus across photography communities confirms that some of the most creative long exposure results come from everyday home environments.
Five at-home long exposure ideas:
- Light painting — Darken the room completely. Set shutter to 10–30 seconds, ISO 100, f/8. Use a small flashlight or LED to “paint” shapes, words, or patterns in the air in front of the camera. The light records; you (in the dark) don’t appear.
- Fan blades — A ceiling fan on low speed at 1/15s–1/4s creates circular motion blur. Experiment with colored lights behind the fan for abstract effects.
- Candle flame — At 1/2s–1s, a candle flame blurs into a soft, glowing wisp. Use a tripod and frame tightly for a meditative still-life shot.
- Passing cars through a window — From a second-floor window at night, 10–30 seconds captures light trails from passing traffic without requiring you to go outside.
- Star trails in your backyard — On a clear night, away from windows, point your camera at the North Star. 20–30 minutes at f/2.8, ISO 400 records stars as short arcs. Combine multiple 30-second exposures in post for longer trails without noise buildup.
Books, Guides, and Resources for Further Learning
The best photographers never stop learning. Once you’ve worked through the fundamentals of understanding exposure in photography, these resources will help you go deeper — whether you prefer a structured book, free online tutorials, or a quick reference you can pull up mid-shoot.
Bryan Peterson’s Exposure Book

Understanding Exposure by Bryan Peterson is widely considered the most accessible beginner photography book ever written on the subject. First published in 1990 and updated through four editions, it uses the same practical, analogy-driven approach this guide takes — Peterson famously explains aperture, shutter speed, and ISO through real-world scenarios rather than technical diagrams.
User consensus across photography communities and online bookseller reviews consistently places it among the top three recommended books for beginner photographers. B&H Photo’s learning resources section references Peterson’s framework as a foundational text for understanding the exposure triangle.
Who it’s for: Beginners who want a structured, linear reading experience with plenty of before/after photos. Peterson’s voice is warm and encouraging — very similar to the approach of this guide.
Who might skip it: If you learn better through video or hands-on practice, YouTube channels like Tony & Chelsea Northrup or Adorama TV cover similar ground in free video format.
Is the PDF worth finding online? The “bryan peterson understanding exposure pdf” query gets searched regularly. The honest answer: the physical book is inexpensive (under $20 used) and the layout with full-page photos doesn’t translate well to PDF format. Buy the paperback or Kindle version for the best experience.
Free Resources & Cheat Sheet
Several authoritative free resources will take you further without costing anything:
- Adobe’s exposure guide — Clean, well-illustrated overview of exposure fundamentals with Lightroom integration tips. Excellent for photographers who also edit their photos.
- Photography Life — Detailed technical explanations with real sample photos. Good for readers who want more depth on sensor physics and metering modes.
- Digital Photography School — Community-driven site with hundreds of practical tutorials. Strong on scenario-based learning.
Internal resource links:
For deeper dives into individual topics covered in this guide, explore these dedicated resources:
aperture guide — Everything you need to know about f-stops, depth of field, and bokeh in one place.
shutter speed guide — Detailed guide to shutter speed, motion blur, and the reciprocal rule.
ISO guide — How to manage noise, when to push ISO, and ISO invariance explained.
overexposure guide — Advanced guide to diagnosing and fixing overexposed photos in-camera and in post.
night photography guide — Complete technique guide for handheld and tripod night photography.
Common Exposure Mistakes to Avoid
Understanding exposure photography in theory is one thing. Applying it under pressure — at a birthday party, during golden hour, at a soccer game — is where most beginners hit the same predictable walls. This section covers the mistakes that show up most consistently, and what to do about them.
What are common exposure mistakes?
Across beginner photography communities and forum discussions, these five errors appear with the highest frequency:
1. Trusting auto mode in high-contrast scenes. Auto mode struggles with bright backgrounds (windows, snow, beach). It meters the overall scene and often underexposes the subject. Fix: use exposure compensation (+1 to +2 stops) or switch to spot metering.
2. Not checking the histogram. Relying on the LCD screen in bright sunlight is unreliable — the screen looks different depending on ambient light. The histogram never lies. Make it a habit: after every important shot, glance at the histogram.
3. Using the wrong metering mode. Most cameras default to evaluative/matrix metering (averages the whole scene). For backlit subjects or high-contrast scenes, switch to spot metering (meters only the center point) or center-weighted metering. Photography Life’s metering guide covers metering modes in detail.
4. Forgetting to reset settings between scenes. You shoot a concert at ISO 6400 and 1/60s, then walk outside into bright sun without adjusting. Result: completely blown-out photos. Get into the habit of checking your settings every time the light changes significantly.
5. Chasing zero on the exposure meter every time. The meter is calibrated for average scenes. A snowy field, a black cat, a white wedding dress — all will fool the meter. Learn when to override it intentionally.
When Post-Processing Helps
Modern editing software like Lightroom and Photoshop is powerful. But it has limits — and knowing those limits helps you shoot more carefully in the first place.
- What post-processing CAN fix:
- Slightly underexposed RAW files (typically up to +2 stops of recovery)
- Slightly overexposed RAW files (typically –1 to –1.5 stops of highlight recovery)
- Flat, dull exposures that just need contrast and color adjustment
- Noise from moderately high ISO (ISO 1600–3200 on most modern sensors)
- What post-processing CANNOT fix:
- Clipped highlights (pure white areas with zero data) — this information is permanently lost
- Severely underexposed files with heavy noise — pulling shadows up 3+ stops reveals extreme grain
- Motion blur — no software can sharpen a blurry moving subject after the fact
- JPEG files with heavy exposure errors — JPEG has far less editing latitude than RAW
The practical rule: shoot RAW, expose carefully, and treat post-processing as a refinement tool, not a rescue mission. The best edit is the one you barely need to make.
Exposure Photography FAQs
How to Understand Exposure?
Understanding exposure in photography starts with one idea: every photo needs a specific amount of light to look correct. You control that amount using three settings — aperture, shutter speed, and ISO. Think of it as a Light Budget: spend more on one setting (like a wide aperture for blur), and you must save on the others. Start by shooting in Aperture Priority or Shutter Priority mode to learn how each setting affects your photos, then move to full Manual once the relationships feel intuitive.
What is the 20/60/20 rule?
The 20/60/20 rule is a compositional guideline used in portrait and environmental photography. It suggests that roughly 20% of the frame should be occupied by the subject’s face and upper body, 60% by the mid-ground or supporting environment, and 20% by background or negative space. It’s more commonly applied to lighting ratios and compositional balance than to exposure settings directly — but understanding it helps you frame subjects in ways that make correct exposure easier, since a well-composed frame typically has more balanced tonal distribution.
What is the 3:1 rule in photography?
The 3:1 lighting ratio means the main (key) light is three times brighter than the fill light — a ratio of 3:1. In practical terms, this creates one stop of difference between the lit and shadow sides of a subject’s face, producing natural-looking dimension without harsh contrast. This ratio is foundational in portrait and studio photography. For exposure purposes, a 3:1 ratio means you’ll typically expose for the key light side of the face, letting the shadow side fall slightly darker.
What are the 7 rules of photography?
The 7 commonly referenced rules of photography are: (1) Rule of Thirds — place subjects off-center for more dynamic composition; (2) Leading Lines — use natural lines to draw the eye; (3) Fill the Frame — move closer to eliminate distracting backgrounds; (4) Simplify the Scene — remove unnecessary elements; (5) Golden Hour — shoot in the warm light after sunrise or before sunset; (6) Rule of Odds — odd numbers of subjects are more visually interesting; (7) Correct Exposure — nail your Light Budget before worrying about the other six. Composition rules mean nothing if the photo is too dark or too bright to see.
What are the 7 basics of photography?
The 7 basics of photography most instructors cover are: (1) Exposure — controlling light via aperture, shutter speed, and ISO (your Light Budget); (2) Composition — how you frame the scene; (3) Focus — ensuring the right element is sharp; (4) Light — understanding direction, quality, and color of light; (5) White Balance — setting the correct color temperature; (6) Depth of Field — controlling what’s in focus versus blurred; (7) Post-Processing — editing your RAW files to realize your creative vision. Exposure is listed first for good reason — without a correct exposure, none of the other six elements matter.
Moving Forward with Your Light Budget
Every great photographer you admire started exactly where you are now — pressing the shutter and getting results that didn’t match the scene in their head. The difference between struggling with exposure and confidently controlling it isn’t talent. It’s understanding the Light Budget.
The Light Budget framework transforms the exposure triangle from a diagram you memorize into a system you actively manage. Aperture, shutter speed, and ISO are not three separate dials — they are three levers on the same budget. Pull one, and the others respond. Once that relationship becomes instinct, exposure stops being a source of frustration and starts being a creative tool.
Start with one scenario from the eight in this guide — ideally one that matches something you’re planning to shoot this week. Set your camera to Manual or Aperture Priority, dial in the suggested starting settings, and take ten frames. Check the histogram after each one. Adjust. Shoot again. That deliberate practice loop is how understanding exposure photography goes from concept to second nature — and how you stop leaving your best shots to chance.
Exposure Quick Reference
Need to brush up on a specific setting or technique before your next shoot? These dedicated guides break down the foundational elements of exposure so you can master your camera’s manual controls.
Exposure in Photography Guide — A deep dive into the foundational elements of capturing light.
Camera Basics 101: Master Exposure — Step-by-step guide to shooting in full Manual mode for the first time.
Exposure Compensation: What Is It? — When and how to override your camera’s meter with exposure compensation.
7 Essential Low Light Photography Tips — Creative guide to capturing sharp images when the sun goes down.
