

Table of Contents
This blog post may contain affiliate links. As an Amazon Associate I earn from qualifying purchases.
Rotating a single filter changes everything about how a scene looks—water becomes transparent, skies turn a deep saturated blue, and the hidden colour of wet foliage suddenly appears. That’s not a post-processing trick; it’s polarising filter photography, and it works in real time through your viewfinder.
Lightroom’s dehaze slider can rescue a hazy sky. It cannot remove the specular glare from water, make glass transparent, or restore colour that was never recorded. Those effects require the filter to be physically present at the moment of capture. Every bright-light outdoor scene you’ve shot without one has colour and detail sitting just beneath the surface that never made it to your sensor.
By the end of this guide, you’ll know exactly what a polarising filter does, when to use it and critically when not to, and how to find the sweet spot every time. This guide covers the fundamentals of polarising filter photography, step-by-step use, common failure modes, and filter comparisons.
A polarising filter eliminates glare from non-metallic surfaces—an effect that cannot be replicated in post-processing software.
- Skies deepen: Rotating the filter to its sweet spot darkens blue skies and increases colour contrast.
- Water turns clear: Reflected glare is removed, revealing underwater detail and texture.
- Light is reduced: Expect to lose 1.5–3 stops—compensate with a slower shutter or higher ISO (PolarPro, 2026).
- The Rotation Window matters: Maximum effect occurs when the camera points 90° to the sun—use The Rotation Window framework to find it fast.
What a Polarising Filter Does & Why It Matters

Hold a circular polariser up to a window and slowly rotate it. Watch what happens to the reflection. At one angle, the glare is vivid and the glass is opaque. Rotate 90°, and the reflection fades—the world behind the glass becomes visible. A polarising filter removes glare from non-metallic surfaces, an effect that no post-processing software can replicate once the reflected light is recorded. According to Hoya Filters USA, the filter works by selectively blocking polarised reflected light from water, glass, paint, and leaves, while passing through the direct light your subject actually emits. That distinction is why this filter remains irreplaceable.
The Physics Behind the Filter
What does a polarising filter do in photography? A polarising filter reduces glare from non-metallic reflective surfaces—water, glass, wet leaves, and the sky—by blocking reflected light before it reaches the sensor. This deepens blue skies, makes water appear transparent, and restores colour saturation. The effect cannot be reproduced in post-processing because the glare, once captured, is indistinguishable from the scene’s own light.
When light bounces off a flat non-metallic surface like water or glass, it becomes polarised: the light waves align into a single plane. Your camera sensor records this polarised glare as brightness, washing out the colour beneath. A polarising filter is oriented to block that specific plane of light before it reaches the sensor. Think of it like tilting your head while wearing polarised sunglasses near a car window—the glare cuts in and out as the angle changes.
Harvard Natural Sciences confirms that a circular polarising filter is composed of a linear polarising element followed by a quarter-wave plate. This design is crucial because it preserves autofocus accuracy in modern cameras, a key engineering detail for polarising filter photography.
“A polarizer works by removing glare as you rotate the filter. You can fine-tune this for each scene, but removing glare lets you show off the scene’s natural colour, see through water, and cut glare from foliage.”
This ability to fine-tune the effect is what gives polarising filter photography its creative depth. There is a window of control, not just an on/off switch.
Linear vs. Circular Polarisers
For modern polarising filter photography, the answer is always a Circular Polariser (CPL), due to autofocus compatibility. Linear polarisers were the original design and work perfectly in optical terms. However, they can confuse a modern camera’s metering and autofocus systems.
Modern cameras use a beam-splitter to direct light to the imaging sensor, metering sensor, and autofocus points. A linear polariser sends already-polarised light into this system, resulting in unreliable autofocus and exposure readings. A CPL solves this by adding a quarter-wave plate that “re-circularises” the light, so the AF and metering systems work correctly. The optical effect on glare remains identical. As Hoya explains, the CPL is designed specifically to control reflections while preserving autofocus.
If you’re shooting with any autofocus camera made after the mid-1980s, you need a CPL. One final note from photographer communities: Magnetic filters can fall off, while locking filters stay on. If considering a magnetic system, check reviews carefully, as some have a tendency to detach.
Real-World Benefits: Sky, Water, Foliage
Knowing when to use a polarising filter starts with recognising the surfaces where it delivers the most dramatic improvement.
Skies. The deep blue effect is strongest when the camera is at 90° to the sun. This works because the sky’s blue light is partially polarised. The filter blocks this component, increasing contrast between clouds and sky without digital simulation. This is a core benefit of polarising filter photography.
Water. A CPL eliminates surface sheen, revealing underwater rocks, sand, and fish. On a clear day, the filter can reveal detail up to 1–2 metres deep depending on water clarity.
Foliage. Wet leaves have a thin surface film that washes out colour. The CPL removes these micro-reflections, making greens richer and more saturated.
Glass. Window glare for interior shots, shop windows, and aquariums can be significantly reduced. The CPL does not affect metallic reflections like chrome or mirrors, as polarisation only occurs on non-metallic surfaces.

Caption: The same scene, same exposure—left shows surface glare obscuring detail, right shows the CPL removing reflections to reveal underwater texture and deepen the sky.
How to Use a Polarising Filter: Step-by-Step

You should use a polarising filter in photography whenever you’re shooting in bright light with reflective surfaces. Knowing how is what separates a wasted accessory from a transformative tool. The governing principle is simple: the 90° rule determines where to stand, and The Rotation Window determines how far to turn.
What You’ll Need Before You Start
Before you begin, confirm you have the following:
- A CPL filter matched to your lens thread size. Check the front of your lens for the ⌀ symbol (e.g., 52mm, 67mm, 77mm).
- A lens with a non-rotating front element. Some older lenses rotate when focusing, which will change the filter’s angle.
- Bright, directional light. Polarisers have minimal effect under flat overcast skies.
- A scene with non-metallic reflective surfaces like water, glass, or a blue sky.
- Awareness of the exposure penalty. You will lose 1.5 to 3 stops of light.
With your CPL on the lens, here’s how to get the most from it in your polarising filter photography.
The Rotation Window: Finding Peak Effect
The Rotation Window is the arc of CPL rotation—roughly 90° wide—within which the polarising effect is active and adjustable. Outside this window, the filter is essentially neutral glass, adding light loss without any benefit.
Finding the window is straightforward: slowly rotate the filter ring while watching your viewfinder or live view. You’ll see the sky darken and water clarify as you move through the window, then lighten again as you rotate past the peak.
Here’s the insight most guides skip: maximum polarisation is not always the most aesthetic position. Sometimes 60–70% polarisation produces more natural results. The Rotation Window gives you deliberate creative control. For a landscape with a river, rotate until the sheen just begins to disappear—not all the way to maximum—to retain some specular highlights that add depth.
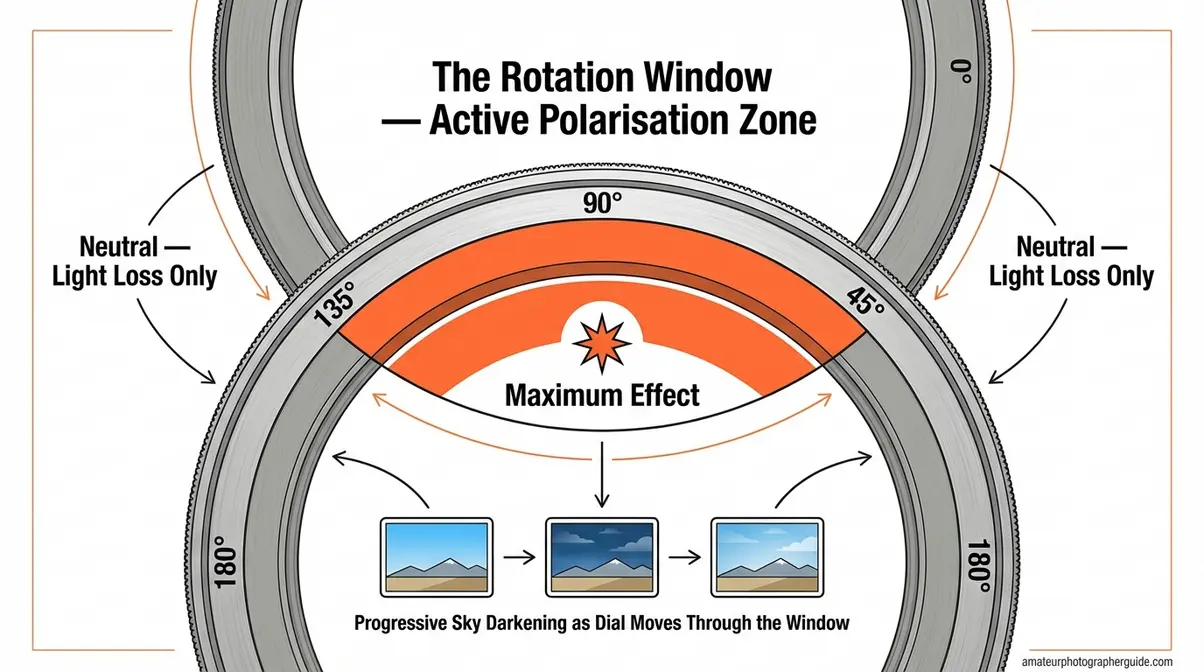
Caption: The Rotation Window spans roughly 90° either side of peak effect—outside it, the filter adds only light loss.
The 90-Degree Sun Rule & Hand Trick
When practicing polarising filter photography, the sun’s position is your starting point. The filter works best at 90 degrees to the sun—meaning the sun should be directly to your left or right. Brian Merry Photography confirms this as the governing rule for landscape use.
The hand trick—the fastest field method: Extend your right hand with your index finger pointing at the sun. Your extended thumb automatically points 90° away. That direction is your optimal shooting angle for maximum polarisation.
💡 Field tip: Point your finger at the sun—your thumb shows the sweet spot.
The effect diminishes as you move away from this angle. Pointing directly toward or away from the sun yields virtually no effect.
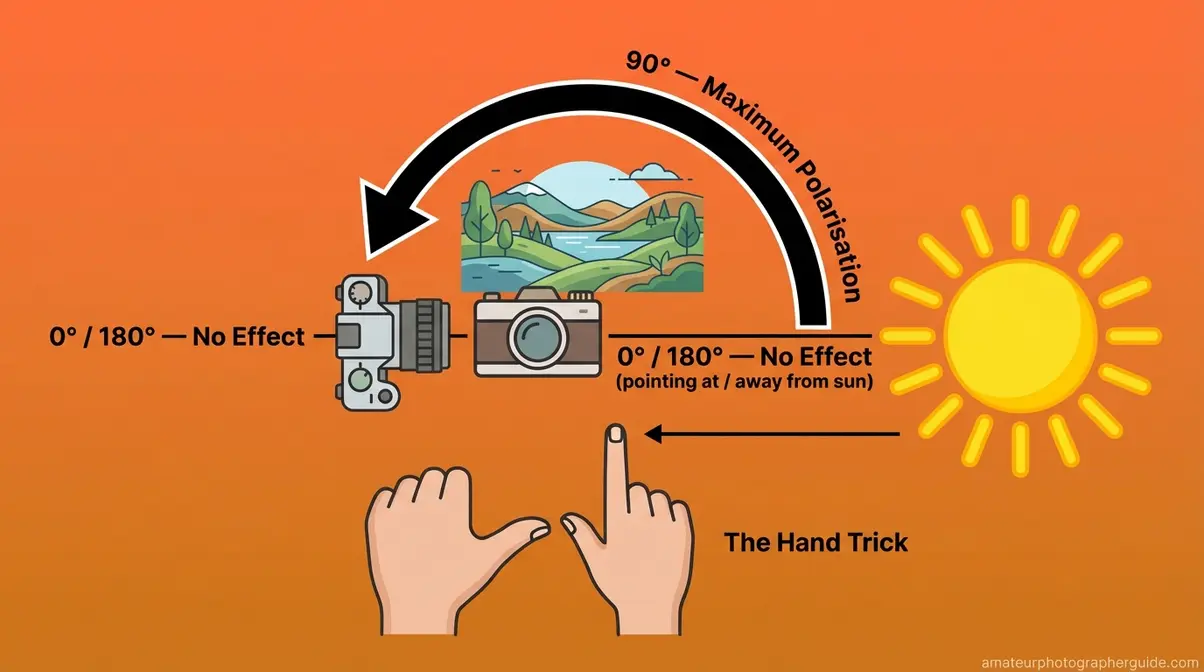
Caption: The hand trick gives you an instant field reference—index finger at the sun, thumb points to the optimal shooting direction.
Adjusting Your Exposure with a CPL
A CPL reduces incoming light by 1.5 to 3 stops, depending on the brand and polarisation applied (PolarPro, 2026). This is a significant reduction—a 2-stop loss cuts light to 25% of its original level. In manual mode, you’ll need to compensate.
There are three options, each with a trade-off:
- Wider aperture: reduces depth of field.
- Slower shutter speed: introduces motion blur risk.
- Higher ISO: increases digital noise.
For landscape work, a slower shutter speed is typically preferred. The filter’s light reduction acts as a mild ND filter, a creative advantage for long-exposure water shots. For general use, treat it as a bright-light tool and remove it when light drops.
When NOT to Use a Polarising Filter
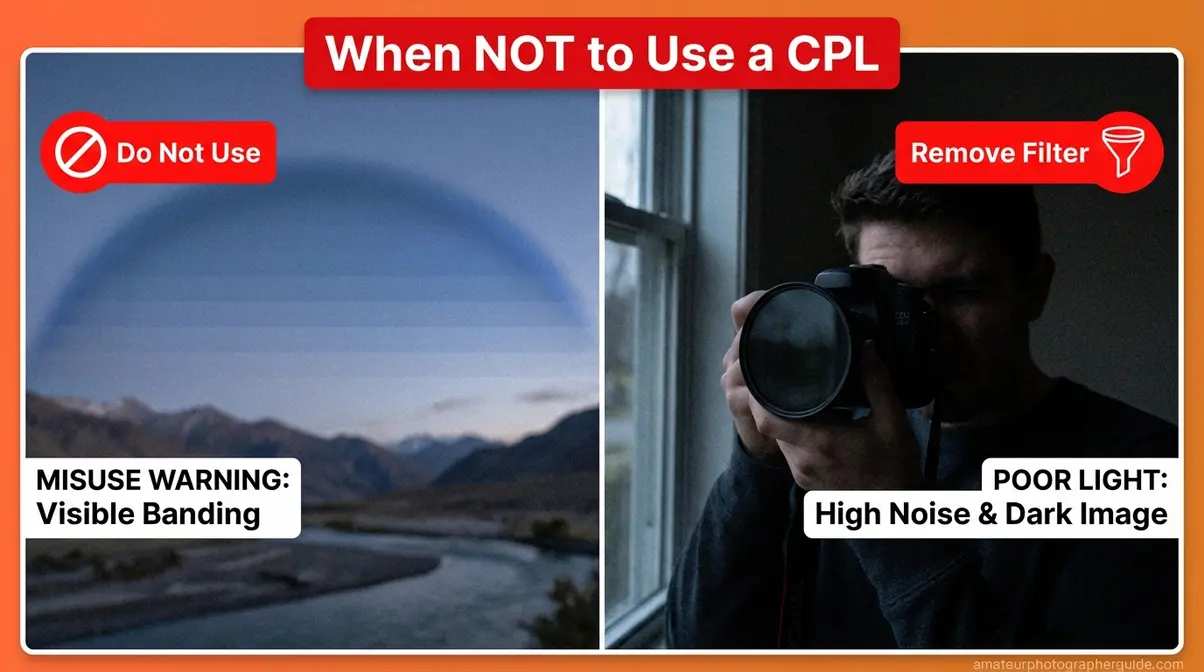
A polarising filter is one of the most useful tools in polarising filter photography, but it’s also easy to misuse. In some situations, it actively degrades the image. Understanding these limits is as important as knowing the benefits.
Wide-Angle Lenses & Sky Banding
This is a geometry problem. Wide-angle lenses capture such a broad arc of the sky that the polarisation effect varies across the frame. The area 90° to the sun is heavily polarised; other areas are not. This results in one section of sky going dramatically dark while the rest remains bright.
According to Fstoppers, this can result in an “uneven and unnaturally dark splotch” in the blue sky. The banding effect becomes noticeable below approximately 24mm equivalent and is often disfiguring below 18mm. A partial fix is to reduce the rotation to a lower setting.
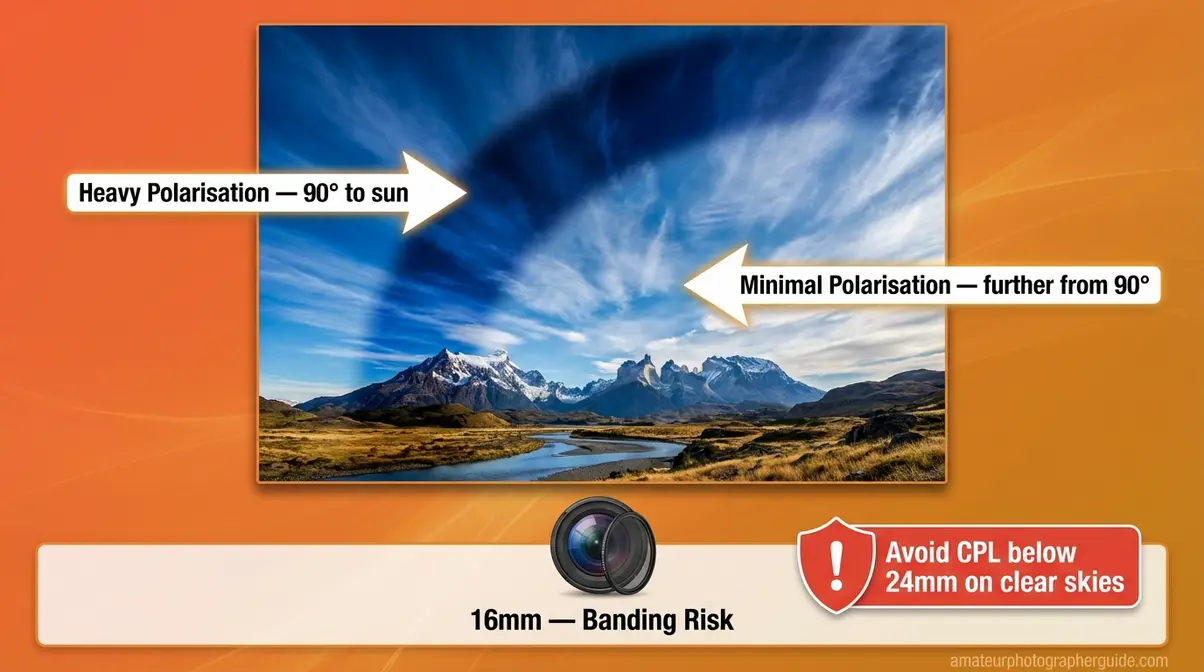
Caption: Sky banding below 24mm—the dark band on the left is heavily polarised sky; the lighter area right is not. No post-processing fix restores this evenly.
Fixing Sky Banding (Exposure Blending)
Photo Cascadia documents the dual-exposure blending technique for this problem. You shoot two photos with the CPL set to opposite positions—one optimised for the left side of the sky, one for the right—then blend the two exposures using a gradient mask in post-processing.
This technique adds time and requires a tripod, so it’s best for critical shots. For casual shooting, simply removing the filter below 24mm or zooming in to 28mm is faster and often eliminates the banding.
Low Light, Action, and Indoor Use
The 1.5–3 stop light penalty becomes a liability when light drops. At golden hour, indoors, or under overcast skies, it forces a difficult choice: high ISO noise, motion-blurring shutter speeds, or a very wide aperture.
For action photography, fast shutter speeds are essential. The filter’s light penalty forces a compromise that can ruin the shot. Remove it. Similarly, for indoor shooting, it’s better to reposition yourself or use a flag to block glare than to accept the light loss.
When Reflections Are the Subject
A CPL removes reflected light. This is normally desirable, but some compelling subjects are reflected light.
- Rainbows are formed by polarised light. A CPL can erase a rainbow from your frame.
- Still water reflections of a mountain in a lake are created by the same surface a CPL is designed to eliminate. Used deliberately, partial polarisation can reduce surface glare while retaining the primary reflection, but this requires careful rotation.
Common Pitfalls and Alternatives
Based on community feedback, four pitfalls appear most often in polarising filter photography:
- Using the filter below 24mm in a clear blue sky, which produces the banding artefact.
- Forgetting to remove the filter as light drops, pushing ISO into unacceptable noise territory.
- Stacking a CPL on a thick-ring ND filter with a wide lens, causing corner vignetting.
- Shooting directly toward or away from the sun, which produces no polarisation effect, only light loss.
In some cases, an alternative is better. For a long-exposure waterfall where you want motion blur and natural reflections, use only an ND filter. For an indoor portrait near a window in dim light, remove all filters and manage glare with a reflector.
CPL vs. ND vs. UV Filters: Which to Buy?
A CPL and an ND filter are not interchangeable. As Adorama’s 42West confirms, an ND filter reduces the amount of light for longer shutter speeds, while a polariser manages reflections and enhances colour. The table below resolves the confusion.
What Each Filter Does (Side-by-Side)
| Filter | Primary Purpose | Light Reduction | Rotation Effect | When to Use | When to Skip |
|---|---|---|---|---|---|
| CPL (Circular Polariser) | Remove glare, deepen skies, enhance colour | 1.5–3 stops | Yes—rotate to control effect | Bright sun, water, glass, foliage | Low light, action, wide-angle lenses |
| ND (Neutral Density) | Reduce all light for long exposures | 3, 6, or 10+ stops | No rotation effect | Waterfalls, motion blur, bright conditions | When glare reduction is needed |
| UV Filter | Minimal optical effect (digital); lens protection | Near zero | No | Harsh environments, coast, dust, drops | When sharpness is critical |
“An ND filter reduces all light uniformly to extend shutter speeds; a CPL selectively removes polarised reflected light to eliminate glare—they solve different problems and are not interchangeable.”
The key distinction: ND filters have no Rotation Window. For most outdoor photographers, the CPL comes first; its effects are unique. An ND filter can be added later for specific long-exposure work.
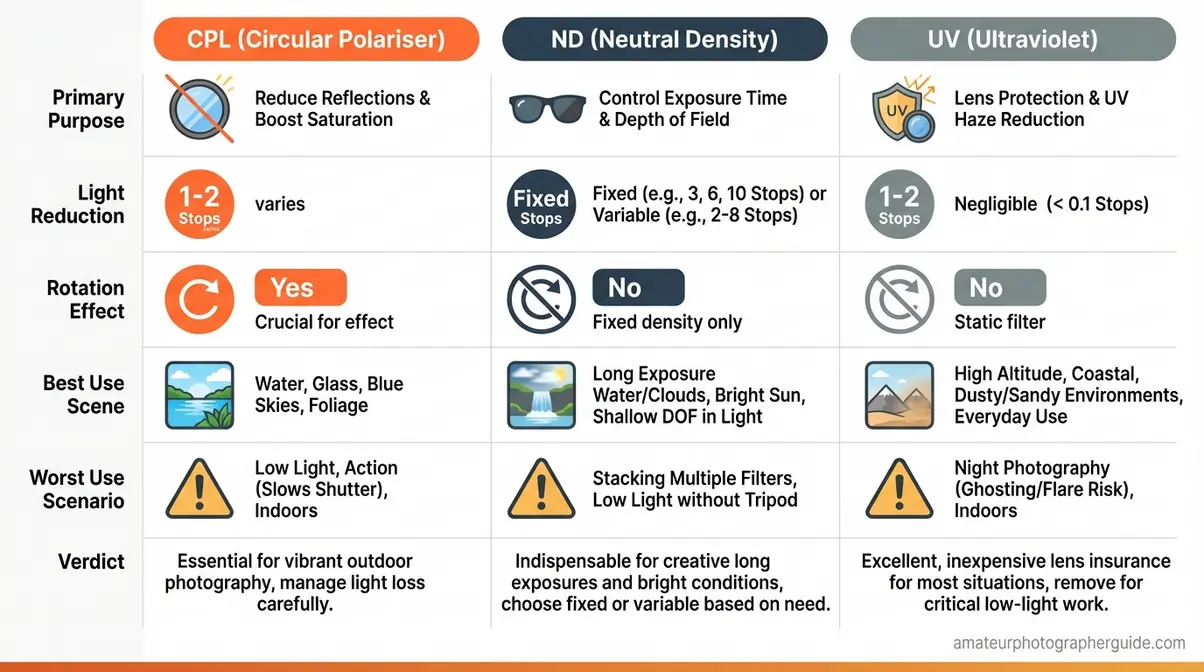
Caption: Each filter solves a distinct problem—a CPL manages reflected light, an ND manages total light volume, and a UV filter primarily offers physical lens protection on digital systems.
Using a CPL and ND Filter Together
Stacking is possible. Thread the ND onto the lens first, then the CPL on top. However, two problems can emerge. First, vignetting: two stacked filter rings can cause the edges of the frame to darken, especially on lenses wider than 35mm. Second, some ND filters introduce a colour cast a stacked CPL can amplify.
As PolarPro confirms, stacking both allows simultaneous long-exposure and glare control but increases vignetting risk. For a long-exposure waterfall in bright sun, this combination can be very useful.
Drone photographers note: A CPL is most useful on drones when the operator can plan the flight path 90° off-axis to the sun, a constraint that makes careful planning essential.
UV Filters: Protection or Just a Myth?
On film cameras, UV filters blocked ultraviolet light. Digital sensors are largely insensitive to UV, so the optical effect is near zero. The legitimate argument for a UV filter is physical protection; a £20 filter is cheaper than a £200 front element repair.
The counter-argument is that a cheap UV filter can reduce contrast and introduce flare. If you choose to use one, invest in high-quality optical glass (like B+W or Hoya) rather than a no-name filter that degrades your expensive lens’s performance.
Specialist Uses: Cars, Flowers, & Beyond

A polarising filter’s benefits extend well beyond landscape photography. For niches like automotive and floral work, glare management is the primary challenge, and polarising filter photography is the best solution.
Automotive: Reducing Paint & Window Glare
In automotive photography, a CPL is indispensable for controlling reflections on paint and windows. DPReview confirms it allows the true paint colour and body lines to show through instead of a washed-out reflection of the sky.
Position the car so the main reflective surfaces are at a 35–45° angle to your camera. Rotate the filter until window reflections disappear. Note that the CPL will not affect chrome trim or polished metal. For the best results, prioritise slim, multi-coated options to minimise colour cast.
Florals: Making Hidden Colours Visible
Wet petals and leaves have a surface film of water that scatters light and washes out colour. A flower photography polarising filter removes this reflection to reveal the saturated pigment beneath. The effect is most pronounced on glossy plants like tropical foliage, camellias, and waxy flower petals. For best results, shoot in bright, indirect light and rotate the filter until the sheen just disappears.
Weddings & Lifestyle: A Surprise Use
A wedding dress in direct sun can lose texture detail to specular glare. A CPL at partial rotation can reduce this reflection and restore fabric detail without over-darkening the scene. It’s also useful for reducing glare when shooting subjects near or through venue windows, though the light penalty must always be considered. This is a subtle but powerful technique in a photographer’s toolkit.
Frequently Asked Questions
What does a polarizing filter do?
A polarising filter reduces glare from non-metallic reflective surfaces like water, glass, and wet leaves by blocking reflected light. This deepens blue skies, makes water appear transparent, and restores colour saturation to foliage. The effect is visible in real-time as you rotate the filter. Unlike software adjustments, the filter works at the point of capture to remove light that would otherwise be recorded as permanent glare.
When should you not use a CPL?
Remove your polarising filter in low-light, at night, or when shooting fast-moving subjects, as the 1.5-to-3-stop light penalty forces difficult compromises. It should also be removed when using lenses wider than 24mm, as it can create uneven dark banding across the sky. Finally, if reflections like a rainbow or a mirror-calm lake are an intentional part of your shot, the filter will eliminate them.
How many stops of light do you lose?
A standard circular polarising filter reduces incoming light by 1.5 to 3 stops, depending on the brand and rotation (PolarPro, 2026). This is a significant reduction, requiring you to compensate with a wider aperture, slower shutter speed, or higher ISO. Premium filters typically lose closer to 1.5 stops, while budget options may lose up to 3 stops. The light loss is greatest at the point of maximum effect.
Is a polarising filter worth buying?
Yes—a polarising filter is worth it for any photographer who regularly shoots outdoors. Its primary effects, like eliminating glare and making water transparent, cannot be replicated in post-processing. For landscape, travel, and automotive photography, the filter delivers visible improvements in nearly every bright-light scene. It represents one of the highest return-on-investment accessory purchases available, according to many sources like Photography Life.
Conclusion: Getting the Most from Your CPL
For outdoor photographers, polarising filter photography delivers results that no editing software can replicate. The filter’s ability to remove glare, deepen blue skies, and reveal hidden colour—at the moment of capture—makes it one of the highest-value accessories in any kit bag. A quality CPL loses 1.5–3 stops of light but transforms images that would otherwise be impossible to fix.
The key is understanding The Rotation Window—the arc of deliberate control that separates a photographer who uses a CPL from one who masters it. Point your camera 90° to the sun, rotate to your preferred effect within that window, and adjust your exposure. The window isn’t just a technique; it’s a mental model for more intentional polarising filter photography.
Start with a mid-range CPL in the thread size of your most-used lens. Take it to a body of water on a bright day and rotate through The Rotation Window. The result—crystal-clear water, a deep blue sky, and colours your camera has never recorded before—will make the purchase obvious.
