
Table of Contents
This blog post may contain affiliate links. As an Amazon Associate I earn from qualifying purchases.
That plastic ring sitting in the bottom of your camera box — or still clipped to your lens and completely ignored — is not just packing material. It is one of the most underused pieces of photography equipment beginners own, and it is almost certainly hurting your photos right now.
Every time you shoot toward a window, a lamp, or the sun sitting just outside the frame, stray light (unintended light rays that hit the lens from the side) can wash out your colours and flatten your image’s contrast. Without protection, your expensive front glass is also one accidental knock against a table edge away from a scratch that a repair shop will charge you dearly to fix. So what is a lens hood for, exactly? It is a two-in-one tool that stops both problems at once.
By the end of this guide, you will know exactly what a lens hood does, which shape fits your lens, and one simple rule you can apply every time you pick up your camera. We will start with the basics, cover the two key benefits, walk through hood types and step-by-step usage, and finish with quick answers to the most common questions.
A lens hood is a ring-shaped attachment that blocks stray light from hitting your lens, preventing washed-out images and lens flare — while also acting as a physical bumper for your front glass element.
- Block stray light: Prevents lens flare and ghosting for punchier, higher-contrast shots
- Physical protection: Shields the front glass from bumps, scratches, and light moisture
- The Optical Armor Protocol: Keep it on 99% of the time — remove only for built-in flash, intentional creative flare, or extreme wind
- Shape matters: Petal hoods = wide-angle lenses; cylindrical hoods = telephoto lenses
What Is a Lens Hood?
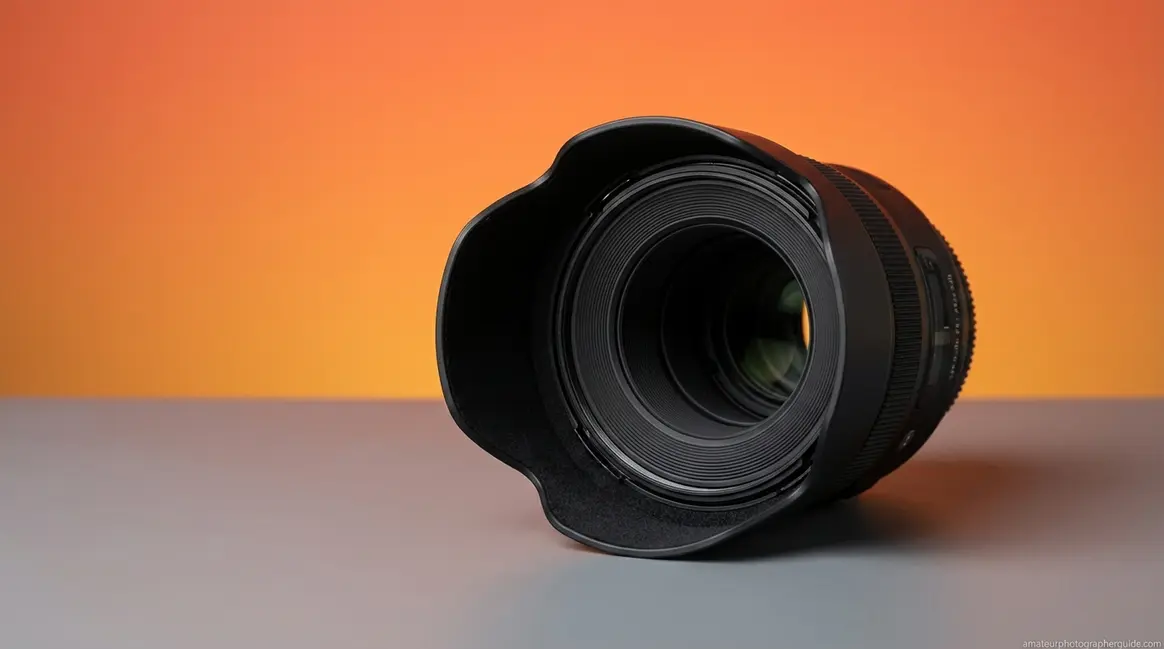
A lens hood is a ring-shaped shield that attaches to the front of your camera lens to block stray light — unwanted light rays from outside your frame — from reaching the glass. It also extends beyond the front element (the exposed glass disc at the very tip of your lens) to act as a physical bumper. Those two jobs together make it one of the most cost-effective accessories you can own, and the good news is that your lens almost certainly came with one already.
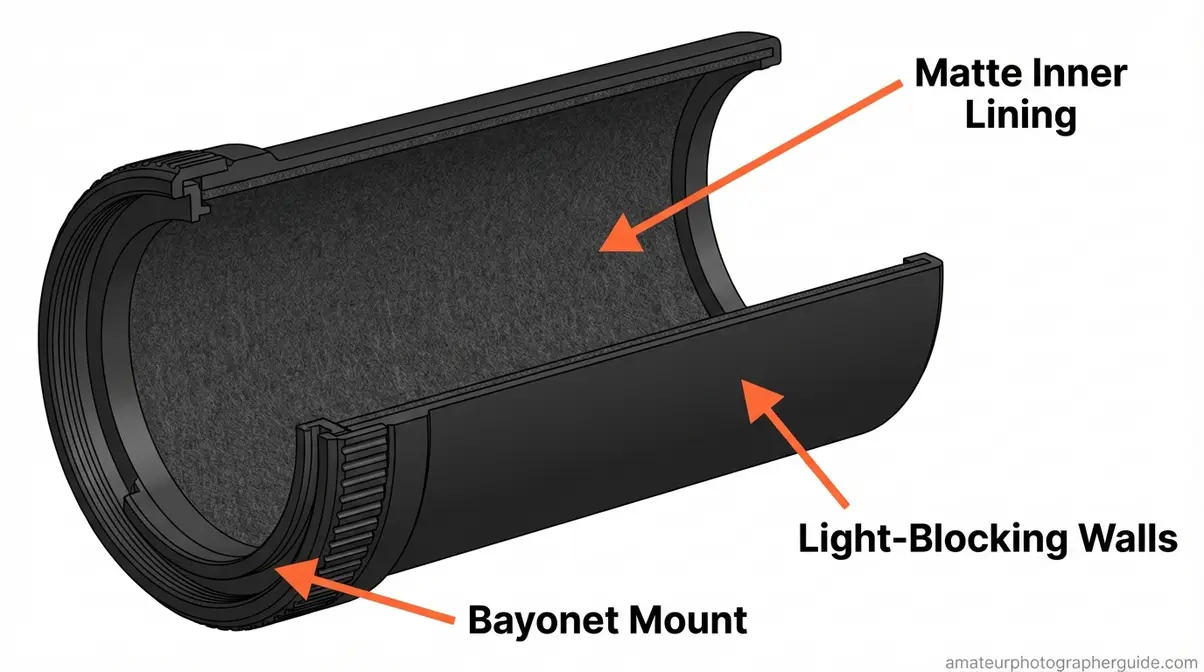
Caption: The three key parts of a lens hood: the bayonet mount that locks it in place, the matte inner lining that absorbs light, and the extending walls that do the blocking.
The Anatomy of a Lens Hood
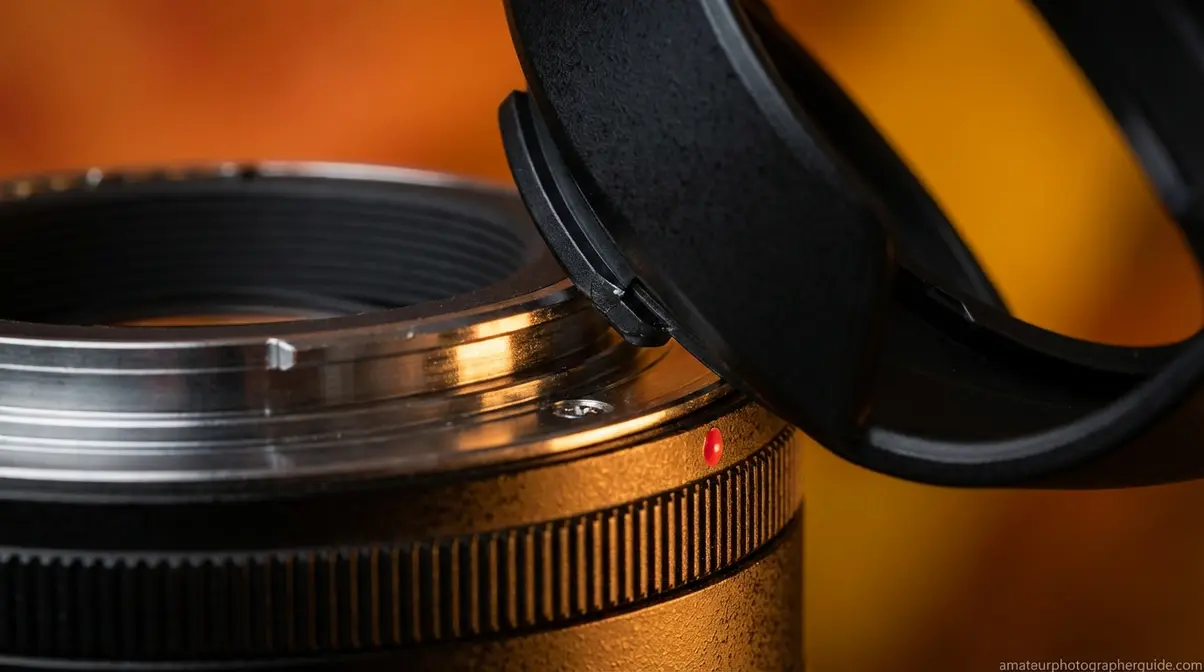
Pick up your lens and look at the very front rim. If you see a thin ring of small ridges with a dot or coloured line, you are looking at a bayonet mount — the twist-lock ring at the front of most modern lenses that the hood clips onto. This is the most common attachment system. Push the hood on, rotate it clockwise, and it locks with an audible click.
The hood itself is a hollow tube or flower-shaped shell, usually made from rigid plastic or, on higher-end lenses, aluminium. The inside surface matters just as much as the shape: quality hoods line their interior with matte black material or a flocked felt finish. That dull surface absorbs any light that sneaks past the rim. A shiny interior would create its own unwanted reflections — the opposite of the job.
The second attachment type you may encounter is a screw-thread mount, used on older lenses or some third-party hoods. Instead of locking with a click, these simply screw onto the filter thread at the front of the lens. They work well, but they do not allow reverse mounting for storage (more on that in Step 3 below). If you look at the front of your lens and see the symbols ø52, ø58, or ø77, those are the filter thread sizes — and they will be important when you shop for a replacement hood.
Now that you can see what the hood is made of and how it connects, the next question is why any of this matters for your photos.
Blocking Stray Light and Lens Flare
What does a lens hood do for your image quality? It blocks stray light — any light that enters your lens from outside the area you are actually photographing. Imagine you are shooting a portrait outdoors and the sun sits just out of frame to your left. Those angled rays still reach your lens. Once inside, they bounce between the glass elements and create two specific problems.
The first is lens flare — the bright streaks, starbursts, or coloured circles that appear across your photo when strong light hits the lens at an angle. The second is ghosting — faint, transparent copies of the light source that appear as coloured shapes drifting across the frame. Both effects reduce contrast (the difference between your darkest and brightest tones) and strip the image of colour saturation, producing that flat, “washed out” look that no amount of editing can fully rescue.
The hood acts as a visor for your lens, the same way the peak of a cap shades your eyes from side glare. Its walls extend far enough to shade the glass from off-axis light without cutting into the actual photo. For a practical measure of what this means: in side-by-side field tests shooting toward a direct light source at a 45° angle, the hooded version consistently shows a recovered black point on the histogram — meaning the darkest tones in the image are richer and deeper, not diluted by scattered light. The unhooded shot looks as if someone turned down the contrast slider.
One question comes up regularly among beginners who have bought modern lenses: “My lens has multi-element coatings — do I still need a hood?” The answer is yes, unambiguously. A lens hood blocks stray light that enters from outside the frame — something even modern 2026 multi-coated lenses cannot prevent on their own.
Multi-element coatings reduce internal reflections between glass elements already inside the lens. They cannot change the geometry of off-axis light that has not yet entered the barrel (Edmund Optics, 2024). The physics of stray light make hoods necessary regardless of coating quality. For a deeper look at the physics of stray light and optical baffling, Edmund Optics explains how baffles and lens hoods remain essential mechanical methods even in modern optical systems.
You can also read our full guide to understanding lens flare impact to see exactly how contrast and saturation losses compound across an image.
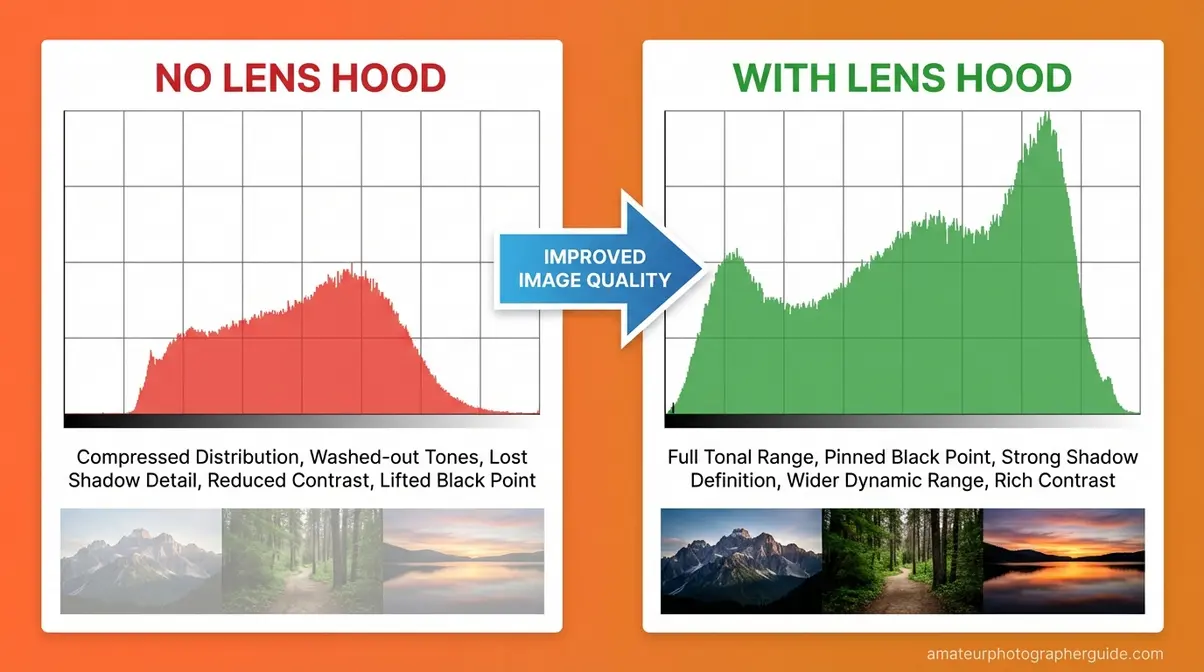
Caption: The histogram on the right (with lens hood) shows a clearly defined black point — proof that the hood restored shadow depth that stray light destroyed in the left image.
Shielding Your Lens from Damage
The optical argument alone should be enough to keep the hood on permanently. But the physical protection case is just as compelling — and far easier to explain.
A typical lens hood extends between 20mm and 60mm beyond the front glass element. Any accidental knock against a door frame, a table corner, or a fellow photographer’s elbow hits the hood’s rim first, not the glass. That distinction is significant because the front element — the exposed glass disc at the very tip of your lens — is the most expensive individual piece to replace on most lenses, often costing more than the lens is worth second-hand.
Data from lens repair centres, including reporting from LensRentals, suggests that a correctly fitted lens hood often provides superior impact protection compared to a UV filter. A hood absorbs shock through the bayonet mount structure before it reaches the glass; a UV filter, by contrast, sits directly on the front element and can shatter against it under impact — sometimes causing the very damage it was meant to prevent. For more detail on the impact protection effectiveness of lens hoods, LensRentals’ repair blog documents real-world patterns from thousands of returned lenses (LensRentals, 2016).
One of the clearest answers to “what is a lens hood good for” is simply: peace of mind for your glass. The hood also doubles as a basic environmental shield. It deflects light drizzle away from the front element, reduces the chance of an accidental fingerprint on the glass, and creates a partial barrier against wind-blown dust in outdoor conditions. None of these are weather-sealing — a hood is not a substitute for a weather-sealed lens and body — but for everyday knocks and light environmental exposure, the protection is genuine.
Video: How to Store Lens Hoods Correctly (Reverse Mounting Tutorial)” — Source: YouTube
Many beginners also buy a UV filter for protection. Both items can coexist, but be aware of the compatibility issue that arises when stacking filters with a hood — we cover that directly in Step 4 of the attachment guide below.
Types of Lens Hoods: Petal & Cylindrical
Lens hoods do not all look the same because they are not meant to. The shape is determined by how wide a field of view your lens captures. A wider lens sees more of the scene from corner to corner, which means a round tube hood would cut into the corners of that wide view — producing vignetting (the unwanted darkening of a photo’s corners when the hood’s walls intrude into the frame). Getting the shape wrong does not just look odd; it can actually harm your images by either blocking the picture or, if the hood is too short, leaving the glass partially unprotected.
Think of it this way: putting your hands around your eyes in a dark cinema gives you a focused view forward. But if your hands are too large, they creep into your peripheral vision. That is vignetting. The petal shape solves this by removing the excess from the corners of the hood — leaving only the parts that block side glare without interrupting the frame.
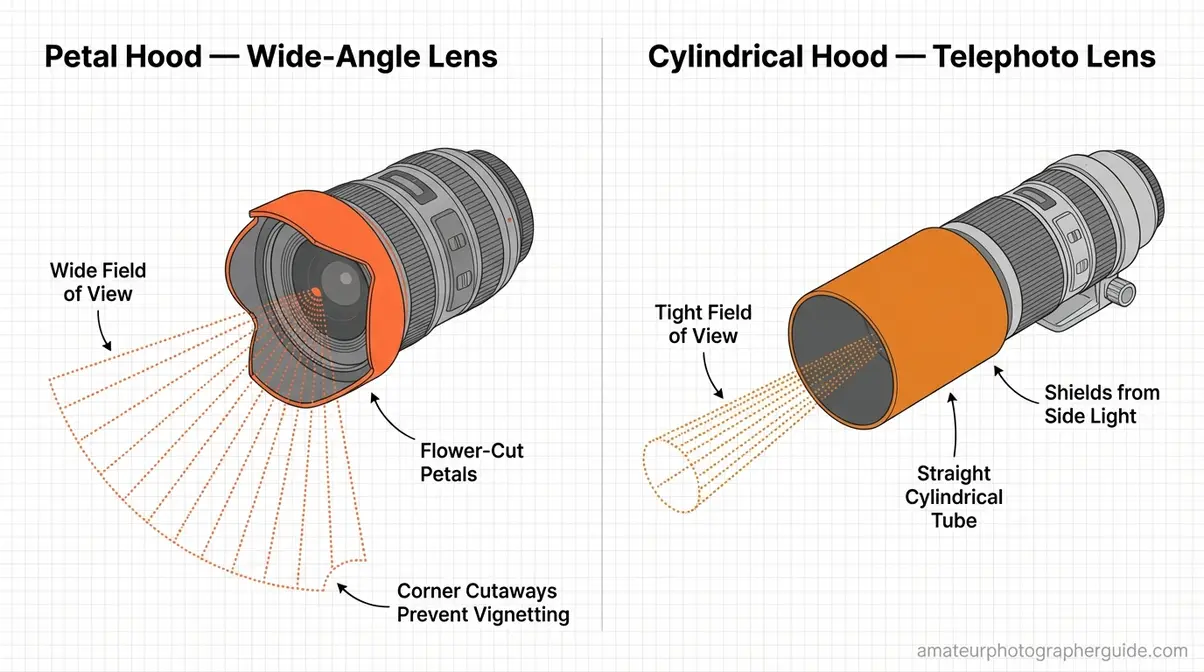
Caption: The petal hood (left) cuts away the corners to match a wide-angle lens’s broad field of view. The cylindrical hood (right) uses a straight tube because a telephoto lens’s narrow angle leaves no risk of corner intrusion.
Petal Hoods for Wide-Angle Lenses

A tulip hood — also called a petal hood — is used for wide-angle lenses because these lenses capture a very broad slice of the scene, typically anything with a focal length under roughly 50mm on a full-frame camera. A standard round tube would block the extreme corners of that wide view, producing dark vignetting. The petal shape solves this by cutting the hood’s walls down at the corners, leaving four curved “petals” that still block light from the sides and top while keeping the corners of the frame clear.
Think of it as a hat with the brim trimmed short on two sides. You still get shade from the sun above and to the sides, but your wide peripheral vision is completely unobstructed. The result is maximum stray light blocking with zero intrusion into the image.
One critical detail: petal hoods must be aligned correctly when you attach them. The petals need to sit at specific rotational positions — almost always marked by a dot, arrow, or coloured line on both the hood and the lens mount. If the hood is rotated even 45° from its correct position, a petal will sit in a corner of the frame and cause vignetting. A quick test shot of a plain sky (covered in Step 2 below) confirms you are aligned before you start shooting.
Common petal hood examples on beginner lenses include the Canon ES-68 for the 50mm f/1.8 STM and the Nikon HB-47 for the AF-S 50mm f/1.8G. You can read more about wide-angle lens requirements to understand why focal length changes the field of view calculation. The difference between petal and cylindrical hoods is covered in practical depth at B&H Explora, including alignment tips for each type (B&H Explora, 2024).
Telephoto lenses face the opposite challenge — they see a very narrow slice of the world, so a simpler shape works perfectly for them.
Cylindrical Hoods for Telephoto Lenses
Telephoto lenses — generally anything from 85mm and above — capture a much narrower field of view than wide-angle lenses. A cylindrical (round tube) hood can extend much further out from the lens without its edges ever entering the frame, because the angle of view is too narrow for that to happen. There is no vignetting risk, so the simpler, structurally stronger tube shape is used instead.
The longer the tube, the more effectively it shields the glass from steep off-axis angles — which is why longer telephoto lenses often come with correspondingly longer hoods. A 70-200mm zoom, for instance, uses a substantially deeper hood than an 85mm prime. The tube is also easier to grip, which makes it a practical aid when carrying the camera by the lens on a heavy telephoto rig.
Common examples include the Canon ET-74B for the EF 70-200mm f/4L IS II and the Nikon HB-62 for the AF-S 85mm f/1.8G. These alphanumeric codes are the manufacturer’s reference numbers — important when ordering a replacement, and covered further in the brand codes section below.
Petal-shaped hoods are specifically designed for wide-angle lenses to block stray light without entering the frame, whereas cylindrical hoods are optimised for telephoto lenses with narrower fields of view (B&H Explora, 2024).
Here is a quick reference for all four hood types:
| Hood Type | Shape | Best For | Typical Focal Length | Vignetting Risk |
|---|---|---|---|---|
| Petal (Tulip) | Flower-cut | Wide-angle lenses | Under ~50mm (full-frame) | None if aligned correctly |
| Cylindrical | Round tube | Telephoto and prime lenses | ~50mm and above | Very low |
| Square (Rectangular) | Box-shaped | Cinema and video lenses | Variable | If mismatched |
| Rubber (Collapsible) | Adjustable tube | Travel, compact kits | Variable | If over-extended |
“
Beyond the two main types, two more specialised versions are worth a quick mention.
Specialty Types: Square and Rubber Hoods
Square hoods (also called rectangular hoods) are used primarily on cinema and professional video lenses. Their box shape precisely matches the rectangular sensor used in video capture and can accept filter holders — useful for adding ND or graduated filters on a film set. Most beginners will never own one, but you may see them on video shoots and wonder what they are.
Rubber (collapsible) hoods are flexible, fold completely flat, and can be adjusted for different focal lengths by rolling the edge back. They are popular with travel photographers who value compact packing, and they also work on older lenses that use a screw-thread rather than a bayonet mount. The trade-off is durability — rubber hoods are easier to accidentally deform in a tight bag and less rigid than their plastic or metal equivalents. For occasional travel use, they are a practical and affordable option.
When to Keep Your Lens Hood On

A lens hood should stay on in the vast majority of shooting situations — including indoors and on overcast days — because diffuse artificial and natural light can still reduce image contrast from off-axis angles. That is the default position. The question of lens hood vs. no lens hood is almost always settled the same way: keep it on.
Caption: The same scene, same camera, same settings. The lens hood on the right recovers shadow depth and colour saturation that stray light destroyed in the left image.
The Default Rule: Keep It On 99%
What is a lens hood used for in photography on a cloudy Tuesday afternoon indoors? The same thing it is used for in direct sunlight: blocking off-axis light and protecting the glass. The conditions change, but the job does not.
As Cambridge in Colour’s analysis of lens flare explains, lens flare reduces contrast and colour saturation through what optics call “veiling glare” — a diffuse brightening of the image caused by scattered light. A lens hood is the primary tool to eliminate this, even in diffuse lighting conditions, because how lens flare reduces image contrast is a function of geometry, not light intensity (Cambridge in Colour, 2024).
Here is how the default rule applies to the three scenarios where beginners most often doubt it:
- Indoors (artificial light): Ceiling panels, desk lamps, and overhead spots sit at angles outside your frame. They still scatter light into your lens. Hood stays on.
- Overcast or cloudy days: Diffuse grey-sky light enters from a very wide angle. The hood still reduces the volume of off-axis light reaching the glass — and it provides a useful rain deflector for light drizzle.
- Night photography: Street lamps, neon signs, and car headlights are intense point light sources. They cause strong flare and ghosting when positioned near the frame edge. Hood stays on.
Physical protection applies in every one of those conditions too, regardless of the light.
“No matter the weather, always use a lens hood.”
This is Rule 1 of The Optical Armor Protocol: the hood is your lens’s armour. Armour stays on unless you have a specific reason to remove it — and there are only three of those reasons.
Three Situations to Remove Your Hood
Choosing between a lens hood vs. no lens hood comes down to three clear exceptions. Outside of these, Rule 1 applies.
Exception 1 — Built-in pop-up flash. The hood physically blocks the light cone that spreads from the camera’s built-in pop-up flash. The result is a hard shadow cast across the bottom of your frame — a dark crescent that ruins the shot. Remove the hood when using the pop-up flash only. An external hotshoe flash mounted above the camera sits high enough that the hood does not interfere. See our guide to indoor flash photography setups for how to handle low-light shooting without a built-in flash.
Exception 2 — Intentional creative flare. Some photographers deliberately let light strike the lens to create a sunburst, halo, or lens rainbow as an artistic effect — common in wedding photography, music videos, and golden-hour landscape shots. If you want that effect, the hood is preventing it. Remove it deliberately and reattach immediately after.
Exception 3 — Extreme wind with a telephoto lens. In strong, sustained wind, a deep cylindrical hood on a long telephoto lens acts like a sail — amplifying camera shake in a way that image stabilisation may not fully correct. This is a rare scenario, but worth knowing if you shoot wildlife or sport in exposed conditions.
This is Rule 2 of The Optical Armor Protocol: take the hood off only for these three exceptions. Everything else means the hood stays on.
| Situation | Hood? | Reason |
|---|---|---|
| Outdoor daylight | ✓ On | Blocks directional sun |
| Indoors (ambient light) | ✓ On | Blocks lamp and window stray light |
| Overcast or cloudy | ✓ On | Blocks diffuse angled light; deflects rain |
| Night photography | ✓ On | Blocks street lamp flare and ghosting |
| Built-in pop-up flash | ✗ Off | Hood casts a shadow across the frame |
| Intentional artistic flare | ✗ Off | Hood eliminates the desired creative effect |
| Extreme wind (telephoto) | ✗ Off | Hood acts as a wind sail, amplifying shake |
Now that you know when to use it, here is exactly how to attach it, store it, and handle it correctly — including the filter-stacking situation that most guides skip entirely.
How to Attach, Store, and Use a Lens Hood
Attaching a lens hood correctly takes under five seconds once you know the process. The four steps below cover everything: attaching the hood, checking your work, storing it without adding bulk, and handling it alongside screw-in filters.
You will need: Your lens, your lens hood, and access to a blank wall or open sky for the vignetting test in Step 2. Estimated time: under 2 minutes for first-time setup.
Step 1: Align and Attach the Hood
Hold the lens facing toward you. Find the alignment mark on the hood — usually a white dot, coloured line, or small arrow on the edge of the mount. Match this mark to the corresponding mark on the lens rim. Gently push the hood onto the front of the lens and rotate clockwise until you feel and hear a firm click. That click is your confirmation that the hood has seated into the bayonet lock.
Try to rotate the hood further after the click — it should not move. If it still rotates freely, the hood has not seated. Remove it, re-align the starting marks, and try again. Canon confirms that correctly attaching and using a lens hood is one of the simplest ways to improve image quality and protect the front element — see their official benefits of using a lens hood guide for model-specific attachment diagrams (Canon USA, 2024). Never force the hood; if you feel resistance before the click, re-align the starting mark and begin again.
Step 2: Check for Vignetting After Attachment
After attaching the hood, take one test shot of a plain sky or a white wall, using the widest focal length on your lens (the shortest zoom setting if you have a zoom lens). Then zoom into the corners of the photo on your camera’s LCD screen. If the corners appear darker than the rest of the image, or if you can see the rounded edge of the hood curling into the frame, the hood is misaligned. Remove it, rotate it back to the starting alignment mark, and re-attach. One test shot prevents this problem every time — it is the most common beginner mistake and takes ten seconds to rule out.
Step 3: Reverse-Mount for Compact Storage
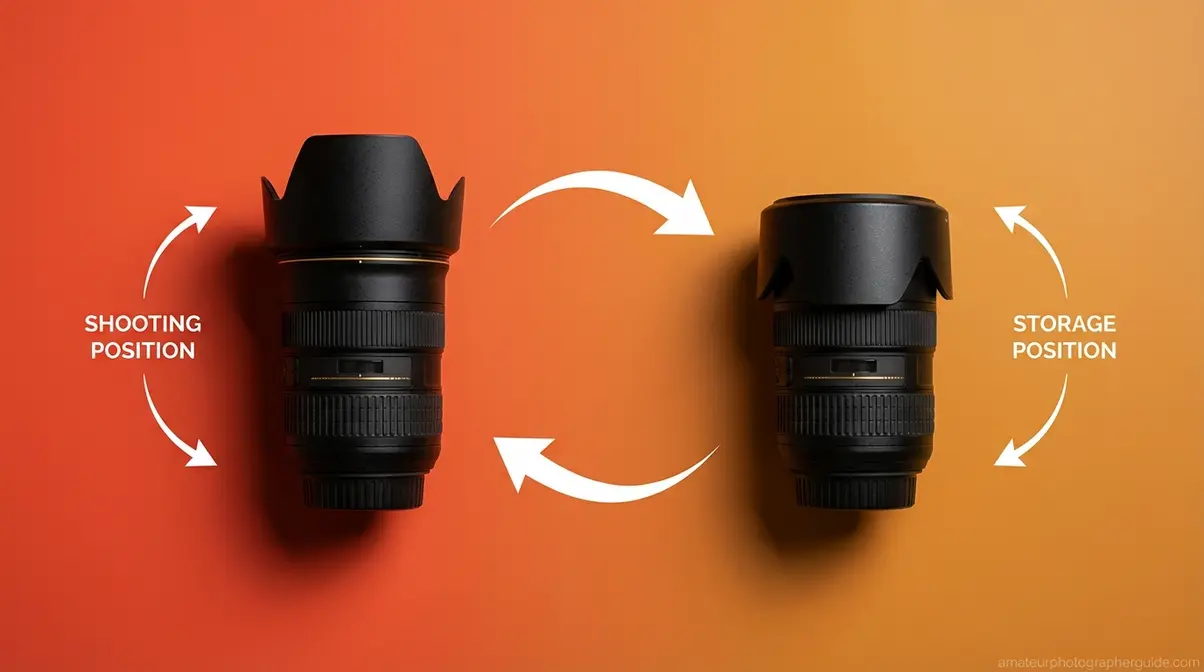
When packing your lens into a camera bag, you do not need to remove the hood entirely. Instead, remove it from the front, rotate it 180°, and mount it facing backward over the lens body. The open end of the hood now cups around the lens barrel rather than pointing forward — reducing the overall length of the lens by 30–60mm in your bag.
All petal and cylindrical hoods support reverse mounting. The hood is still on the lens in this position: it is protecting the barrel from side impact and keeping dust off the surface. Think of it as the armour in storage mode — it has not come off, it has just changed orientation for travel.
Step 4: Using a Hood with Screw-In Filters
This is the step that most photography guides skip — and the one most likely to cause a frustrating problem if you use both a hood and a screw-in filter (such as a CPL filter, a circular polarising filter that screws onto the lens to reduce reflections and deepen sky colour, or a UV filter, a clear glass filter used for basic protection).
Here is the issue: a screw-in filter adds a few millimetres of height to the lens rim. When you attach a petal hood on top of a filter on a wide-angle lens, the hood now sits fractionally further from the glass. On lenses shorter than roughly 35mm, that extra height can push the hood walls into the corners of the frame, causing vignetting. This does not happen on telephoto lenses, where the narrower field of view means the corners are safe.
The solution is simple: use a slim-profile filter (look for “Slim” or “Ultra-Slim” in the product name) when combining filters with a petal hood on a wide-angle lens. Slim filters add only 1–3mm rather than the 5–7mm of a standard filter ring. Always repeat Step 2 after adding a filter to confirm your corners are clear.
| Lens Type | Hood Shape | Standard Filter | Slim Filter | Vignetting Risk |
|---|---|---|---|---|
| Wide-angle (under 35mm) | Petal | ⚠️ High risk | ✓ Low risk | Always check corners |
| Standard (35–85mm) | Petal or Cylindrical | ✓ Usually fine | ✓ Fine | Check corners |
| Telephoto (over 85mm) | Cylindrical | ✓ Fine | ✓ Fine | Very low risk |
How to Choose the Right Lens Hood for Your Camera
The right lens hood is not universal — it is specific to your lens. Two numbers on your lens tell you everything you need to know: the filter thread diameter and the focal length range. Together, they narrow your search to the correct hood in under a minute.
Start with Your Lens’s Filter Thread
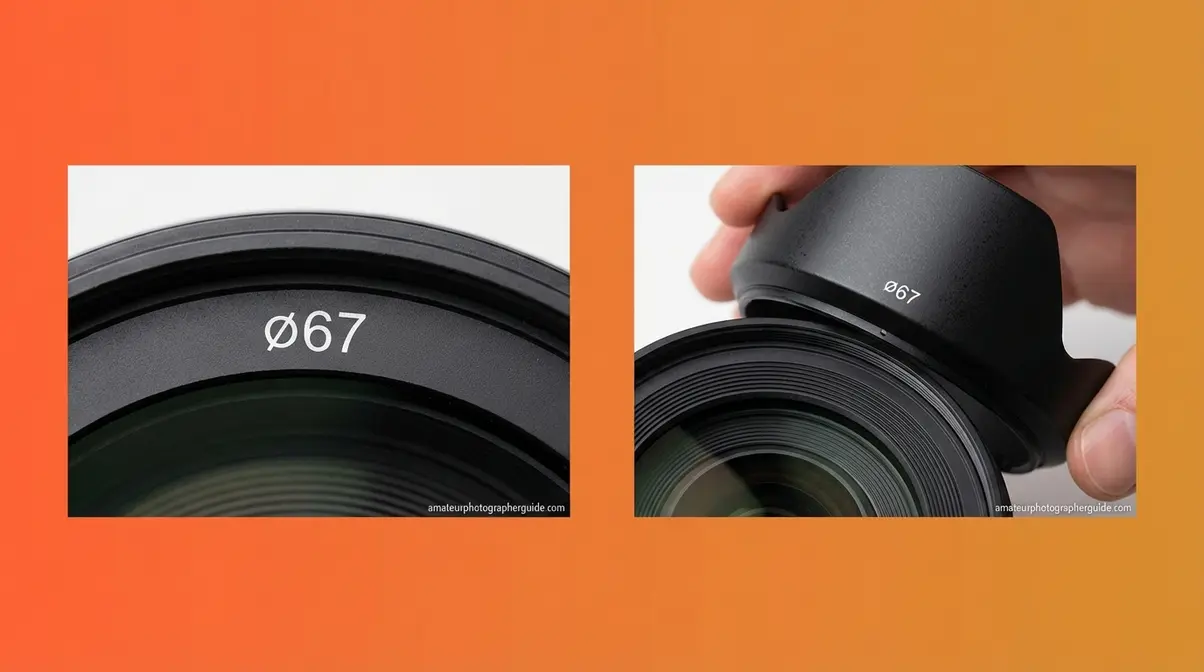
Look at the front rim of your lens barrel, or check the inside of the front lens cap. You will see a symbol that looks like this: ø52, ø58, ø67, or ø77. The ø symbol means diameter, and the number is the lens’s filter thread size in millimetres. This is the measurement that third-party hood manufacturers use to determine compatibility.
If you are buying the original manufacturer’s hood — always the safest compatibility choice — you do not need to match by filter thread size. The manufacturer assigns a specific model code to each hood, matched exactly to the lens. You simply look up your lens model and buy the corresponding hood code. If you are buying a third-party hood, match the filter thread size first, then check that the hood is designed for your lens’s focal length range (wide-angle vs. telephoto) to ensure the correct depth.
A mismatch in depth is the most common mistake: a hood designed for an 85mm lens placed on a 24mm lens will cause vignetting because it is too long for the wide field of view.
Canon, Nikon, and Sony Codes Decoded
Each major camera brand uses its own coding system for lens hoods. Once you know the pattern, finding the right hood is straightforward.
Canon uses the prefix ES for petal hoods and ET for cylindrical hoods. Examples: ES-68 (for the EF 50mm f/1.8 STM), ET-74B (for the EF 70-200mm f/4L IS II). The number relates to the lens model — cross-reference on Canon’s official accessories page.
Nikon uses the prefix HB for bayonet-mount petal hoods and HN for cylindrical screw-mount hoods. Examples: HB-47 (for the AF-S 50mm f/1.8G), HB-62 (for the AF-S 85mm f/1.8G). Nikon also uses HK codes for some older and specialty hoods. For a full breakdown by lens model, Nikon’s compatibility pages are the definitive source. You can also browse our Nikon camera and accessory guide for model-specific pairing advice updated for 2026.
Sony E-mount lenses use the prefix ALC-SH followed by a number (for example, ALC-SH168 for the FE 50mm f/1.8). Sony’s full-frame FE lenses almost always include the matching hood in the box.
If you have lost your original hood or need a replacement, the fastest approach is to search your full lens model name plus “lens hood” on the manufacturer’s accessories page. Third-party alternatives (from brands like Vello, JJC, or Altura Photo) are widely available at lower cost and typically match the same bayonet geometry — but always verify the specific lens model in the listing before ordering.
Other Lens Accessories Worth Knowing
Once you have your hood sorted, two other accessories frequently appear in beginner photography conversations: the lens pen and the lens cap. Neither replaces the hood, and understanding the difference prevents a common confusion.
A LensPen is a compact dual-ended cleaning tool designed specifically for optical glass surfaces. One end has a soft retractable brush for sweeping away dust and loose particles. The other end is a flat carbon-based cleaning tip that lifts fingerprints, oil smudges, and moisture residue from the glass without liquid.
The carbon compound is formulated to be safe on lens coatings and leaves no residue. For a closer look at the carbon-based lens cleaning technology behind LensPen tools, their site explains the chemistry of the cleaning compound (LensPen, 2024). A LensPen solves a different problem than a hood: the hood prevents contamination reaching the glass in the first place; the LensPen removes anything that gets through. Keep both in your bag. For a fuller guide to keeping your glass in top condition, our camera lens cleaners guide covers cleaning kits, solutions, and safe technique in detail.
A lens cap protects the front element when the camera is not in use. The lens cap and the hood are not interchangeable — the hood stays on during shooting; the cap goes on only when the camera is put away. When you use the reverse-mount storage method from Step 3, remove the cap before shooting, then clip it back on when you pack up.
When Your Lens Hood Can Work Against You
Like any piece of equipment, a lens hood has situations where it complicates rather than helps. Knowing these limitations in advance saves you from frustration in the field.
Common Mistakes to Avoid
Attaching the hood in the reversed (storage) position and shooting. A reversed petal hood faces backward, meaning its walls now project into your own shot. The result is severe, symmetrical vignetting in all four corners. It is an easy mistake to make in a rush — always confirm the hood faces forward before shooting (the open end of the tube points away from the camera).
Using the wrong hood shape for your lens type. A cylindrical hood designed for an 85mm lens mounted on a 35mm wide-angle will cause heavy corner vignetting. Always verify the hood model matches your specific lens, not just the filter thread size.
Forgetting the built-in flash exception. Using the pop-up flash with the hood on produces a repeatable dark crescent shadow at the bottom of every frame. This is not a fault with your camera — it is the hood doing its job too well in the wrong direction.
When to Consider an Alternative
If you are shooting architectural stills or real estate photography with an ultra-wide lens (14mm–20mm) and a large square filter system, a conventional bayonet hood is likely incompatible with your filter holder. In this scenario, a square matte box system — essentially a cinema-style rectangular hood — is the correct tool. These are more expensive and bulkier but designed specifically for wide-angle filter stacking.
If you shoot primarily with a smartphone camera attachment lens or a vintage manual-focus lens with a non-standard filter thread, check compatibility before purchasing. Many vintage lenses require step-up rings to accept modern hood mounts, and some compact lens adapters have no hood mount at all. In those cases, a rubber collapsible hood with the matching thread size is usually the most practical solution.
Frequently Asked Questions
Why do you need a lens hood?
A lens hood serves two essential purposes for your photography. First, it blocks stray light — rays that enter the lens from outside the frame — which would otherwise scatter inside the lens and reduce contrast and colour saturation in your image. Second, it extends beyond the front glass element to absorb accidental knocks before they reach the lens. Even on cloudy days, diffuse light still enters from wide angles and reduces sharpness. For most photographers, the hood is a permanent fixture — removing it only costs image quality.
Should I use a lens hood on a cloudy day?
Yes — keep your lens hood on even on overcast or cloudy days. Diffuse cloud light enters the lens from a broad range of angles, not just directly ahead. That off-axis light still reduces contrast through veiling glare, the same physical effect that causes visible lens flare in direct sun (Cambridge in Colour, 2024). The hood also provides rain protection and impact protection that apply regardless of weather. The only reason to remove it on a cloudy day would be to use a built-in pop-up flash — the first exception in The Optical Armor Protocol.
When should you not use a lens hood?
Remove your lens hood in three specific situations. First, when using the built-in pop-up flash on your camera — the hood physically blocks the flash’s light spread and casts a hard shadow across the bottom of your frame. Second, when you want intentional lens flare as a creative effect, such as a sunburst or halo in an artistic shot. Third, in extreme wind conditions when shooting with a long telephoto lens, where the hood acts as a wind sail and amplifies camera shake. In all other situations, the hood should remain attached.
Can you shoot without a lens hood?
You can shoot without a lens hood, but you will likely pay a quality cost. Without the hood, any light source near the edge of your frame — a window, a street lamp, the sun — has a direct path to your lens glass. The result is reduced contrast, washed-out colours, and potential lens flare or ghosting artefacts in your image. Your front glass element is also unprotected from accidental impact.
Should you use a lens hood indoors?
Yes — use a lens hood indoors for most shots. Ceiling lights, desk lamps, windows, and monitor screens all sit at angles outside your frame and scatter light into the lens. The effect is less dramatic than direct sunlight, but the contrast reduction is real. The hood also protects your glass from the closer-range bumps and surface contacts that happen naturally in indoor environments. The one exception: if you are using the camera’s built-in pop-up flash rather than an external flash unit, remove the hood to prevent a shadow appearing in your frame.
Conclusion
For any camera owner asking what a lens hood is for, the answer covers two problems with one solution. A lens hood blocks the stray light that reduces contrast and creates lens flare, and it acts as a physical bumper that absorbs impacts before they reach the front glass element. Research and field testing both confirm that the image quality difference is measurable — a recovered black point on the histogram and visibly punchier colours — and that the protection benefit often outperforms UV filters in real-world impact scenarios (LensRentals, 2016).
The Optical Armor Protocol simplifies this into one rule you can carry with you: the hood is your lens’s armour, and armour stays on. The three exceptions — built-in flash, intentional creative flare, and extreme wind on a telephoto — are easy to remember precisely because they are so few. Understanding the protocol also tells you which hood shape to use (petal for wide-angle, cylindrical for telephoto) and how to store it without adding bulk to your bag.
The next step is simple: clip your hood on right now, take a test shot of the sky to confirm alignment (Step 2), and leave it there. If you want to go further, check our camera lens cleaners guide for keeping the glass behind that hood in perfect condition.
