
Table of Contents
- Key Takeaways
- Defining a Stop in Photography
- The Role of Stops in Exposure Control
- Understanding Stops in Aperture, Shutter, ISO
- Stops versus EV and Exposure Triangle
- Common Mistakes With Stops and How to Avoid Them
- Master Exposure Control and Take Your Photography Further
- Frequently Asked Questions
- Recommended
This blog post may contain affiliate links. As an Amazon Associate I earn from qualifying purchases.
Most photographers quickly learn that even the tiniest adjustment to exposure can make or break a photo. Understanding how stops work is central to solving this challenge. A single stop can double or halve the light in your shot, giving you precise control over brightness and image quality. This article breaks down stops in simple terms and shows how mastering them can transform the way you approach every scene with your camera.
Key Takeaways
| Point | Details |
|---|---|
| Understanding Stops | A stop represents a precise change in exposure, doubling or halving the light reaching the sensor, and allows for intentional control over brightness. |
| Exposure Triangle | Mastery of stops involves balancing aperture, shutter speed, and ISO to achieve desired exposure while maintaining creative intent. |
| Common Mistakes | Avoid treating camera settings as independent; always make compensatory adjustments to maintain consistent exposure when changing one element. |
| Creative Control | Developing an intuitive grasp of stops empowers photographers to make quick adjustments, enhancing their ability to capture the visual narrative they envision. |
Defining a Stop in Photography
A stop in photography is a fundamental measurement that represents a precise change in exposure by doubling or halving the amount of light reaching your camera’s sensor. Think of it like a volume dial for light: when you adjust one stop, you’re essentially increasing or decreasing the light by exactly 100%. This critical concept allows photographers to make precise, incremental adjustments to their image’s brightness.
Photographers can manipulate stops across three key camera settings: aperture, shutter speed, and ISO. Each of these settings allows you to control light in standardized increments. For instance, changing your aperture from f/4 to f/2.8 represents one stop of additional light, while moving from 1/250 second to 1/125 second shutter speed also represents one stop of increased exposure.
The stop system provides photographers with a universal language for discussing light and exposure. By understanding how stops work, you gain the ability to make intentional creative decisions about your images. Whether you’re trying to capture a dark night scene or a bright midday landscape, stops give you precise control over how much light enters your camera. Understanding exposure guide can help you master these techniques even further.
Interestingly, professional photographers often think in terms of stops rather than exact numeric values. This standardized approach allows quick communication and consistent adjustments across different camera systems and shooting environments. A stop isn’t just a technical measurement its a universal language that translates visual intent into precise optical control.
The Role of Stops in Exposure Control
Stops play a crucial role in exposure control, serving as the primary mechanism photographers use to balance light across different camera settings. By understanding how to manipulate stops, photographers can precisely adjust the brightness and overall visual character of their images. This nuanced control allows for creative expression beyond simply making an image lighter or darker.
At its core, exposure control through stops involves strategic adjustments to three fundamental camera settings: aperture, shutter speed, and ISO. Each setting provides unique opportunities for light management. For example, widening the aperture by one stop (say from f/8 to f/5.6) doubles the amount of light entering the camera, while increasing shutter speed can help freeze motion or reduce light sensitivity.
 Professional photographers often describe this as maintaining a consistent exposure triangle, where changes in one setting are counterbalanced by corresponding modifications in another.
The practical application of stops becomes particularly powerful in challenging lighting conditions. When shooting a high-contrast scene like a sunset or a dimly lit interior, photographers can use stop adjustments to preserve details in both highlights and shadows. Exposure compensation guide offers additional insights into fine-tuning these techniques.
Understanding stop manipulation is less about rigid rules and more about developing a fluid, intuitive approach to light. Experienced photographers treat stops like a language they can speak fluently, making instant, almost unconscious adjustments to capture exactly what they envision. Whether you’re a landscape photographer tracking changing light or a portrait artist managing subtle skin tones, mastering stops transforms technical knowledge into creative potential.
Understanding Stops in Aperture, Shutter, ISO
In photography, understanding how stops work across aperture, shutter speed, and ISO is crucial for mastering exposure control. Each of these three fundamental settings can be adjusted by one stop, which fundamentally means doubling or halving the amount of light entering or being processed by the camera. This standardized approach allows photographers to make precise, predictable changes to their image’s brightness and characteristics.
Let’s break down how stops function in each camera setting. In aperture, moving from f/8 to f/5.6 represents one stop of additional light, effectively doubling the light entering through the lens. For shutter speed, shifting from 1/250 second to 1/125 second increases light by one stop. With ISO, moving from 200 to 400 represents a one-stop increase in light sensitivity, which also increases digital noise in the image. F-stop guide can help you dive deeper into understanding these nuanced adjustments.
The real magic happens when photographers understand how to balance these settings. By making compensating adjustments across aperture, shutter speed, and ISO, you can maintain consistent exposure while achieving different creative effects. A landscape photographer might stop down the aperture for greater depth of field, then adjust shutter speed or ISO to compensate and maintain the same overall exposure. This flexibility is what transforms technical knowledge into artistic expression.
Mastering stops isn’t about memorizing numbers—it’s about developing an intuitive feel for light. Experienced photographers can almost instantly calculate and adjust their exposure triangle, making split-second decisions that transform an ordinary scene into an extraordinary image. Whether you’re shooting a dimly lit concert or a bright, sun-drenched beach, understanding stops gives you the creative control to capture exactly what you see in your mind’s eye.
Stops versus EV and Exposure Triangle
Navigating the world of photographic exposure requires understanding the intricate relationships between stops, Exposure Value (EV), and the exposure triangle. While these terms are closely related, they each play a unique role in helping photographers control light and create compelling images. Think of them as different languages within the same photographic communication system.
Exposure Value (EV) is essentially a standardized measurement that combines aperture and shutter speed to represent a specific exposure level. Where stops represent incremental light changes, EV provides a comprehensive numeric representation of those changes. A one-stop adjustment corresponds directly to a one-point change in EV, creating a precise mathematical relationship that allows photographers to make calculated exposure modifications. Exposure in photography guide offers deeper insights into these technical nuances.
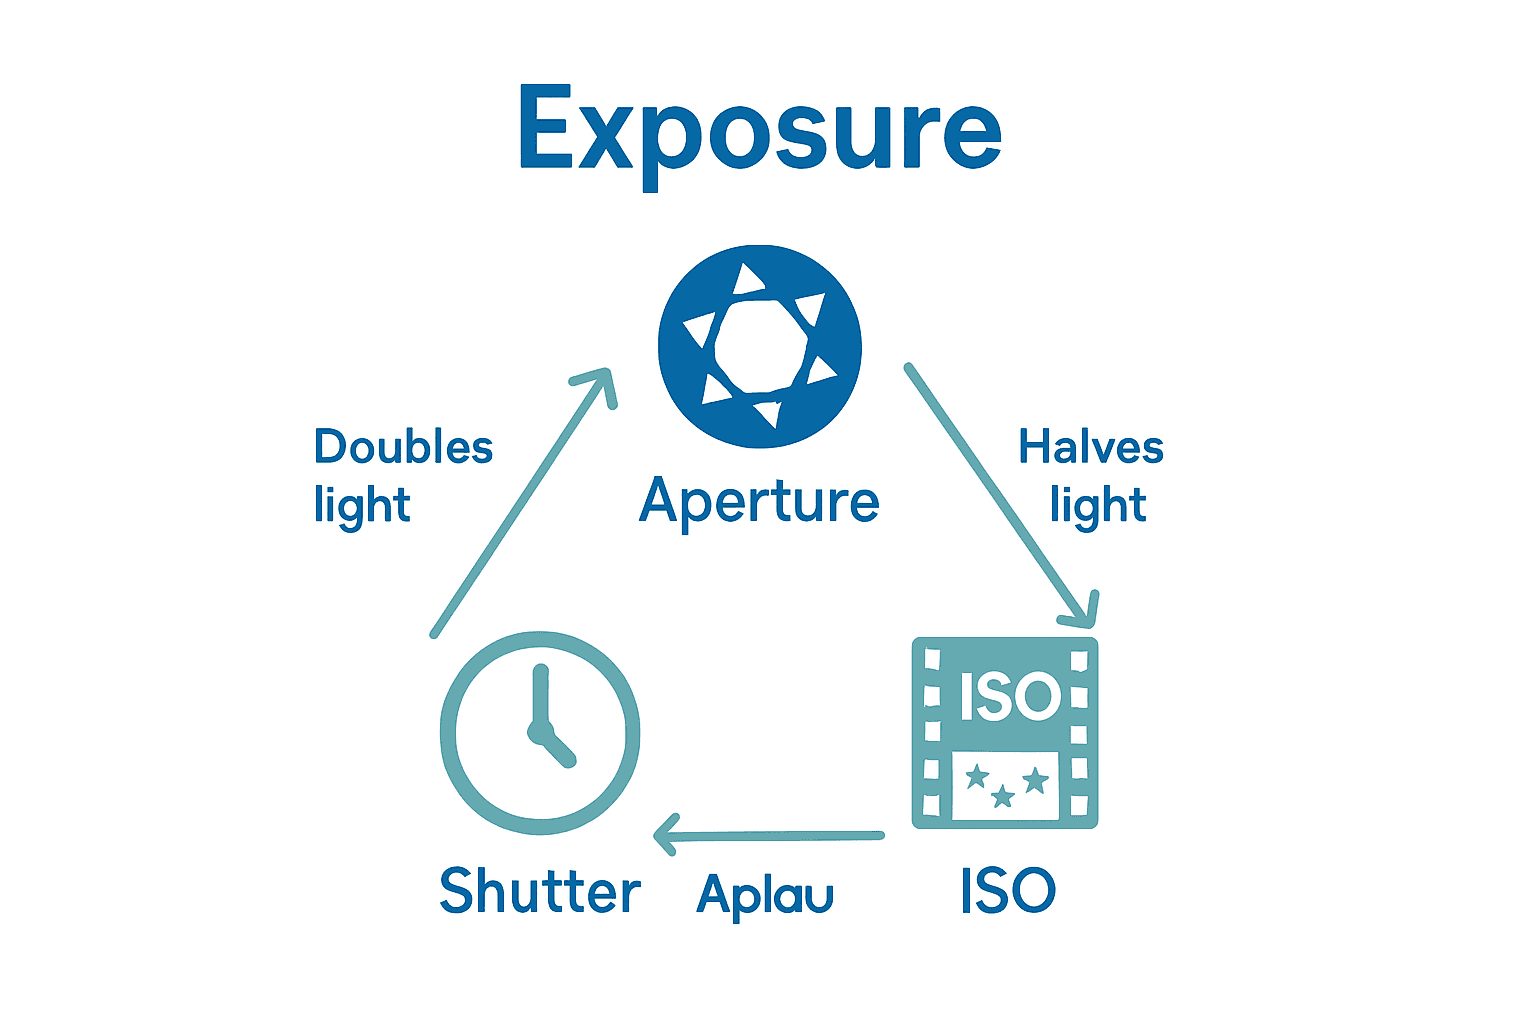
The exposure triangle visualizes how aperture, shutter speed, and ISO interact to create a balanced exposure. When you adjust one element by a stop, the triangle demands compensatory changes in the other elements to maintain consistent overall exposure. For instance, if you widen the aperture by one stop to allow more light, you’ll need to either increase shutter speed or reduce ISO to prevent overexposure. This dynamic interplay transforms exposure control from a technical challenge into a creative opportunity.
Mastering the relationship between stops, EV, and the exposure triangle is less about mathematical precision and more about developing an intuitive understanding of light. Experienced photographers seamlessly translate these technical concepts into artistic expression, making split-second decisions that transform an ordinary scene into a extraordinary visual narrative. Whether you’re capturing a moonlit landscape or a sun-drenched portrait, understanding these interconnected principles gives you the creative control to bring your photographic vision to life.
Common Mistakes With Stops and How to Avoid Them
Photographers often stumble when working with stops, transforming what should be a precise technical skill into a frustrating guessing game. The most fundamental mistake is treating each camera setting as an independent variable, rather than recognizing how aperture, shutter speed, and ISO interact within the exposure triangle. This tunnel vision can lead to dramatically over or underexposed images that miss the creative mark entirely.
One frequent error is failing to make compensatory adjustments when changing one camera setting. For instance, if you widen your aperture by one stop to achieve a shallower depth of field, you must simultaneously adjust either shutter speed or ISO to maintain consistent exposure. Beginners often forget this critical balancing act, resulting in images that are either too bright or too dark. Common photography mistakes guide provides additional insights into avoiding these technical pitfalls.
Another common misstep is neglecting the impact of ISO changes on image quality. While increasing ISO by a stop can help in low-light situations, it also introduces digital noise that can degrade image sharpness. Experienced photographers learn to make strategic compromises, understanding that sometimes a slightly darker image with less noise is preferable to a brighter but grainy photograph. The key is practicing with different settings and developing an intuitive understanding of how stops affect your final image.
Ultimately, mastering stops is about developing muscle memory and visual intuition. It’s not about perfect mathematical calculations, but about feeling the light and understanding how small adjustments can dramatically transform an image. Practice, experimentation, and a willingness to make mistakes will help you internalize these technical nuances, turning complex exposure control into a seamless part of your creative process.
Master Exposure Control and Take Your Photography Further
Understanding what a stop means in photography unlocks the door to precise exposure control and creative freedom. Many photographers struggle with balancing aperture, shutter speed, and ISO to get just the right exposure in varied lighting conditions. If you want to confidently navigate the exposure triangle and avoid common mistakes like over or underexposing your images, mastering stops is a must.
Start improving your skills today by exploring practical tutorials and trusted advice at Amateur Photographer Guide. Discover clear explanations on stops, exposure compensation, and the technical details behind aperture and ISO in our detailed guides like Understanding Exposure and Exposure Compensation Guide. Take control of your photography journey now and capture images the way you envision them.
Frequently Asked Questions
What is a stop in photography?
A stop in photography is a measurement that reflects a change in exposure, either doubling or halving the amount of light reaching the camera’s sensor. This allows photographers to make precise adjustments to an image’s brightness.
How do stops affect aperture, shutter speed, and ISO?
Stops influence aperture, shutter speed, and ISO by allowing photographers to adjust each setting in standardized increments. For example, moving from f/8 to f/5.6 increases light by one stop, as does changing shutter speed from 1/250 second to 1/125 second or increasing ISO from 200 to 400.
Why is understanding stops important for photographers?
Understanding stops is crucial for photographers because it enables them to control exposure effectively. Mastering this concept helps achieve desired brightness, depth of field, and motion effects, transforming technical knowledge into creative expression.
What common mistakes do photographers make with stops?
Common mistakes include failing to make compensatory adjustments when changing one camera setting and neglecting the impact of ISO on image quality. This can lead to overexposed or underexposed images, so it’s vital to understand how aperture, shutter speed, and ISO interact within the exposure triangle.
