
Table of Contents
- What Is Aperture? The Simplest Explanation
- How Aperture Affects Your Photos
- F-Stops and Aperture Numbers Explained
- Aperture and the Exposure Triangle
- How to Change Aperture on Your Camera
- Other Things Called “Aperture”
- Common Aperture Mistakes to Avoid
- Frequently Asked Questions About Aperture
- Your First Aperture Decision
This blog post may contain affiliate links. As an Amazon Associate I earn from qualifying purchases.
“When I first started shooting, concepts like aperture, depth of field, focal length, wide vs narrow apertures felt confusing and overwhelming.”
— A sentiment shared by nearly every photographer who has ever moved off auto mode.
If that quote sounds familiar, you’re in exactly the right place. Aperture has always felt like one of those settings you know you should understand but somehow never quite do — and that’s not your fault. The way it’s usually explained makes a simple idea sound like a physics exam.
Every time you shoot in auto mode, you’re handing your camera a creative decision that belongs to you. Your camera doesn’t know whether you want a dreamy blurred background or a razor-sharp landscape — only you do. With aperture explained clearly, you’ll know exactly how to control both the brightness and the creative feel of every photo you take, including why f/1.8 gives you that beautiful blurry background while f/16 keeps every blade of grass sharp.
We’ll start with the simplest possible analogy — one your eye already understands — then decode the confusing number system, and finish with exactly which buttons to press on your camera.
Aperture explained: Aperture is the adjustable opening in your camera lens — it controls how much light reaches your sensor AND how much of your photo is in sharp focus. Research confirms that decreasing pupil size (and lens aperture) increases the range of sharpness in a scene (NCBI, 2026).
- Small f-number (f/1.8): Large opening → more light → blurry background (bokeh)
- Large f-number (f/16): Small opening → less light → everything sharp
- The Aperture-First Mindset: Set aperture before ISO or shutter speed — it’s the only setting that controls both light AND creative depth of field simultaneously
- F-stops are fractions: f/1.8 is a bigger opening than f/16, just as 1/1.8 is larger than 1/16
What Is Aperture? The Simplest Explanation
Aperture is the adjustable opening in your camera lens that controls how much light reaches the sensor — and with that single adjustment, it also determines how much of your scene appears sharp. With aperture explained this way, it immediately becomes the most powerful creative control on your camera. It works exactly like the pupil of your eye: research confirms that both structures control light intake and depth of field through the same mechanism (NCBI, 2026). Understanding aperture is the first step to taking photos that look intentional, not accidental.
Aperture functions exactly like the pupil of your eye: it widens in dark conditions to let in more light and narrows in bright conditions to reduce it — and just like the pupil, a smaller opening increases the range of sharpness (NCBI, 2026).
Your Eye Already Understands Aperture
Before any technical explanation, here’s the easiest way to grasp aperture: look at your own eye in a mirror, then cover it briefly and uncover it. The black circle in the center — the pupil — just got bigger in the relative darkness and will shrink again in bright light. How the pupil responds to changes in light is a well-documented biological process: the iris muscle dilates the pupil in dim conditions to let in more light so you can see, and constricts it in bright sunlight to protect your retina (Cleveland Clinic).
Your camera lens has a mechanical equivalent. Similarities between the human eye and a camera are numerous — Boston University’s Physics Department notes that both rely on refraction and lenses to form images, and both use a circular opening that adjusts size to control light intake.
Here’s the part most analogies skip: a smaller pupil doesn’t just reduce light — it also sharpens the range of things you can see clearly. Decreasing pupil size increases the depth of field, leading to a wider range of focus (NCBI, 2026). Your lens aperture does the exact same thing. Next time you walk from a bright room into a dark hallway and notice your vision momentarily blurs before your pupil adjusts, you’re experiencing the same principle that governs every portrait you’ll ever shoot.
The infographic below shows exactly how the pupil and aperture mirror each other.
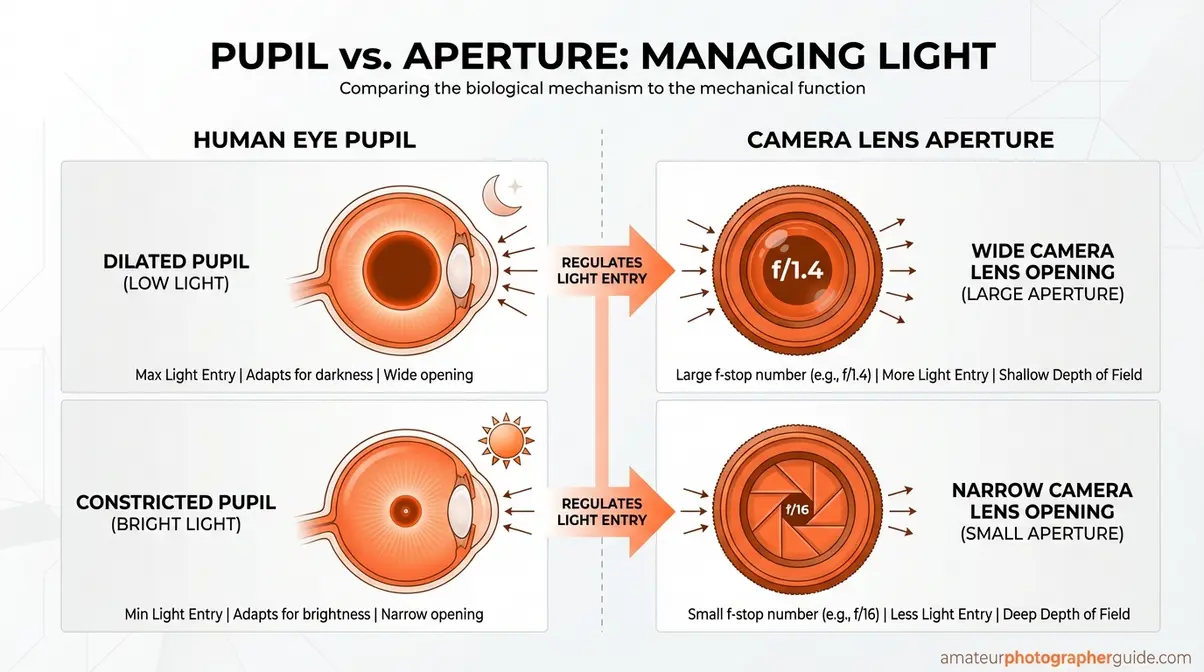
Caption: The pupil and camera aperture share the same physics — both widen for light and narrow for sharpness.
Transition: Now that you can picture what aperture is, let’s look at the mechanical structure inside your lens that makes it happen.
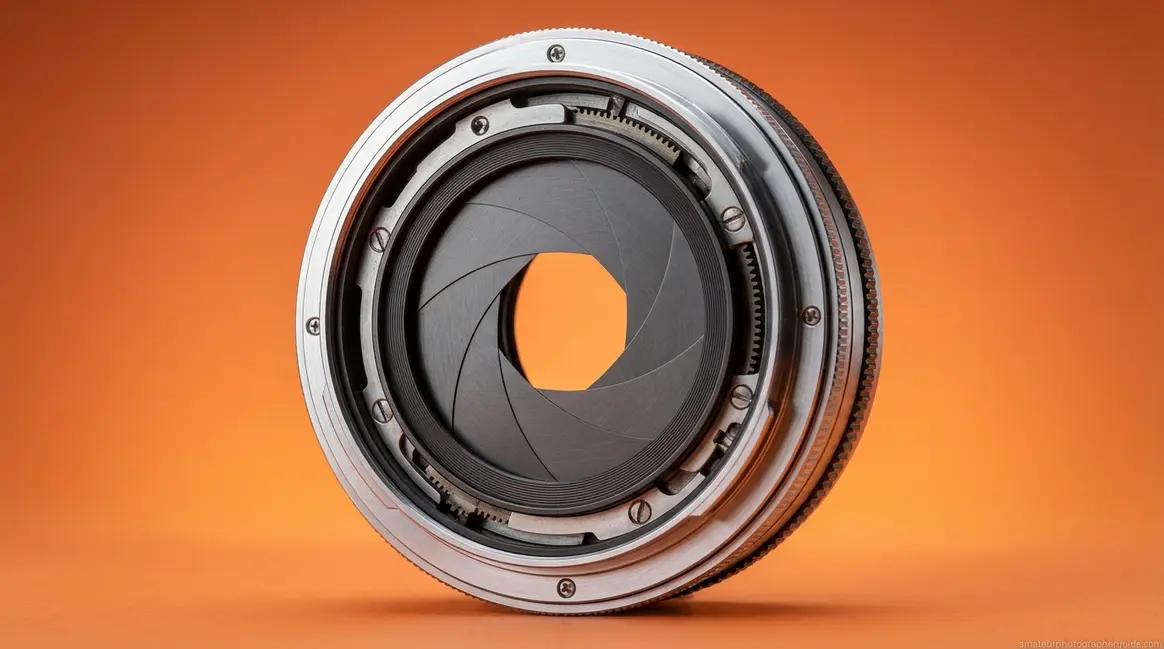
How Aperture Works Inside Your Lens
Inside a camera, aperture is controlled by a diaphragm — a set of 5 to 9 overlapping blades arranged in a circular pattern inside the lens. When you change the aperture setting on your camera, these blades either spread apart (opening wider) or close inward (narrowing the opening). The result is a larger or smaller circular hole through which light passes on its way to your sensor.
Research on pupil size and depth of field confirms the parallel: decreasing the size of the opening — whether in the eye or a camera lens — increases the depth of field, leading to a wider range of focus (NCBI, 2026).
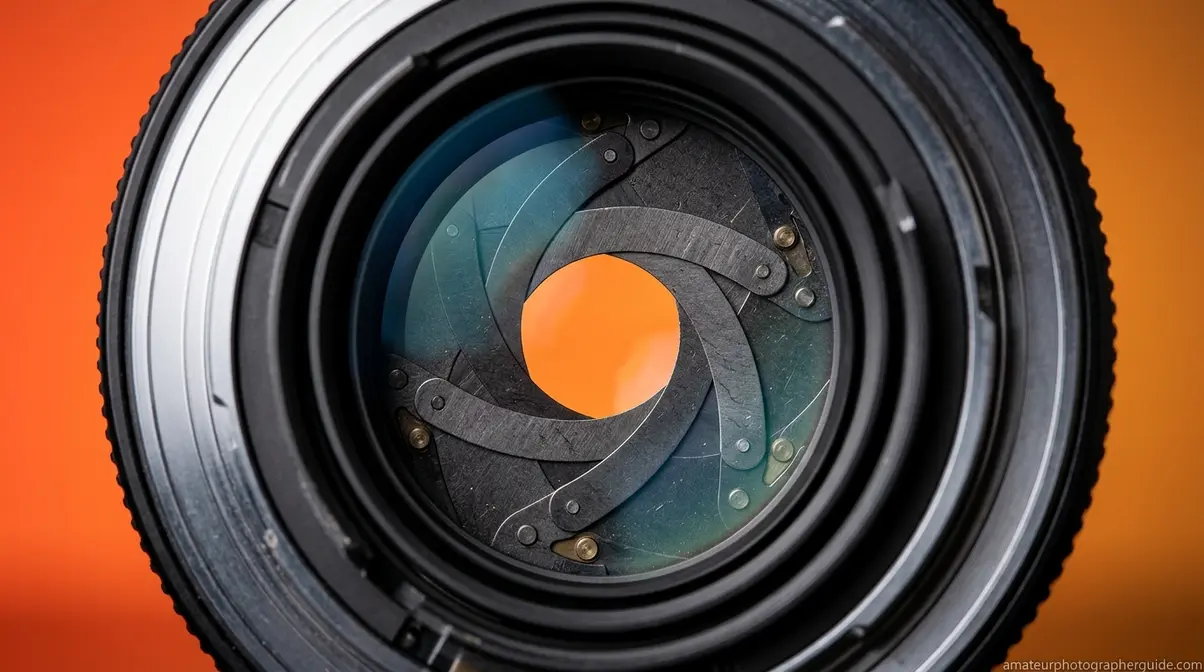
This lens aperture mechanism is essentially the same whether you’re shooting on a DSLR, a mirrorless camera, a film camera, or even a smartphone — though smartphone aperture is typically fixed and cannot be adjusted. On a DSLR or mirrorless, you control it directly from the camera body. On a film camera, many lenses have a physical aperture ring you twist by hand.
The size of this opening is expressed as an f-number — something we’ll decode fully in the next section. When you hear a photographer say they’re shooting wide open, they mean the aperture blades are as spread apart as the lens allows, letting in the maximum amount of light and producing the shallowest depth of field. Constant-aperture zoom lenses are a premium option that maintain the same f-number throughout the zoom range — so your exposure stays consistent whether you’re zoomed in or out.
For a deeper foundational breakdown, see our complete guide: learn the basics of aperture in photography.
Transition: You now know what aperture is and how it works physically. But what does changing it actually do to your photos? That’s where aperture gets genuinely exciting.
What Aperture Actually Controls
Aperture is the only camera setting that simultaneously controls two distinct outcomes: how much light reaches your sensor (exposure) and how much of your scene is in sharp focus (depth of field, or DoF). No other setting does both at once — not ISO, not shutter speed.
A wide aperture like f/1.8 lets in a lot of light AND creates a shallow depth of field — perfect for portraits where you want the subject sharp and the background blurry. A narrow aperture like f/16 lets in less light BUT keeps everything from the foreground to the background in focus — ideal for landscapes where every detail matters.
Because aperture is the only setting that controls both light AND creative effect, it should always be your first decision when setting up a shot. This is what we call the Aperture-First Mindset — set your creative intent with aperture first, then let ISO and shutter speed compensate for the light. It’s a decision-making framework that removes guesswork from the field. We’ll show you exactly how to balance those other two settings in the Exposure Triangle section.
How Aperture Affects Your Photos
A wide aperture (f/1.8–f/2.8) creates shallow depth of field and isolates subjects with background blur; a narrow aperture (f/8–f/16) keeps the entire scene sharp from foreground to background. This single decision — how much of your frame is in focus — is the most powerful creative choice photography gives you, and aperture is the tool that makes it.
Choosing Your Depth of Field
Depth of field (DoF) describes the range of distances in your photo that appear acceptably sharp. Aperture is its primary driver. The choice is simple once you know what you’re after:
- Wide aperture (f/1.8–f/2.8): Subject is sharp, background dissolves into blur. Use for portraits, food photography, product shots, and any time you want to isolate your subject. When you shoot a portrait at f/1.8, your subject’s eyes are razor-sharp while the background softens — that’s depth of field doing exactly what you asked.
- Narrow aperture (f/8–f/16): Everything from the foreground to the horizon stays in focus. Use for landscapes, architecture, and group photos where every element matters.
- Middle ground (f/5.6–f/8): A versatile range for street photography, travel, and documentary work where you want reasonable sharpness without committing to either extreme.
Worth noting: very narrow apertures like f/22 can actually reduce overall sharpness despite keeping more of the scene in focus. As how the aperture stop causes diffraction explains, diffraction occurs due to the wave nature of light hitting the limiting edges of the aperture — meaning f/22 can produce a softer image than f/11 on most lenses (SPIE).
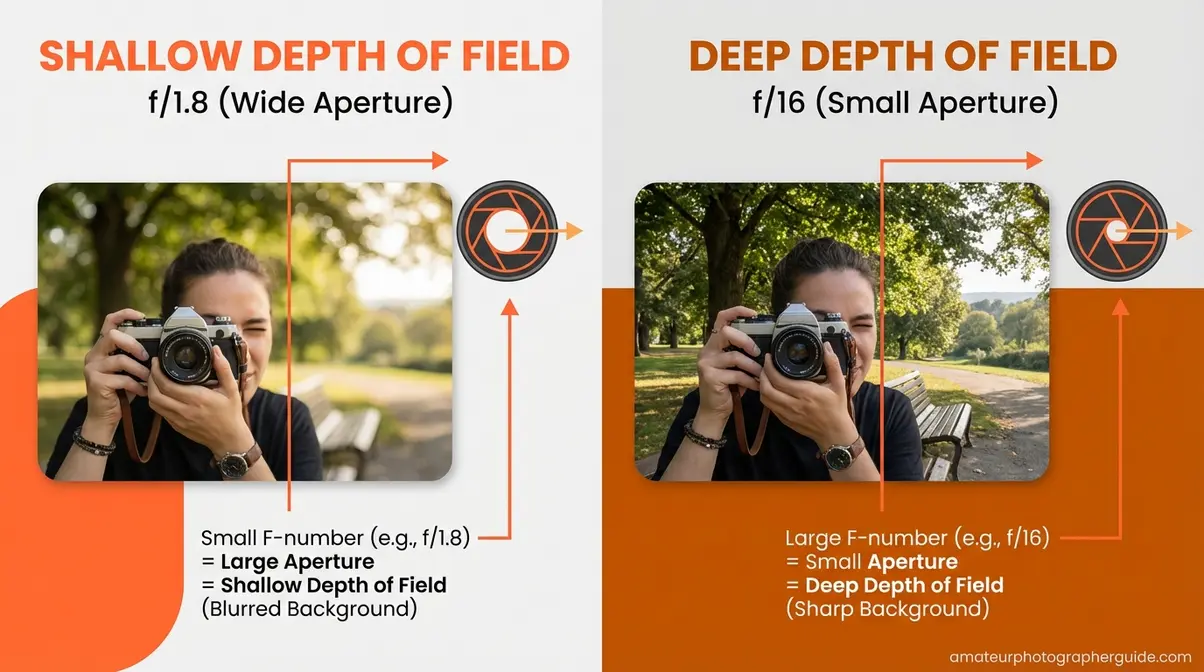
Caption: f/1.8 isolates the subject with creamy bokeh; f/16 keeps the entire scene sharp from front to back.
Transition: Understanding depth of field also helps explain one of the most sought-after effects in photography: bokeh.
Bokeh and What Wide Open Means
Bokeh (from the Japanese word for “blur”) refers to the aesthetic quality of out-of-focus areas in an image — that creamy, smooth blur you see in professional portrait photography. It’s a natural byproduct of shooting at wide apertures, and it’s one of the primary reasons photographers invest in fast lenses with maximum apertures of f/1.4 or f/1.8.
At the opposite end of the scale, narrow apertures create a starburst effect around bright light sources. At f/11–f/22, the aperture blades diffract light into the distinctive star pattern popular in cityscape photography at night — a technique that works with street lamps, car headlights, or any point light source.
“Wide open” and “stopped down” are the two vocabulary terms every photographer uses daily. Wide open means using the widest aperture your lens allows — maximum light, minimum depth of field. Stopped down means narrowing the aperture toward smaller openings like f/8 or f/11. Focal length also affects depth of field — longer focal lengths produce more background compression and blur at the same aperture, which is why a 85mm lens at f/1.8 creates more dramatic bokeh than a 24mm at the same setting.
For a complete guide including how focal length and sensor size interact with aperture to affect bokeh, see how aperture controls depth of field.
Is high or low aperture better?
It depends entirely on what you’re photographing. A low f-number (wide aperture, like f/1.8) is better for portraits, low-light shooting, and any situation where background blur is desirable. A high f-number (narrow aperture, like f/11) is better for landscapes, architecture, and group shots where you want everything sharp. The answer to “is high or low aperture better?” is always situational — this is precisely why the Aperture-First Mindset exists: decide your creative intent first, then choose the f-number that achieves it.
Transition: Now that you know what aperture does to your photos, let’s decode those confusing numbers — because f/1.8 vs f/16 is not as intuitive as it should be.
F-Stops and Aperture Numbers Explained
The f-stop system is one of photography’s most counterintuitive conventions: smaller numbers mean larger openings. Once you understand why, the confusion dissolves permanently. The f-number is a ratio — specifically, the focal length of the lens divided by the diameter of the aperture opening. A 50mm lens at f/2 has an aperture diameter of 25mm (50 ÷ 2). At f/16, that same lens has an opening of just 3.1mm (50 ÷ 16). For a complete breakdown of how f-stops affect your shots in practice, see what f-stop does on a camera.
Why Small Numbers Mean Big Openings
Think of f-stops as fractions. f/1.8 means 1 divided by 1.8. f/16 means 1 divided by 16. Just as the fraction 1/2 is larger than 1/16, f/2 represents a larger opening than f/16. The f-number formula — f-number = focal length ÷ aperture diameter — is the mathematical expression of this physical relationship, as defined by NASA’s scientific definition of the f-number.
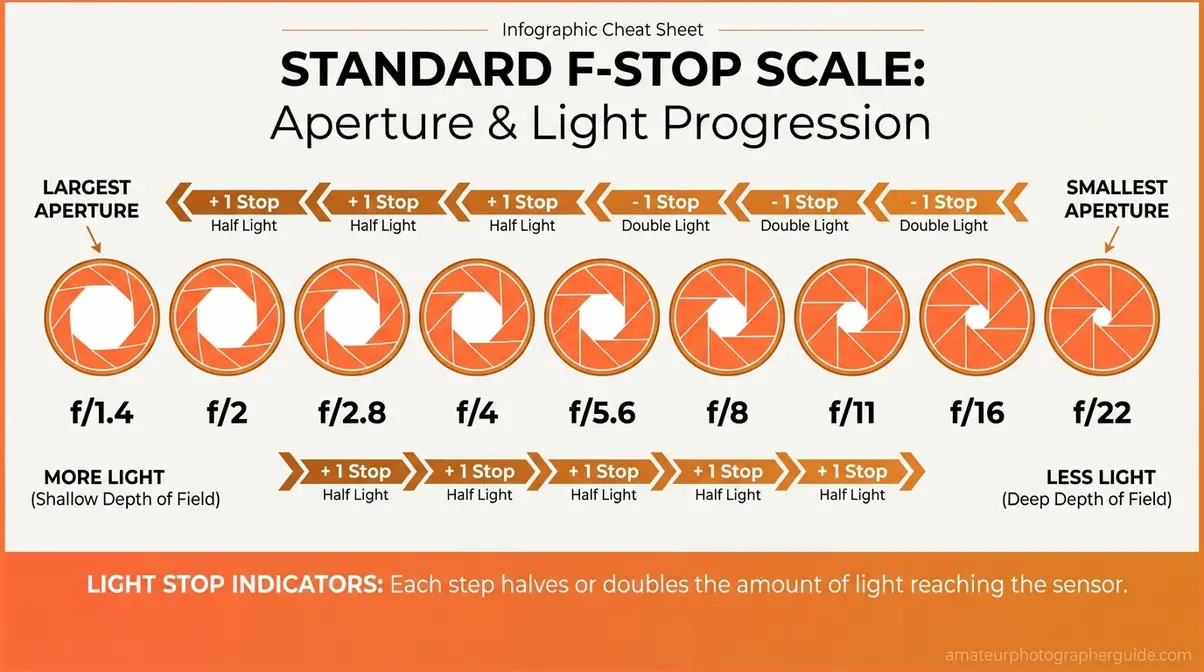
Caption: Each full stop on the scale either halves or doubles the amount of light entering the lens.
Each full stop on the scale either halves or doubles the light reaching your sensor. The standard full-stop sequence runs: f/1.4 → f/2 → f/2.8 → f/4 → f/5.6 → f/8 → f/11 → f/16 → f/22. Moving from f/4 to f/2.8 doubles the light (one stop wider). Moving from f/4 to f/8 halves the light (two stops narrower). Across photography communities, the consistent advice is to think of these as light-stops — each step is a doubling or halving, which makes balancing your exposure a logical process rather than guesswork.
f/1.8 vs f/2.8: Real-World Differences
This is the question beginners search for most — and competitors rarely answer directly. Here’s the practical breakdown:
| Aperture | Opening Size | Depth of Field | Best For | Trade-off |
|---|---|---|---|---|
| f/1.4 | Very wide | Extremely shallow | Low-light portraits | Razor-thin focus plane; one eye may be sharp while the other isn’t |
| f/1.8 | Wide | Very shallow | Portraits, low light | Beautiful bokeh; some lens softness at edges wide open |
| f/2.2 | Slightly narrower | Shallow | Portraits (safer) | Marginally more depth; both eyes typically in focus |
| f/2.8 | Moderate | Shallow-moderate | Portraits, events | Sharp across the face; less bokeh than f/1.8 |
| f/5.6 | Moderate-narrow | Moderate | Street, travel | Versatile; most lenses near peak sharpness |
| f/8 | Narrow | Deep | Landscapes, groups | Sweet spot for corner-to-corner sharpness on most lenses |
| f/16 | Very narrow | Very deep | Architecture, macro | Risk of diffraction softening on high-resolution sensors |
Is f/1.8 or f/2.2 aperture better? For portraits, f/1.8 delivers more dramatic bokeh and admits roughly one-third more light than f/2.2. However, f/2.2 sits in a more forgiving range where both eyes and most of the face stay in focus — a practical advantage for photographers still developing their focus accuracy. The difference in background blur between the two is incremental, not dramatic. Professional photographers often gravitate toward f/2–f/2.8 as the portrait sweet spot: enough background separation to look intentional, enough depth of field to keep the whole face sharp.
What does f/1.8 mean?
F/1.8 means the aperture opening is equal to the focal length divided by 1.8. On a 50mm lens, that’s an aperture diameter of approximately 27.8mm — a very wide opening. In practical terms, f/1.8 means maximum light intake, very shallow depth of field (only a narrow plane of your scene will be sharp), and noticeable background blur. It’s near the widest aperture available on most consumer lenses, and it excels in low light and portrait work. Expect some edge softness at f/1.8; stopping down to f/2.8 typically delivers noticeably sharper results across the frame.
Aperture and the Exposure Triangle
The exposure triangle is the relationship between aperture, shutter speed, and ISO — the three settings that together determine whether your photo is properly exposed. As BBC Maestro’s beginner’s definition of aperture explains, aperture is the fundamental opening that controls how much light enters your camera. Change one, and at least one of the others needs to adjust to maintain the same overall brightness. For a complete deep dive, see understanding exposure and getting the perfect shot.
Aperture, ISO, and Shutter Speed
Each element of the triangle controls light differently:
- Aperture controls how wide the lens opening is (and depth of field)
- Shutter speed controls how long the sensor is exposed to light (and motion blur)
- ISO controls how sensitive the sensor is to the light it receives (and image noise)
When you widen your aperture from f/8 to f/4 (two stops more light), your camera — or you, in manual mode — needs to compensate. You can speed up the shutter (less time exposed), lower the ISO (less sensitivity), or both. The Aperture-First Mindset makes this process intuitive: decide on your creative depth of field first, then adjust shutter speed and ISO to balance the exposure around that decision.
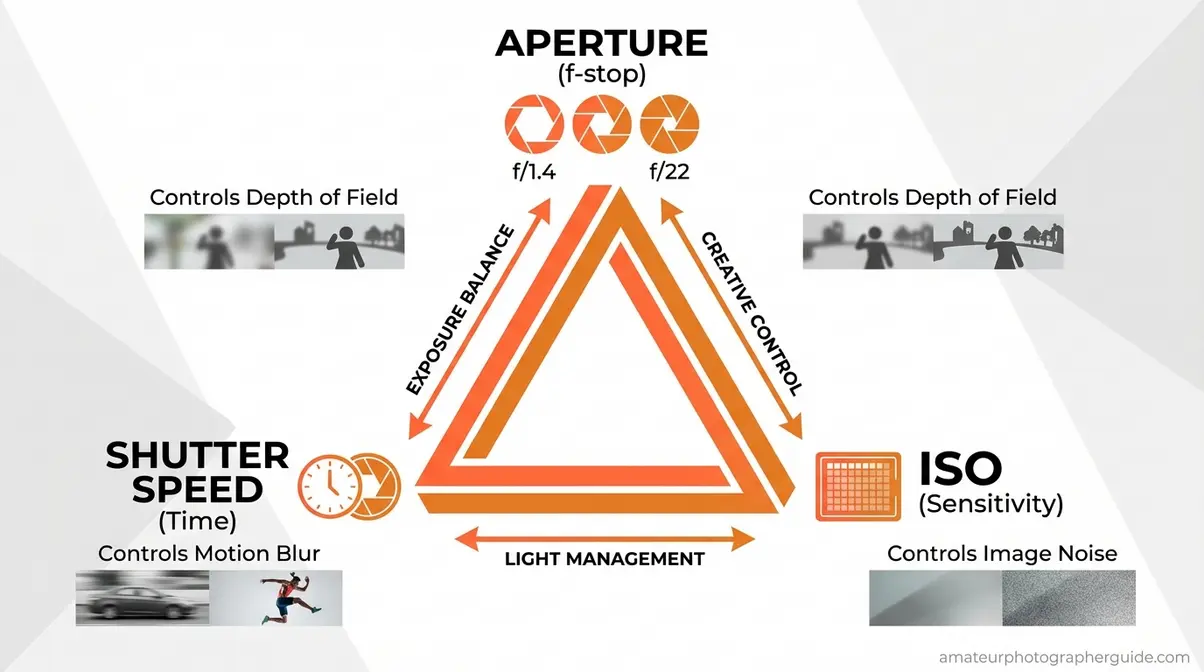
Caption: The exposure triangle: change one setting and at least one other must compensate to maintain correct exposure.
Photos turning out too dark or too bright after changing aperture is the most common beginner frustration — and it’s almost always solved by this principle. Widen aperture → speed up shutter or lower ISO. Narrow aperture → slow shutter or raise ISO.
Real-World Scenarios
These two examples show the Aperture-First Mindset applied from start to finish.
- Portrait in soft afternoon light:
- Set aperture to f/2.0 (shallow DoF, subject isolated from background)
- Set ISO to 100 (clean, low-noise image in good light)
- Let aperture priority mode select shutter speed — or set manually to 1/200s (fast enough to freeze natural movement)
- Review exposure: if too dark, raise ISO to 200 or 400; if too bright, speed up shutter
- Landscape at golden hour:
- Set aperture to f/11 (deep DoF, everything sharp from foreground rock to distant mountains)
- Set ISO to 100 (maximum quality for a scene you’ll print large)
- Use a tripod; set shutter to 1/30s or slower as needed for correct exposure
- Review: if foreground is too dark, use a graduated ND filter or bracket exposures — don’t widen aperture, or you’ll lose the landscape sharpness you set up in step 1
Across photography communities and forums, the consistent advice is identical: aperture first, then shutter speed, then ISO as a last resort. That sequence is the Aperture-First Mindset in practice.
How to Change Aperture on Your Camera
Changing aperture is simpler than most beginners expect. The method depends on your camera mode, but the underlying principle is always the same: you select an f-number and the lens adjusts its diaphragm blades accordingly.
Aperture Priority Mode (A or Av)
Aperture Priority mode is a semi-automatic shooting mode where you choose the aperture and your camera automatically selects the appropriate shutter speed for correct exposure. You keep creative control over depth of field; the camera handles the technical exposure math.
To use it on most cameras:
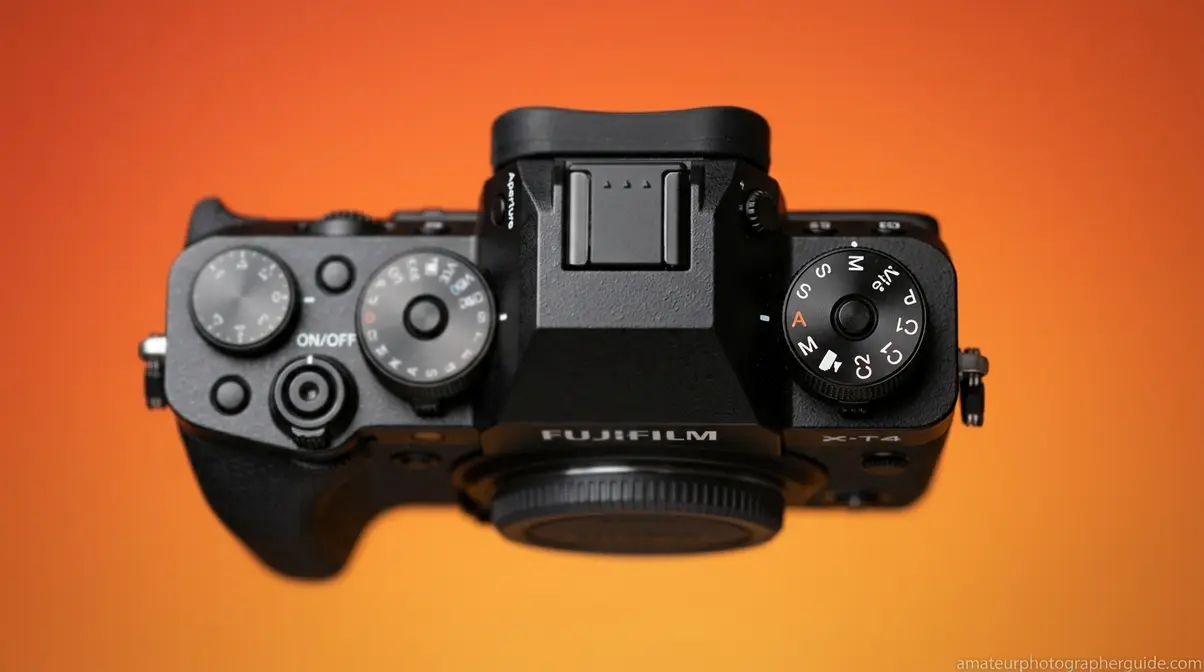
- Turn the mode dial to A (Nikon, Sony, Fuji) or Av (Canon)
- Rotate the main command dial (usually near your right thumb or index finger) to change the f-number — lower for wider aperture, higher for narrower
- Set your ISO — start at ISO 100 in bright light, ISO 400–800 indoors, ISO 1600–3200 in low light
- Half-press the shutter to confirm the camera has selected a reasonable shutter speed (avoid anything slower than 1/focal length to prevent camera shake — e.g., 1/50s minimum on a 50mm lens)
- Adjust exposure compensation (the +/- button) if the camera’s auto-selected shutter speed produces an image that looks too bright or too dark
Aperture Priority is the mode most professional photographers use for the majority of their shooting — it’s not a beginner shortcut, it’s a practical workflow. For a full guide to using this mode effectively, see aperture priority mode and when to use it.
Other Things Called “Aperture”
Not every search for “aperture explained” is about photography. The word appears in science, technology, and gaming — and if you landed here looking for one of those, here’s what you need to know.
Scientific and Technical Aperture
In optics and physics, aperture refers to the opening through which electromagnetic radiation — light, radio waves, or other signals — passes. The concept is consistent across every application: a larger aperture collects more energy and resolves finer detail.
Telescope aperture explained: A telescope’s aperture is the diameter of its primary lens or mirror. This single measurement determines how much light the telescope gathers and how fine the detail it can resolve. A 6-inch aperture telescope gathers significantly more light than a 3-inch model — which is why professional observatories use mirrors measured in meters, not inches. The Hubble Space Telescope’s 2.4-meter aperture, for instance, was the primary reason it could capture images of galaxies billions of light-years away with unprecedented clarity.
Numerical aperture explained: In microscopy and fiber optics, numerical aperture (NA) is a dimensionless number that describes the range of angles over which a system can accept or emit light. A higher NA means a microscope objective can resolve finer details. It’s the microscopy equivalent of a camera lens’s f-number — both quantify the light-gathering angle of an optical system.
Synthetic aperture radar explained: Synthetic Aperture Radar (SAR) is an active imaging system used by aircraft and satellites. According to NASA’s explanation of synthetic aperture radar, it synthesizes a very large virtual aperture by combining radar signals collected over time as the platform moves — producing high-resolution maps that penetrate clouds, smoke, and vegetation. SAR is used in Earth observation, as detailed in how synthetic aperture radar observes the Earth by NASA Earthdata. The “synthetic” aperture is a computational construct, not a physical opening, but the physics principle is identical: a wider effective aperture produces higher resolution.
Aperture in Gaming
If you searched for “aperture explained” in a gaming context, you’re almost certainly looking for Aperture Science — the fictional research company at the center of Valve’s Portal series.
Aperture Science explained: Founded in the game’s lore by Cave Johnson in the 1950s as a shower curtain manufacturer, Aperture Science pivoted to experimental research and became the rival of Black Mesa. The company is best known for developing the Aperture Science Handheld Portal Device — the portal gun — and GLaDOS, an AI that runs the facility’s test chambers and has a complicated relationship with the concept of human safety.
Portal and Portal 2 explained: In Portal, test subject Chell awakens in a relaxation vault and is guided — or manipulated — by GLaDOS through a series of increasingly dangerous puzzle chambers using the portal gun. Portal 2 expands the lore with Cave Johnson’s recorded history of the company’s decline, the introduction of Wheatley, and a deeper look at how GLaDOS came to be.
Aperture Desk Job explained: Aperture Desk Job is a short Valve game designed to showcase the Steam Deck. You play as a new employee at Aperture Science, guided through an absurdist orientation by Grady, a toilet. It’s essentially an interactive tech demo wrapped in Portal-universe humor.
Quantum aperture explained: “Quantum aperture” appears in some gaming and science fiction contexts as a fictional technology — typically referring to a portal or dimensional opening with quantum-level precision. It’s not an established scientific term, though it borrows from real quantum optics concepts.
Common Aperture Mistakes to Avoid
Even with a solid understanding of aperture, beginners — and plenty of experienced shooters — fall into predictable traps. Knowing them in advance saves a lot of frustrating deleted photos.
Three Pitfalls That Trip Up Beginners
Pitfall 1: Shooting wide open expecting sharpness everywhere.
Wide apertures like f/1.4 and f/1.8 are powerful, but they come with a trade-off: lens aberrations are typically at their worst at maximum aperture. Most lenses produce noticeably sharper images when stopped down 1–2 stops from their maximum. If your f/1.8 lens is producing soft, slightly hazy images, try f/2.8 — you’ll likely see a visible improvement in center sharpness and edge detail. This 2-stop “sweet spot rule” is one of the most widely shared pieces of advice across photography communities for good reason.
Pitfall 2: Using f/22 for maximum sharpness.
It seems logical — smallest aperture, maximum depth of field, maximum sharpness. But diffraction softens images at very narrow apertures. On most modern lenses, sharpness peaks somewhere between f/5.6 and f/11, then gradually decreases toward f/22. For landscapes, f/11 is almost always a better choice than f/22.
Pitfall 3: Forgetting the reciprocal relationship.
When you widen aperture for more light, your camera needs to compensate somewhere — usually with a faster shutter speed. Beginners often widen aperture in low light and then wonder why their photos are blurry. The answer: the camera slowed the shutter to compensate, and handshake did the rest. Aperture-First doesn’t mean aperture-only. The other two sides of the triangle always respond.
When Aperture Isn’t the Right Tool
Aperture is powerful, but it’s not always the answer. Three scenarios where reaching for a different control makes more sense:
When you need to freeze fast motion in low light. Widening aperture helps, but if you’ve already hit f/1.8 and the image is still blurry due to motion, the fix is shutter speed — not aperture. Raise ISO to allow a faster shutter instead.
When you’re shooting with a fixed-aperture lens. Many smartphone cameras and some specialty lenses have a fixed aperture that cannot be changed. In these cases, depth of field is controlled by changing your distance to the subject or using the camera’s digital depth-of-field simulation (portrait mode), not by adjusting f-stops.
When you’re printing very large from a high-resolution sensor. On 45MP+ cameras, diffraction becomes visible at narrower apertures than on lower-resolution bodies. If you’re shooting landscapes for large-format prints with a high-resolution sensor, f/8 may serve you better than f/16 — test your specific body and lens combination before committing to a narrow aperture for critical work.
Frequently Asked Questions About Aperture
What is aperture in simple terms?
Aperture is the adjustable opening in your camera lens that controls light and focus range simultaneously. Think of it like the pupil of your eye — it gets bigger in the dark to let in more light and smaller in bright conditions. A wider aperture (small f-number like f/1.8) lets in more light and blurs the background. A narrower aperture (large f-number like f/16) lets in less light and keeps more of the scene sharp. It’s the single most creative control on your camera.
Is f/1.8 or f/2.2 aperture better?
Neither is universally better — the right choice depends on your subject and focus accuracy. F/1.8 delivers more background blur (bokeh) and admits roughly one-third more light than f/2.2 according to standard f-stop math, making it ideal for low-light portraits where maximum separation is the goal. F/2.2 provides a slightly deeper focus plane, which typically keeps both eyes and more of the face in sharp focus — a more forgiving choice for photographers still refining their autofocus technique. For most portrait work, the practical difference between the two is subtle; f/2.0 is a popular middle ground.
How do you explain aperture to kids?
Tell them to look at their eyes in a mirror, then cover one eye and uncover it fast. The black dot in the middle — the pupil — just got bigger. That’s exactly what aperture does inside a camera lens. In the dark, both the pupil and the aperture get bigger to let more light in. In bright light, both get smaller. The camera’s aperture even does one more trick: when it’s small (like a tiny dot), more things look sharp in the photo. When it’s big (like a wide circle), only the thing you’re pointing at looks sharp, and everything behind it goes blurry.
What does f/2.8 mean?
F/2.8 is a wide aperture that balances light, bokeh, and sharpness — often called the professional portrait sweet spot. The opening is the focal length divided by 2.8: on a 70mm lens, that’s 25mm of aperture diameter. F/2.8 constant-aperture zoom lenses (like a 70–200mm f/2.8) are among the most popular professional tools because they maintain this wide aperture throughout the zoom range. At f/2.8, you get meaningful background blur, good low-light performance, and sharper results than f/1.8 across most of the frame — making it a versatile choice for events, weddings, and sports where you can’t always control the light.
Your First Aperture Decision
For photographers moving off auto mode, aperture is the setting that unlocks creative control fastest. It controls light intake and depth of field simultaneously — the only camera setting that does both — which is exactly why the Aperture-First Mindset exists as a practical framework. Research confirms that the pupil-aperture parallel is structurally accurate: decreasing the opening size increases the range of sharpness in both the human eye and a camera lens (NCBI, 2026). Every f-number decision you make flows from that single physical principle.
The Aperture-First Mindset isn’t just a framework for remembering settings — it’s a shift in how you approach every shot. When you arrive at a scene and ask “how much of this do I want in focus?” before touching any other dial, you’re thinking like a photographer rather than reacting like one.
Your next step: switch your camera to Aperture Priority mode (A or Av on your dial), set your aperture to f/2.8, and photograph the same subject three times — once at f/1.8, once at f/5.6, once at f/11. Review the results side by side. That 10-minute exercise, done on your next walk outside, will make aperture click in a way no guide can fully replicate on its own.
