Aperture Priority Mode: Complete Guide to Depth of Field
“Most people stick with aperture priority — until it ruins their shot.”
What’s in this guide
- What Is Aperture Priority Mode?
- When to Use Aperture Priority Mode
- Aperture Priority vs. Manual vs. Shutter Priority
- How to Use Aperture Priority Mode: Step-by-Step
- Aperture Priority on Your Specific Camera
- When Aperture Priority Fails: Common Mistakes
- Frequently Asked Questions
- The Bottom Line on Aperture Priority Mode
If your last shoot ended with blurry subjects or blown-out backgrounds, you weren’t using the mode wrong — you were missing one critical setting.
Every missed shot in aperture priority mode comes down to the same preventable mistake: letting the camera choose a shutter speed you didn’t approve. That’s how you end up with motion blur at a family gathering, overexposed portraits in harsh sun, or a wildlife moment ruined by a 1/20s shutter at dusk. The camera is doing exactly what you told it to do — you just didn’t know you had more to say.
By the end of this guide, you’ll understand exactly how aperture priority mode works, when to use it, and how to configure the one setting — Auto ISO minimum shutter speed — that makes it bulletproof on any camera brand. We’ll cover what the mode does, the best shooting scenarios, how it compares to manual, a brand-specific setup for Canon, Nikon, Sony, and Fujifilm, and the most common mistakes to avoid.
What Is Aperture Priority Mode?
Aperture Priority Mode (labeled “A” on Nikon, Sony, and Fujifilm cameras, or “Av” on Canon) is a semi-automatic camera mode where you set the aperture (f-stop) and the camera’s light meter automatically selects the correct shutter speed for proper exposure. This gives you direct creative control over depth of field — how much of your scene appears sharp from foreground to background — without calculating exposure manually. It’s the preferred working mode for a significant share of professional photographers because it responds faster than full manual in changing light (Canon USA Support, 2026).
Most guides treat aperture priority as “Auto with f-stop control.” The more useful framing: it’s automation with one degree of creative override. Understanding exactly what you control and what you don’t is what sets up the Shutter Speed Safety Net concept we’ll cover in depth in Section 4 — consider this your foreshadowing.
How Depth of Field Is Controlled
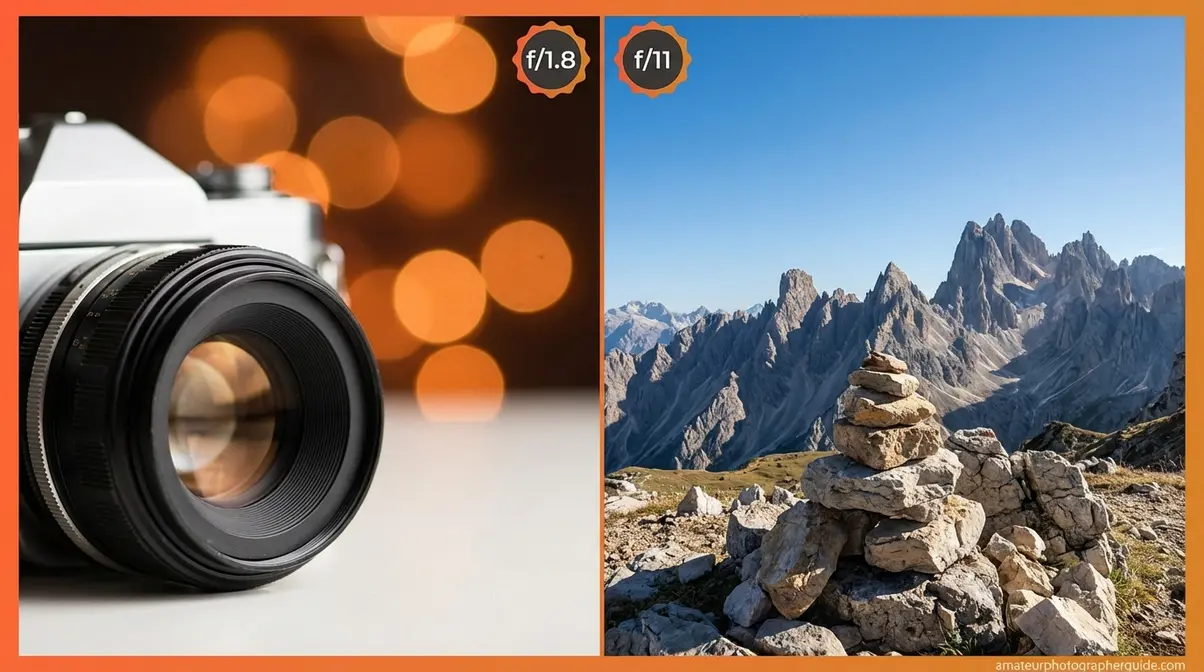
Depth of field (DoF) is how much of your scene appears sharp from foreground to background. The f-stop drives this relationship directly: lower f-numbers (f/1.4, f/1.8, f/2.8) create a shallower depth of field — your subject is sharp, the background dissolves into blur. Higher f-numbers (f/8, f/11, f/16) produce deeper depth of field, bringing everything from near to far into focus.
Once you dial in your f-stop, the camera’s light meter reads scene brightness and selects a shutter speed to achieve correct exposure. Set f/1.8 in a bright park and the camera might choose 1/2000s. Walk into deep shade, and it might automatically drop to 1/60s to compensate. That’s the essential transaction — and it’s also where things go wrong for most photographers. The camera may choose a shutter speed too slow to freeze your subject or handhold your camera steadily, and it does so silently, without warning.
There’s also a lens sweet spot worth knowing: most lenses produce their sharpest images two to three stops closed from maximum aperture. A 50mm f/1.8 lens, for example, resolves the most detail around f/4–f/5.6, balancing wide-open optical aberrations with the diffraction softness that occurs at very small openings (finding your lens’s sharpest aperture, B&H eXplora). The f-number itself represents the ratio of lens focal length to entrance pupil diameter — the physical basis for aperture control (NIST f-number standards, NIST).
| F-stop Range | Depth of Field Effect | Typical Use |
|---|---|---|
| f/1.4 – f/2.8 | Very shallow — background heavily blurred | Portraits, low light |
| f/4 – f/5.6 | Moderate — subject sharp, some background separation | General, events |
| f/8 – f/11 | Deep — most of scene in focus | Landscapes, architecture |
| f/16 – f/22 | Very deep — maximum front-to-back sharpness | Landscape, macro setups |

Caption: In aperture priority mode, you own two corners of the exposure triangle — aperture and ISO. The camera fills in shutter speed based on its light reading.
A vs Av: What Your Dial Symbol Means
Canon cameras use “Av” (Aperture Value); Nikon, Sony, and Fujifilm use “A.” Both labels activate the identical semi-automatic exposure mode — you set the aperture, the camera sets shutter speed — confirming that Canon’s technical overview of Av mode and Nikon’s “A” setting are functionally equivalent (Canon USA Support, 2026).
Fujifilm has a uniquely physical approach. On X-series cameras — the X100VI, X-T30 II, X-S20 — aperture is set directly on the lens aperture ring, not a camera body dial. To engage full aperture priority, rotate the lens ring to your chosen f-stop (say, f/2.8) and set the shutter speed dial on the camera body to “A.” That combination activates automatic exposure control. On Fujifilm bodies without a physical aperture ring (some X-A series models), a front command dial handles aperture.
- Quick-reference dial locations:
- Canon: Mode dial, top-right of camera body → turn to “Av”
- Nikon: Mode dial, top-left → turn to “A”
- Sony: Mode dial, top-right → turn to “A”
- Fujifilm: Lens aperture ring to chosen f-stop + shutter speed dial to “A”
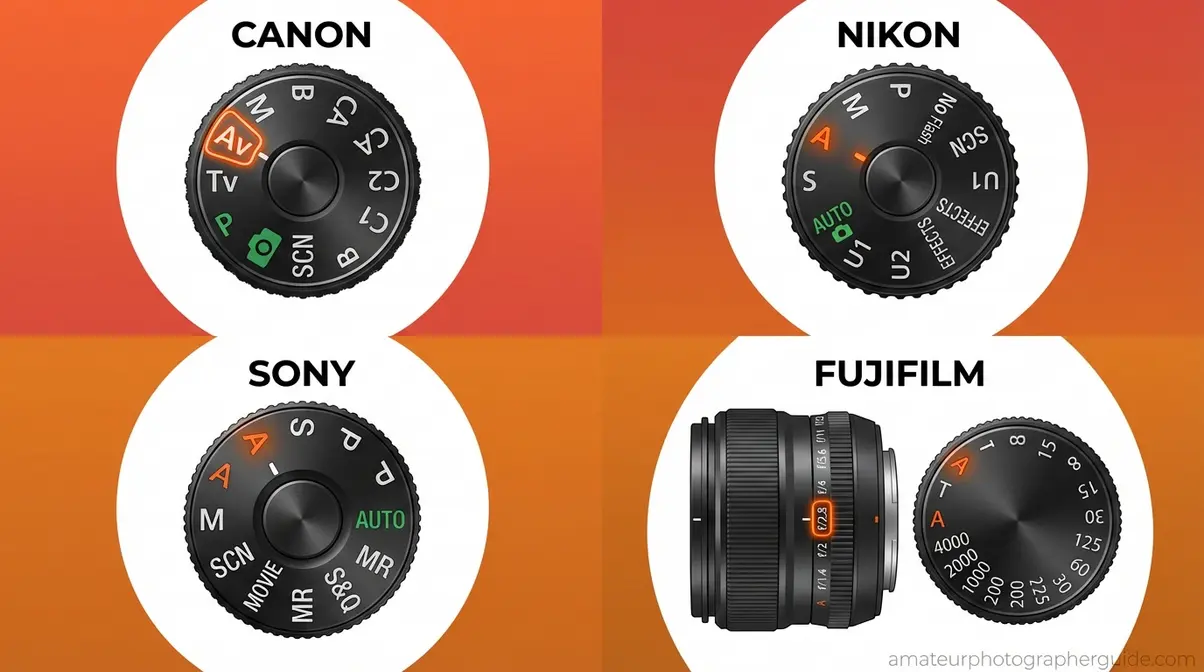
Caption: Side-by-side dial positions for aperture priority mode across Canon (Av), Nikon, Sony, and Fujifilm (A) — same mode, four different labels.
The Exposure Triangle in A Mode
Understanding aperture priority fully means knowing exactly which exposure variables you own — and which ones you hand over. In A or Av mode, the transaction is clear:
| Setting | Who Controls It | What It Affects |
|---|---|---|
| Aperture (f-stop) | You | Depth of field, light intake |
| ISO | You (manual) or camera (Auto ISO) | Sensor sensitivity, noise |
| Shutter Speed | Camera | Motion freeze, exposure |
When Auto ISO is active, the camera controls both shutter speed AND ISO, leaving you with aperture alone. This is more hands-off than it sounds — and it’s where noise creep and blur risk both increase. The Shutter Speed Safety Net technique in Section 4 is exactly how you reclaim indirect control without leaving aperture priority mode.
For most photographers starting out with A mode, the recommended setup is: set ISO manually (you choose the sensitivity), set the mode dial to A/Av (you choose depth of field), and let the camera handle shutter speed. That gives you two-thirds control — a powerful starting position.
BBC Maestro’s definition of exposure describes it well: exposure is the amount of light reaching your camera sensor, determined by the interplay of aperture, shutter speed, and ISO (BBC Maestro). In aperture priority, you’re shaping two of those three variables with intention.
When to Use Aperture Priority Mode

Aperture priority mode delivers the most value when depth of field is your primary creative decision — and when light is changing faster than manual mode allows. The 8 scenarios below cover the situations where reaching for “A” or “Av” is the right call, with specific settings for each.
Aperture Priority Mode is the professional’s choice for portraits (f/1.4–f/2.8) and landscapes (f/8–f/16) because it combines creative depth-of-field control with automatic exposure in rapidly changing lighting conditions.
Portraits, Landscapes & Events: Core Uses
The four scenarios below are where most photographers will use aperture priority every single week. Nail these settings, and the mode becomes second nature.
1. Portraits (f/1.4–f/2.8)
Set a wide aperture to isolate your subject against a dreamy, blurred background. At f/1.8 on a 50mm lens with a full-frame sensor, backgrounds dissolve beautifully — this is the classic “dreamy bokeh” effect readers associate with professional portraits. The risk in dim indoor light: the camera may drop the shutter below 1/100s, and your subject — even one who’s nearly still — will show motion blur. The Shutter Speed Safety Net technique (covered fully in Section 4) is essential for portrait work in any controlled indoor space.
2. Landscapes (f/8–f/16)
Narrow the aperture for front-to-back sharpness across your entire scene. f/11 is the reliable standard for most lenses — it sits in the lens sweet spot while delivering maximum depth of field. Avoid pushing narrower than f/16 unless you need it; diffraction softens fine detail at very small apertures. In landscape conditions, the camera typically selects shutter speeds between 1/30s and 1/250s depending on light. Use a tripod for anything below 1/60s.
3. Weddings and Events (f/2.8–f/4)
Changing light from an outdoor ceremony to an indoor reception is exactly where aperture priority proves its worth. Set f/2.8–f/4, activate Auto ISO, and the camera adapts as you move between environments — dramatically faster than manually recalculating exposure at each location. Digital Photography School’s scenario guide confirms this: in rapidly changing light conditions, aperture priority prevents missed shots because exposure adaptation is automatic while creative depth-of-field control stays with the photographer.
4. Street Photography (f/5.6–f/8)
A mid-range aperture keeps both subject and environmental context sharp — letting you tell the story of a scene, not just isolate a face. In mixed street light (deep shade next to harsh sun), aperture priority handles the exposure shift cleanly as you move. The “overcomplicating it” trap here: don’t stop down too far in low light. At f/8 indoors or in shade, the camera will select a shutter speed too slow for handheld shooting.
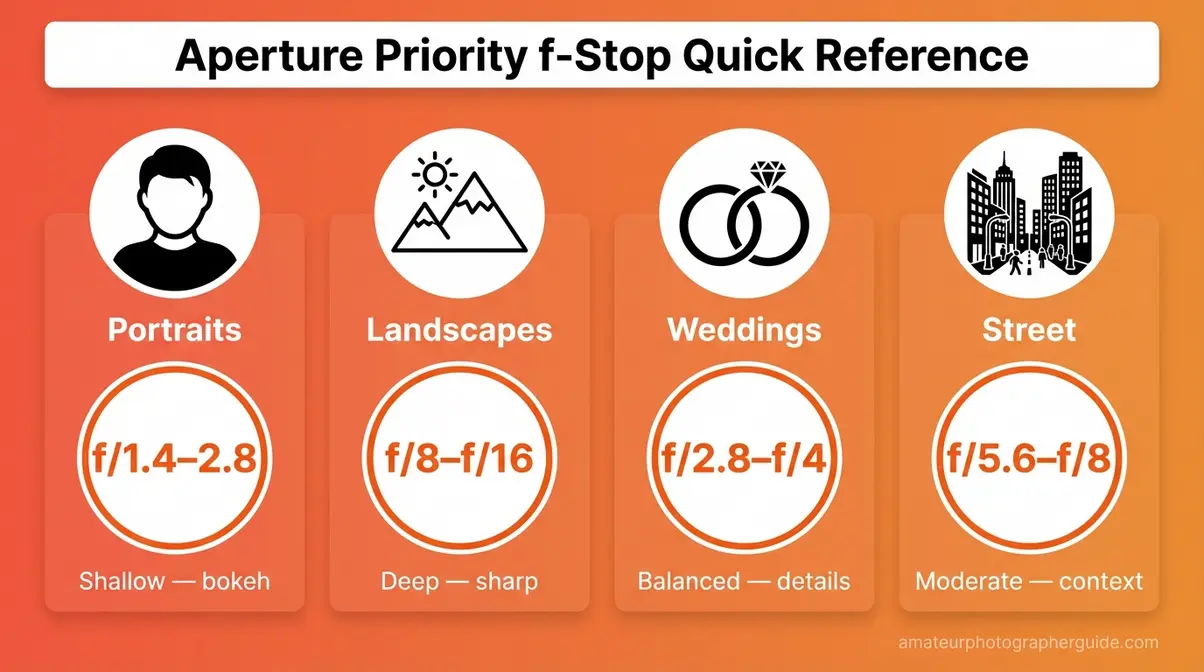
Caption: Quick-reference f-stop guide for aperture priority mode across the most common shooting genres — bookmark this before your next shoot.
Wildlife, Macro, Birds & Time-Lapse
These four scenarios extend aperture priority into specialized shooting contexts — including one that surprises most photographers.
5. Wildlife and Bird Photography (f/4–f/6.3)
At these apertures with telephoto lenses (100–400mm), depth of field is already naturally shallow due to focal length compression — you get subject separation without pushing to wide-open settings. The critical variable here is shutter speed. Set a minimum shutter speed of at least 1/1000s via the Safety Net to freeze wing movement. Without it, the camera will happily drop to 1/60s as a bird flies into shadow, and you’ll lose the shot entirely.
6. Macro Photography (f/11–f/16)
At close focus distances, depth of field becomes razor-thin — even f/11 may hold only a few millimeters of sharp focus. Use a tripod and remote shutter release for macro work in aperture priority; the camera’s exposure automation helps as you shift magnification between shots without manually re-metering each composition.
7. Indoor and Event Photography (f/1.8–f/2.8)
Dark reception halls, conference rooms, theater performances — let your wide aperture gather maximum light and use Auto ISO to handle sensitivity. The watch-out: at 1/60s or slower (common in dim rooms without a minimum shutter speed set), moving subjects will ghost. This is the scenario most responsible for the blurry-photos-in-aperture-priority frustration photographers experience.
8. Time-Lapse (Aperture Priority with Interval Shooting)
For day-to-night time-lapses, leaving the camera in aperture priority allows automatic exposure ramping as ambient light fades — a technique that using aperture priority for time-lapse exposure ramping describes as the smoothest way to handle lighting transitions across extended intervals (B&H eXplora). Set a consistent aperture, let the camera ride the exposure shift, and avoid the abrupt jumps you’d get from re-metering in manual mode.
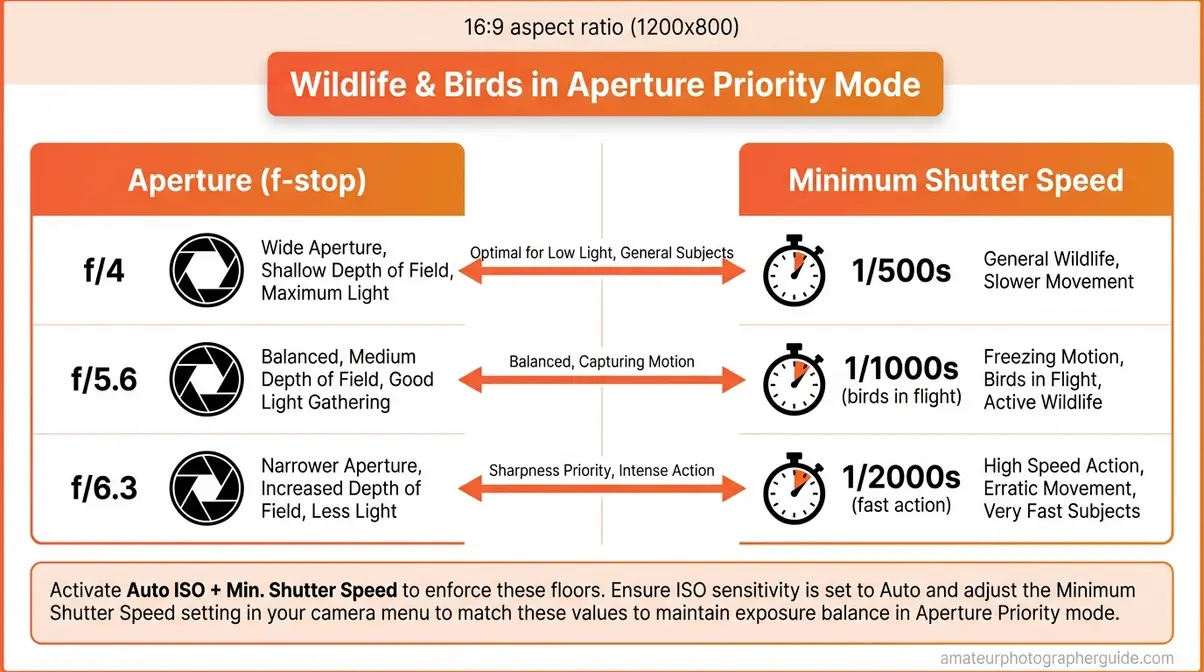
Caption: Recommended f-stop and minimum shutter speed pairings for wildlife and bird photography in aperture priority mode.
Aperture Priority vs. Manual vs. Shutter Priority
Is aperture priority mode the best option on your camera? That depends entirely on what you’re shooting. The real question isn’t which mode sounds more professional — it’s which mode gives you the right creative control for your specific situation. Here’s a direct comparison of aperture priority mode against the other settings on your dial.
Manual Mode: For Full Control
In aperture priority vs. manual mode, the decision comes down to one question: is your light fixed or changing? Manual mode gives you direct control over all three exposure variables simultaneously — aperture, shutter speed, and ISO. It’s genuinely the correct choice in two scenarios: (a) studio photography with strobes, where light doesn’t change between frames and recalibration is unnecessary, and (b) controlled product photography where you need both a specific shutter speed AND a specific aperture at the same moment (for example, 1/1000s at f/11 to freeze water with maximum depth of field).
Outside those scenarios, the “pros only use manual” belief doesn’t hold up. A Digital Photography School reader poll — one of the largest in photography community surveying — found aperture priority was the most commonly used mode among active photographers, including professionals. Community consensus across wedding photographers and photojournalists indicates aperture priority is the working default for the majority of real-world shooting (Digital Photography School, reader polling data).
The real cost of manual is adaptation speed. Every significant light change requires deliberate recalibration. Move from shade to sun at a wedding, or follow a subject from indoors to outdoors, and manual mode means your next five frames are potentially mis-exposed while you adjust. Aperture priority with the Shutter Speed Safety Net delivers equivalent creative control for 90% of photography situations with significantly faster response — the same f-stop decision, none of the cognitive overhead of tracking shutter speed manually.
Shutter Priority: For Fast Action
Shutter Priority (labeled “S” on Nikon, Sony, and Fujifilm; “Tv” — Time Value — on Canon) reverses the aperture priority transaction: you set shutter speed, the camera selects aperture. It’s the correct mode when motion freezing is the primary concern — athletes in flight at 1/1000s–1/2000s, birds at 1/2000s or faster, motor racing where blur is never acceptable.
Shutter priority has a meaningful weakness, though. In very bright conditions, the camera may select an extremely wide aperture (f/1.4 or even wider on some lenses) to balance exposure at your locked shutter speed. The result: an unintentionally shallow depth of field that throws your background — or part of your subject — completely out of focus. Aperture priority avoids this by letting you set the aperture floor yourself.
Here’s the full comparison:
| Mode | You Set | Camera Sets | Best For | Biggest Risk |
|---|---|---|---|---|
| Aperture Priority (A/Av) | Aperture + ISO | Shutter Speed | Portraits, landscapes, events | Slow shutter = motion blur |
| Shutter Priority (S/Tv) | Shutter Speed + ISO | Aperture | Sports, birds in flight, action | Unintended shallow DoF in bright light |
| Manual (M) | Everything | Nothing | Studio, fixed controlled light | Slow to adapt to changing scenes |
| Program (P) | Nothing (EV comp only) | Aperture + Shutter | Snapshots | Least creative control of any mode |
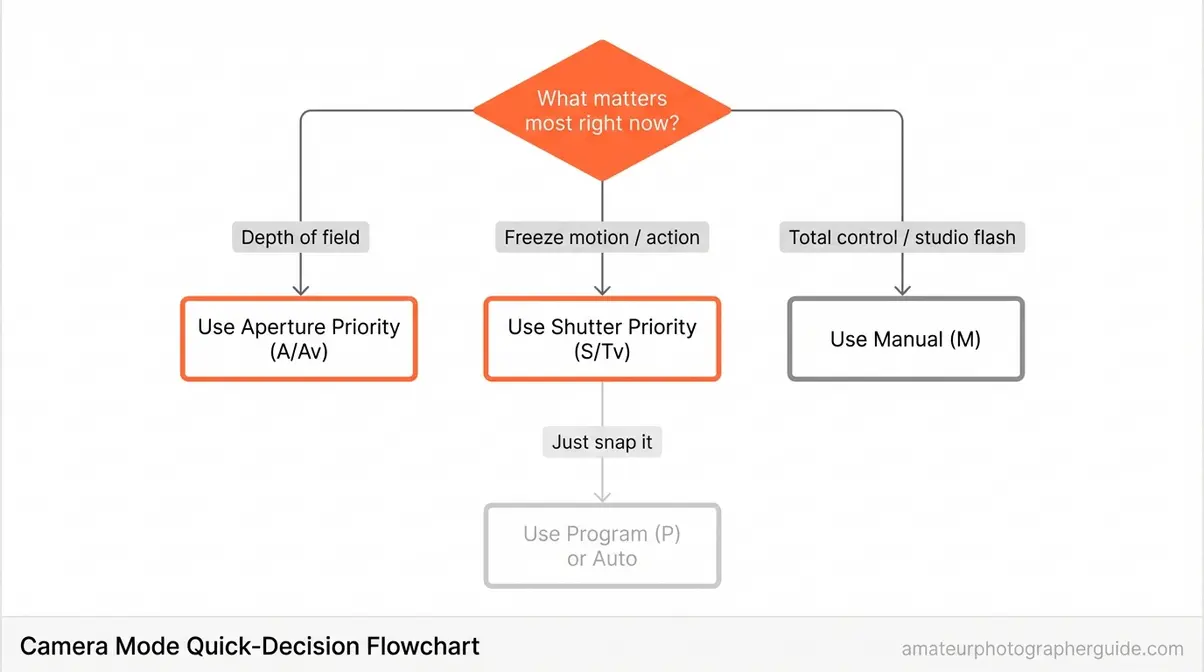
Caption: Use this decision tree before your next shoot — the answer usually points to aperture priority faster than you’d expect.
Program Mode: Giving Up Control
Program Mode (“P”) selects both aperture AND shutter speed automatically, leaving you with only exposure compensation as a creative input. You can shift the program curve on some cameras — nudging toward wider or narrower apertures — but you never hold direct aperture control. For any photographer who cares about depth of field decisions, Program mode vs. aperture priority is a simple call: Program is a smarter Auto mode, nothing more. If you want fully automatic, use Auto. If you want any intentional creative input, use Aperture Priority.
How to Use Aperture Priority Mode: Step-by-Step
Aperture priority mode lets you control depth of field while the camera manages shutter speed — but using it effectively requires three specific settings dialed in before you shoot. Here’s the complete setup workflow, followed by the one configuration that prevents 90% of blurry-photo complaints.
Steps 1-3: Mode, Aperture & ISO Setup
Follow these steps with your camera in hand:
Step 1 — Set Your Mode Dial to A or Av
Turn your camera’s mode dial to “A” (Nikon, Sony, Fujifilm) or “Av” (Canon). On Fujifilm X-series with a physical aperture ring (X100VI, X-T30 II, X-S20), rotate the lens ring off its “A” position to your chosen f-stop, then set the shutter speed dial on the body to “A” — that combination locks in aperture priority. Estimated time: 10 seconds.
- Step 2 — Set Your Base ISO
- Before activating Auto ISO, set a manual ISO that matches your environment:
- Bright daylight or reflective outdoor scenes: ISO 100–400
- Overcast sky or open shade: ISO 400–800
- Indoors, twilight, or dim event spaces: ISO 800–3200
Modern mirrorless bodies — Sony A7 IV, Nikon Z6 III, Canon EOS R6 Mark II — produce clean files at ISO 6400 and beyond. Don’t be afraid to push sensitivity on newer hardware. Estimated time: 15 seconds.
- Step 3 — Choose Your Aperture
- Dial in the f-stop that matches your creative intent using your camera’s command dial:
- Canon: Rear Quick Control Dial (right thumb)
- Nikon: Front sub-command dial (near shutter button)
- Sony: Front dial (near shutter button); lens aperture ring on G-Master and Sigma lenses
- Fujifilm: Lens aperture ring directly
Refer to the Scenario Cheat Sheet from Section 2 for genre-specific starting points. Estimated time: 10 seconds.
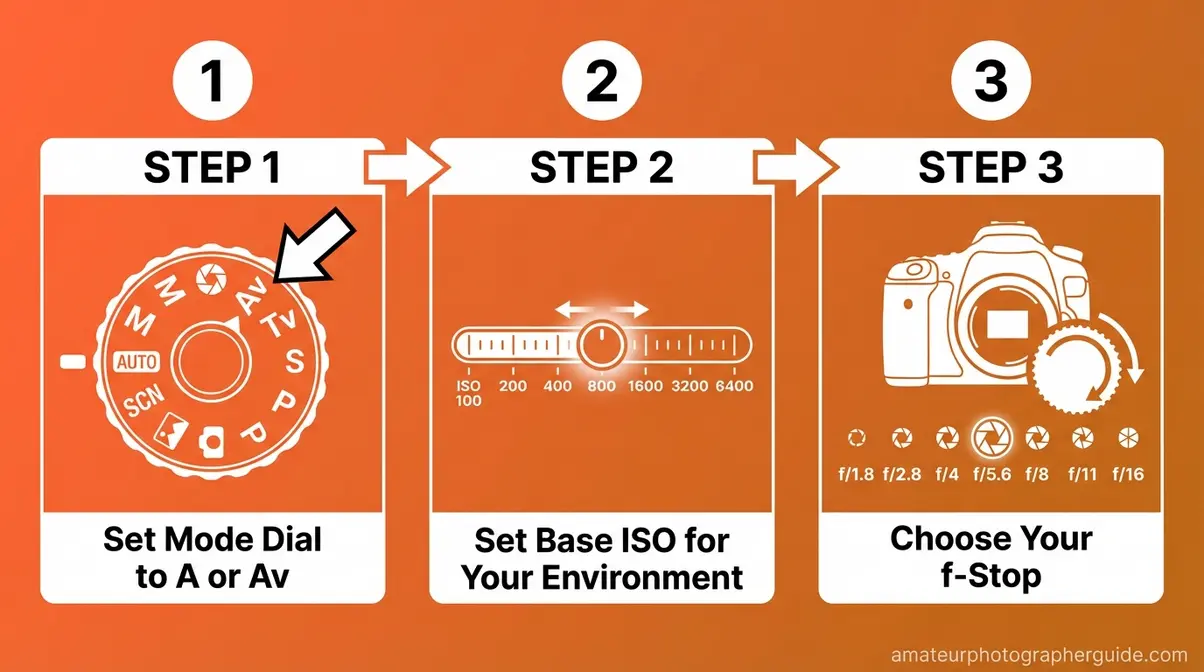
Caption: Dial locations for aperture and mode control across Canon, Nikon, Sony, and Fujifilm — all leading to the same A/Av mode.
With the mode configured, you’re now 60% of the way to mastering aperture priority. The remaining 40% — the part that prevents ruined shots — is the Shutter Speed Safety Net.
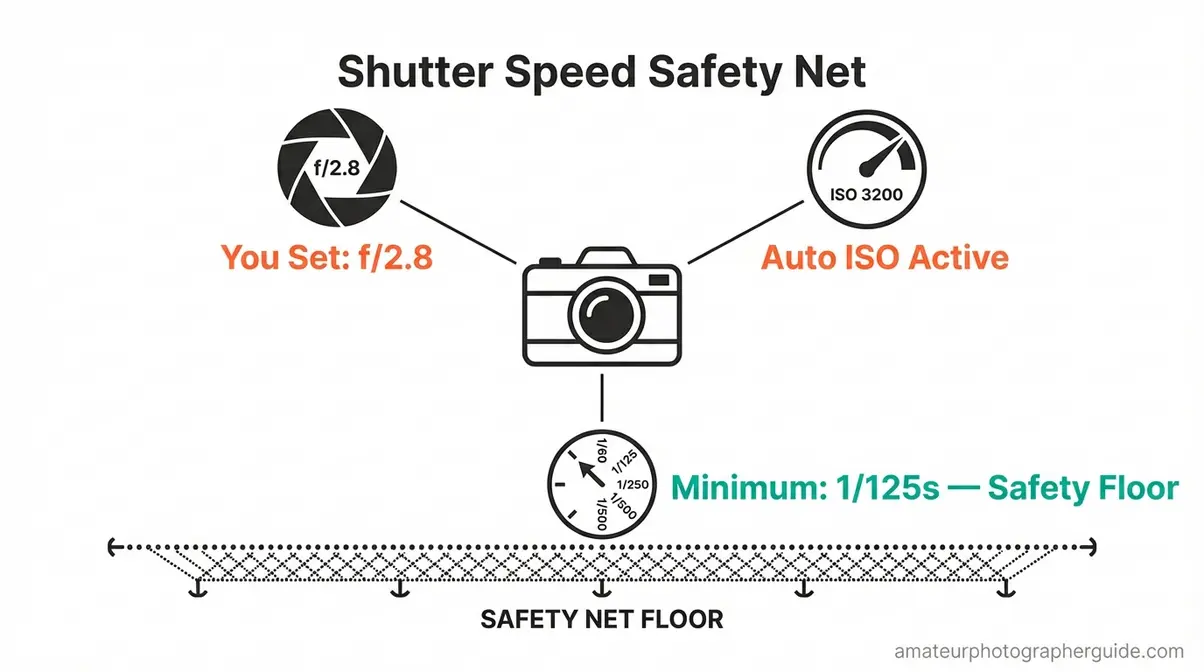
The Shutter Speed Safety Net
The Shutter Speed Safety Net is the combination of Auto ISO and a minimum shutter speed limit that lets you stay in aperture priority while preventing the camera from selecting a shutter speed slow enough to blur your shot. It’s the direct answer to the question photographers don’t know to ask: Can you control shutter speed in aperture priority mode? Not directly — but the Safety Net is the effective workaround, and it works on every major camera brand.
Why you need it: Without a minimum shutter speed set, a camera in aperture priority will drop to 1/10s, 1/6s, or even 1/2s in dim conditions to maintain exposure. At those speeds, any subject movement — a child turning their head, a bird shifting weight, your own hand tremor — produces motion blur. This is the “ruins their shot” scenario. The camera did exactly what you asked. You just didn’t know to ask for more.
The 1/focal-length rule: As a starting minimum shutter speed floor, use the reciprocal of your focal length. A 50mm lens → minimum 1/50s (round up to 1/60s). A 200mm lens → minimum 1/200s. For active subjects — children, pets, birds — double it: 1/125s for 50mm, 1/400s for 200mm. This is the same principle Nikon’s explanation of Auto ISO in Aperture Priority applies in their Auto minimum shutter speed algorithm — the camera uses focal length as its baseline (Nikon Learn and Explore).
How to activate it — verified brand-specific menu paths:
| Brand | Menu Path | Setting Name | Recommended Starting Value |
|---|---|---|---|
| Canon EOS R-series | Menu → Shooting Settings → ISO Speed Settings → Min. Shutter Speed | Auto or Manual value | 1/125s (portrait) / 1/250s (moving subjects) |
| Canon Rebel / EOS series | Menu → Shooting Menu → ISO Auto Settings → Min. Shutter Speed | Specific value | 1/125s |
| Nikon Z-series / D-series | Menu → Photo Shooting Menu → ISO Sensitivity Settings → Minimum Shutter Speed | Auto or specific value | 1/250s (action) / 1/125s (static) |
| Sony Alpha A7 / A6000 series | Menu → Camera Settings → ISO Settings → ISO Auto Min. SS | Standard / Manual value | Standard (focal-length auto) or 1/125s |
| Fujifilm X-series | Menu → Shooting Setting → ISO Auto Setting → Min. Shutter Speed | Specific value or Auto | Auto (uses 1/focal-length rule natively) |
Canon’s implementation confirms the critical prerequisite: the ISO Speed must be set to AUTO for minimum shutter speed to activate, and the camera must be in Av (Aperture Priority) or Program mode — it does not function in Manual mode (Canon Support, ART136820, 2026). Sony’s implementation, described in their Sony’s official guide to Aperture Priority, allows either a Standard (focal-length-based) setting or a manually specified value (Sony Help Guide).
Recommended starting values by scenario:
- Portraits with relatively still subjects: 1/125s
- Children, pets, casual movement: 1/250s
- Wildlife or birds in flight: 1/500s–1/1000s
- Handheld with telephoto (100mm+): 1/focal-length, doubled
In aperture priority, if light levels change and the required shutter speed falls below the minimum you selected, Auto ISO automatically raises sensitivity to compensate — preventing motion blur without switching modes (Nikon Learn and Explore). That’s the Safety Net working exactly as designed: you keep your aperture, the camera keeps the shutter fast enough, and ISO takes the trade-off hit instead.
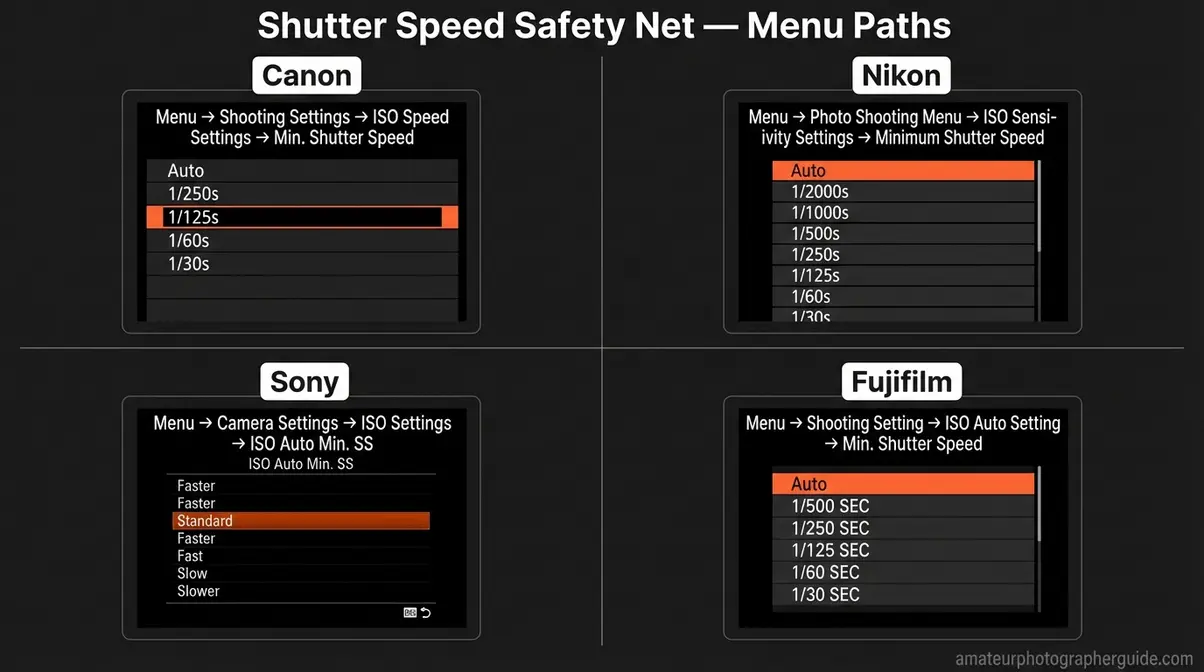
Caption: Exact menu navigation for activating the Shutter Speed Safety Net on all four major camera brands — set this once and leave it.
Exposure Compensation: Fixing Mistakes
The most useful aperture priority tips beyond the Safety Net involve one more override: Exposure Compensation. This is the +/- control (a dedicated button, dial, or both depending on brand) that tells the camera to expose brighter or darker than its meter suggests. It works by instructing the camera to recalculate its automatic shutter speed selection up or down from the metered value — your f-stop stays exactly where you set it.
Three common situations where exposure compensation saves the shot in aperture priority mode:
| Situation | What Goes Wrong | EV Compensation Fix |
|---|---|---|
| Subject in front of bright window | Camera meters bright background, underexposes subject | +1 to +2 EV |
| Snow or beach scene | Meter sees bright reflective surface, underexposes | +1 EV |
| Dark subject against dark background | Camera overexposes trying to “correct” the darkness | -1 EV |
The most practical tool for calibrating exposure compensation is your histogram — visible on the LCD or EVF in real-time on most modern mirrorless cameras. A spike pushed hard against the right edge means blown highlights (overexposed). A spike bunched on the left means blocked shadows (underexposed). Adjust EV compensation until the histogram balances toward the center for your scene. Shoot, review, and re-adjust — it takes less than 10 seconds once the habit is established.
Aperture Priority on Your Specific Camera
Canon cameras label Aperture Priority as “Av” (Aperture Value), while Nikon, Sony, and Fujifilm cameras use “A” — both activate identical semi-automatic exposure control (Canon USA Support, 2026). The mode works the same across all four platforms; what differs is how you adjust aperture, where you find Auto ISO settings, and one meaningful quirk in Fujifilm’s physical-ring approach.
Canon: Av Mode and the Rear Dial
Aperture priority mode on Canon (including the EOS R5, R6 Mark II, R8, R50, R100, and Rebel T-series) is labeled “Av” on the mode dial. To adjust aperture in Av mode: use the rear Quick Control Dial — the large dial your right thumb rests on. On EOS R-series bodies, you can also assign aperture adjustment to the top control ring or front control ring via Custom Controls in the menu, which many professionals prefer for faster one-hand operation.
To activate the Shutter Speed Safety Net: Menu → Shooting Settings → ISO Speed Settings → Min. Shutter Speed → choose “Auto” (camera applies 1/focal-length rule automatically, adjustable ±3 stops) or a specific value like 1/125s (Canon Support, ART136820, 2026). Canon’s technical overview of Av mode confirms: in Av mode, you set aperture and Canon cameras set shutter speed automatically to suit subject brightness (Canon USA Support, 2026).
Related query answered: In Manual (M) mode on Canon, shutter speed is adjusted via the front Main Control Dial and aperture via the rear Quick Control Dial — the reverse of what some photographers expect coming from Av mode.
Nikon: A Mode and the Front Command Dial
Aperture priority mode on Nikon — covering the D3400, D3500, D5600, D7100, D7500, D850, Z30, Z50, Z6 III, and Z8 — is labeled “A” on the mode dial. To adjust aperture in A mode: use the front sub-command dial (the small dial near the shutter button). On entry-level Nikon DSLRs like the D3400 and D3500, which lack a dedicated sub-command dial, hold the Exposure Compensation (+/-) button and rotate the main command dial to shift aperture.
To activate the Safety Net: Menu → Photo Shooting Menu → ISO Sensitivity Settings → Minimum Shutter Speed → select “Auto” (Nikon applies focal-length-based minimum automatically, adjustable with a Faster/Slower slider) or a specific value. Nikon’s Auto setting is particularly convenient for photographers who switch lenses frequently — it recalculates the minimum shutter floor for each focal length automatically (Nikon Learn and Explore).
Sony and Fujifilm: A Mode Quirks to Know
Sony Alpha series (A6400, A6700, A7C, A7 III, A7 IV) — set the mode dial to “A.” Adjust aperture via the front dial near the shutter button. On Sony G-Master, Zeiss, and compatible third-party lenses with aperture rings, rotate the ring to “Auto” (or “Click” position) and control aperture via the camera dial instead. To activate the Safety Net: Menu → Camera Settings → ISO Settings → ISO Auto Min. SS → choose Standard (camera uses focal-length rule) or a manually specified value. Sony’s official guide to Aperture Priority confirms that setting the mode dial to A allows photographers to control depth of field while the camera manages shutter speed automatically (Sony Help Guide).
Fujifilm X-series (X100VI, X-T30 II, X-S20, and most X-series prime-lens bodies) operates differently from every other major brand. On cameras with physical aperture rings, set the aperture directly on the lens aperture ring — rotate to f/2.8, f/4, or your chosen f-stop. Then set the shutter speed dial on the camera body to “A.” That combination — physical aperture ring to a specific f-stop, body dial to A — engages Aperture Priority Automatic exposure mode, as confirmed by Fujifilm manual instructions for Aperture-Priority AE (Fujifilm Digital Camera Manuals). To activate the Safety Net on Fujifilm: Menu → Shooting Setting → ISO Auto Setting → Min. Shutter Speed → select a value or choose Auto, which natively applies the 1/focal-length rule.
On X-A series bodies without lens aperture rings, a front command dial handles aperture — closer to the Sony and Nikon approach.
When Aperture Priority Fails: Common Mistakes
Aperture priority mode is reliable — but not unconditional. Knowing when it will disappoint you matters as much as knowing how to set it up.
When Shutter Speed Ruins Your Shot
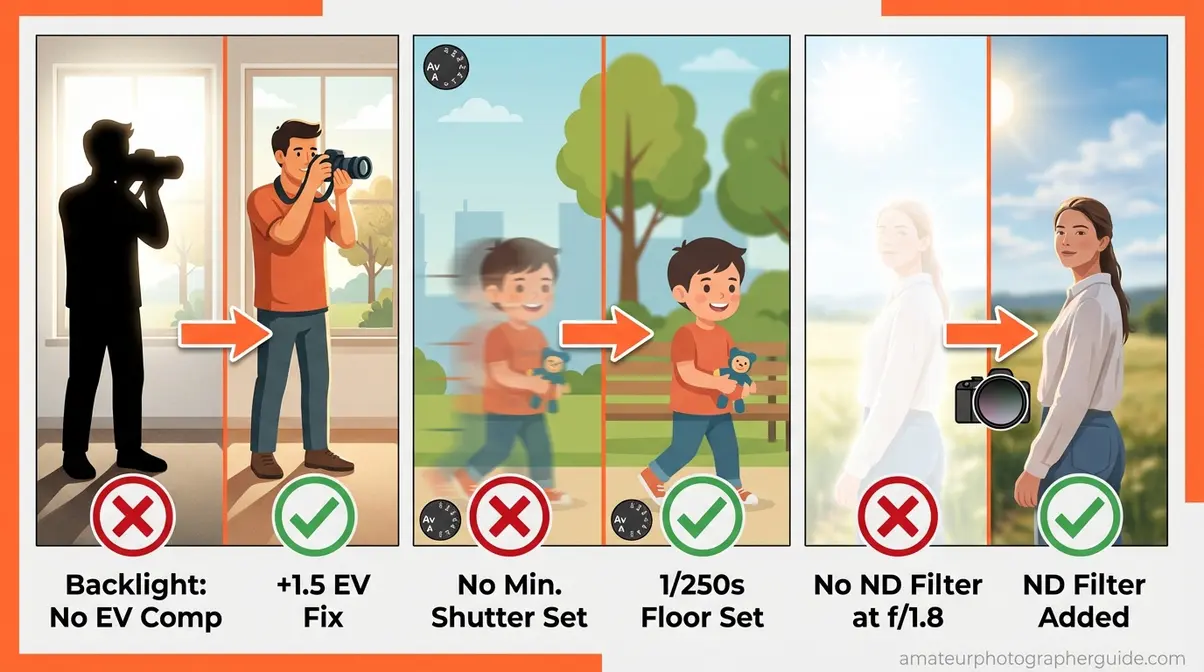
Three specific situations will produce bad results in aperture priority mode without the right countermeasures:
- Extreme backlight without exposure compensation: The camera meters the bright background, underexposes your subject, and you end up with a silhouette you didn’t intend. Symptom: subject is dark, background properly exposed. Fix: dial +1 to +2 EV Exposure Compensation before shooting.
- Fast-moving subjects without a minimum shutter speed set: The camera drops to 1/20s in low indoor light and motion blur destroys the frame. Symptom: subject is smeared or ghosted, background is sharp. Fix: activate the Shutter Speed Safety Net with a minimum of 1/125s for general subjects, 1/500s+ for fast movement.
- Bright outdoor scenes at wide aperture: In strong sunlight at f/1.8, the camera may need 1/8000s or faster to maintain exposure — and hit its maximum shutter speed limit. Symptom: image is still overexposed at the camera’s fastest shutter speed. Fix: use a neutral density (ND) filter to reduce incoming light, or narrow the aperture by 2–3 stops.
When to Switch Modes Instead
Switch to Shutter Priority (S/Tv) when you’re shooting fast sports, birds in flight, or any situation where a specific minimum shutter speed is more critical than depth of field. A basketball player cutting to the basket or a falcon diving needs 1/2000s — no aperture consideration overrides that.
Switch to Manual (M) when you’re using studio strobes or shooting in absolutely fixed, controlled lighting. In a studio with consistent flash output, the camera’s meter is irrelevant — you set the exact triangle values once and shoot.
Stay in aperture priority mode — with the Safety Net active — for everything else. It’s the most practical working mode for the widest range of photographic situations, and with a minimum shutter speed configured, the “ruins your shot” scenario becomes a setting problem you’ve already solved.
Frequently Asked Questions
Is aperture priority A or AV?
Aperture Priority is labeled “A” on Nikon, Sony, and Fujifilm cameras, and “Av” (Aperture Value) on Canon cameras. Both labels refer to the identical semi-automatic camera mode — you set the aperture (f-stop) and the camera automatically calculates the correct shutter speed for proper exposure. If you’re shooting Canon and see “Av” on your mode dial, that is your Aperture Priority setting. The function is identical across all brands despite the different nomenclature.
Adjusting Shutter Speed in A-Mode
In standard Aperture Priority mode, the camera selects shutter speed automatically — you cannot set it directly. However, you can indirectly control it by activating your camera’s Auto ISO Minimum Shutter Speed setting, which prevents the camera from dropping below a threshold you choose (for example, 1/125s). Adjusting Exposure Compensation (+/-) also influences the camera’s shutter speed selection by shifting its metered exposure target up or down by a specified number of stops.
When to Use Aperture Priority
Use Aperture Priority mode when depth of field is your primary creative decision. It’s ideal for portraits (wide apertures like f/1.8 for blurred backgrounds), landscapes (narrow apertures like f/11 for front-to-back sharpness), weddings, events, and street photography where lighting changes frequently. It also excels when you need to adapt quickly to changing light — transitioning from outdoors to indoors, or following a subject through shifting ambient conditions — without manually recalculating exposure each time.
Aperture Priority vs. Manual Mode
In Aperture Priority mode, you set the aperture and ISO while the camera automatically selects shutter speed. In Manual mode, you control all three exposure variables — aperture, shutter speed, and ISO — independently, with no automatic adjustments. Manual delivers complete creative control but requires deliberate recalibration with every significant light change. Aperture priority adapts exposure automatically, making it faster and more responsive for dynamic environments like outdoor events, portrait sessions with changing ambient light, or any situation where the light won’t hold still.
Why Are My Photos Blurry in A-Mode?
Blurry photos in Aperture Priority almost always mean the camera selected a shutter speed too slow to handhold or freeze subject movement. The fix: activate your camera’s Auto ISO Minimum Shutter Speed setting and set a floor of at least 1/125s for general shooting — higher for moving subjects (1/500s for wildlife, 1/250s for children). This is the Shutter Speed Safety Net. It prevents the camera from choosing dangerously slow shutter speeds when ambient light dims between frames, without requiring you to leave aperture priority mode.
The Bottom Line on Aperture Priority Mode
For intermediate photographers using any major camera brand, aperture priority mode delivers professional-level depth-of-field control without the cognitive load of full manual exposure. The key is pairing A or Av mode with the Shutter Speed Safety Net — Auto ISO with a minimum shutter speed set — so the camera never selects a shutter speed slow enough to ruin your shot. Configure this once per camera, and aperture priority becomes your default working mode across portraits, events, landscapes, and wildlife.
This is exactly why photographers who “tried aperture priority and it ruined their shot” abandoned it too early. They were one menu setting away from reliable results. The mode doesn’t ruin shots — the missing Safety Net does. The blurry family gathering, the dark indoor portrait, the ghosted bird at dusk — those aren’t aperture priority failures. They’re Auto ISO minimum shutter speed absences. Configure it, and the frustration disappears.
Start today: set your camera to A or Av mode, dial in f/2.8 for your next portrait session, and navigate to your Auto ISO minimum shutter speed setting — set it to 1/125s as your starting floor. Shoot a test sequence and review the EXIF data on your computer. If no frame shows a shutter speed below 1/125s, your Safety Net is working. That’s the whole technique. One menu, one value, permanently solved.
Dave King
Hi, I'm Dave, the founder of Amateur Photographer Guide. I created this site to help beginner and hobbyist photographers build their skills and grow their passion. Here, you’ll find easy-to-follow tutorials, gear recommendations, and honest advice to make photography more accessible, enjoyable, and rewarding.