
Table of Contents
- What Is Focus Stacking? The Simple Definition
- How to Focus Stack: Step-by-Step Walkthrough
- What Equipment Do You Need for Focus Stacking?
- Choosing Your Focus Stacking Software
- Is Focus Stacking Right for You?
- Common Mistakes and How to Avoid Them
- Frequently Asked Questions About Focus Stacking
- Putting It All Together
This blog post may contain affiliate links. As an Amazon Associate I earn from qualifying purchases.
You take a close-up photo of a flower, and the front petals are razor-sharp — but everything behind them dissolves into a blurry haze. Or you photograph a rocky coastline, and the foreground stones are crisp while the distant cliffs go frustratingly soft. You try narrowing your aperture (the opening in your lens that controls how much light enters) down to f/22, hoping to sharpen the whole scene. But instead of getting sharper, your image actually gets softer — thanks to a physics effect called diffraction that smears fine detail at very small apertures.
This is one of the fundamental limitations of camera lenses. No single exposure can always give you sharpness from the nearest point to the farthest — it’s physically impossible beyond a certain point.
“Hi, I’m new to ‘focus stacking’ and just want to learn more about it.”
If that sounds like you, you’re in exactly the right place. By the end of this guide, you’ll understand precisely what focus stacking is, have a clear step-by-step process you can follow today, and know which software and equipment you need to get started. We cover the core concept, The Two-Path Method for capturing your images, the gear you need, and the best software for blending your shots into one perfectly sharp result.
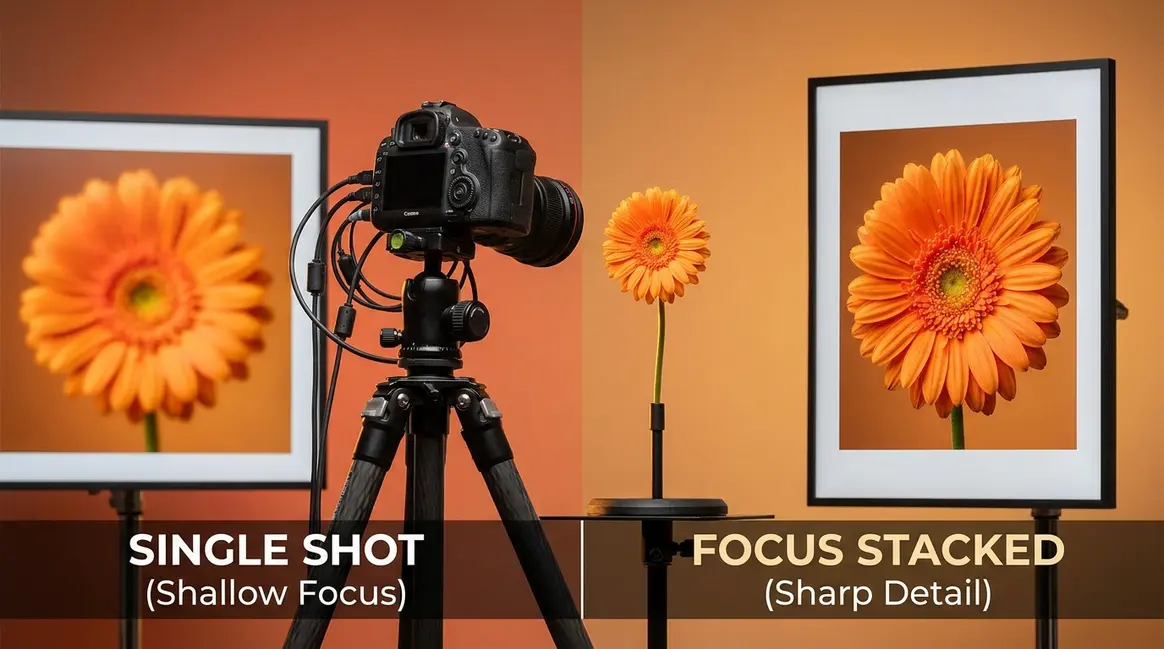
Focus stacking combines multiple photos taken at different focus distances into one image with edge-to-edge sharpness — overcoming the physical limits of any camera lens.
- What it solves: Shallow depth of field in macro, landscape, and product photography
- The Two-Path Method: Choose the traditional manual approach or modern in-camera automated bracketing based on your camera and skill level
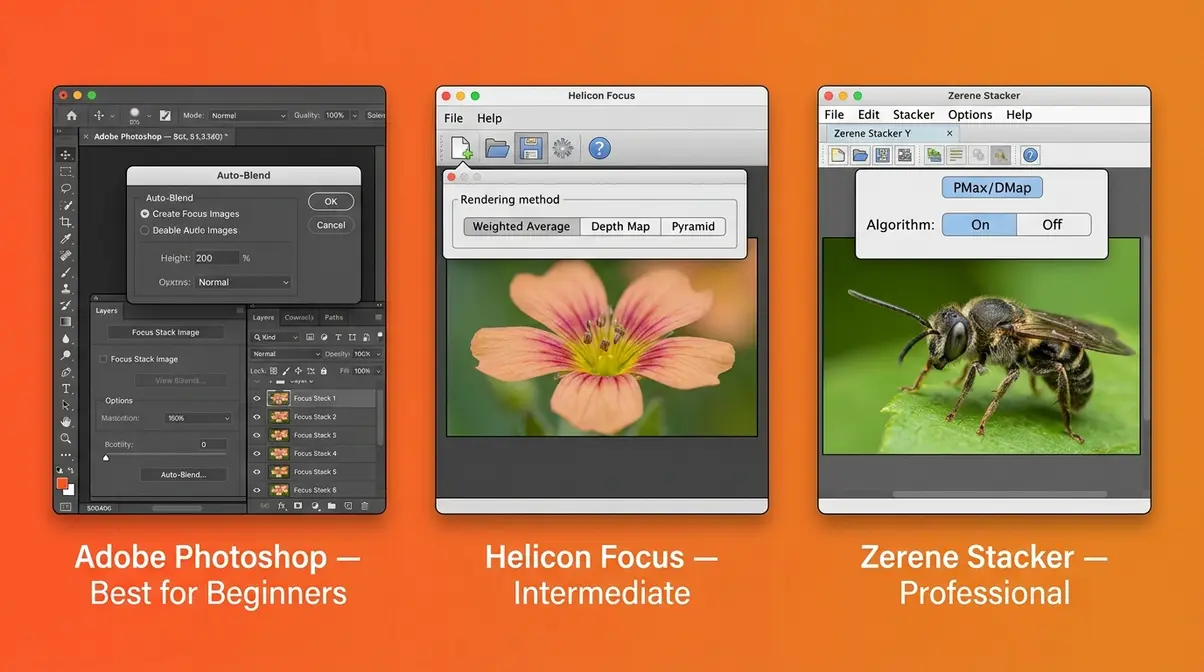
- Software: Photoshop works for most beginners; Helicon Focus and Zerene Stacker offer more power for complex stacks
- Difficulty: Basic results are achievable after just a few practice attempts
- When to use it: Anytime a single shot cannot capture the full depth of field you need
What Is Focus Stacking? The Simple Definition
Focus stacking is a photography technique that combines multiple photos taken at different focus distances into one final image with sharpness from front to back. As B&H Explora defines it, focus stacking merges images taken at varying focus distances to achieve a depth of field that is simply impossible with a single exposure. For beginners shooting macro subjects or wide scenes, this technique is often the only way to get every detail in your scene perfectly sharp — from the closest petal to the farthest mountain ridge.
“Focus stacking combines multiple photos taken at different focus distances into one image with edge-to-edge sharpness, overcoming the physical limits of any camera lens.”
What makes this guide different from most others is a framework called The Two-Path Method. Focus stacking doesn’t have a single workflow — it has two distinct routes depending on your camera and comfort level. The Traditional Path uses a manual focus ring, a sturdy tripod, and software like Photoshop to blend your shots. The Modern Path uses in-camera automated focus bracketing (built into many recent mirrorless cameras from Nikon, Canon, Sony, and OM System) combined with dedicated stacking software. Most beginner guides teach only one path, leaving readers confused when their camera doesn’t match the tutorial. Knowing both paths from the start makes the whole technique feel immediately approachable.
Interest in focus stacking has grown steadily alongside the rise of mirrorless camera systems, which now ship with automated bracketing built in as a standard feature — making the technique more accessible than ever before. The learning community around focus stacking has expanded significantly, with dedicated forums, YouTube channels, and software tutorials available for every skill level.
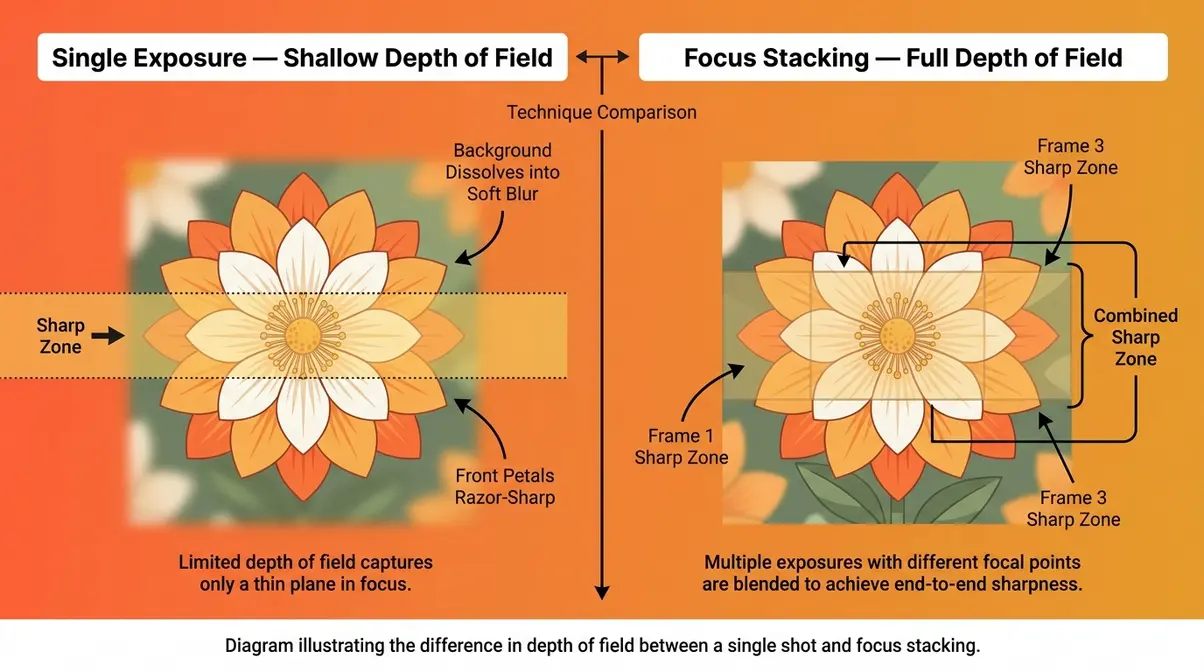
The Problem It Solves: Shallow Depth of Field
Think of depth of field (the zone of sharpness in a photo) like a spotlight on a stage. Only the performer standing in the spotlight is clearly visible — everything in front of and behind them fades into darkness. Your camera lens works the same way: it focuses sharply on one specific distance, and subjects closer or farther away go progressively blurry.
You might try to widen that spotlight by using a smaller aperture — say, f/16 or f/22. This does increase depth of field, but it introduces diffraction (a physics effect that softens images at very small apertures), which actually reduces overall sharpness. Most lenses begin showing diffraction softness around f/11–f/16, and by f/22, the image can look noticeably mushy even in the focused zone. Cambridge in Colour notes that focus stacking allows photographers to bypass these physical limitations entirely, achieving extensive depth of field without the image-softening effects of diffraction.
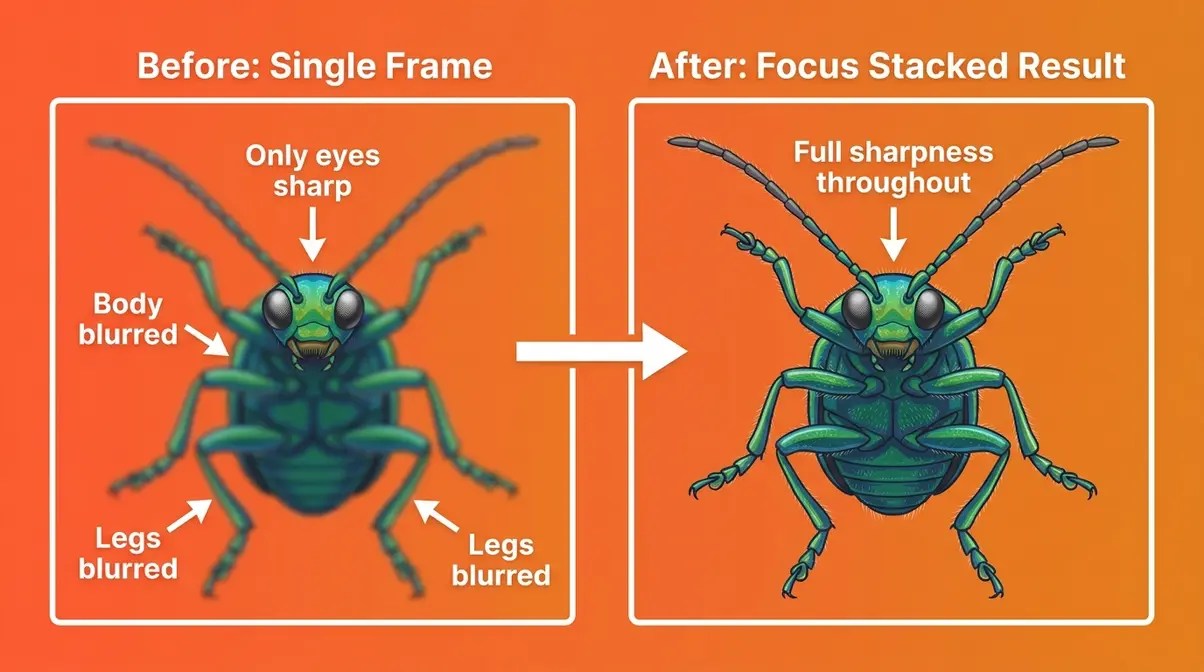
A classic example: photographing a beetle in macro photography, where only the eyes are sharp but the body and legs blur away. Or a landscape where foreground wildflowers are crisp but the distant peaks dissolve into softness. These aren’t mistakes — they’re the natural behavior of camera optics.
How Focus Stacking Works: The Core Idea
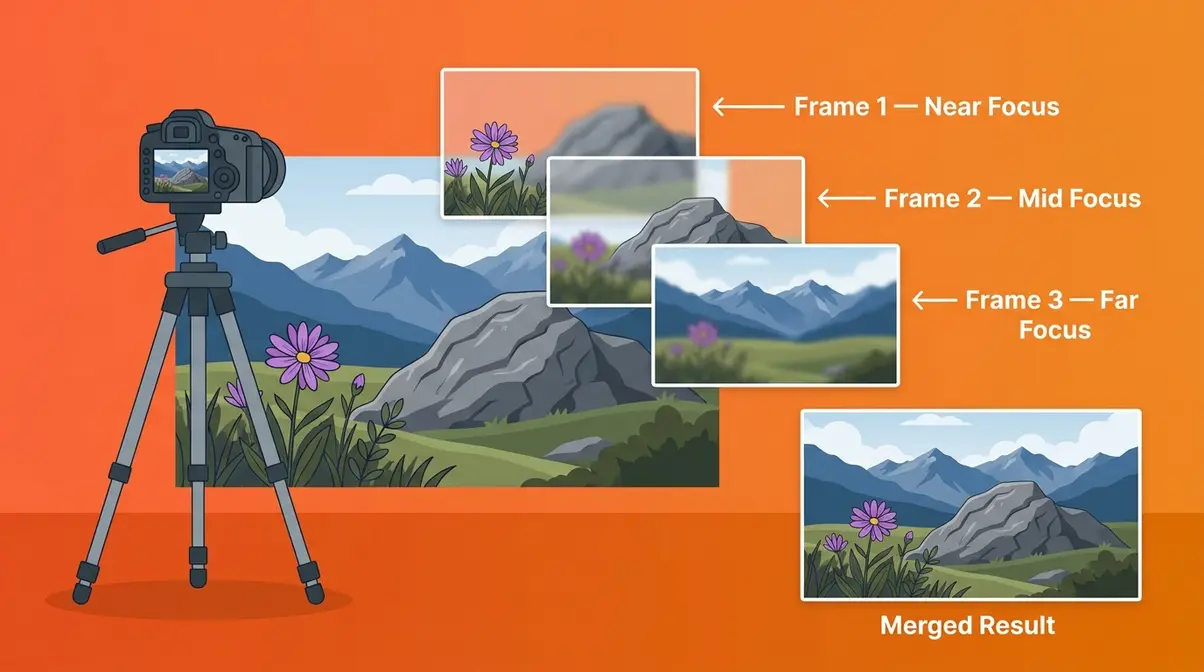
The core mechanism is straightforward. You take multiple photos of the same scene — each with a slightly different focus point, moving from the nearest element to the farthest. You might take 5 shots, 10 shots, or even 30 for extreme macro work. Software then analyzes every photo, identifies the sharpest area in each one, and blends those sharp zones together into a single composite image.
The Two-Path Method determines how you shift focus between shots:
- Traditional Path: You manually turn your focus ring (or use a macro rail — a sliding platform that physically moves your camera forward in tiny increments) between each shot. You then import all images into software like Adobe Photoshop, which aligns and blends them automatically.
- Modern Path: Your camera does the focus shifting for you. You set the number of shots and the step size in your camera’s menu, press the shutter once, and the camera fires an entire sequence automatically. You then use software — Photoshop, Helicon Focus, or Zerene Stacker — to merge the results.
The end result of both paths is identical: one image with sharpness across the entire scene that no single exposure could achieve.
When Should You Use Focus Stacking?
Focus stacking isn’t needed for every photo — but it becomes essential in three common situations:
- Macro photography: Any time your subject is small enough that even f/11 leaves part of it blurry. Insects, coins, jewelry, and flowers are classic examples.
- Landscape photography: When you want foreground rocks or flowers sharp alongside distant mountains or a horizon — a single shot rarely achieves both.
- Product photography: E-commerce and still-life shots where the entire product must appear sharp, from the nearest edge to the farthest corner.
If you’re shooting fast-moving subjects, focus stacking won’t work well — your subject needs to stay still between shots. For those situations, a single well-chosen aperture is still your best tool.
Now that you understand what focus stacking is and why it matters, let’s walk through exactly how to do it — step by step.
How to Focus Stack: Step-by-Step Walkthrough
The most common question beginners ask is simply: how do you actually do this? The answer depends on which of the two paths suits your camera and shooting style. This section walks you through both — starting with the setup steps that apply to everyone, then branching into the Traditional and Modern paths.
Before You Begin: What You’ll Need
You don’t need to buy expensive new gear to try focus stacking. Here’s what the process requires:
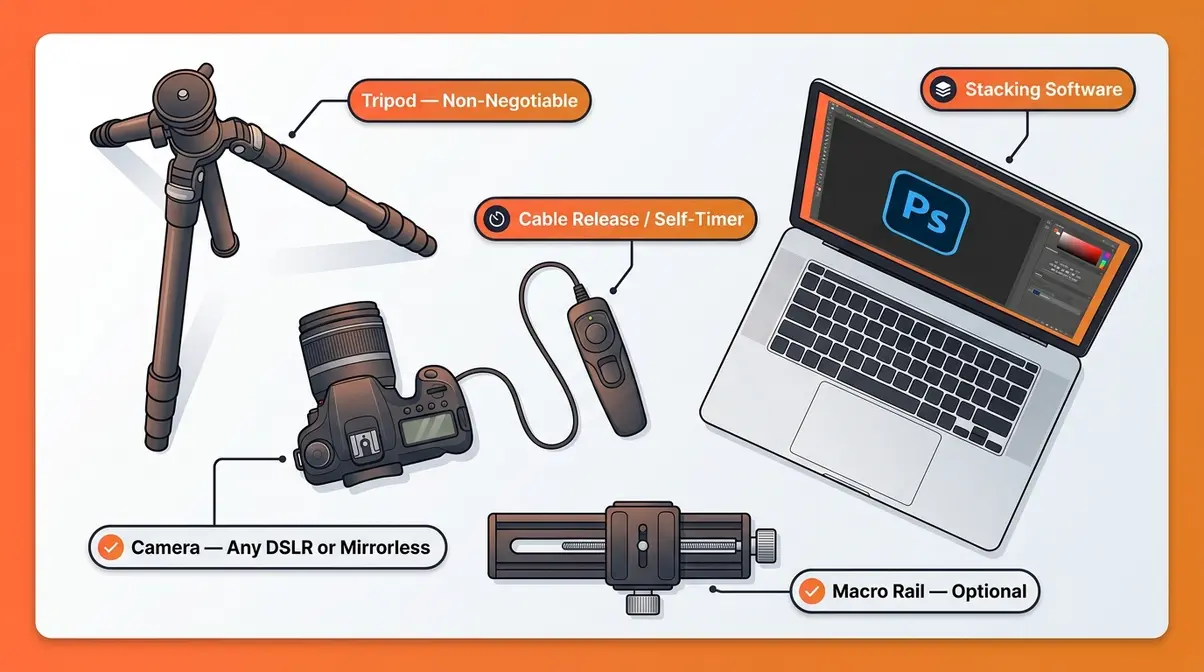
- Essential items:
- A camera — any DSLR or mirrorless camera with manual focus control (or in-camera bracketing for the Modern Path)
- A tripod — this is non-negotiable; your camera must not move between shots, or the software can’t align the images correctly
- A cable release or self-timer — to fire the shutter without physically touching the camera and causing vibration
- Stacking software — Adobe Photoshop (included in most Creative Cloud plans), Helicon Focus, or Zerene Stacker
- A stationary subject — focus stacking does not work on moving subjects
- Optional but helpful:
- A macro rail (a precision sliding rail that moves your camera in tiny, measured increments) for extreme close-up work
- A remote shutter release app (available for most modern mirrorless cameras via Bluetooth)
Time required: Expect 20–40 minutes for your first complete stack, including capture and processing. With practice, the workflow typically takes 10–15 minutes.
Steps 1–3: Setting Up and Capturing Your Image Sequence
These steps apply to both the Traditional Path and the Modern Path.
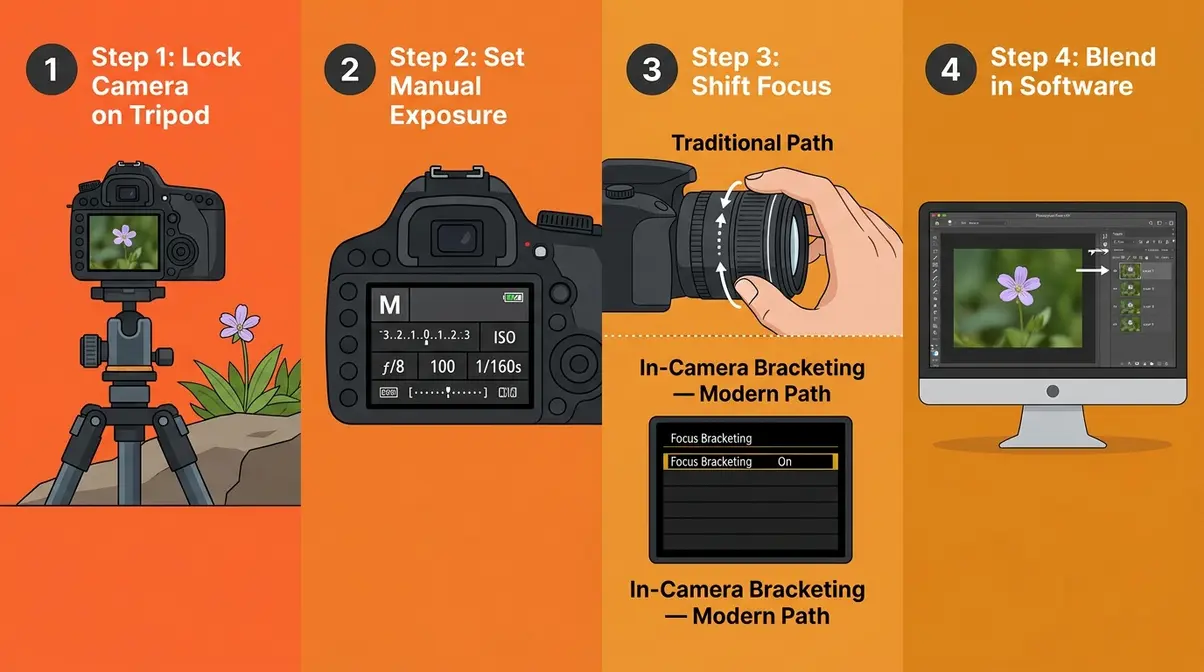
Step 1: Lock your camera on a tripod and compose your shot.
Frame your subject exactly as you want the final image to look. Once you start shooting your sequence, the composition must not change. Use mirror lock-up (if your camera has it) to minimize vibration from the mirror mechanism.
Step 2: Set your exposure manually.
Switch to Manual (M) mode. Choose an aperture between f/5.6 and f/11 — this range gives you enough depth of field per shot to keep the stacking manageable, while avoiding the diffraction softness that creeps in at f/16 and beyond. Set your ISO as low as possible (ISO 100 or 200) for clean images, and adjust your shutter speed to achieve correct exposure.
Step 3: Shoot your focus sequence — Traditional Path or Modern Path.
- Traditional Path (manual focus shifting):
- Focus on the nearest element in your scene (the front edge of your subject).
- Take the first shot using a cable release or self-timer (2-second delay).
- Gently turn the focus ring a small amount toward infinity (farther focus).
- Take the next shot.
- Repeat, shifting focus slightly farther each time, until you’ve captured the farthest element in your scene.
- Aim for 10–20% overlap in sharpness between consecutive shots — each image’s sharp zone should overlap with the next one slightly.
Modern Path (in-camera automated bracketing):
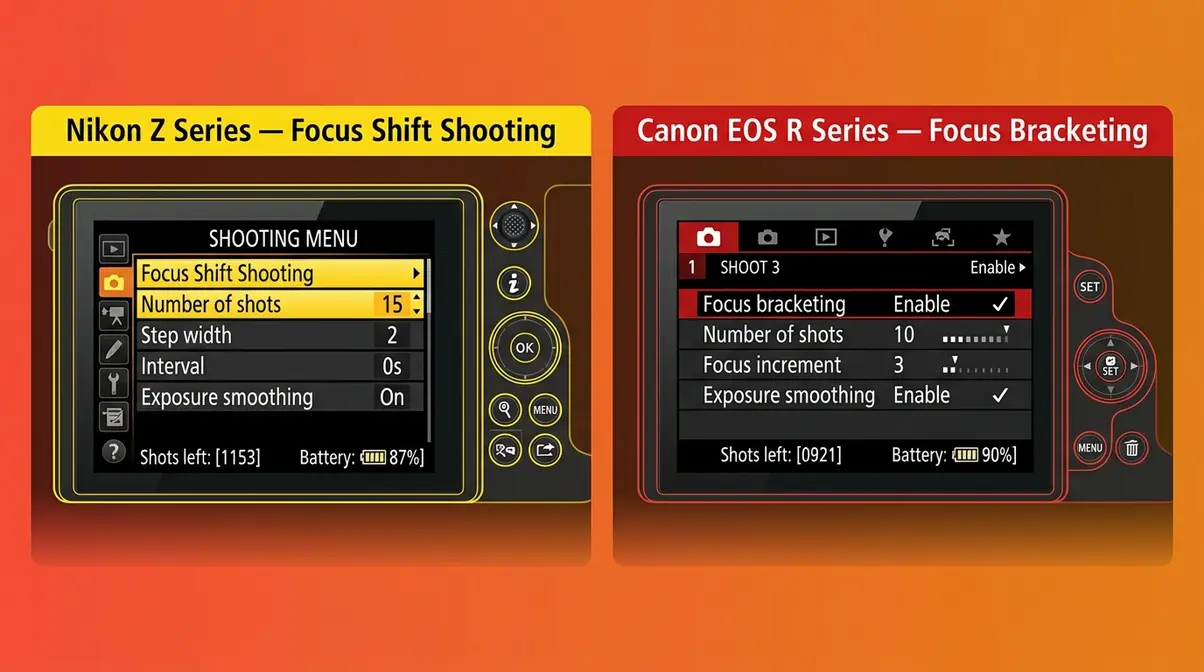
Most current mirrorless cameras include a focus bracketing or “focus shift shooting” mode. Here’s where to find it:
- Nikon Z series (Z6 III, Z8, Z9, Zf): Menu → Photo Shooting Menu → Focus shift shooting. Set “Number of shots” (start with 10–15), “Step width” (1–3 for macro; 5–7 for landscape), and “Interval” (0 seconds for static subjects).
- Canon EOS R series (R5, R6 Mark II, R8, R50): Menu → Shoot 4 → Focus bracketing. Enable focus bracketing, set number of shots and focus increment (1–10 scale; lower = smaller steps).
- Sony A7 and ZV-E series: Menu → Shooting → Drive Mode → Focus Bracketing. Set the number of shots and focus step.
- OM System / Olympus (OM-5, OM-1 Mark II): Menu → Drive/Self-Timer → Focus Bracketing. OM System cameras are particularly well-regarded for their automated stacking capabilities and can even merge the stack in-camera.
Once configured, press the shutter once and the camera fires the entire sequence automatically. This is the fastest, most reliable way to capture a focus stack — particularly for beginners.
Steps 4–6: Blending Your Images in Software
Once you have your sequence of images, the blending process is surprisingly straightforward.
Step 4: Import and align your images.
Open all your focus stack images in your chosen software. In Adobe Photoshop: File → Scripts → Load Files into Stack → check “Attempt to Automatically Align Source Images.” This corrects for any tiny camera movements between shots. Alternatively, open images as layers (File → Open As Layers) and use Edit → Auto-Align Layers.
Step 5: Run the focus blend.
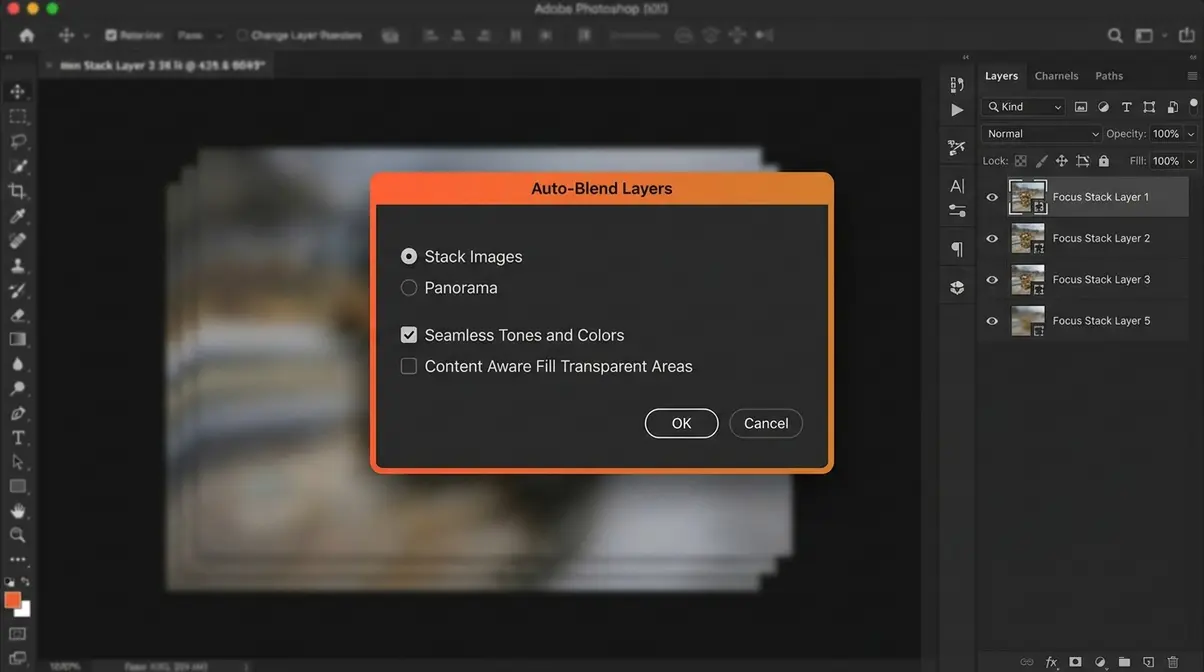
In Photoshop: select all layers → Edit → Auto-Blend Layers → choose “Stack Images” → check “Seamless Tones and Colors.” Photoshop analyzes each layer, creates layer masks that reveal only the sharpest areas of each image, and merges them into a single composite. This process typically takes 30 seconds to 3 minutes depending on the number of images and your computer’s speed.
Step 6: Flatten, crop, and export.
After blending, go to Layer → Flatten Image. You may notice slight edge artifacts or a small crop needed around the borders — this is normal, as alignment slightly shifts the image edges. Crop to clean up, then export as a high-quality JPEG or TIFF.
The Modern Path: Using In-Camera Automated Bracketing
The Modern Path deserves a dedicated note for beginners: if your camera supports in-camera focus bracketing, start here. The automated approach eliminates the most common beginner errors — inconsistent focus step sizes, camera shake between shots, and missed focus positions.
Canon’s documentation confirms that in-camera focus bracketing produces consistent, evenly spaced focus shifts that are difficult to replicate manually, particularly for macro subjects where the depth of field per frame can be less than a millimeter. For landscape photography, where subjects are farther away, the Traditional Path with manual focus shifting remains a reliable option — and is the only option for older DSLR cameras without automated bracketing menus.
The key advantage of the Modern Path: you can focus stack handheld in some situations (using burst mode with a fast shutter speed), though a tripod is still strongly recommended for the sharpest results.
What Equipment Do You Need for Focus Stacking?
The good news for beginners: you probably already own most of what you need. Adobe’s focus stacking guide confirms that the essential gear list is short — a camera, a tripod, and software. The rest is optional refinement.
The Essential Gear (What You Already Own Is Probably Enough)
| Gear Item | Required? | Notes |
|---|---|---|
| Camera (DSLR or mirrorless) | ✅ Yes | Any camera with manual focus control works for the Traditional Path |
| Tripod | ✅ Yes | The single most important piece of gear — stability is everything |
| Cable release / self-timer | ✅ Strongly recommended | Eliminates shutter-press vibration; 2-second self-timer works as a free alternative |
| Stacking software | ✅ Yes | Photoshop (most beginners already have it), Helicon Focus, or Zerene Stacker |
| Macro rail | ❌ Optional | Useful for extreme close-up work; not needed for landscape or product stacking |
| Dedicated macro lens | ❌ Optional | A standard kit lens works for learning; a macro lens (1:1 magnification ratio) gives better results for tiny subjects |
A macro rail is worth understanding even if you don’t own one. It’s a precision sliding platform that mounts between your tripod head and camera, allowing you to move the camera forward in measured increments (often 0.1mm steps) rather than rotating the focus ring. This produces extremely consistent focus steps and is the preferred method for professional insect and flower macro work. However, for your first attempts, a manual focus ring works fine.
Camera Settings for Focus Stacking
Getting your settings right before you start shooting saves significant time in post-processing. Here are the recommended settings for both paths:
| Setting | Recommended Value | Why It Matters |
|---|---|---|
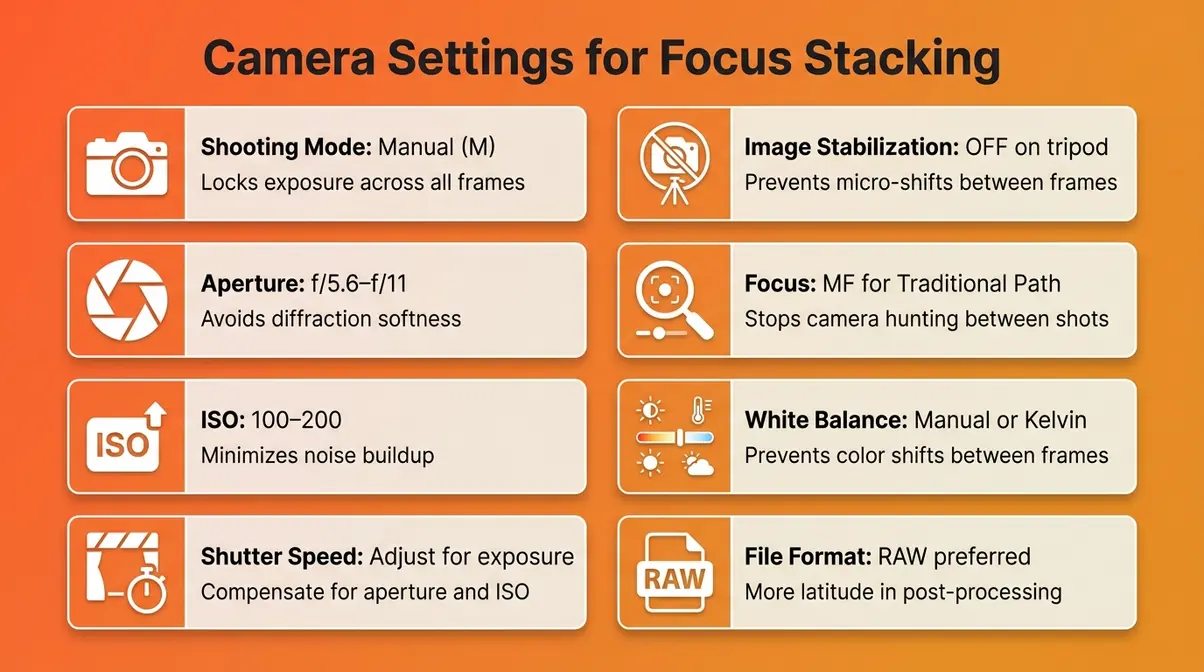
| Shooting mode | Manual (M) | Keeps exposure identical across all frames — critical for seamless blending |
| Aperture | f/5.6 – f/11 | Avoids diffraction; gives manageable depth of field per frame |
| ISO | 100–200 (lowest native) | Minimizes noise in each frame; noise compounds when stacking |
| Shutter speed | Whatever achieves correct exposure | Adjust to compensate for chosen aperture and ISO |
| Image stabilization | OFF (on tripod) | IS can cause micro-shifts between shots when the camera is already stable |
| Autofocus | OFF (Manual Focus) for Traditional Path | Prevents the camera from refocusing between shots unexpectedly |
| Autofocus | ON for Modern Path (in-camera bracketing) | The camera uses AF to drive focus shifts automatically |
| White balance | Manual or Kelvin value | Prevents automatic white balance shifts between frames |
| File format | RAW (preferred) or JPEG | RAW gives more latitude in post; JPEG works but offers less flexibility |
Should your camera be on AF or MF? For the Traditional Path, always use Manual Focus (MF) — this prevents the camera from hunting for a new focus point between your manually adjusted shots. For the Modern Path with in-camera bracketing, the camera uses autofocus internally to drive its focus sequence, so AF can remain active. Check your camera’s manual for the specific bracketing mode behavior, as this varies slightly between brands.
Choosing Your Focus Stacking Software
Software choice is where many beginners get stuck — particularly because most guides only mention Photoshop. The reality is that three distinct tools serve different needs, and the best choice depends on your budget, how often you stack, and how complex your subjects are.
Adobe Photoshop: The All-In-One Option
Photoshop is the natural starting point for most photographers because it’s already part of the Adobe Creative Cloud Photography Plan (which includes Lightroom). The Auto-Blend Layers feature handles straightforward focus stacks competently — particularly for landscape and product photography where subjects are relatively large and well-lit.
- Photoshop works well when:
- You’re stacking 5–20 images of larger subjects
- Your images are well-exposed with low noise
- You already own a Creative Cloud subscription
- Photoshop struggles when:
- You’re stacking 30+ images of tiny macro subjects with complex edges (insect legs, fine hairs, transparent wings)
- Your images have any subject movement between frames
- You need fine control over blending artifacts
Across photography communities, the consistent feedback is that Photoshop’s Auto-Blend is a capable generalist tool — but it can produce visible blending artifacts on complex macro subjects that require manual correction. For beginners, it’s the right place to start.
Helicon Focus and Zerene Stacker: The Specialist Tools
When Photoshop’s blending isn’t delivering clean results, photographers consistently turn to two dedicated focus stacking applications: Helicon Focus and Zerene Stacker. Both were built specifically for focus stacking and offer algorithmic approaches that outperform Photoshop on difficult subjects.
Helicon Focus (heliconsoft.com) uses three rendering methods — Weighted Average, Depth Map, and Pyramid — letting you choose the algorithm that works best for your subject. It includes a retouching tool for fixing blending artifacts and a built-in image viewer for reviewing results. As of 2026, Helicon Focus is available as a subscription (~$30/year for the basic tier) or a perpetual license.
Zerene Stacker (zerenesystems.com) is favored by many professional macro photographers and scientific imaging specialists for its two algorithms — PMax and DMap — which handle fine, high-contrast edges (like insect antennae or fiber textures) with fewer artifacts than competing tools. Zerene Stacker is available as a one-time purchase license (approximately $89–$289 depending on tier, as of 2026 — verify current pricing at zerenesystems.com).
Software Comparison: Which Is Right for You?
| Feature | Adobe Photoshop | Helicon Focus | Zerene Stacker |
|---|---|---|---|
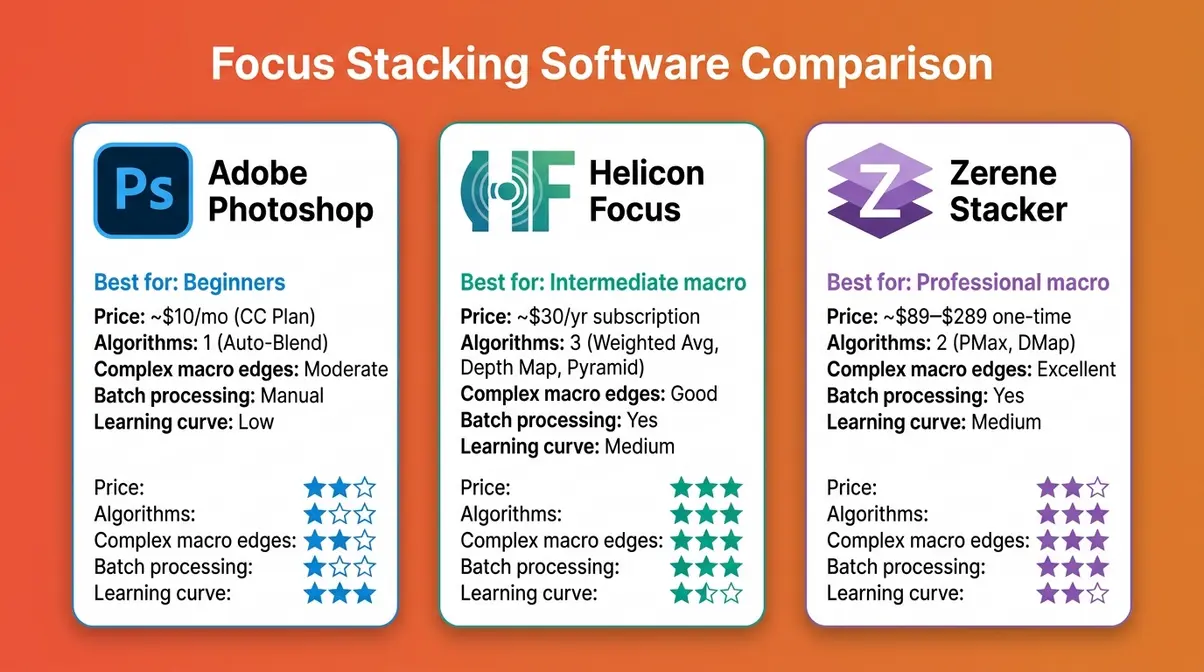
| Price | Included in CC Photography Plan (~$10/mo) | ~$30/year subscription | ~$89–$289 one-time license |
| Best for | Beginners; landscape & product stacking | Intermediate; macro & scientific work | Advanced; professional macro & fine detail |
| Blending algorithms | 1 (Auto-Blend) | 3 (Weighted Average, Depth Map, Pyramid) | 2 (PMax, DMap) |
| Handles complex macro edges | Moderate | Good | Excellent |
| Retouching tools | Basic (layer masks) | Built-in retouching brush | Built-in retouching |
| Batch processing | Manual | Yes | Yes |
| Learning curve | Low | Medium | Medium |
| Platform | Windows, Mac | Windows, Mac | Windows, Mac, Linux |
Our recommendation for beginners: Start with Photoshop. If you find yourself regularly photographing small macro subjects and noticing blending artifacts, try Helicon Focus’s free trial before committing. Zerene Stacker is the choice of working macro photographers who need maximum precision on technically demanding subjects.
Is Focus Stacking Right for You?
Not every photo needs to be focus stacked, and not every photographer needs to master the technique immediately. Here’s an honest assessment of when the extra effort pays off — and when it doesn’t.
The Payoff: When Results Justify the Extra Work
Focus stacking is genuinely worth learning in three scenarios. First, if you shoot macro photography regularly, it’s essentially unavoidable — the physics of close-up work make shallow depth of field a constant obstacle, and stacking is the standard professional solution. Second, for landscape photographers who want foreground-to-background sharpness in a single final image (rather than compositing separately shot foreground and background exposures), stacking delivers technically cleaner results. Third, for product photographers working in a studio, where the subject is stationary and consistency matters, stacking is a reliable part of the professional workflow.
The time investment is real but manageable. Most photographers report that after three to five practice attempts, the capture workflow becomes routine. Post-processing in Photoshop typically adds 5–15 minutes to an editing session. Digital Photography School notes that beginners who approach focus stacking systematically — using a tripod, consistent settings, and overlapping focus steps — achieve usable results on their first attempt far more often than those who improvise.
When to Skip It (and What to Do Instead)
Focus stacking is not the right tool in these situations:
- Moving subjects: Birds, people, flowing water, or wind-blown flowers will shift between frames, causing ghosting artifacts that software cannot cleanly repair. Use a fast shutter speed and a moderate aperture (f/8) instead.
- Handheld shooting: Without a tripod, alignment errors accumulate across a sequence and produce blurry, distorted composites. If you can’t use a tripod, a single well-exposed shot at f/8–f/11 is a better result.
- Casual snapshots: The technique adds time and complexity. For everyday photography where a slightly soft background is acceptable or even desirable (portrait bokeh, for example), focus stacking is unnecessary overhead.
- Difficult lighting conditions: Changing light between frames — clouds moving across the sun, flickering artificial light — creates exposure inconsistencies that are hard to blend cleanly.
If stacking isn’t practical, a good middle-ground approach is shooting at f/8–f/11 and accepting a slightly reduced depth of field — this avoids diffraction while maximizing the depth of field a single shot can deliver.
Common Mistakes and How to Avoid Them
Top Mistakes Beginners Make When Focus Stacking
Even with a solid understanding of the technique, a few consistent errors trip up beginners across photography communities. Recognizing them in advance saves significant frustration.
1. Skipping the tripod. This is the single most common mistake. Even a small camera shift between frames causes misalignment that software struggles to fully correct, producing blurry or doubled edges in the final composite. A tripod is non-negotiable.
2. Using too-large focus steps. If the sharp zone in one frame doesn’t overlap with the sharp zone in the next frame, you’ll end up with gaps of blurriness in the final stack — areas no frame covered sharply. Start with smaller step sizes than you think you need, especially for macro work. You can always stack fewer images, but you can’t recover missing focus coverage.
3. Changing exposure between frames. Any change in aperture, shutter speed, or ISO between shots creates visible brightness differences that blend poorly. Lock your exposure in Manual mode before you begin, and don’t touch it until the sequence is complete.
4. Shooting in changing light. A cloud passing over the sun, or a lamp flickering, creates exposure shifts that look like blending artifacts. Shoot in stable light — indoors under controlled lighting, or outdoors on an overcast day or in shade.
5. Forgetting to turn off image stabilization on a tripod. IS systems can introduce micro-vibrations when the camera is already stable, causing subtle shifts between frames. Turn IS/VR off when shooting on a tripod.
When Focus Stacking Isn’t the Answer
Some situations call for a different approach entirely. If your subject moves — even slightly — between frames, no stacking software will produce a clean result. In those cases, consider using a wider aperture and accepting a shallower depth of field, or using a single image with selective sharpening in post-processing to draw attention to the key focal point. For scenes where some background blur is aesthetically appropriate (portraits, for example), focus stacking would actually harm the image by eliminating the separation between subject and background that makes the composition work.
Frequently Asked Questions About Focus Stacking
Is focus stacking worth it?
Focus stacking is worth it for macro, landscape, and product photographers who regularly struggle with insufficient depth of field. The technique delivers sharpness that is physically impossible in a single exposure, and modern software makes blending straightforward. For casual photographers who shoot moving subjects or handheld, the effort-to-reward ratio is lower — a single shot at f/8–f/11 is usually a better practical choice. Photographers who invest the time to learn the workflow consistently report that it transforms their macro and landscape results within just a few practice sessions.
Is focus stacking hard to learn?
Focus stacking has a gentle learning curve for beginners who follow a structured approach. The capture side — setting up a tripod, locking exposure, and shooting a focus sequence — typically takes one or two practice sessions to feel comfortable. The software side (Photoshop’s Auto-Blend Layers) is largely automated and requires only a few clicks. Most beginners achieve a usable stacked image on their first or second attempt. The technique becomes significantly easier if you start with the Modern Path using in-camera automated bracketing, which eliminates manual focus shifting entirely.
How do you do focus stacking?
Focus stacking involves three main phases: capture, import, and blend. First, mount your camera on a tripod and shoot a series of images, each focused at a slightly different distance — from the nearest to the farthest point in your scene. Second, import all images into Photoshop (or Helicon Focus / Zerene Stacker) and run an automatic alignment to correct for any small camera movement. Third, use the software’s blending function (Auto-Blend Layers in Photoshop, or the rendering algorithms in dedicated tools) to combine the sharpest areas of each frame into one composite. The full process takes 20–40 minutes for a first attempt and 10–15 minutes once the workflow is familiar.
What equipment is needed for focus stacking?
The essential equipment for focus stacking is a camera with manual focus control (or in-camera bracketing), a tripod, a cable release or 2-second self-timer, and stacking software. A macro rail is optional but useful for extreme close-up work. Most photographers find they already own everything required for the Traditional Path — the only addition is stacking software, and Photoshop covers this if you already have a Creative Cloud subscription. For the Modern Path, you need a mirrorless camera with a built-in focus bracketing menu (available on current Nikon Z, Canon EOS R, Sony A7/ZV-E, and OM System models).
What is the best program for focus stacking?
The best focus stacking software depends on your subjects and experience level. Adobe Photoshop is the right starting point for most beginners — it’s included in the Creative Cloud Photography Plan and handles landscape and product stacks competently. For serious macro photographers dealing with fine, complex edges (insect details, fiber textures), Helicon Focus and Zerene Stacker offer more sophisticated blending algorithms with fewer artifacts. Zerene Stacker is particularly well-regarded among professional macro and scientific photographers for handling difficult edges. Start with Photoshop; upgrade to a specialist tool only when you find its blending insufficient for your specific subjects.
Should my camera be on AF or MF for focus stacking?
Use Manual Focus (MF) for the Traditional Path and Autofocus (AF) for the Modern Path. On the Traditional Path, switching to MF prevents your camera from searching for a new focus point between your manually shifted shots — unexpected AF hunting will ruin your sequence. On the Modern Path, the camera’s in-camera focus bracketing system uses its own AF mechanism to drive focus shifts automatically, so AF can remain active. Regardless of path, always lock your exposure in Manual (M) shooting mode so aperture, shutter speed, and ISO stay identical across every frame in the sequence.
Putting It All Together
For beginners encountering shallow depth of field for the first time, focus stacking offers a clear, learnable solution to a problem that no single camera setting can fully solve. The technique combines multiple shots — each sharp at a slightly different distance — into one image with edge-to-edge sharpness, bypassing the physical diffraction limits that make tiny apertures counterproductive.
The Two-Path Method is the key mental model to carry forward. If your camera has in-camera focus bracketing (most modern mirrorless cameras do), start with the Modern Path — it removes the most error-prone step and produces consistent, evenly spaced focus sequences from the first attempt. If you’re using an older DSLR or prefer full manual control, the Traditional Path with a tripod, careful focus ring adjustments, and Photoshop delivers excellent results with practice.
Your next step is simple: pick one subject — a flower, a small object on your desk, or a textured surface — set up your tripod, and shoot your first five-frame sequence today. Run it through Photoshop’s Auto-Blend Layers and see what you get. The first stack doesn’t need to be perfect. What matters is building the muscle memory for the workflow so that by your third or fourth attempt, the process feels natural. The technique that once seemed technical and intimidating quickly becomes one of the most satisfying tools in a photographer’s kit.
