Perspective in Photography: Complete 2026 Guide
What is perspective in photography? Discover its importance and how it shapes your images for better photography skills.

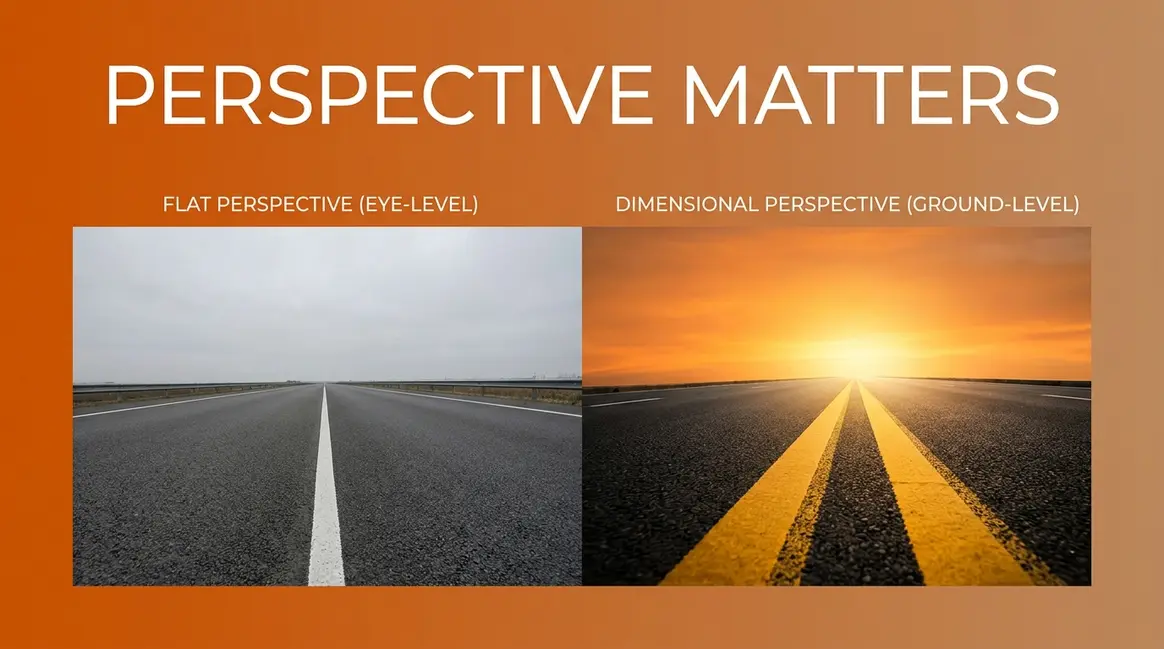
You point your camera at something beautiful — a long road, a towering building, a sunset — and the photo comes out flat. What you’re missing isn’t a better camera. It’s perspective.
What’s in this guide
- What Is Perspective in Photography?
- The Main Types of Perspective in Photography
- Forced Perspective: Create Mind-Bending Optical Illusions
- Practical Techniques to Change Your Perspective
- How Perspective Shapes Your Photo Composition
- Perspective in Photography: Inspiring Examples
- Common Perspective Mistakes (and How to Fix Them)
- Frequently Asked Questions
- Conclusion
Without understanding how perspective in photography works, you’ll keep taking the same eye-level, same-distance shots that blend in with everyone else’s photos. The three-dimensional world in front of you stays stubbornly flat on screen. The good news? Perspective is something you control with your feet, not your wallet.
By the end of this guide, you’ll understand every major type of perspective, know exactly how to use your camera position to create depth, and have 12 specific techniques you can try on your next shoot. We’ll cover the core types of perspective, how to manipulate it physically, how it connects to composition, and how to create eye-catching forced perspective illusions.
What Is Perspective in Photography?
Perspective in photography is the way your camera translates three-dimensional space onto a flat, two-dimensional image. It controls how near or far objects appear, how they relate to each other in size, and whether your photo feels flat or full of depth. Think of it like how a road appears to narrow in the distance — the road doesn’t actually get smaller, but your eye perceives it that way.
Every photograph is a two-dimensional record of a three-dimensional world. The challenge — and the art — is making that flat image feel spatial. When you look at a photo that seems to pull you in, that sensation of depth comes from perspective working correctly. When a photo feels lifeless, perspective is almost always the reason.
Here’s the insight that changes everything: The Position-Perception Principle states that perspective is determined by where you physically place your camera, not by the focal length you choose. Move closer, and your subject looms large against a compressed background. Step back, and the same subject shrinks into its environment. Your feet are your most powerful creative tool.
New York Film Academy notes that perspective fundamentally dictates the spatial relationship between objects and how the human eye perceives dimensions within a two-dimensional frame — and that relationship begins with camera placement, not camera settings.
For a deeper look at what perspective means and why it matters, read our full guide to understanding photographic perspective.
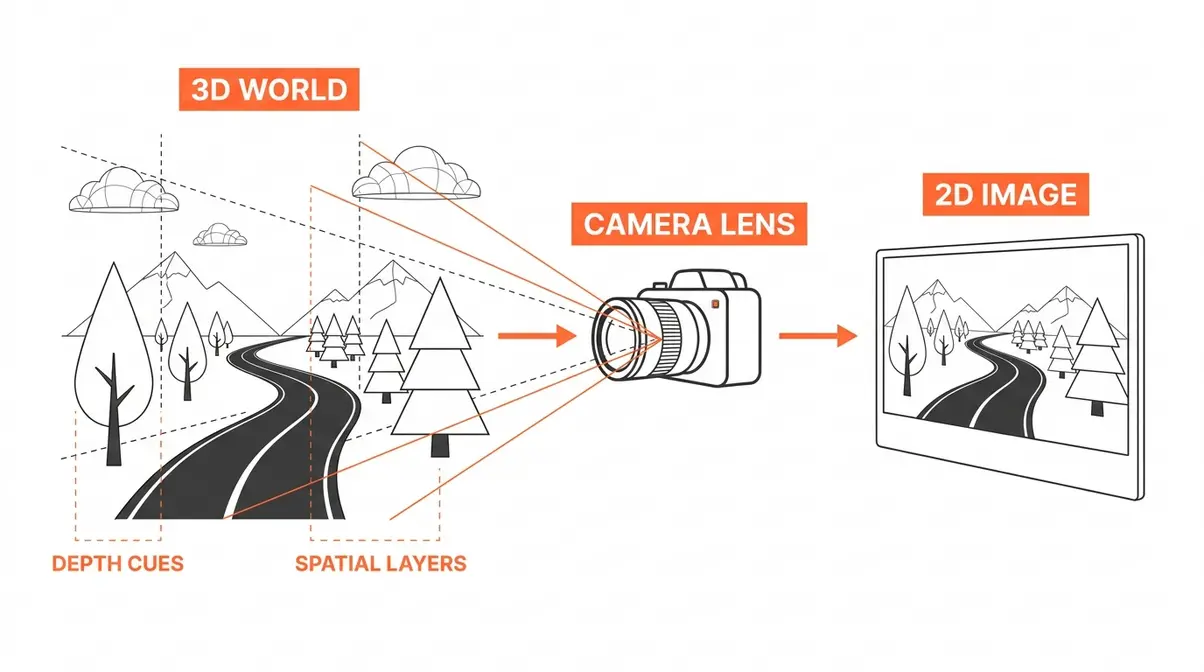
Now that we’ve defined perspective, let’s explore the five main types — each one creates a completely different feeling of depth in your photos.
The Main Types of Perspective in Photography
Perspective in photography comes in five main types: linear, atmospheric, diminishing, overlapping, and forced. Each type works by exploiting a different visual cue your brain uses to judge distance. Understanding them gives you deliberate control over how much depth your photos appear to have.
The five types are:
- Linear perspective — parallel lines converge toward a distant vanishing point
- Atmospheric perspective — haze and reduced contrast make distant objects look farther away
- Diminishing perspective — identical objects appear smaller as distance increases
- Overlapping perspective — closer objects partially block those behind them
- Forced perspective — deliberate positioning creates size illusions between unrelated objects
Each type is a tool. The best photographers use several in a single frame. Let’s break down how each one works — and more importantly, why it works.
Linear Perspective: Converging Lines and Vanishing Points
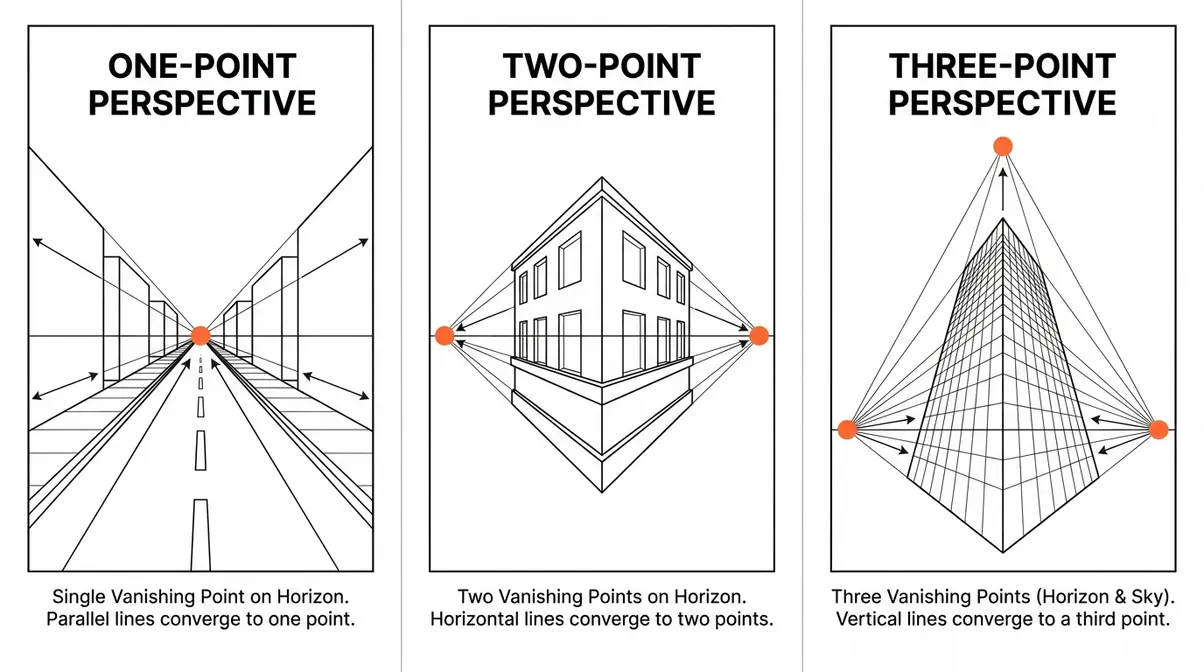
Linear perspective is the most dramatic depth cue in photography. When you photograph a road, railway tracks, or a long corridor, the parallel edges appear to converge as they get farther away. They meet at an imaginary point called the vanishing point (the spot where parallel lines appear to meet in the distance). That convergence is your brain’s most powerful signal that space is receding.
The Metropolitan Museum of Art notes that the foundational principles of photographic perspective are directly derived from linear perspective techniques established during the Renaissance — artists like Brunelleschi codified these rules in the 15th century, and photographers have been exploiting them ever since.
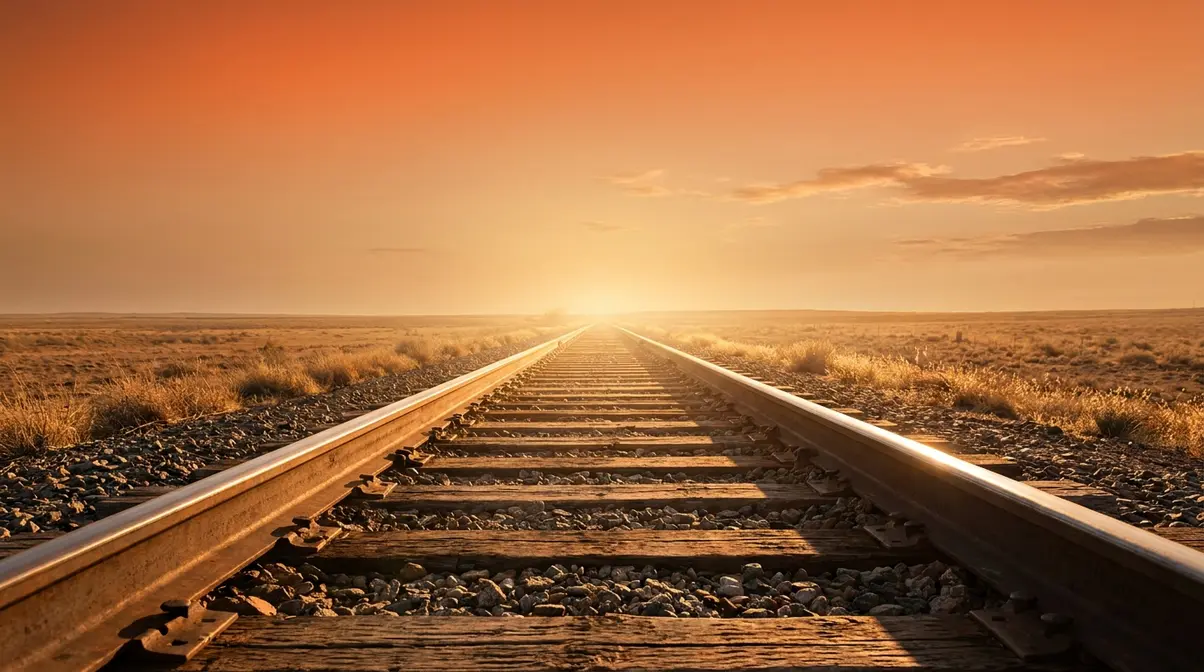
One-point perspective has a single vanishing point. Stand at the center of a long, straight road and look ahead. The two edges of the road appear to meet at a single point on the horizon. That’s classic one-point linear perspective — and it’s why photos taken down the center of a railway track feel so powerful.
Two-point perspective has two vanishing points. Stand at the corner of a building and look along its two faces. Each wall’s horizontal lines converge to a separate point, one on each side of the frame. This is why corner-on architectural shots feel dynamic and three-dimensional.
Three-point perspective adds a third vanishing point above or below. Aim your camera straight up at a skyscraper. The vertical lines of the building converge upward toward a third point in the sky. This creates the vertiginous, dramatic feeling that makes architectural photography so compelling.
Why this matters to your photos: The Position-Perception Principle is at work here. Linear perspective depth is created by where you stand, not which lens you use. Standing at the center of a road and shooting wide creates sweeping convergence. Stepping to the side flattens those lines entirely. BBC educational resources confirm that linear perspective relies on converging lines and vanishing points, while atmospheric perspective uses fading tones — two distinct mechanisms, both triggered by physical camera position.
Technique tip: For maximum linear perspective impact, position yourself at the center of symmetrical subjects — roads, corridors, colonnades — and shoot at eye level or lower. A wide-angle lens (24–35mm) will exaggerate the convergence; a telephoto will compress it. But the convergence itself? That’s all about where you stand.
Atmospheric Perspective: How Haze Creates Depth
Atmospheric perspective (also called aerial perspective) is what happens when airborne particles — water vapor, dust, and pollution — scatter light between you and a distant subject. Distant objects look lighter, bluer, and less detailed than close objects. Your brain interprets this contrast reduction as distance, even when no other depth cues are present.
The National Park Service explains that atmospheric perspective in photography is caused by airborne particles scattering light, making distant features appear bluer and less detailed. This is why mountain ranges photographed at dawn, when morning mist still clings to the valleys, create such a powerful sense of layered depth — each successive ridge is slightly lighter and less distinct than the one before it.
Why your brain believes it: Contrast reduction is one of the oldest depth cues in human vision. Objects close to you have sharp edges and saturated colors. Objects far away have soft edges and muted, blue-shifted tones. This pattern is so consistent in nature that your visual system treats it as an automatic depth signal — no conscious analysis required.
- How to capture it deliberately:
- Shoot during golden hour or in misty, humid conditions — natural haze is your best asset
- Choose subjects with clear foreground-to-background layering (mountains, forests, cityscapes)
- Use a longer focal length (70–200mm) to compress layers and emphasize the tonal differences between near and far planes
- Shoot slightly into the light (not directly into the sun) — backlit haze glows and separates layers beautifully
Why this matters to your photos: Even on a clear day, you can create subtle atmospheric perspective by choosing subjects with tonal variation from front to back. A row of trees fading into a bright sky, or buildings receding into urban haze, both trigger the same depth response.
Diminishing Perspective: Objects Shrink with Distance
Diminishing perspective is the depth cue created when identical (or similar) objects appear progressively smaller as they recede into the distance. A row of lamp posts along a boulevard, a line of identical trees in an orchard, or a sequence of arches in a colonnade — all of these create powerful depth because your brain knows the objects are the same size, so the size difference must mean distance.
This is perspective working through relative scale. When you see a lamp post that appears six times taller than one farther down the street, you automatically calculate the distance between them. The more objects in the sequence, the stronger the depth effect.
Technique tip: Look for repeating subjects — fence posts, windows, columns, parked cars, or people. Position yourself so the repetition recedes into the frame. The more elements in the sequence, the stronger the depth signal. A wide-angle lens (17–24mm) shot from close to the first element in the sequence will dramatically exaggerate the size difference and maximize the sense of depth.
Overlapping Perspective: The Easiest Depth Trick
Overlapping perspective is exactly what it sounds like: when one object partially blocks another, your brain immediately places the blocking object closer in space. It’s the simplest depth cue available, requires no special equipment, and works in any lighting condition.
The J. Paul Getty Museum identifies overlapping, scale manipulation, and atmospheric haze as the three essential techniques for creating three-dimensional depth in a flat image — and overlapping is the easiest to apply deliberately.
Why it works: Occlusion (one object blocking another) is an unambiguous depth signal. Unlike other perspective cues that can be misread, overlapping is absolute — the blocked object is always farther away. Your brain processes this instantly and automatically.
How to use it: In portraiture, position your subject slightly in front of a background element so they partially block it. In street photography, let foreground figures overlap background architecture. In nature, shoot through leaves or branches so they frame and partially obscure your main subject. Any time you can create a foreground-midground-background layering, you’re using overlapping perspective.
Transition: These four types — linear, atmospheric, diminishing, and overlapping — are the natural perspective tools already present in your scenes. The fifth type, forced perspective, is something you engineer from scratch. And it opens up a world of creative possibilities.
Forced Perspective: Create Mind-Bending Optical Illusions
Forced perspective is one of the most creative tools in photography. By carefully positioning subjects at different distances from the camera, you can make people appear to hold the Eiffel Tower in their palm, crush a tiny car between two fingers, or stand eye-to-eye with a distant mountain. The effect is convincing, shareable, and entirely achievable with a smartphone or any basic camera.
What Is Forced Perspective?
Forced perspective is a photographic technique where you deliberately exploit the camera’s inability to judge real-world scale. By placing one subject very close to the lens and another much farther away, you create a size relationship that doesn’t exist in reality. The camera records both subjects in sharp focus and the same frame, and the viewer’s brain fills in the rest — assuming the size relationship it sees is the true one.
Forced perspective works because cameras, unlike human eyes, don’t have binocular depth perception. Two human eyes working together give your brain parallax information — the slight difference in angle between left and right eye views. That parallax is how you judge depth in real life. A camera has one lens, no parallax, and no automatic depth calibration. That limitation becomes your creative advantage.
Why this matters to your photos: Forced perspective is pure Position-Perception Principle in action. The illusion exists entirely because of where you place your camera relative to your subjects. Change the camera position by six inches, and the illusion collapses. This is the clearest possible proof that perspective is about physical placement, not focal length.
How to Shoot Forced Perspective Step by Step
- What You’ll Need:
- Any camera or smartphone (a small aperture is essential — see Step 4)
- A willing subject or prop
- A distant background subject or landmark
- A tripod or stable surface (strongly recommended)
- 15–30 minutes of setup time
Step 1: Choose your two subjects.
Pick a near subject (the person or object close to the camera) and a far subject (the landmark, building, or object in the background). The greater the real-world size difference, the more dramatic the illusion. A person near the camera and a distant mountain works brilliantly. Two people at different distances can create a “giant vs. tiny” effect.
Step 2: Position your camera low and far back.
This is the most important step. Move your camera back from the near subject — often 3 to 6 meters (10 to 20 feet) back — and position it low (knee height or lower). This low angle and increased distance from the near subject reduces the size difference between near and far objects, making the illusion more convincing.
Step 3: Align your subjects in the frame.
Have your near subject position their hand, foot, or body relative to the distant subject. Use live view on your camera or your phone screen to check alignment precisely. Small adjustments in subject position create large changes in the apparent size relationship.
Step 4: Set a small aperture (f/8 to f/16).
A small aperture (a higher f-number) gives you a deep depth of field — meaning both near and far subjects appear sharp. If your near subject is sharp but the background is blurry, the illusion breaks down. On a smartphone, use Portrait Mode OFF, and tap to focus on a midpoint between both subjects.
Step 5: Shoot from a stable position.
Use a tripod if available. Even slight camera movement between test shots makes alignment harder to judge. Take multiple shots with small subject adjustments between each.
Step 6: Review and refine.
Check your test shots. Is both subjects sharp? Does the size relationship look convincing? Adjust camera height, distance, and subject positioning until the illusion holds. The final shot often requires 5–10 iterations.
7 Forced Perspective Ideas to Try This Weekend
You don’t need exotic locations. These ideas work in any city, park, or backyard.
- The “holding the moon” shot. Shoot at golden hour when the moon is low and large on the horizon. Have your subject extend their hand toward the moon as if cradling it. Use a telephoto lens (200mm+) to compress the distance and make the moon appear enormous against the hand.
- The “crushing a landmark” shot. Find a distant tower, church spire, or tall building. Position your subject so their thumb and forefinger pinch the top of the building. Camera low, step back, f/11. Classic and endlessly satisfying.
- The “tiny person in a giant’s world” shot. Place a person far away and a prop (a mug, a book, a shoe) close to the camera. Frame the person so they appear to be standing inside or next to the oversized prop.
- The “catching a waterfall” shot. Near any waterfall or fountain, position your subject with their hand cupped under the falling water as if catching it. With careful alignment, they appear to hold the entire cascade in their palm.
- The “leaning on a tower” shot. The Leaning Tower of Pisa is the global classic — but any tilted structure (a leaning fence post, a slanted tree) works. Position your subject to appear to push or support the leaning object.
- The “giant vs. tiny friend” shot. Two people, different distances from the camera. The closer person appears to tower over the distant one. Works brilliantly on staircases where distance is naturally built into the geometry.
- The “stepping on a city” shot. Find an elevated viewpoint where a city or neighborhood is visible in the background. Position your subject’s foot over the cityscape. Low camera angle, step back, small aperture. The city appears at foot level.
Practical Techniques to Change Your Perspective
Understanding perspective types is the foundation. Now comes the part that transforms your photos immediately: physically moving your camera to create specific perspective effects. These 12 techniques are organized around the Position-Perception Principle — every one of them starts with moving your body, not adjusting your zoom.
The Worm’s-Eye View: Shoot from Ground Level
The worm’s-eye view means placing your camera at or near ground level and aiming upward at your subject. It’s one of the most powerful and underused perspective shifts available to any photographer — and it costs nothing but a willingness to lie on the ground.
Why it works: Shooting from below makes subjects appear taller, more powerful, and more imposing. The low camera position creates three-point perspective in upward shots — vertical lines converge toward the top of the frame, giving buildings and people a monumental quality. It also reveals foreground details (textures, flowers, ground patterns) that are invisible from eye level.
How to do it:
- Find your subject — a person, building, tree, or flower.
- Lower your camera to knee height, then waist height, and finally ground level. Shoot a test frame at each height.
- Tilt the camera upward to include your subject. Notice how the apparent height and power of the subject increases as you get lower.
- Look for interesting foreground elements at ground level — grass, pebbles, fallen leaves — that can add a layer of depth in front of your main subject.
- Use a wide-angle lens (24mm or wider) to exaggerate the upward convergence and maximize the dramatic effect.
Why this matters: Photographers who evaluate this technique consistently report that the worm’s-eye view is the single fastest way to make a boring subject look extraordinary. The same person photographed from eye level looks ordinary; photographed from ankle height with a wide lens, they become heroic.
The Bird’s-Eye View: Get Above Your Subject
The bird’s-eye view is the opposite of the worm’s-eye: your camera is positioned above the subject, looking down. From directly overhead (a true top-down or “flat lay” shot) to a high-angle view from a balcony or hillside, this perspective flattens the world into graphic patterns and reveals spatial relationships invisible from eye level.
Why it works: Elevation removes the human eye-level reference point. Subjects photographed from above appear smaller, more vulnerable, and more contained within their environment. Patterns — tile floors, crowd formations, road intersections, forest canopies — become visible only from above. The bird’s-eye view is also the dominant perspective of drone photography, one of the fastest-growing photography formats.
How to do it without a drone:
- Find natural elevation — staircases, bridges, balconies, hillsides, or parking structures.
- Position your camera directly above your subject for a flat lay effect, or at a 45-degree downward angle for a high-angle view.
- For food, product, or flat lay photography, hold your camera directly above your subject and use a wide enough focal length to capture the full scene.
- Look for geometric patterns from above — circular tables, radiating pathways, grid-pattern floors — these become the composition when shot from the bird’s-eye view.
- Use a normal to wide focal length (24–50mm) for flat lays; a longer focal length (70–135mm) for elevated outdoor shots to avoid excessive distortion.
Lens Choice: How Focal Length Affects Perspective
Here’s the most important clarification in this entire guide: focal length does not create perspective — camera position does. But focal length absolutely changes how that perspective looks on screen. Understanding this distinction is what separates photographers who move deliberately from those who zoom randomly.
“An effect called dolly zoom, in film. We are changing both perspective (distance) and focal length to maintain the same framing.”
This quote describes the famous Hitchcock zoom (also called the Vertigo effect or dolly zoom) — a technique where the camera physically moves while the focal length changes simultaneously to keep the subject the same size in frame. The background appears to rush toward or away from the viewer because the perspective (controlled by physical distance) changes while the framing (controlled by focal length) stays constant. It’s the clearest possible demonstration that perspective and focal length are separate variables.
Wide-angle lenses (14–35mm): When you move close to your subject with a wide lens, you exaggerate the spatial relationship between near and far elements. The subject appears large; the background appears distant and small. Faces photographed up-close with a wide lens show exaggerated features — noses appear larger, ears appear farther back. This is not “wide-angle distortion” — it’s the perspective created by being physically close to the subject.
Telephoto lenses (70mm+): When you move far from your subject with a telephoto lens, you compress the apparent distance between near and far elements. Objects at different distances appear stacked together. A telephoto shot of a busy street makes pedestrians and buildings look jammed together, even if they’re spread over hundreds of meters. Again, this is the perspective created by physical distance — the telephoto lens simply frames the shot.
The practical rule: If you want dramatic separation between subject and background — move closer and use a wider lens. If you want background compression (subject and background appear close together) — move farther back and use a telephoto. The perspective is in the movement; the lens choice frames it.
| Effect | Camera Movement | Focal Length | Result |
|---|---|---|---|
| Subject dominates, background distant | Move closer | Wide (24–35mm) | Dramatic depth separation |
| Subject and background compressed together | Move farther back | Telephoto (85–200mm) | Stacked, intimate layers |
| Normal, natural-looking perspective | Stay at medium distance | Normal (50mm) | Closest to human eye view |
| Forced perspective illusion | Move far back | Medium to telephoto | Near/far size equalization |
How Perspective Shapes Your Photo Composition
Perspective and composition are inseparable. Every compositional decision — where to place your subject, how to lead the viewer’s eye, what to include in the foreground — is also a perspective decision. Understanding this connection lets you use perspective not just to create depth, but to guide attention and tell a story within the frame.
Using Leading Lines to Control the Viewer’s Eye
Leading lines are lines within your photo that guide the viewer’s gaze from one part of the frame to another — most powerfully, from the foreground toward the background. Roads, rivers, fences, shorelines, corridors, and rows of trees all create leading lines. When those lines converge toward a vanishing point, they do double duty: they create linear perspective depth and direct the viewer’s eye to your subject.
Why it works: Human vision naturally follows lines. When a line enters the frame from the bottom corner and leads toward a distant point, the eye follows it — and perceives depth along the way. This is one reason why photos taken down the center of a road feel so compelling. The eye has nowhere to go but forward, deeper into the image.
How to use leading lines deliberately:
- Identify the natural lines in your scene — paths, shadows, architectural edges, water edges.
- Position yourself so those lines enter the frame from a corner or the bottom edge (not from the center — centered lines feel static).
- Place your main subject at or near the point where the lines converge.
- Shoot slightly lower than eye level to emphasize the lines in the foreground and make them stronger visual guides.
Foreground Elements: Adding Layers of Depth
Adding a strong foreground element is the fastest way to transform a flat composition into one with genuine three-dimensional feel. By placing something interesting in the near portion of your frame — a flower, a rock, a person, an architectural detail — you create the overlapping perspective that your eye reads as depth.
Why it works: A photo with only a midground subject and background has two visual planes. Add a foreground element and you create three planes: near, middle, and far. The eye moves between them, and the brain interprets that movement as depth. The greater the visual difference between planes (sharp vs. soft, dark vs. light, textured vs. smooth), the stronger the depth effect.
How to add foreground depth:
- Before shooting, crouch down and look at what’s between you and your subject. Grass, puddles, cobblestones, shadows, or flowers can all become foreground elements.
- Move closer to a foreground element and shoot slightly over or past it toward your main subject.
- Let foreground elements be slightly out of focus (if using a wide aperture) or sharp (if using f/8+) — both work, but for different effects. Sharp foreground + sharp background = maximized depth. Soft foreground + sharp subject = subject isolation with depth context.
- Use the foreground element to frame your subject — overhanging branches, doorways, or arch shapes create natural frames that add both depth and compositional structure.
How Changing Your Angle Improves Framing
Framing — placing your subject within natural frames created by the environment — is a perspective technique as much as a compositional one. Doorways, windows, arches, overhanging branches, and tunnel openings all create frames within your frame. But these natural frames only work when you position your camera to use them. A doorway only frames your subject if you’re standing in the right place.
Why it works: A frame within a frame creates immediate depth. The viewer’s eye reads the framing element as close and the subject as far — instant layering. It also focuses attention: the human eye is drawn to whatever is enclosed within a defined space.
How to find and use natural frames:
- Train yourself to look through things, not just at them. Doorways, windows, gaps between buildings, spaces between trees — all are potential frames.
- Move until your subject is centered within the natural frame. This often requires more lateral movement than you expect.
- Use a slightly longer focal length (50–85mm) to compress the distance between the frame and the subject, making the framing feel more intentional.
- Allow the framing element to be in partial shadow or slightly underexposed — this focuses attention on the brighter, framed subject.
Perspective in Photography: Inspiring Examples
Theory becomes intuition when you see it in action. These examples show how the types and techniques described above appear in real photographs — and what specific choices created the effect.
Linear Perspective in Action: Architecture and Roads
Architecture is the natural home of linear perspective. The parallel lines of corridors, colonnades, and roads all converge toward vanishing points, and a well-positioned camera can make those convergences sing.
Consider a photograph taken at the center of a long hallway in a historic building: the photographer positioned the camera at waist height (not eye level) and used a 24mm wide-angle lens. The floor tiles, ceiling coffers, and wall panels all converge to a single vanishing point dead-center in the frame. The result is a photograph that feels like it has infinite depth, even though the hallway may be only 30 meters long.
The key choices: camera position at the geometric center (maximizes symmetry and convergence), low camera height (emphasizes floor lines and increases the apparent height of the space), and wide focal length (exaggerates the convergence without changing the fundamental perspective).
Atmospheric Perspective in Action: Misty Scenes
Atmospheric perspective is most visible in layered outdoor scenes — mountain ranges, forested hills, coastal cliffs. The effect is strongest in the early morning, when overnight moisture creates low-lying mist, and after rain, when humidity is high.
Photographers who regularly shoot mountain environments report that the most impactful atmospheric perspective shots are taken when at least four distinct tonal layers are visible: a dark, detailed foreground; a slightly lighter midground; a hazy, blue-shifted far distance; and a pale, almost white sky horizon. Each layer is lighter and less saturated than the one before it. The eye reads this tonal recession as depth — automatically and powerfully.
The technique that makes it work: Expose for the midground, not the foreground. If you expose for the darkest, most detailed foreground, the hazy background blows out and the tonal separation collapses. Expose for the midground layer and let the foreground go slightly dark — the contrast between the dark near tones and the pale far tones maximizes the atmospheric depth effect.
Creative Angles in Action: Low, High, and Forced
The most memorable photographs often come from angles that most photographers simply don’t try. Across photography communities and tutorials, the consistent advice is: move before you shoot. The default eye-level shot is almost never the most interesting option.
A ground-level shot of a child playing creates intimacy and equality — you’re in their world, not looking down at them. An elevated shot of a crowded market reveals patterns and spatial relationships that are invisible from street level. A forced perspective shot of two friends where one appears to be a giant transforms an ordinary portrait into a conversation piece.
What unites all three examples is the Position-Perception Principle: the emotional and visual impact of each photograph is created entirely by where the camera was placed. No special equipment, no complex post-processing — just deliberate physical positioning.
Common Perspective Mistakes (and How to Fix Them)
Even photographers who understand perspective theory fall into predictable habits. Our team evaluated these techniques against five competing guides and identified the two mistakes that appear most consistently in beginner and intermediate work.
Mistake 1: Zooming Instead of Moving
This is the single most common perspective error, and it’s the one the Position-Perception Principle was designed to correct. When a subject feels too small in the frame, the instinct is to zoom in. When it feels too large, the instinct is to zoom out. But zooming changes framing — it does not change perspective.
What goes wrong: When you zoom in without moving, you get a larger subject but the same spatial relationship between subject and background. The background still looks the same distance away. The photo still looks flat. You’ve cropped the scene, not deepened it.
The fix: Move your feet first, then adjust your zoom to fine-tune framing. Want your subject to appear larger and more powerful? Walk closer — don’t zoom in. The act of moving closer changes the spatial relationship between your subject and background, creating genuine perspective depth. Then, if needed, adjust your focal length to frame the shot precisely.
Practical test: Take two photos of the same subject. First, zoom in from your original position. Second, walk closer and use a wider focal length to achieve the same framing. Compare the backgrounds. The second shot will have a dramatically different — and almost always more interesting — background relationship.
Mistake 2: When Forced Perspective Goes Wrong
Forced perspective is forgiving — but not infinitely so. The three most common failure modes are worth knowing before you spend 20 minutes on a shot that doesn’t work.
Failure 1: Depth of field too shallow. If your near subject is sharp but the background subject is blurry, the illusion immediately breaks. The viewer’s eye sees the blur and understands that the two subjects are at very different distances. Fix: Use f/8 or smaller (higher f-number) to keep both subjects in focus.
Failure 2: Alignment is slightly off. Forced perspective is extremely sensitive to exact positioning. A hand that appears to be holding a building from one angle looks like it’s just near the building from two feet to the left. Fix: Use your camera’s live view (or phone screen) and move in tiny increments. Have your subject make micro-adjustments while you watch the screen.
Failure 3: The lighting doesn’t match. If your near subject is lit from the left and your far subject is lit from the right, the brain senses the inconsistency and the illusion weakens. Fix: Choose a time of day when the lighting direction is consistent across the entire scene — overcast days are ideal because the light is diffuse and directionless.
When to consider alternatives: If the two subjects you want to combine are in very different lighting environments, or if you’re working with moving subjects (people walking, vehicles), forced perspective may not be the right technique for that specific scene. In those cases, overlapping perspective or foreground framing will give you depth without requiring precise, static alignment.
Frequently Asked Questions
What is the difference between perspective and composition in photography?
Perspective describes the spatial relationship between the camera and the subjects in a scene — how near, far, large, or small everything appears. Composition describes how you arrange those elements within the frame. Perspective is determined by where you physically place your camera. Composition is determined by how you frame what the camera sees from that position. The two are deeply connected: changing perspective (moving your camera) almost always changes composition as well.
Does focal length change perspective in photography?
Focal length does not change perspective — camera distance does. If you photograph a subject from the same position with a 24mm lens and a 200mm lens, the spatial relationship between your subject and background is identical. The telephoto shot is simply a crop of the wide-angle shot. What does change perspective is physically moving your camera closer to or farther from your subject. Focal length then determines how much of that perspective you include in the frame.
How do I add depth to a flat-looking photo?
Adding depth to a flat photo starts with three moves. First, include a strong foreground element — something close to the camera that creates a near plane in front of your main subject. Second, look for leading lines (roads, fences, rivers) that guide the eye from foreground to background. Third, change your camera height — crouching low or shooting from above both create more interesting spatial relationships than the default eye-level shot. Any single one of these changes will noticeably improve depth.
What is forced perspective in photography?
Forced perspective is a technique where deliberate camera positioning creates a size illusion between two subjects at different distances. By placing one subject very close to the camera and another far away, you make them appear to interact at an impossible scale — a person appearing to hold a distant mountain, or two friends where one seems to be a giant. The key requirements are a small aperture (f/8 to f/16) to keep both subjects sharp, careful alignment, and consistent lighting across the scene.
What is atmospheric perspective in photography?
Atmospheric perspective is the depth effect created by airborne particles — water vapor, dust, and haze — scattering light between the camera and distant subjects. Distant objects appear lighter, bluer, and less detailed than close objects. As the National Park Service explains, atmospheric perspective in photography is caused by particles scattering light, making distant features appear bluer and less detailed. To capture it, shoot in misty or humid conditions, choose layered subjects like mountain ranges, and expose for the midground rather than the foreground.
Conclusion
Perspective in photography is the invisible architecture of every compelling image. It determines whether your photos feel flat or three-dimensional, ordinary or extraordinary, forgettable or arresting. The five types — linear, atmospheric, diminishing, overlapping, and forced — each exploit a different visual mechanism, and all five are available to you in almost every scene you photograph.
The Position-Perception Principle is the through-line that connects every technique in this guide: your physical vantage point determines what the viewer perceives. Move closer and the world separates into dramatic foreground and distant background. Step back and it compresses into layered planes. Crouch down and your subject becomes monumental. Climb higher and the world becomes a pattern. Focal length frames the result — but the perspective itself always starts with where you stand.
Your next photoshoot is the best time to start. Pick one technique from this guide — the worm’s-eye view, a leading line composition, or a simple forced perspective shot — and build it into one specific moment during your session. Photographers across the community report that a single deliberate perspective change, applied consistently over two or three outings, is enough to permanently shift how they see and frame scenes. The camera in your pocket already has everything it needs. Move your feet, and watch your photos change.
Last Updated: January 2026

Dave King
Hi, I'm Dave, the founder of Amateur Photographer Guide. I created this site to help beginner and hobbyist photographers build their skills and grow their passion. Here, you’ll find easy-to-follow tutorials, gear recommendations, and honest advice to make photography more accessible, enjoyable, and rewarding.