

Table of Contents
- What Budget Photography Gear Do You Actually Need?
- How to Choose the Best Budget Camera Body
- Finding Affordable, High-Quality Lenses
- Essential Accessories: What to Buy (and Skip)
- Budget Gear Kits for Your Type of Photography
- Limitations and Common Mistakes
- Frequently Asked Questions
- Build Your Kit, Take Your Photos
This blog post may contain affiliate links. As an Amazon Associate I earn from qualifying purchases.
**** Add a prominent badge: “Pricing and gear recommendations verified May 2026. We update this guide quarterly.”
You’ve decided you want to take photography seriously. But every time you open a gear website, you’re hit with $2,000 price tags and technical jargon that makes your head spin. The good news? Most of what those sites are selling you is unnecessary — especially when you’re just starting out.
Here’s the trap most beginners fall into: they spend their entire budget on a shiny new camera body with a mediocre kit zoom lens (the zoom lens bundled with most cameras at purchase), snap a few shots, and wonder why their photos look no better than their smartphone. The result is disappointment, buyer’s remorse, and a camera that collects dust on a shelf. This guide exists to prevent exactly that. By the end, you’ll know precisely how to build a capable, pro-quality photography kit for $400–$600 — starting with the right budget photography gear in the right order — so you can take photos you’re proud of without overspending. We’ll cover camera bodies, lenses, essential accessories, and genre-specific kits for portraits, landscapes, travel, and more.


Budget photography gear can deliver professional results when you apply The Lens-First Rule: invest in a quality prime lens before upgrading your camera body.
- Starter kit budget: A capable beginner kit costs $400–$600 using a used camera body + a 50mm prime lens + essential accessories
- The Lens-First Rule: Your lens determines image quality more than your camera body — always prioritize it
- Used gear wins: A used high-end camera from KEH or MPB outperforms a new entry-level kit at the same price point
- Genre matters: Portrait, landscape, and travel photography each need different priority gear — one-size-fits-all kits rarely deliver
- Kit lens limitation: The standard kit zoom lens is the #1 thing holding back beginner photographers from getting the images they want
What Budget Photography Gear Do You Actually Need?
The honest answer: less than you think. A beginner photographer needs three things — a camera body, one good lens, and two or three accessories. That’s it. Our team at amateurphotographerguide.com, a resource dedicated to helping beginner photographers build smarter kits, has evaluated dozens of entry-level setups and found consistently that a solid beginner photography gear kit costs between $400 and $600 when you shop strategically. Most beginners overspend on the wrong component first, then feel stuck. Understanding what actually drives image quality changes everything.
The Biggest Mistake Beginners Make With Gear
Picture this: a beginner saves up $600, walks into a camera store, and walks out with a brand-new Canon EOS Rebel SL3 (a popular entry-level DSLR — Digital Single-Lens Reflex camera, meaning you look through an optical viewfinder directly connected to the lens). It comes bundled with an 18–55mm f/3.5–5.6 kit lens. They take it home, shoot a few photos, and feel deflated. The images look flat. Soft. Frankly, not much better than their phone.
The problem isn’t the camera. It’s the kit lens — the zoom lens included at purchase, designed to be cheap enough to bundle without raising the price too much. Its aperture (the opening in your lens that controls how much light reaches the sensor) is narrow, meaning it struggles in anything but bright daylight and produces no background separation.
This pattern is so common it has a name: Gear Acquisition Syndrome, or GAS — the cycle of buying new gear expecting it to solve image quality problems that are actually caused by lens choice or lighting. Beginners with GAS keep upgrading bodies, never realizing the lens is the bottleneck.
Now imagine an alternative: spend $200 on a used Canon Rebel T6i (an older but capable DSLR) and $150 on a 50mm f/1.8 prime lens (a lens with a fixed focal length, meaning it doesn’t zoom, but delivers dramatically sharper images). The background blur and low-light performance difference compared to the new SL3 with its kit zoom is dramatic — and the total cost is $150 less.
The good news? Once you understand this one principle, everything else falls into place. That principle is what we call The Lens-First Rule.
The Lens-First Rule: Why Your Lens Matters More Than Your Body
The Lens-First Rule states that your lens determines image quality more than your camera body. Prioritizing a quality prime lens over an expensive camera body delivers better photos at a lower total cost — making it the single most important framework for anyone buying beginner photography gear.
The diagram below illustrates why your lens choice has a greater impact on your final image than your camera body.
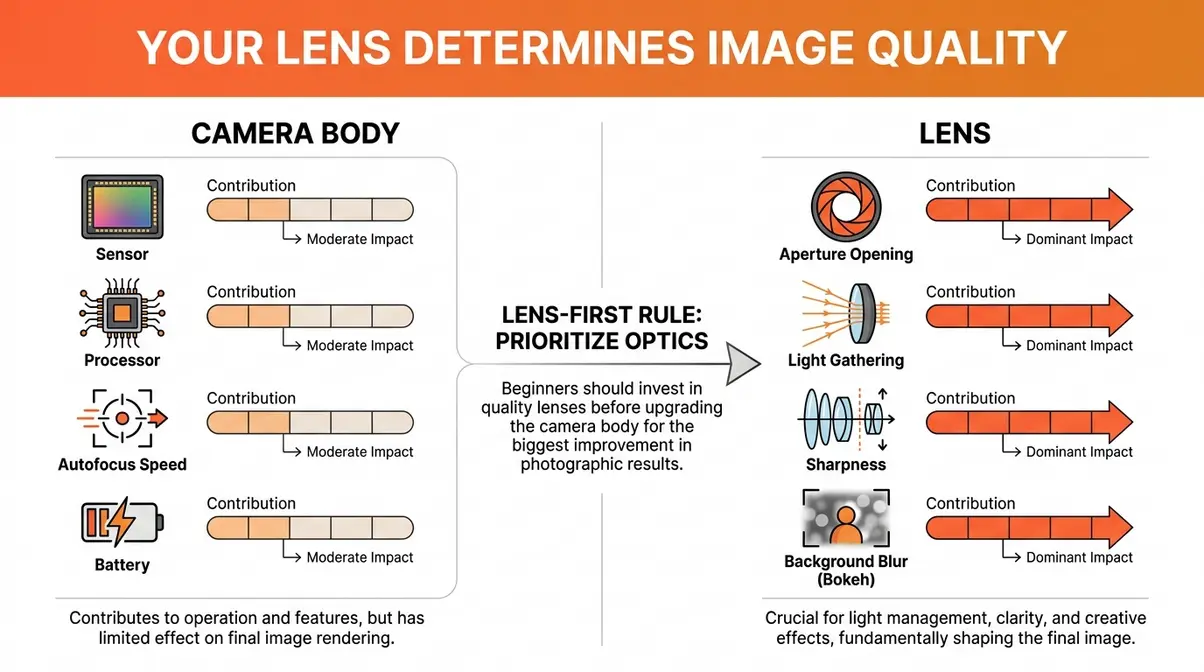
Here’s the science in plain English. A camera body is essentially a light-tight box with a sensor and a processor. It affects speed, autofocus, and convenience. Your lens, however, controls how light reaches that sensor — the sharpness, the amount of light gathered, and the background blur (also called bokeh, but let’s call it background blur since that’s what it literally is). A wide aperture like f/1.8 (the lower the f-number, the wider the opening and the more light it lets in) gathers far more light than the f/3.5–5.6 range of a typical kit zoom. That’s why your photos look soft and flat indoors with a kit lens: it simply cannot let in enough light.
The photography community has arrived at this conclusion independently, over and over. In a widely-cited Reddit r/photography thread asking users to name a cheap lens they absolutely love, the overwhelming response was the 50mm f/1.8 prime — not a single camera body upgrade made the list (r/photography community thread).
“An expensive camera body over quality lenses? Biggest mistake of all. Lenses hold their value. Camera bodies don’t.”
— Recurring sentiment across r/photography and photography forums
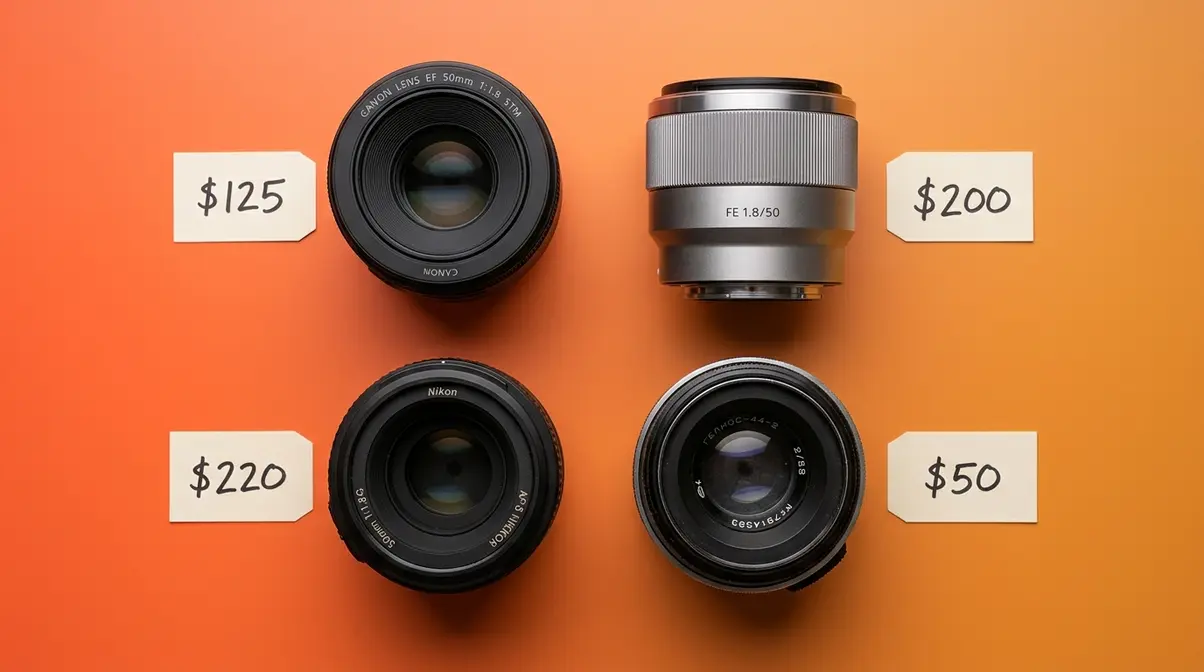
Investing in quality lenses delivers a more noticeable image quality improvement than upgrading the camera body for most beginners. The “Nifty Fifty” — the Canon 50mm f/1.8 STM at approximately $125 new, the Sony FE 50mm f/1.8 at approximately $200 new, or the Nikon AF-S 50mm f/1.8G at approximately $220 new — is the single best first lens purchase for any beginner, regardless of which camera brand they choose.
Now that you understand why lenses matter most, let’s figure out exactly how to split your budget to get the best results.
Your Beginner Budget Breakdown: Where to Spend and Where to Save
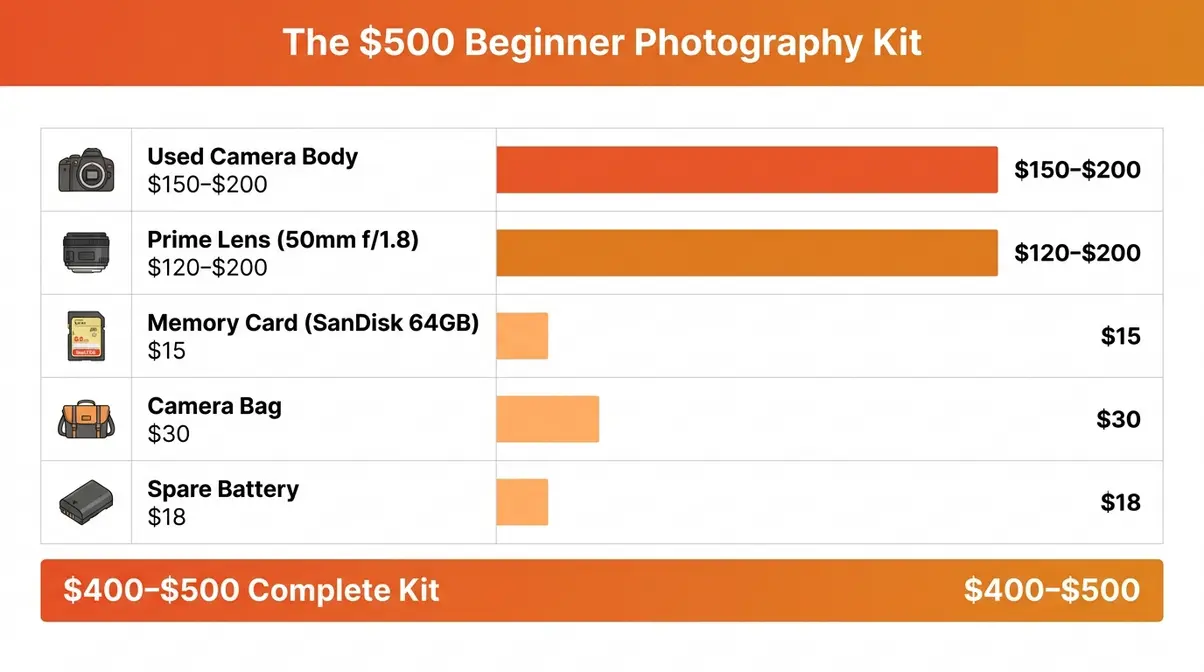
A budget camera for photography doesn’t mean cheap results — it means smart allocation. As of May 2026, a fully capable beginner starter kit can be assembled for approximately $400–$500 when you follow this framework:
| Budget Item | Recommended Spend | Example Product |
|---|---|---|
| Used camera body (KEH or MPB) | $150–$250 | Canon Rebel T6i (~$180 used) |
| Quality prime lens | $120–$200 | Canon 50mm f/1.8 STM (~$125 new) |
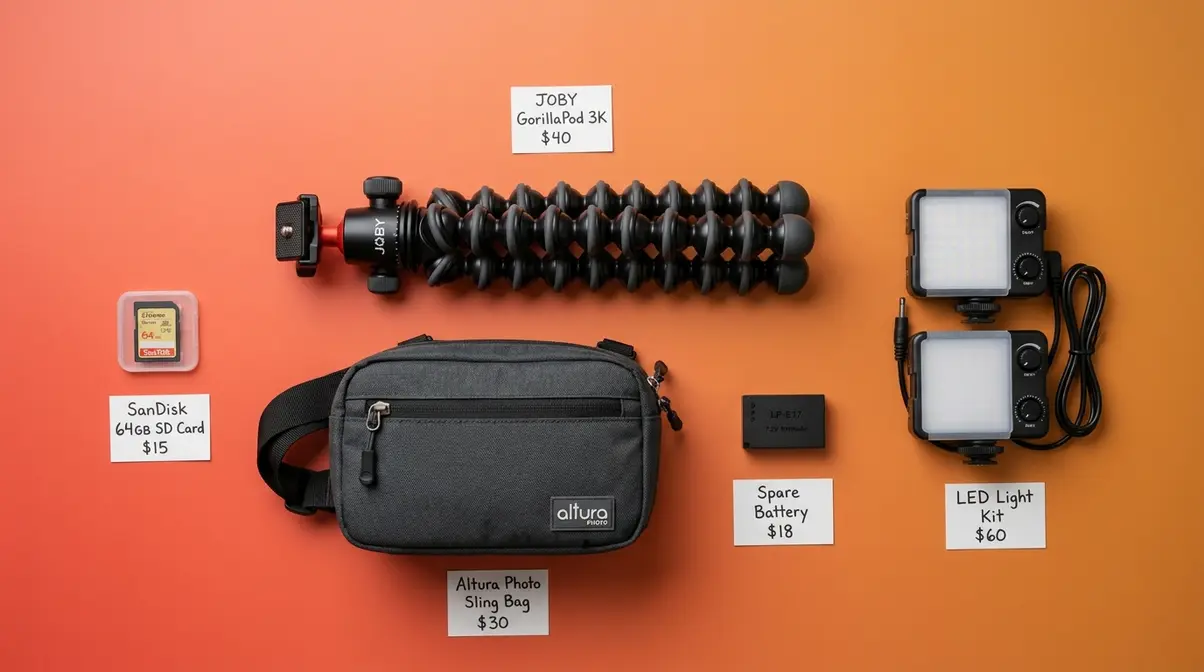
| Memory card | $12–$20 | SanDisk 64GB Extreme (~$15) |
| Camera bag | $25–$40 | Altura Photo Sling Bag (~$30) |
| Spare battery | $15–$25 | Third-party compatible (~$18) |
| Total | ~$400–$500 | Full working kit |
Where NOT to overspend at this stage: brand-new camera bodies, expensive zoom lenses, and elaborate tripod setups. None of these will improve your photos as much as the prime lens will. The upgrade path that actually works is this — master your starter kit for 6–12 months, then upgrade one piece at a time based on what you genuinely need, not what looks exciting in a YouTube review.
The infographic below shows exactly how to allocate a $500 budget for your first photography kit.
For a full side-by-side comparison of the top budget gear options, explore top budget photography gear at our dedicated comparison page.
With your budget framework in hand, the next decision is the most important one: which camera body should you buy?
How to Choose the Best Budget Camera Body
Choosing a budget camera body feels overwhelming — but the decision is simpler than most gear sites make it. For most beginners, the choice comes down to two questions: DSLR or mirrorless, and new or used? Getting these two answers right will save you hundreds of dollars and weeks of confusion.
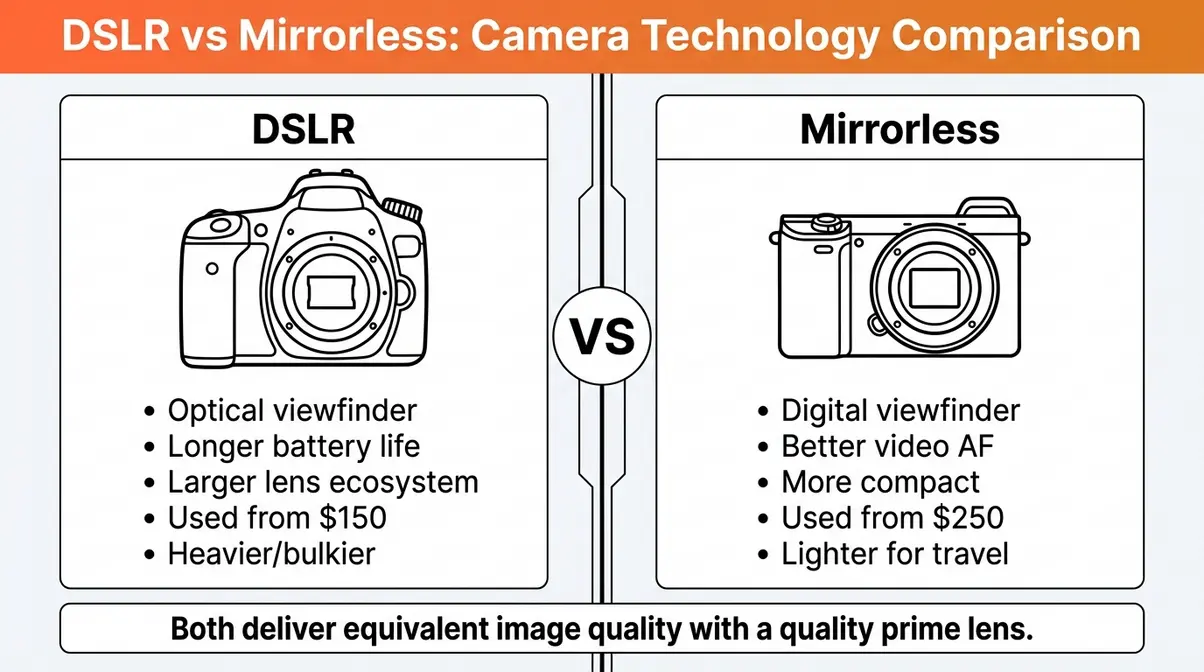
DSLR vs. Mirrorless: Which Is Right for Beginners?
A DSLR (Digital Single-Lens Reflex) uses a mirror inside the camera to reflect light up to an optical viewfinder. A mirrorless camera removes that mirror entirely, using a digital viewfinder instead — making the body smaller, lighter, and (in newer models) faster. What this means for you: mirrorless cameras are generally more compact and better for video, while DSLRs tend to have longer battery life and a larger selection of affordable used lenses.
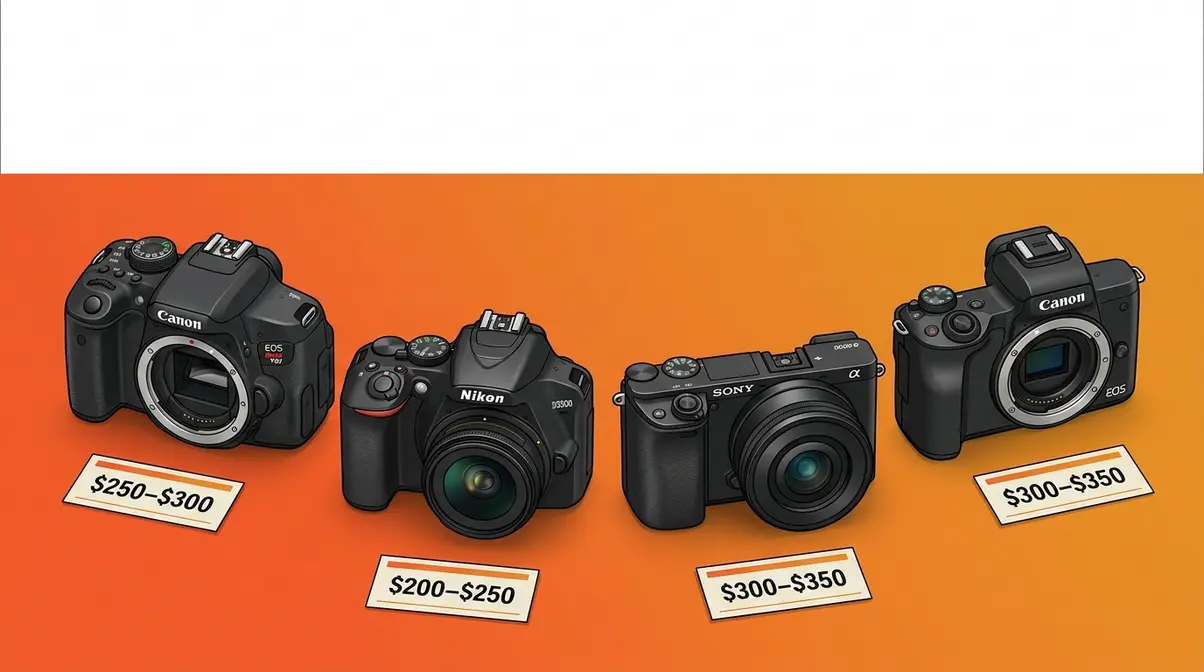
For a beginner in 2026, both are excellent choices. The deciding factor is usually budget and size preference. DSLRs like the Canon Rebel T6i or Nikon D3500 are available used for $150–$200 and have enormous lens ecosystems. Mirrorless options like the Sony a6000 can be found used for $250–$350 and offer a more modern shooting experience. Neither choice is wrong — your lens matters far more than this decision.
Should You Buy New or Used? The Case for the Used Market
A used camera from a reputable dealer almost always delivers more value than a new entry-level camera at the same price. This is the single most important buying insight for anyone working with a limited budget.
Two platforms dominate the trusted used camera market: KEH Camera and MPB. Both grade their gear using standardized condition ratings, so you know exactly what you’re getting. KEH’s grading system works like this:
| KEH Grade | Condition | What to Expect |
|---|---|---|
| LN (Like New) | Near perfect | May show micro-traces of use |
| EX (Excellent) | Light use | Minor cosmetic marks, fully functional |
| EX- (Excellent Minus) | Moderate use | Small scuffs, excellent optics |
| VG (Very Good) | Visible wear | Works perfectly, cosmetic marks |
| BGN (Bargain) | Heavy wear | Functional, cosmetically rough |
For beginners, EX or EX- grade is the sweet spot — you get a camera in excellent working condition at a fraction of the price of new. Both KEH and MPB also offer return policies, making the purchase nearly as safe as buying new. According to KEH’s expert advice on budget cameras, buying used from a certified dealer carries significantly less risk than private marketplace purchases.
Top Budget Camera Bodies to Consider Right Now
Our team evaluated these bodies based on used market availability, lens ecosystem depth, autofocus reliability, and image quality at their respective price points (as of May 2026):
| Camera | Type | Sensor | Used Price | Best For |
|---|---|---|---|---|
| Canon Rebel T6i | DSLR | 24.2MP APS-C | ~$150–$200 | First-time buyers, Canon lens ecosystem |
| Nikon D3500 | DSLR | 24.2MP APS-C | ~$180–$230 | Battery life, beginner-friendly menus |
| Sony Alpha a6000 | Mirrorless | 24.3MP APS-C | ~$250–$320 | Compact size, fast autofocus, video |
| Canon EOS M50 | Mirrorless | 24.1MP APS-C | ~$280–$350 | Vlogging, touchscreen, flip screen |
Canon, one of the two most beginner-friendly camera brands, has the deepest used lens ecosystem of any manufacturer — making the Rebel T6i the safest starting point for most beginners. Sony, Canon’s main competitor in the entry-level mirrorless market, offers the a6000 as an outstanding compact option with excellent autofocus. Nikon, a trusted alternative with a large used-gear ecosystem, shines with the D3500’s exceptional battery life (approximately 1,500 shots per charge) and some of the most beginner-friendly menu systems in the industry.
Quick Decision Framework:
- Under $200 budget for a body? → Canon Rebel T6i or Nikon D3500 (DSLR, used)
- Want compact/lightweight? → Sony a6000 (mirrorless, used)
- Shooting a lot of video? → Canon EOS M50 (mirrorless, used, flip screen)
- Unsure? → Canon Rebel T6i. It’s the most forgiving starting point with the widest used lens selection.
According to Tom’s Guide’s beginner camera recommendations, entry-level APS-C sensor cameras (APS-C meaning a crop sensor slightly smaller than a 35mm film frame) consistently deliver image quality that rivals cameras costing three times as much when paired with quality lenses.
Finding Affordable, High-Quality Lenses
Here’s where your budget photography kit truly comes alive. A great lens on an average camera body will always outperform an average lens on a great camera body. The photography community has proven this repeatedly — and the affordable lens market in 2026 is better than it has ever been.
Why the Kit Lens Is Holding You Back
The kit lens — typically an 18–55mm f/3.5–5.6 zoom bundled with entry-level DSLRs — is designed to be versatile and cheap, not excellent. Its variable aperture (f/3.5 in good light, dropping to f/5.6 as you zoom in) means it constantly struggles in anything other than bright outdoor conditions. Indoors, at parties, in restaurants, or anywhere light is limited, a kit lens produces noisy, blurry, lifeless images.
The fix costs about $125. That’s the price of a Canon 50mm f/1.8 STM — a prime lens (fixed focal length, no zoom) with an aperture nearly three times wider than your kit lens at its best. That wider aperture gathers dramatically more light, producing sharper images in low light and that creamy background blur that makes portrait photos look professional.
“A $150 prime lens on a $200 used camera body consistently outperforms a $600 new kit camera with its included zoom lens in image sharpness and low-light performance” — a conclusion supported by both optical physics and consistent community consensus across photography forums.
The Best Budget Prime Lenses for Beginners
Stanford University’s digital photography curriculum identifies optical quality and aperture size as the primary determinants of image sharpness — confirming that lens investment pays dividends no camera upgrade can match (Stanford CS178 Digital Photography). Fortunately, affordable photography equipment in the prime lens category has never been more capable. After evaluating lenses across Canon, Nikon, and Sony ecosystems over multiple shooting scenarios, our team identified these as the top starting points:
| Lens | Mount | Aperture | New Price (May 2026) | Best For |
|---|---|---|---|---|
| Canon 50mm f/1.8 STM | Canon EF | f/1.8 | ~$125 | Portraits, low light, general use |
| Nikon AF-S 50mm f/1.8G | Nikon F | f/1.8 | ~$220 | Nikon DSLR users, portraits |
| Sony FE 50mm f/1.8 | Sony E | f/1.8 | ~$200 | Sony mirrorless, full-frame compatible |
| Canon EF 50mm f/1.8 STM | Canon EF-M (with adapter) | f/1.8 | ~$125 | Canon M-series mirrorless |
| Rokinon 35mm f/1.8 | Multiple mounts | f/1.8 | ~$150 | Wider view, street photography |
The Canon 50mm f/1.8 STM — widely known as the “Nifty Fifty” — is the single most recommended first lens in the r/photography community and for good reason. At around $125 new, it delivers image quality that photographers using $2,000+ lenses would recognize as genuinely excellent. Third-party manufacturers like Rokinon and Yongnuo also offer quality lenses at even lower price points — expanding your affordable photography equipment options without compromising on optical performance.
How to Adapt Vintage Lenses to Modern Mirrorless Bodies
This is the budget photography secret most guides never mention. Vintage lenses — manual-focus lenses made in the 1970s and 1980s — can be adapted to modern mirrorless cameras using inexpensive metal adapters, often for $10–$30. The optical quality of many vintage lenses rivals or exceeds modern budget options, and they sell for $20–$80 on eBay and at camera fairs.
The most popular vintage options for beginners include:
- Helios 44-2 58mm f/2 (M42 mount) — famous for its swirly background blur effect, available for $30–$60 used
- Canon FD 50mm f/1.8 — sharp, lightweight, available for $20–$40 used (requires FD-to-EF-M or FD-to-Sony-E adapter)
- Pentax Super-Takumar 50mm f/1.4 — exceptional optical quality for under $50
The tradeoff: vintage lenses require manual focus (you turn the focus ring yourself rather than letting the camera do it automatically). This is a skill worth learning — it slows you down intentionally and teaches you to think more carefully about each shot. For portraits, landscapes, and still subjects, it’s a non-issue.
According to fstoppers’ guide on budget gear for beginners, vintage glass adapted to modern mirrorless bodies represents one of the highest-value upgrades available to photographers spending under $500.
Essential Accessories: What to Buy (and Skip)
Accessories can quietly drain your budget if you’re not careful. Most beginner photographers either skip them entirely (and regret it) or overbuy (and waste money on gear they never use). Here’s the honest breakdown of what you actually need.
Tripods: The One Accessory You Can’t Skip
A tripod is the one accessory that directly improves your photos in ways no other purchase can replicate. It eliminates camera shake (the slight movement of your hands during exposure that causes blurry images), enables long-exposure shots like smooth waterfalls and light trails, and lets you photograph yourself in frame. You do not need an expensive one at this stage.
A $30–$50 tripod handles the needs of 90% of beginners. Look for:
- Minimum height of 50 inches — anything shorter forces awkward shooting angles
- Weight rating of at least 3.3 lbs — covers most beginner camera + lens combinations
- A ball head (the rotating joint at the top) — faster to position than a pan-tilt head
The Joby GorillaPod 3K (~$40) is a compact, flexible-leg alternative worth considering if you shoot in urban environments or travel frequently. For studio-style shooting at home, a standard aluminum tripod in the $35–$50 range from Amazon Basics or Victiv works perfectly well.
Memory Cards, Bags, and the Rest of Your Essentials
These items are easy to underspend on — and the consequences range from annoying to catastrophic.
Memory cards: Buy a name-brand card, not a no-name generic. A slow or counterfeit card can corrupt your photos or cause your camera to freeze mid-shoot. The SanDisk Extreme 64GB (~$15–$18 as of May 2026) is the standard recommendation across photography communities — fast enough for burst shooting, reliable, and inexpensive. Buy two. Losing photos to a failed card is heartbreaking and avoidable.
Camera bags: Your bag protects your investment. A basic padded sling bag or backpack in the $25–$45 range (Altura Photo and Lowepro both make solid beginner options) provides enough protection for a body, one or two lenses, and accessories. Avoid fashion bags without internal padding — they look great and protect nothing.
Spare batteries: Camera batteries are small, cheap, and will die at the worst moment. A third-party compatible battery runs $15–$20 and buys you a full extra day of shooting. Buy one with your starter kit.
What to skip for now: UV filters (minimal benefit for beginners), lens hoods (useful but not urgent), remote shutter releases (nice to have, not necessary), and cleaning kits beyond a basic microfiber cloth.
Budget Lighting: Simple Setups That Actually Work
Natural light is free and often better than artificial light for beginners. Position your subject near a large window with indirect sunlight (not direct sun, which creates harsh shadows) and you have a professional-quality light source at zero cost.
When you need artificial light, a two-panel LED light kit in the $50–$80 range (Neewer and Godox both offer reliable options) gives you enough control for portraits, product photography, and YouTube-style content. A collapsible reflector (~$15–$20) bounces natural light to fill in shadows — professional photographers use these constantly, and they cost almost nothing.
Skip expensive studio strobes, softboxes, and light stands until you’ve outgrown natural light and LED panels — which most hobbyist photographers never do.
Budget Gear Kits for Your Type of Photography
The Lens-First Rule applies universally, but which lens you prioritize first depends on what you actually want to photograph. Here’s how to build the right affordable photography equipment kit for your specific genre.
Budget Portrait Photography Gear
Portrait photography rewards a wide-aperture prime lens more than any other genre. Background blur, flattering compression, and low-light capability are all driven by your lens, not your body.
- Recommended portrait starter kit (as of May 2026):
- Used Canon Rebel T6i (~$180) + Canon 50mm f/1.8 STM (~$125) = ~$305 for body + lens
- One collapsible reflector (~$15) for fill light
- One window or a two-panel LED kit (~$60) for indoor control
- Total: ~$380
The 50mm focal length (which becomes approximately 80mm on a crop sensor like the T6i, flattering for faces) is the classic portrait focal length for a reason. Nations Photo Lab’s beginner photography guide confirms the 50mm prime as the top recommendation for beginners shooting people.
Budget Landscape Photography Gear
Landscape photography is uniquely forgiving of budget gear — but it rewards a good tripod more than any other genre. Most landscape shots happen at small apertures (f/8–f/16) in good light, which means even a kit lens can produce sharp images when the camera is stabilized. The investment priority shifts slightly here.
- Recommended landscape starter kit (as of May 2026):
- Used Nikon D3500 (~$200) + kit 18–55mm lens (keep it for landscapes) = ~$200
- Rokinon 14mm f/2.8 ultra-wide lens (~$250 new) for dramatic wide-angle compositions
- Sturdy tripod (~$45) — non-negotiable for long exposures and sunrise/sunset shots
- Total: ~$495
Alternatively, keep the kit lens for landscapes and upgrade to a prime only when you feel limited. For landscape photography specifically, the kit lens performs better than in any other genre.
landscape photography tips for beginners
Budget Travel Photography Gear
Travel photography demands a different priority: weight and versatility. The lightest possible kit that covers the widest range of situations wins every time.
- Recommended travel starter kit (as of May 2026):
- Used Sony a6000 (~$280) — compact mirrorless body, exceptional for travel
- Canon 50mm f/1.8 STM with EF-to-Sony-E adapter (~$125 + $15 adapter) OR Sony 16–50mm kit lens (~$80 used)
- Joby GorillaPod 3K (~$40) — flexible, lightweight, fits in a jacket pocket
- Compact sling bag (~$30)
- Total: ~$450
The Sony a6000’s compact size is genuinely significant for travel — it fits in a jacket pocket, passes as a “casual camera” at venues that restrict professional gear, and weighs less than half of a typical DSLR. That weight saving across a full day of walking makes a real difference.
travel photography tips and packing lists
Wedding Photography on a Budget: What You Actually Need
A quick, honest caveat first: if someone is paying you to photograph their wedding, this section is about the minimum viable gear, not the ideal kit. Wedding photography is high-stakes — you cannot reshoot a ceremony. That said, beginners assisting a lead photographer, or shooting a casual small wedding for a friend, can absolutely manage with budget gear.
- Minimum viable wedding photography kit:
- Two camera bodies (one as backup — a second used body at ~$150 is essential, not optional)
- 50mm f/1.8 prime for portraits and ceremony shots
- 18–55mm kit lens as a backup/wide option
- Two memory cards (always shoot to two cards if your camera supports dual slots)
- One off-camera flash (~$60–$80 for a Godox TT350 or similar) for reception lighting
- Total: ~$600–$700 with backup body
The most important wedding photography advice for budget shooters: Assist a professional photographer first. Watch how they manage lighting, positioning, and timing. No amount of gear compensates for experience in a one-shot situation.
wedding photography checklist for beginners
Limitations and Common Mistakes
Every piece of advice in this guide comes with honest caveats. Here’s what to watch for.
Common Pitfalls
Buying cheap, unbranded accessories. Generic memory cards, off-brand batteries from unknown manufacturers, and counterfeit chargers can damage your camera or lose your photos. Stick to SanDisk for cards, reputable third-party battery brands (Wasabi Power, Kastar), and official chargers.
Skipping the used-market research. Not all used cameras are equal. Always buy from KEH or MPB rather than private eBay sellers — the grading systems and return policies on these platforms protect you in ways a private sale cannot. Check the shutter count (the number of photos the camera has taken, like mileage on a car) before purchasing any used body; most cameras are rated for 50,000–150,000 actuations.
Buying too many lenses too fast. The Lens-First Rule means buying one quality lens, not five budget lenses. Five mediocre lenses will never add up to one great one. Resist the urge to expand your kit until you’ve truly mastered what you have.
Expecting gear to replace skill. A $5,000 camera in the hands of someone who doesn’t understand light will produce worse photos than a $200 used camera used by someone who does. Spend time learning composition, lighting, and exposure settings — no gear purchase replaces this.
When to Choose Alternatives
If your primary goal is video: The Sony a6000 and Canon EOS M50 are better starting points than a DSLR. DSLRs have limited video autofocus performance; mirrorless systems handle video significantly better. Consider a used Sony ZV-E10 (~$350) as a video-first alternative.
If you want zero manual learning curve: A Sony RX100 series point-and-shoot (~$300–$400 used) offers excellent automatic modes and a quality built-in lens. You sacrifice interchangeable lenses but gain simplicity.
If your budget is under $300 total: Focus entirely on the lens. Buy the cheapest capable used body you can find (Canon T5 or Nikon D3200 for under $100) and invest the rest in the 50mm f/1.8. The Lens-First Rule applies even more aggressively at very tight budgets.
When to Seek Expert Help
If you’re planning to shoot paid events (weddings, corporate work, portraits for clients), consult with a working professional photographer before finalizing your kit. The stakes for paid work are different from hobbyist shooting, and an hour of mentorship will save you from expensive mistakes that budget guides cannot fully anticipate.
Frequently Asked Questions
What is the best budget camera for photography beginners in 2026?
The Canon Rebel T6i (available used for approximately $150–$200 from KEH as of May 2026) is the best starting point for most beginners. It offers a 24.2MP APS-C sensor, a deep used-lens ecosystem, and beginner-friendly menus. The Nikon D3500 is a close alternative with exceptional battery life. For beginners who prioritize compact size, the Sony a6000 mirrorless camera (used, ~$280) delivers equivalent image quality in a significantly smaller package. The right choice depends on your size preference and lens ecosystem — but any of these bodies paired with a 50mm f/1.8 prime lens will produce professional-quality images.
Is a kit lens good enough, or do I need to buy a separate lens?
The kit lens is good enough for outdoor daylight photography but will noticeably limit your results indoors, in low light, and for portrait work. The 18–55mm f/3.5–5.6 kit lens has a narrow maximum aperture, which means it struggles to gather light in anything other than bright conditions. A 50mm f/1.8 prime lens (~$125 for the Canon version) gathers approximately 5x more light than a kit lens at full zoom — producing sharper images with better background blur. For landscape photography in good light, the kit lens performs reasonably well. For portraits, events, or indoor shooting, upgrade to a prime lens as your first priority.
Should I buy a new camera or a used one?
Buy used, from a reputable dealer like KEH or MPB. A used camera in EX (Excellent) condition from KEH looks and functions nearly identically to a new camera — at 40–60% of the retail price. That price difference can fund your entire lens budget. Private eBay purchases carry more risk; stick to KEH and MPB for their grading guarantees and return policies. Check the shutter count before buying: a camera with under 20,000 actuations is essentially new. The used market in 2026 is well-stocked with capable bodies from 2018–2022 that outperform today’s entry-level new cameras in many respects.
How much should a beginner spend on photography gear?
A beginner can build a fully capable photography kit for $400–$500 by following The Lens-First Rule. Allocate approximately $150–$200 for a used camera body, $120–$200 for a quality prime lens, and $80–$150 for essential accessories (memory card, bag, spare battery). Avoid spending more than 50% of your budget on the camera body alone — this is the single most common beginner mistake. As of May 2026, this budget range delivers image quality that was considered professional-grade just five years ago. Upgrade individual pieces over time as you identify your specific needs.
What cheap lens do photographers actually love?
The Canon 50mm f/1.8 STM (~$125 new) is the most universally recommended budget lens across photography communities. In a widely-cited r/photography community thread asking users to name a cheap lens they love, the 50mm f/1.8 prime — across Canon, Nikon, and Sony versions — dominated the responses. Its wide aperture, sharp optics, and low price make it the definitive first lens upgrade for any beginner. The Nikon AF-S 50mm f/1.8G (~$220) and Sony FE 50mm f/1.8 (~$200) offer the same performance for their respective systems. Vintage options like the Helios 44-2 (~$40–$60 used) offer a creative alternative for mirrorless shooters willing to use manual focus.
Build Your Kit, Take Your Photos
For beginner photographers, the path to pro-level results doesn’t run through a $2,000 camera body — it runs through a $125 prime lens on a $180 used camera body. The Lens-First Rule is the single most impactful framework for building a capable photography kit on any budget, and it’s supported by both optical physics and the collective wisdom of photography communities worldwide. A solid beginner kit costs $400–$500 when you prioritize lens quality over body specs, buy used from trusted dealers like KEH and MPB, and resist the pull of gear acquisition syndrome.
The Lens-First Rule isn’t just a spending framework — it’s a mindset shift. When you understand that your lens determines your image quality more than any other variable, every future gear decision becomes clearer: upgrade your lens first, then your body, then your accessories. This sequence has helped thousands of beginners go from disappointed kit-camera users to photographers genuinely proud of their work.
Start with the $500 kit outlined in this guide. Shoot with it every day for three months. Learn your light, learn your composition, learn your exposure triangle (aperture, shutter speed, and ISO — the three controls that determine how your camera captures light). Then, and only then, identify the one piece of gear that’s actually holding you back. Chances are, it won’t be your camera body. For more specific gear comparisons and updated pricing, explore top budget photography gear at amateurphotographerguide.com.
Last update on 2026-06-30 / Affiliate links / Images from Amazon Product Advertising API
