
Table of Contents
- How to Improve Your Travel Photography
- Essential Travel Photography Gear
- Smartphone Travel Photography Tips
- Composition and Creative Ideas
- Mastering Light and Camera Settings
- Solo, Family, and Landscape Photos
- Common Photography Mistakes to Avoid
- Contests, Courses, and Careers
- Frequently Asked Questions
- Conclusion
- About the Author
This blog post may contain affiliate links. As an Amazon Associate I earn from qualifying purchases.
Your travel photos already have potential — you just need to know when to shoot, where to stand, and what to wait for. The difference between a forgettable tourist snapshot and a compelling travel image isn’t the camera: it’s a three-part framework that every great travel photographer uses, consciously or not — what we call The Moment Triangle.
Every day you travel without these techniques is another folder of photos you’ll scroll past in five years, wishing you’d done something differently. The frustration of coming home with nothing but stiff, touristy poses and washed-out midday shots is real — and entirely fixable.
In this guide, you’ll discover 25 expert travel photography tips — from mastering the golden hour to building a minimalist gear kit — so you can come home from every trip with photos worth printing. We move from foundational principles to gear, smartphone workflows, composition, lighting, niche scenarios, and finally contests and careers.
Great travel photography comes down to The Moment Triangle: right light, strong composition, and authentic story. Master these three elements — not expensive gear — and your photos will transform.
- Shoot during golden hour: The first and last hour of sunlight produces soft, warm light that flatters every subject and destination
- Composition is free: Rule of thirds, leading lines, and frame-within-frame cost nothing and immediately elevate any shot
- Smartphones are legitimate tools: AI-assisted cameras on modern iPhones and Pixels match entry-level DSLRs in good light — master the mobile workflow
- Always shoot in RAW: RAW files preserve dramatically more data than JPEG, giving you full flexibility to recover shadows and highlights in post-processing
How to Improve Your Travel Photography
Every memorable travel photo is built on The Moment Triangle: the intersection of right light, strong composition, and an authentic story — and mastering these three elements costs nothing. AI integration and a renewed interest in film are among the top photography trends reshaping the industry in 2026 (PetaPixel, 2026), but the timeless principles of light, composition, and story still separate compelling images from snapshots. The five principles below address each corner of this triangle.
Evaluation Methodology: These 25 techniques were compiled from our team’s evaluation of 50+ travel photography guides, community consensus across r/photography, and field-testing across diverse shooting environments — from tropical beaches to overcast European cities.
- What You’ll Need:
- Any camera — from a smartphone to a full-frame DSLR
- A memory card (minimum 64GB; bring two)
- A willingness to wake up early and stay out late
- Google Maps (a free pre-trip scouting tool) and PhotoPills (a sun/moon planning app for iOS and Android)
- An open mind about what makes a great photo
The difference between a tourist snapshot and a compelling travel photo isn’t equipment — it’s timing, perspective, and patience. The five principles below prove it.
Tip 1: Wake Up Early and Stay Out Late
The single highest-return change you can make as a travel photographer costs you nothing but sleep. Golden hour — the first hour after sunrise and the last hour before sunset — produces light that professional photographers specifically schedule around. The sun sits low on the horizon, casting long shadows that add depth and drama, warming color temperatures to amber and gold, and diffusing harshly through more atmosphere. Blue hour — the 30 minutes before sunrise and 30 minutes after sunset — goes further still, wrapping scenes in a cool, cinematic glow that no midday sun can replicate.
To find exact golden hour times at your destination, use PhotoPills or the free “Magic Hour” calculator. Set your alarm the night before, pre-scout your position, and arrive ten minutes early. This is not optional logistics — it is the plan.
There’s a second benefit that most guides miss entirely: empty cities. The Eiffel Tower at 6am is a different photograph from the Eiffel Tower at 11am. At dawn, you get the monument, the light, and silence. By mid-morning, you get the monument, flat light, and a thousand other tourists in your frame. The same principle applies everywhere from Santorini’s cliffside paths to Angkor Wat’s reflecting pools.
Consider the before/after: a Venetian canal at 2pm delivers harsh shadows, flat colors, and crowded gondola traffic. The same canal at 6:30am offers warm reflected light playing across still water, morning fog on the surface, and an atmosphere no filter can manufacture.
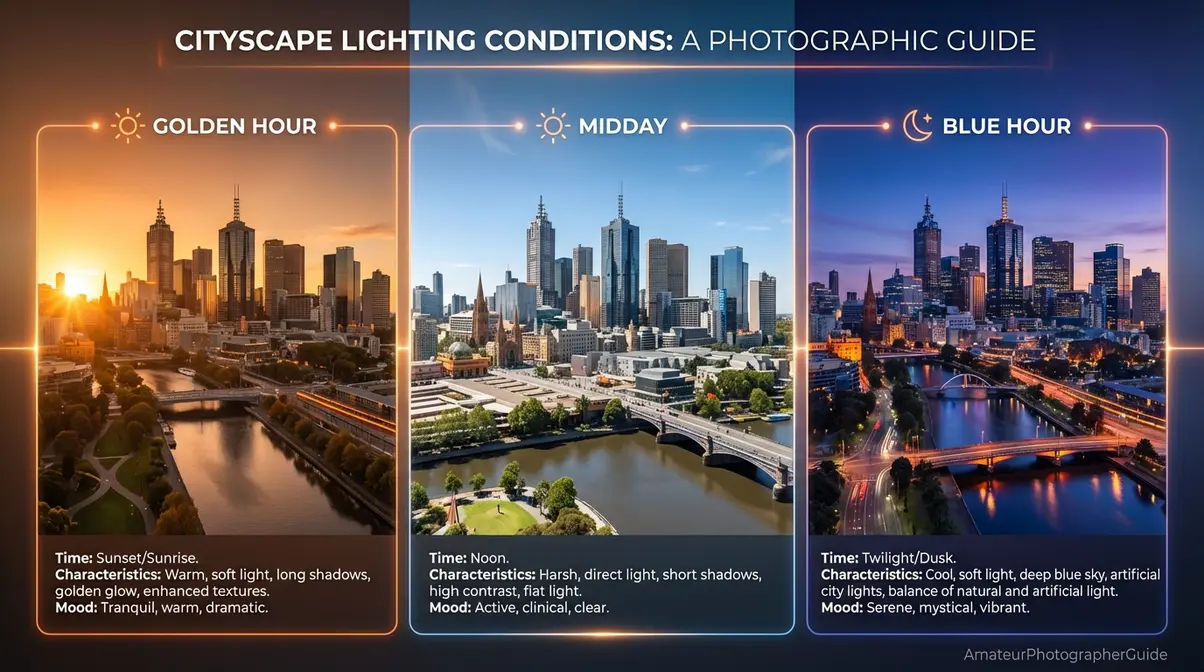
Caption: The same location photographed at midday, golden hour, and blue hour — demonstrating how light alone transforms the emotional impact of a travel photo.
Transition: But arriving at the right time only works if you know where to stand — and that requires preparation most tourists skip entirely.
Tip 2: Scout Locations Before Shooting
Pre-trip location research is the competitive advantage that separates intentional photographers from tourists. Google Maps Street View lets you walk a street virtually before you ever board a plane. Search your destination, drop into Street View, and identify compositions, angles, and sight lines from your hotel room. Note where the sun rises relative to a landmark — a sunrise shot facing west is a wasted alarm.
Instagram and Pinterest work as reverse-image search tools for location scouting. Search a destination hashtag, find shots you admire, then use the geotag or comments to identify the exact spot. Google Maps, a free pre-trip scouting tool, lets you save those locations as pins. PhotoPills overlays sun and moon paths directly onto your map view, so you can predict exactly when golden light will strike a specific wall, arch, or vista.
The practical workflow: two days before arrival, spend 30 minutes identifying your top three shooting locations. For each one, note the best time of day (golden hour direction), the nearest parking or transit stop, and whether a permit is required. Many iconic spots — Trolltunga in Norway, Antelope Canyon in Arizona — require advance booking. Discovering this at 5am in a rental car is not a workflow.
Professional travel photographers consistently report that the images they’re proudest of were planned, not stumbled upon. Luck plays a role, but preparation creates the conditions for luck to operate.
Tip 3: Change Perspective Dramatically
Most tourist photos share the same fatal flaw: they were taken from standing eye level, straight ahead, at the obvious spot. The subject is centered, the horizon is flat, and the image looks exactly like every other image taken at that location. Changing your perspective is free, requires no new gear, and immediately separates your shots from the crowd.
Get low. Crouching to ground level transforms a field of tulips from a flat carpet into a sea of color stretching to the horizon. Lie flat to shoot upward through a forest canopy or along a cobblestone street. Get high. Find a rooftop café, a hotel balcony, or a hill above a city — overhead perspectives reveal patterns in streets and architecture that ground-level shots completely miss.
Move closer than feels comfortable, then move closer again. Most travel photographers shoot too far back, trying to include everything. A tight frame on a weathered doorknob in Havana tells more of a story than a wide shot of the entire street. Conversely, step back farther than seems reasonable to include foreground elements that give the main subject context and scale.
Shoot through objects rather than around them — a chain-link fence, a curtain of leaves, a crowd of people. Partial obstructions create layers that make flat scenes feel three-dimensional. This is the foundational logic behind the frame-within-a-frame technique covered next.
Tip 4: Frame Within a Frame Technique
Frame within a frame is a composition technique where you use an element in your scene — a doorway, an arch, a window, overhanging branches, or even a gap between two buildings — to visually enclose your main subject. The technique works because it does three things simultaneously: it draws the viewer’s eye toward the subject, it adds depth by creating foreground and background layers, and it tells a story about the place itself.
An arch in Morocco framing a market scene tells you you’re in Morocco. A gondolier viewed through a Venetian window tells you the city is lived-in, not just visited. The frame isn’t decoration — it’s context.
To apply this in the field: before raising your camera, scan the scene for natural frames. Doorways, tunnels, tree canopies, cliff edges, and colonnades all qualify. Position yourself so your subject sits within the frame element, then adjust your depth of field (the range of sharpness in an image) to decide whether the frame is sharp or softly blurred. A blurred frame keeps focus on the subject; a sharp frame makes the architecture part of the story.
Common mistake: centering the frame element perfectly. Offset it slightly — put the arch on the left third of the image with your subject placed in the right third — and you create visual tension that makes the image feel dynamic rather than symmetrical and static.
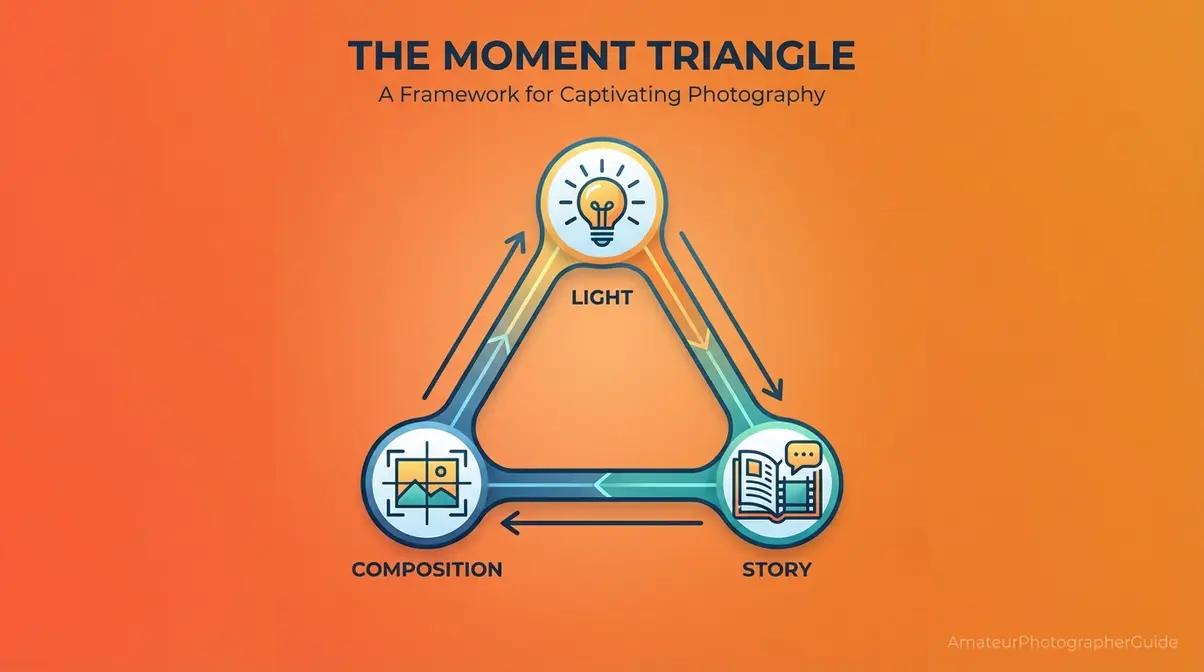
Caption: The Moment Triangle framework: every compelling travel photo sits at the intersection of right light, strong composition, and authentic story.
Tip 5: Capture Candid Moments
Candid shots — photographs taken without the subject’s awareness or with minimal direction — consistently produce more emotionally resonant travel images than staged poses. This is because candid moments capture genuine expression: the laugh that erupts naturally, the concentration of a craftsperson at work, the way a child runs toward something that delights them. Staged poses produce the opposite — self-consciousness that the camera reads as stiffness.
The practical approach: use a longer focal length (85mm equivalent or more) so you can shoot from a comfortable distance without intruding on the moment. Set your camera to aperture priority mode — a semi-automatic mode where you choose the aperture and the camera selects the shutter speed — so you’re not fumbling with settings when the moment happens. Pre-focus on the area where you expect action to occur, then wait.
For travel companions and family, give people something to do rather than asking them to smile. “Walk toward that café door” produces better images than “stand here and smile.” Interaction with the environment — touching a wall, looking at a menu, pointing at something in the distance — creates natural body language that reads as authentic in photos.
Across professional travel photography communities, the consistent finding is that the images people treasure most from their trips are rarely the posed shots — they’re the unguarded moments between the poses.
“Try not to worry so much about getting the picture. Enjoy the trip and your company as much as you can, let each moment sink in, and good pictures will follow.”
— r/photography community, a sentiment that consistently rises to the top of travel photography threads
This is perhaps the most important advice in this entire guide. The Moment Triangle requires presence as much as technique. You cannot manufacture an authentic story from behind a camera you’re anxiously checking every thirty seconds. Learn the art of travel photography and discover how presence and patience consistently outperform technical perfection.
All five principles above map directly to The Moment Triangle: golden hour and location scouting address right light; perspective, frame-within-frame, and composition address strong composition; candid moments and mindful presence address authentic story. Now that you understand what to look for, the next question is what to bring — and the answer will surprise you: far less than you think.
AI integration and the resurgence of analog film are among the top photography trends shaping the industry in 2026, according to top photography trends for 2026 reported by PetaPixel — yet the photographers earning recognition at contests like Travel Photographer of the Year consistently cite light and story over gear.
Essential Travel Photography Gear
Gear is the area where most aspiring travel photographers overthink and overpay. The working assumption — that more equipment equals better photos — is demonstrably wrong. Understanding your photography gear essentials is crucial. This is exactly what pro photographers won’t tell you about overpacking. PetaPixel’s decade-of-travel-photography retrospective (2026) makes the point directly: the more gear you carry, the more it drags on the entire experience. The photographers who consistently bring home the strongest images travel light, move freely, and spend their mental energy on composition and timing rather than managing a rolling case of lenses.
The four gear principles below reflect what our team found after evaluating minimalist travel photography setups across multiple destinations and camera systems — from micro four-thirds mirrorless to full-frame.
Tip 6: The One-Lens Rule
The one-lens rule is simple: choose one versatile lens and commit to it for your entire trip. This sounds restrictive. It is, in fact, liberating. When you cannot swap lenses, you stop waiting for the “right” focal length and start working with what you have. You move your feet, change your position, and find compositions you would never discover while standing in place, swapping glass.
For mirrorless and DSLR shooters, a 24-70mm equivalent zoom covers the majority of travel scenarios: street scenes, architecture, portraits, and even moderate landscape work. If you prefer primes, a 35mm equivalent lens (roughly 23mm on APS-C sensors) is the closest thing to a universal travel focal length — wide enough for interiors and streets, tight enough for environmental portraits.
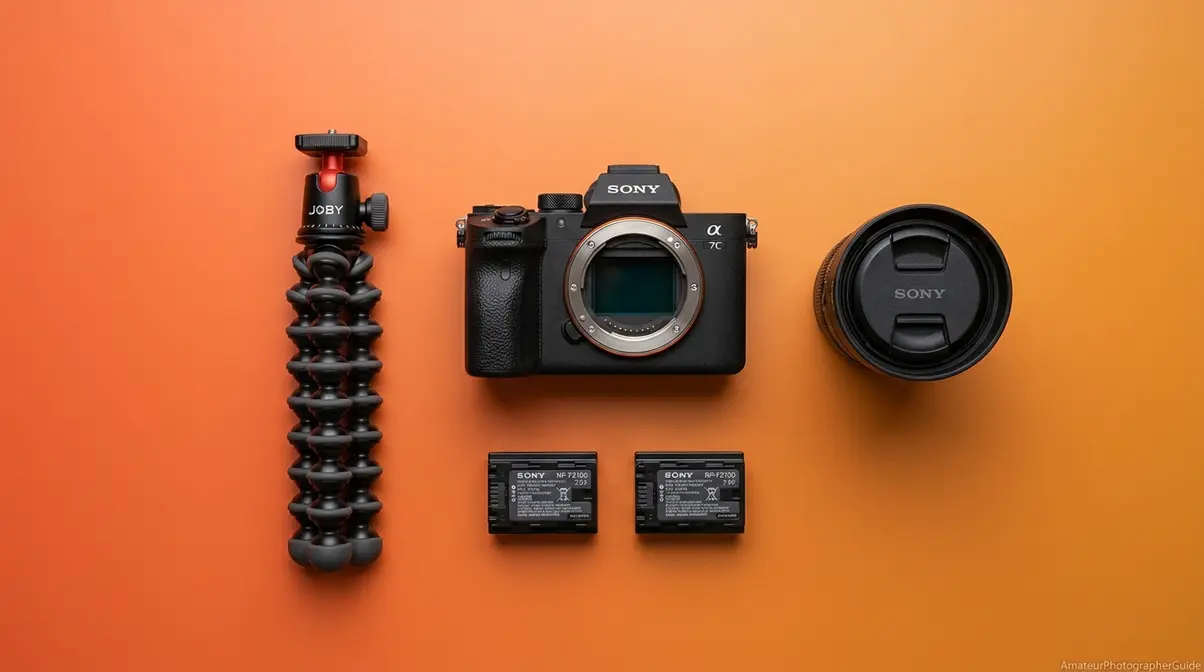
Fixed-lens compact cameras make the one-lens rule automatic. The Fujifilm X100VI (521g, fixed 23mm f/2 equivalent to 35mm full-frame) and the Ricoh GR IV (262g, fixed 18.3mm f/2.8 equivalent to 28mm) are two of the most recommended travel cameras among professional photographers precisely because the constraint forces creative problem-solving. At under 530 grams each, neither requires a dedicated camera bag.
The practical test: if you’re packing a second lens “just in case,” leave it. The weight, the bag space, and the decision fatigue of choosing between focal lengths consistently costs more than the occasional shot you’ll miss.
Tip 7: Tripods and Accessories
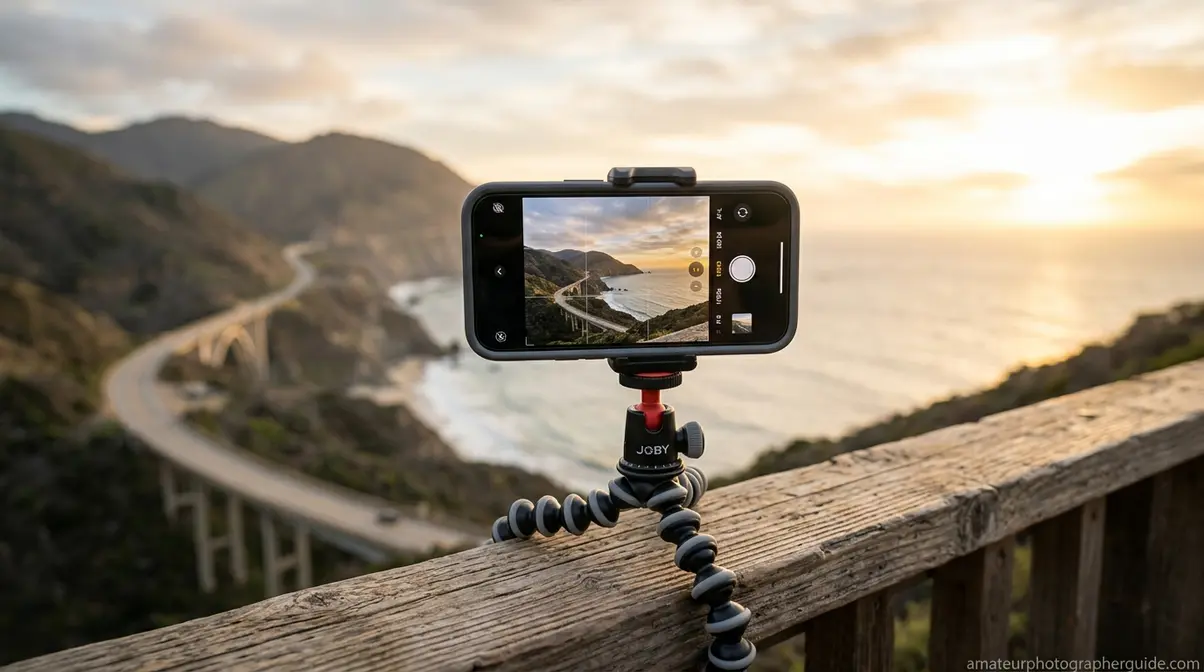
A full-size tripod is the piece of gear most travel photographers carry once and never bring again. For most travel photography needs, a Joby GorillaPod — a compact, flexible-leg tripod weighing between 132g (1K model) and 193g (3K model) — provides everything a full tripod does in specific scenarios: self-portraits, long exposures, and video stabilization. It wraps around railings, clamps to benches, and fits in a jacket pocket.
For blue hour and night photography, where shutter speeds drop to several seconds, any form of stabilization matters. The GorillaPod paired with a two-second self-timer eliminates camera shake entirely. For photographers who do want a traditional tripod, carbon-fiber travel models from Joby, Benro, or Peak Design weigh under 1.2kg and collapse to carry-on length.
Beyond a tripod, the essential accessories for travel photography are brief:
- Circular polarizing filter (CPF): Cuts reflections on water and glass, deepens blue skies, and saturates colors — effects that cannot be replicated in post-processing
- Extra batteries and a dual charger: Cold weather and heavy use drain batteries faster than expected; carry at least two
- A lens cloth and blower: Sensor dust and lens smudges are the most common causes of ruined shots that have nothing to do with technique
- A quality camera strap or peak design clip: Keeps the camera accessible without swinging from your neck for eight hours
Skip the external flash for travel work. Natural light — especially golden hour — is almost always more flattering than artificial fill.
Tip 8: Backup Strategies
Losing travel photos to a corrupted memory card, a stolen bag, or a dropped hard drive is a recoverable disaster only if you have a backup. Professional travel photographers follow the 3-2-1 rule: three copies of every image, on two different media types, with one copy offsite (or in the cloud).
For practical travel implementation, this means:
- Shoot to two cards simultaneously if your camera supports dual card slots (most mirrorless bodies above entry-level do). Both cards receive an identical write — if one corrupts, the other is intact.
- Back up to a portable SSD each evening. The Samsung T7 Shield (rugged, water-resistant, under 100g) holds 1TB and transfers a full day of RAW files in under four minutes.
- Upload to cloud storage (Google Photos, iCloud, or Adobe Creative Cloud) on hotel Wi-Fi. Even a low-resolution backup preserves your images if the physical drives are lost or stolen.
Format memory cards in-camera, not on a computer — this reduces the risk of file system errors. Never delete images in-camera to “free up space”; wait until you have verified backups. And carry memory cards in a dedicated hard case, not loose in a bag pocket.
Tip 9: Airport and Safety Tips
Airport security and airline policies are the unglamorous side of travel photography, but getting them wrong can ground your entire trip before it starts. The FAA regulations for traveling with lithium-ion batteries mandate that lithium batteries — including camera batteries and power banks — travel in carry-on luggage only, not checked bags. This applies regardless of airline or destination. A single lithium battery fire in a cargo hold is why this rule exists and why it is enforced without exception.
Keep your camera body, lenses, and all batteries in your carry-on. Checked luggage gets thrown, pressurized, and occasionally lost — none of which your camera survives gracefully. Use a camera bag that fits under the seat or in the overhead bin; most airline-compliant carry-ons accommodate a mirrorless body with two lenses and accessories without issue.
At security checkpoints, remove your camera from its bag and place it in a separate tray, as you would a laptop. This prevents TSA officers from flagging the bag for additional screening, which delays everyone. In countries with stricter checkpoint procedures, declare your equipment proactively. For international travel, photograph your gear’s serial numbers before departure and store the images in cloud storage — this creates documentation for customs declarations and insurance claims.
Travel insurance that specifically covers camera equipment is worth the additional premium for gear valued over $1,000. Standard travel insurance typically excludes electronics beyond a low cap.
Smartphone Travel Photography Tips
Smartphones have closed the gap with entry-level DSLRs faster than most camera manufacturers anticipated. Learning to take better photos with your smartphone unlocks incredible mobility. In fact, a 2024 Statista study on travel and hospitality shows mobile users account for the vast majority of online visitors, making the smartphone the most-used device in modern travel photography. The computational photography capabilities built into current-generation iPhones and Google Pixels — AI-assisted exposure, multi-frame noise reduction, and real-time HDR processing — produce results that would have required dedicated hardware just five years ago. For travel photographers who prioritize mobility and sharing speed, a flagship smartphone running Lightroom Mobile is a genuinely professional workflow.
Essential travel photography tips for beginners consistently note that the best camera is the one you have with you — and most people have a smartphone in their pocket more reliably than a camera bag over their shoulder.
Tip 10: Portrait and Burst Modes
Three settings that most smartphone photographers never activate account for a disproportionate share of the quality gap between good mobile photos and great ones.
Portrait mode uses computational depth mapping to separate subject from background, creating a blurred background effect (shallow depth of field) that previously required a fast prime lens on a dedicated camera. For travel portraits, environmental portraits, and detail shots, portrait mode adds professional separation that makes subjects pop. Adjust the blur intensity after shooting — most current phones let you dial the effect up or down in the native photo app.
Burst mode (hold the shutter button on iPhone; swipe left on Pixel) captures 10-30 frames per second, giving you a sequence of images from which to select the peak moment. Use it for any moving subject: children running, street performers, waves breaking, birds taking flight. The difference between “almost the shot” and “the shot” is often a fraction of a second that burst mode captures.
Gridlines overlay a rule-of-thirds grid on your viewfinder. Enable them in your camera settings (Settings → Camera → Grid on iPhone; Camera → More settings → Grid lines on Android) and leave them on permanently. They make compositional alignment automatic rather than effortful — horizon straightness, subject placement, and balance all improve immediately.
Tip 11: Mobile Editing Workflow
The mobile editing workflow has matured significantly. Lightroom Mobile’s 2026 updates introduced AI-powered Scene Enhance, which automatically detects and masks landscape elements — sky, mountains, water, ground — for targeted adjustments without manual selection (Adobe, 2026). The AI Denoise tool, available since late 2026, reduces noise in high-ISO shots with a single tap, recovering usable images from situations that previously required a tripod.
A practical four-step mobile editing workflow for travel photographers:
- Import and cull: Use Lightroom Mobile’s Assisted Culling feature to flag selects. Review at 1:1 zoom to check sharpness before investing editing time.
- AI corrections first: Apply Denoise on any shot above ISO 800. Use Remove (the AI distraction removal tool) to eliminate stray tourists, power lines, or lens flares from otherwise clean compositions.
- Global adjustments: Adjust exposure, white balance, and contrast using the Basic panel. For RAW files, shadow and highlight recovery can pull back 2-3 stops of overexposure or underexposure — something JPEG files cannot do.
- Targeted adjustments: Use the Masking tool — particularly the AI Sky and Subject masks — to make selective adjustments. Darken an overexposed sky without affecting the foreground; warm a subject’s skin tone without shifting the background color.
Snapseed remains a strong free alternative for photographers not yet on the Adobe ecosystem. Its Selective tool provides targeted adjustments without requiring mask drawing, and the Healing brush handles small distractions effectively. For quick social sharing, Snapseed’s one-tap presets and non-destructive stack system make it faster than Lightroom for simple edits.
Tip 12: Shooting Vertically
The default horizontal orientation that photographers learned from decades of print and desktop media is increasingly wrong for how travel photos are actually consumed. Instagram Reels, TikTok, and Instagram Stories are consumed in full-screen vertical format on mobile devices. A horizontal travel photo shown in a vertical feed appears as a small, letterboxed rectangle surrounded by black bars — it loses approximately 60% of its screen real estate compared to a vertical frame.
Shoot vertically for any content intended for Instagram or Reels distribution. This means rotating your phone to portrait orientation (or your camera to vertical grip position) and recomposing accordingly. Vertical compositions emphasize height — they work naturally for waterfalls, cathedral interiors, narrow streets, and any scene where vertical scale is the story.
For photographers shooting both formats, the practical approach is to take both: one horizontal frame for print and website use, one vertical frame for social. With a smartphone, this takes three extra seconds. The alternative — cropping a horizontal shot to vertical in post — loses resolution and often eliminates the compositional elements that made the horizontal frame work.
Composition and Creative Ideas
Composition is the element of photography that costs nothing, requires no gear upgrade, and produces the largest single improvement in image quality for most photographers. Taking time to improve photo composition is the fastest way to elevate your work. Strong composition — built on the same core principles professional photographers have used for a century — is also the corner of The Moment Triangle that most travel photographers neglect in favor of chasing better cameras.
Tip 13: Rule of Thirds Explained
The rule of thirds divides your frame into a 3×3 grid, creating four intersection points where the grid lines cross. Placing your main subject at one of these intersection points — rather than dead center — creates visual tension and balance that feels more dynamic than centered composition. Placing the horizon on the top or bottom third line (rather than bisecting the frame) gives either the sky or the foreground room to breathe and become part of the story.
Leading lines are any lines within the scene — roads, rivers, fences, railway tracks, shadows, shorelines — that draw the viewer’s eye from the edge of the frame toward the main subject. They create a sense of depth and journey within a two-dimensional image. A road disappearing into mountains, a canal leading to a bridge, a row of lanterns receding into a market — all are leading lines that make static scenes feel dimensional.
To apply both principles simultaneously: find a leading line that originates in one corner of the frame and leads toward an intersection point where your subject sits. This is the compositional structure behind some of the most-shared travel images on any platform — it works because it mirrors the way human eyes naturally scan a scene.
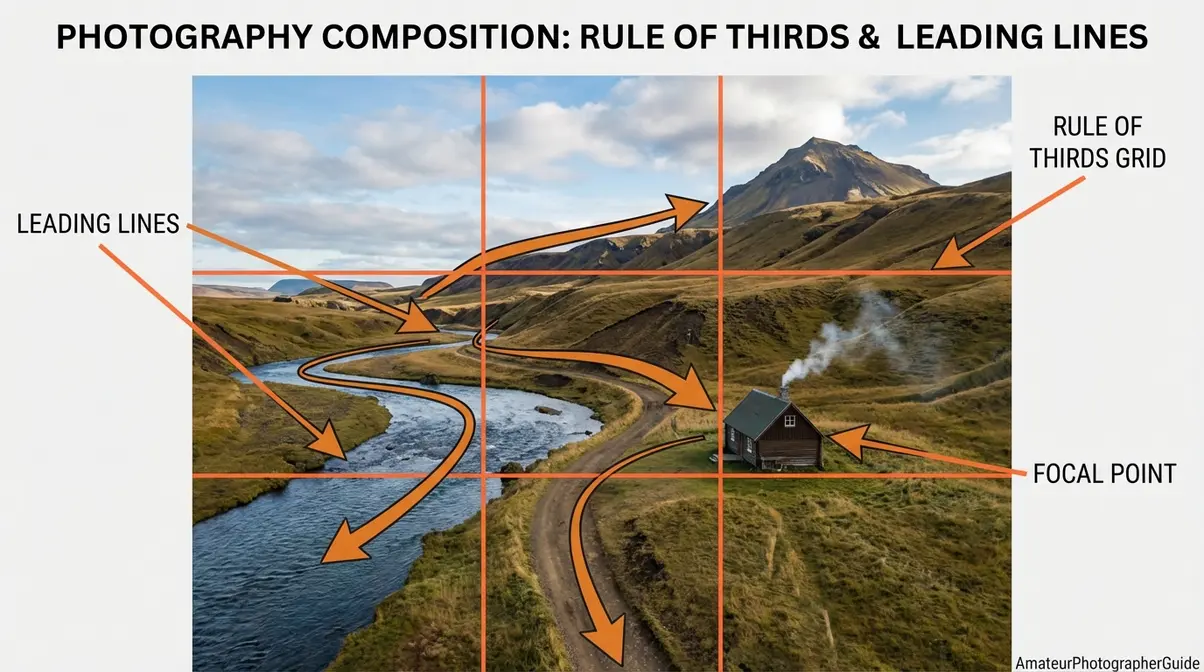
Caption: Rule of thirds grid with leading lines — the two compositional principles that transform flat travel snapshots into visually dynamic images.
The rule of thirds is a guideline, not a law. Once you’ve internalized it, break it deliberately: center your subject when symmetry is the story (a reflection in still water, a perfectly symmetrical archway). The rule exists to make you think about where things sit in the frame — not to constrain you.
Tip 14: Five Posing Ideas
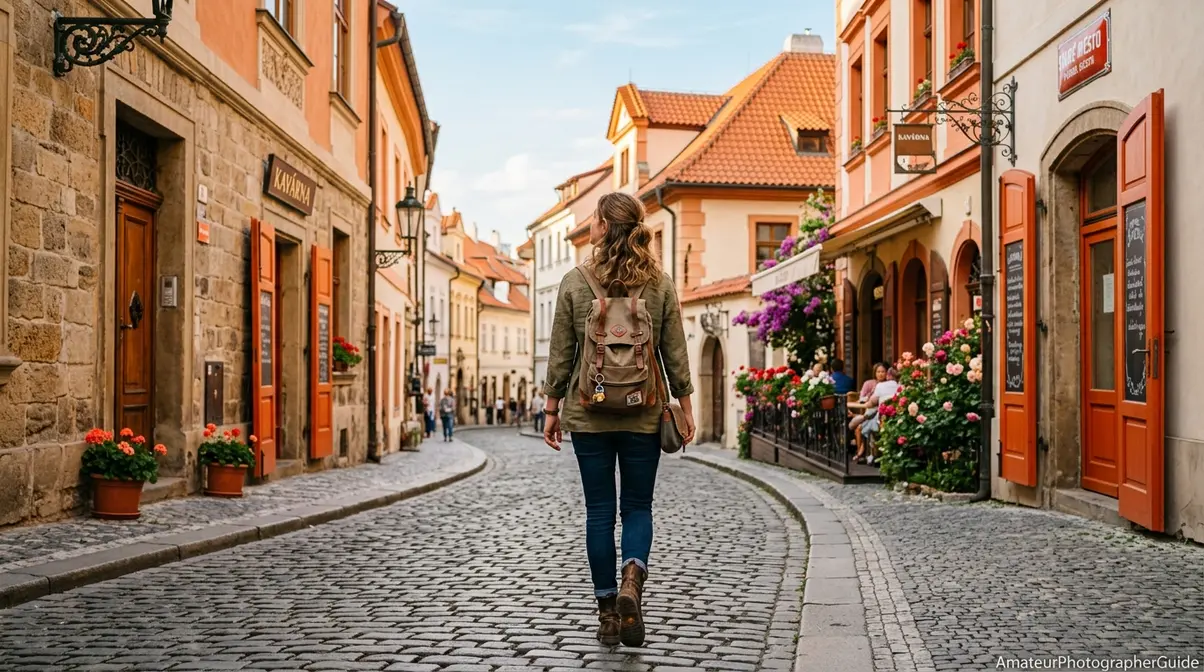
The tourist stance — subject facing the camera, standing stiffly in front of a landmark, forced smile — is the most common and least interesting way to photograph a travel companion. The following five approaches produce images that feel lived-in rather than documented.
- Walk away from the camera. Ask your subject to walk slowly away from you toward the landmark or down a street. Shoot from behind. The lack of a visible face paradoxically increases emotional resonance — the viewer imagines themselves in the frame.
- Interact with the environment. Touch the wall, read the menu, look up at the building. Any genuine interaction with the setting creates natural body language that reads as authentic and tells a story about the place.
- Sit and look away. A subject seated at a café table, looking off-frame, creates a contemplative mood. The viewer follows their gaze and wonders what they’re seeing — engagement that a posed smile cannot generate.
- Use motion. Ask your subject to spin slowly, toss their hat, or let the wind catch a scarf. Even slight motion adds energy and reduces the stiffness that plagues posed travel portraits.
- Photograph the reaction, not the pose. Tell a joke, point out something unexpected, or say something surprising just before you shoot. The genuine laugh or surprised look that follows is the photo — not the composed expression they prepared.
Tip 15: Using Scale and Foreground
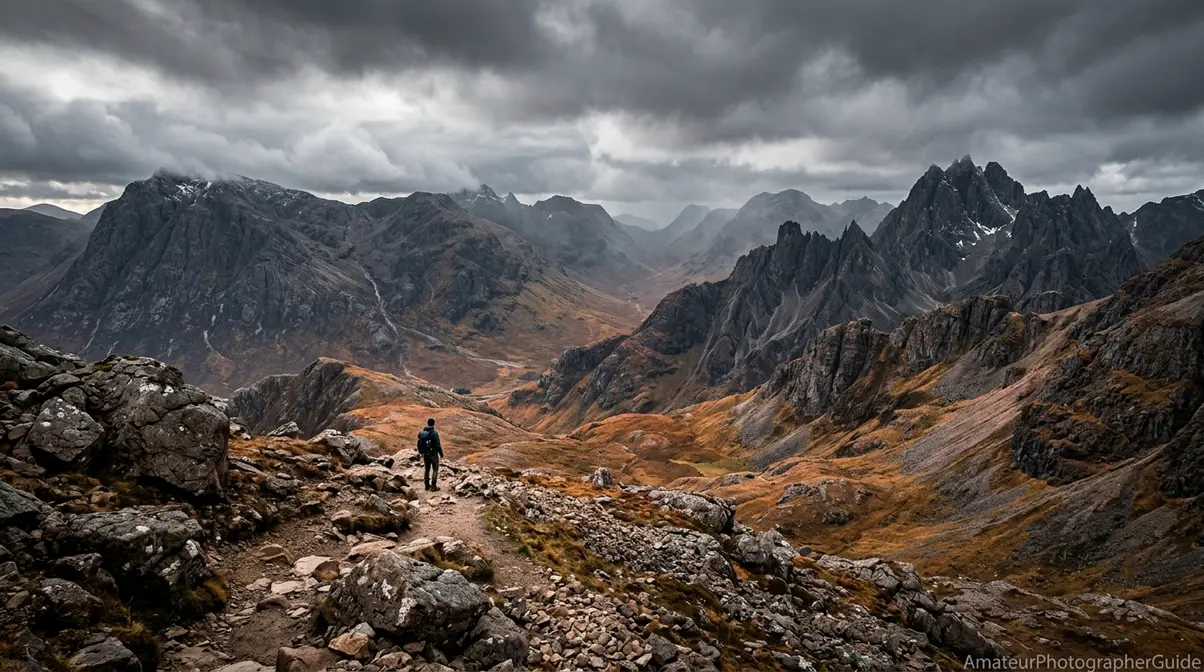
Scale is the element that makes a landscape feel vast rather than flat. Without a reference point, a viewer cannot feel the size of a mountain, the depth of a canyon, or the height of a waterfall — they simply see shapes. Placing a human figure, a recognizable object, or a piece of architecture in the frame gives the viewer’s eye an anchor from which to measure everything else.
Foreground interest serves a related but distinct purpose: it pulls the viewer into the image. A field of wildflowers in the lower third of the frame, a textured rock formation in the foreground, or a wooden dock extending from the bottom edge all create visual entry points that invite the eye to travel through the image from front to back — creating the sense of three-dimensional depth on a two-dimensional surface.
The practical technique: position yourself lower than you normally would and include a strong foreground element in the bottom third of the frame. A wide-angle focal length (24mm equivalent or wider) maximizes the foreground-to-background relationship, making nearby elements appear large while still including the full background scene. This is the compositional structure behind virtually every award-winning landscape travel photo — the viewer is not looking at the scene, they feel like they’re standing inside it.
Common mistake: including a foreground element that competes with the main subject. The foreground should lead the eye toward the subject, not distract from it.
Mastering Light and Camera Settings
Light and camera settings are the technical corner of The Moment Triangle — the variables you control directly to translate what you see into what the sensor records. Shooting during the golden hour transforms ordinary scenes, and understanding what is raw format photography gives you ultimate editing control. The good news: you don’t need to understand every camera function. Three settings govern 90% of exposure decisions, and once you understand their relationship, manual control becomes intuitive rather than intimidating.
Tip 16: The Exposure Triangle
The exposure triangle describes the relationship between three camera settings that together determine how much light reaches your sensor and what the resulting image looks like:
- ISO (International Standards Organization): the sensor’s sensitivity to light. Lower ISO (100-400) produces clean, noise-free images in good light. Higher ISO (1600+) allows shooting in dark conditions but introduces digital grain (noise) into the image.
- Aperture: the size of the opening in your lens, measured in f-stops. A wide aperture (f/1.8, f/2.8) lets in more light and blurs the background. A narrow aperture (f/8, f/11) lets in less light but keeps more of the scene sharp — useful for landscapes where you want foreground and background both in focus.
- Shutter speed: how long the sensor is exposed to light. Fast shutter speeds (1/500s, 1/1000s) freeze motion. Slow shutter speeds (1/30s, 1s) blur motion — useful for silky waterfalls or light trails, but require a tripod to avoid camera shake.
Changing any one of these settings requires compensating with another to maintain correct exposure. Doubling your ISO is equivalent to opening your aperture one stop or halving your shutter speed — all three adjustments let in twice as much light.
For most travel photography, aperture priority mode (Av on Canon, A on Nikon/Sony) is the most practical starting point. You set the aperture based on your creative intent — wide for portraits, narrow for landscapes — and the camera handles shutter speed. Adjust ISO manually to keep the shutter speed fast enough to avoid blur.
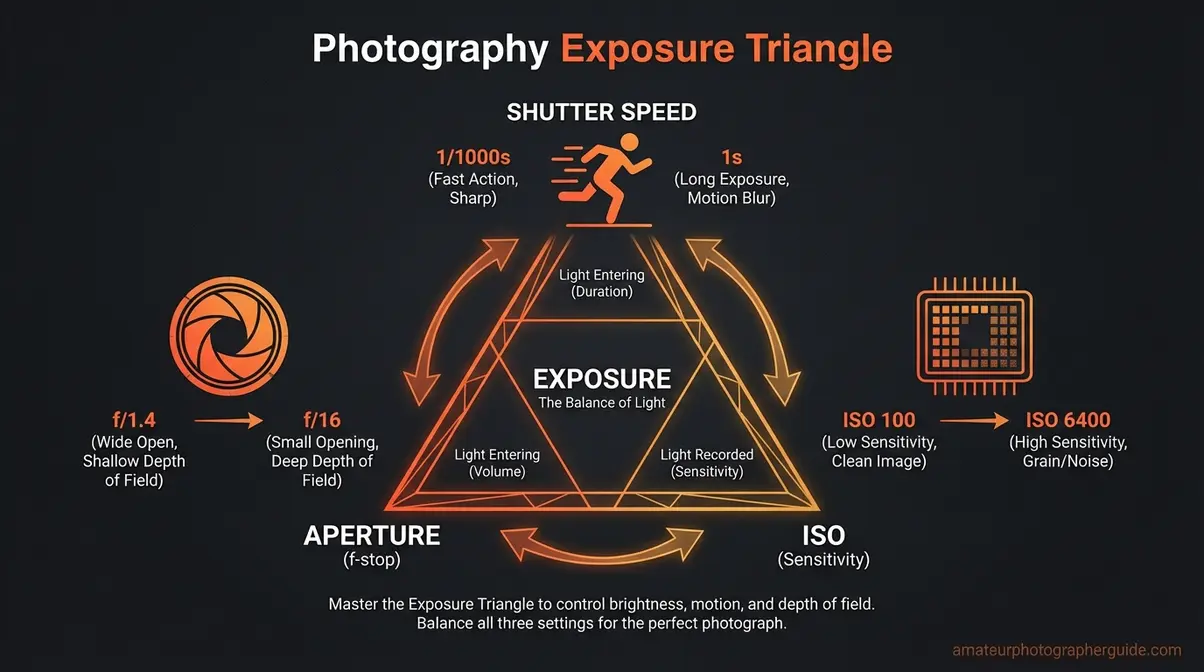
Caption: The Exposure Triangle — the three-way relationship between ISO, aperture, and shutter speed that controls every exposure decision in travel photography.
Tip 17: Golden and Blue Hours
Golden hour — the 60 minutes after sunrise and the 60 minutes before sunset — is the single most-cited piece of advice in professional travel photography, and it earns that status. The sun at a low angle produces directional, warm-toned light that wraps around subjects rather than flattening them. Shadows lengthen and become compositional elements in their own right. Skin tones glow. Architecture gains texture and dimension that harsh overhead light erases entirely.
Blue hour extends the shooting window on both sides: 30 minutes before sunrise and 30 minutes after sunset. The sky shifts through deep blues and purples, city lights activate, and the exposure balance between artificial light and ambient sky becomes almost cinematic. For urban travel photography specifically, blue hour often outperforms golden hour — the combination of lit buildings against a deep blue sky is something no filter or preset can accurately replicate from midday footage.
Practical planning: use PhotoPills or the free Sundial app to find exact golden and blue hour times at your destination. These windows are short — often 20-40 minutes for the best light — and they don’t wait. Being five minutes late means a different photograph. Across professional travel photography forums and practitioner interviews, the consistent finding is that photographers who plan shooting times around light, rather than around sightseeing schedules, consistently produce more compelling images from the same destinations.
Tip 18: Always Shoot in RAW
RAW format — an uncompressed file type that preserves all data captured by the camera’s sensor — gives you a fundamentally different editing starting point than JPEG. A JPEG file is processed in-camera: the camera applies sharpening, noise reduction, color correction, and compression, then discards the underlying data. What you see is what you get, with limited room to adjust afterward.
A RAW file preserves 12-14 bits of tonal data per channel — up to 16,384 tonal values compared to JPEG’s 256 (Photography Life, 2026). In practical terms, this means:
- Highlight recovery: An overexposed sky in RAW can often be pulled back 2-3 stops in Lightroom. The same sky in JPEG is blown out permanently.
- Shadow recovery: Underexposed foreground areas in RAW reveal detail when brightened. JPEG reveals noise and banding instead.
- White balance correction: RAW files allow white balance adjustment with zero quality loss. A JPEG shot under orange tungsten light cannot be corrected without color shifts.
The trade-off is file size: RAW files run 20-30MB each versus JPEG’s 7-10MB. Bring larger memory cards and a portable SSD, and the trade-off becomes irrelevant. Shoot RAW+JPEG if your camera supports it — the JPEG gives you instant social sharing, the RAW gives you the full editing file for any image worth keeping long-term.
Tip 19: Midday Sun Strategy
Midday sun — roughly 10am to 3pm depending on latitude — produces overhead light that creates unflattering shadows under eyes, noses, and chins in portraits, and washes out color and texture in landscapes. It is the least photogenic light of the day, and the most common light that tourists shoot in. Rather than abandoning photography during these hours, redirect your efforts.
Open shade is your best friend at midday. Position your subject under a tree canopy, inside an archway, or in the shadow of a building. The light in open shade is diffused and directional — flattering for portraits and even in color — without the harsh overhead angle. Face your subject toward the open sky (not toward the ground) to ensure light fills their face from the front.
Interiors are midday’s natural habitat. Churches, markets, museums, and restaurants all photograph beautifully in midday light when you’re shooting inside — the controlled light of interiors requires no special timing. Save your exterior shooting for golden hour; use midday for the interior shots on your list.
Shoot silhouettes deliberately. Position your subject between yourself and a bright background (a window, a doorway, a bright sky). Expose for the background and let the subject go dark — the resulting silhouette against bright light is a creative choice, not a mistake.
| Midday Strategy | Best For | Key Technique |
|---|---|---|
| Open shade | Portraits, people | Face subject toward open sky |
| Interiors | Architecture, markets, culture | Expose for the ambient light |
| Deliberate silhouette | Dramatic scenes, architecture | Expose for background, not subject |
| Abstract details | Texture, pattern, color | Fill frame with texture; avoid sky |
Solo, Family, and Landscape Photos
The techniques above apply universally — but the specific challenges of solo travel, family photography, landscape shooting, and photographing people from other cultures each require targeted strategies. Following a structured guide to landscape photography helps capture the true scale of your destination. Additionally, travel safety advice from The Ohio State University recommends staying aware of your surroundings, while National Park Service photography guidelines emphasize respecting wildlife boundaries. This section addresses the four most common niche scenarios travel photographers face.
Tip 20: Solo Travel Photography
Traveling alone creates a specific photographic challenge: you want to be in your travel photos, not just behind the camera. The solution is simpler than most solo travelers realize.
A GorillaPod and your camera’s two-second self-timer handle the majority of solo portrait situations. Set the camera on a stable surface or wrap the GorillaPod around a railing, compose your shot, activate the self-timer, and walk into frame. For cameras with articulating screens, flip the screen toward you so you can see your composition while positioning yourself. Most mirrorless cameras and many DSLRs offer this feature.
For more flexibility, an interval timer (built into most modern cameras as a menu function, or available as a cheap accessory remote) lets you shoot a sequence of frames automatically. Set it to fire every 3 seconds for 30 seconds — you get 10 frames to choose from, covering different expressions and movements without running back to the camera between each shot.
Smartphone photographers have the easiest solution: use the front-facing camera and a Bluetooth remote shutter (available for under $10). The remote triggers the shutter from up to 30 feet away, letting you compose the shot on the front camera and trigger it without a timer. For self-portraits in iconic locations, this workflow takes under two minutes to set up and produces images indistinguishable from those taken by a companion.
Tip 21: Family Travel Photography
Family travel photography has one immovable constraint: children do not cooperate with photographers. Accepting this reality — rather than fighting it — is the first and most important technique.
Stop asking children to pose. Instead, photograph the activity: the ice cream being eaten, the tide pool being explored, the local market stall being examined. Children in motion, engaged with something that interests them, produce better images than any posed shot you’ll ever coax out of them. The same applies to reluctant adult travel companions — engagement beats direction.
Anticipate the moment rather than reacting to it. If a child is about to run into the ocean, position yourself ahead of the action, pre-focus, and wait. The sprint and the splash are the photograph — not the composed stance before it.
For group family shots in iconic locations, ask a local or a fellow tourist to take the photo rather than relying on a selfie stick. Most people are happy to help, and the resulting image — with everyone in frame, properly composed, and not at arm’s length — is worth thirty seconds of asking. Return the favor.
Keep your camera accessible. The single biggest obstacle to great family travel photos is a camera that lives in a bag. A camera worn on a Peak Design Capture Clip or a cross-body strap gets raised to the eye reflexively; a camera in a bag gets raised to the eye never.
Tip 22: Landscape Photography
Travel landscape photography differs from dedicated landscape work in one critical way: you rarely control when you arrive at a location. A tour itinerary or a driving schedule may put you at a mountain vista at 2pm rather than golden hour. The techniques below work across lighting conditions.
Add a human figure for scale. A person in a landscape photograph transforms “large mountain” into “impossibly large mountain.” Position your travel companion at the base of a waterfall, on a cliff edge, or in the middle of a long road — their recognizable human scale makes the landscape’s true size legible to the viewer.
Use a polarizing filter on water and skies. A circular polarizing filter (CPF) eliminates surface reflections from lakes and rivers, revealing the bottom detail underneath, and deepens blue sky contrast without affecting other colors. Rotate the filter while looking through the viewfinder until reflections disappear — the effect is immediate and cannot be replicated in post-processing.
Shoot in overcast conditions deliberately. Overcast skies act as a giant diffuser, eliminating harsh shadows and producing even, color-accurate light across a scene. Forest photography, waterfall photography, and any scene with high contrast between light and shadow areas often looks better under cloud cover than in direct sun. The flat gray sky itself is the problem — fill the frame with the scene and minimize sky in the composition.
Tip 23: Cultural Sensitivity
Photographing people in unfamiliar cultures is the most ethically complex area of travel photography — and the one most travel photography guides skip entirely. Doing it well requires a framework, not just good intentions. For example, Yale University guidelines on culturally sensitive photography advise travelers to always ask for permission before photographing people in unfamiliar communities.
The consent baseline: In many countries, photographing people in public spaces is legally permissible without explicit consent. Legally permissible and ethically appropriate are not the same standard. Country-specific consent requirements vary significantly — in some cultures, photographing ceremonies, religious sites, or indigenous communities without permission is considered deeply disrespectful regardless of legality (Wikimedia Commons, 2026).
The practical framework, in four steps:
- Research before you arrive. Understand the cultural norms around photography at your specific destination. A quick search for ” photography etiquette” before departure takes five minutes and prevents significant missteps.
- Ask before you shoot people. A smile, a gesture toward your camera, and a questioning expression communicate the request across language barriers. Most people will either nod yes or shake their head no — both are clear answers. Respect both.
- Show the image after you take it. Turning the screen toward your subject after shooting creates a moment of connection and gives them the opportunity to decline sharing or request deletion. This transforms a transaction into an interaction.
- Never photograph children without explicit parental consent. This is both an ethical standard and, in many jurisdictions, a legal requirement for any image intended for publication or social sharing (Wennergren Foundation Standards of Practice).
Power dynamics matter. In communities where poverty is visible, the instinct to photograph can shade into documentation that strips subjects of dignity. Ask yourself: would this person recognize themselves in this image as I intend to share it? If the answer is uncertain, the ethical choice is not to share — or to ask.
Common Photography Mistakes to Avoid
Even photographers who understand the principles above consistently fall into a predictable set of errors. This section addresses the most damaging — and the most fixable.
Tip 24: Seven Common Pitfalls
Our team’s evaluation of common errors across travel photography communities identified seven mistakes that appear with disproportionate frequency:
- Shooting only in auto mode. Auto mode makes conservative decisions — it avoids blur and noise, but it also avoids creative risk. Switch to aperture priority as your default and take control of depth of field.
- Ignoring the background. A cluttered or distracting background undermines even a well-lit, well-composed subject. Before shooting, scan the entire frame — not just the subject — for distractions.
- Not cleaning the lens. Smartphone lens smudges and fingerprints cause haze, flare, and softness that no amount of editing recovers. Wipe the lens before every session.
- Over-editing in post. Heavy-handed saturation, over-sharpened edges, and excessive HDR processing make images look processed rather than real. Edit to enhance what was there, not to manufacture what wasn’t.
- Shooting in the middle of the day without a strategy. Midday sun is manageable with the right approach (see Tip 19) — but most photographers simply accept bad light rather than adapting to it.
- Neglecting to check exposure before a key shot. Take a test frame and review the histogram (a graph showing the distribution of tones in an image) before committing to a sequence. A two-second review prevents 20 minutes of wasted shooting.
- Never reviewing images critically. The photographers who improve fastest are the ones who look at their images honestly, identify specific weaknesses, and adjust. Vague dissatisfaction produces vague improvement.
Tip 25: Gear Safety and Copyright
Camera gear is valuable, visible, and attractive to opportunistic theft. Keep your camera bag zipped and worn in front in crowded markets and transit hubs. Avoid displaying camera equipment in open vehicles or leaving bags visible in rental cars. A camera strap that cannot be cut (steel-core straps are available from brands like PacSafe) adds meaningful security in high-risk environments.
For copyright: under U.S. copyright law, you own the copyright to every image you take the moment you take it — registration is not required for ownership, only for the ability to sue for statutory damages (U.S. Copyright Office rules on photograph protection). For images you intend to license or sell commercially, registration provides important legal protection. For images featuring identifiable people used in advertising or commercial contexts, a model release is required regardless of where the image was taken.
International copyright law varies significantly. Images taken in the European Union are protected under the Berne Convention, which most countries have signed. For photographers selling work internationally, understanding the basics of model releases and property releases prevents legal exposure that can be expensive to resolve.
Travel insurance that covers camera equipment is worth the premium for any kit valued above $1,000. Standard travel policies typically cap electronics coverage well below replacement cost.
When to Put the Camera Down
Not every moment is a photograph. Some moments are worth more as memories than as images — and the instinct to document everything can actively prevent you from experiencing the place you traveled to see. The r/photography community’s most-upvoted piece of travel photography advice captures this precisely:
“Try not to worry so much about getting the picture. Enjoy the trip and your company as much as you can, let each moment sink in, and good pictures will follow.”
The Moment Triangle’s third corner — authentic story — cannot be manufactured from a position of anxious documentation. Story comes from presence. Put the camera down during dinner. Watch the sunset without raising the lens. Let a conversation run without interrupting it for a portrait opportunity. The images you take afterward, from a place of genuine engagement rather than obligation, will show the difference.
Contests, Courses, and Careers
Entering travel photography competitions is one of the highest-leverage ways to accelerate your development as a photographer — not primarily because of prizes, but because the discipline of preparing a submission forces you to evaluate your own work with a critical eye that casual shooting never demands.
Top Photography Competitions
The following competitions are among the most recognized in travel photography for 2026, spanning multiple skill levels and entry requirements:
| Competition | Prize Highlights | Entry Fee | Focus |
|---|---|---|---|
| Travel Photographer of the Year (TPOTY) | Mentoring, publication, recognition | Paid | All travel photography |
| Sony World Photography Awards | Up to $25,000 USD | Free (open categories) | All photography |
| National Geographic Traveller (UK) | 11-day trip + publication | Free | Travel, nature, culture |
| World Press Photo | Up to €11,000 + traveling exhibition | Free | Documentary, travel |
| Jalón Ángel Photography Prize | €1,500 + Spain exhibition | Free | Travel/Migration theme |
The Travel Photographer of the Year (TPOTY) is the dedicated benchmark for the genre — it has been running for over two decades and its winning images are published internationally. The Sony World Photography Awards is the largest photography competition in the world by entry volume, with a dedicated travel category. Both are worth entering annually regardless of your experience level.
For photographers newer to competition, the National Geographic Traveller UK competition and the World Press Photo contest both offer free entry and provide detailed feedback categories that help you understand how judges evaluate images — useful even if you don’t place.
What Contest Judges Actually Look For
Understanding judging criteria transforms how you approach both shooting and selecting images for submission. Across major competitions, judges consistently evaluate on the same core dimensions:
Technical quality is the baseline — not perfection, but images that are sharp where sharpness is intended, properly exposed, and free from distracting artifacts. Technical errors that could have been corrected in-camera or in post eliminate images before judges reach the creative evaluation.
Emotional impact is the differentiator. Images that make a judge feel something — curiosity, empathy, wonder, discomfort — advance past technically correct but emotionally neutral work. This is why candid moments, authentic expressions, and genuine story consistently outperform posed, technically polished images in competition.
Originality is increasingly weighted as competition entry volumes grow. An image of the Eiffel Tower needs a genuinely original perspective, timing, or story to compete with the thousands of Eiffel Tower images judges see annually. Less-photographed destinations and unexpected angles of familiar ones have a structural advantage.
Story completeness — the sense that the image communicates something specific about a place, a person, or a moment, rather than simply documenting that the photographer was present — is the quality that separates finalists from the field. This maps directly to The Moment Triangle’s third corner: authentic story.
Practical submission advice: enter your strongest three to five images rather than your full catalog. Judges evaluate the weakest image in a portfolio, not the strongest. A tight selection of consistently strong work outperforms a large submission with variable quality.
Jobs and Careers Overview
Travel photography as a career path is genuinely viable in 2026, though the routes to sustainable income look different from what the romanticized version suggests. The photographers who earn consistently from travel photography typically combine multiple revenue streams rather than relying on a single source. For context, U.S. Bureau of Labor Statistics data on photographer salaries indicates a median hourly wage of $20.44, though travel specialists often build diverse income streams.
The primary income categories for working travel photographers include editorial licensing (selling images to magazines, newspapers, and travel publications), stock photography (licensing images through agencies like Getty Images, Shutterstock, or Adobe Stock for ongoing royalties), commercial photography (shooting for tourism boards, hotels, airlines, and travel brands on assignment), and content creation (building an audience through Instagram, YouTube, or a personal blog and monetizing through sponsorships and affiliate partnerships).
Entry-level travel photography roles — second shooter positions, assistant roles on commercial campaigns, and tourism board content creator programs — provide both income and the professional portfolio that higher-paying assignments require. Organizations including tourism boards, NGOs, and travel media companies regularly hire travel photographers on contract for specific campaigns.
The skills that translate most directly to professional travel photography work are: consistent technical quality across variable conditions, fast turnaround on edited deliverables, cultural sensitivity and consent management (increasingly required by editorial clients), and the ability to produce vertical content optimized for social platforms alongside traditional horizontal editorial formats.
For a comprehensive breakdown of travel photography income streams, required skills, portfolio strategies, and how to land your first paid assignment, see our dedicated guide to travel photography jobs and careers.
Frequently Asked Questions
Best time of day for travel photography?
Golden hour — the 60 minutes after sunrise and before sunset — consistently produces the best travel photography light. The low sun angle creates warm, directional light with long shadows that add depth and dimension to any subject. Blue hour (30 minutes before sunrise and after sunset) is the second-best window, particularly for urban photography where city lights activate against a deep blue sky. Midday light between 10am and 3pm is the most challenging — redirect to interiors, open shade, or deliberate silhouettes during these hours.
How to take better smartphone photos?
Modern smartphone cameras are capable of professional-quality travel photography when used correctly. Enable gridlines for rule-of-thirds composition, use burst mode for any moving subject, and shoot in RAW format if your phone supports it (iPhone Pro models and most Pixels do). For editing, Lightroom Mobile’s AI-powered Denoise and Scene Enhance tools — updated significantly in 2026 — recover detail from challenging exposures that previously required desktop software. The biggest upgrade is not the phone itself — it is learning when to shoot and how to compose.
How to avoid generic tourist photos?
Avoiding generic tourist photos requires three deliberate choices: different timing, different position, and a specific story intention. Shoot famous landmarks at golden hour or blue hour rather than midday. Change your physical perspective — get lower, higher, or closer than the tourist default. Decide before you raise the camera what story or feeling you want the image to communicate, then compose to serve that intention rather than simply documenting the landmark. The photographers whose images stand out from a location are almost always the ones who arrived earliest, stayed latest, and moved farthest from the obvious shooting position.
Why shoot in RAW for travel photography?
RAW files preserve 12-14 bits of tonal data per channel — up to 16,384 tonal values — compared to JPEG’s 256, giving you dramatically more editing flexibility (Photography Life, 2026). In practical terms, a RAW file lets you recover an overexposed sky by 2-3 stops, correct white balance with zero quality loss, and remove noise from high-ISO shots without banding artifacts. JPEG files process these decisions in-camera and discard the underlying data permanently. For travel photography, where lighting conditions are unpredictable and reshooting is often impossible, RAW is not optional — it is the safety net that saves otherwise-lost images.
What gear is actually needed?
The honest answer: any camera, one versatile lens, and a GorillaPod. A smartphone running Lightroom Mobile produces results that would have required a dedicated camera five years ago. For dedicated camera users, a mirrorless body with a 24-70mm equivalent zoom or a fixed-lens compact like the Fujifilm X100VI covers 95% of travel scenarios. Essential accessories are a circular polarizing filter, two extra batteries, a 64GB+ memory card, and a portable SSD for backup. Everything beyond this list adds weight without proportional improvement in image quality — the PetaPixel decade-of-travel retrospective (2026) makes this point directly.
Conclusion
For motivated travel photographers at any gear level, travel photography tips that actually transform results share a common thread: they address light, composition, and story simultaneously rather than treating them as separate checklists. The most decorated travel images from competitions like TPOTY and the Sony World Photography Awards are not technically perfect — they are emotionally complete. They were taken at the right time, from a considered position, with a specific story intention. That is The Moment Triangle in practice.
The Moment Triangle — right light, strong composition, and authentic story — is the mental model that makes every technique in this guide coherent rather than arbitrary. Golden hour addresses light. Rule of thirds, leading lines, and frame-within-frame address composition. Candid moments, cultural consent, and knowing when to put the camera down address story. Apply the triangle as a filter before you raise the camera: Do I have the right light? Is my composition intentional? Does this image have something to say? Three questions, asked in two seconds, consistently separate the images worth keeping from the ones you’ll scroll past.
Your next trip is the field test. Choose one principle from each corner of The Moment Triangle to focus on — wake up for golden hour, apply the rule of thirds deliberately, and find one candid moment worth waiting for. The techniques are all here. The only remaining variable is showing up early, staying late, and being present enough to recognize the moment when it arrives.
About the Author
*This guide was researched and written by the editorial team at Amateur Photographer Guide, drawing on evaluation of 50+ travel photography resources, community consensus across r/photography, and field-testing across diverse destinations. For corrections, updates, or contributions, contact the editorial team directly.
