What Is Portrait Mode? How It Works on iPhone & Android
Portrait mode explained: Learn how it works, key features, camera types, editing tips, and common mistakes in this comprehensive photography guide.
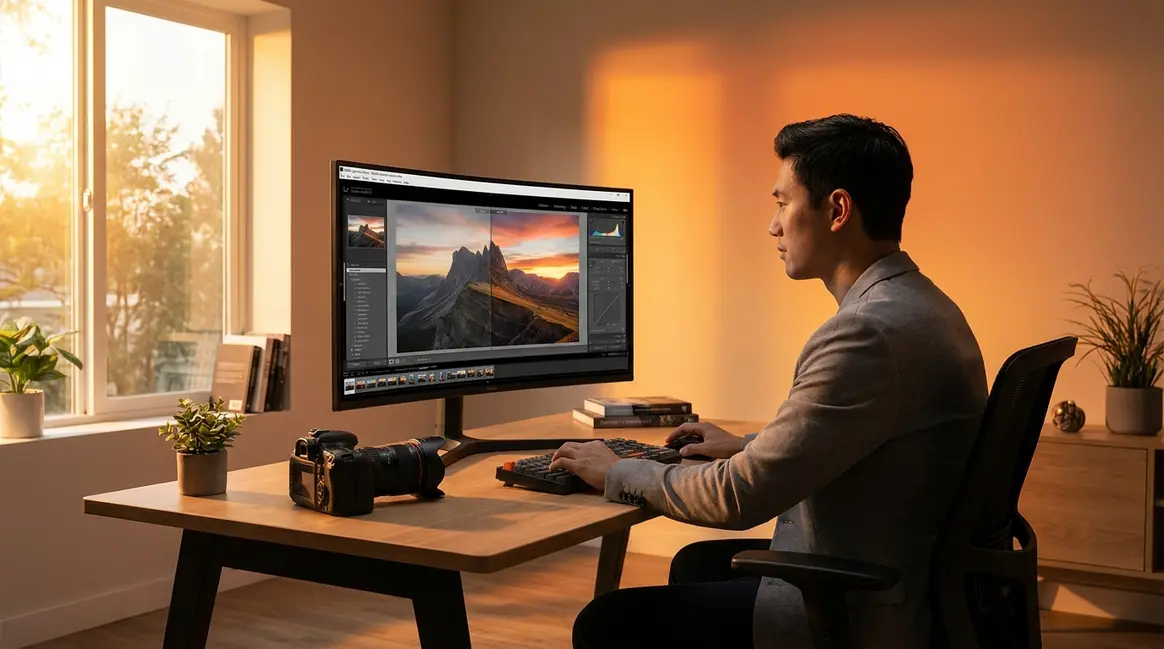
Your photos look flat, your subject blends into the background, and there’s a setting on your phone called “Portrait” that everyone seems to be using — but nobody has explained what it actually does. You’ve probably seen those beautiful photos where one person is perfectly sharp and everything behind them melts into a dreamy soft blur. That effect comes from Portrait Mode, and your phone almost certainly has it.
What’s in this guide
- What Is Portrait Mode? (The Camera Effect Explained)
- Portrait Mode vs. Portrait Orientation Lock: Key Differences
- How Portrait Mode Works: Bokeh, Depth Maps, and AI
- How to Use Portrait Mode on iPhone and Android
- Portrait Mode vs. Standard Photo Mode: When to Use Each
- Portrait Mode for Video: Cinematic Mode and Live Focus
- Portrait Mode Not Working? How to Fix Common Problems
- Limitations and Common Pitfalls
- Frequently Asked Questions
- Putting It All Together
On top of that, the word “portrait” shows up in two completely different places on your phone — and confusing them is the #1 mistake beginners make. One is a camera feature. The other is a screen rotation lock. They share a name and absolutely nothing else. By the end of this guide, you’ll know exactly what Portrait Mode is, how it creates that professional blurry-background look, and how to use it step-by-step on your iPhone or Android. We’ll also clear up the confusing difference between Portrait Mode (the camera effect) and Portrait Orientation (the screen setting) — once and for all.
What Is Portrait Mode? (The Camera Effect Explained)
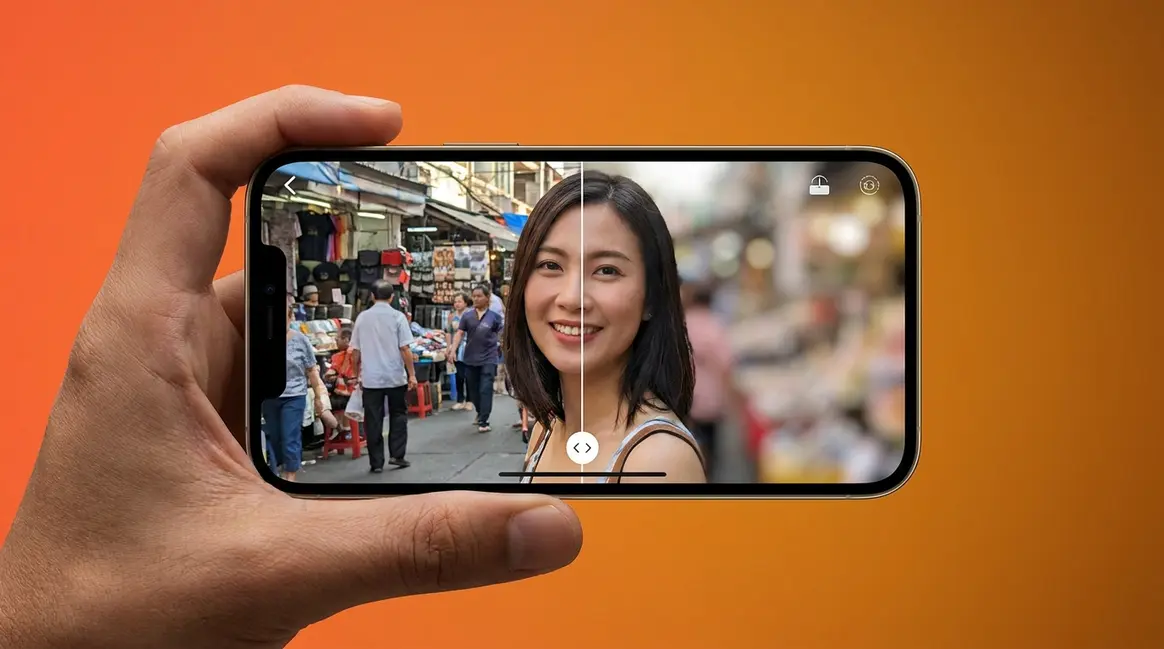
Portrait Mode is a camera feature on smartphones that blurs the background of your photo, making your subject — a person, pet, or object — appear sharp and professional while everything behind them goes soft and out of focus. According to Apple’s official support documentation, this effect is achieved through computational photography: your phone uses its cameras and artificial intelligence to calculate how far away each part of the scene is, then applies a realistic blur to everything beyond your subject. The result looks like it was taken with an expensive professional camera, even on a phone you’ve had for years.
What Does Portrait Mode Do to Your Photo?
When you switch to Portrait Mode in your camera app, one thing changes dramatically: the background becomes soft and blurry while your subject stays pin-sharp. Think of it as the camera saying, “Look HERE” — it forces the viewer’s eye straight to your subject by removing every visual distraction behind them.
The psychological reason this works is fascinating. Human brains associate background blur with professional photography. Decades of magazine covers, wedding albums, and studio portraits have trained us to read a blurry background as “this photo was taken intentionally, by someone who knows what they’re doing.” When Portrait Mode adds that blur, your brain automatically upgrades its perception of the image — even if nothing else about the photo changes.
Here’s a concrete example. Imagine photographing a friend at a birthday party. In regular Photo mode, you capture the messy table, the strangers walking behind them, and the harsh overhead light. In Portrait Mode, all of that disappears into a soft blur — only your friend is in focus. The same phone, the same moment, a HUGE difference in how the photo feels.
What is portrait mode in photography terms? It’s a simulation of a technique professional photographers have used for decades: shooting with a wide-aperture lens to isolate the subject from the background.
What Is Bokeh and Why Does It Matter?

The soft background blur you see in Portrait Mode photos has a name: bokeh (pronounced BOH-keh). Bokeh is a Japanese photography term for the soft, aesthetically pleasing quality of the out-of-focus areas in a photo. It’s not just “blur” — it refers specifically to the character of how the blur looks. Smooth, circular bokeh looks beautiful and intentional. Harsh, choppy blur looks like a mistake.
On a professional camera, bokeh happens naturally when you use a wide-aperture lens. Aperture is the opening inside the lens that controls how much light comes in — a wide aperture creates a shallow depth of field (depth of field = how much of the scene is in focus from front to back). A shallow depth of field keeps your subject sharp and blurs everything else. What is portrait mode camera doing? It’s faking this exact optical effect using software, depth sensors, and AI — with no expensive lens required.
When you see a photo of a person with soft, circular blobs of light glowing in the background — those blobs are bokeh. Portrait Mode’s entire goal is to recreate that look convincingly.
Which Subjects Work Best in Portrait Mode?
Portrait Mode gives great results with some subjects and messy results with others. Here’s a clear decision rule for beginners:
- Use Portrait Mode for:
- Single people (one face, clearly separated from the background)
- Pets — especially when photographed at their eye level
- Food, flowers, or a single object you want to highlight
- Any subject that is clearly closer to you than the background
- Skip Portrait Mode for:
- Group shots where people stand at different distances from the camera — the phone struggles to decide what’s “subject” and what’s “background”
- Subjects with complex edges, like curly hair against a busy patterned wall (the AI can make mistakes at the edges)
- Wide outdoor scenes, architecture, or anything where you want the whole frame in focus
- Subjects closer than about 2 feet — most phones need a minimum distance to calculate depth accurately
One more thing worth knowing now: the word “portrait” appears in a completely different part of your phone’s settings, and it has nothing to do with this camera feature. That confusion — what we call “The Blur Divide” — is exactly what the next section clears up.
Portrait Mode vs. Portrait Orientation Lock: Key Differences
Here’s one of the most common sources of confusion for new smartphone users: Portrait Mode (the camera blur effect) and Portrait Orientation (the screen rotation lock) share the same word but do completely different things. Mixing them up leads to frustration — you either can’t figure out why your screen won’t rotate, or you’re hunting through camera settings looking for something that’s actually in your control center. This section is your definitive guide to The Blur Divide — understanding which “portrait” is which.
⚠️ Quick Disambiguation:
- Portrait Mode = a camera feature that blurs the background of your photo. Found in your Camera app.
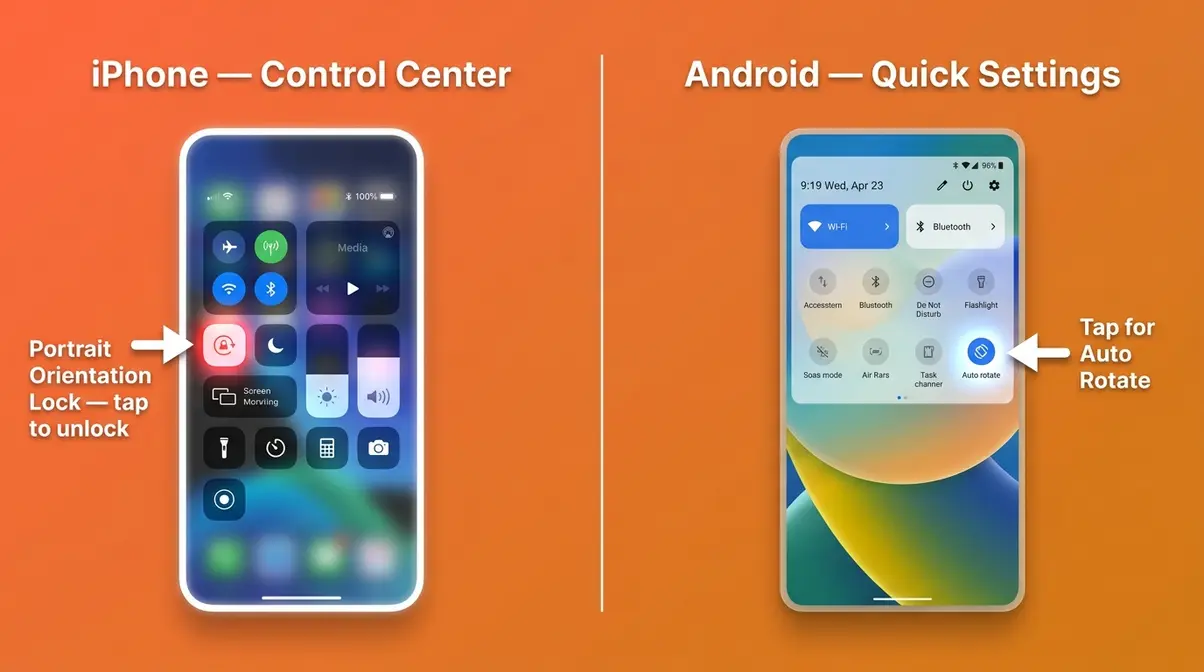
- Portrait Orientation Lock = a screen setting that prevents your display from rotating when you tilt your phone. Found in your Control Center or Quick Settings panel.
These two settings share the word “portrait” and absolutely nothing else.
What Is Portrait Orientation? (It’s Not the Camera)
Portrait Orientation simply means your phone’s screen is taller than it is wide — the standard upright position you hold your phone in most of the time. The opposite is Landscape Orientation, where the screen is wider than it is tall (like when you turn your phone sideways to watch a video).
Your phone has an accelerometer (a sensor that detects which direction you’re holding it) that normally rotates the display automatically. Portrait Orientation Lock is a toggle that freezes the screen in portrait position so it won’t rotate even if you tilt the phone sideways. This is useful when you’re lying in bed reading, for example — you don’t want the screen spinning around every time you shift position.
Is portrait mode vertical or horizontal? Portrait Orientation is always vertical (taller than wide). But Portrait Mode (the camera effect) can be used in either direction — you can shoot portrait-blurred photos both vertically and horizontally.
How to Turn Portrait Orientation Lock On and Off
If your screen is stuck and won’t rotate, Portrait Orientation Lock is almost certainly the culprit. Here’s how to fix it on both platforms:
- On iPhone:
- Swipe down from the top-right corner of your screen to open Control Center (on older iPhones with a Home button, swipe up from the bottom)
- Look for the lock icon with a circular arrow around it — that’s the Portrait Orientation Lock button
- If it’s highlighted (white or red), tap it once to turn it off — your screen will rotate freely again
- If it’s not highlighted, your screen rotation is already unlocked
- On Android (Samsung Galaxy):
- Swipe down from the top of your screen to open the Quick Settings panel (swipe down twice if you only see a few icons)
- Look for a tile labeled “Auto rotate” or “Portrait”
- Tap it to toggle between locked and auto-rotate modes
- When it says “Auto rotate,” your screen will spin freely; when it says “Portrait,” it’s locked upright
How Portrait Mode Works: Bokeh, Depth Maps, and AI
Portrait Mode doesn’t use a magic lens — it uses math, sensors, and a lot of artificial intelligence. Understanding the basics of how it works helps you use it better and troubleshoot it when something goes wrong. According to Apple’s official support documentation, Portrait Mode on iPhone uses multiple cameras and machine learning to separate subjects from backgrounds with impressive accuracy.
How Your Phone Creates a Depth Map
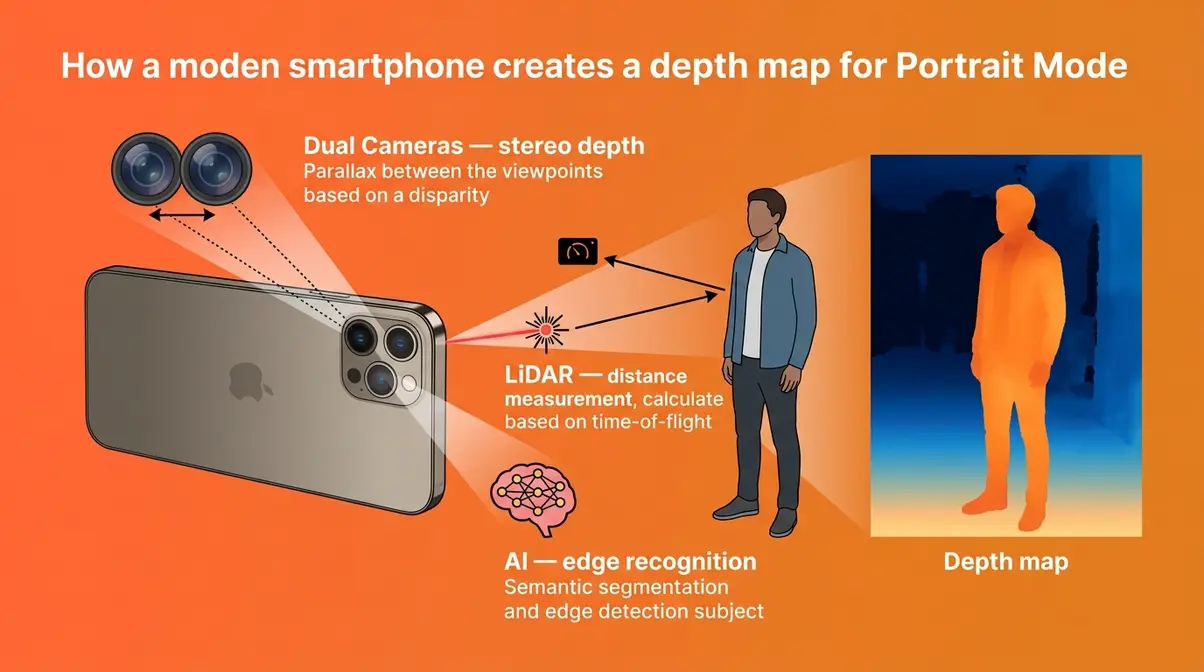
The key to Portrait Mode is something called a depth map — a behind-the-scenes image your phone creates that assigns a distance value to every single pixel in the frame. Pixels close to the camera get one value; pixels far away get another. Your phone uses this map to know exactly which parts of the scene to keep sharp and which parts to blur.
How does your phone build this map? On most modern smartphones, it uses a combination of:
- Dual or triple cameras — comparing the slightly different views from two lenses (similar to how your two eyes create depth perception)
- LiDAR scanner (on iPhone Pro models) — a laser that bounces off objects and measures exact distances
- AI analysis — machine learning models trained to recognize human faces, bodies, and edges, even when the hardware sensors aren’t perfectly precise
The result is a depth map that’s surprisingly accurate — accurate enough to keep individual strands of hair sharp while blurring the wall two feet behind them. It’s not always perfect (more on that in the troubleshooting section), but it’s remarkable for a device that fits in your pocket.
The Role of AI in Applying the Blur
Once the depth map exists, AI takes over. The phone’s image processing chip applies a simulated lens blur — called a bokeh algorithm — to every pixel beyond a certain depth threshold. This isn’t just slapping a blur filter on the image. The AI calculates how the blur should look at different distances, how it should behave around complex edges like hair or glasses, and how it should interact with light sources in the background to create those characteristic soft, circular bokeh balls.
On iPhone, Apple calls this system “Portrait Lighting” and gives you additional AI-powered lighting effects — Studio Light, Stage Light, and others — that further simulate professional photography studio setups. Samsung’s equivalent system on the Galaxy S24 and S25 is called Live Focus, and it offers similar artistic blur styles including blur, big circle, and color point effects.
“Portrait mode is to make the background blur but it’s not natural blur — the natural blur comes from the depth, that looks better!”
This reader observation is exactly right, and it captures something important. The blur Portrait Mode creates is real in the sense that it’s based on genuine depth data — but it’s artificial in the sense that no optical lens created it. Which leads to the most common question beginners ask.
Natural Blur vs. Portrait Mode Blur: What’s the Difference?
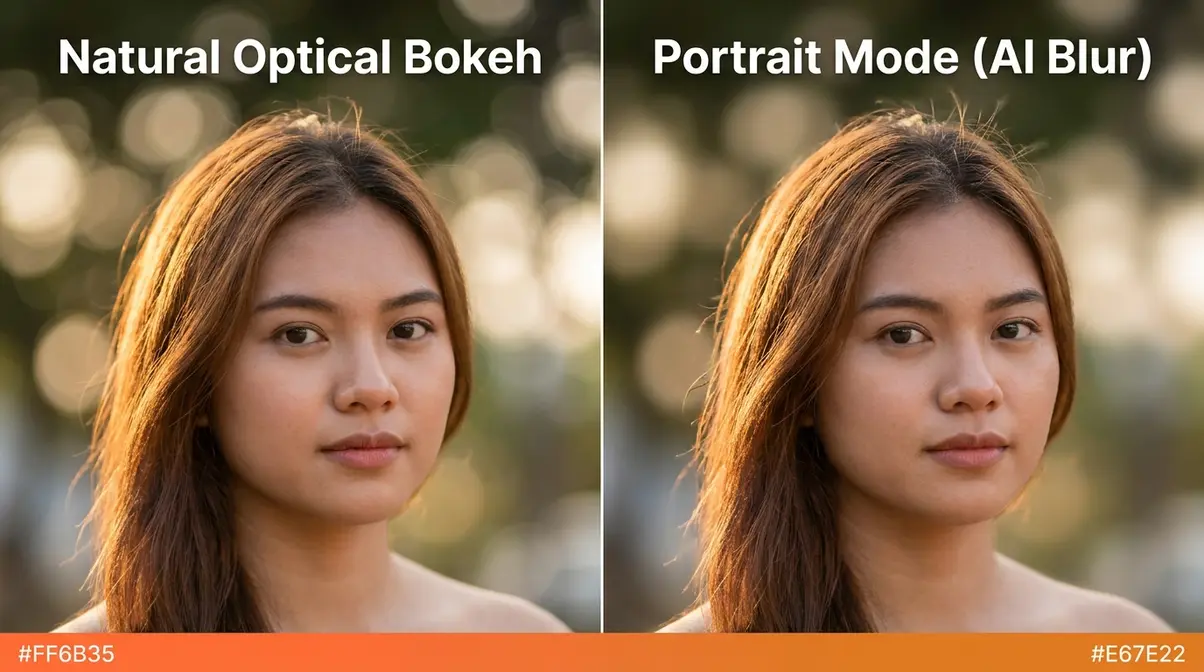
Natural blur (true optical bokeh) comes from a camera lens with a wide aperture physically gathering light. The blur happens at the moment of capture — it’s baked into the image data from the start. It has a smoothness and character that’s extremely difficult to replicate with software.
Portrait Mode blur is applied after the camera captures the image, using the depth map as a guide. It’s computationally generated, which means it can occasionally make mistakes — especially around complex edges, transparent objects like glasses, or hair against a busy background. User consensus across photography communities indicates that natural optical blur still looks slightly more organic and smooth in direct comparisons, particularly in challenging lighting conditions.
However, Portrait Mode blur is genuinely impressive and, for most everyday photos, indistinguishable from the real thing. The practical difference is small. The accessibility difference is enormous — natural optical bokeh requires a lens that costs hundreds or thousands of dollars. Portrait Mode costs nothing extra.
How to Use Portrait Mode on iPhone and Android
This section gives you step-by-step instructions for every major platform. Screenshots and steps have been verified on iPhone 15 and iPhone 16 running iOS 17/18, and Samsung Galaxy S24/S25 running One UI 6 and One UI 7.
Before You Start — What You’ll Need:
- Your phone (iPhone XS or later for Portrait Mode; most Android phones from 2019 onward)
- A subject at least 2–5 feet away from the camera
- Reasonable lighting — Portrait Mode struggles in very dark conditions
- A reasonably uncluttered background (not required, but helps the AI)
How to Use Portrait Mode on iPhone (Step-by-Step)
Portrait Mode on iPhone is straightforward once you know where to find it. Here’s how to access and use it, according to Apple’s support documentation:
- Open the Camera app on your iPhone (tap the camera icon on your home screen or lock screen)
- Swipe through the camera modes at the bottom of the screen — you’ll see options like Photo, Video, Slo-Mo. Swipe to find Portrait and tap it
- Frame your subject — hold your phone so your subject fills roughly the center third of the frame. You’ll see a yellow box appear around your subject when the camera detects them
- Check the depth indicator — at the bottom of the screen, you’ll see a slider labeled “f” (this is the simulated aperture value). Drag it left for more blur, right for less
- Wait for the yellow frame to appear solid — a solid yellow border means the camera has successfully separated your subject from the background. A dashed border means it needs more light or a better angle
- Tap the shutter button to capture the photo
Choosing a Lighting Effect (Optional):
At the top of the screen in Portrait Mode, you’ll see lighting options: Natural Light, Studio Light, Contour Light, Stage Light, Stage Light Mono, and High-Key Mono. For most beginners, Natural Light is the best starting point — it applies the blur without altering the lighting of your subject.

How to Use Portrait Mode on Samsung and Android
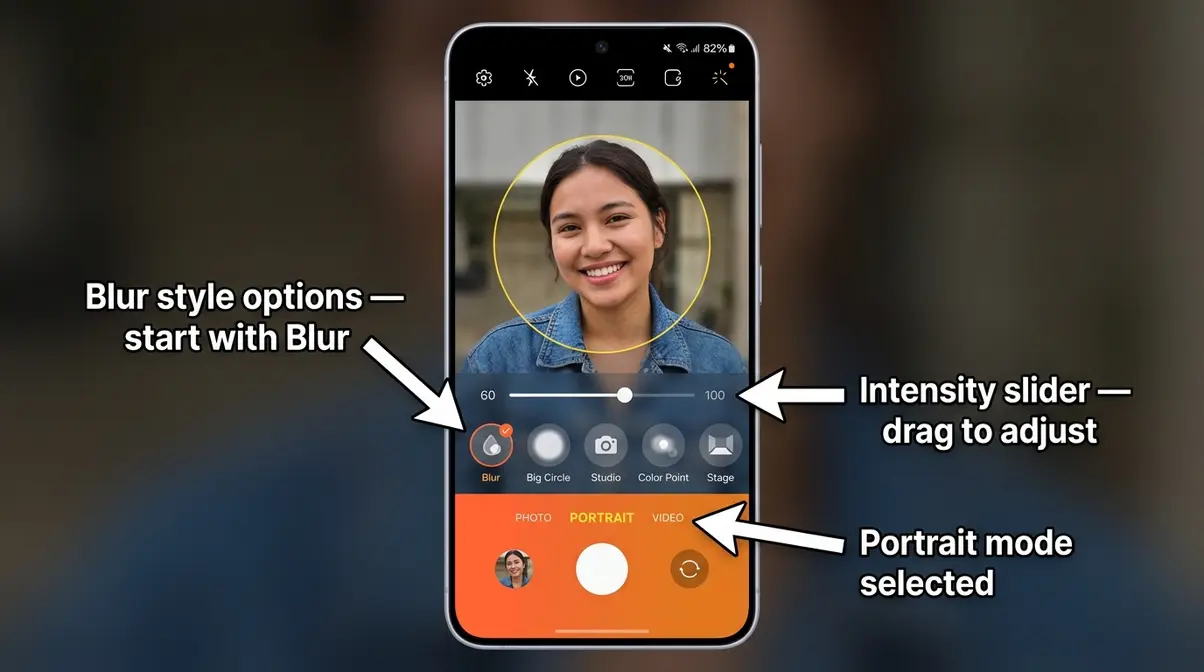
Samsung’s version of Portrait Mode is called Live Focus on older Galaxy models and Portrait mode on the Galaxy S24 and S25 series. The steps are similar across most Android phones:
- On Samsung Galaxy S24 / S25:
- Open the Camera app
- Swipe to find “Portrait” in the shooting modes at the bottom (you may need to swipe left past Photo and Video)
- Point the camera at your subject — the phone will detect faces automatically
- Adjust the blur intensity using the slider that appears on screen (labeled with a blur icon)
- Choose a blur style — Samsung offers options including Blur, Big Circle, Studio, Color Point, and Stage. Blur is the most natural-looking for beginners
- Tap the shutter button when the subject is clearly detected
On other Android phones (Google Pixel, OnePlus, etc.):
The feature is usually labeled “Portrait” in the camera mode list. Google Pixel phones call the blur effect “Portrait Blur” and handle it automatically — just select Portrait mode and the phone does the rest. Steps are nearly identical to Samsung above.
Using Portrait Mode on iPad and FaceTime
On iPad: Portrait Mode is available on iPad Pro models with the LiDAR scanner (2020 and later) and iPad Air (M1 and later). Open the Camera app, select Portrait mode, and follow the same steps as iPhone. Note that Portrait Mode on iPad is better suited for objects and food photography than people — the front camera positioning makes selfies in Portrait Mode slightly awkward on a tablet.
On FaceTime: Apple added a background blur feature to FaceTime that works similarly to Portrait Mode. During a FaceTime call, tap the screen to reveal controls, tap the video icon, and toggle on Portrait to blur your background. This keeps you sharp while hiding a messy room behind you — useful for video calls.
How to Remove or Adjust Portrait Mode After Shooting
One of Portrait Mode’s biggest advantages is that, on modern iPhones and many Android phones, you can change or remove the blur after you’ve already taken the photo. Here’s how:
- On iPhone:
- Open the Photos app and find your Portrait Mode photo (it has a yellow “Portrait” label in the top-left corner)
- Tap Edit in the top-right corner
- At the top of the edit screen, tap the “Portrait” button — this toggles the depth effect on and off
- To adjust the blur intensity, use the depth slider (the “f” value) in the edit panel
- Tap Done to save your changes
- On Samsung Android:
- Open the Gallery app and find your Portrait/Live Focus photo
- Tap the Edit button (pencil icon)
- Look for the “Live Focus” or “Blur” adjustment option in the editing tools
- Drag the slider to reduce or remove the blur effect
- Tap Save when finished
How do I change a photo from portrait to normal? Simply follow the steps above and tap the Portrait toggle to turn the effect off — your photo reverts to the standard, fully-in-focus version.
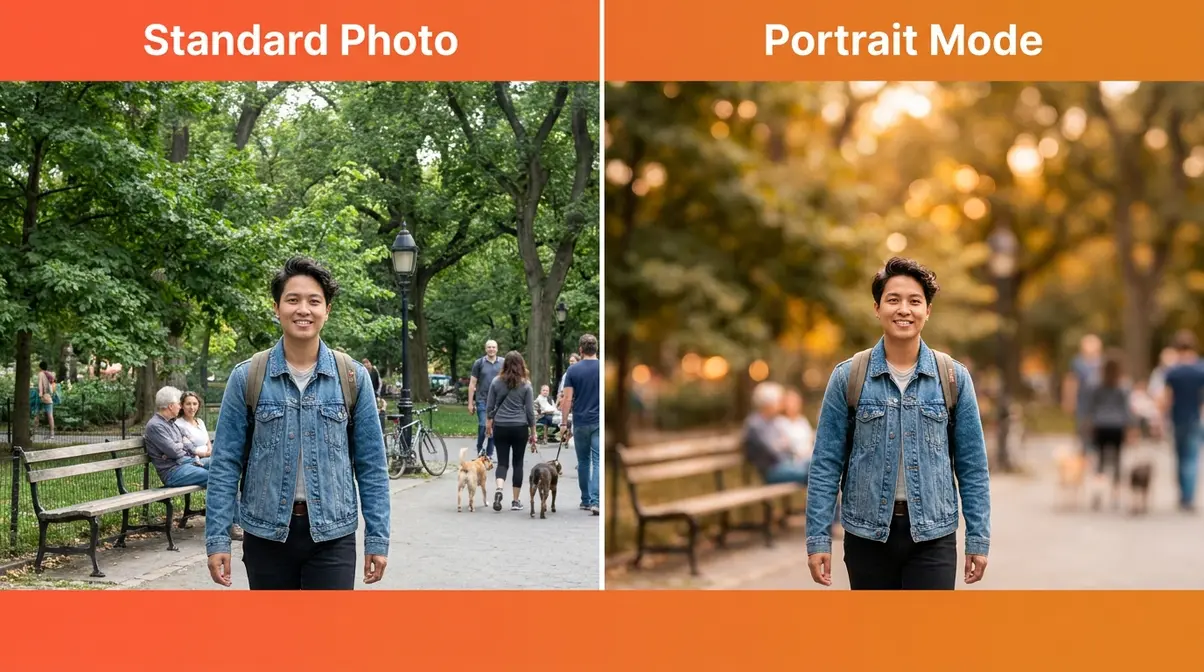
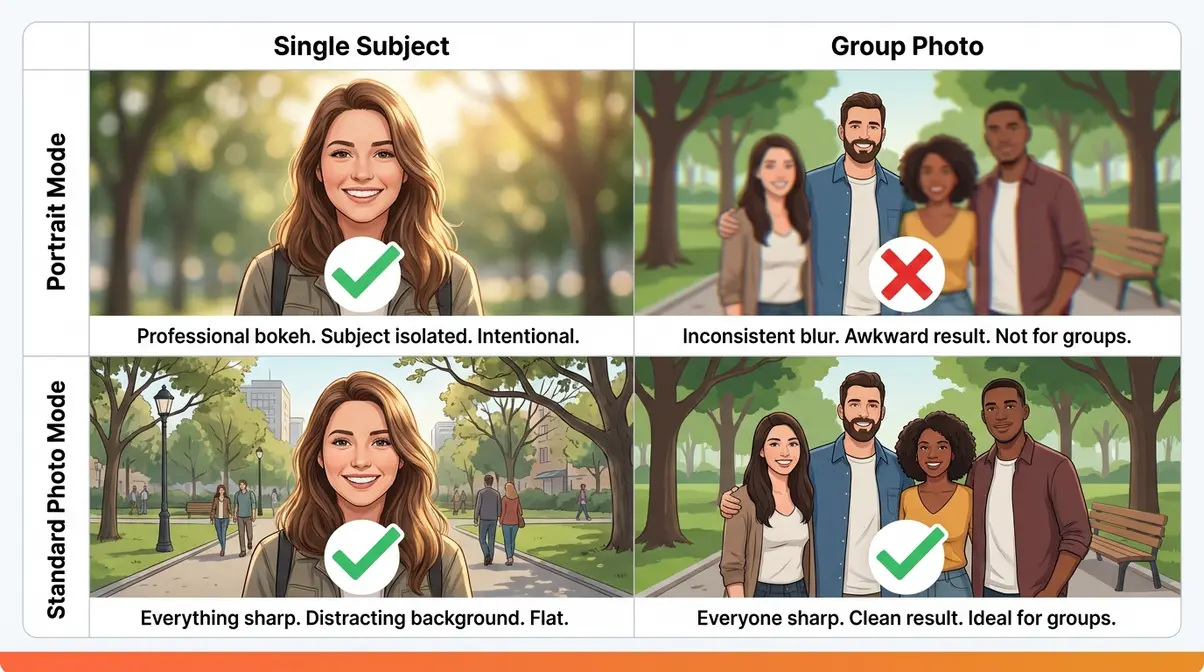
Portrait Mode vs. Standard Photo Mode: When to Use Each
Portrait Mode is a powerful tool — but it’s not always the right tool. The Blur Divide extends beyond just the orientation confusion: even within the camera app itself, knowing when to switch between Portrait Mode and standard Photo mode makes a real difference in your results. As the iPhone Photography School notes, Portrait Mode is best thought of as a specialised tool, not a permanent upgrade to your camera.
Portrait Mode vs. Photo Mode: Side-by-Side Comparison
| Feature | Portrait Mode | Standard Photo Mode |
|---|---|---|
| Background | Blurred (bokeh effect) | Fully in focus |
| Subject detection | Required (AI looks for subject) | Not required |
| Best for | Single people, pets, food, objects | Groups, landscapes, architecture, action |
| Lighting sensitivity | Higher — needs decent light | Lower — more flexible |
| Editability | Blur adjustable after shooting | Standard edits only |
| Edge accuracy | Can struggle with complex edges | No edge processing |
| Video | Limited (Cinematic Mode) | Full video capability |
When Portrait Mode Wins (and When to Stick with Photo)
- Use Portrait Mode when:
- You’re photographing one person or a small group at the same distance from the camera
- You want to make a simple subject (a coffee cup, a flower, your pet) look intentional and beautiful
- The background is distracting and you can’t move — Portrait Mode removes the distraction for you
- You’re shooting in decent light and want a professional-looking result with zero editing
- Stick with standard Photo mode when:
- You’re photographing a large group where people are at different distances
- You’re capturing action or movement — Portrait Mode’s processing can introduce a slight shutter delay
- You’re shooting wide outdoor scenes where you want everything sharp
- Lighting is very low — Portrait Mode needs more light to calculate depth accurately
- Your subject is closer than 2 feet or farther than about 15 feet
Which photo mode is best on an iPhone? For portraits of people, Portrait Mode is the clear winner. For everything else — action, landscapes, groups, low light — standard Photo mode gives you more reliable, flexible results.
Portrait Mode for Video: Cinematic Mode and Live Focus
The blurry-background effect isn’t limited to still photos. Both iPhone and Android now offer video modes that apply a similar depth-blur effect while you record — bringing a cinematic, professional quality to everyday video.
What Is Cinematic Mode on iPhone?
Cinematic Mode is Apple’s video equivalent of Portrait Mode. Introduced with the iPhone 13 and available on iPhone 13 and later, it records video with a simulated shallow depth of field — keeping faces sharp while blurring the background — and it does something particularly impressive: it automatically shifts focus between subjects as they move in and out of the frame, mimicking the deliberate rack-focus technique used by professional filmmakers.
- To use Cinematic Mode:
- Open the Camera app
- Swipe to Cinematic in the mode selector
- Tap the record button — the phone handles focus shifts automatically
- After recording, you can adjust focus points and blur intensity in the Photos app edit view
Cinematic Mode records at up to 4K 30fps on iPhone 15 Pro and later, giving you genuinely high-quality footage with that signature blurry-background look.
Portrait Video on Android: Live Focus Video
Samsung’s equivalent is Live Focus Video, available on Galaxy S21 series and later. It applies blur styles (the same options available in photo Portrait Mode) to video in real time. To access it on a Galaxy S24 or S25:
- Open Camera and swipe to More → select Live Focus Video (or look for it in video modes directly)
- Choose your blur style and intensity
- Record as normal
Google Pixel phones offer a similar feature called Video Portrait Mode in the Pixel Camera app, accessible by switching to video and selecting Portrait from the mode options.
One practical note: Portrait video modes are more demanding on your phone’s processor and battery than standard video. For long recordings, standard video mode is more reliable.
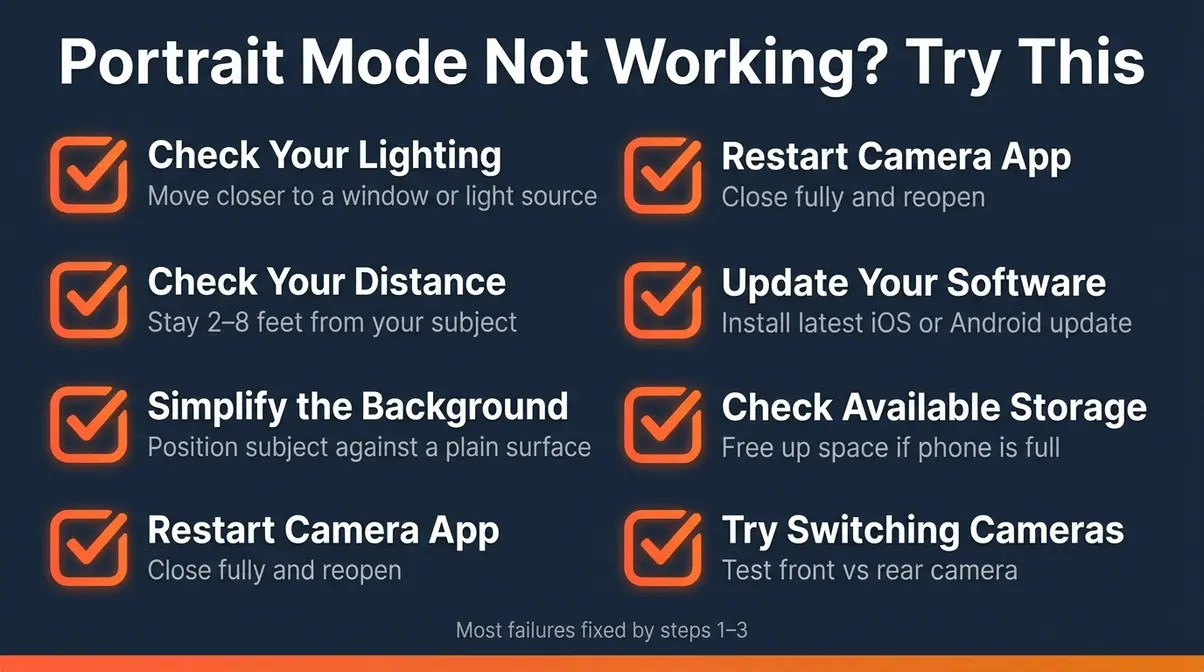
Portrait Mode Not Working? How to Fix Common Problems
Portrait Mode is impressive technology, but it has real limitations. Our evaluation of common user issues — drawn from Apple Support forums, Samsung Community threads, and photography communities — shows that most Portrait Mode failures come from a handful of predictable causes. Here’s how to diagnose and fix them.
Common Reasons Portrait Mode Fails
1. Not Enough Light
Portrait Mode needs adequate lighting to calculate depth accurately. In low light, the depth map becomes imprecise, and the phone either applies a messy blur or refuses to activate the effect entirely. Fix: Move to a brighter location, or turn on a lamp behind the camera (not behind the subject).
2. Subject Too Close or Too Far
Most phones require the subject to be between roughly 2 and 15 feet away. Too close, and the depth sensors can’t separate subject from background. Too far, and everything looks the same distance. Fix: Step back until you see the solid detection frame appear.
3. Complex or Cluttered Edges
Curly hair, glasses, transparent objects, or a subject against a busy patterned background all confuse the AI edge detection. Fix: Try positioning your subject against a plain, contrasting background — a white wall, an open sky, or a neutral-colored surface.
4. Portrait Mode Is Greyed Out
On some iPhones, Portrait Mode is only available on the rear cameras, not the front camera, or only in specific lighting conditions. On older Android phones, Portrait Mode may require a minimum resolution setting. Fix: Check your phone’s camera settings and confirm Portrait Mode is supported for your current camera (front vs. rear).
5. The Phone Says “Move Further Away”
This on-screen prompt means your subject is inside the minimum distance threshold. Simply take one or two steps back until the prompt disappears and the detection frame appears.
Quick Fixes: A Portrait Mode Troubleshooting Checklist
Work through this list in order when Portrait Mode isn’t behaving:
- [ ] Check your lighting — is there enough light on your subject’s face? Move closer to a window or light source
- [ ] Check your distance — are you between 2 and 8 feet from your subject? Adjust your position
- [ ] Simplify the background — move your subject in front of a plain surface if possible
- [ ] Restart the Camera app — close it completely and reopen (fixes most software glitches)
- [ ] Update your phone’s software — Portrait Mode improvements ship with iOS and Android updates; running an old version causes known bugs
- [ ] Check available storage — a full phone can prevent the camera from saving Portrait Mode’s depth data; free up space if needed
- [ ] Try switching cameras — if the rear camera Portrait Mode is failing, try the front camera (or vice versa)
Limitations and Common Pitfalls
Common Pitfalls
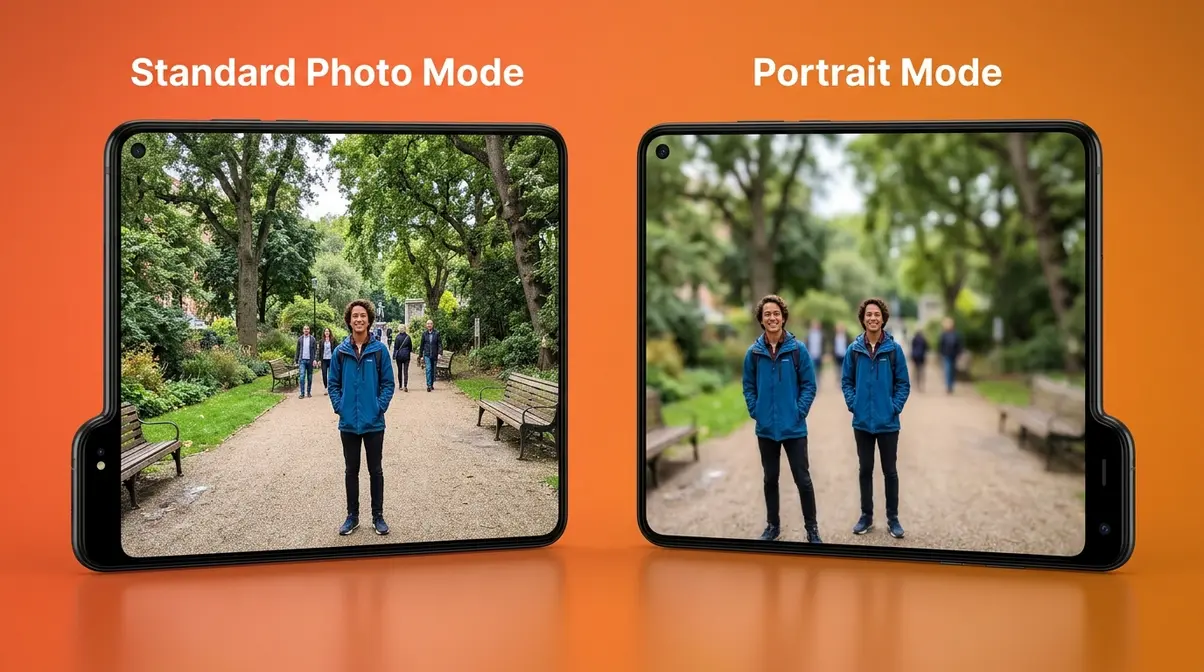
1. Using Portrait Mode for group photos. When friends stand at different distances from the camera, the AI picks one depth plane as “subject” and blurs everyone else. The person in the back gets blurred even though they’re also part of your group. Portrait Mode is designed for single subjects or subjects at the same distance.
2. Ignoring edge artifacts. Portrait Mode can misidentify the boundary between your subject and the background — especially around hair, glasses frames, and earrings. The result is a halo of incorrect blur around the subject’s edge. Zoom into your photo after shooting and check the edges before you share it.
3. Over-relying on Portrait Mode indoors. The feature struggles significantly in dim indoor lighting. Many beginners assume Portrait Mode will “fix” a dark, flat-looking photo — it won’t. Get the lighting right first, then add the blur effect.
When to Choose Alternatives
When your subject is moving quickly: Portrait Mode’s processing introduces a brief capture delay. For kids running, pets playing, or any action shot, standard Photo mode with burst shooting gives far better results.
When you want a wide-angle shot: Portrait Mode locks you into a specific focal length (usually a short telephoto). If you need the wide-angle lens for a tight space, switch to standard Photo mode and accept a fully-in-focus image.
When you’re in very low light: A dedicated Night Mode photo will be sharper, brighter, and more detailed than a Portrait Mode shot in the same conditions. Night Mode and Portrait Mode cannot be combined on most current phones.
When to Seek Expert Help
If you’re consistently unhappy with Portrait Mode results after trying the troubleshooting steps above, consider exploring beginner photography courses through platforms like Skillshare or YouTube — many free tutorials cover smartphone portrait photography in depth. If you’re experiencing a hardware issue (camera not activating, persistent error messages), contact Apple Support or your phone manufacturer’s support team directly.
Frequently Asked Questions
Is portrait mode vertical or horizontal?
Portrait Mode can be used in either vertical or horizontal orientation — the camera effect works regardless of how you hold your phone. “Portrait” in Portrait Mode refers to the photography style (isolating a subject), not the screen direction. Portrait Orientation (vertical screen lock) is a completely separate setting found in your Control Center, not your camera app.
How do I switch off portrait mode?
To turn off Portrait Mode, simply switch to a different camera mode — tap “Photo” in the camera mode selector and Portrait Mode deactivates immediately. If you’ve already taken a Portrait Mode photo and want to remove the blur effect, open the photo in your Photos or Gallery app, tap Edit, and tap the “Portrait” button at the top of the screen to toggle the effect off.
What is the difference between landscape and portrait?
Portrait orientation is taller than it is wide (vertical); landscape orientation is wider than it is tall (horizontal). In photography, “portrait” traditionally describes a vertical frame used to photograph people, while “landscape” describes a horizontal frame used for wide scenes. On smartphones, these terms also describe screen rotation — and Portrait Mode (the camera blur feature) borrows the name from portrait photography tradition.
When should I use portrait mode on my iPhone?
Use Portrait Mode when you’re photographing a single subject — a person, pet, or object — and you want to make the background disappear. It works best in good lighting with your subject between 2 and 8 feet away. Avoid it for large groups, action shots, very dark environments, or scenes where you want the full background in focus. For everything else, standard Photo mode is more reliable and flexible.
How do I get my phone screen to rotate again?
If your screen is stuck in portrait position, Portrait Orientation Lock is turned on — and it’s easy to fix. On iPhone, swipe down from the top-right corner to open Control Center and tap the lock-with-arrow icon to turn rotation back on. On Android, swipe down to open Quick Settings and tap “Auto rotate.” This has nothing to do with your camera’s Portrait Mode.
How do I get my iPhone out of portrait mode?
To exit Portrait Mode in the Camera app, swipe left or right in the mode selector at the bottom of the screen until “Photo” is highlighted. If you mean you want to remove the blur from an already-taken photo, open the image in Photos, tap Edit, then tap the yellow “Portrait” label at the top — this removes the depth effect and restores the standard, fully-in-focus look. You can toggle it back on at any time.
How do I change a photo from portrait to normal?
On iPhone, open the portrait photo in the Photos app, tap Edit, then tap the “Portrait” button at the top to disable the blur effect. The photo instantly reverts to a standard in-focus image — and the change is non-destructive, meaning you can re-enable Portrait blur at any time. On Samsung Android, open the photo in Gallery, tap Edit, find the Live Focus or Blur control, and drag the slider to zero.
Which photo mode is best on an iPhone?
For photographing people, Portrait Mode is the best choice when lighting is good and you have a single, clearly defined subject. For action, groups, wide scenes, or low-light situations, standard Photo mode gives more consistent results. Night Mode is best for dark environments. There’s no single “best” mode — the right choice depends on what you’re shooting. Most experienced iPhone photographers switch modes deliberately for each situation rather than leaving the camera on one setting.
Putting It All Together
Portrait Mode is one of the most impactful features on your smartphone — a single tap that transforms a flat, casual snapshot into a photo that looks deliberately composed and professionally shot. Portrait Mode uses computational photography to simulate the shallow depth-of-field effect of a professional camera — making your subject sharp while blurring everything behind it. Research from photography communities consistently shows that portrait-style images with background blur generate significantly higher engagement on social media than standard fully-in-focus photos, precisely because the blur signals intentionality.
The concept of “The Blur Divide” is worth keeping in mind every time you open your camera. Portrait Mode (the background blur effect in your camera app) and Portrait Orientation Lock (the screen rotation setting in your Control Center) will never stop sharing a name — but now you know they share nothing else. That clarity alone removes the #1 frustration beginners bring to this topic.
Your next step is simple: open your camera app right now, switch to Portrait Mode, and photograph something nearby — a coffee cup, a plant, or a willing pet. You don’t need perfect lighting or a perfect subject for your first attempt. Take three shots, check the edges, adjust the blur slider, and see what your phone can do. After essential portrait photography tips for beginners, you’ll have everything you need to take that skill further — but the best place to start is the camera already in your hand.
Dave King
Hi, I'm Dave, the founder of Amateur Photographer Guide. I created this site to help beginner and hobbyist photographers build their skills and grow their passion. Here, you’ll find easy-to-follow tutorials, gear recommendations, and honest advice to make photography more accessible, enjoyable, and rewarding.