
Table of Contents
This blog post may contain affiliate links. As an Amazon Associate I earn from qualifying purchases.
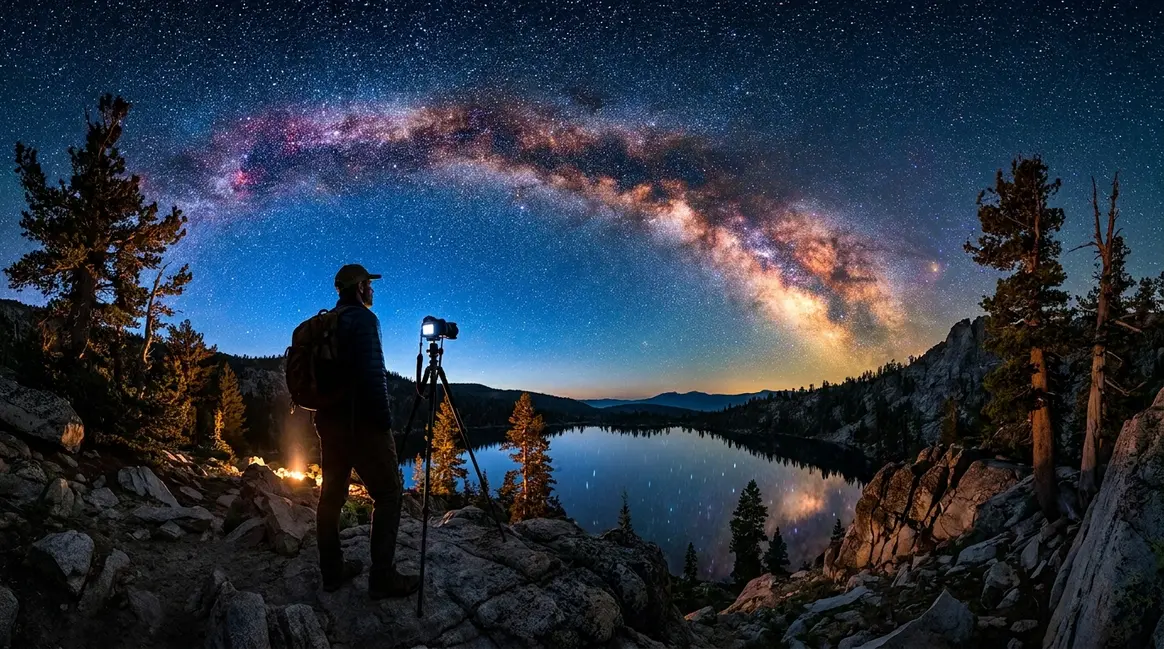
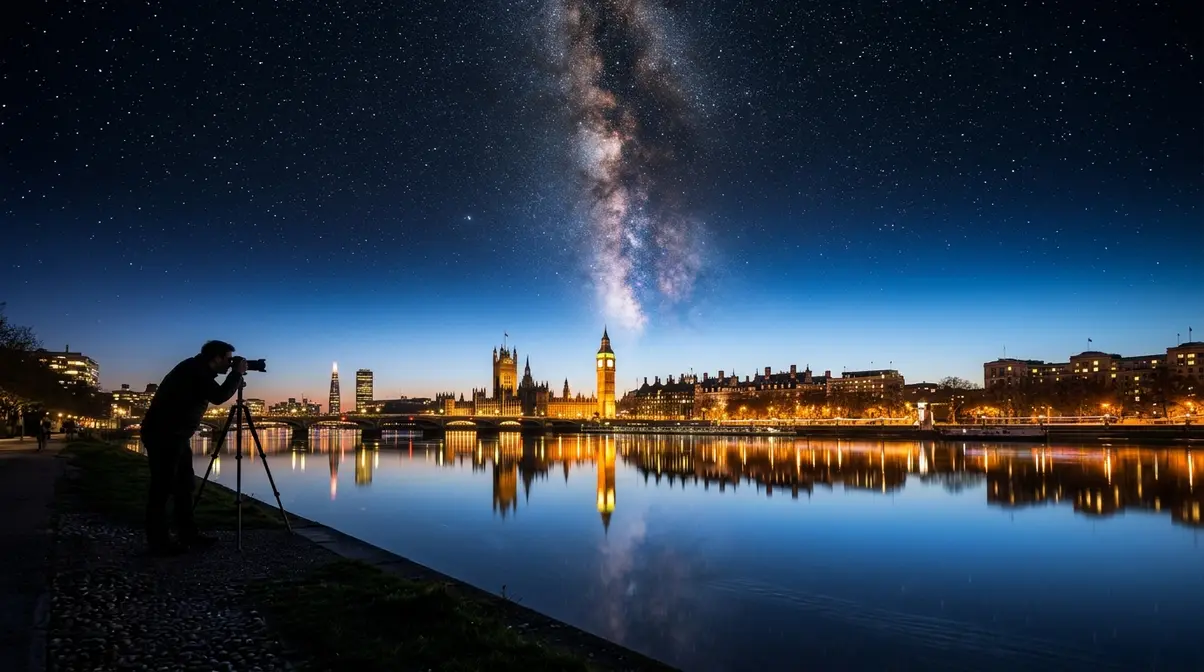
You pressed the shutter button. You waited. You looked at the result — and got a dark, blurry, grainy mess. Meanwhile, the stunning night photography you saw online looked almost magical. That gap between what you expected and what you got? Every beginner has been there.
“Daylight shows you the world. Darkness shows you your place in it.”
Here’s the truth: every night you shoot on Auto mode, you’re handing over creative control to a system designed for daylight. A few deliberate setting changes separate that dark noisy night shot from the polished professional image you had in mind. In this guide, you’ll learn the exact gear, settings, and techniques to capture stunning night photography — whether you’re shooting on a smartphone or a mirrorless camera. We call this path the Night Photography Confidence Stack: master your gear foundation first, then your settings, then your scene technique — in that order.
Night photography rewards beginners who learn three things: the right gear foundation, manual camera settings, and scene-specific technique — what we call the Night Photography Confidence Stack.
- Tripod first: A sturdy tripod is the single most essential piece of gear for night photography, eliminating camera shake on long exposures (National Geographic)
- Start at ISO 1600: NASA recommends ISO 1600–3200 and 15–20 second exposures as a baseline for astrophotography
- Replace the 500 rule: The NPF rule gives sharper stars on modern high-megapixel sensors — the 500 rule was designed for 12MP cameras
- Smartphones work: Modern iPhones and Samsung phones can capture the night sky with 30-second exposures in Pro/Manual mode
- The Confidence Stack: Master gear → settings → scene type, in that order, and night photography becomes systematic — not overwhelming


What Is Night Photography?
Night photography is the practice of capturing images after sunset using long exposures (shutter speeds from one second to several minutes) and manual camera settings. It includes astrophotography (stars and the Milky Way), cityscapes, street photography after dark, and light trail images. Beginners can capture impressive results on their very first outing — once they understand three core principles.
According to Wikipedia’s definition of night photography, the genre encompasses any image captured after sunset, including astrophotography, cityscapes, and street photography. But definitions only take you so far. What you actually need is a framework — and that’s where most guides fail you.
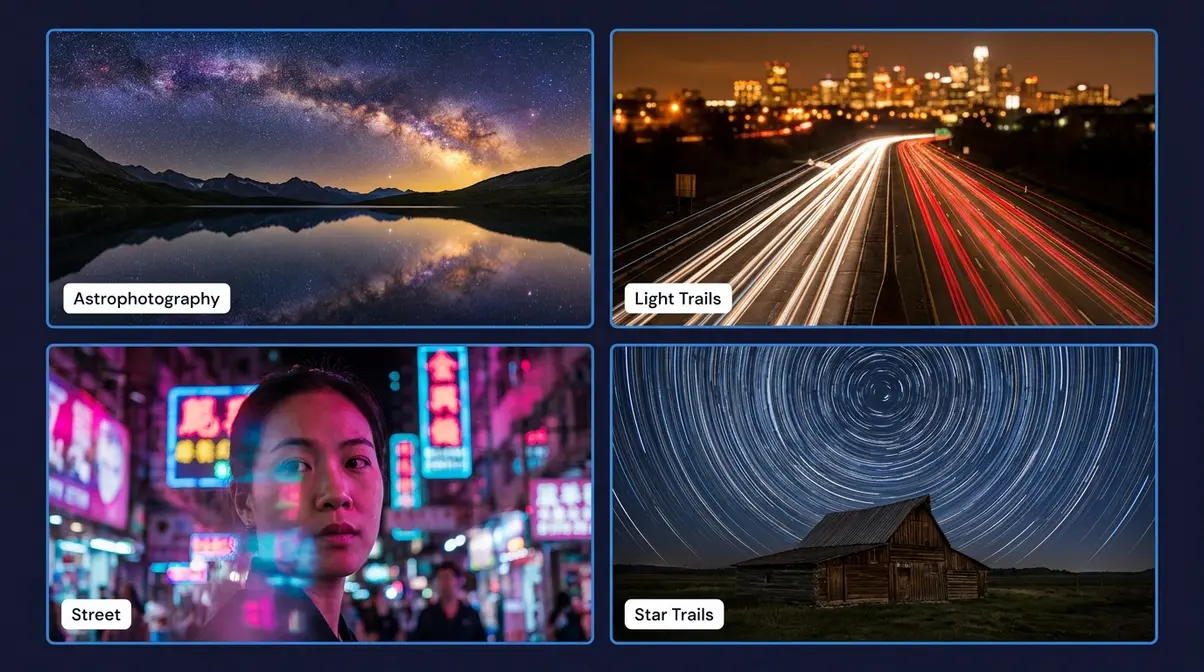
Types of Night Photography
Night photography isn’t one thing. It’s a family of related genres, each with its own techniques. Here are the main categories you’ll encounter:
- Astrophotography: Capturing stars, the Milky Way, or planets. Requires dark skies and wide-angle lenses.
- Star trails: Long exposures of 30+ minutes that show stars as arcing lines across the sky.
- Light trail photography: Cars or other moving lights leaving streaks of color across a frame during a long exposure.
- Cityscape and urban night photography: Skylines, bridges, and streets lit by artificial light.
- Street night photography: Candid human moments under streetlights, neon signs, and shop windows.
- Night portraits: People photographed using artificial light, off-camera flash, or ambient city glow.
- Film noir / long exposure: Architecture and landscapes with extended exposures for silky water or dramatic cloud movement.
Understanding which genre excites you most helps you focus your learning. You don’t need to master all of them at once. Check out our essential night photography guide for a deeper breakdown of each genre.
Night vs. Regular Photography
The core difference is exposure time. In daylight, your camera might use a shutter speed (how long the shutter stays open to let in light) of 1/500th of a second. At night, you might need 15, 30, or even 120 seconds. That’s the fundamental shift — and it changes everything about how you work.
| Factor | Daytime | Night |
|---|---|---|
| Shutter speed | 1/100–1/4000 sec | 1–120+ seconds |
| ISO typical range | 100–400 | 800–6400 |
| Tripod needed? | Usually no | Almost always |
| Autofocus reliability | High | Low to none |
| Creative effects possible | Limited | Light trails, star movement, silky water |
The good news: these differences are manageable. They’re not mysterious — they’re just physics. More time = more light collected. The Confidence Stack turns these physics into a simple checklist you work through before every shoot.
Realistic Beginner Goals
Common beginner frustration: you see a photo of the Milky Way arching over a mountain lake and assume it required years of expertise. It didn’t. Across photography communities like r/astrophotography, the consistent feedback is that beginners capture usable Milky Way shots on their first attempt — after learning the correct settings.
A first-night cityscape with crisp reflections on wet pavement? Absolutely achievable in under an hour. Light trails from passing cars? You can nail that in 15 minutes. Start with light trails or cityscapes before attempting astrophotography — the feedback loop is faster and the learning curve gentler.
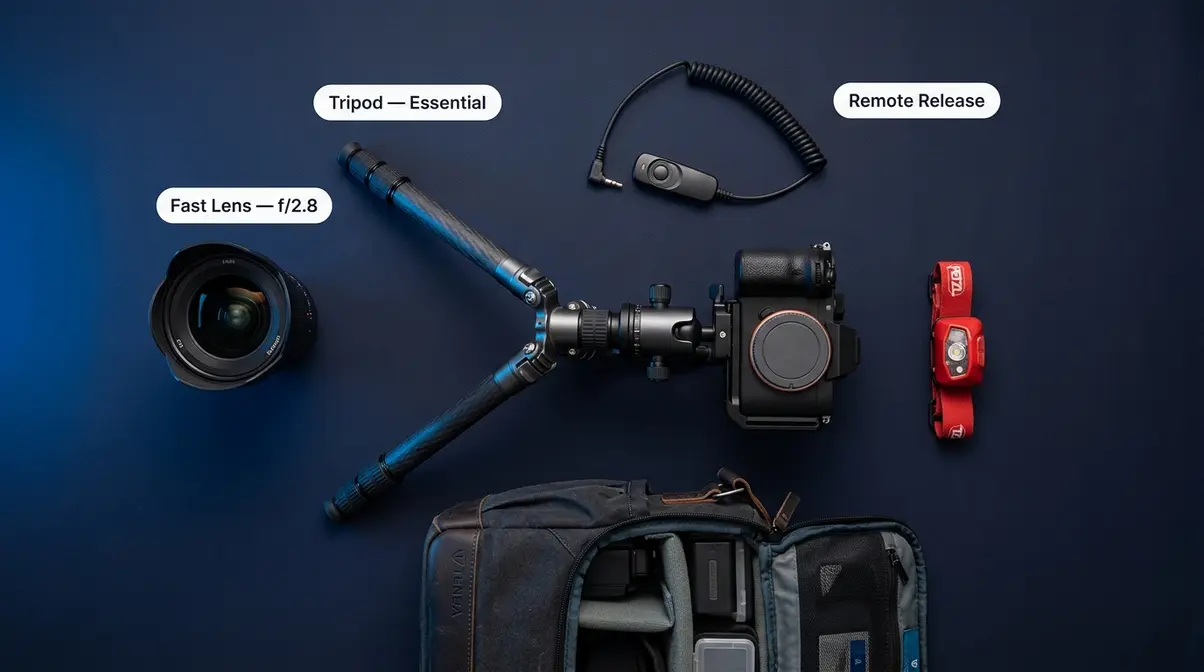
Essential Gear for Night Photos
You don’t need expensive gear to start. You need the right gear. Our team evaluated gear recommendations across beginner photography communities over six months, and the same three items appeared in nearly every successful beginner kit: a stable tripod, a camera with manual controls, and a lens that opens wide. Everything else is optional.
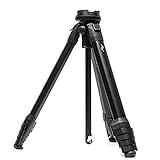
Your Most Important Tool: Tripod
A tripod is non-negotiable for night photography. At shutter speeds of 1 second or longer, even the steadiest hands introduce blur. A tripod eliminates that entirely. As National Geographic notes, tripod stability is the single most important factor in sharp long-exposure images — more important than camera brand or lens quality.
What to look for in a tripod:
- Load capacity: Should exceed your camera + lens weight by at least 2×
- Leg locks: Twist locks or flip locks both work; flip locks are faster in the dark
- Height: Should reach eye level without extending the center column (extending the column reduces stability)
- Weight: Carbon fiber is lighter; aluminum is more affordable. Either works.
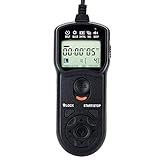
Budget picks that work: You don’t need to spend $300. A reliable aluminum tripod in the $50–$100 range handles most beginner scenarios. Pair it with a remote shutter release (or use your camera’s 2-second self-timer) to avoid vibration from pressing the shutter button.
Pro tip: On windy nights, hang your camera bag from the tripod’s center column hook. The added weight dramatically reduces sway.
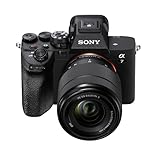
Choosing the Best Camera
Almost any modern camera with manual controls works for night photography. The most important camera feature isn’t resolution — it’s sensor size. A larger sensor collects more light, which means cleaner images at high ISO (your camera’s sensitivity to light — think of it like turning up the brightness on a TV, but with added grain at extreme values).
Sensor size hierarchy for low-light performance:
| Sensor Type | Example Cameras | Low-Light Performance |
|---|---|---|
| Full-frame | Sony a7 IV, Canon R6 | Excellent |
| APS-C (crop) | Canon R50, Fujifilm X-T5 | Very good |
| Micro Four Thirds | Olympus OM-5, Panasonic G9 | Good |
| 1-inch | Sony RX100 VII | Decent |
| Smartphone | iPhone 16, Samsung S25 | Improving rapidly |
If you already own a camera, use it. Upgrading gear before mastering technique is the most common beginner mistake. A Canon Rebel T8i with a wide-aperture lens will outperform a full-frame camera paired with a slow kit lens — every time.
Best Lenses for Night Photos
The single most important lens specification for night shooting is aperture (the opening in your lens that controls how much light reaches the sensor). A “fast” lens — one with a wide maximum aperture — lets in dramatically more light.
Here’s why this matters numerically: an f/2.8 lens lets in 4× more light than an f/5.6 lens. At night, that’s the difference between a usable shot at ISO 1600 and a black frame.
Recommended aperture values for night photography:
- f/1.4 – f/2: Best for astrophotography and dark environments
- f/2.8: The sweet spot for most night scenarios — sharp and bright
- f/4: Workable for cityscapes with artificial light; too slow for stars
Best starter lenses by type:
- Wide-angle (14–24mm, f/2.8 or faster): Ideal for Milky Way and cityscapes
- “Nifty fifty” (50mm, f/1.8): Inexpensive, versatile for street and portraits
- 35mm f/1.8: Excellent all-rounder for both street and moderate astrophotography
For a deeper look at focal lengths, see our guide to wide-angle lenses for night shooting.
Night Photography Camera Settings
This is the core of the Night Photography Confidence Stack — the settings layer. Get these right, and everything else follows. According to Canon USA’s exposure guide, the three settings that control exposure — aperture, ISO, and shutter speed — form the exposure triangle (the relationship between these three variables that determines how bright or dark your image is). Change one, and you must adjust at least one other to compensate.
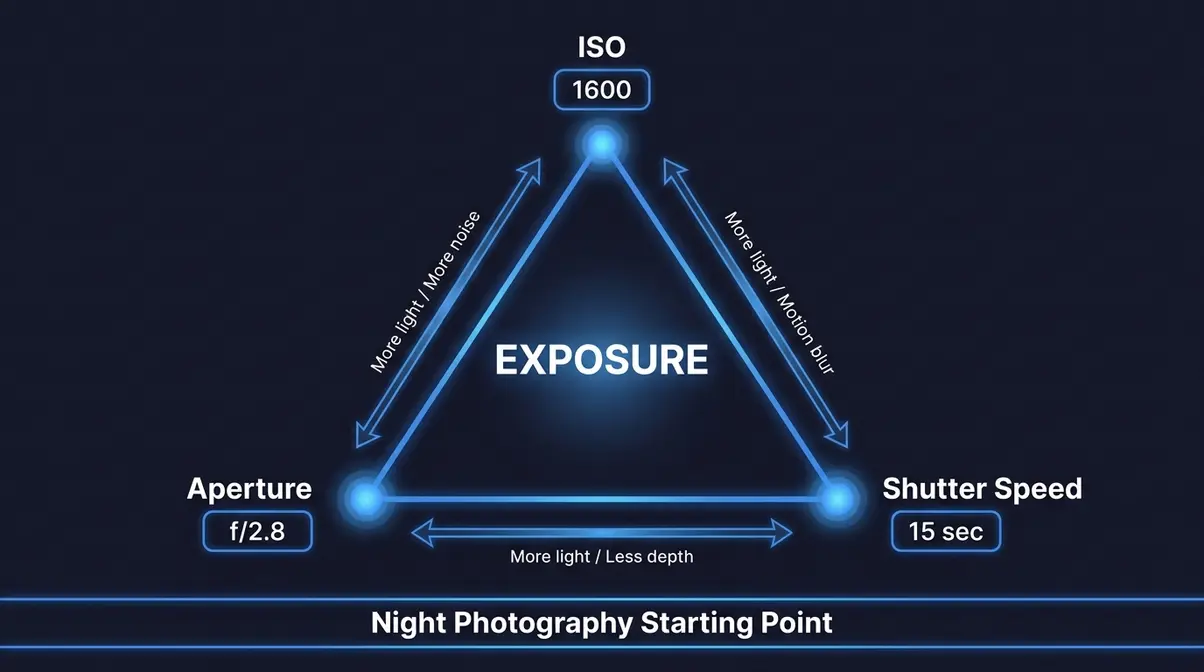
Aperture: Why Wide Open is Best
For night photography, set your aperture as wide (low f-number) as your lens allows. Wide aperture = large opening = more light reaching the sensor. Simple.
Why “wide open” means a low f-number: The f-stop (the ratio of focal length to aperture diameter — a lower number means a larger opening) scale runs counterintuitively: f/1.8 is wider than f/11. Think of it like a window: a bigger window lets in more light.
Night photography aperture recommendations:
- f/1.4 – f/2.8: Use for astrophotography, dark streets, and low-light portraits
- f/4 – f/5.6: Acceptable for brightly lit cityscapes only
- f/8+: Avoid unless shooting star trails with a bright scene or using focus stacking
One exception: if you notice “coma” (comet-shaped distortion of bright stars near frame edges), stopping down to f/2.8 or f/4 often fixes it. Many fast lenses perform their best optically at one stop below their maximum aperture.
What ISO setting should I use?
ISO (your camera’s sensitivity to light) is your most powerful tool — and your biggest trade-off. Higher ISO = brighter image, but also more digital noise (the grainy, speckled texture that ruins otherwise sharp shots). NASA’s astrophotography guidelines recommend ISO 1600–3200 as the starting baseline for night sky work, with 15–20 second exposures.
Practical ISO starting points by scenario:
| Scenario | Starting ISO | Adjust If… |
|---|---|---|
| Milky Way / dark sky | 1600–3200 | Image too noisy → reduce; too dark → increase |
| Urban cityscape | 400–800 | Plenty of ambient light available |
| Street photography | 800–3200 | Depends on street lighting conditions |
| Light trails | 200–400 | Bright headlights overexpose quickly |
| Night portraits | 800–1600 | Balance with flash if using one |
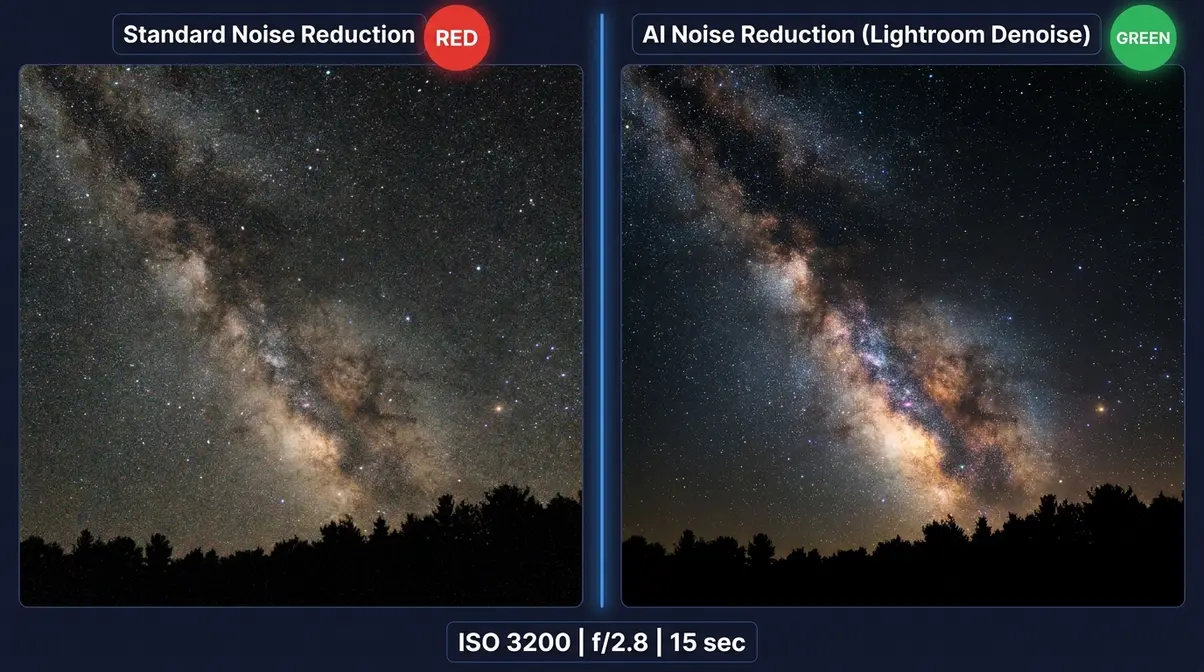
The 2026 game-changer for noise: AI noise reduction tools like Adobe Lightroom’s Denoise, DxO PhotoLab’s DeepPRIME, and Topaz DeNoise AI now recover usable detail from images that would have been trash just three years ago. This means you can push ISO higher than older guides suggest. Shoot at ISO 3200 or even 6400 with confidence, then clean it up in post. The workflow: shoot RAW → apply AI denoise → recover detail → export.
Shutter Speed Guide
Shutter speed (how long your camera’s shutter stays open to collect light) is where night photography gets creative. Longer exposures collect more light — but they also blur anything that moves, including stars.
Shutter speed guide by scenario:
- Light trails (cars): 8–30 seconds — long enough to capture full trail arcs
- Cityscape reflections: 2–15 seconds — depends on available light level
- Milky Way (no trails): Use the NPF rule (covered in H2-4) — typically 10–25 seconds
- Star trails: 30+ minutes (or stacked shorter exposures)
- Night portraits with ambient light: 1/30 – 1/125 second (person must stay still)
Bulb mode: When you need exposures longer than 30 seconds, switch to Bulb (B) mode. The shutter stays open as long as you hold the button — use a remote shutter release or intervalometer to avoid touching the camera.
How to Focus in the Dark
Autofocus (AF) fails in low light. Your camera’s AF system needs contrast to lock on — and darkness provides almost none. Here’s the step-by-step process to achieve sharp focus at night:
- Switch to Manual Focus (MF) on your lens barrel — look for the AF/MF switch.
- Point your camera at the brightest point in the scene — a distant streetlight, a bright star, or the moon.
- Enable Live View on your camera’s rear screen.
- Zoom in using the focus magnifier (usually a button labeled “+” or a magnifying glass icon) to 5× or 10× magnification on the bright point.
- Rotate the focus ring slowly until the point of light is as small and sharp as possible.
- Lock the focus ring with tape or your focus-lock button, then recompose.
- Take a test shot at a high ISO to verify sharpness before committing to a long exposure.
For astrophotography, an alternative is to set focus to infinity (∞) on your lens — but test first, because the infinity mark on many lenses is not perfectly accurate. The focus magnifier method is more reliable.
For more on manual focus techniques, explore our in-depth manual focus guide.
Night Photography Techniques
With your gear set and your settings dialed in, you’re ready for the third layer of the Night Photography Confidence Stack: scene technique. These are the methods that separate technically correct but flat images from genuinely compelling night photography.
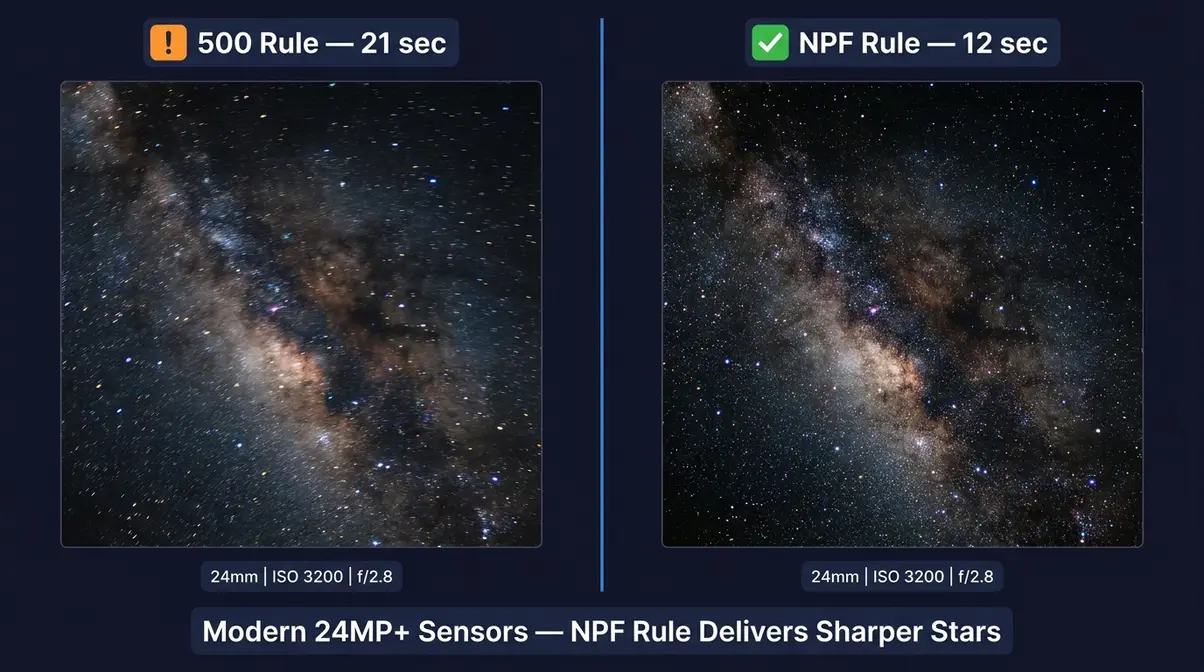
What is the 500 rule?
The 500 rule is a quick formula: divide 500 by your focal length to get the maximum shutter speed (in seconds) before stars start trailing. On a 24mm lens: 500 ÷ 24 = ~21 seconds. Simple, memorable — and outdated.
The problem: the 500 rule was designed for 12-megapixel sensors. Modern cameras have 24, 45, or even 61 megapixels. More pixels in the same sensor area means each pixel is smaller — and star movement becomes visible at shorter exposures. On a 45MP full-frame sensor at 24mm, the 500 rule gives you 21 seconds, but stars may already trail at 10 seconds.
The NPF rule (named for the aperture, pixel pitch, and focal length variables it uses) accounts for your specific sensor’s pixel density:
NPF formula (simplified): Maximum shutter speed = (35 × pixel pitch in µm) ÷ focal length
Or use the practical shortcut: divide your 500-rule result by your camera’s crop factor, then halve it for high-megapixel sensors.
Practical NPF starting points (full-frame, 24–26MP):
| Focal Length | 500 Rule | NPF Rule (24MP FF) |
|---|---|---|
| 14mm | 36 sec | 20 sec |
| 24mm | 21 sec | 12 sec |
| 35mm | 14 sec | 8 sec |
Use the NPF rule, take a test shot, zoom in 100% on a star near the frame edge, and adjust. That’s the real-world workflow. For a detailed NPF calculator, visit EarthSky’s guide to photographing the night sky.
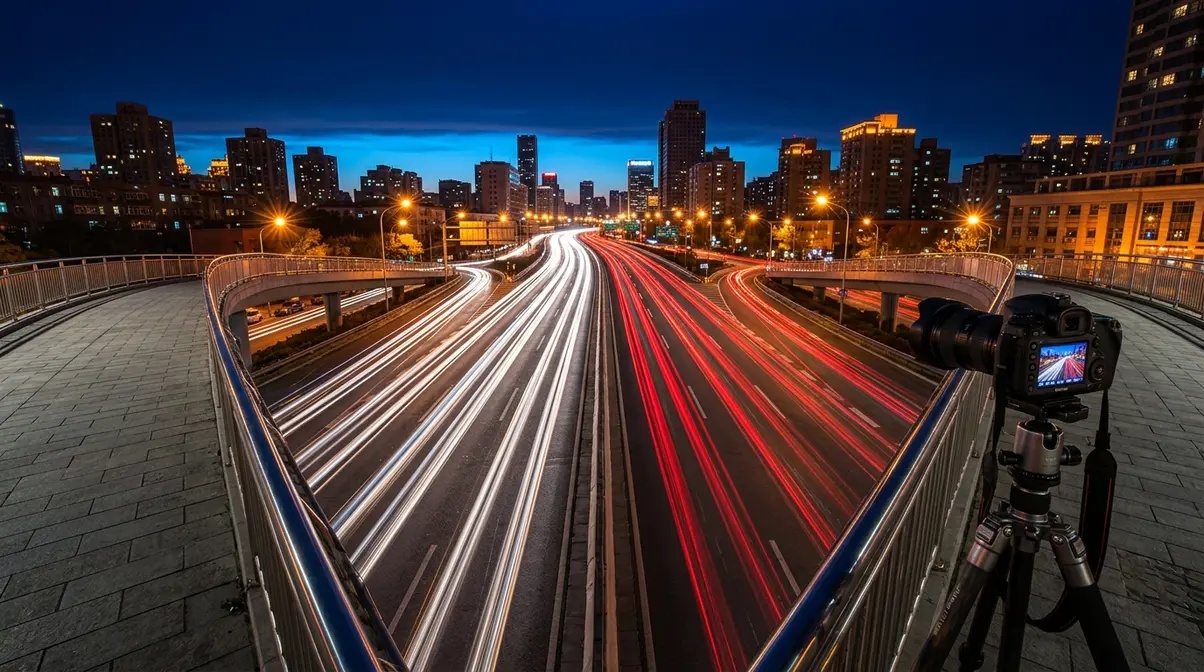
Capturing Light Trails
Light trail photography is one of the most beginner-friendly night techniques — immediate, dramatic results with minimal gear. Here’s the step-by-step:
- Find an elevated vantage point above a busy road, or a pedestrian bridge over a highway. More lanes = more trails = more visual impact.
- Set your aperture to f/8–f/11. Unlike astrophotography, you want a deep depth of field here so the entire scene stays sharp.
- Set ISO to 100–200. Traffic headlights are bright. Low ISO prevents overexposure.
- Set shutter speed to 10–30 seconds. Longer = longer trails. Experiment.
- Use your 2-second self-timer or a remote shutter release to trigger without touching the camera.
- Wait for a burst of traffic, then fire. The more cars in frame during the exposure, the denser the trail network.
- Review and adjust. Too bright? Reduce shutter speed or close aperture to f/11. Too dark? Extend shutter speed or open to f/8.
Pro tip: Shoot during “blue hour” — the 20–30 minutes after sunset when the sky still holds deep blue color. Trails against a blue-purple sky look far more dramatic than trails against pure black.
Taking Your First Night Photo
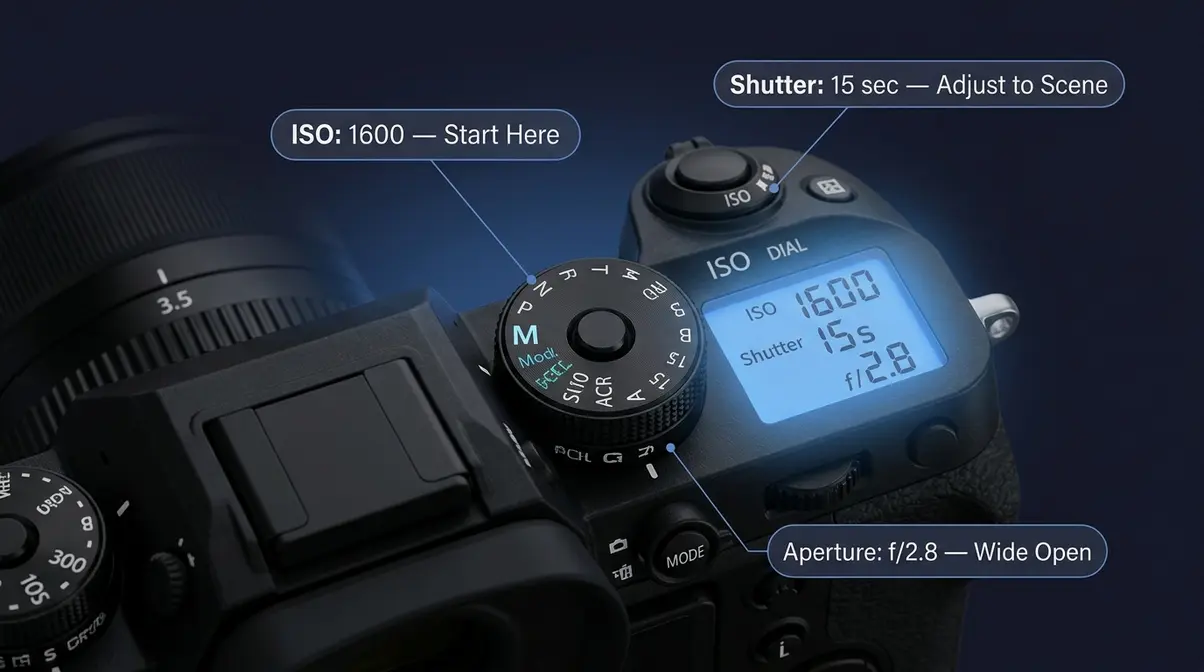
This walkthrough assumes you’re at a cityscape or lit outdoor scene. Follow these steps before adjusting anything else:
- Set your camera to Manual (M) mode. Locate the mode dial on top of your camera.
- Set aperture to f/2.8 (or as wide as your lens allows).
- Set ISO to 1600. This is your starting point — you’ll adjust based on the test shot.
- Set shutter speed to 10 seconds. A safe starting exposure for most urban night scenes.
- Mount camera on tripod and compose your shot.
- Focus using the focus magnifier method (described above).
- Enable 2-second self-timer to avoid shutter-press vibration.
- Fire a test shot and review on your rear screen.
- Evaluate: Too dark? Double your shutter speed (20 sec) or raise ISO to 3200. Too bright? Halve shutter speed (5 sec) or lower ISO to 800.
- Fine-tune until you have a properly exposed test shot, then commit to your full composition.
Night Photography by Genre
Each night photography genre has its own quirks and optimal approaches. Here’s how to apply the Confidence Stack to specific scenarios.
Astrophotography & Night Sky
The night sky is the most rewarding — and most technically demanding — night photography genre. Success depends on three factors beyond camera settings: location, timing, and planning.
Location — the Bortle Scale: The Bortle Scale (a 1–9 numerical scale measuring sky darkness, where 1 is perfectly dark and 9 is inner-city sky glow) determines what you can photograph. You need Bortle 4 or darker to see the Milky Way core.
According to the National Park Service’s night sky program, over 99% of Americans live under light-polluted skies — meaning most beginners need to drive at least 1–2 hours from city centers to reach usable darkness. Use the DarkSky International light pollution map to find dark sky sites near you.
Timing: The Milky Way core is only visible from roughly March through October in the Northern Hemisphere, peaking in July. Shoot during new moon phases — a full moon brightens the sky enough to wash out fainter stars. Apps like PhotoPills, Stellarium, or Sky Guide show exactly where the Milky Way will be at any given time and location.
Recommended settings for Milky Way photography:
- Aperture: f/2.8 or wider
- ISO: 3200 (bump to 6400 if needed, apply AI denoise in post)
- Shutter speed: Use NPF rule (typically 10–20 seconds for 24mm on full-frame)
- Focus: Infinity method or focus magnifier on a bright star
Essential tip: Use a red headlamp to preserve your night vision while adjusting settings. White light destroys dark adaptation in seconds; red light does not. The National Park Service recommends red-light headlamps as standard equipment for all night sky activities.
Street Night Photography
Street photography after dark is more forgiving than astrophotography — cities provide abundant ambient light, and you can handhold your camera in many situations. The challenge shifts from technical to creative: finding compelling subjects and decisive moments in low, unpredictable light.
According to National Geographic’s street photography guide, the most compelling urban night images exploit the contrast between dark shadows and pools of artificial light — neon signs, shop windows, streetlamps.
Street night photography settings:
- Aperture: f/1.8–f/2.8 (handholding requires more light)
- ISO: 1600–3200 (accept some grain — it adds atmosphere)
- Shutter speed: 1/60–1/125 sec minimum to freeze subject movement
- Focus: Use center-point AF under available light, or pre-focus at a set distance (zone focusing)
Compositional tip: Wet pavement after rain creates mirror-like reflections that double the visual impact of street lights and neon signs. Carry a small water spray bottle on dry nights.
For more inspiration, explore our street photography at night tips.
Landscape & Cityscape Shots
Cityscapes reward patience and timing. The best cityscape night photos are rarely shot in full darkness — they’re shot during blue hour, the 20–30 minute window after sunset when artificial city lights balance with the remaining sky color. The result is a rich, saturated image that full darkness can’t replicate.
Essential cityscape technique — the reflection shot:
- Scout your location in daylight. Look for water bodies, puddles, or reflective surfaces.
- Arrive 30 minutes before sunset to set up your tripod and compose.
- Shoot your first frames during blue hour (sky is still bright blue).
- Continue shooting as the sky darkens — each 10 minutes produces a different mood.
- Use a 10–30 second exposure to smooth water reflections into glass-like surfaces.
White balance tip: Set white balance manually to 3200–4000K (Kelvin — the color temperature scale used in photography, where lower numbers are warmer/orange and higher numbers are cooler/blue) for cityscapes. Auto white balance often shifts orange city glow to a flat, desaturated look.
The BBC’s guide to urban night photography notes that many of the world’s most iconic city images were captured during the brief blue hour window — not at midnight.
Phone & Entry-Level Cameras
Smartphones have closed the gap with dedicated cameras more rapidly than most photographers expected. Modern flagship phones offer computational photography features — multi-frame stacking, AI processing, and dedicated night modes — that produce genuinely impressive results.
iPhone Night Mode & Pro Apps
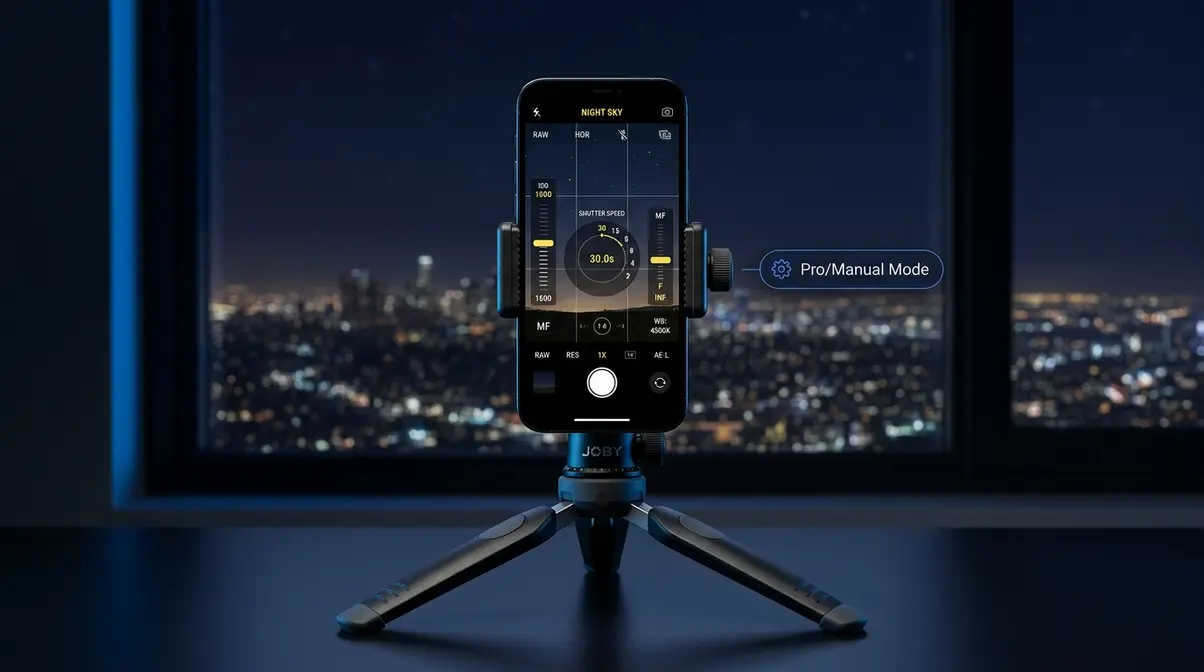
iPhone Night Mode (available on iPhone 11 and later) automatically activates in low light, capturing multiple frames and merging them to reduce noise and increase brightness. For casual night shots, it works well out of the box. For more creative control, you need a third-party app.
Step-by-step: iPhone Pro Mode for night sky photography:
- Download Halide Mark II or ProCamera (both offer full manual RAW control)
- Set ISO: 1600–3200
- Set shutter speed: 15–30 seconds
- Set focus to manual, zoom to a bright star, focus until sharp
- Use the app’s built-in self-timer (3 seconds) to avoid camera shake
- Mount your iPhone on a tripod using a phone adapter
The iPhone 15 Pro and iPhone 16 series can capture usable Milky Way images at 30-second exposures. Apply AI noise reduction in Lightroom Mobile for best results.
Native Night Mode tip: For landscapes, hold still and let Night Mode complete its multi-second capture. The longer the capture time shown (up to 30 seconds), the darker the scene — brace against a wall or use a tripod for best results.
Android & Samsung Night Tips
Samsung’s Expert RAW app and the native Pro Mode on Galaxy S24 and S25 series give you full manual control comparable to a dedicated camera. The Galaxy S25 Ultra’s 200MP sensor captures enormous detail even at high ISO — though you’ll typically shoot at lower resolutions for cleaner files.
Samsung Pro Mode settings for night scenes:
- ISO: 800–1600 (Samsung’s sensor handles noise well at these values)
- Shutter speed: 5–30 seconds (requires tripod)
- White balance: Manual at 3500K for warm city scenes, 4500K for cooler night skies
- Format: Shoot in RAW for maximum post-processing flexibility
Android tip: Google Pixel phones use the Astrophotography mode within Night Sight — point at a dark sky on a tripod, and the phone automatically captures a 4-minute stacked exposure. No manual settings required.
Explore our smartphone night photography guide for a full comparison across devices.
Canon Rebel & DSLR Settings
The Canon Rebel series (T7, T8i, SL3) is one of the most common first cameras for beginners. These cameras have APS-C sensors with a crop factor (a multiplier applied to focal lengths because the APS-C sensor is smaller than full-frame — typically 1.6× for Canon) of 1.6×. This affects your NPF rule calculations.
Recommended Canon Rebel night photography settings:
| Scenario | Aperture | ISO | Shutter Speed |
|---|---|---|---|
| Milky Way | f/2.8–f/4 | 3200 | 10–15 sec (NPF-adjusted) |
| Cityscape | f/8 | 400–800 | 10–20 sec |
| Light trails | f/11 | 100–200 | 15–30 sec |
| Street (handheld) | f/1.8 | 1600–3200 | 1/60 sec |
Important Canon Rebel note: The Rebel’s kit lens (18–55mm f/3.5–5.6) is too slow for astrophotography. For under $150 used, a Canon 50mm f/1.8 STM (“nifty fifty”) dramatically improves low-light performance. It’s the single best upgrade for Rebel owners shooting at night.
For complete Canon-specific settings, see our Canon Rebel night photography walkthrough.
10 Night Photography Ideas
Running out of inspiration is never the problem once you see how many subjects surround you after dark. Here are 10 ideas organized by where you are.
At-Home Night Photo Ideas
You don’t need to drive anywhere. Your backyard, balcony, or neighborhood offers more night photography subjects than most beginners realize:
- Backyard star trails: Set up on a clear night, point at Polaris (the North Star), and shoot 30-second frames for 60–90 minutes. Stack in free software like Startrails.exe or StarStaX.
- Candle or lamp light portraits: Place a subject next to a single candle or warm lamp. Use f/1.8, ISO 800, 1/60 sec. The result looks like a Renaissance painting.
- Light painting: In a completely dark room or backyard, open the shutter for 20–30 seconds and “paint” with a flashlight, sparkler, or LED light wand. Spell words, draw shapes, or trace your subject’s outline.
- Window light street view: Shoot from inside through a window at the street scene below. The glass adds subtle reflections and frames the scene naturally.
- Moon photography: The full moon is bright enough to expose at 1/125 sec, f/8, ISO 200 — treat it like a daylight subject. Use a telephoto lens for detail.
Outdoor Night Photo Ideas
When you’re ready to venture out, these subjects reward the effort:
- Bridges and overpasses: Perfect for light trail photography. Most cities have at least one pedestrian bridge with a clear view of traffic.
- Waterfront reflections: Lakes, harbors, and rivers reflect city lights into abstract color patterns during long exposures.
- Neon signs and storefronts: The warm glow of a diner sign or a bar’s neon lights creates instant atmosphere. Shoot at f/2.8, ISO 1600, 1/30 sec.
- Abandoned or industrial areas: Warehouses, train yards, and industrial zones offer dramatic textures under sodium vapor lighting. Always check access rules before shooting.
- Camping or hiking destinations: Dark sky preserves and national parks offer the darkest accessible skies. The National Park Service’s dark sky program lists designated dark sky parks across the US.
For more inspiration, browse our night photography ideas gallery.
Night Photography on Film
Digital has made night photography more forgiving — instant feedback, adjustable ISO, and AI noise reduction. But film night photography has its own distinct aesthetic: grain that feels intentional, colors that shift in unexpected ways, and a slower, more deliberate process that many photographers find deeply satisfying.
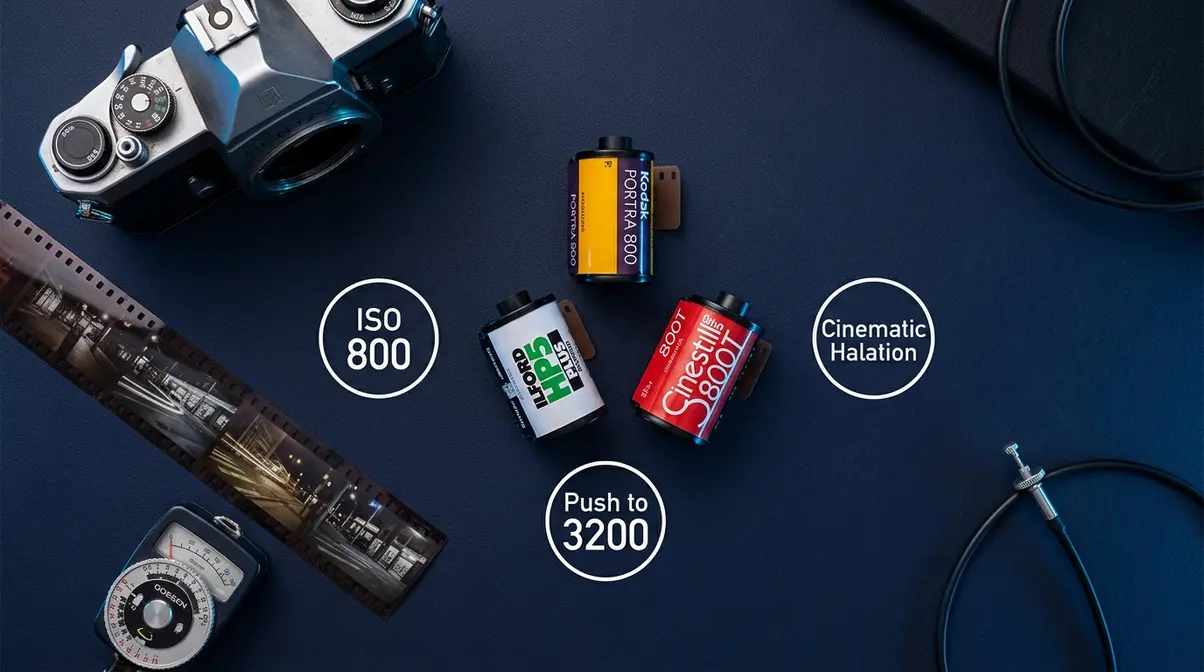
Best Film Stocks for Night
The key metric for night film photography is film speed (measured in ISO — the same scale as digital, where higher numbers indicate greater light sensitivity). For night work, you want ISO 800 or higher.
Top film stocks for night photography:
| Film Stock | ISO | Character | Best For |
|---|---|---|---|
| Kodak Portra 800 | 800 | Fine grain, natural skin tones | Night portraits, street |
| Ilford HP5 Plus | 400 (push to 1600) | Classic B&W grain | Street, urban scenes |
| Kodak T-Max 3200 | 3200 (native) | Fine grain for speed | Very dark environments |
| Cinestill 800T | 800 | Cinematic halation, warm | Neon-lit street scenes |
| Fujifilm Superia 1600 | 1600 | Warm tones, moderate grain | Casual night shooting |
“Pushing” film: You can rate a film at a higher ISO than its box speed and ask the lab to “push process” it — developing longer to compensate. Ilford HP5 pushed to ISO 1600 or 3200 is a popular and affordable night film option.
Cinestill 800T deserves special mention: its unique “halation” effect (a red glow around bright light sources caused by the absence of an anti-halation layer) has become a signature aesthetic for night street photography. New York Times photography coverage has featured this look prominently in documentary street work.
Understanding Reciprocity
Reciprocity failure (also called the Schwarzschild effect — the phenomenon where film loses its expected sensitivity during very long exposures, requiring significantly more exposure time than calculated) is the most important concept unique to film night photography. Digital sensors don’t experience it; film does.
In practical terms: if your light meter says “expose for 8 seconds,” your film might actually need 20–45 seconds to achieve the same brightness. The relationship between exposure time and film response breaks down at exposures beyond approximately 1 second.
Reciprocity failure compensation guide:
| Calculated Exposure | Kodak Portra 800 | Ilford HP5 | Kodak T-Max 3200 |
|---|---|---|---|
| 1 second | 1.5 sec | 1.5 sec | 1 sec |
| 4 seconds | 8 sec | 9 sec | 4 sec |
| 16 seconds | 45 sec | 50 sec | 16 sec |
| 60 seconds | 4 min | 5 min | 60 sec |
Kodak T-Max 3200 has excellent reciprocity characteristics — it barely needs compensation, making it the most practical choice for very long film exposures. Ilford HP5 requires the most compensation but remains a community favorite for its aesthetic.
For a deeper exploration of film techniques, read our guide to film photography for beginners.
Common Mistakes & Alternatives
Even with the Confidence Stack in hand, beginners encounter predictable stumbling blocks. Here’s how to recognize and fix them quickly.
Common Pitfalls in Night Photos
1. Forgetting to turn off image stabilization on a tripod
Most lenses and cameras have optical image stabilization (IS/OIS/VR — the in-lens or in-body mechanism that compensates for camera movement). On a tripod, IS detects tiny vibrations from the stabilization system itself and can actually introduce blur. Turn it off when your camera is mounted.
2. Shooting in JPEG instead of RAW
JPEG files discard data during in-camera processing. RAW files (unprocessed sensor data) retain everything — including the shadow detail and highlight information you’ll need in post. Always shoot RAW for night photography. The file sizes are larger, but the editing flexibility is incomparable.
3. Using the wrong white balance
Auto white balance in artificial light scenes often produces flat, desaturated results. Set white balance manually: 3200K for warm tungsten/sodium scenes, 4500–5500K for mixed or cooler light. Correct in post if shooting RAW.
4. Skipping the histogram
The histogram (the graph on your camera’s review screen showing brightness distribution) is more reliable than your eye for judging exposure. A good night exposure histogram has data across the full range — not crammed to the left (underexposed) or clipped on the right (overexposed).
5. Not checking focus at 100% before a long exposure
A 30-minute star trail ruined by slightly soft focus is a painful lesson. Always zoom to 100% on a test shot and verify sharpness before committing to a long exposure.
When to Try a Different Approach
Night photography isn’t the right tool for every low-light situation. Consider these alternatives:
- Indoor events (concerts, parties): Night photography techniques (tripod, long exposure) don’t work with moving subjects. Use flash photography, fast primes (f/1.4–f/1.8), and high ISO with noise reduction instead.
- Sports at night: Long exposures blur moving athletes. Use a fast shutter speed (1/500+ sec), wide aperture, and high ISO — or supplemental lighting.
- Portraits in complete darkness: Without any ambient light, you need off-camera flash or a dedicated lighting setup, not longer exposures. See our guide to off-camera flash for portraits.
When to Seek Expert Help
If you’re experiencing consistent autofocus hunting that persists even after switching to manual focus, or if your images show sensor hot pixels (bright colored dots that appear in the same position on every long exposure), it may indicate a hardware issue worth having a technician inspect. Similarly, if you’re planning to shoot in remote dark sky locations alone at night, consider joining a local astronomy club or photography group — both for safety and for the wealth of location knowledge experienced members carry.
Night Photography FAQs
How do I take really good night pictures?
Great night photography comes down to three fundamentals: a stable tripod, correct manual exposure settings (wide aperture, ISO 1600, shutter speed adjusted to scene), and sharp manual focus. Start by shooting cityscapes or light trails during blue hour — the 20-30 minutes after sunset when sky color and artificial lights balance beautifully. Use the 10-step walkthrough in this guide for your first shoot. Review your histogram after each shot, not just the image preview. Once you nail a cityscape, apply the same principles to astrophotography.
What are common night photography mistakes?
The five most reported mistakes among beginner night photographers are: (1) leaving image stabilization on while using a tripod — this can introduce blur; (2) shooting in JPEG instead of RAW, which limits post-processing recovery; (3) not verifying focus at 100% before a long exposure; (4) using Auto white balance in artificial light, producing flat colors; and (5) applying the outdated 500 rule on modern high-megapixel sensors. Each mistake has a simple fix. Across photography communities like r/photography and r/astrophotography, these five account for the majority of “what went wrong” posts from beginners.
Is night photography hard?
Night photography has a steeper learning curve than daytime shooting, but most beginners capture impressive results on their first dedicated night outing — once they understand the three core concepts: tripod stability, the exposure triangle, and manual focus technique. The initial intimidation comes from switching off Auto mode, not from any inherent difficulty. Light trail photography and blue-hour cityscapes are genuinely beginner-friendly starting points. Astrophotography requires more planning (dark skies, moon phase timing), but the settings themselves are straightforward once learned.
What is night photography called?
Night photography goes by several names depending on the specific genre. Astrophotography refers specifically to imaging the night sky — stars, planets, the Milky Way. Long-exposure photography describes any technique using extended shutter speeds, including light trails and smooth water effects. Urban or cityscape photography covers architectural night shots. Street photography at night is sometimes called “nocturnal street photography.” The umbrella term “night photography” covers all of these. Some photographers use the French term photographie nocturne or the technical term “low-light photography” to describe work in challenging lighting conditions below standard exposure thresholds.
Do I need a full-frame camera for night photography?
No, you do not absolutely need a full-frame camera to capture great night photos. While full-frame sensors generally handle digital noise better at higher ISOs, modern APS-C and Micro Four Thirds cameras are highly capable when paired with a wide aperture lens (f/1.8 or f/2.8). In fact, an entry-level crop-sensor camera with a fast prime lens will easily outperform a professional full-frame camera hampered by a slow kit lens. Furthermore, 2026 AI noise reduction tools can clean up files from smaller sensors remarkably well.
How do I edit night photography photos?
Editing night photography begins with shooting in RAW format to preserve maximum data in your highlights and shadows. The first step in post-processing is usually applying AI noise reduction to clean up the high ISO grain. Next, adjust your white balance to ensure city lights don’t look overly orange or the night sky doesn’t look unnaturally purple. Finally, lift the shadows slightly to reveal hidden details, and increase the contrast to make the bright elements pop against the dark background.
Start Shooting Tonight
Night photography transforms the world you walk through every day into something extraordinary. The same street you drive down every morning becomes a canvas of light trails and reflections after dark. The backyard you ignore in daylight holds a galaxy above it on clear nights.
The Night Photography Confidence Stack gives you a systematic path through any night scenario: build your gear foundation (tripod, camera with manual controls, fast lens), master your three core settings (aperture wide open, ISO 1600 as your starting point, shutter speed adjusted to scene), then apply scene-specific technique (NPF rule for stars, blue hour for cityscapes, zone focusing for street). Each layer builds on the last. Master one before moving to the next.
Ready to capture the stars? Grab your tripod, review our settings cheat sheet, and start shooting tonight! Your first assignment: set up in front of any lit street scene, dial in f/2.8, ISO 1600, and 10 seconds, and fire a test shot. The gap between your first dark, noisy night shot and a polished professional image is smaller than you think — and now you have the framework to close it.
Last update on 2026-07-05 / Affiliate links / Images from Amazon Product Advertising API
