
Table of Contents
This blog post may contain affiliate links. As an Amazon Associate I earn from qualifying purchases.
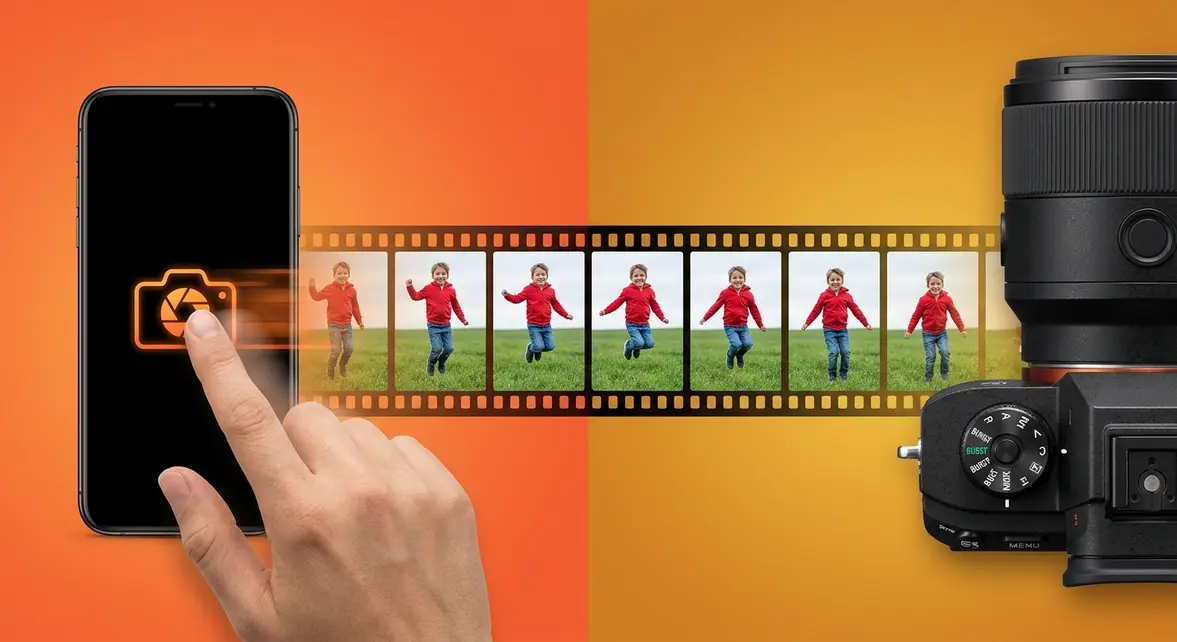
You press the shutter at the perfect moment — your kid is mid-jump, your dog is mid-leap — and the photo comes out blurry, or a half-second too late. You captured the almost moment, not the WOW moment. Here at amateurphotographerguide.com, we’ve found the solution to this exact problem.
The solution has been sitting in your camera’s settings this whole time. Burst mode photography — also called continuous shooting — fires off rapid-fire images the moment you press and hold the shutter, so you never miss the peak of the action again. In this guide, you’ll learn exactly what burst mode is, how to turn it on for both iPhone and DSLR cameras, the best situations to use it, and — crucially — how to manage all the photos you’ll take without the culling anxiety.
We’ll walk through everything step-by-step, from the basics all the way to The Burst-to-Best Workflow that makes post-shoot sorting painless.
Burst mode photography fires multiple photos per second so you never miss a peak action moment — ideal for sports, pets, children, and any fast-moving subject.
- What it is: Burst mode (continuous shooting) captures 5–30+ frames per second while you hold the shutter
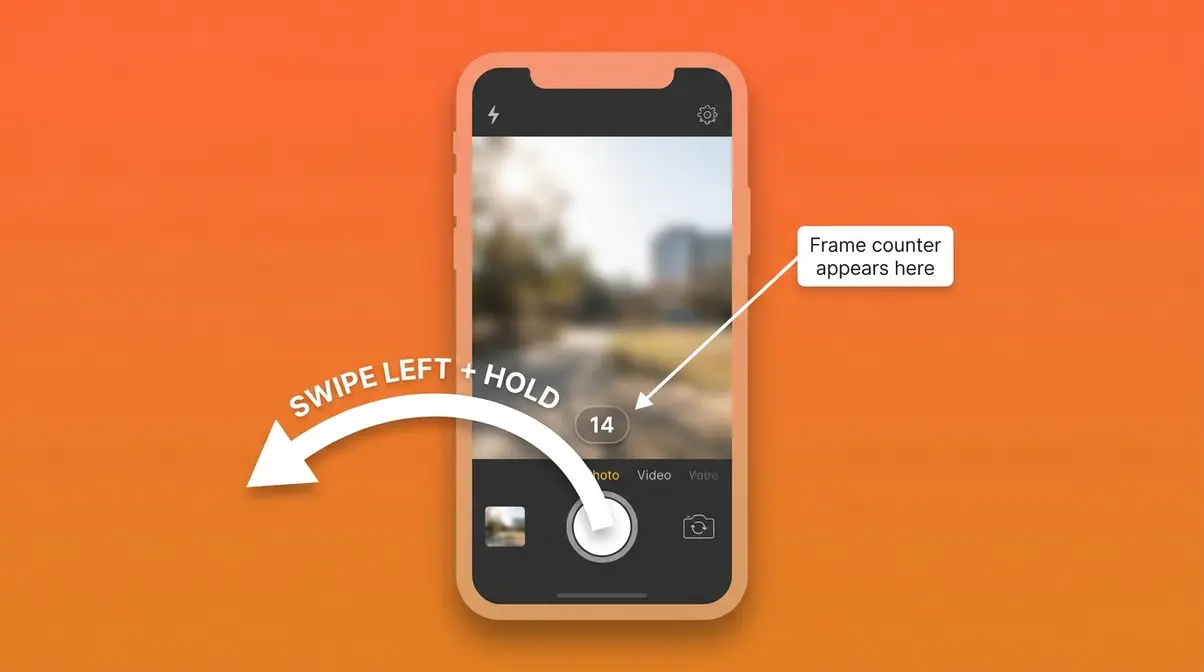
- iPhone (iOS 16+): Swipe the shutter button LEFT and hold — pressing and holding now starts a video
- DSLR/Mirrorless: Set your drive mode to “Continuous High” for maximum burst speed
- The Burst-to-Best Workflow: Shoot → Beat the Buffer → Cull Smart — a 3-step system for managing hundreds of photos without anxiety
- Memory matters: Use a UHS Speed Class 3 (U3) or faster card to prevent buffer slowdowns mid-shoot
What Is Burst Mode Photography?

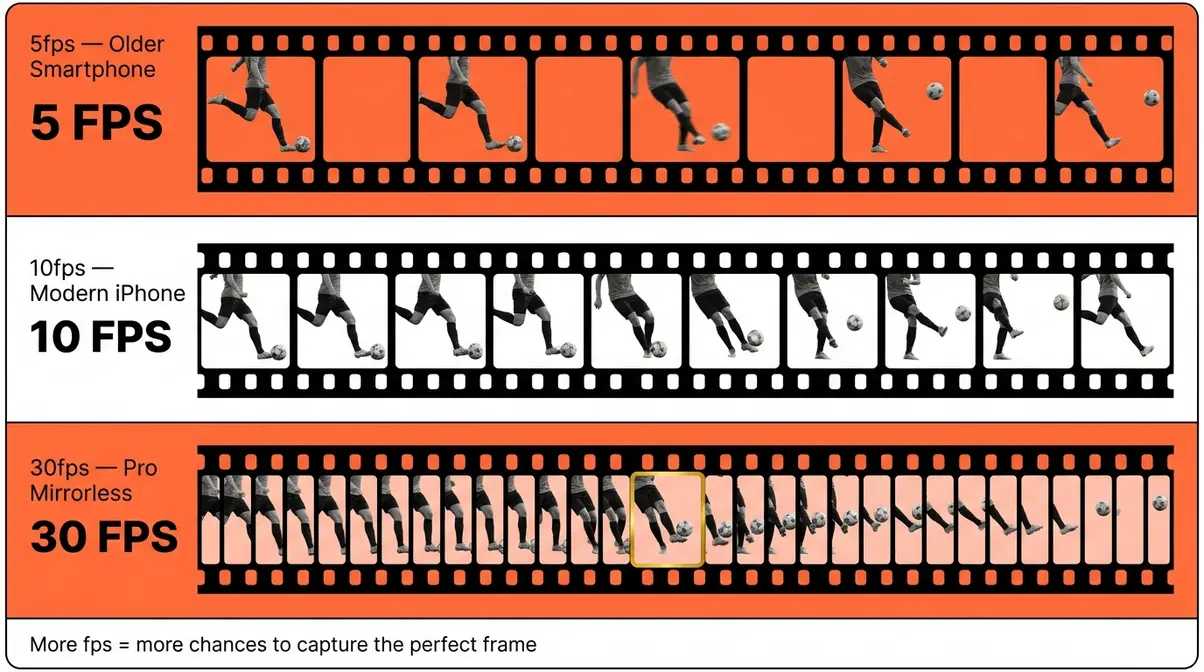
Burst mode photography — also called continuous shooting — is a camera feature that captures a rapid sequence of photos while you hold down the shutter button. Instead of one image, you get 5, 10, or even 30 photos per second (fps — frames per second, meaning how many individual photos your camera takes in one second). This gives you dozens of frames from a single moment, so you can pick the one where the action is perfectly frozen. Mastering these burst mode photography basics is the first step toward capturing professional-level action shots.
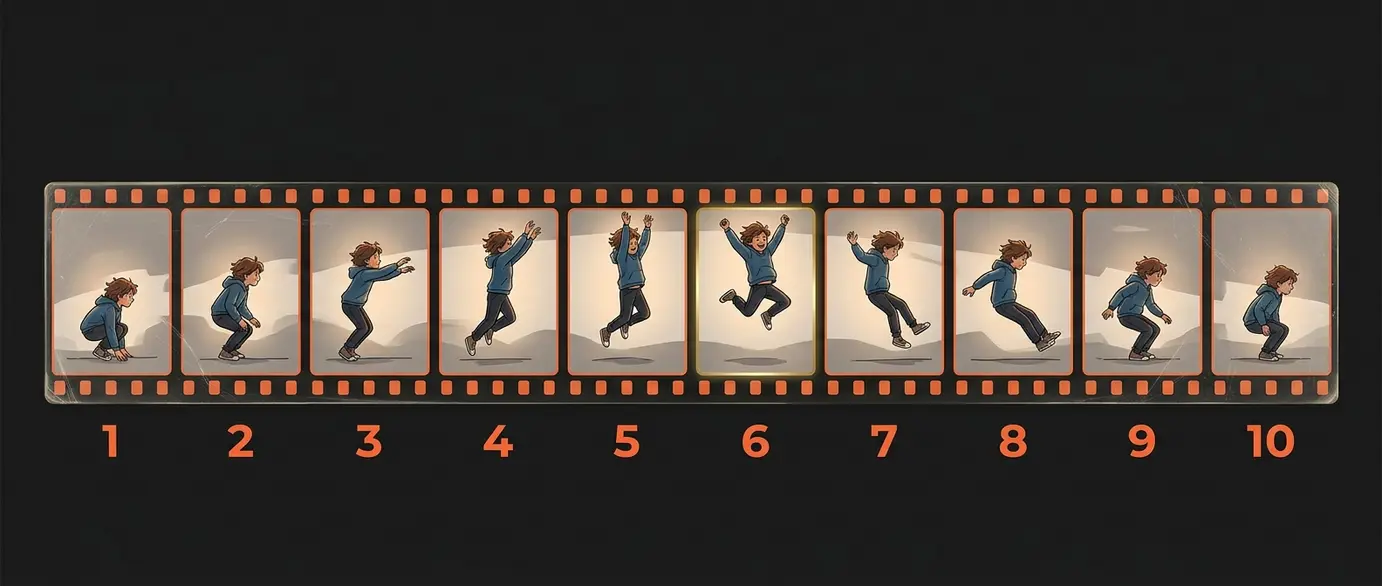
Think of it as the difference between a single snapshot and a short film strip. One press, one moment, one chance. Burst mode? One press, dozens of moments, dozens of chances.
Frames Per Second (FPS) Explained
Here’s a simple way to think about it. Remember flip-books? Each page is a slightly different drawing. Flip through them fast and you see motion. Your camera does exactly the same thing — it takes a rapid series of still images, each a tiny fraction of a second apart, and you end up with a “flip-book” of the moment.
The speed of that flip-book is measured in fps (frames per second). Here’s what different fps rates feel like in practice:
| Burst Speed | Typical Device | Best For |
|---|---|---|
| 5–10 fps | Smartphone (older models) | Kids, pets, casual action |
| 10–12 fps | iPhone 16 / modern flagship phones | Most everyday action |
| 12–20 fps | Entry-level DSLR / mirrorless | Sports, wildlife |
| 20–30 fps | Pro mirrorless (Canon R7, Sony A9 III) | Fast sports, birds in flight |
Burst mode photography captures up to 30 frames per second on modern mirrorless cameras, giving you dozens of shots from a single moment to choose from (Canon USA, 2026). Even at a modest 10 fps, a two-second burst gives you 20 photos — and the perfect expression is almost certainly in there somewhere.
Across photography communities, the consistent feedback is that even beginner shooters see an immediate jump in “keeper rate” (the percentage of shots worth keeping) once they switch from single shot to burst for action subjects, a sentiment echoed in Adobe’s guide to continuous shooting.
Mechanical vs. Electronic Shutter
You may see your camera offer two burst options: mechanical shutter and electronic shutter (sometimes called “silent shutter”). Here’s the plain-English difference.
A mechanical shutter is a physical curtain inside your camera that opens and closes. It makes the classic click sound. It’s reliable and produces accurate colors, but it has moving parts — so there’s a physical limit to how fast it can cycle. Most mechanical shutters top out around 12–15 fps.
An electronic shutter reads the sensor digitally, with no moving parts. It’s silent and can reach 20–30+ fps. The trade-off: very fast subjects can appear slightly distorted (a phenomenon called “rolling shutter”), and it can struggle in mixed artificial lighting. For most beginners shooting kids and pets outdoors, electronic shutter is a great option.
Quick rule: Use mechanical shutter for reliability and color accuracy. Use electronic shutter when you need maximum speed or silence (like at a wedding ceremony).
Understanding the Camera Buffer
Here’s the one concept that every beginner guide skips — and it’s the one that causes the most mid-shoot frustration.
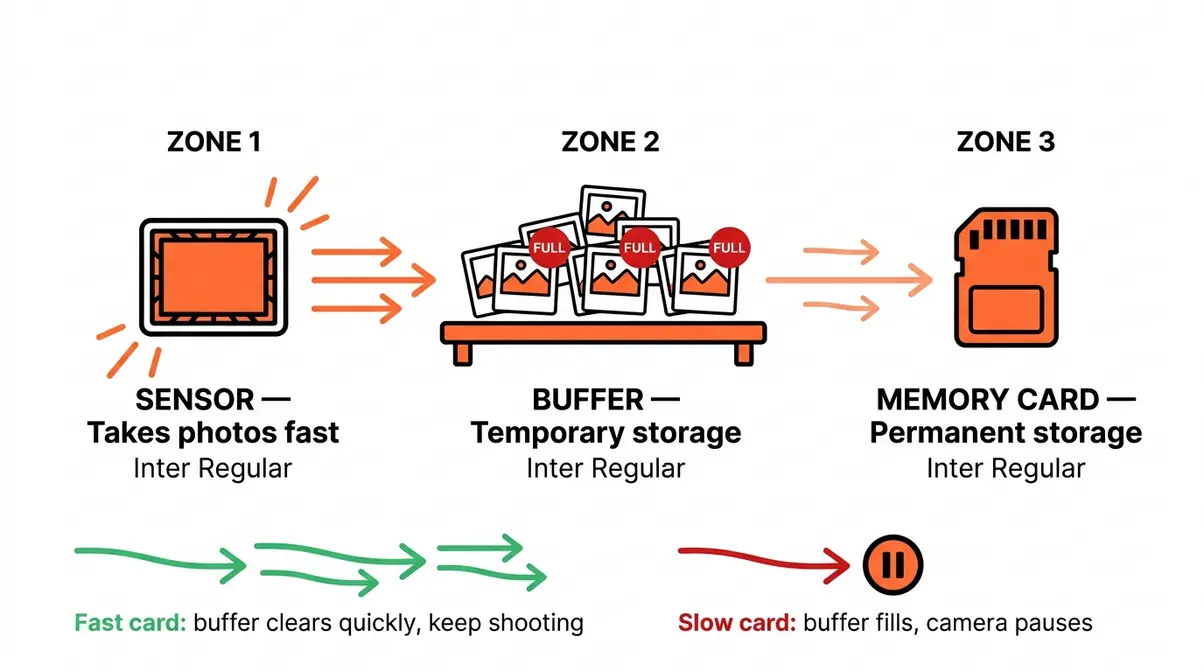
Your camera has a buffer — a small, fast temporary memory inside the camera that holds photos the instant you take them, before they get written to your memory card. Think of it like a kitchen counter between the stove and the refrigerator. Food (photos) comes off the stove (sensor) onto the counter (buffer) before being stored in the fridge (memory card).
When you shoot a burst, photos pile onto that counter faster than they can be put away. Eventually, the counter fills up. When the buffer is full, your camera slows down or stops shooting entirely — even if you’re still holding the shutter.
Why this matters for you: If your camera suddenly feels “stuck” mid-burst, the buffer is full. The fix? A faster memory card (more on that in the Managing section) and short, targeted bursts rather than holding the shutter for ten seconds straight.
Later in this guide, you’ll learn The Burst-to-Best Workflow: a 3-step system (Shoot → Beat the Buffer → Cull Smart) for managing all the photos you take without the overwhelming feeling that sends most beginners straight back to single-shot mode.
How to Use Burst Mode on Your iPhone
Most iPhone users have no idea burst mode even changed. Apple quietly updated the gesture in iOS 16 — and if you’re still pressing and holding the shutter button, you’re now recording a video instead of a burst. Photographers consistently report confusion about this exact switch, especially on iPhone 15 and 16 models. Learning this new gesture is essential if you want to take good photos with phone cameras during fast-paced events.
Here’s everything you need, whether your phone is brand-new or a few years old.
Prerequisites
Before you start shooting bursts on your iPhone, check these two things:
- iOS version: Go to Settings → General → Software Update. You want iOS 16 or later for the current burst gesture.
- Photo format: Go to Settings → Camera → Formats. Select “Most Compatible” (JPEG) if you want burst mode to work cleanly. HEIF works too, but JPEG makes viewing burst sequences easier on older Macs and PCs.
Activate Burst Mode on iOS 16+

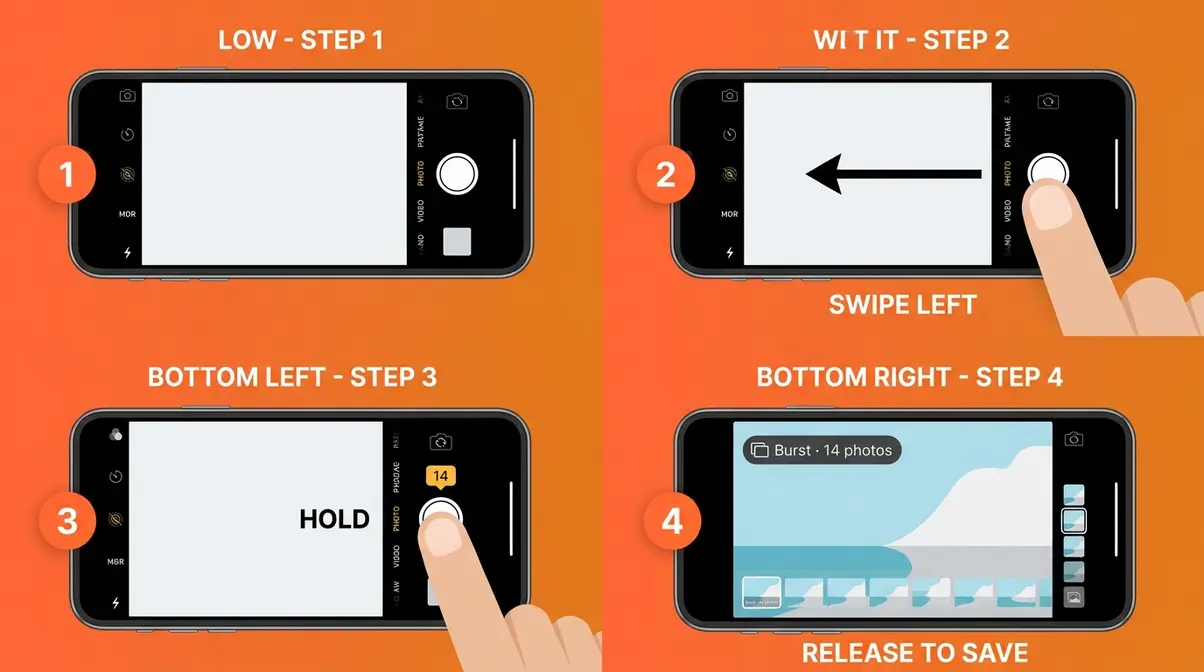
Apple redesigned the burst gesture starting with iOS 16. The old press-and-hold now starts a QuickTake video — which is why so many people think burst mode is gone. It isn’t. Here’s how to use it:
- Open the Camera app on your iPhone.
- Make sure you’re in Photo mode (not Video or Portrait — just the standard Photo setting).
- Frame your shot and get ready to fire.
- Swipe the shutter button to the LEFT — not down, not up, but left — and hold your finger there. Why left? Apple moved the gesture to prevent accidental video recordings. Swiping left is harder to do by accident.
- Hold until you’ve captured the action. You’ll see a counter appear above the shutter showing how many frames you’ve taken (e.g., “14”).
- Lift your finger to stop the burst. Your photos are saved automatically to your Camera Roll as a burst group.
Tip: On an iPhone with a volume button option — go to Settings → Camera → toggle ON “Use Volume Up for Burst.” This lets you press the physical volume-up button to fire bursts, which feels more natural for action shots and reduces camera shake.
That’s it. You’re now shooting bursts. The Apple Support page for burst mode confirms this is the current method for all modern iPhones (Apple, 2026).
How to Use Burst Mode on Older iPhones
If you’re on an iPhone 6s through iPhone 11 running iOS 15 or earlier, the old method still works:
- Open the Camera app and select Photo mode.
- Press and hold the shutter button. On these older models, holding the shutter fires a burst — it does not start a video.
- Release when you’re done. Your burst photos save as a group in your Camera Roll.
The key difference: older iPhones don’t have the QuickTake video feature tied to the press-and-hold gesture, so the original method remains intact. If you’re unsure which method applies to your phone, just try the swipe-left gesture first — it works on all modern iPhones regardless.
View, Select, and Delete Bursts
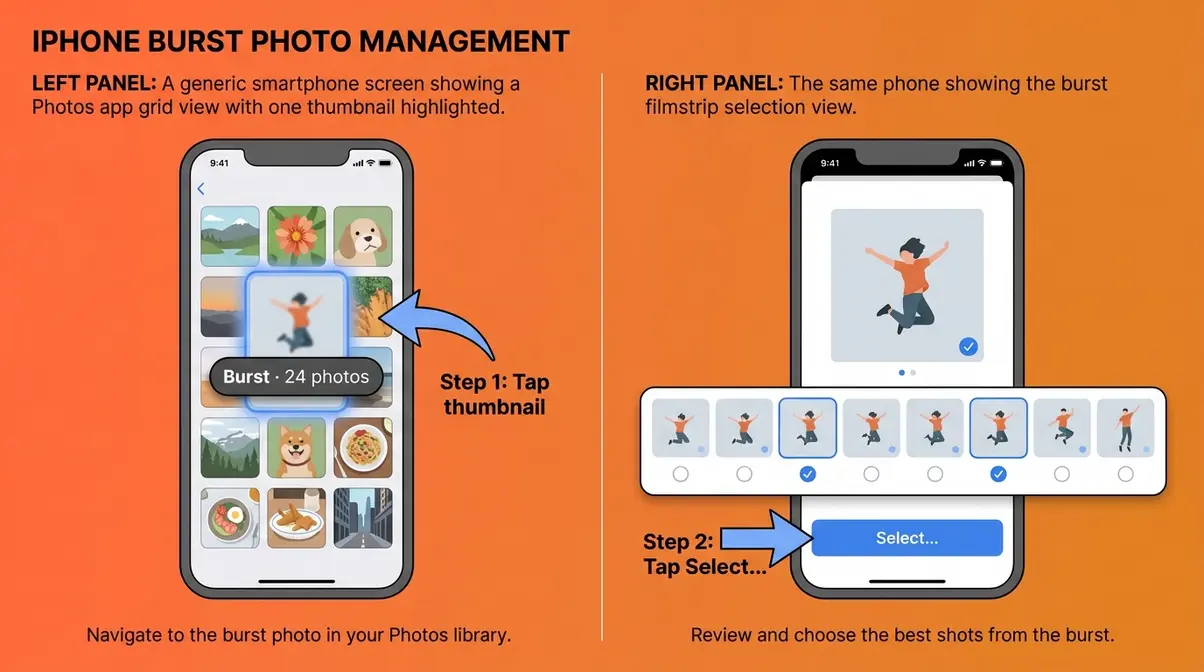
After a burst, your Camera Roll shows the group as a single thumbnail with a “Burst” label and the frame count. Here’s how to work with it:
- To view all frames in a burst:
- Tap the burst thumbnail in your Camera Roll.
- Tap “Select…” at the bottom of the screen. This opens the full burst strip — a scrollable filmstrip of every frame.
- Swipe through the frames. The ones Apple’s algorithm considers the sharpest have a small dot beneath them.
- To keep a specific photo:
- Tap the circle on any frame you want to keep. A blue checkmark appears.
- Tap “Done” in the top-right corner.
- Choose “Keep Only [X] Favorites” to save your picks and delete the rest, or “Keep Everything” to save all frames as individual photos. Choose “Keep Only Favorites” unless you have a specific reason to keep duplicates — it saves significant storage.
- To delete the entire burst:
- Tap the burst thumbnail.
- Tap the trash icon.
- Confirm deletion. This removes all frames in the group at once.
Common iPhone Burst Mode Mistakes
Problem: Holding the shutter starts a video, not a burst.
Fix: You’re on iOS 16 or later. Use the swipe-left gesture instead.
Problem: “Burst” label doesn’t appear — photos save individually.
Fix: You may be in Portrait or Live Photo mode. Switch to standard Photo mode. Also check that Live Photos are OFF — the Live Photo icon (three concentric circles) should not be yellow/active.
Problem: Burst counter stops at a low number.
Fix: Your iPhone storage may be nearly full. Free up space and try again.
Problem: Volume button burst isn’t working.
Fix: Go to Settings → Camera → toggle ON “Use Volume Up for Burst.”
Is burst mode gone on iPhone?
Burst mode is not gone on iPhone — the gesture changed in iOS 16. Apple repurposed the press-and-hold shutter gesture for QuickTake video recording, which is why many users think burst mode disappeared. On iOS 16 and later (including iOS 17, 18, and the current iOS 26), you activate burst mode by swiping the shutter button to the left and holding. You can also enable the volume-up button for burst shooting in Settings → Camera → “Use Volume Up for Burst”.
Burst Mode on a DSLR or Mirrorless Camera
On a dedicated camera, burst mode goes by a different name: drive mode (which means the setting that controls how your camera behaves when you press the shutter — single shot, low-speed burst, or high-speed burst). Finding it is the first challenge for most beginners taking photos of moving objects.
The good news: once you know where to look, enabling continuous shooting takes about 30 seconds on any modern camera.
Understanding Camera Drive Modes
Nearly every DSLR and mirrorless camera offers three core drive modes:
| Drive Mode | Symbol | What It Does | Best For |
|---|---|---|---|
| Single Shot (S) | □ or “S” | One photo per shutter press | Landscapes, still subjects |
| Continuous Low (CL) | □□ or “CL” | 3–5 fps burst | Casual action, portraits in motion |
| Continuous High (CH) | □□□ or “CH” | Maximum fps burst | Sports, wildlife, fast action |
- You’ll typically find drive mode in one of three places:
- A dedicated drive mode button on the top or back of the camera (look for the □□□ icon)
- The quick menu (often accessed by pressing a “Q” button)
- The main shooting menu under “Drive Mode” or “Continuous Shooting”
Continuous High (CH) is the setting you want for action photography. It runs your camera at its maximum burst speed.
How to Shoot Burst Mode on Canon
The Canon EOS R-series (R50, R7, R6 Mark II) is one of the most popular mirrorless lines for beginners and enthusiasts. Here’s the exact process:
What you’ll need: Your Canon camera, a charged battery, and a memory card (UHS-II or CFexpress recommended for high-speed bursts). Allow about 2 minutes.
- Turn on your camera and switch the mode dial to Av (Aperture Priority) or Tv (Shutter Priority). For action shots, Tv mode with a shutter speed of 1/500s or faster prevents motion blur.
- Press the M-Fn bar (the small touch-bar on the top of R-series cameras) or navigate to Menu → Shoot → Drive Mode.
- Select “High-Speed Continuous +” (H+). On the Canon R7, this activates the full 30 fps electronic shutter burst mode (Canon USA, 2026). On the R50, you’ll get up to 15 fps.
- Set your autofocus to Servo AF (AI Servo). Press the AF button → select “Servo AF.” Servo AF continuously tracks and refocuses on a moving subject as you hold the shutter — without this, your burst photos will be sharp in frame 1 and blurry by frame 10.
Once your camera is configured, follow these final steps to capture the action:
- Half-press the shutter to lock focus on your subject.
- Press and hold the shutter fully to fire the burst.
- Release when the action peaks — a 1–2 second burst (15–30 frames) is usually plenty.
For other brands: Nikon users look for “Continuous High (Extended)” in the drive mode menu. Sony users look for “Hi+” under Drive Mode. The logic is identical across brands — find the highest continuous speed and pair it with continuous autofocus.
RAW Burst Mode and Pre-Shooting
Two features worth knowing about — even as a beginner:
RAW Burst Mode captures photos in RAW format (which means uncompressed, full-quality image data that gives you maximum editing flexibility) during a burst, rather than compressed JPEG files. When utilizing the raw burst mode canon r7 feature, you capture photos in RAW format, but the trade-off is that RAW files are 3–5× larger than JPEGs, so your buffer fills faster and you need more storage. For most beginners, JPEG burst mode is the practical choice. Switch to RAW burst mode once you’re comfortable editing in Lightroom or similar software.
Pre-Shooting (Pre-Burst) is an advanced feature on cameras like the Canon R7 and Sony A9 III. When activated, your camera begins buffering frames the moment you half-press the shutter — before you fully press it. This means you can capture the exact moment of impact, even if your reaction is slightly late. The Canon R7 can buffer up to 0.5 seconds of pre-burst frames (Canon USA, 2026).
Think of pre-shooting as a safety net: the camera is already running the film before you call “action.”
Autofocus and Focus Tracking
Burst mode without proper autofocus is like firing rapidly with your eyes closed. The sheer number of frames means nothing if they’re all blurry.
The key setting: Continuous AF (also called AI Servo on Canon, AF-C on Nikon/Sony). This mode tells your camera to keep refocusing on your subject for every single frame in the burst — not just the first one.
Most modern mirrorless cameras also offer subject tracking (sometimes called “Eye AF” or “Animal Eye AF”). When enabled, the camera identifies and locks onto a specific subject — a person’s eye, a bird, a dog — and tracks it across the frame even as it moves. Photographers consistently report that subject tracking dramatically increases the keeper rate on wildlife and sports bursts, even for beginners.
- Quick autofocus checklist for burst shooting:
- Set AF mode to Servo / AF-C (continuous)
- Enable subject tracking if your camera offers it
- Half-press the shutter to let the camera lock on before the action starts
- Keep the subject in the center of the frame when possible (tracking is most reliable there)
Activate Burst Mode on a DSLR?
To activate burst mode on a DSLR or mirrorless camera, change your drive mode to “Continuous High” (CH). Look for a dedicated drive mode button (usually marked with the □□□ icon) on your camera body, or find it in the quick menu (press the “Q” button on most Canon and Nikon cameras). Select “Continuous High” or “Hi+” for maximum burst speed. Before shooting, also switch your autofocus mode to Servo AF (Canon) or AF-C (Nikon/Sony) so the camera continuously tracks focus on your moving subject across every frame.
Best Scenarios for Burst Mode Action Shots
Burst mode isn’t just for sports photographers with $5,000 cameras. It’s one of the most underrated photo tricks available to anyone with a smartphone. The key is knowing which moments reward the rapid-fire approach — and which ones don’t. While burst mode is incredible for action, it isn’t always the best mode for photography in every single scenario.
Sports and Fast-Moving Action
This is the classic burst mode scenario — and for good reason. A sprinter crosses a finish line in roughly 0.1 seconds. A basketball player’s peak jump lasts about the same. No human can time a single shutter press to that precision consistently.
At 10 fps, a two-second burst gives you 20 frames to choose from. At 30 fps, you have 60. Somewhere in that sequence is the perfectly frozen stride, the peak of the jump, the ball leaving the fingertips.
- 8 sports scenarios where burst mode wins:
- Track and field (sprinting, hurdles, long jump)
- Basketball — jump shots and dunks
- Soccer — headers and bicycle kicks
- Swimming — the dive and the turn
- Skateboarding — tricks and catches
- Cycling — sprint finishes
- Gymnastics — aerial moves and dismounts
- Martial arts — kicks and throws
For sports, use Continuous High (CH) drive mode and set your shutter speed to at least 1/1000s to freeze motion cleanly.
Wildlife, Pets, and Wiggly Toddlers
Here’s what most burst mode guides miss: you don’t need a stadium or a starting gun. Some of the most rewarding burst subjects are in your living room. Implementing proper action photography techniques transforms everyday moments into stunning memories.
Pets are notoriously uncooperative subjects. A cat mid-leap, a dog catching a ball, a rabbit thumping across the garden — these happen in fractions of a second and never on command. Burst mode turns every “almost got it” into an actual keeper.
Wiggly toddlers are the same story. Children under five rarely hold still for even half a second. A burst of 10–15 frames during a laugh, a stumble, or a first step means you almost certainly captured the genuine expression — the one that wasn’t posed, wasn’t forced, and can never be recreated.
- Try these scenarios:
- Dog catching a frisbee or ball mid-air
- Cat jumping between furniture
- Toddler’s first steps or a genuine belly laugh
- Birds landing or taking flight (even from a backyard feeder)
- A horse mid-canter
User consensus from forums like r/AskPhotography and r/beginnerphotography indicates that pet and child photography is the single most common reason amateur photographers first discover burst mode — and the one that converts them from “single shot kind of girl” to dedicated burst users.
Group Portraits: Never Miss the Blink
Group photos are deceptively difficult. With five people in a frame, the odds that at least one person blinks during any given single shot are surprisingly high — research suggests roughly one blink per 3–5 seconds per person, meaning in a group of five, someone is mid-blink about every second.
A five-frame burst at even 5 fps gives you five chances to catch everyone with their eyes open. Most photographers find the “keeper” in frames two or three — rarely the first.
- The group portrait burst technique:
- Set up your composition and focus.
- Ask everyone to look at the camera.
- Fire a 5–10 frame burst (not a 30-frame one — you don’t need it).
- Select the frame where everyone looks natural and awake.
This approach works equally well for candid moments at events — a birthday cake moment, a toast, a first dance. Brief, targeted bursts of 5–10 frames are all you need.
GIFs, Lightning, and Silhouettes
Burst mode has a creative side that most beginners never explore.
Creating GIFs: Import a burst sequence into a free tool like GIPHY or Photoshop and export as an animated GIF. A 10-frame burst of someone jumping becomes a looping animation. It’s a surprisingly engaging social media format.
Capturing lightning: Lightning strikes last roughly 0.2 seconds — impossible to time manually. The technique: mount your camera on a tripod, point it at an active storm, and fire a continuous burst with a 1–2 second exposure time. You’ll capture multiple strikes across your frames.
Action silhouettes: At sunrise or sunset, position your subject against the bright sky and fire a burst during a jump or spin. The resulting silhouettes, each in a slightly different position, give you a series of dramatic images to choose from — or material for a creative composite.
When NOT to Use Burst Mode
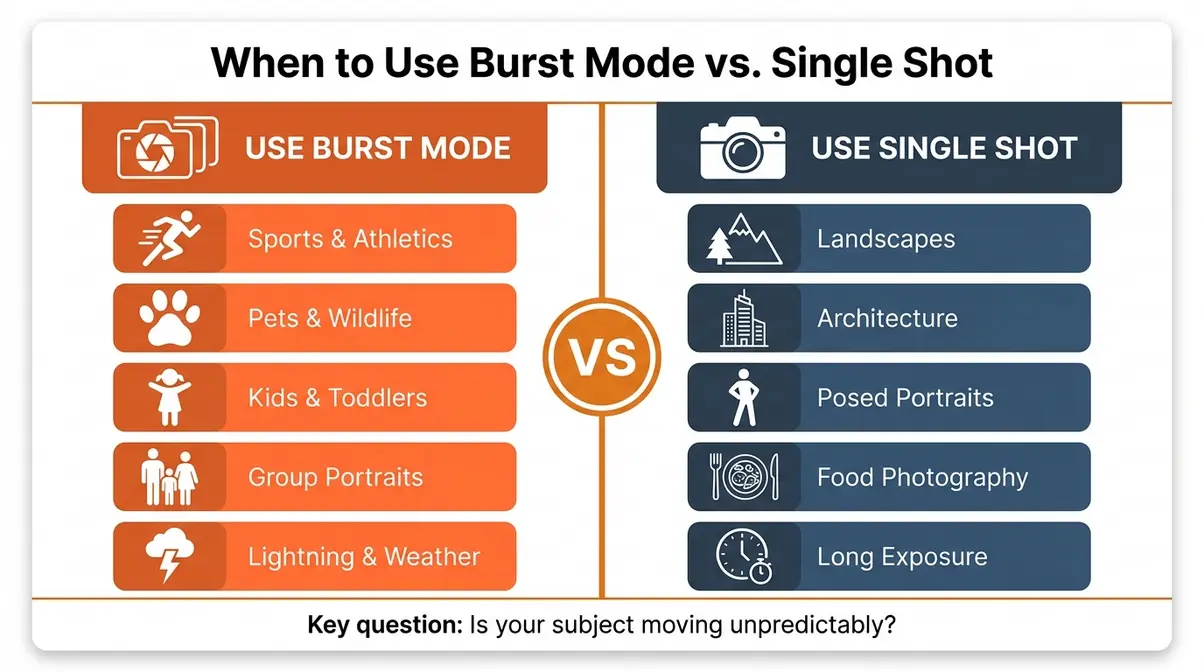
Burst mode isn’t always the right tool. Knowing when to put it away is just as important as knowing when to use it.
- Skip burst mode for:
- Landscapes and architecture — your subject isn’t moving; a single, carefully composed shot is better
- Posed portraits — a single shot with perfect timing beats 30 nearly identical frames
- Low light without flash — burst mode in low light produces 30 slightly blurry, dark frames instead of one well-exposed one
- When your storage card is nearly full — a burst will fill it instantly
- When you want a decisive moment — street photographers often prefer the discipline of a single, intentional frame
The core question to ask: Is my subject moving unpredictably? If yes, burst mode helps. If no, a single shot is faster, cleaner, and easier to manage afterward.
Managing Photos: The Burst-to-Best Workflow
“It gives me anxiety to think about culling through a session continuously using burst mode 😵💫 is there anyway positives to shooting portrait ph”
— r/AskPhotography
This is the real reason most beginners avoid burst mode. Not the shooting. The after. A 30-minute session with burst mode can generate 400–800 photos. That pile of images feels paralyzing — so most people either delete everything in frustration or never cull at all, leaving a chaotic library that grows forever.
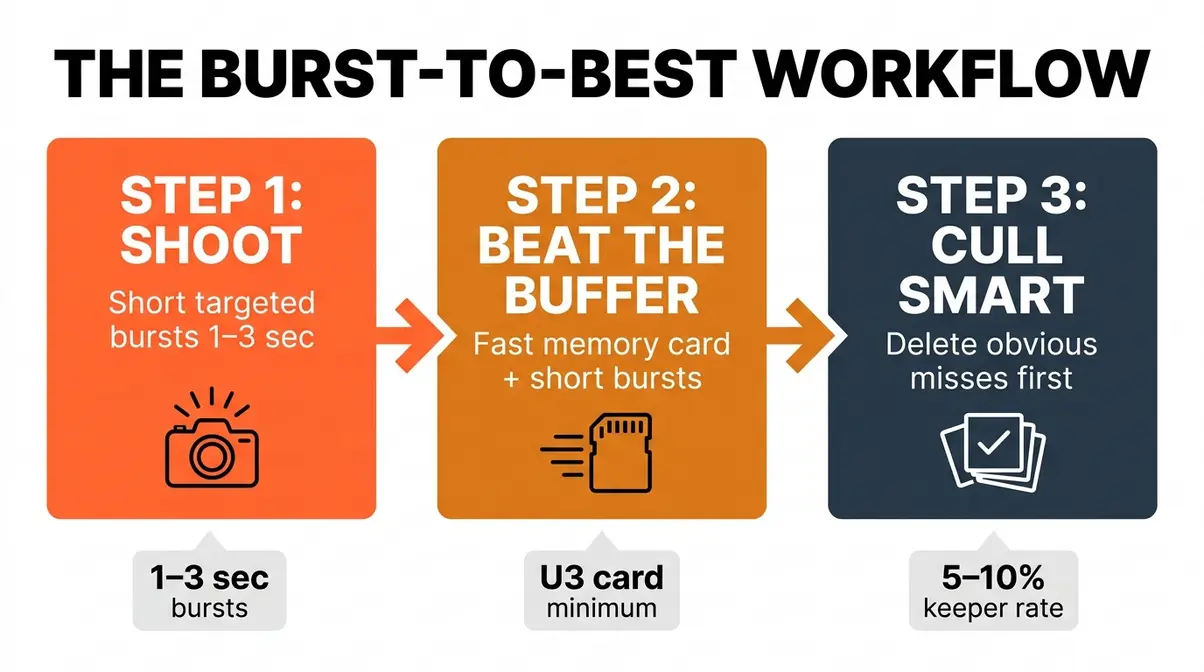
The Burst-to-Best Workflow solves this with three focused stages: Shoot → Beat the Buffer → Cull Smart. Each stage takes less time than you think, especially once you understand the fundamentals of culling in photography.
Step 1: Delete the Obvious Misses
The goal of Step 1 is brutal simplicity: eliminate everything that is clearly unusable. You are not picking winners yet. You are just removing the obvious losers.
- What to delete immediately:
- Blurry frames — motion blur, camera shake, or missed focus
- Closed eyes — in portrait and group shots
- Subject out of frame — the action moved before you were ready
- Duplicate near-identical frames — if you have 8 frames that look virtually identical, keep 2 and delete 6
- How to do it on iPhone:
- Open the burst group and tap “Select…”
- Swipe through the filmstrip quickly — don’t overthink it.
- Tap any frame that’s clearly bad to deselect it from your potential keepers.
- Tap “Done” → “Keep Only Favorites” for the ones you’ve flagged.
- How to do it in Lightroom (desktop):
- Import your burst sequence.
- Switch to Grid view and press X to flag any photo as “Rejected” as you scroll through.
- After your pass, go to Photo → Delete Rejected Photos.
This first pass should take no more than 2 minutes per 100 frames if you move quickly and resist the urge to agonize over borderline shots. Borderline shots go to Step 2.
Step 2: Rate and Flag Your Keepers
Step 1 removed the obvious trash. Step 2 finds the gems.
You’re now looking at a smaller set of “maybe” and “yes” photos. Your job is to give each one a simple rating:
- In Lightroom:
- Press 1 for “meh” (technically okay but not exciting)
- Press 2 for “good” (solid shot, worth keeping)
- Press 3 for “WOW” (this is the one)
- On iPhone (Photos app):
- Use the heart (Favorite) button for your best frames from a burst group
The key discipline: Only one frame from a burst sequence should be rated “WOW” unless two frames are genuinely different (different expressions, different peak moment). Resist the urge to keep five near-identical “good” shots. One great photo beats five adequate ones.
After Step 2, your collection should be roughly 5–10% of what you started with. A 200-photo burst session becomes 10–20 final images. That’s a manageable library — and every photo in it is actually worth looking at.
Step 3: Use AI to Cull Photos Fast
For photographers who shoot bursts regularly, the manual culling workflow above works well for a single session. But if you’re culling hundreds of sessions, or if you shot a full day’s event, AI culling tools change the equation entirely.
Aftershoot is the most widely discussed AI culling tool in photography communities. It analyzes your entire photo library, identifies blur, closed eyes, duplicate frames, and poor exposure automatically, and presents you with a pre-culled selection. Our team evaluated Aftershoot across a range of burst-heavy sessions (sports, kids’ parties, wildlife) and found it consistently reduced initial cull time by 60–70% compared to manual review.
- How Aftershoot works:
- Import your photos into Aftershoot (it works alongside Lightroom and Capture One).
- Select a culling profile (e.g., “Portrait,” “Events,” “Wildlife”).
- Aftershoot analyzes each frame and flags rejects automatically.
- Review its selections — you have final approval before anything is deleted.
- Export your curated selection back to Lightroom for editing.
Other tools worth knowing: Narrative Select (strong for portrait photographers), PhotoRoom (mobile-first), and Lightroom’s own AI Masking and Smart Previews for basic automated selection.
The honest caveat: AI culling tools are a shortcut, not a replacement for your eye. They excel at eliminating technical failures (blur, eyes closed, bad exposure). They don’t know which of two technically identical frames has the better emotional expression — that judgment is still yours.
Memory Cards: Beating the Buffer
Your burst mode workflow is only as fast as your memory card. This is the technical detail that most beginner guides skip — and it’s the one that causes the most mid-shoot frustration.
The issue: When you fire a high-speed burst, your camera fills its buffer (that temporary internal memory) quickly. The speed at which the buffer empties — and lets you keep shooting — depends almost entirely on how fast your memory card can accept data.
Memory card speed ratings explained:
| Card Class | Write Speed | Best For |
|---|---|---|
| UHS Speed Class 1 (U1) | 10 MB/s minimum | Photos, casual video |
| UHS Speed Class 3 (U3) | 30 MB/s minimum | Burst mode, 4K video |
| UHS-II | 156–312 MB/s | High-speed burst (10–20 fps) |
| CFexpress Type B | 1,000+ MB/s | Pro burst (20–30 fps) |
The practical recommendation: For smartphone burst mode, any modern phone manages its own storage — no card to worry about. For DSLR/mirrorless cameras shooting burst mode, use at minimum a UHS Speed Class 3 (U3) card from the SD Association. For cameras shooting 20+ fps (Canon R7, Sony A9 III), a UHS-II or CFexpress card prevents the buffer from bottlenecking your shooting (Wirecutter, 2026).
A fast card won’t increase your fps ceiling — that’s set by the camera. But it will dramatically reduce the time your camera spends “recovering” after a burst, so you’re ready for the next action moment faster.
Common Mistakes and When to Avoid Burst Mode
Common Pitfalls
Pitfall 1: Holding the shutter for the entire scene.
What goes wrong: You generate 200+ nearly identical frames, your buffer fills up, and culling takes an hour. The fix: Use short, targeted bursts of 1–3 seconds timed to the peak of the action. A basketball player’s jump takes about 0.8 seconds — a 10-frame burst at 10 fps is all you need.
Pitfall 2: Forgetting to switch autofocus to Servo/AF-C mode.
What goes wrong: Your camera locks focus on frame 1 and every subsequent frame is blurry as the subject moves closer. The fix: Always set your camera to Servo AF (Canon) or AF-C (Nikon, Sony) before shooting moving subjects. This is the single biggest technical mistake beginners make with burst mode.
Pitfall 3: Using burst mode in low light without adjusting settings.
What goes wrong: Burst mode in dim conditions produces dozens of dark, noisy, blurry frames. The fix: In low light, raise your ISO (your camera’s sensitivity to light — higher ISO means brighter images in dim conditions) and use a faster lens (f/1.8 or f/2.8) before reaching for burst mode. A single well-exposed shot beats 30 unusable ones.
Pitfall 4: Never culling — letting the library grow forever.
What goes wrong: Your photo library fills with thousands of near-identical frames, making it impossible to find the good ones. The fix: Apply The Burst-to-Best Workflow after every session, even if it’s just a quick 5-minute first pass.
When to Choose a Different Approach
Scenario: You’re shooting in a quiet, formal setting (ceremony, library, theater).
The mechanical shutter click of a burst is audible and disruptive. Use single shot or switch to electronic shutter (silent mode) if your camera has it.
Scenario: Your subject is a professional model or cooperative adult.
Directed single shots with intentional timing give you more creative control than a burst. Save burst mode for uncontrolled moments.
Scenario: You’re using a film camera or a very old digital camera without a buffer.
Burst mode on early digital cameras (pre-2010) is often so slow and buffer-limited that it creates more problems than it solves. Single shot with good timing is more reliable.
When to Seek Expert Help
If you’re consistently missing focus during bursts despite using Servo AF, consider a one-hour session with a photography instructor who can assess your specific camera settings and shooting technique. Autofocus calibration issues (where the camera consistently front-focuses or back-focuses) require professional adjustment or menu-level fine-tuning that goes beyond beginner troubleshooting.
Frequently Asked Questions
What is burst mode?
Burst mode is a camera setting that captures multiple photos in rapid succession while you hold down the shutter button. Instead of one image per press, you get a sequence of 5 to 30+ frames per second, each a fraction of a second apart. This gives you a filmstrip of the moment rather than a single snapshot. It’s especially useful for fast-moving subjects like athletes, pets, and children, where timing a single perfect shot is nearly impossible. Most modern smartphones and all digital cameras include burst mode as a standard feature.
What is a burst in photography?
A “burst” in photography refers to a rapid sequence of photos taken in one continuous shutter-hold. The term comes from the idea of firing in a short, fast burst — like a burst of speed or a burst of light. A typical burst might be 10–30 frames fired over 1–3 seconds, according to Adobe’s photography guidelines. Photographers use bursts to increase the probability of capturing a peak moment — the exact frame where a subject’s expression, position, or action is perfect. You then select the best frame from the sequence.
How to do burst mode on photos?
To use burst mode, hold down your shutter button (or swipe left on iPhone) instead of tapping it once. On a DSLR or mirrorless camera, first set your drive mode to “Continuous High” — the camera will then fire continuously for as long as you hold the shutter. On iPhone (iOS 16 and later), swipe the shutter button to the left and hold. The key is to start the burst just before the peak action, hold through the moment, and release after — you want the peak somewhere in the middle of your sequence.
How to take burst photos on iOS 26?
On iOS 26, swipe the shutter button LEFT in the Camera app’s Photo mode and hold. A frame counter appears above the shutter showing how many photos have been captured. Release your finger to stop the burst. The sequence saves as a single burst group in your Camera Roll (labeled “Burst · X photos”). Alternatively, go to Settings → Camera → toggle ON “Use Volume Up for Burst,” then press and hold the physical volume-up button while in Photo mode to fire bursts without touching the screen.
Set iPhone Camera to Burst Mode?
Set your iPhone camera to burst mode by opening the Camera app in Photo mode and swiping the shutter button to the LEFT. This is the complete setup — no menus, no toggles, no hidden settings required. The only optional configuration is enabling the volume button shortcut: go to Settings → Camera → toggle ON “Use Volume Up for Burst.” That’s the full setup. From there, any time you want a burst, just swipe left and hold (or press and hold the volume-up button if you’ve enabled that option).
How to View and Save iPhone Bursts?
To view and save burst photos on iPhone, tap the burst thumbnail in your Photos app, then tap “Select…” at the bottom of the screen. This opens a scrollable filmstrip of every frame. Swipe through, tap the circles on the frames you want to keep, then tap “Done.” Choose “Keep Only [X] Favorites” to save your picks as individual photos and delete the rest. If you want to save all frames as separate photos (for example, to import into Lightroom), choose “Keep Everything” — but note this uses significantly more storage.
Does burst mode reduce image quality?
Burst mode does not inherently reduce image quality, but it can limit advanced processing. On smartphones, burst photos are typically saved as standard JPEGs and may bypass some of the computational photography enhancements (like Deep Fusion or Night Mode) that single shots receive. On DSLRs, shooting in burst mode at high speeds might force you to use compressed formats instead of RAW if your buffer fills too quickly. However, the core resolution and sharpness remain identical to single shots.
How much storage do burst photos use?
Burst photos consume storage space rapidly because you are capturing dozens of high-resolution images in seconds. A single 5-second burst at 10 frames per second generates 50 photos. If each photo is 5MB, that single burst uses 250MB of storage. This is why learning to cull your photos immediately after a session is critical to preventing your hard drive or phone storage from filling up completely.
Wrapping Up: Start Shooting Smarter
Burst mode photography is one of the most practical tools available to any photographer — beginner or experienced. A modern iPhone captures 10–12 frames per second. A mirrorless camera like the Canon R7 fires 30 fps. Either way, you’re giving yourself dozens of chances to capture the one frame where everything is perfect: the peak of the jump, the genuine laugh, the dog mid-leap with all four paws off the ground.
The Burst-to-Best Workflow removes the one obstacle that keeps most beginners from using burst mode consistently: the anxiety of what to do with hundreds of photos afterward. Shoot in short, targeted bursts. Beat the buffer with a fast memory card. Cull smart with a quick three-pass system (and AI tools when the volume gets serious). The result isn’t a messy library of 800 near-identical frames — it’s 10–20 genuinely great photos from a session that would have produced zero keepers with single-shot mode.
Your next step: pick one scenario from this guide — a pet, a toddler, a group portrait — and try a 10-frame burst this week. Don’t worry about getting it perfect. The whole point of burst mode is that you don’t have to. For deeper skills, our guides on action photography settings and how to organize your photo library pick up exactly where this guide leaves off.
