25+ Creative Photography Ideas at Home: Easy 2026 Guide
Your home contains everything you need for a compelling photoshoot. Every window, household item, and patch of shadow is a studio waiting to be discovered — most photographers just don’t know how to unlock it.
What’s in this guide
- 10 Easy Creative Photography Ideas at Home
- Simple Photography Ideas at Home With Your Phone
- How to Do a Photoshoot at Home by Yourself
- Still Life, Product, and Food Photography at Home
- Conceptual and Advanced Photography Ideas at Home
- Common Mistakes to Avoid in Home Photography
- Frequently Asked Questions
- Bringing It All Together
The frustration isn’t a lack of creativity. It’s the Setup-to-Shot Gap: you scroll through stunning home photography, feel inspired for about 30 seconds, then stare at your living room and have no idea how to recreate what you saw. No one shows you where the camera was, where the light was coming from, or which household items were rearranged to make that shot work.
This guide fixes that. You’ll find 25+ creative photography ideas at home, organized by skill level, with behind-the-scenes setup notes and step-by-step execution for every project. Whether you’re shooting with a smartphone or a DSLR, you’ll find beginner-friendly phone projects, DIY portrait lighting setups, still life and food photography techniques, and advanced conceptual ideas — all without leaving home.
10 Easy Creative Photography Ideas at Home
Your home is already a photography studio — you just haven’t mapped it yet. The Museum of Modern Art notes that photographers have historically transformed their own home spaces into inventive theatrical sets to control lighting and composition — and the same principle applies whether you’re shooting with a mirrorless camera or a three-year-old phone.
These 10 creative photography ideas at home prove it, using nothing more than household items, natural window light, and your existing camera.
Our team set up and tested each of these projects in a standard home environment using both DSLR and smartphone gear to confirm that every idea is genuinely executable without professional studio equipment.
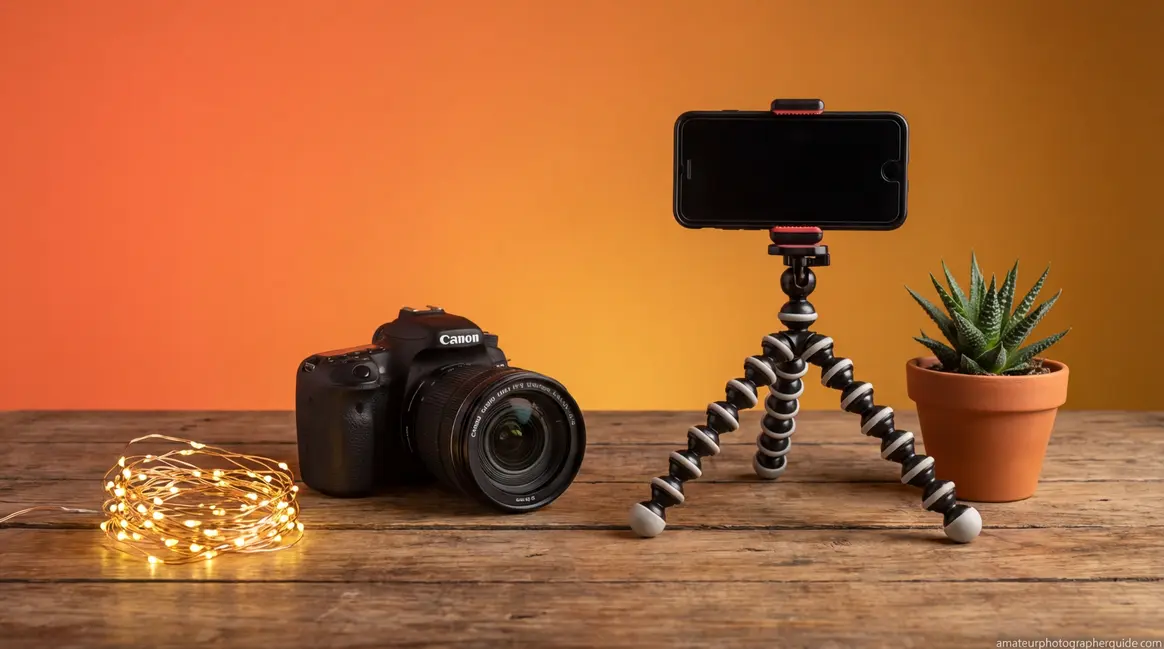
What You’ll Need
- Any camera or smartphone
- A window with natural light
- Household items: colander, fairy lights, glass of water, small mirror, fabric or paper backdrop
- Optional: tripod, remote shutter, white foam board (DIY reflector)
No studio equipment required for any project in this section.
Here are 10 easy creative photography ideas at home, organized from simplest to most technical:
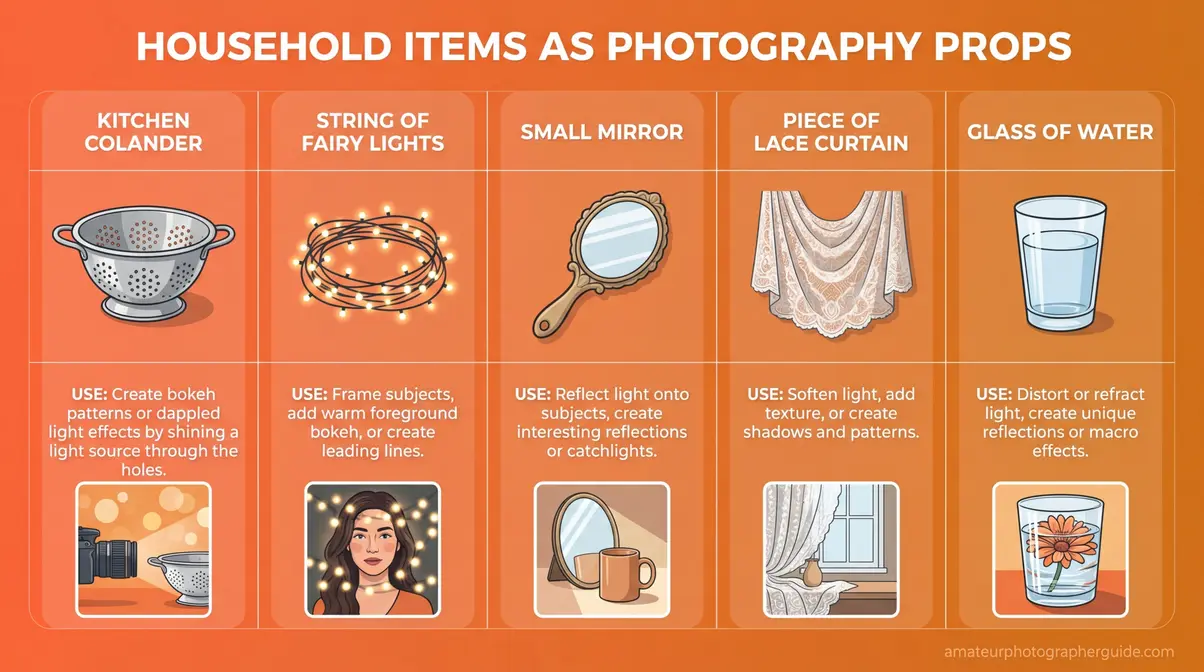
Caption: Five household items that double as professional photography props — no studio shopping required.
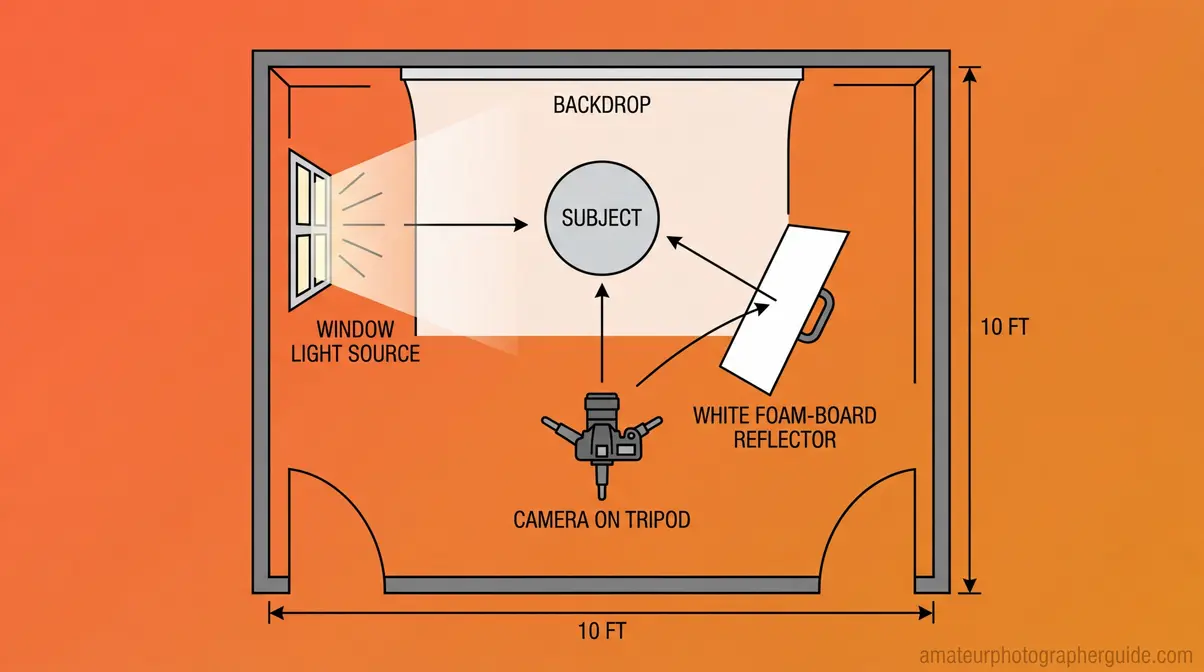
Caption: The standard home photography setup: camera opposite the window, subject in the light path, foam-board reflector filling shadows from the opposite side.
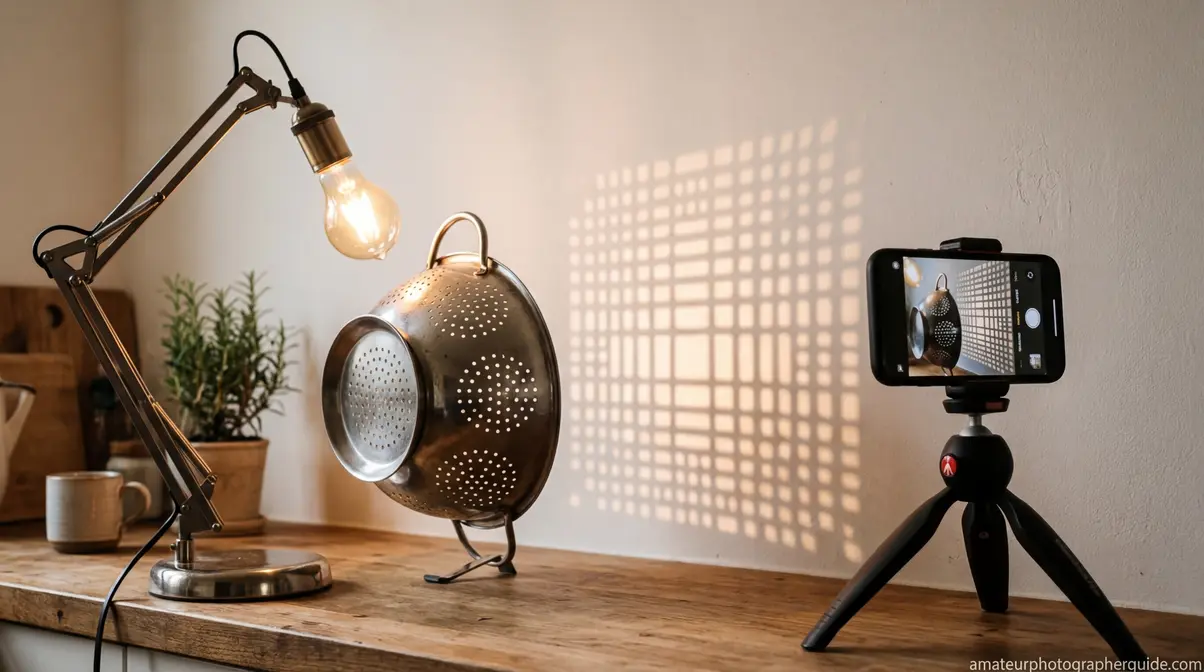
Shadow Play and Light Painting at Home
Idea #1 — Shadow Play uses a household item as a light blocker to cast dramatic patterns onto a flat surface or subject. A kitchen colander — the round strainer with holes — is the most effective tool for this because it casts a grid of circular dots when positioned between a light source and a wall. A lace curtain or venetian blinds work equally well, producing lattice or horizontal stripe patterns.
Setup: Position your light source (a strong window or a desk lamp) at a 30–45 degree angle to the wall or subject. Hold the colander 12–18 inches from the light source. The further the colander is from the surface, the softer and more diffuse the shadow pattern becomes. Shoot at f/8 for sharp shadow edges. Try projecting the pattern onto a white wall, a piece of fruit, or a subject’s face for a portrait variation.
Idea #2 — Light Painting turns a darkened room into a canvas. Set your camera to Bulb mode or a 10–30 second exposure. Use a flashlight, phone torch, or glow stick to draw shapes, words, or spirals in the air during the exposure.
Setup: ISO 100–400 (lower ISO = less noise on long exposures). Aperture f/8–f/11 for sharpness. Mount the camera on a tripod — even slight movement will blur the static background. Use a 2-second self-timer or a remote shutter to prevent camera shake at the moment of triggering. These are two of the most unique photography ideas at home because they require zero editing — the effect happens entirely in-camera.
Transition: Shadow play and light painting work with any light source. The next two ideas go further — turning ordinary tap water into abstract art.
Abstract Photography With Water and Oil
Idea #3 — Water Drop Abstract freezes the moment a drop hits a water surface, creating crown-shaped splashes that look like macro studio work. Fill a glass or wide bowl with water. Position a dropper or wet fingertip above it, and use burst mode to capture the impact.
Setup: Position your camera at eye level with the water surface — not above it. Use a shutter speed of 1/500s or faster to freeze the splash cleanly. A small flash or a phone torch held to the side of the bowl dramatically improves contrast. Place a piece of brightly colored paper or fabric beneath the glass as a background — it will show through the water as a vivid tint. Shoot on burst mode and drop water repeatedly; you’ll capture a clean splash within 15–20 attempts.
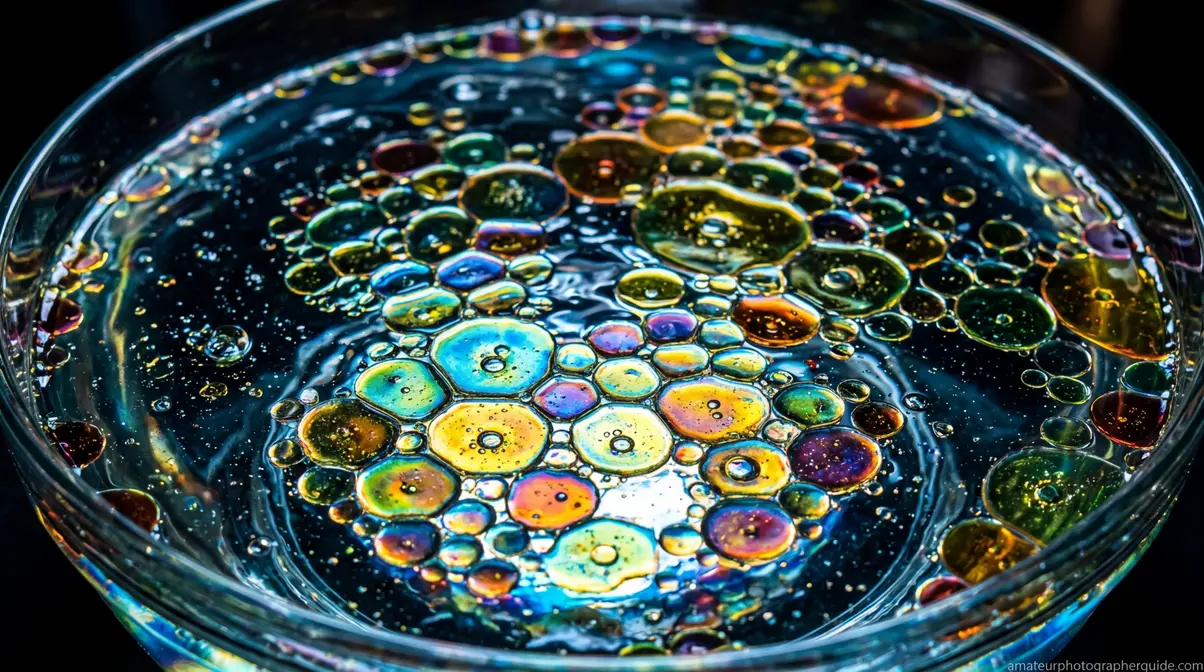
Idea #4 — Oil and Water Abstract requires a shallow bowl, cooking oil, water, and a backlighting source. Add a thin layer of cooking oil to a shallow bowl of water. Place the bowl over a phone screen showing a white browser tab, or over a tablet showing a plain white image, so light passes through from below. Shoot from directly overhead.
The oil separates into circular bubble formations that catch the backlight — the resulting images resemble microscopy slides or satellite imagery. No post-processing is needed. Both ideas create images that look far more complex than their setup, which is the Setup-to-Shot Gap in reverse: the final photo looks impossible, but the setup takes under five minutes.
Transition: Water and oil create macro-style abstracts without a macro lens. If you have a macro lens — or your phone’s dedicated macro mode — the next idea takes close-up photography even further.
Macro Textures of Everyday Objects
Idea #5 — Macro Textures reframes familiar objects as alien landscapes. The best subjects in a standard home include: the weave pattern of a couch fabric or linen napkin, the veined surface of a houseplant leaf, the textured surface of an eggshell, the cross-section of a sliced kiwi or orange, and the grain of a wooden cutting board.
Setup: Use your phone’s dedicated macro mode (available on most phones released after 2022) or a DSLR macro lens. Get as close as the lens allows while maintaining sharp focus. Place the subject near a window and position the light source to one side — side lighting creates shadows that reveal surface depth and texture. Shoot in portrait orientation if the image is destined for social media.
A common mistake here: shooting at maximum aperture (f/1.8 or f/2.0) creates a depth of field so shallow that only a sliver of the subject stays sharp. For macro textures, f/5.6–f/11 keeps the whole surface in focus.
Your phone’s macro mode makes creative mobile photography ideas at home like this one surprisingly accessible — you don’t need a dedicated lens to produce compelling close-up work.
Transition: Macro photography focuses on a single object in isolation. Flat lay photography does the opposite — it arranges multiple objects together to tell a story.
Flat Lay and Styled Still Life
Idea #6 — Flat Lay Composition arranges themed objects on a flat surface and shoots from directly above (bird’s-eye view). The overhead angle creates a graphic, poster-like image with no horizon line and no background distraction. Suggested themes: a morning coffee setup (mug, book, plant, pen), a creative workspace (camera, film roll, notebook, pencils), or a seasonal kitchen arrangement (herbs, spices, fresh produce).
Setup: Position your camera directly above the surface, parallel to it — use a step ladder or stand on a sturdy chair for enough height. Place the window to one side of the setup, not overhead, so you get directional shadows that add visual depth. Position a white foam board on the opposite side of the window to bounce light back and fill the shadow side. Shoot at f/5.6–f/8 to keep the entire flat surface sharp.
Idea #7 — Styled Still Life is the 3D version of flat lay — a physical arrangement photographed from eye level or a slight downward angle. Combine objects with varying heights: a vase, a candle, a stack of books, a small plant. Apply the rule of odds (3 or 5 objects, not 4 or 6 — odd numbers feel more natural to the eye). Vary textures deliberately: smooth glass next to rough wood next to soft fabric. Position the tallest object slightly off-center, and place your window light at 45 degrees to create modeling shadows that give the arrangement depth.
BTS Setup: Camera at eye level, 18 inches from the arrangement. Window to the left. White foam board to the right as a fill reflector. This simple three-element setup produces studio-quality results. Flat lays work for any themed grouping — including creative food photography ideas at home like a morning coffee arrangement or a kitchen herb spread.
Transition: Flat lays and still life setups are static and controlled. The next three ideas introduce movement and light effects for more dynamic results.
Color Splash, Motion Blur, and Bokeh
Idea #8 — Color Splash is primarily a post-processing technique that desaturates an image to black and white, then selectively restores color to one element — a red apple in a monochrome kitchen, a yellow flower on a gray tabletop. The camera setup is simple: clean even light, sharp focus on the subject. The effect is created in Lightroom (using the HSL mask brush) or Snapseed (the free mobile app, using the Selective tool). Works best when the “splash” color is highly saturated and the surrounding elements are naturally neutral.
Idea #9 — Motion Blur uses a slow shutter speed (1/15s to 1/4s) to capture a moving subject while the background stays sharp. Try waving hands, a slowly rotating houseplant, or someone walking through the frame. Mount the camera on a tripod. Use ISO 100 in bright window light to keep the image clean. For a different effect, try panning — moving the camera to follow a moving subject — which blurs the background instead of the subject.
Idea #10 — Bokeh With Fairy Lights uses fairy lights (the small decorative string lights that create stunning bokeh effects) as a background element. Place the lights several feet behind your subject. Use a wide aperture (f/1.8–f/2.8) to throw the lights completely out of focus, transforming them into soft glowing orbs. The further the fairy lights are from the subject, the larger the bokeh circles become. On a phone, use Portrait mode — it simulates wide-aperture bokeh effectively. Position the subject near a window for natural front lighting to balance the warm artificial background glow.
These three techniques are ideal bored-at-home photography ideas because they require minimal props but produce dramatically different results from each other — and from the first seven ideas in this section.
For 10 more project ideas with full step-by-step guides, explore creative photography ideas to try at home in our dedicated deep-dive article.
Simple Photography Ideas at Home With Your Phone
Smartphone cameras in 2026 have closed the gap with entry-level DSLRs more than most photographers realize. Modern phones offer computational bokeh, multi-frame noise reduction, dedicated macro modes, and manual exposure controls — all in a device you already carry. The real limitation isn’t hardware. It’s knowing which settings to use and where to position the phone relative to your light source.
Apple’s guide to iPhone camera modes confirms that Portrait mode can apply studio-quality lighting effects in real time, including Studio Light, Contour Light, and Stage Light — all accessible without any additional equipment. These five ideas are designed specifically for smartphone cameras and require no accessories beyond what’s already in your home.
For a deeper dive into phone camera technique, the pro photographer’s guide to phone photography covers manual controls, composition, and advanced editing in detail.
Essential Mobile Camera Settings
Before shooting any of the five phone projects below, configure these settings. The difference between a muddy indoor shot and a clean, professional-looking one often comes down to three controls.
Settings to adjust before every indoor phone shoot:
| Setting | Recommended Value | Why |
|---|---|---|
| Exposure lock (AE/AF Lock) | Tap and hold on your subject | Prevents the camera from re-exposing when you reframe |
| Grid lines | On | Helps align horizon lines and apply the rule of thirds |
| HDR | Off (for most creative projects) | HDR flattens shadows and highlights — defeats creative lighting effects |
| Portrait Mode distance | 2–5 feet from subject | The phone needs this range to calculate depth accurately |
| ISO (if manual mode available) | 50–200 for daylight window | Keeps noise low; avoid Auto ISO indoors |
How to lock exposure on iPhone: Tap and hold your finger on the subject in the viewfinder until you see “AE/AF Lock” appear at the top of the screen. The camera will maintain that exposure even if you reframe. This is the single most impactful setting change for indoor phone photography — it prevents the camera from brightening the background and silhouetting your subject.
On Android, the equivalent is a long press on the subject in the camera app, which locks both focus and exposure in most manufacturer camera apps (Samsung, Google Pixel, OnePlus).
Using Window Light for Phone Photos
Natural window light is the most powerful free light source in your home — and for phone photography specifically, it’s more effective than any artificial light because phone sensors are optimized for broad-spectrum natural light. Photography experts consistently recommend cleaning your phone lens before every shoot — a fingertip smudge on a phone lens reduces contrast and sharpness more dramatically than on a DSLR lens due to the smaller optical elements.
The three window light positions that work for phones:
- Side lighting (45 degrees): Subject faces the window at a 45-degree angle. One side of the face or object is lit, the other falls into shadow. This creates depth and dimension — the most flattering position for portraits and the most revealing for textured objects.
- Front lighting (subject faces window directly): Even, shadow-free illumination. Best for flat lays, product shots, and any image where you want consistent exposure across the frame. Looks clean on phone screens.
- Backlit (subject between camera and window): Creates a rim-light effect around the subject and a glowing, airy background. Tap the subject’s face or body to lock exposure on it — otherwise the camera will expose for the bright window and turn your subject into a silhouette (unless that’s the intended effect — see Idea #17 below).
Project #11 — Window Light Phone Portrait: Position a person or object 18–24 inches from a window. Set the phone to Portrait mode. Lock exposure on the face. The resulting image will have soft, directional light on the subject and a naturally blurred background — without any additional equipment.
3 Easy Projects for Smartphone Cameras
Project #12 — Food Close-Up: Enable grid lines and macro mode. Place a plate of food near a window (side lighting preferred). Shoot from directly above or at a 45-degree angle. Tap to lock focus on the most visually interesting element — a sauce drizzle, a herb sprig, a cut fruit cross-section. The grid lines help you align the plate edge parallel to the frame edge, which makes the composition feel intentional rather than casual.
Project #13 — Reflection in a Spoon or Glass Surface: Hold a metal spoon or a glass of water close to your phone camera. The curved surface reflects a miniaturized, distorted version of the room behind the camera. Frame the spoon so the reflection fills most of the frame. Shoot at the closest focus distance your phone allows. The distorted reflection creates an abstract, surreal image that looks far more complex than the 30-second setup behind it.
Project #14 — Forced Perspective With Small Objects: Place a small toy, figurine, or household object close to the camera and a person or larger object further away. By aligning them in the frame, the small object appears to be the same size as — or larger than — the distant one. Classic examples: a toy dinosaur appearing to tower over a real building visible through a window, or a small figurine appearing to hold a real mug. No editing required — the effect is entirely optical. Simple photography ideas at home with your phone don’t get more satisfying than this one, because the final image looks like a compositing trick but requires zero post-processing.
These five phone projects cover the full range of what modern smartphone cameras can produce indoors. For a complete breakdown of manual controls and advanced editing, visit the pro photographer’s guide to phone photography.
How to Do a Photoshoot at Home by Yourself
Not having a model is one of the most common reasons photographers avoid portrait work at home. But photoshoot ideas at home by yourself are not a compromise — they’re a distinct creative discipline. Self-portrait photography forces you to think about composition, lighting, and posing simultaneously, which builds technical skills faster than photographing other people. Every great portrait photographer understands light by studying how it falls on their own face.
The BBC Northern Ireland’s self-portrait tutorial demonstrates that compelling self-portraits require nothing beyond a camera, a tripod, and an understanding of where to position yourself relative to your light source.
For complete lighting setup guidance, the home photography lighting guide covers DIY modifiers, reflectors, and multi-light setups in depth.
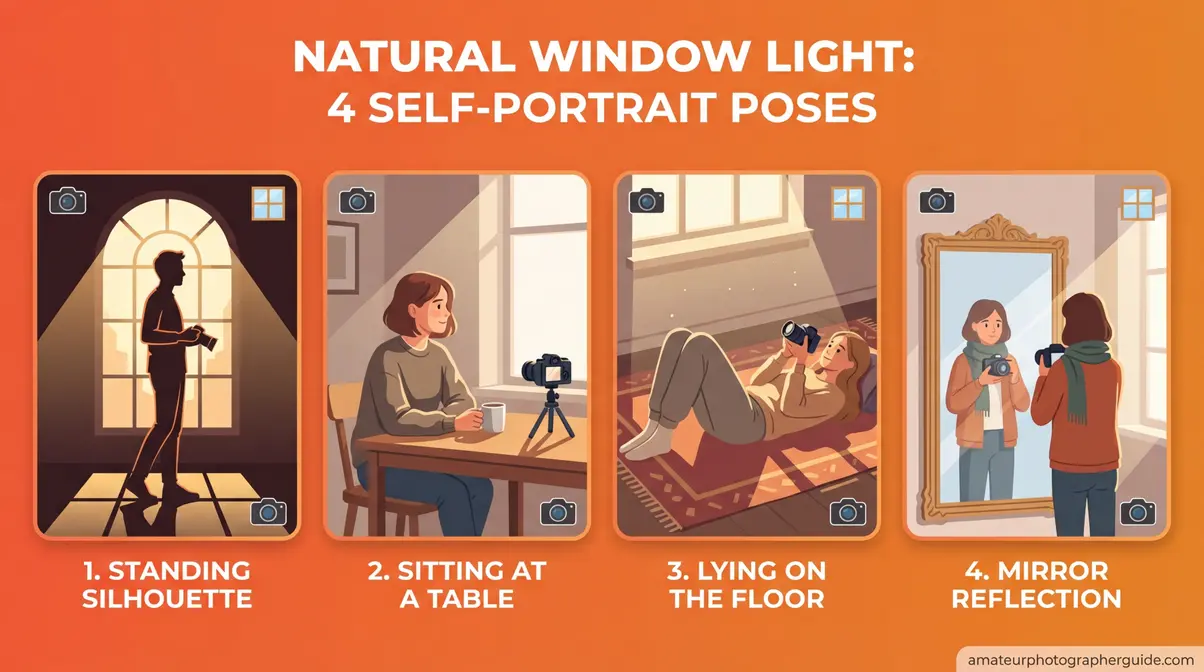
Caption: Four self-portrait compositions achievable in any room with a window — from silhouette to dramatic side light.
Setting Up for Solo Portrait Shoots
The three tools that make solo portrait photography possible — and consistent — are a tripod, a 2-second self-timer, and a remote shutter. You don’t need all three, but each one solves a specific problem.
Tools and their roles:
| Tool | Problem It Solves | DIY Alternative |
|---|---|---|
| Tripod | Keeps camera stable and framing consistent between shots | Stack of books + phone case, or a camera bag wedged on a shelf |
| 2-second self-timer | Prevents camera shake from the shutter button press | Use the camera’s built-in timer; 2 seconds is faster than 10 for workflow |
| Remote shutter (Bluetooth) | Lets you trigger the shot without returning to the camera | Free phone apps (e.g., Camera Connect for Canon, SnapBridge for Nikon) serve the same purpose |
| A stand-in object | Helps you pre-focus on the exact spot where you’ll stand | Place a chair or bag where your face will be; focus on it; switch to manual focus to lock it |
Pre-focus technique: Place an object (a bag, a pillow, a chair) exactly where your face will be during the shot. Set autofocus on that object. Switch the lens to manual focus (MF) to lock the focal point. Remove the stand-in object, take your position, and shoot. This prevents the camera from hunting for focus on an empty background between shots.
A 2-second self-timer prevents camera shake at the moment of triggering — the reason professional photographers use it even on tripods. The 10-second timer works too, but 2 seconds creates a faster shooting rhythm that lets you take more variations in a session.
3 Creative Indoor Lighting Setups
Understanding light is what separates a snapshot from a portrait. These three setups use only window light and household reflectors — no studio equipment.
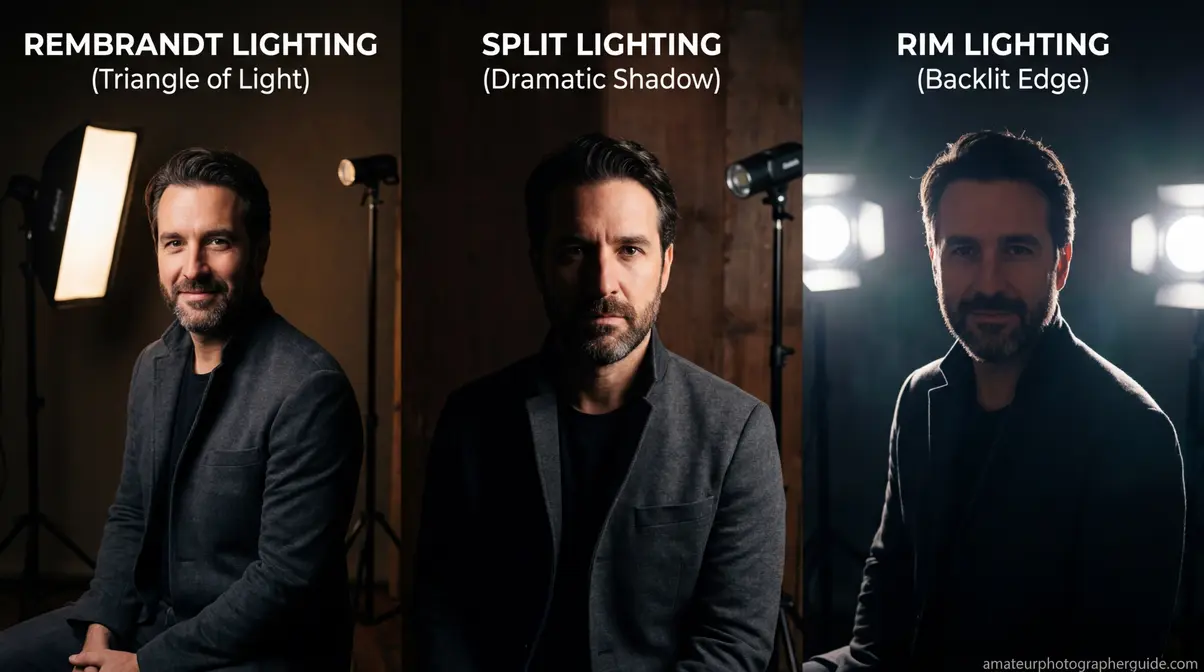
Setup 1 — Rembrandt Light: Position yourself at roughly 45 degrees to the window, slightly further back than direct side lighting. The window illuminates one side of your face fully and creates a small triangle of light on the shadow-side cheek (the “Rembrandt triangle,” named after the painter’s characteristic lighting style). This is the most flattering and dimensional portrait lighting achievable with a single window. Shoot at f/2.8–f/4 to blur the background slightly. Place a white foam board on the shadow side to fill in the darkest areas if needed.
Setup 2 — Split Light: Position yourself directly to the side of the window, so light falls on exactly one half of your face and the other half falls into shadow. No fill reflector. This creates high-contrast, dramatic portraits — effective for moody or editorial-style images. Works best when the background behind you is dark (a dark wall or a dark curtain).
Setup 3 — Backlit Rim Light: Position yourself between the camera and the window, facing the camera. The window behind you creates a glowing rim of light around your hair and shoulders. Lock exposure on your face (not the window) — the face should be slightly underexposed rather than the window blown out. Add a white foam board directly in front of you (between camera and subject) to bounce window light back onto your face as fill. This creates the “golden hour” look indoors, at any time of day.
For a complete guide to building these setups with DIY equipment, visit the home photography lighting guide and the step-by-step portrait photography guide.
The New York Film Academy notes that a thin layer of Vaseline on a UV filter (never directly on the lens) creates a soft-focus, dreamlike effect — a useful technique for self-portraits where you want to minimize skin texture without heavy post-processing.
Posing Ideas for Home Self-Portraits
Posing for your own portrait while operating the camera is a skill that develops quickly once you have a consistent system. The key is to pre-plan three or four positions before you start shooting, rather than improvising between each shot.
Project #16 — Window Light Self-Portrait: Stand 18–24 inches from a window in Rembrandt position (45 degrees to the light). Look slightly past the camera — not directly into the lens — to avoid the “passport photo” stare. Tilt your chin slightly downward. The combination of directional light, off-axis eye line, and slight chin tilt produces a naturally flattering portrait without requiring any specific posing experience.
Project #17 — Mirror Self-Portrait: Set up your camera on a tripod facing a mirror. Position yourself between the camera and the mirror, slightly to one side so the camera appears in the reflection but your face is the dominant element. The frame-within-a-frame effect (the mirror edge visible in the composition) adds a conceptual layer that elevates the image beyond a standard portrait. Use a longer focal length (85mm equivalent or higher) to compress the scene.
- Four positions worth pre-planning for any self-portrait session:
- Standing directly in front of the window, looking away from the camera (silhouette or rim-light effect)
- Seated at a table with window to the side, looking down at an object (candid/editorial feel)
- Lying on the floor with the camera overhead (dramatic perspective, requires ceiling clearance)
- Reflected in a mirror with the camera visible in frame (conceptual, layered composition)
Silhouette and Shadow Portraits
Project #18 — Silhouette Self-Portrait: Position yourself between the camera and a bright window. Lock exposure on the window (not on yourself). Your body will render as a pure black shape against the bright background. The most effective silhouettes have a clearly readable outline — a profile view of the face, arms extended, or a distinctive pose. Avoid full-frontal silhouettes where the body shape becomes ambiguous.
Project #19 — Shadow Portrait With Venetian Blinds: Close your venetian blinds to leave narrow horizontal gaps. Position yourself so the light passes through the gaps and falls in parallel stripes across your face and body. The striped shadow pattern creates a dramatic, cinematic portrait effect that looks like a film noir lighting setup. Shoot at f/8 for sharp shadow edges. The stronger and more directional the window light (direct sun works best), the sharper the shadow lines will be.
Project #20 — Fairy Lights Bokeh Portrait: Hang fairy lights on a wall or drape them across a surface 4–6 feet behind you. Use your camera at f/1.8–f/2.8 (or Portrait mode on a phone) to blur the lights into large glowing orbs. Position yourself near the window for natural front lighting. The warm bokeh background against the cooler window light creates a natural two-tone color palette that requires no color grading in post.
Indoor Photos Without Pro Lighting?
Natural window light is the most effective indoor light source available, and it’s free. Position your subject 18–24 inches from a window with the light source to the side (not directly behind the camera or directly behind the subject). Use a white foam board on the shadow side to fill in the darkest areas. Avoid mixing window light with warm household lamps in the same shot — the competing color temperatures create unnatural color casts. Shooting between 9 a.m. and 3 p.m. on a cloudy day produces the softest, most even window light — direct sunlight creates harsh shadows that are difficult to manage indoors.
Still Life, Product, and Food Photography at Home
Still life photography is one of the most technically instructive disciplines you can practice at home — because every element in the frame is under your complete control. The light, the background, the props, the arrangement, the camera angle: nothing is left to chance. This makes it ideal for building deliberate technical skills that transfer directly to every other genre.
Adobe Lightroom Academy’s food photography resources demonstrate that professional food and product images consistently use one or two light sources maximum — more lights create competing shadows that flatten the image. The object photography ideas at home in this section apply the same principle.
For a dedicated deep-dive, the 7 tips for better still life photography guide covers advanced compositional techniques and lighting ratios.
Building a DIY Light Box at Home
Project #21 — DIY Light Box Product Shot produces clean, white-background product images without a studio or expensive equipment. A DIY light box built from a cardboard box costs under $5 in materials and takes 20 minutes to construct.
- Materials:
- One large, sturdy cardboard box
- White tissue paper or white printer paper (for diffusion panels)
- White posterboard or white printer paper (for the interior sweep)
- Packing tape and a box cutter
- Two desk lamps or LED strips
Step-by-step construction:
- Lay the box on its side so the open end faces you (this becomes the front opening you’ll shoot through).
- Cut rectangular openings on the top, left side, and right side of the box — leave a 1–1.5 inch border around each cutout for structural integrity.
- Cover each cutout with white tissue paper, secured with packing tape. The tissue paper diffuses the light from your desk lamps, eliminating harsh shadows.
- Cut a piece of white posterboard large enough to curve from the back interior wall up to the top interior wall. Tape it in place to create a seamless sweep — this eliminates the visible corner between the back wall and the floor, giving you the clean infinity-background look.
- Position one lamp on each side of the box, shining through the tissue paper panels.
- Place your product on the interior sweep and shoot through the front opening.
Camera settings for light box: ISO 100–200, f/8–f/11 for maximum depth of field, white balance set to match your lamp color temperature (typically 3200K for warm LED, 5500K for daylight-balanced LED). Shoot tethered to a laptop if possible — light box work benefits enormously from seeing the full image immediately.
Caption: A DIY light box built from a cardboard box and tissue paper produces studio-quality white-background product shots for under $5 in materials.
Food Photography Flat Lays at Home
Project #22 — Food Flat Lay applies overhead composition to food styling. The most effective food flat lays combine a hero element (the main dish), supporting elements (ingredients, utensils, napkins), and negative space (empty background area that gives the eye somewhere to rest).
Setup: Position your setup on a table near a window. Shoot from directly above — stand on a sturdy chair or use a wall-mounted arm. Side lighting from the window (not overhead) creates shadows that give food depth and texture. A white foam board on the opposite side of the window fills the shadow side without eliminating it completely.
- Styling principles that separate amateur from professional food flat lays:
- Use odd numbers of supporting elements (3 forks, not 4; 5 herbs, not 6)
- Allow ingredients to spill naturally rather than arranging them symmetrically — controlled imperfection reads as authentic
- Vary heights where possible (a small jar next to a flat plate next to a folded napkin)
- Include a human element — a hand reaching into frame, a fork mid-use — to create a sense of life and scale
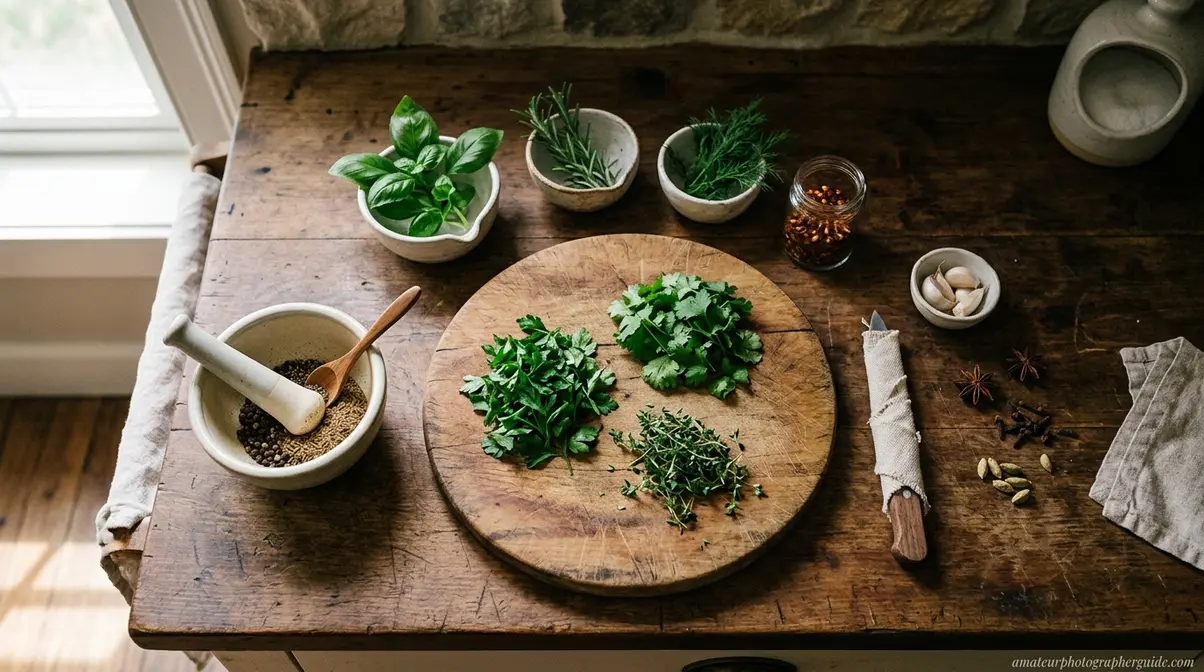
Project #23 — Kitchen Herb and Spice Arrangement: Gather 5–7 fresh herbs, spice jars, or whole spices on a wooden cutting board. Arrange them in a loose triangular composition. Shoot from above at f/5.6 with window light from the left. This is one of the fastest creative food photography ideas at home — the setup takes under 3 minutes and produces images that work well for recipe blogs, social media, and portfolio work.
Watch and Reflective Object Photography
Project #24 — Watch Macro With Reflective Surface combines close-up photography with reflective surfaces to create images that look like luxury advertising work.
Setup: Place the watch on a small mirror or a piece of acrylic sheet. The mirror creates a clean reflection of the watch dial that doubles the visual interest of the image. Position a desk lamp at 45 degrees to the watch — this illuminates the dial without creating a direct glare spot on the crystal. Shoot with a macro lens or phone macro mode. Focus on the watch face rather than the reflection. Set f/8 for sharpness across the dial.
Managing reflections: Watches and other reflective objects (jewelry, glassware, chrome objects) are notoriously difficult because they reflect the camera and photographer. Position a large white card above and slightly in front of the object — this creates a clean white reflection in the surface rather than an image of the room. A black card placed out of frame but close to the object creates a dark edge reflection that defines the object’s outline against a light background.
The principle here extends to any reflective household object: a glass vase, a chrome kettle, a polished stone. Reflective object photography is one of the most technically instructive of all object photography ideas at home because it forces you to think about what the object is seeing, not just what the camera is seeing.
Conceptual and Advanced Photography Ideas at Home
Conceptual photography moves beyond documenting what’s in front of the camera into constructing images that couldn’t exist in the physical world — or that reframe ordinary reality in an unexpected way. These three projects require more technical preparation than the ideas in earlier sections, but none of them require equipment beyond what a hobbyist photographer already owns.
The Smithsonian Institution’s photography resources demonstrate that the most enduring photographic images are those that transform the familiar into the unexpected — which is precisely what conceptual techniques achieve. These advanced creative photography ideas at home close the Setup-to-Shot Gap in its most dramatic form: the final image looks impossible, but the technique behind it is entirely learnable.
Adobe’s levitation photography guide confirms that the two-shot composite method is the standard technique used by professional photographers — no wire rigging or special equipment required.
For abstract and experimental techniques beyond these three projects, the abstract photography guide covers experimental approaches in depth.
Levitation Photography at Home
Project #24 — Levitation Composite creates the illusion that a person or object is floating in mid-air. The technique requires two photographs taken from an identical camera position and combines them in Photoshop or a free alternative like GIMP.
Step-by-step execution:
- Set up the camera on a tripod. The tripod is non-negotiable — the two images must be pixel-perfect matches. Set your camera to manual mode and lock exposure, white balance, and focus before shooting.
- Photograph the subject on a support. Seat your subject on a stool, step ladder, or stack of books. Photograph them in the desired “floating” position. The support will be removed in post-processing.
- Remove the subject and support without moving the camera. Photograph the empty background from the identical camera position. This is your background plate.
- Open both images in Photoshop as layers. Place the empty background image on the bottom layer and the subject image on top.
- Add a layer mask to the subject layer. Paint black over the support (stool, ladder, etc.) using a soft brush. The black paint reveals the clean background from the layer below, making the support disappear and leaving the subject apparently floating.
- Add a shadow. Create a new layer between the two. Paint a soft elliptical shadow beneath the subject using a large, soft black brush at 20–30% opacity. Match the shadow direction to your light source. Without a shadow, the levitation effect looks unconvincing.
Camera settings: Shoot at ISO 100–400, f/5.6–f/8 (enough depth of field to keep the subject and background sharp), and a shutter speed appropriate for the ambient light. Consistent lighting between the two shots is critical — shoot both within the same 5-minute window to avoid changes in natural light.
Caption: Shot one (subject on stool) + shot two (empty background) = levitation composite. The entire technique happens in two frames and basic layer masking.
Forced Perspective With Toys and Objects
Project #25 — Forced Perspective exploits the camera’s inability to perceive depth the way human binocular vision does. By placing a small object close to the lens and a larger object further away, you can make them appear to be the same size — or make the small object appear enormous.
Setup: Position a small figurine, toy, or household object 6–12 inches from the camera lens. Place a larger real-world element — a person, a piece of furniture, a building visible through a window — 10–20 feet behind it. Look through the viewfinder and adjust the foreground object’s position until the two elements appear to interact convincingly (the toy appears to hold the mug, the figurine appears to stand on the person’s hand, the small object appears to block the view of something much larger).
Technical considerations: Use a narrow aperture (f/11–f/16) to keep both the foreground object and the background in sharp focus simultaneously. If either element is soft, the illusion breaks. A tripod helps because the framing must be precise — small shifts in camera position dramatically change the apparent size relationship between elements.
Unlike the beginner phone version (Project #14), this advanced approach uses deliberate depth-of-field control to make the illusion more convincing and allows for more complex scene construction.
Mirrors and Water for Surreal Photos
Project #26 — Water and Mirror Reflections uses reflective surfaces to create doubled, symmetrical, or distorted images that feel surreal without any digital manipulation.
Technique 1 — Still Water Reflection: Fill a shallow baking tray or large bowl with water. Place it on the floor near a window. Position your camera at water level — the lens nearly touching the water surface. Frame so that the real scene appears in the top half of the image and its reflection appears in the bottom half, creating a symmetrical, mirror-image composition. Any ripple in the water adds an impressionistic quality to the reflection.
Technique 2 — Mirror Kaleidoscope: Hold two small mirrors at an angle to each other (45–90 degrees) in front of a subject or a patterned surface. The mirrors reflect each other’s reflections, creating a repeating, kaleidoscopic pattern. Photograph the interior of the mirror angle. This works particularly well with patterned fabric, flowers, or fairy lights as the reflected subject.
Technique 3 — Partial Reflection: Place a small mirror flat on a table. Position an object partially on the mirror and partially on the table surface. The mirror creates a perfect reflection of the half of the object that sits on it, making the object appear whole and floating above a reflective surface. This is especially effective with flowers, fruit, or any object with a clean base.
These levitation photography ideas at home — and the mirror techniques alongside them — demonstrate the core principle of conceptual photography: the most visually striking images often come from the simplest optical tricks, not from complex post-processing.
Levitation Without Photoshop?
Yes — free alternatives to Photoshop work effectively for levitation composites. GIMP (free, desktop) offers the same layer masking tools as Photoshop and handles the two-shot composite technique identically. Snapseed (free, mobile) includes a “double exposure” feature that allows basic compositing on a phone, though with less precision than desktop software. The most important factor isn’t the software — it’s keeping the camera absolutely stationary between the two shots. A tripod is the non-negotiable requirement; the software choice is secondary. For the smoothest mask edges around the support structure, shoot against a simple background (a plain wall or neutral floor) rather than a complex textured background.
Common Mistakes to Avoid in Home Photography
Every technique in this guide works — but specific execution errors will undermine results consistently. Understanding where home photography goes wrong is as important as knowing how to set it up correctly.
Technical Pitfalls in Home Photography
Shooting with Auto ISO indoors: Auto ISO causes the camera to select high ISO values (3200–6400) in low light, producing heavy grain that destroys fine detail in macro shots and portrait skin. Set ISO manually: ISO 100–400 near a window in daylight, ISO 400–800 for dim indoor conditions. Accept a slower shutter speed and use a tripod rather than letting ISO climb.
Forgetting to white balance: Indoor mixed lighting (warm lamp + cool window) creates color casts that look unnatural and are difficult to correct in post. Set a custom white balance or shoot in RAW format so you can adjust it non-destructively in Lightroom or Capture One. Never shoot JPEG under mixed lighting without setting a custom white balance first.
Using maximum aperture for everything: f/1.8 is seductive, but a depth of field of 2–3mm at close focusing distances means that even slight subject movement throws the eyes out of focus in portraits, or renders only a fraction of a textured object sharp in macro work. Use f/5.6–f/11 for macro textures, still life, and flat lays. Reserve f/1.8–f/2.8 for portraits and bokeh effects where shallow depth of field is intentional.
Cluttered backgrounds: The most common problem in home photography. Before shooting, spend 90 seconds clearing everything from the background that doesn’t contribute to the image. A plain wall, a simple fabric backdrop, or a position that places the subject against the sky through a window eliminates 80% of background clutter problems.
When to Shoot Outside Your Home Studio
At-home photography has genuine limitations that are worth acknowledging. If your creative goals include any of the following, stepping outside — or renting a space — will produce better results than any home workaround:
- When to consider alternatives:
- Large group portraits: Coordinating more than 3–4 people in a home space creates logistical problems that affect image quality — insufficient space for correct lens-to-subject distance, limited room for reflectors and lighting modifiers.
- Long-lens wildlife or sports work: Telephoto lenses (300mm+) require significant shooting distance that most home environments can’t accommodate.
- Consistent commercial product work: A DIY light box is excellent for learning and occasional use, but professional e-commerce photography at volume benefits from a proper studio setup with consistent, repeatable lighting.
Home photography excels at creative exploration, skill-building, and experimental work. When a project requires scale, consistent repeatability, or specialized equipment, recognizing that limit is part of developing as a photographer — not a failure of creativity.
Frequently Asked Questions
What Equipment Do I Need?
Any camera — including a smartphone — is sufficient for the majority of projects in this guide. The most important piece of equipment is a tripod or stable surface, which enables long exposures, self-portraits, and consistent framing for composite shots. A white foam board (under $5 at any craft store) functions as a reflector and background simultaneously. For levitation composites and color splash work, basic editing software is required — Adobe Lightroom (free mobile version available) or the free app Snapseed covers most needs. Expensive lenses and studio lighting are unnecessary for any of the 26 projects covered here.
How to Take Self-Portraits Alone?
Self-portrait photography requires three elements: a tripod, a pre-focused target, and a remote shutter or self-timer. Set your camera on a tripod, place an object where your face will be, focus on it, then switch to manual focus to lock the focal point. Remove the stand-in object, take your position, and trigger the shot using a 2-second self-timer or a Bluetooth remote shutter (available for under $15). For the most flattering results, position yourself 18–24 inches from a window in Rembrandt position — 45 degrees to the light source. Plan 3–4 poses before you start shooting rather than improvising between each frame.
Easiest Ideas for Beginners?
Shadow play and flat lay photography are the most beginner-accessible projects because they require no camera settings beyond basic auto mode and no post-processing. For shadow play, hold a colander between a lamp and a white wall and photograph the resulting pattern. For flat lays, arrange themed objects on a table and shoot from directly above using your phone’s grid lines to align the composition. Both techniques produce immediately dramatic results and teach foundational skills — light direction for shadow play, compositional balance for flat lays — that apply to every other photography genre.
Bringing It All Together
The 26 projects in this guide cover every major category of at-home photography — from the 30-second shadow play setup to the multi-step levitation composite — and they share one underlying principle: creative photography ideas at home succeed when you understand the setup, not just the result. That’s the Setup-to-Shot Gap, and closing it is what separates photographers who execute from those who only admire.
The Setup-to-Shot Gap applies whether you’re building a $5 DIY light box or masking a levitation composite in Photoshop. In each case, the technique is learnable and the equipment is already in your home. According to the Museum of Modern Art, photographers have always transformed their immediate environments into creative studios — the constraint of a home space is a creative parameter, not a limitation.
Start with one project today. If you’re new to home photography, begin with shadow play (Idea #1) or a window light phone portrait (Project #11) — both produce compelling results in under 15 minutes with zero equipment investment. If you’re an intermediate shooter ready to build technical skills, the DIY light box (Project #21) and the three-lighting-setup portrait section will advance your understanding of light faster than any other practice. When you’re ready to push further, the levitation composite (Project #24) is genuinely achievable in a single afternoon session. Visit the step-by-step portrait photography guide for a structured progression through lighting, posing, and composition that builds directly on what you’ve practiced here.
Dave King
Hi, I'm Dave, the founder of Amateur Photographer Guide. I created this site to help beginner and hobbyist photographers build their skills and grow their passion. Here, you’ll find easy-to-follow tutorials, gear recommendations, and honest advice to make photography more accessible, enjoyable, and rewarding.