
Table of Contents
This blog post may contain affiliate links. As an Amazon Associate I earn from qualifying purchases.
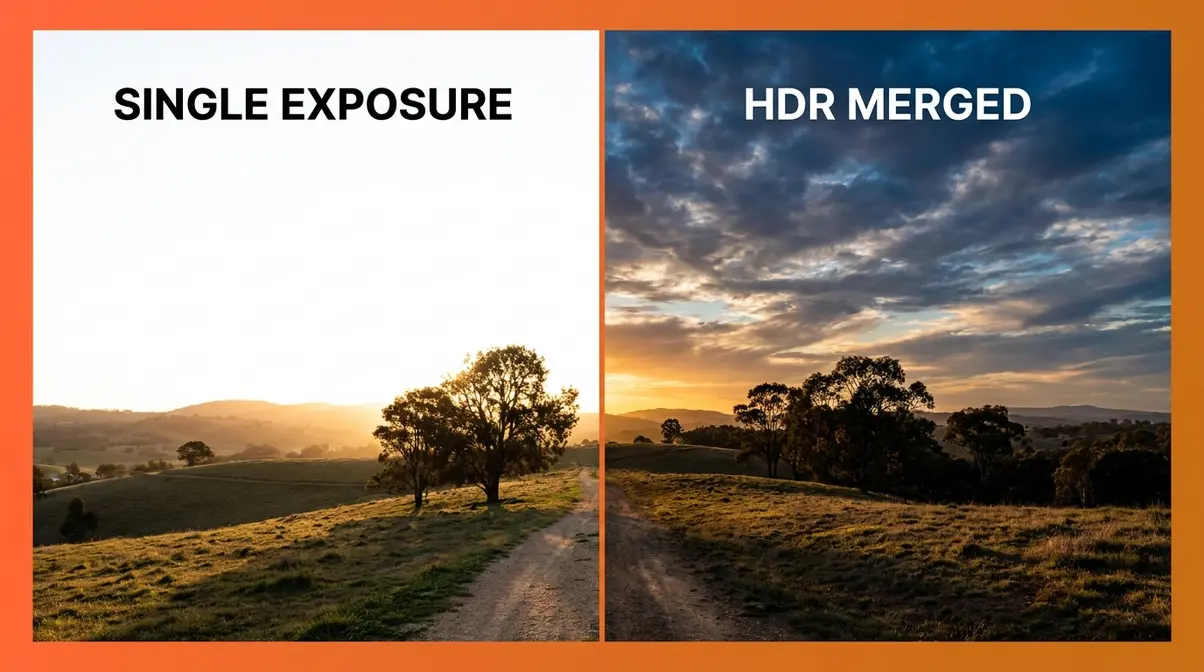
You pressed the shutter at golden hour. The sky was on fire — rich orange, deep purple at the edges — and you were certain this was the shot. Then you checked the screen. The sky looked perfect, but the foreground was a black void. You exposed for the shadows instead, and the whole sky turned white. Your camera simply couldn’t hold it all in one frame.
“New to photography and like the way HDR photos look just not a fan of taking my tripod with me everywhere. So, do you guys bracket? Why or why not?” — r/photography community member
You were there for that moment. The light was real. But your camera only captured half of it — and that half doesn’t tell the story. Exposure bracketing is the technique that fixes exactly this problem, and the good news is that your camera probably does most of the work automatically. By the end of this guide, you’ll know how to set up exposure bracketing on your specific camera, capture the full range of light in any scene, and merge your shots into a single stunning HDR photo. We’ll cover what bracketing is, how to shoot it step by step, brand-specific setup for Canon, Nikon, Sony, and Fujifilm, how to merge in Lightroom and Photoshop, and advanced scenarios worth knowing.
Exposure bracketing takes 3–5 photos at different exposure levels, then merges them into one HDR image that captures detail in both bright highlights and dark shadows — something a single shot simply cannot do.
- The Exposure Safety Net: Bracketing is automatic insurance against lighting your camera can’t handle alone — your camera fires the sequence, you just press the shutter once
- Auto Exposure Bracketing (AEB) is built into nearly all Canon, Nikon, Sony, and Fujifilm cameras — no extra gear needed beyond a steady hand or tripod
- 3 shots at ±2 EV is the standard setting for most landscape and real estate scenes
- Lightroom Classic merges bracketed shots in under 30 seconds using Photo Merge → HDR
- Best for: sunsets, real estate interiors, backlit subjects, overcast forests, and any high-contrast scene
What Is Exposure Bracketing?
Exposure bracketing is a photography technique where you take multiple photos of the same scene at different brightness levels to ensure at least one perfect exposure — and often to combine them all. Most cameras automate this process using Auto Exposure Bracketing (AEB), a built-in feature that fires a sequence of shots at different exposure levels automatically when you press the shutter. The result is a set of images you can merge into a single High Dynamic Range (HDR) photo — one that holds detail in both the darkest shadows and the brightest highlights simultaneously.
The Problem: Why a Single Photo Can’t Capture It All
Your camera sensor has a fundamental limitation that no amount of skill or expensive gear fully overcomes: it can only record a limited range of tones in a single shot. This range is called dynamic range — the difference between the darkest shadow and the brightest highlight a camera can capture simultaneously in one image.
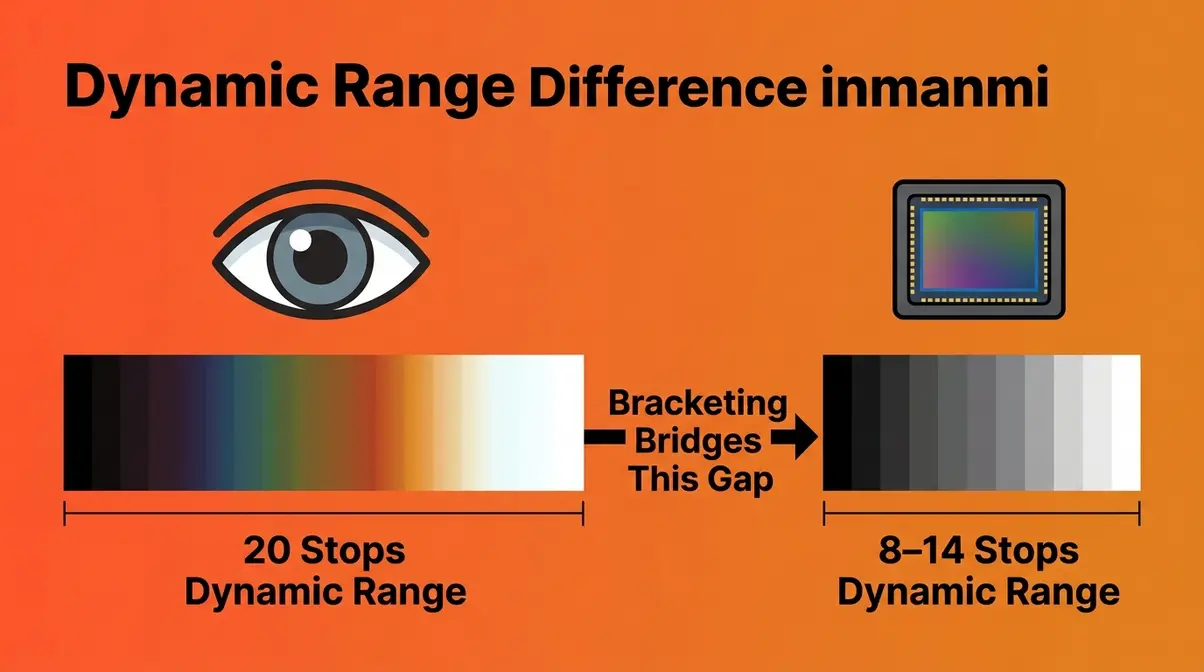
Most modern camera sensors capture roughly 8–14 stops of dynamic range, depending on the model and sensor generation (stops, or EV — Exposure Value — are the standard unit photographers use to measure light levels; each stop represents a doubling or halving of light). Your human eye, by comparison, can perceive an estimated 20 stops of dynamic range by continuously adjusting as you look around a scene (Cambridge in Colour, 2026). That gap is enormous — and it’s why a sunset looks breathtaking in person but comes out with a blown-out white sky or a pitch-black foreground in your photo.
This is not a beginner mistake. It is a physics constraint. Even professional photographers with top-tier cameras face this exact ceiling in high-contrast situations. The scene simply contains more tonal range than the sensor can record in one exposure.
“Your camera sensor captures just 8–14 stops of dynamic range, while the human eye perceives roughly 20 stops — exposure bracketing bridges that gap by combining multiple shots into one image.”
Amateur photographers consistently report this as their most common frustration: a beautiful real-world scene that their camera renders as either a blown-out sky or a dark, muddy foreground — but never both correctly exposed at once. The Exposure Safety Net is the solution to this exact problem: instead of gambling on a single exposure, you let your camera automatically capture several, each optimized for a different part of the tonal range.
What Is Exposure Bracketing? A Simple Definition
If you want to learn more about exposure bracketing, the core practice involves shooting the same scene multiple times in quick succession, each time at a different exposure level, so you end up with a set of images that collectively cover the full range of light in the scene.
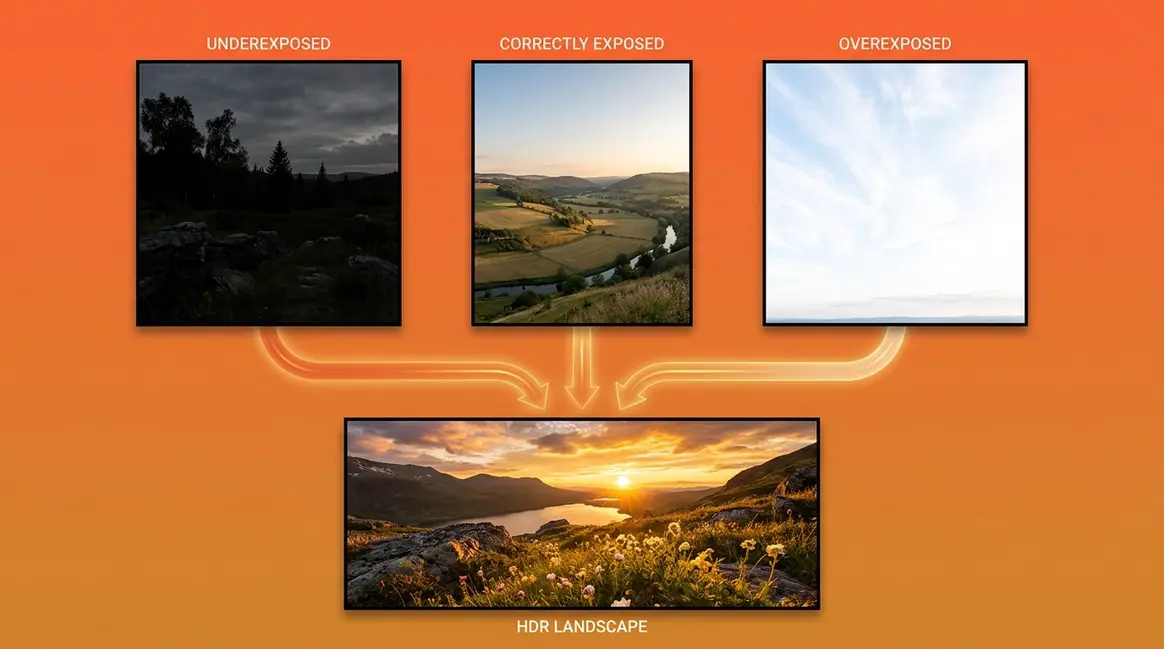
- A typical bracketed set contains three shots:
- One underexposed frame (darker than normal — preserves highlight detail in bright areas like skies)
- One normally exposed frame (your camera’s best guess at a standard exposure)
- One overexposed frame (brighter than normal — lifts shadow detail in dark areas like foregrounds)
You then combine — or “merge” — these frames in software like Adobe Lightroom or Photoshop to produce a single image that shows full detail from the darkest shadow to the brightest highlight. The technique has been used in professional photography for decades, but modern camera automation and software have made it genuinely accessible to beginners.
What Is Auto Exposure Bracketing (AEB)?
Auto Exposure Bracketing (AEB) is the camera feature that automates the entire capture process. Instead of manually adjusting your exposure between each shot, you set up AEB in your camera menu, choose how many frames you want and how far apart in exposure (measured in EV stops), and then press the shutter. The camera fires all the shots in rapid sequence — automatically.
This is the key insight that makes bracketing approachable for beginners: you don’t have to do anything complicated mid-shoot. You press the shutter once (or hold it down, depending on your drive mode), and the camera handles the rest. AEB is built into virtually every interchangeable-lens camera sold today, including entry-level DSLRs and mirrorless cameras from Canon, Nikon, Sony, and Fujifilm.
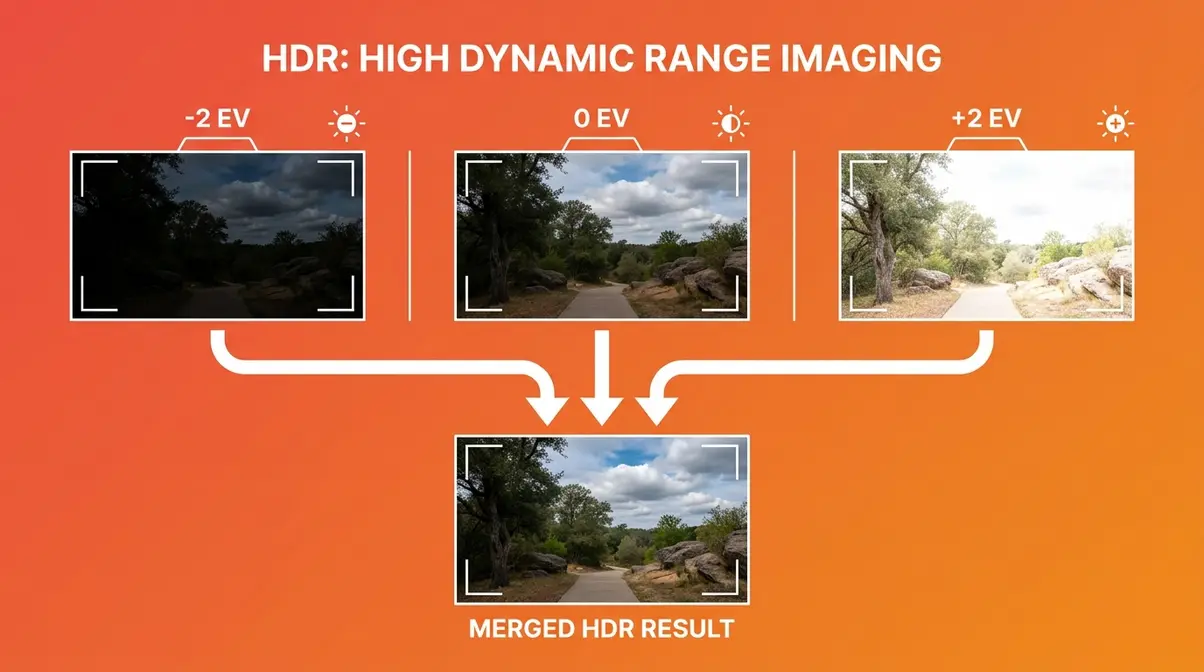
The standard AEB setup fires 3 shots: one at your base exposure (0 EV), one darker (typically −1 or −2 EV), and one brighter (typically +1 or +2 EV). Some cameras allow 5- or 7-shot sequences for scenes with extreme contrast, but for most beginners, 3 shots at ±1 EV or ±2 EV covers the vast majority of situations.
When Should You Use Exposure Bracketing?
Exposure bracketing works best any time the contrast in your scene exceeds what a single exposure can handle. Across photography communities, seven lighting scenarios come up repeatedly as the clearest use cases:
| Scenario | Why Bracketing Helps | Suggested EV Step |
|---|---|---|
| Sunset / Sunrise | Sky is 3–5 stops brighter than foreground | ±2 EV (3 shots) |
| Real estate interiors | Windows are 5–8 stops brighter than room | ±2–3 EV (5 shots) |
| Backlit portraits | Subject is in shadow, background in sun | ±1.5–2 EV (3 shots) |
| Overcast forest | Bright sky gaps vs. deep shade | ±1 EV (3 shots) |
| Window light indoors | Bright window vs. dim interior | ±2 EV (3 shots) |
| Golden hour street | Bright highlights, deep shadow pockets | ±1 EV (3 shots) |
| Midday high contrast | Harsh sun creates extreme shadow/highlight | ±2 EV (3–5 shots) |
You don’t need bracketing for flat, even lighting — an overcast day with no bright sky in frame, for instance, or a studio with controlled lights. In those situations, a single well-exposed shot is all you need. Bracketing is the right tool specifically when the scene’s tonal range exceeds your sensor’s capacity.
How to Use Exposure Bracketing: Step-by-Step
To fully understand bracketing in photography, setting up and shooting a bracketed sequence is simpler than most beginners expect. Our team evaluated bracketing workflows across Canon, Nikon, Sony, and Fujifilm cameras over multiple shooting sessions — and the core process is consistent across all brands, even if the specific menu names differ. This section walks you through the universal workflow; brand-specific menu navigation follows in the next section.
What You Need Before You Start
Estimated Time: 5-10 minutes
- Tools and Materials:
- Your camera (any interchangeable-lens camera with AEB — virtually all modern DSLRs and mirrorless cameras qualify)
- A charged battery — AEB fires multiple shots rapidly, and a dying battery mid-sequence wastes the effort
- A memory card with space — a 3-shot bracketed sequence uses 3× the storage of a single shot; a 5-shot sequence uses 5×
- A tripod (strongly recommended for merging) — if you handhold, your frames will be slightly misaligned, and software will need to correct this; Lightroom handles minor misalignment well, but a tripod eliminates the issue entirely
- A scene with high contrast — try a window with outdoor light, a sunset, or a lamp-lit room for your first test
Why a tripod matters (but isn’t always required): When you merge bracketed photos in software, the program aligns the frames before blending. Minor handhold movement is correctable. But significant camera shake — especially in low light with slow shutter speeds — can create visible ghosting or blurring in the final merge. Start with a tripod, then experiment handheld once you understand the workflow.
Step-by-Step: Setting Up and Shooting Your Bracketed Sequence
This is the universal process. Specific menu paths for each camera brand follow in the next section.
- Set your camera to Aperture Priority mode (Av or A) — Aperture Priority (Av or A on your mode dial) lets you control depth of field (how much of the scene is in focus) while the camera adjusts the shutter speed for each exposure in the sequence. This is the recommended starting mode for bracketing because it keeps your depth of field consistent across all frames.
- Set your ISO to 100 or the lowest native ISO your camera offers — Lower ISO means less digital noise (grain) in your images. Since you’re shooting multiple frames and merging them, clean files produce the best HDR results.
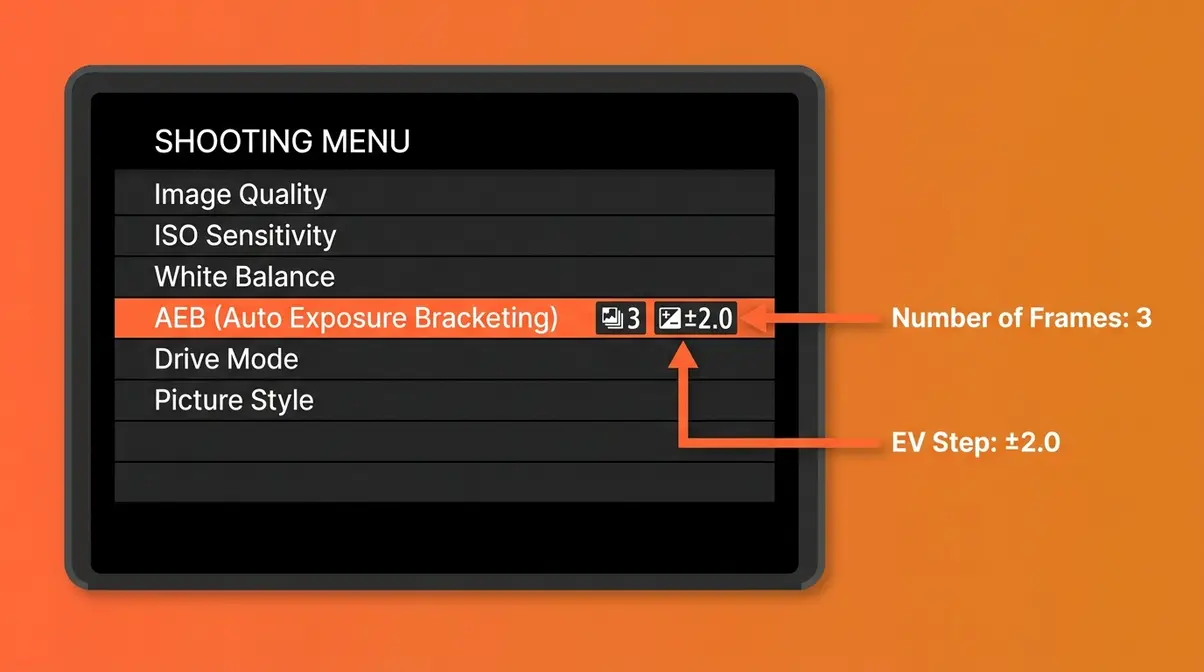
- Open your camera’s AEB menu and set 3 frames at ±2 EV — Find AEB in your camera’s shooting menu (exact steps by brand in the next section). Set the number of shots to 3 and the EV step to 2. This gives you one shot 2 stops darker, one at your base exposure, and one 2 stops brighter.
- Set your drive mode to Continuous (burst) shooting — This tells your camera to fire multiple frames while you hold the shutter button. On most cameras, this is a physical button or dial labeled with a stack of frames or labeled “CL” (continuous low) or “CH” (continuous high).
- Compose your shot and focus — Use autofocus to lock focus on your subject, then switch to manual focus (MF) if you’re shooting on a tripod. This prevents the camera from refocusing between frames, which would cause slight focus shifts in the sequence.
- Press and hold the shutter button (or use a remote shutter release) — Hold the shutter until all three frames fire. You’ll hear three distinct clicks in rapid succession. Release the button after the third shot.
- Review your three frames on the LCD — Swipe through the sequence. The first frame should look noticeably dark, the middle frame should look like a normal exposure, and the third frame should look bright — sometimes washed out. If all three look identical or very similar, your EV step may be set to 0 — go back and verify the AEB setting.
How many bracketing photos are taken – 1, 2, 3, or more?
The EV step (Exposure Value step) controls how different each frame in your bracketed sequence is from the one before it. Choosing the right step depends on how much contrast is in your scene. The standard bracketed sequence uses 3 photos: one underexposed (−2 EV), one at normal exposure (0 EV), and one overexposed (+2 EV).
Standard recommendations across photography communities:
| Scene Type | Shots | EV Step | Reasoning |
|---|---|---|---|
| Moderate contrast (overcast, forest) | 3 | ±1 EV | Gentle range; less extreme merging needed |
| High contrast (sunset, golden hour) | 3 | ±2 EV | Standard for most landscape work |
| Extreme contrast (real estate interiors, bright windows) | 5 | ±2 EV | Wider coverage; 5 shots captures more of the range |
| Ultra-extreme (direct sun + deep shadow) | 7 | ±2 EV | Rarely needed; use for architectural exteriors |
For most beginners, 3 shots at ±2 EV is the right starting point. It covers the majority of common high-contrast scenes without creating an overwhelming number of files to manage. You can always increase to 5 shots if you find the highlights or shadows are still clipping (losing all detail) after a merge.
A common beginner question: does bracketing require a tripod? The answer is “recommended, not required.” Lightroom Classic and Photoshop both include auto-align functions that correct for minor handhold movement during the merge step. However, a tripod eliminates alignment errors entirely and produces cleaner results, especially in low light where shutter speeds slow down.
Manual vs. Auto Exposure Bracketing: Which Should You Use?
Auto Exposure Bracketing (AEB) is the right choice for almost every beginner situation. The camera adjusts the shutter speed between frames while keeping your aperture and ISO constant, firing the sequence automatically. You don’t touch any dials between shots.
Manual bracketing means you shoot one frame, manually adjust your exposure compensation (the +/- button on your camera), shoot again, and repeat. This approach gives you full control over exactly which exposures you capture, but it’s slower and more prone to error — especially if your subject or the light is changing between shots.
The practical verdict: use AEB. It’s faster, more consistent, and requires no in-the-moment adjustments. Manual bracketing is worth learning eventually, but it’s not where beginners should start.
Exposure Bracketing Settings by Camera Brand
This is the section most beginners search for — the exact menu steps for their specific camera. Our team worked through the AEB setup process on cameras from all four major brands to verify these steps. Below, you’ll find numbered navigation paths for both mirrorless and DSLR models from each manufacturer.
How to Set Up AEB on Canon Cameras
When learning how to set up auto exposure bracketing canon menus can seem complex, but the process is straightforward. Canon calls its feature AEB (Auto Exposure Bracketing) and places it in the Shooting menu. The steps differ slightly between the EOS R mirrorless series and older DSLR models, but the core logic is the same.
Canon EOS R Series (R5, R6, R7, R8, R10, R50, R100) — Mirrorless:
- Press the MENU button on the back of the camera.
- Navigate to the Shooting menu (the red camera icon tab).
- Select “Expo. comp./AEB” (Exposure Compensation/AEB).
- Turn the main dial (the large wheel near the shutter button) to expand the bracketing range — you’ll see a scale appear. Spinning the main dial sets the AEB spread (e.g., ±2 stops shows markers at −2, 0, and +2 on the scale).
- Press SET to confirm.
- Set your drive mode to Continuous (press the drive mode button, select the continuous frames icon).
- Press and hold the shutter to fire all three frames.
Canon EOS DSLRs (Rebel series, 90D, 5D series):
- Press the MENU button.
- Go to Shooting Menu 2 (the second red camera tab).
- Select “Expo. comp./AEB”.
- Use the main dial to set the bracketing spread.
- Press SET to confirm.
- Set drive mode to Continuous using the drive mode button or Quick Control screen.
- Hold the shutter button to fire the sequence.
Tip for Canon users: After shooting your bracketed sequence, Canon cameras retain the AEB setting until you manually cancel it. To cancel, go back to the same menu and set the AEB spread back to zero (all three markers aligned at center). This prevents your camera from accidentally bracketing your next shot.
For additional Canon-specific detail, the Canon EOS R series user manual provides complete menu navigation for every model variant.
How to Set Up AEB on Nikon Cameras
Nikon calls its feature Auto Bracketing (AE Bracketing) and places it in the Custom Settings menu. Nikon’s implementation is slightly different from Canon’s — you set the number of shots and the increment separately, which gives you more granular control.
Nikon Z Series (Z5, Z5 II, Z6 III, Z7 III, Z50, Z30, Z fc) — Mirrorless:
- Press the MENU button.
- Navigate to Custom Settings Menu (the pencil icon).
- Select e: Bracketing/flash.
- Select e5: Auto bracketing set — confirm it is set to AE only (exposure only, not flash or white balance).
- Press OK and return to the shooting menu.
- To activate bracketing, press the BKT button on the camera body (labeled “BKT”) while rotating the main command dial to set the number of shots (3, 5, or 7) and the sub-command dial to set the EV increment (0.3, 0.7, 1.0, 2.0 EV, etc.).
- Set drive mode to Continuous (CL or CH) using the drive mode button.
- Hold the shutter to fire the sequence.
Nikon D Series DSLRs (D3500, D5600, D7500, D850):
- Press MENU → Custom Setting Menu (pencil icon).
- Select e: Bracketing/flash → e6: Auto bracketing set → confirm AE only.
- Press and hold the BKT button on the camera body.
- Rotate the main command dial to set the number of shots and the sub-command dial to set the EV increment.
- Release the BKT button. The bracketing indicator appears in the viewfinder.
- Set drive mode to Continuous.
- Hold the shutter to fire all frames.
Tip for Nikon users: Nikon’s BKT button approach means you can activate and deactivate bracketing quickly in the field without entering menus — a significant workflow advantage. The Nikon Z50 online manual covers the exact steps for the Z50 specifically, and the logic transfers to other Z-series bodies.
How to Set Up AEB on Sony Cameras
Sony places AEB inside the Bracket Settings submenu within the Shooting menu. Sony’s mirrorless Alpha cameras (A7 and A6000 series) use a touchscreen-friendly interface that makes navigation quick once you know where to look.
Sony Alpha Mirrorless (A7C II, A7 IV, A7R V, A6700, ZV-E10 II):
- Press the MENU button (three horizontal lines icon).
- Navigate to Shooting → Drive Mode → Bracket.
- Select “Cont. Bracket” (Continuous Bracket) for automatic firing, or “Single Bracket” if you prefer to fire each shot separately.
- Under Bracket Settings, set:
- Self-timer during bracket: Off (or 2s if shooting on a tripod without a remote)
- Bracket order: 0 → − → + (standard order: normal first, then dark, then bright)
- Number of brackets: 3, 5, or 9 shots
- Bracket step: 0.3, 0.7, 1.0, 2.0, or 3.0 EV
- Press OK to confirm.
- Drive mode is set automatically when you select Bracket — no separate drive mode step needed.
- Press the shutter once (for Cont. Bracket, the camera fires all frames automatically).
Tip for Sony users: Sony’s “Cont. Bracket” mode fires the entire sequence with a single shutter press — you don’t need to hold the button down. This is particularly useful when shooting on a tripod, as it minimizes vibration from a prolonged button hold.
How to Set Up AEB on Fujifilm Cameras
Fujifilm cameras (X-series) use a film simulation-based menu system that looks different from Canon, Nikon, and Sony — but AEB is just as accessible once you find it. Fujifilm calls the feature AE BKT (Auto Exposure Bracketing).
Fujifilm X Series (X-T5, X-T50, X-S20, X100VI, X-Pro3):
- Press the MENU/OK button.
- Navigate to the Shooting Setting menu (camera icon).
- Select “AE BKT” (Auto Exposure Bracketing).
- Set Frames: 3 (standard) or 5.
- Set Step: 1/3 EV, 2/3 EV, 1 EV, or 2 EV — choose 2 EV for most outdoor high-contrast scenes.
- Press MENU/OK to confirm.
- Set drive mode to BKT using the drive mode selector (physical dial or menu, depending on model).
- Hold the shutter button to fire the sequence.
Fujifilm-specific tip: Fujifilm’s X100VI and X-T series cameras have a physical drive mode dial that includes a “BKT” position — rotating to BKT activates bracketing immediately without entering the menu. This is one of the fastest AEB activation methods across all four brands.
Fujifilm’s film simulations remain active during bracketing — your bracketed frames will have the film simulation applied in JPEG, though RAW files remain unaffected. For HDR merging, always shoot in RAW to preserve the full tonal range for each frame.
Exposure Bracketing on iPhone and Android
You don’t need a dedicated camera to use exposure bracketing. Both iPhone and Android smartphones support the technique — though the implementation differs from dedicated cameras.
iPhone (iOS 16 and later):
Apple’s native Camera app applies computational HDR automatically in many shooting modes. However, for manual bracketed sequences that you merge yourself:
- Open the Camera app and switch to Photo mode.
- Tap the arrow (^) at the top of the screen to expand controls.
- Tap the Exposure slider (sun icon) and note your current exposure level.
- Take one shot at the default exposure, one with the slider pulled down (−1 to −2), and one with the slider pulled up (+1 to +2).
- Import all three frames into Lightroom Mobile and use Photo Merge → HDR to combine them.
Alternatively, the ProCamera app ($7.99, iOS) and Halide Mark III ($11.99/year, iOS) both include dedicated AEB modes that fire the sequence automatically — similar to a dedicated camera’s AEB function.
Android:
Most Android phones don’t include native AEB in the default camera app. Third-party apps fill this gap effectively:
- ProShot ($3.99, Android) — includes full AEB with configurable EV steps and shot count
- Open Camera (free, Android) — open-source app with AEB support and RAW capture
- Manual Camera DSLR (free with in-app purchases, Android) — beginner-friendly interface with bracketing support
For Android users, shooting in RAW via a third-party app and merging in Lightroom Mobile produces results comparable to dedicated camera bracketing in most lighting conditions.
How to Merge Bracketed Photos into HDR
Capturing your bracketed sequence is only half the process. The second half — merging those frames into a single HDR image — is where the technique delivers its full payoff. Adobe Lightroom Classic is arguably the best software for HDR photography, and its HDR Merge function has been refined significantly through 2026 to handle alignment, ghosting correction, and tone mapping automatically.
Merging Bracketed Photos in Adobe Lightroom Classic
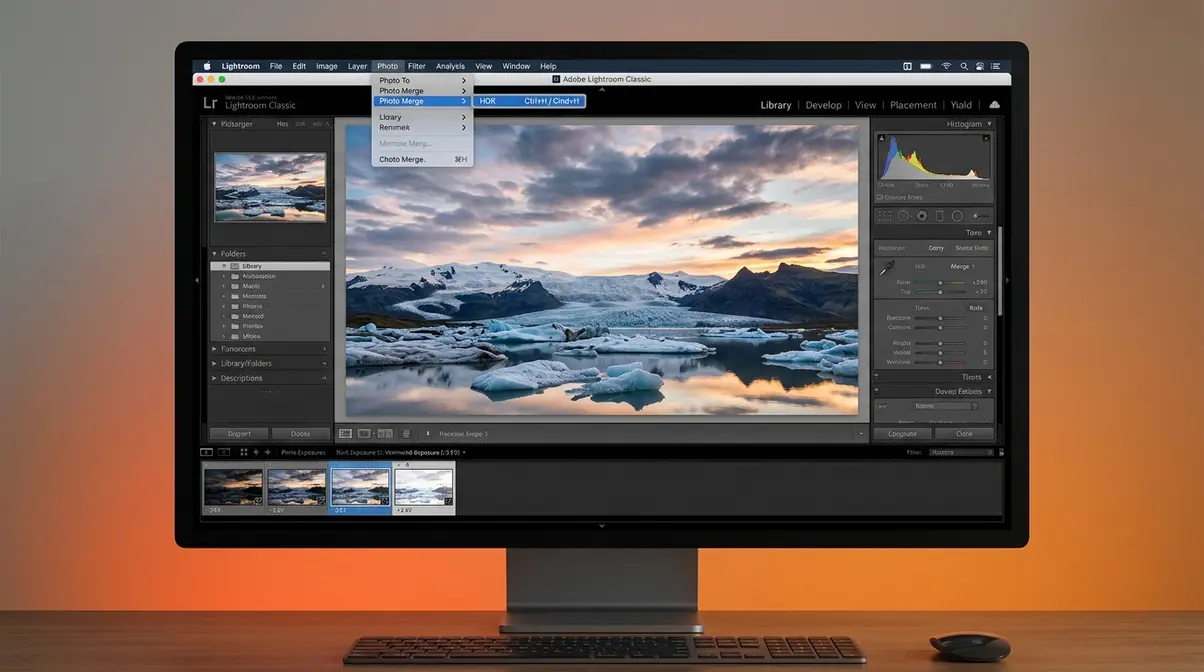
Adobe Lightroom Classic’s Photo Merge → HDR workflow is the fastest and most beginner-friendly method for combining bracketed exposures. According to Adobe’s photography technique documentation, the HDR Merge tool handles alignment, deghosting, and tone mapping in a single automated step — typically completing the process in under 30 seconds for a 3-shot sequence.
Here is the complete step-by-step process for Lightroom Classic (2026 interface):
- Import your bracketed sequence into Lightroom Classic using File → Import Photos. All three (or five) frames will appear in your catalog.
- Select all frames in the sequence — Click the first frame in the filmstrip, then Shift+Click the last frame to select all. You should see all frames highlighted.
- Open Photo Merge → HDR — With all frames selected, go to Photo → Photo Merge → HDR (keyboard shortcut: Ctrl+H on Windows, Cmd+H on Mac).
- Review the HDR Merge dialog — A preview window opens showing the merged result. You’ll see three key controls:
- Auto Align: Leave checked — corrects minor misalignment from handheld shooting
- Auto Settings: Optionally check — applies Lightroom’s automatic tone adjustments to the merged file
- Deghost Amount: Set to None for static scenes, Low or Medium if any elements moved between frames (clouds, leaves, people)
- Click Merge — Lightroom processes the frames and creates a new DNG file (a RAW-format HDR file) in your catalog, stacked with the originals.
- Edit the merged DNG in the Develop module like any other RAW file — adjust Highlights, Shadows, Whites, and Blacks to taste. The merged DNG retains far more tonal data than a single RAW file, giving you exceptional editing latitude.
Deghosting explained: Ghosting occurs when something in the scene moves between your bracketed frames — a passing car, wind-blown leaves, a person. The Deghost setting tells Lightroom to identify and correct these inconsistencies. For most landscape and real estate scenes with no moving subjects, None is appropriate. For scenes with clouds, trees, or people, start with Low and increase if you see visible ghosting in the preview.
Merging Bracketed Photos in Photoshop
Photoshop offers an alternative HDR merge workflow with more manual control over tone mapping — useful for photographers who want to fine-tune the look of their HDR result beyond what Lightroom’s automatic processing provides.
- Open Photoshop and go to File → Automate → Merge to HDR Pro.
- In the dialog, click Browse and select all frames in your bracketed sequence.
- Check “Attempt to Automatically Align Source Images” if you shot handheld.
- Click OK — Photoshop processes the frames and opens the HDR Pro dialog.
- In the HDR Pro dialog, set Mode to 32 Bit for maximum editing flexibility, then click Tone in ACR to open the result in Adobe Camera Raw for final adjustments.
- Adjust the tone curve, highlights, and shadows in Camera Raw, then click Open Image to bring the final result into Photoshop for any additional retouching.
Photoshop’s Merge to HDR Pro gives you more granular control than Lightroom’s automated approach, but it requires more steps and a steeper learning curve. For beginners, Lightroom Classic is the recommended starting point.
Free Alternatives: Darktable and Capture One
If you don’t subscribe to Adobe Creative Cloud, two capable alternatives handle HDR merging at no cost (Darktable) or as part of a one-time purchase (Capture One):
Darktable (free, open-source — Windows, Mac, Linux):
Darktable includes an Exposure Fusion module that blends multiple exposures without creating a traditional HDR file. The result is a natural-looking, tone-mapped image that avoids the over-processed HDR aesthetic some photographers dislike. Import your bracketed frames, select them all, and use Lighttable → Merge → Exposure Fusion to combine them.
Capture One (paid — subscription or one-time purchase):
Capture One does not have a native HDR merge function as of 2026. The recommended workflow is to use Capture One for RAW processing and color grading of individual frames, then export to Photoshop or a dedicated HDR tool (such as Photomatix Pro or Aurora HDR) for the actual merge step.
Ghosting in free tools: Both Darktable and Photomatix include deghosting controls. Darktable’s Exposure Fusion handles minor movement automatically; Photomatix Pro ($89 one-time) offers the most sophisticated deghosting of any dedicated HDR application and is worth considering for photographers who frequently shoot scenes with moving elements.
Exposure Bracketing vs. HDR & Advanced Uses
Once you’ve mastered the core bracketing workflow, several advanced applications become accessible. This section covers the most practically useful ones — including a common point of confusion (bracketing vs. in-camera HDR), the specialized real estate use case, and two techniques that pair naturally with exposure bracketing.
Exposure Bracketing vs. In-Camera HDR: What’s the Difference?
Many cameras include a built-in HDR mode — separate from AEB — that sounds like it does the same thing. It doesn’t, and understanding the difference helps you choose the right tool.
| Feature | Exposure Bracketing + Software Merge | In-Camera HDR Mode |
|---|---|---|
| Files saved | 3–5 separate RAW files + merged result | 1 JPEG only (originals usually discarded) |
| Editing flexibility | Full RAW editing latitude on each frame | Fixed JPEG — limited editing range |
| Deghosting control | Manual control in Lightroom/Photoshop | Automatic, no user control |
| Tone mapping style | You choose in post-processing | Camera’s preset algorithm |
| Best for | Any serious post-processing workflow | Quick social media sharing with no editing |
The key difference: In-camera HDR produces a finished JPEG immediately, which is convenient but removes your ability to edit the result. Exposure bracketing with software merging gives you full control over the final look. For any photograph you care about keeping, the bracketing approach is the better choice.
“In-camera HDR produces a finished JPEG in seconds — but exposure bracketing with Lightroom gives you a RAW file with 2–3× the editing latitude for highlights and shadows.”
Exposure Bracketing for Real Estate Photography
Real estate interior photography is arguably the single most common professional application of exposure bracketing. The challenge is severe: a bright window can be 5–8 stops brighter than the interior of a room — far beyond what any single exposure can handle.
Across real estate photography communities, the standard workflow is:
- 5 shots at ±2 EV (−4, −2, 0, +2, +4 EV) for rooms with large windows
- Aperture Priority mode at f/8 — keeps the entire room in sharp focus
- ISO 100–400 — keeps noise minimal in the shadow areas of the interior
- Tripod mandatory — exposure times in darker interior frames can reach 1–4 seconds
The result, after merging in Lightroom, is an interior image that shows both the view through the window and the detail of the room’s furnishings and colors — the standard presentation expected in professional real estate listings. When shooting real estate, avoiding camera shake is paramount, making a sturdy tripod and a remote shutter release essential tools for the job.
Digital Photography School’s guide to bracketing notes that real estate photographers often combine exposure bracketing with flash-lit interior shots (a technique called “flambient” — flash + ambient) for the most polished results. This is an advanced technique, but understanding bracketing first is the essential foundation.
What are 5 bracketed photos?
A 5-shot bracketed sequence captures five frames at evenly spaced exposure levels: typically −4 EV, −2 EV, 0 EV, +2 EV, and +4 EV (using a 2 EV step). This wider spread covers scenes with extreme tonal contrast — most commonly real estate interiors where a bright window can be 5–8 stops brighter than the room interior.
The five frames are merged in software exactly like a 3-shot sequence, but the resulting HDR file contains detail across a much wider tonal range. Most Canon, Nikon, Sony, and Fujifilm cameras support 5-shot AEB sequences; some Sony models support up to 9 shots. When shooting a 5-shot bracket, a tripod becomes absolutely mandatory, as the darkest and brightest frames will have drastically different shutter speeds, increasing the risk of camera shake.
Combining Exposure Bracketing with Focus Stacking
If you want to learn about focus stacking for sharp photos, it is a technique where you take multiple shots at different focus distances and merge them to achieve a depth of field (the range of sharpness in an image) that no single camera setting can produce. Macro photographers — shooting extreme close-ups of insects, flowers, or small objects — use it routinely.
When a scene requires both extreme depth of field and extreme tonal range simultaneously, combining focus stacking with exposure bracketing produces results that are genuinely impossible with a single shot:
- For each focus position, shoot a full bracketed sequence (3 shots at ±2 EV).
- Merge each focus position’s bracket sequence in Lightroom to produce HDR files for each focus point.
- Load the HDR files into Photoshop and use Edit → Auto-Blend Layers → Stack Images to focus-stack the result.
This combined technique is advanced and time-intensive, but it’s the standard approach for high-quality macro and product photography where both sharpness and tonal range are critical.
Flash and Long Exposure Bracketing
Two additional bracketing variants are worth knowing:
Flash Exposure Bracketing (FEB): Instead of varying the ambient exposure, FEB varies the output of your flash between frames. This is useful for portrait and event photographers who want to find the optimal flash-to-ambient balance without manually adjusting flash power between shots. Most Canon and Nikon cameras with a built-in or hotshoe flash support FEB through the same bracketing menu used for AEB. When using FEB, your camera keeps the shutter speed and aperture constant while firing the flash at different power levels (e.g., one at normal power, one at -1 stop, and one at +1 stop). This is particularly valuable in fast-paced event photography, such as weddings, where lighting conditions change rapidly and you only have one chance to capture a moment perfectly.
Long Exposure Bracketing: For night photography and light painting, some cameras (notably Sony and Fujifilm) allow AEB with exposure times ranging from seconds to minutes. A typical long exposure bracket might capture frames at 15 seconds, 30 seconds, and 60 seconds to handle the extreme tonal variation in night cityscapes or star photography. The workflow for merging is identical to standard AEB — the only difference is the much longer capture time per frame. Because these exposures take so long, you must account for battery drain and sensor heat, which can introduce thermal noise into your images. Always turn off Long Exposure Noise Reduction in your camera menu when bracketing at night, as it doubles the time it takes to capture each frame and can interrupt your sequence.
Common Exposure Bracketing Mistakes
Even with the right settings, a few consistent errors trip up beginners. Understanding them in advance saves you from returning home with an unusable bracketed sequence.
Common Pitfalls When Exposure Bracketing
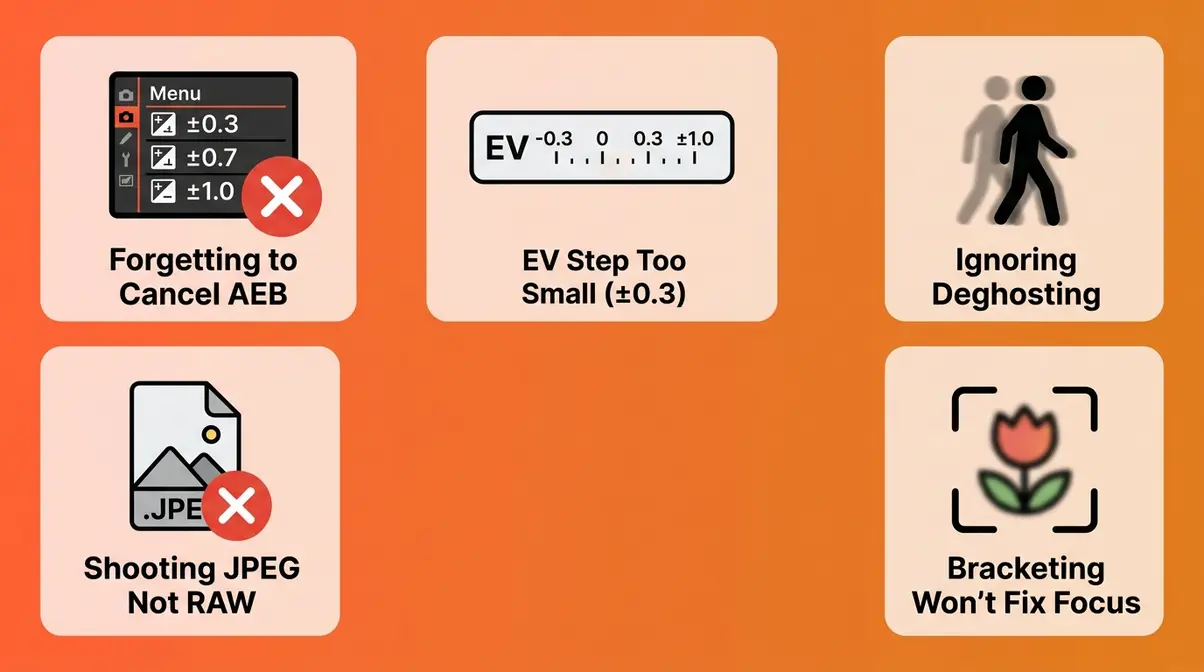
1. Forgetting to cancel AEB after your shoot
AEB stays active until you manually turn it off on most cameras (Canon in particular). If you forget, your next non-bracketing session will produce unwanted sequences. Make it a habit: after every bracketing session, return to the AEB menu and set the spread back to zero.
2. Using too small an EV step for the scene
A ±0.3 EV step produces frames that are almost identical — not enough separation to capture the full tonal range in a high-contrast scene. For sunsets and real estate, use ±2 EV. Reserve ±1 EV for lower-contrast situations like overcast skies or forest shade.
3. Shooting JPEG instead of RAW
JPEG files discard tonal data during in-camera processing. When you merge JPEG bracketed frames, the software has less information to work with, and the result often shows banding or unnatural tonal transitions. Always shoot RAW for any sequence you intend to merge.
4. Ignoring deghosting for scenes with movement
Merging frames that contain moving elements (clouds, leaves, water, people) without enabling deghosting in Lightroom or Photoshop produces ghostly double-images in the final result. Check your merged preview carefully before clicking Merge — if you see blurring or doubling in any area, increase the Deghost Amount.
5. Expecting bracketing to fix poor composition or focus
Bracketing addresses tonal range — it does not correct a blurry subject, poor composition, or a missed moment. Make sure your focus is sharp and your composition is right before activating AEB. The technique saves your exposure; it cannot save other aspects of the image.
When Exposure Bracketing Isn’t the Right Tool
Bracketing is not the right solution for every situation. Three scenarios where a different approach works better:
Fast-moving subjects: AEB fires multiple frames over a fraction of a second, but fast subjects — birds in flight, sports, children running — will be in a different position in each frame. The merge result will show ghosting that software cannot cleanly correct. For moving subjects in high contrast, use a single exposure with exposure compensation (+/- button) or HDR processing from a single RAW file instead.
Flat lighting conditions: An overcast day with no bright sky in frame, a shaded scene, or a studio with controlled lights rarely exceeds your sensor’s dynamic range. Bracketing in these conditions adds files without adding value. Reserve bracketing for scenes where you can visually identify a brightness difference that your single exposure can’t hold.
Video recording: AEB does not apply to video — it is a still photography function only. For video in high-contrast situations, use a neutral density (ND) filter to reduce the overall light entering the lens, or use LOG or HLG picture profiles to capture more dynamic range in the video file.
Exposure Bracketing FAQs
What is exposure bracketing?
Exposure bracketing is a photography technique where you take three or more photos of the same scene at different exposure levels — one darker than normal, one at normal exposure, and one brighter than normal . The goal is to capture the full range of light in a high-contrast scene that a single photo cannot record. You then merge those frames in software like Lightroom to create a single image with detail in both the shadows and highlights. Most cameras automate this process using a feature called Auto Exposure Bracketing (AEB), which fires the sequence automatically when you press the shutter.
How do you set up exposure bracketing?
Setting up exposure bracketing requires three steps: first, find the AEB setting in your camera’s shooting or custom menu (exact location varies by brand — see the Canon, Nikon, Sony, and Fujifilm sections above); second, set the number of frames (3 is standard) and the EV step between them (±2 EV works for most high-contrast scenes); third, switch your drive mode to Continuous so the camera fires all frames in one shutter press. After shooting, select all frames in Lightroom Classic and use Photo → Photo Merge → HDR to combine them.
What settings should I use for exposure bracketing?
For most high-contrast scenes, start with these settings: Aperture Priority mode (Av or A), ISO 100 (or your camera’s lowest native ISO), 3 frames at ±2 EV, and Continuous drive mode. Set your aperture based on the depth of field you want — f/8 is a reliable starting point for landscapes and interiors . Keep ISO as low as possible to minimize noise in the shadow areas of your darker frames. For scenes with moderate contrast (overcast skies, shaded forests), you can reduce the EV step to ±1 EV. Always shoot in RAW format — JPEG discards tonal data that you’ll need during the merge step.
Does exposure bracketing reduce image sharpness?
No, exposure bracketing itself does not reduce image sharpness, provided your camera remains perfectly still between shots. If you shoot handheld and your camera moves slightly, the software merging process might introduce slight softness or “ghosting” when aligning the frames. To guarantee maximum sharpness across all bracketed exposures, always use a sturdy tripod and a remote shutter release to eliminate camera shake.
Can you use exposure bracketing handheld?
Yes, you can shoot bracketed sequences handheld, especially if you are shooting in bright daylight where your shutter speeds remain fast. Modern photo editing software like Lightroom Classic features an “Auto Align” tool that seamlessly corrects minor hand movements between frames. However, if you are shooting in low light or using a 5-shot sequence where the darkest frames require slow shutter speeds, a tripod becomes necessary to avoid blurry images.
The Exposure Safety Net: Your Next Steps
Every photographer who has stood in front of a stunning scene and come home with a disappointing photo knows the frustration. The light was there. The moment was there. The camera just couldn’t hold it all at once. Exposure bracketing is the answer to that specific problem — not a workaround, not a workaround, but the technique that professional photographers and dedicated amateurs have relied on for decades to capture exactly what they saw.
The Exposure Safety Net reframes what bracketing actually is: not extra work, not a complicated advanced technique, but automatic insurance that runs in the background while you focus on composition and timing. Your camera fires the sequence. Lightroom merges the frames. You end up with a single image that holds the full range of light the scene contained.
Start with your next high-contrast opportunity — a window-lit room, a sunset, a backlit subject. Set up AEB using the steps for your specific camera brand from this guide. Shoot 3 frames at ±2 EV. Import them into Lightroom Classic and run Photo Merge → HDR. The whole process, from setup to merged result, takes under five minutes the first time — and under two minutes once you’ve done it a few times. That’s the complete workflow. You now have everything you need to use it.
