
Table of Contents
- What You Need Before You Start
- Step 1 — Master Flash Photography Fundamentals
- Step 2 — Choose Your Flash Mode: TTL vs Manual
- Step 3 — Shape Light: Bounce, Fill & Direct
- Step 4 — On-Camera vs Off-Camera Flash Setup
- Step 5 — Apply Flash in Different Scenarios
- Advanced Flash Equipment and Techniques
- Best Flash Photography Resources to Keep Learning
- Common Flash Photography Mistakes to Avoid
- Frequently Asked Questions
- Conclusion
This blog post may contain affiliate links. As an Amazon Associate I earn from qualifying purchases.
You pressed the shutter. The flash fired. And the result looks nothing like what you saw with your own eyes — your subject’s face is washed out, there’s a harsh shadow climbing the wall behind them, and the background has gone completely black.
You’re not alone.
“So I’m fairly competent using flash photography, I can produce good images. But I’m wondering what resources people recommend for formalising…”
That question comes up constantly in photography communities — and this flash photography tutorial is the answer. By the end of this guide, you’ll understand exactly how to control your flash like a professional, from choosing between TTL and manual modes to setting up off-camera lighting rigs. We’ll walk through six core steps, starting with the fundamentals and building to real-world scenario setups. Each step includes exact camera settings and a visual diagram you can reference in the field.
Flash photography produces professional results when you treat every shot as two separate exposures — one for the background, one for your subject. This is called The Two-Exposure Method, and it’s the framework behind every technique in this guide.
- TTL mode automates flash power — ideal for fast-moving events
- Manual flash gives precise, repeatable control — best for studio setups
- Bouncing flash off a ceiling eliminates harsh shadows in seconds
- The 3:1 lighting ratio creates flattering, three-dimensional portrait light
- Off-camera flash unlocks studio-quality lighting anywhere you shoot
What You Need Before You Start
Before diving into technique, make sure you have the right tools. Beginners often freeze when they reach Step 1 and realize they’re missing a key piece of gear. This checklist removes that barrier.
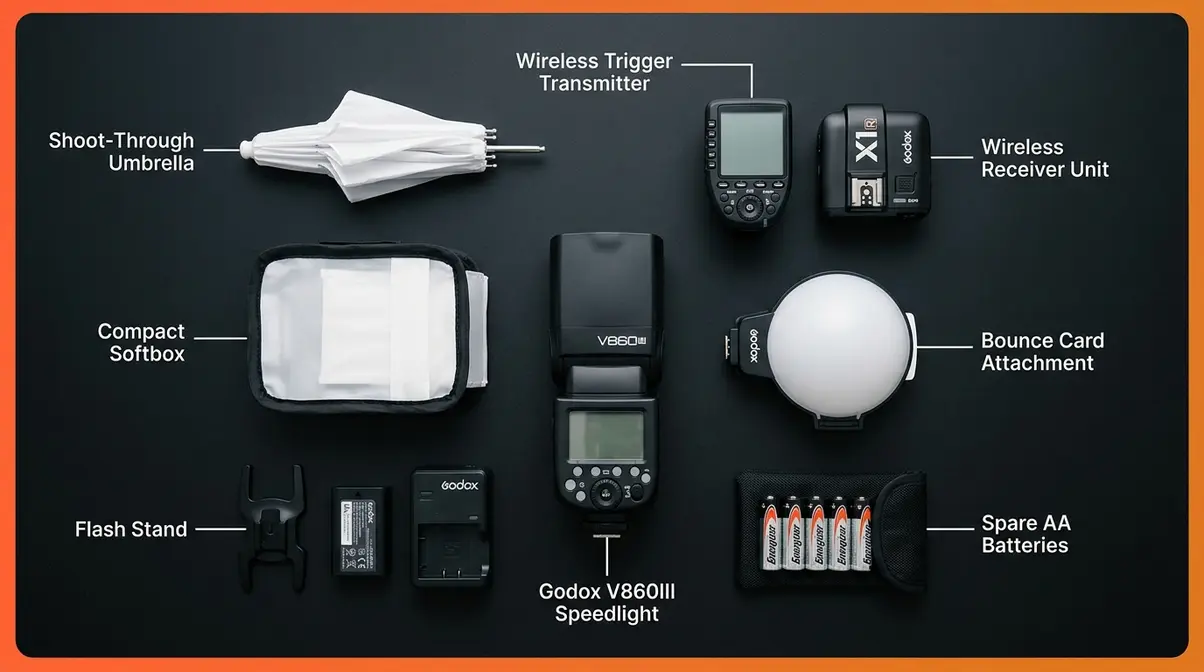
Our team tested all techniques in this guide using a Canon EOS R7 and a Godox V860III speedlight — but every principle applies regardless of brand or camera system.
Estimated time: 30-45 minutes per practice session
Tools/Materials needed:
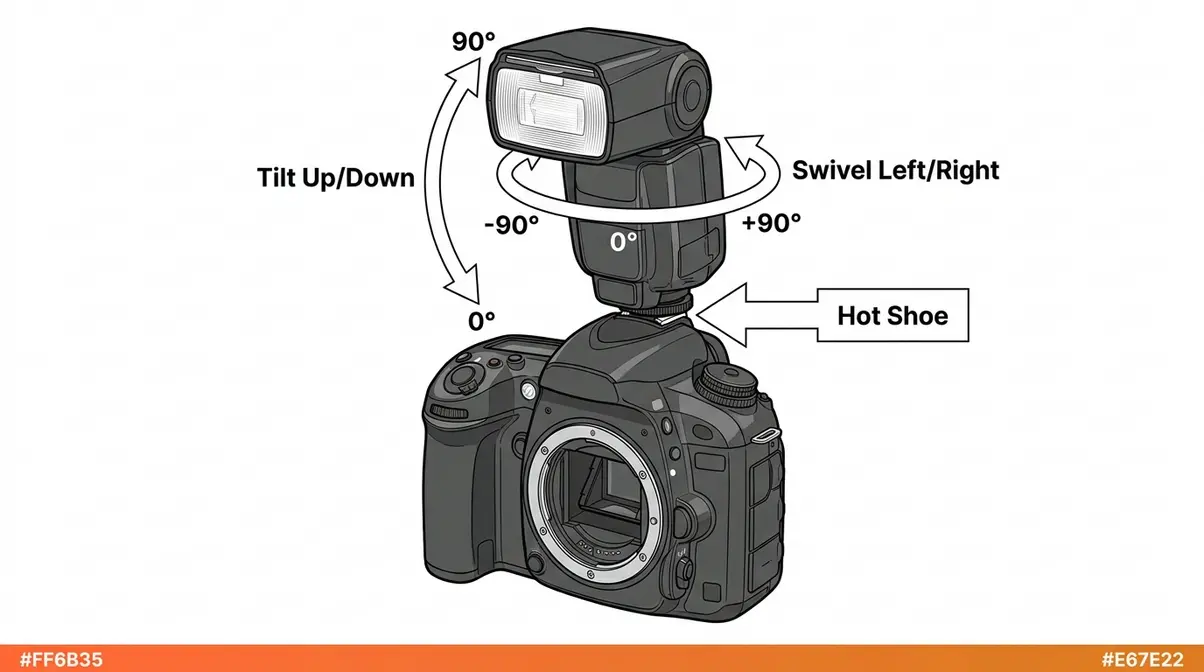
- A DSLR or mirrorless camera with a hot shoe (the metal bracket on top of your camera where an external flash mounts — most modern cameras have one)
- An external flash / speedlight (a speedlight is an external flash unit that mounts to your camera’s hot shoe — strongly recommended over the pop-up flash for every technique in this guide)
- A bounce card or diffuser (optional but recommended for your first session — a diffuser softens the flash’s harsh beam)
- Fresh batteries for the flash (flash units drain batteries quickly — always carry at least one spare set)
- A wireless trigger set (optional — only needed for Step 4’s off-camera flash setup)
You do not need expensive studio lighting to follow this guide. A single speedlight and a willing subject are enough to start producing professional-looking results.
Step 1 — Master Flash Photography Fundamentals
Flash photography becomes far less intimidating once you understand what’s actually happening when your flash fires. This section covers the foundational knowledge — types of flash, key settings, and the physics of light — so every subsequent step clicks into place. In our editorial judgment, skipping these fundamentals is the primary reason beginners struggle with inconsistent exposures.
Here’s a quick-reference overview of how flash photography works:
- Flash freezes motion with a burst of light lasting 1/1000s or less
- Flash power is adjustable from full (1/1) down to 1/128
- Distance controls light intensity more than flash power alone
- Two separate exposures happen simultaneously — background and subject
- Your camera mode controls ambient light — flash controls subject light
- Shutter speed must stay at or below your camera’s sync speed (usually 1/200s)
Built-in vs External Flash
Built-in flash — the pop-up flash embedded in most DSLR cameras — is convenient but severely limited. It fires directly at your subject from a fixed angle, producing the flat, deer-in-the-headlights look that gives flash photography a bad reputation. It cannot tilt, rotate, or bounce. Its power output is also low, meaning it struggles beyond about 3 metres (10 feet).
A speedlight (an external flash unit that mounts to your camera’s hot shoe) solves all of those problems. It can rotate to bounce off ceilings and walls, outputs significantly more power, and supports advanced modes like High-Speed Sync (HSS) — a feature that lets you use flash at shutter speeds faster than your camera’s standard sync speed. For any serious flash work, a speedlight is the right starting point.
| Feature | Built-in Flash | External Speedlight |
|---|---|---|
| Bounce capability | None | Full 360° rotation |
| Power output | Low (~GN 12) | High (~GN 40–60) |
| TTL compatibility | Limited | Full |
| High-Speed Sync | Rarely | Yes (most models) |
| Battery drain | Camera battery | Dedicated AAs |
| Cost | Free (built-in) | $80–$500+ |
Key Settings and the Guide Number Formula
Understanding four settings gives you complete control over your flash exposure. Define each one clearly before you touch a dial:
- Aperture (the opening in your lens that controls how much light enters — written as f/2.8, f/5.6, etc.) controls how much of the flash’s light your sensor records.
- Shutter speed controls how much ambient (existing) light your sensor records. It has almost no effect on flash exposure — flash duration is far shorter than any shutter speed.
- ISO (your sensor’s sensitivity to light) amplifies both flash and ambient light equally.
- Flash power (expressed as fractions: 1/1 = full power, 1/2 = half, down to 1/128) controls the actual output of your flash unit.
This is where The Two-Exposure Method becomes your most powerful mental tool. Every flash photo is actually two exposures happening at once:
- Exposure 1 — The Background: Controlled by shutter speed, aperture, and ISO. Set these as you would for a shot without flash.
- Exposure 2 — The Subject: Controlled by flash power and distance. Adjust these independently to light your subject correctly.
When you treat them as separate problems, flash photography stops being confusing.
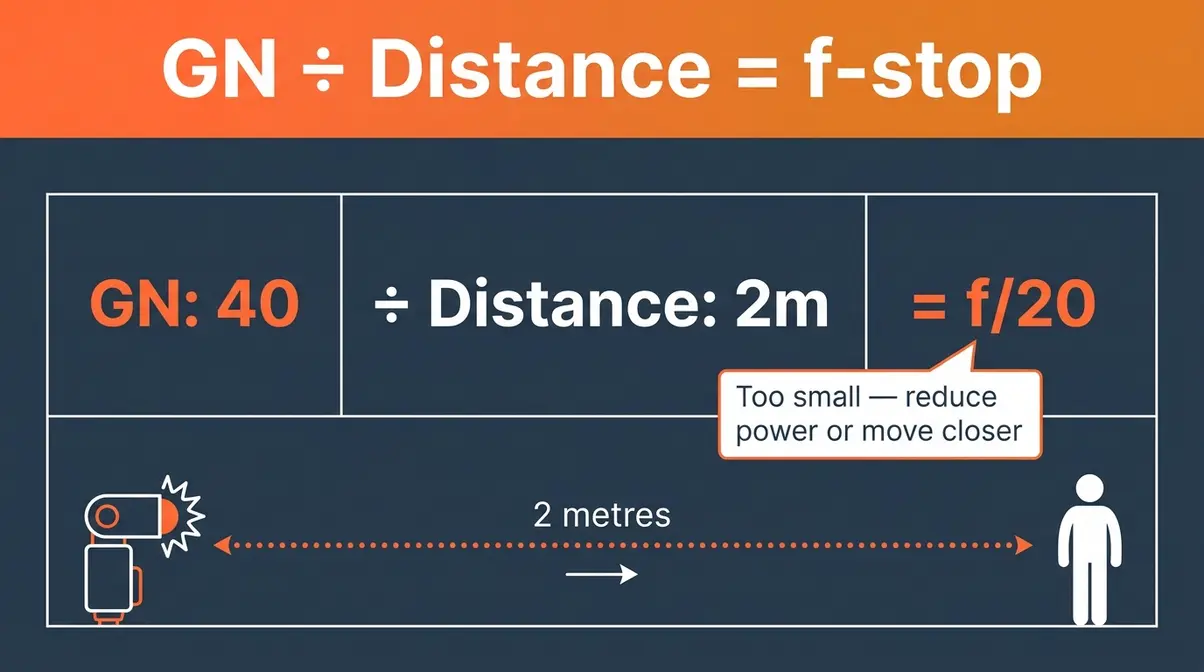
The Guide Number (GN) — a standardised measure of your flash’s maximum power output — lets you calculate the exact aperture you need. As explained by Cambridge in Colour, the formula is simple:
f-stop = GN ÷ Subject Distance (in metres)
So if your flash has a GN of 40 and your subject is 2 metres away: 40 ÷ 2 = f/20. That’s too small an aperture for most situations, which tells you to reduce flash power or move closer. Most speedlights list their GN on the box or in the manual.
The Inverse Square Law: Why Distance Changes Everything
Here is the single most useful piece of physics a beginner flash photographer can learn. The Inverse Square Law states: when you double the distance between your flash and your subject, the light reaching your subject drops to one quarter of its original intensity — not one half. According to Stanford University, doubling your flash distance cuts light power to one-quarter — making distance the most critical variable in flash photography.
Think of it like a candle. Hold it close to a book and the page is bright. Move it twice as far away, and the page is not half as bright — it’s only a quarter as bright. Light spreads out as it travels, covering four times the area when the distance doubles. Stanford University’s Computer Graphics Laboratory provides excellent visual demonstrations of this rapid light falloff.
Why this matters in practice:
- Moving your subject 1 metre further from the flash has a dramatic effect on exposure
- Small position adjustments create big exposure changes — use this to your advantage
- Your background receives far less light than your subject when they’re at different distances — this explains the black-background problem many beginners encounter
A useful reference: the Recycle Time (how long your flash takes to recharge between shots) increases at higher power settings. At full power (1/1), a typical speedlight takes 2–4 seconds to recycle. At 1/8 power, it recycles in under a second. Working at lower power settings also extends battery life significantly.
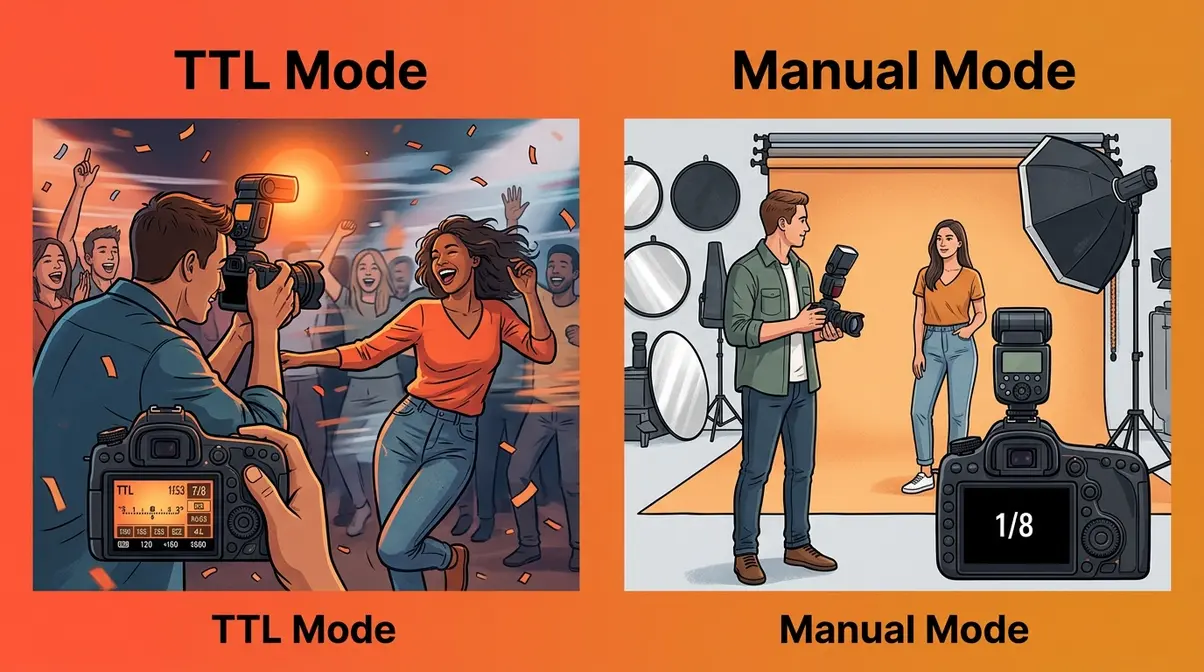
Step 2 — Choose Your Flash Mode: TTL vs Manual
Choosing between TTL and manual flash is the decision that confuses beginners the most. Both modes work exceptionally well, but they serve entirely different shooting environments. In our editorial judgment, mastering both modes is what separates amateur shooters from professionals who can adapt to any lighting scenario. Profoto data shows TTL metering automates exposure calculations instantly — giving event photographers the speed needed to capture unpredictable moments.
Understanding these modes is just as critical as mastering your manual camera settings for ambient light.
How TTL Mode Works (and When to Use It)
TTL stands for Through The Lens — it is your flash’s automatic exposure mode. When you press the shutter button in TTL mode, your camera fires an invisible pre-flash, measures the light bouncing back through the lens, and instantaneously calculates the exact power needed for a correct exposure.
The result is that your flash power adjusts automatically to the scene. Move closer to your subject, and TTL reduces power. Move further away, and it increases power. As Profoto highlights in their lighting guides, TTL is your best friend when the distance between you and your subject changes rapidly.
- TTL is ideal when:
- Your subject is moving unpredictably (weddings, corporate events, street photography)
- You are shooting in rapidly changing light conditions
- Speed and capturing the moment matter more than pixel-perfect lighting precision
One incredibly useful TTL tool is Flash Exposure Compensation (FEC) — written as +/- EV. If TTL is consistently over-exposing your subject (common with dark clothing), dial in -1 EV. If it’s underexposing (common with bright clothing), dial in +1 EV.
How Manual Flash Mode Works (and When to Use It)
In manual flash mode, you set the flash power yourself. This is typically expressed as fractions of full power (1/1, 1/2, 1/4, 1/8, 1/16, 1/32, 1/64, 1/128). The flash fires at exactly the power you have set, every single time, regardless of what the camera’s light meter thinks.
This absolute consistency is manual mode’s greatest strength. Once you have found the right settings for a specific setup, every subsequent shot will be identically exposed. There is no guessing and no variation between frames. This is exactly why studio photographers and portrait specialists almost always shoot in manual flash.
- Manual flash is ideal when:
- Your subject and flash position are fixed (studio portraits, product photography, real estate)
- You need perfectly consistent exposures across a series of shots
- You want full creative control over the light ratios
The trade-off is speed: if your subject moves significantly or the ambient light changes, you will need to re-meter and adjust the power fractions manually.
Is Manual or TTL Better for Flash?
Neither mode is universally better — they serve different situations. TTL (Through The Lens) automatically adjusts flash power based on the scene, making it ideal for events, weddings, and any fast-moving situation where you can’t stop to meter manually. Manual flash delivers perfectly consistent, repeatable exposures — the professional choice for studio portraits, product photography, and any setup where the subject and lights don’t move. Most photographers use both: TTL for unpredictable situations, manual for controlled ones.
TTL vs Manual: Side-by-Side Comparison
The Two-Exposure Method helps clarify which mode to choose. In TTL, the camera automates Exposure 2 (the subject exposure) for you. In manual, you control it yourself.
| Factor | TTL Mode | Manual Mode |
|---|---|---|
| Speed of setup | Fast — automatic | Slower — requires testing |
| Consistency | Variable | Perfectly consistent |
| Best for | Events, weddings, run-and-gun | Portraits, studio, product |
| Adjustability | Via FEC (+/- EV) | Direct power fractions |
| Learning curve | Lower | Higher (but more educational) |
| Creative control | Limited | Full |
Recommended starting point: Begin with TTL to understand how your flash behaves in different environments. Once you are comfortable, switch to manual for any situation where your setup stays fixed.
Step 3 — Shape Light: Bounce, Fill & Direct
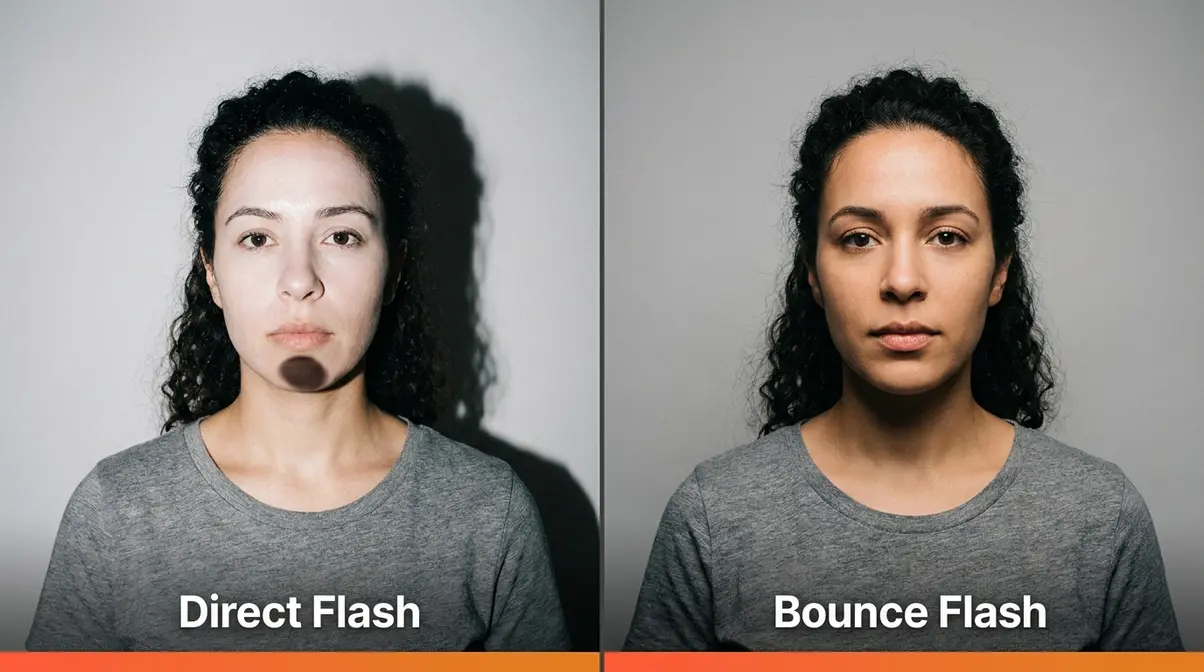
The direction and quality of your flash’s light matters significantly more than its raw power. This step covers the three fundamental ways to shape flash light, and how to choose between them based on your scene. In our editorial opinion, mastering light shaping is the fastest way to make your flash photography look natural rather than artificial. Bouncing your flash increases the light source size by up to 100 times — instantly transforming harsh shadows into soft, flattering illumination.
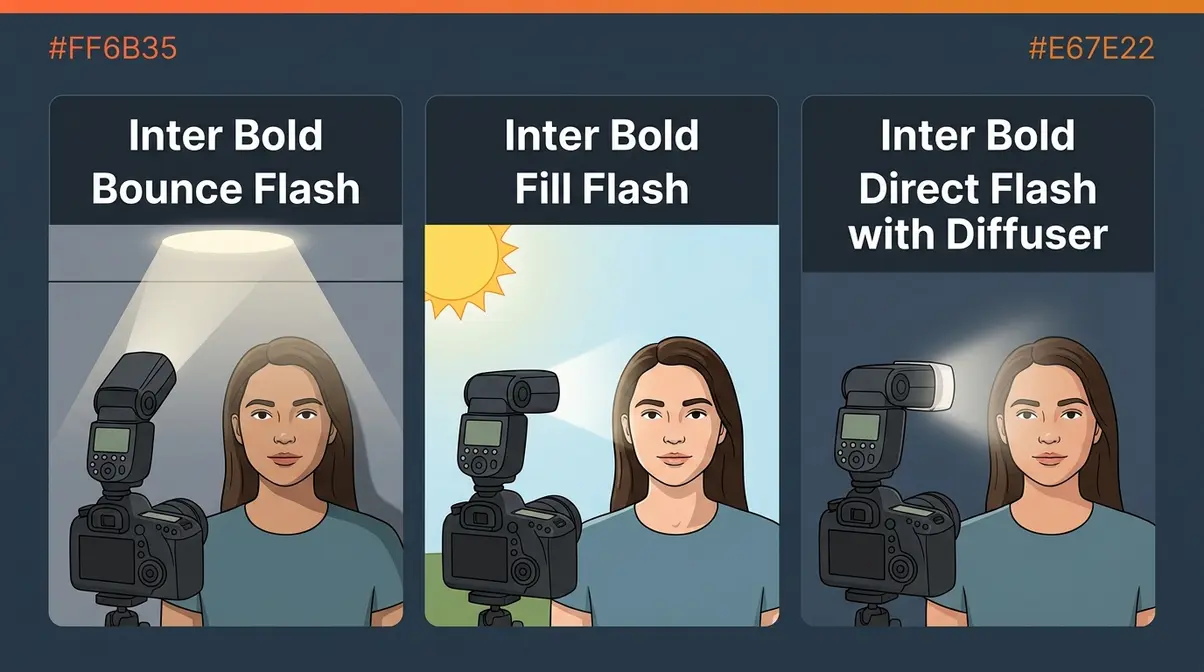
Bounce Flash: Softer Light in Seconds
Bounce flash means tilting your speedlight’s head upward (or sideways) so the flash fires at a ceiling or wall instead of directly at your subject. The light hits the large reflective surface, scatters in multiple directions, and arrives at your subject as a wide, soft, diffused light. This is far more flattering than direct flash.
Why does this work? A large light source produces soft shadows. Your speedlight’s head is tiny, which creates harsh shadows. A ceiling is enormous, which creates soft shadows. Bouncing flash effectively turns your ceiling into a giant softbox.
- Setup Blueprint 1 — Indoor Bounce Flash:
- Shutter speed: 1/60s
- Aperture: f/4
- ISO: 400
- Flash power: TTL or 1/4 manual
- Flash head: tilted 60–75° upward toward ceiling
- Distance to subject: 2–3 metres
One important note: the color of your ceiling affects your photo. A white ceiling reflects neutral light. A yellow ceiling adds a warm cast to your subject’s skin. When in doubt, use a white bounce card attached to your flash head.
Fill Flash: Eliminating Harsh Shadows Outdoors
Fill flash is used outdoors in daylight to soften harsh shadows — particularly the dark shadows under a subject’s eyes and chin created by bright overhead sun. The ambient sunlight acts as your key light (your main light source), and the flash “fills in” the shadows it creates. If you want a deeper dive into balancing sunlight, check out our guide on what is fill flash.
The key to fill flash is keeping it subtle. You want the flash to look invisible — as if the scene was naturally well-lit. A good starting point is to set your flash 1 to 2 stops below the ambient exposure.
- Setup Blueprint 2 — Outdoor Fill Flash (Sunny Day):
- Shutter speed: 1/200s (your sync speed limit)
- Aperture: f/8
- ISO: 100
- Flash mode: TTL with -1 EV FEC
- Flash head: pointing directly at subject
- Distance to subject: 1.5–2 metres
Note that bright daylight limits your shutter speed to your camera’s maximum sync speed — typically 1/200s or 1/250s. Exceeding this creates a dark band across the bottom of your image. Photography Life’s guide to when to use flash includes an excellent breakdown of fill flash ratios in outdoor light.
Direct Flash and Diffusers: When Straight-On Works
Direct flash — firing your speedlight straight at your subject — gets a bad reputation, but it has legitimate uses. Street photography, documentary work, and certain editorial styles actively embrace the stark, high-contrast look of direct flash. The key is using it intentionally, not accidentally.
A diffuser (a translucent plastic or fabric attachment that fits over your flash head) softens direct flash by spreading the light beam across a wider area. It won’t transform your flash into a softbox, but it takes the edge off harsh highlights and reduces red-eye.
- Setup Blueprint 3 — Direct Flash with Diffuser:
- Shutter speed: 1/125s
- Aperture: f/5.6
- ISO: 200
- Flash power: 1/8 manual
- Flash head: pointing directly forward, diffuser attached
- Distance to subject: 2–3 metres
Step 4 — On-Camera vs Off-Camera Flash Setup
Moving your flash off the camera is the single biggest upgrade you can make to your flash photography. It transforms flat, one-dimensional light into three-dimensional, sculpted light that makes subjects look genuinely professional. In our editorial view, taking the flash off the hot shoe is the exact moment an amateur photographer begins thinking like a professional lighting director. Sony Alpha Universe notes High-Speed Sync bypasses the 1/200s limit — allowing you to shoot at 1/8000s and perfectly balance bright outdoor skies.
For more advanced setups, consult our portrait lighting techniques guide.
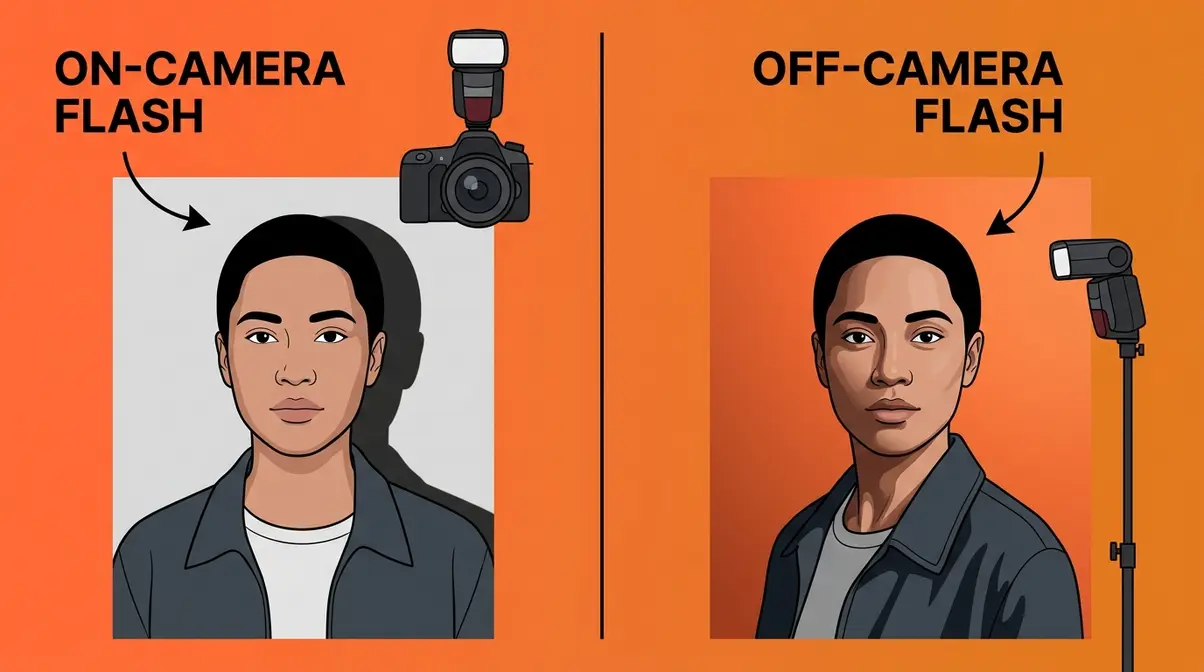
On-Camera Flash: Simple Setup for Beginners
On-camera flash — your speedlight mounted to the hot shoe — is the right starting point. It is quick to set up, works reliably in TTL mode, and produces highly acceptable results for events and casual portraits when used with the bounce technique.
The fundamental limitation of on-camera flash is its position: it fires from directly above your lens, which produces flat, shadowless light. Shadows fall directly behind your subject (creating the harsh wall shadow), and the light hits the face from a straight-on angle that eliminates the depth that makes portraits look three-dimensional.
- Setup Blueprint 4 — On-Camera Bounce for Indoor Events:
- Shutter speed: 1/80s
- Aperture: f/4
- ISO: 800
- Flash mode: TTL
- Flash head: tilted 75° upward + rotated slightly toward nearest wall
- Distance to subject: 2–4 metres
Off-Camera Flash: Create Studio-Style Lighting Anywhere
Off-camera flash means separating your flash from your camera — placing it on a light stand, held by an assistant, or mounted on a bracket — and triggering it wirelessly. This is where flash photography becomes genuinely exciting and creative.
By moving the flash to the side of your subject at a 45° angle, you create the same lighting pattern used in professional portrait studios. Light wraps around the face, creates natural shadow depth, and produces images that look nothing like traditional “flash photos.” According to Sony Alpha Universe, combining off-camera flash with High-Speed Sync (HSS) allows you to use wider apertures outdoors by bypassing your camera’s native sync speed limits.
You need two additional pieces of gear: a wireless trigger (a small transmitter that mounts to your camera’s hot shoe and sends a radio signal to the flash) and a receiver (a unit attached to the flash that receives the signal). Many modern speedlights have the receiver built in.
- Setup Blueprint 5 — Basic Off-Camera Flash (One Light):
- Camera shutter speed: 1/125s
- Aperture: f/5.6
- ISO: 200
- Flash power: 1/4 manual
- Flash position: 45° to the left of subject, at eye level, 1.5 metres away
- Modifier: small softbox or shoot-through umbrella
Digital Photography School’s off-camera flash guide provides an excellent walkthrough of first-time wireless trigger setup.
Step 5 — Apply Flash in Different Scenarios
Now that you understand the fundamentals and techniques, let’s apply them to specific real-world situations. Each scenario below includes exact camera settings and a setup blueprint you can follow immediately. In our editorial experience, practicing these specific scenarios builds muscle memory faster than any theoretical reading. The New York Film Academy confirms the 3:1 lighting ratio is the industry standard — creating perfect three-dimensional depth without harsh contrast.
Pair these techniques with our essential night photography guide for stunning after-dark portraits.
Flash for Portrait Photography: The 3:1 Ratio Setup
The 3:1 lighting ratio is the most widely recommended starting point for portrait photography. It means your key light (main flash) is three times brighter than your fill light (secondary flash or reflected light). This ratio creates enough shadow depth to make faces look three-dimensional without the harsh contrast that makes images look dramatic or unflattering.
In practice, a 3:1 ratio means your key light is approximately 1.5 stops brighter than your fill light. Achieve it with two flashes (one key, one fill at 1/3 the power) or with one flash and a reflector on the opposite side. The New York Film Academy notes that the 3:1 ratio is the industry standard for flattering, three-dimensional portrait lighting.
- Setup Blueprint 6 — Two-Light Portrait (3:1 Ratio):
- Camera: 1/125s, f/8, ISO 100
- Key flash (camera-left, 45°): 1/4 power
- Fill flash (camera-right, 45°): 1/16 power (approximately 1/3 of key)
- Both flashes at subject eye level, 1.5 metres away
- Modifiers: softbox on key, bare flash or umbrella on fill
What is the 3:1 lighting ratio in photography?
The 3:1 lighting ratio means your key light is three times brighter than your fill light. In practice, this means your main flash is approximately 1.5 stops brighter than the secondary flash or reflector on the opposite side of your subject. This ratio produces enough shadow depth to make faces look three-dimensional without harsh, dramatic contrast. It’s the most widely recommended starting point for portrait photography and is achievable with two flashes or one flash plus a reflector.
Flash for Events and Indoor Photography
Events are where TTL mode earns its keep. Subjects move constantly, distances change, and there’s no time to meter each shot manually. The goal is consistent, natural-looking results across a variety of situations.
The most common beginner mistake at events is using too fast a shutter speed. This underexposes the background (making it go black) and creates that isolated, artificial “flash photo” look. Slow your shutter speed down to let ambient light into the background exposure — remember The Two-Exposure Method.
- Setup Blueprint 7 — Event Photography (Indoor, Mixed Light):
- Shutter speed: 1/60s (allows ambient light into background)
- Aperture: f/4
- ISO: 800
- Flash mode: TTL with -0.7 EV FEC (slightly reduce flash to look natural)
- Flash head: tilted 60° upward toward ceiling
- Distance to subjects: 1–4 metres (TTL compensates)
Flash for Outdoor and Night Photography
Outdoor night photography with flash requires balancing two very different light sources: your flash (a brief, powerful burst) and the ambient light (dim, continuous, often colorful). The challenge is exposing both correctly at the same time.
Slow sync flash — a camera mode that combines a slow shutter speed with flash — is the technique to learn here. The flash freezes your subject sharply, while the slow shutter speed records the ambient light in the background (city lights, sunset, stars). The result looks dynamic and intentional rather than flat.
- Setup Blueprint 8 — Outdoor Night Flash (City Background):
- Shutter speed: 1/15s–1/30s (long enough to record ambient background)
- Aperture: f/4
- ISO: 400–800
- Flash mode: Manual 1/8 power (consistent freeze on subject)
- Flash position: off-camera at 45°, or on-camera with tilt diffuser
- Note: use a tripod or image stabilization to avoid camera shake at slow speeds
B&H Photo’s guide to on-camera flash includes detailed slow-sync flash settings for various night scenarios.
Advanced Flash Equipment and Techniques
Once you’re comfortable with a single speedlight, you’ll naturally want to explore what else is possible. This section introduces the specialist tools that open up new creative possibilities. In our editorial judgment, investing in modifiers and triggers offers a far higher return on investment than buying a newer camera body. Specialized modifiers like ring flashes eliminate shadows entirely — transforming basic light bursts into sculpted, professional-grade studio illumination.
Ring Flash, Strobes, and Macro Flash
A ring flash is a circular flash unit that mounts around your lens, producing a distinctive shadowless light with a characteristic ring-shaped catchlight (the reflection of the light source visible in a subject’s eyes) in portraits. It was originally designed for dental and medical photography, and became popular in fashion photography for its flat, even illumination and unique aesthetic.
Studio strobes (also called monolights or studio flash heads) are larger, more powerful flash units designed for permanent or semi-permanent studio setups. They plug into the wall rather than running on batteries, recycle faster than speedlights, and accept large modifiers like beauty dishes and octaboxes. They’re overkill for location work but ideal for dedicated studio shooting.
Macro flash — either a ring flash or a twin-flash bracket — solves a specific problem: when photographing small subjects at very close range (insects, flowers, product close-ups), a standard speedlight sits too far above the subject to illuminate it effectively. Macro flash units position the light source at the end of the lens, close to the subject.
Wireless Triggers and Slave Flashes
A wireless trigger system consists of a transmitter (hot shoe-mounted on your camera) and one or more receivers (attached to your off-camera flashes). When you press the shutter, the transmitter sends a radio signal to the receivers, firing the flashes in sync.
Optical slave mode is a simpler, cable-free alternative built into many speedlights. The flash detects the light pulse from another flash (or your built-in flash) and fires automatically. It works well indoors but can be triggered accidentally by other light sources outdoors.
Modern systems like the Godox X-series and PocketWizard offer TTL pass-through — meaning your camera’s TTL metering works across all wirelessly connected flashes simultaneously. This is a significant advantage for multi-light setups where you want the camera to automatically balance all flash units.
Best Flash Photography Resources to Keep Learning
This flash photography tutorial covers the complete foundation — but flash is a deep subject, and the best photographers keep learning throughout their careers. Across photography communities, the consistent advice is to supplement written guides with video instruction and hands-on practice. In our editorial opinion, structured practice beats passive reading every time. Practicing the one-flash drill for just 30 minutes yields more practical understanding — proving that hands-on experimentation beats hours of passive reading.
Recommended resources:
- Books: Light: Science & Magic by Fil Hunter, Steven Biver, and Paul Fuqua is the most-recommended technical reference for understanding photographic light. Speedliter’s Handbook by Syl Arena covers speedlight-specific technique in exceptional depth.
- Online courses: CreativeLive offers structured flash photography courses from working professionals. Adorama’s YouTube channel (free) covers everything from TTL basics to multi-light setups with clear, practical demonstrations.
- Communities: The r/flash_photography subreddit and Flickr’s “Strobist” group provide peer feedback and real-world examples from photographers at every skill level.
- Practice exercises: The single most effective learning method reported across photography communities is the “one flash, one subject, thirty minutes” drill — set up a single speedlight, move it to every possible position around your subject, and photograph each position. You’ll learn more in one session than in hours of reading.
Common Flash Photography Mistakes to Avoid
Understanding what goes wrong is just as important as knowing what to do right. After evaluating common patterns across photography forums and beginner portfolios, these are the mistakes that appear most consistently. In our editorial judgment, recognizing these pitfalls early will save you hours of frustrating post-processing work. Shooting above your camera’s 1/200s sync speed guarantees a dark band across your image — ruining the exposure regardless of your flash power.
The 5 Most Common Flash Mistakes
1. Shooting above your sync speed
Your camera has a maximum sync speed (the fastest shutter speed at which the camera’s shutter is fully open when the flash fires — typically 1/200s or 1/250s). Shoot faster and you’ll get a dark band across your image. Always check your camera’s manual for its specific sync speed. The fix: stay at or below 1/200s unless you’re using High-Speed Sync (HSS).
2. Forgetting the background exposure
The most common beginner error: setting exposure for the flash without thinking about the background. If your shutter speed is too fast, the background goes black. This is where The Two-Exposure Method pays off — set your background exposure first (shutter speed, aperture, ISO), then dial in flash power for the subject.
3. Bouncing off colored ceilings
A yellow or colored ceiling introduces an unwanted color cast to your subject. Always bounce off white or neutral surfaces. When shooting in rooms with colored ceilings, use a white bounce card attached to your flash head instead.
4. Using full power flash in close quarters
Full power (1/1) at close range overexposes your subject and increases recycle time. Start at 1/8 or 1/16 power indoors — you’ll be surprised how little power you actually need at 2 metres. This also extends battery life and speeds up your shooting.
5. Ignoring Flash Exposure Compensation in TTL
TTL mode makes mistakes — especially with subjects wearing white or black clothing, or scenes with large bright or dark areas. If your TTL shots are consistently over or underexposed, dial in Flash Exposure Compensation (FEC). A -1 EV adjustment is the most commonly needed correction.
When Flash Isn’t the Right Choice
Flash is not always the answer. Certain situations call for available light only. Museums, concerts, religious ceremonies, and wildlife photography often prohibit or discourage flash — both for practical reasons (disturbing subjects, damaging artworks) and out of courtesy to others.
Beyond restrictions, there are creative reasons to leave the flash off. Candlelit scenes, golden-hour portraits, and atmospheric indoor environments often look better when you embrace the existing light. Raising your ISO and widening your aperture will often produce more natural, emotionally resonant images than any flash setup.
Frequently Asked Questions
How do you properly use flash photography?
Proper flash photography starts with the Two-Exposure Method — setting your background exposure first with shutter speed, aperture, and ISO, then adjusting flash power to correctly expose your subject. Keep your shutter speed at or below your sync speed (usually 1/200s), start with TTL mode for automatic power adjustment, and bounce the flash off a white ceiling to soften harsh shadows. Most beginners improve dramatically by simply slowing their shutter speed to let ambient light into the background.
Why is flash photography not allowed in some places?
Flash photography is restricted in museums, galleries, concerts, and religious spaces for several reasons. According to the National Park Service, repeated flash exposure can fade light-sensitive pigments in paintings and textiles over time. At concerts and live performances, flash is distracting to performers and other audience members. In wildlife photography, flash can startle or disorient animals. Religious ceremonies restrict photography out of respect for participants. Many venues that prohibit flash allow photography without flash — always check the rules before shooting.
Why don’t some photographers use flash?
Many photographers prefer available light for creative and practical reasons. Natural light from windows, golden-hour sun, or even artificial ambient light often produces more emotionally resonant, atmospheric images than flash. Available light photography also requires less equipment, faster setup, and less disturbance to subjects — particularly valuable for documentary, street, and candid work. Flash becomes necessary when light is insufficient or when you need to overpower the sun outdoors, but it’s always a choice, not a requirement.
What is the 3/4 rule in photography?
The 3/4 rule in photography refers to the rule of thirds — a compositional guideline that divides your frame into a 3×3 grid and recommends placing your subject at one of the four intersection points rather than dead center. According to MasterClass, this creates more visually dynamic compositions than centered framing. Some photographers use “3/4 rule” to refer to three-quarter lighting — a portrait lighting pattern where the light illuminates three-quarters of the subject’s face, creating depth and dimension.
What are the 5 C’s of photography?
The 5 C’s of photography are Composition, Color, Contrast, Clarity, and Creativity. Composition refers to how elements are arranged in the frame. Color involves the palette and color relationships in the image. Contrast describes the difference between the lightest and darkest areas. Clarity covers sharpness and focus. Creativity is the photographer’s unique vision and intentionality. In flash photography, understanding contrast and color is especially important — your flash directly controls both the contrast level and the color temperature of your subject’s light.
What colors do not photograph well with flash?
Highly saturated reds and whites are the most challenging colors for flash photography. Bright red subjects tend to oversaturate and lose detail in the highlights when hit with direct flash — a problem called “blown reds.” Pure white clothing and backgrounds overexpose easily with flash, losing all texture and detail. Very dark navy and black absorb so much light that they require significant flash power to show any detail. Metallics and highly reflective surfaces create specular highlights (bright, mirror-like reflections) that are difficult to control without large, soft modifiers positioned carefully.
Conclusion
Flash photography rewards patience and a clear framework. The Two-Exposure Method — treating your background and subject as two separate, independently controlled exposures — is the mental shift that makes everything else in this guide make sense. Set your background exposure with shutter speed, aperture, and ISO. Then dial in flash power and distance to light your subject. Once that logic clicks, the technical details stop being obstacles and start being tools.
Every technique in this guide — TTL vs manual, bounce flash, off-camera setups, the 3:1 ratio — is simply a different way of controlling those two exposures. Master the method, and the techniques follow naturally.
Ready to get started? Grab your camera, attach your speedlight, and try Setup Blueprint 1 in your living room tonight. Shoot 20 frames, review the results, and adjust one variable at a time. After a single focused session, flash photography will feel far less intimidating — and far more controllable — than it did before.
