
Table of Contents
- 📋 Table of Contents
- What Is Focal Length? The Simple Definition
- How Focal Length Changes Your Photos
- Wide, Standard, and Telephoto Lenses Explained
- Best Focal Lengths for Every Photography Genre
- 35mm vs. 50mm, Prime vs. Zoom Lenses
- Crop Factor, Aperture, and the Sweet Spot
- Common Focal Length Mistakes Beginners Make
- Limitations and Common Pitfalls
- Frequently Asked Questions
- The Focal Length Triangle in Practice
This blog post may contain affiliate links. As an Amazon Associate I earn from qualifying purchases.
You’ve held a lens in your hands and spotted that number — 35mm, 50mm, 85mm — printed right on the barrel. But what does it actually do to your photos? If you’ve ever swapped lenses and wondered why your shots suddenly looked completely different, you’ve already felt the effect of focal length in photography without knowing its name.
Most beginner guides hand you a chart of numbers and leave you to memorize them. This guide takes a different approach. You’ll learn The Focal Length Triangle — the idea that focal length only makes full sense when you understand three things working together: the mm number on your lens, the size of your camera’s sensor, and your distance from the subject. Change any one of those three variables, and your image changes dramatically.
Before you dive in, here’s what will help: you don’t need any prior knowledge of optics. If you know how to press a shutter button, you’re ready. We’ll define every technical term the moment it appears.
Focal length in photography controls how wide or narrow your view is, how much your subject is magnified, and how your background looks — all in one number.
- The Focal Length Triangle: The mm number, your sensor size, and your distance to the subject work together to create your final image.
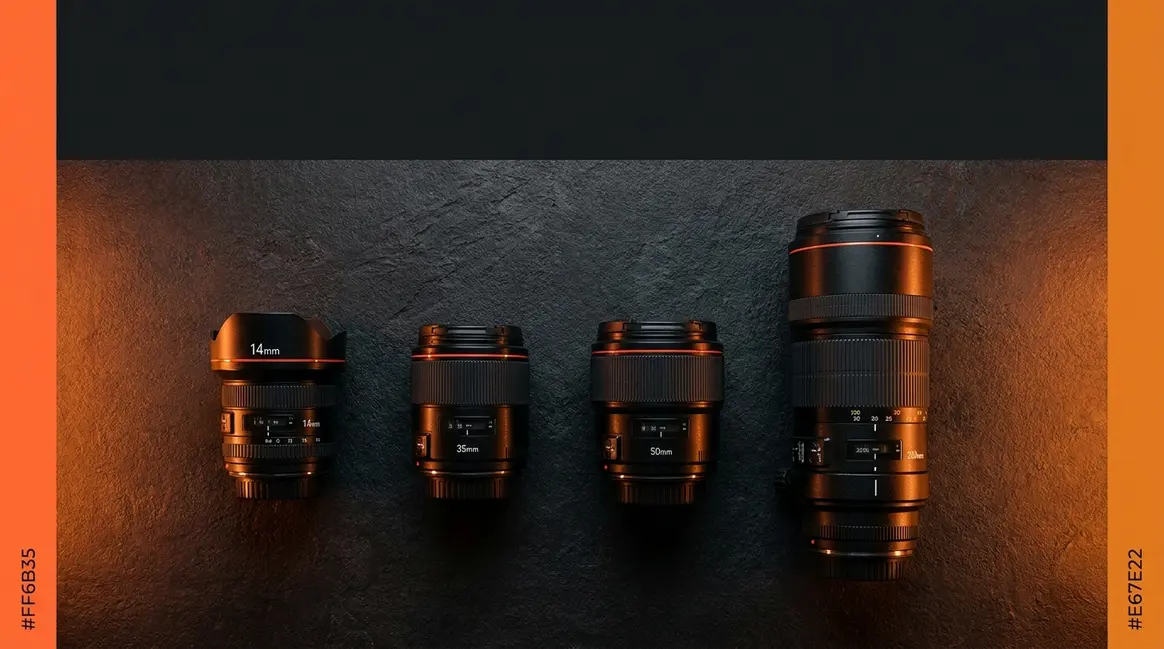
- Short focal lengths (14–35mm) capture wide scenes; long focal lengths (85–300mm+) bring distant subjects close.
- 50mm is popular because it most closely mimics the natural field of view of the human eye on a full-frame sensor.
- The sweet spot for sharpness is typically 2–3 stops down from your lens’s maximum aperture.
Tutorial Prerequisites
- Estimated time: 15-20 minutes
- Tools/Materials needed: Your camera body, at least one lens (a kit zoom is perfect to start), and a subject to photograph.
📋 Table of Contents
- What Is Focal Length? The Simple Definition
- How Focal Length Changes Your Photos
- Wide, Standard, and Telephoto Lenses Explained
- Best Focal Lengths for Every Photography Genre
- 35mm vs. 50mm, Prime vs. Zoom Lenses
- Crop Factor, Aperture, and the Sweet Spot
- Common Focal Length Mistakes Beginners Make
- Frequently Asked Questions
What Is Focal Length? The Simple Definition
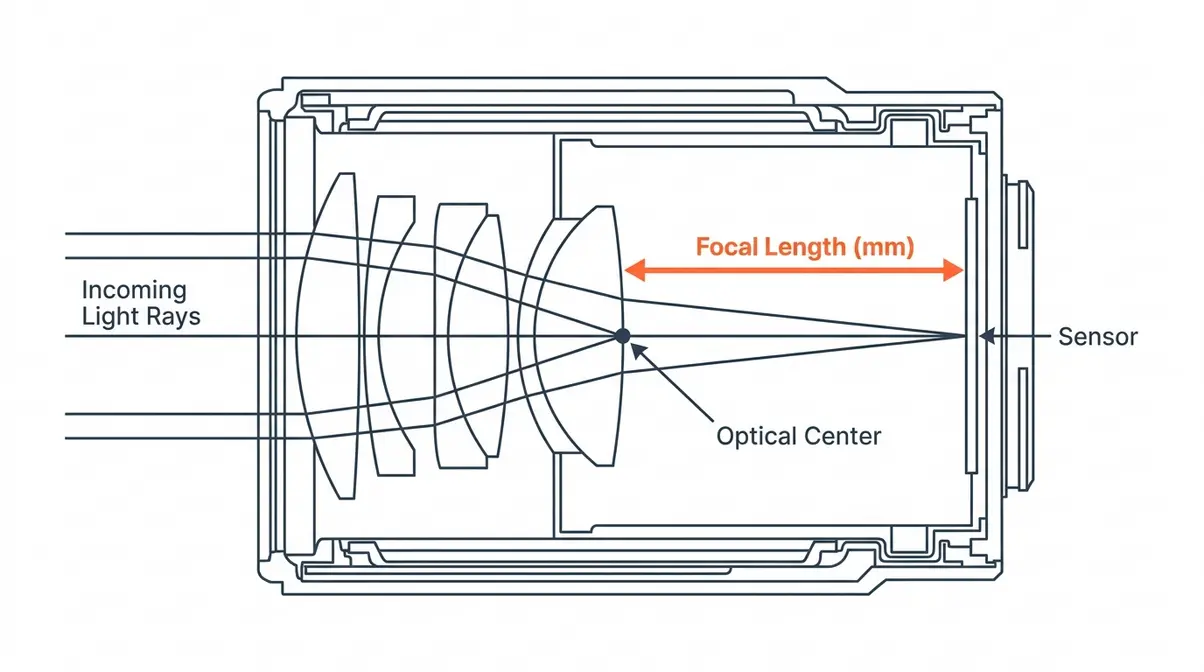
Focal length in photography is the distance — measured in millimeters — between your lens’s optical center and the camera sensor when the lens is focused at infinity. In plain language: it tells you how “zoomed in” your lens is and how wide a slice of the world it can capture.
A short number like 14mm sees a very wide view. A long number like 300mm sees a very narrow, magnified view. Every mm number in between lands somewhere on that spectrum. Understanding this single idea unlocks most of what you’ll ever need to know about choosing lenses.
What Focal Length Means in Simple Terms
Think of focal length like a zoom slider on your phone. Slide it toward the wide end and you see more of the scene — your subject looks smaller, and the background stretches out behind them. Slide it toward the telephoto end and you see less of the scene — your subject fills the frame, and the background appears compressed and blurry.
The key insight beginners often miss: focal length doesn’t physically move you or your subject. It changes your angle of view (how much of the scene your lens captures) and your magnification (how large your subject appears in the frame). Those two things together shape everything about how your photo feels.
“Focal length is just a physical measurement of the lens. How it impacts your photos depends on the size of sensor you’re using and the distance to your subject.”
This is the core truth that most beginner articles skip past. Your lens’s mm number is only one piece of the puzzle. Keep that in mind as you read through this guide.
How Focal Length Is Measured
The “mm” number on your lens barrel refers to millimeters — specifically, the distance from the lens’s optical center (the point where light rays converge inside the lens) to the focal point on your camera’s image sensor when the lens is focused at infinity. According to Canon’s official lens documentation, this measurement is a fixed physical property of the lens design, not something that changes when you zoom or focus.
Here’s why this matters for your photos: a lens with a short focal length (say, 20mm) has its optical center close to the sensor, so light rays must spread wide to reach it — giving you a wide-angle view. A lens with a long focal length (say, 200mm) has its optical center far from the sensor, so only a narrow beam of light reaches it — giving you a telephoto, magnified view.
Focal Point vs. Focal Length
These two terms sound almost identical, but they mean different things. The focal point is the specific spot where light rays converge after passing through the lens — it’s the single point of sharpest focus. Focal length is the distance between the lens’s optical center and that focal point, measured in millimeters.
According to the physics principles documented by Georgia State University’s HyperPhysics project, all parallel rays of light entering a convex lens converge at the focal point, and the distance to that point determines how strongly the lens bends light. A shorter focal length means stronger light bending — which is why wide-angle lenses can appear to “stretch” a scene.
For practical photography, you don’t need to calculate this. Just remember: focal length = how zoomed in your lens is, and focal point = where your camera achieves sharp focus on your subject.
How Focal Length Changes Your Photos
Focal length shapes three visual qualities in every image you take: how much of the scene is visible (angle of view), how large your subject appears and how the depth of your scene looks (magnification and compression), and how blurry or sharp your background is (depth of field). Understanding all three helps you make deliberate creative choices rather than guessing.
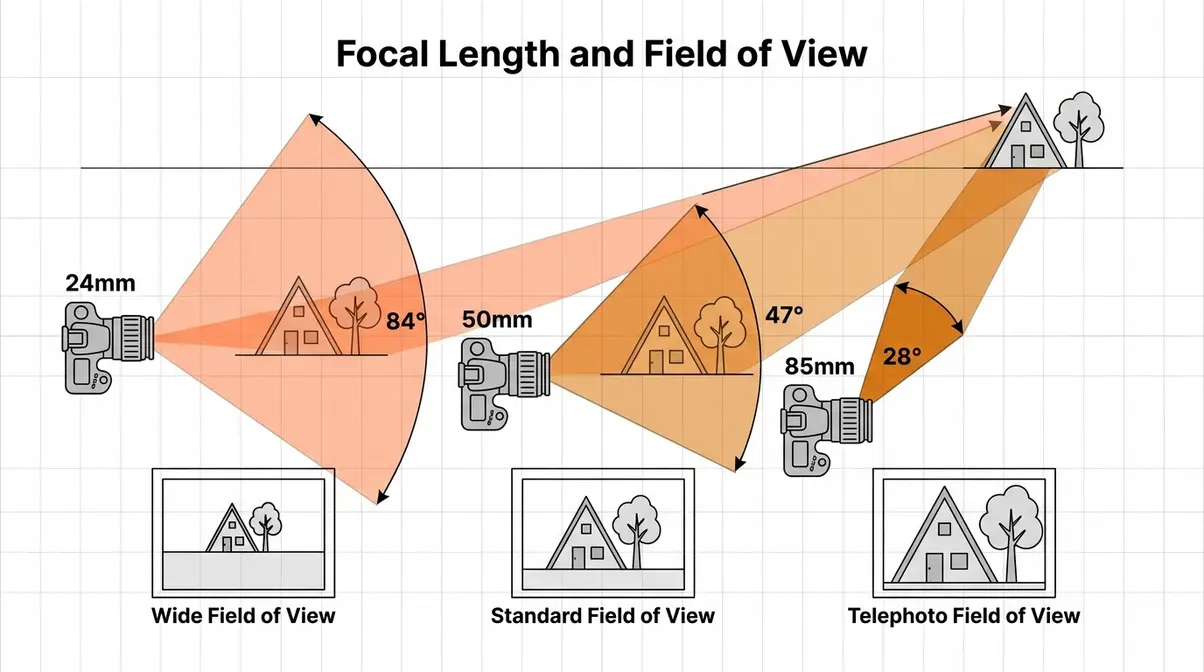
Angle of View: How Your Scene Is Framed
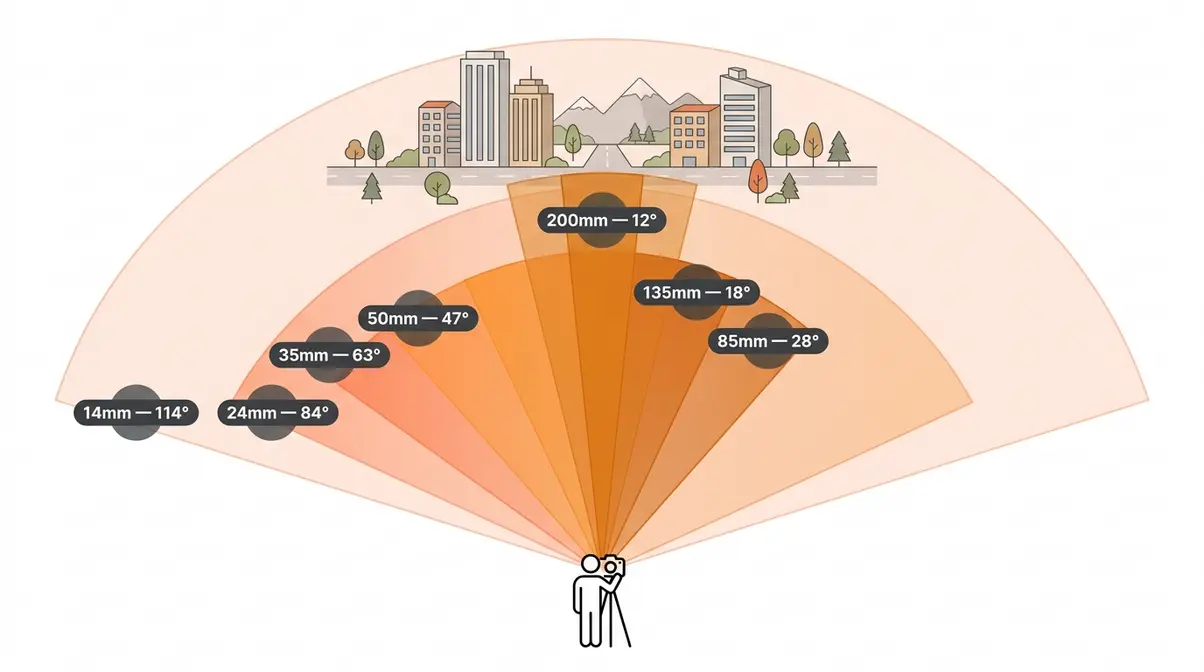
Angle of view is how much of the scene in front of you fits inside the frame. It’s measured in degrees. A 14mm ultra-wide lens has an angle of view around 114°, meaning it captures almost a quarter of the visible hemisphere in front of you. A 300mm telephoto lens narrows that down to about 8° — a tiny slice of the world, pulled close.
Here’s a practical way to feel this: hold your hands out in front of your face, spread wide, with your thumbs touching — that’s roughly a 90° field of view, similar to a 20mm lens on a full-frame camera. Now curl your hands into a tube and look through it — you’re now seeing something like a 50mm view. Squint through just one eye with your hand blocking the sides, and you’re approaching telephoto territory.
Angle of view is why photographers talk about lenses “compressing” or “opening up” a scene. According to Adobe’s photography education resources, focal length is the primary factor controlling how much environmental context surrounds your subject.
Magnification and Compression
Magnification is straightforward: longer focal lengths make your subject appear larger in the frame, even if you don’t move. Compression, however, is one of the most misunderstood concepts in beginner photography — and it’s worth taking a moment to get it right.
Lens compression (also called subject squeeze or perspective compression) is what happens when the background appears to be “stacked up” close behind your subject, making the scene look flatter than it really is. You’ve seen this effect in sports photography: a telephoto lens makes a crowd of spectators look like they’re pressed right up against the athlete on the field.
Here’s the critical insight, backed by research from Stanford University’s optics documentation: compression is caused by distance, not focal length. When you use a long lens, you naturally stand farther from your subject to keep them in the frame. That greater distance — not the focal length itself — is what compresses the background. If you stood at the same distance and cropped a wide-angle shot to match a telephoto shot, the compression would be identical.
This sequence is one of the most revealing demonstrations in photography. The subject’s nose, cheeks, and ears look proportionally different at 14mm vs. 200mm — not because the lens distorts them, but because your physical distance to the subject changes the perspective.
Background Blur and Depth of Field
Depth of field (how much of your scene is in sharp focus, from front to back) is influenced by focal length — but not in the way most beginners assume. Longer focal lengths produce shallower depth of field at the same aperture, meaning your background blurs more at 85mm than at 24mm when shooting at f/2.8 from the same distance.
However, as with compression, distance is the dominant factor. Move closer to your subject and depth of field shrinks regardless of focal length. The relationship between focal length, aperture, and subject distance is exactly what makes The Focal Length Triangle so useful as a mental model: you can’t change one variable without affecting the others.
For portraits, photographers typically choose 85mm–135mm because the combination of longer focal length + comfortable working distance + wide aperture produces that creamy, blurred background that separates subject from scene. Photography Life’s technical documentation confirms that 85mm at f/1.8 from about 2 meters produces a depth of field of roughly 4–5 centimeters — just enough to keep both eyes sharp while blurring the ears.
Wide, Standard, and Telephoto Lenses Explained
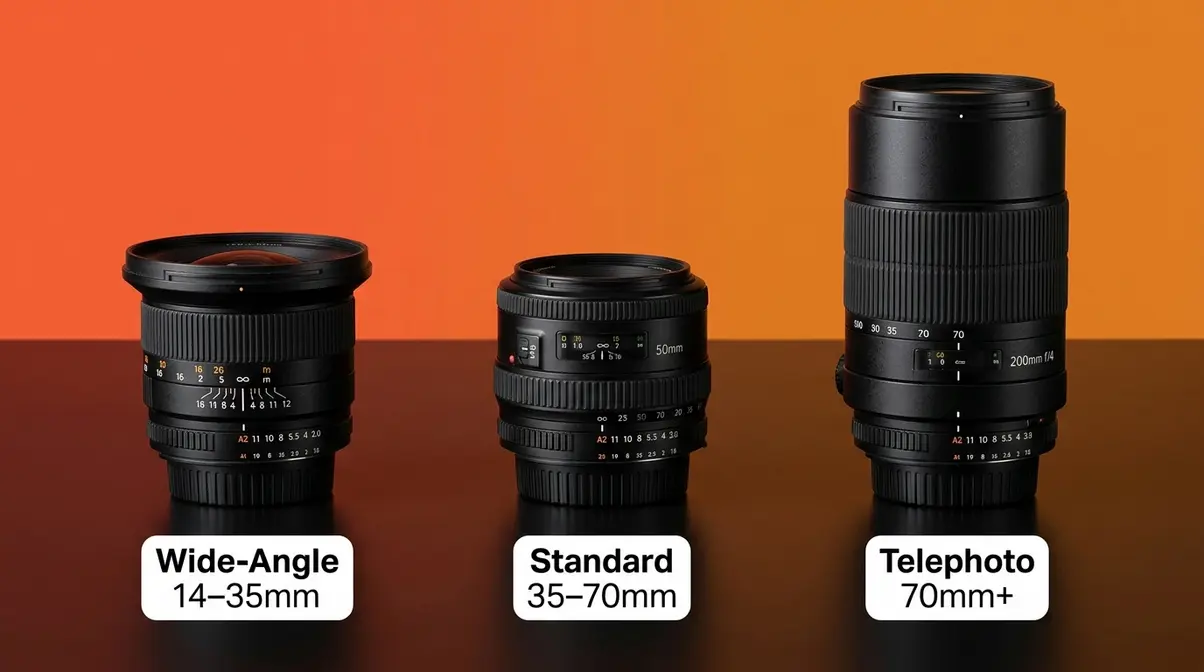
Every lens on the market fits somewhere on a spectrum from ultra-wide to super-telephoto. Learning these three broad categories — and what each one is naturally good at — gives you a practical framework for choosing gear and planning shots.
Wide-Angle Lenses (14–35mm)
Wide-angle lenses capture a broader-than-normal view of the world. On a full-frame camera, any lens below 35mm qualifies. Ultra-wide lenses (14–20mm) are used for dramatic architecture, interior spaces, and astrophotography. Standard wide lenses (24–35mm) are favorites for street photography, travel, and environmental portraits.
- What they’re good at:
- Fitting large subjects (buildings, mountains, interiors) into the frame
- Exaggerating depth and leading lines in a composition
- Making small spaces feel larger
Watch out for: Shooting people too close with a wide-angle lens (especially below 35mm) causes barrel distortion — faces appear stretched, noses look larger, and edges of the frame bow outward. Keep portraits at 35mm or longer.
Across photography communities, the consistent advice is to use 24mm for travel and storytelling shots where you want the subject in context with their environment. Street photographers like Henri Cartier-Bresson famously worked with a 50mm, but many contemporary street photographers prefer 28mm or 35mm for the slightly wider perspective that includes more environmental context.
Standard Lenses (35–70mm)
Standard lenses sit in the middle of the focal length spectrum. They’re called “standard” because they produce a perspective that feels natural and undistorted to the human eye — neither stretched nor compressed. The 50mm lens is the classic standard, but the 35mm–70mm range all qualifies.
These lenses are the best starting point for most beginners because they require you to use your feet. You can’t rely on the drama of a wide-angle stretch or the compression of a telephoto — you have to think about composition and move to find your shot.
- Best uses for standard lenses:
- Documentary and street photography (35mm–50mm)
- Environmental portraits (35mm–50mm)
- Everyday shooting and travel (50mm)
- Light event and candid photography (50mm–70mm)
The 50mm f/1.8 is consistently the most recommended first prime lens for beginners — it’s available for under $150 on most camera systems and teaches you to see the world in a way that translates directly to your photos.
Telephoto Lenses (70mm and Beyond)
Telephoto lenses start at 70mm and extend into the hundreds of millimeters. They bring distant subjects close, compress backgrounds, and let you shoot without physically approaching your subject — which matters enormously in wildlife, sports, and candid photography.
| Focal Length | Primary Use | Typical Subject Distance |
|---|---|---|
| 70–135mm | Portraits, headshots, candid | 2–5 meters |
| 135–200mm | Sports, events, compressed portraits | 5–15 meters |
| 200–400mm | Wildlife, birding, sports | 10–50+ meters |
| 400mm+ | Astrophotography, extreme wildlife | Variable |
Telephoto lenses above 300mm require careful technique. Camera shake is magnified along with your subject, so a fast shutter speed (at minimum, 1/focal length — e.g., 1/400s for a 400mm lens) or image stabilization is essential.
A Decision Framework for Choosing
When you’re standing in front of a scene and aren’t sure which focal length to reach for, run through these three questions:
- How much of the scene do I need to include? → Wide scene = shorter focal length. Isolated subject = longer focal length.
- How close can I physically get? → Can’t approach your subject? Use telephoto. Have full freedom to move? Use standard or wide.
- What feeling do I want? → Expansive and environmental? Wide. Natural and documentary? Standard. Intimate and compressed? Telephoto.
These three questions embody The Focal Length Triangle in practice: you’re weighing the mm number against your subject distance and the scene context simultaneously.
Best Focal Lengths for Every Photography Genre
Knowing the focal length ranges is useful — but knowing which range works best for which type of photography is what actually changes your results. Our team evaluated focal length recommendations across professional photography resources, manufacturer guides, and community consensus to compile these genre-specific guidelines.
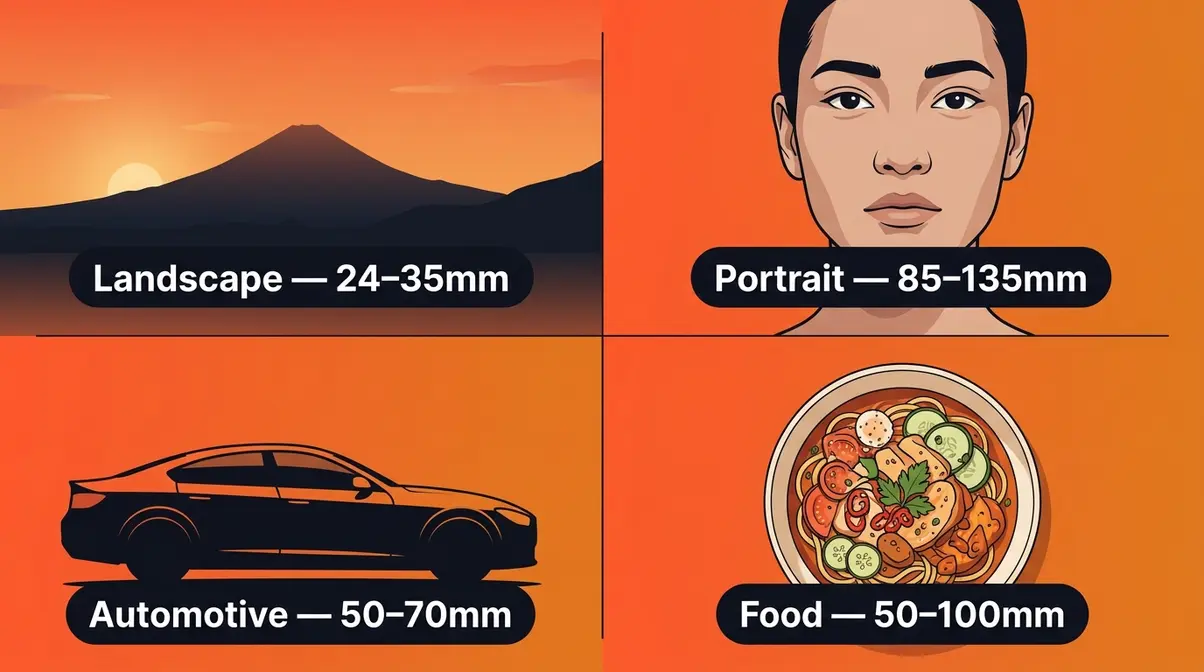
Landscape Photography
For landscapes, 24mm–35mm is the workhorse range on a full-frame camera. This gives you enough width to capture sweeping scenes — mountain ranges, coastlines, open fields — without the extreme distortion of an ultra-wide lens.
- Recommended focal lengths for landscapes:
- 14–20mm: Dramatic foreground interest, starry skies, tight interior spaces (caves, canyons)
- 24–35mm: Classic landscape photography, balanced compositions
- 50–70mm: Compressing a distant mountain range against a foreground element
- 70–200mm: Isolating a specific detail within a large scene (a single tree, a waterfall)
A practical tip from landscape photography communities: shoot at f/8–f/11 for maximum depth of field, and use the hyperfocal distance (the focus distance that keeps everything from a certain point to infinity sharp) to ensure your entire scene is in focus from foreground to sky.
Portrait and Headshot Photography
For portraits, 85mm–135mm is the gold standard on a full-frame camera. This range provides enough working distance to avoid facial distortion, produces pleasing background compression, and allows natural interaction between photographer and subject without crowding them.
Portrait focal length guide:
| Shot Type | Recommended FL | Working Distance | Why It Works |
|---|---|---|---|
| Environmental portrait | 35–50mm | 1.5–3m | Shows subject in context |
| Standard portrait | 85mm | 2–3m | Flattering compression, natural proportions |
| Headshot | 85–105mm | 2–4m | Tight framing, minimal distortion |
| Beauty/editorial | 135mm | 3–5m | Maximum compression, creamy blur |
Professional portrait photographers working across editorial and commercial genres consistently find that 85mm f/1.8 offers the best balance of image quality, working distance, and background separation for most portrait scenarios. The 135mm f/2 is considered the ultimate portrait focal length by many working professionals, but requires more space and is harder to handhold at lower shutter speeds.
Car Photography
Car photography sits at an interesting intersection of genres. 24mm–50mm works well for lifestyle and environmental shots that show the car in its setting. 70–135mm is better for detail shots (grilles, wheels, badge close-ups) and for compressing a dramatic background against the car’s profile.
A common mistake is shooting cars with ultra-wide lenses from close range — this causes the same barrel distortion that affects portraits, making the car’s proportions look exaggerated and unrealistic. The exception: intentional creative distortion for dynamic, stylized automotive advertising.
For the classic three-quarter front profile shot that dominates car photography, 50–70mm at f/8 from about 5–8 meters gives you sharp detail across the full vehicle with a naturally proportioned look.
Food, Interior, and Other Genres
Food photography typically uses 50mm–100mm on a full-frame camera. The 50mm allows you to shoot overhead (flat-lay) compositions easily, while 85–100mm adds compression that makes food textures look richer and more appetizing. Avoid ultra-wide lenses for food — they distort the shape of plates and bowls.
Interior photography is one of the few genres where ultra-wide lenses are genuinely necessary. 16–24mm is standard for real estate and architectural interiors because you physically cannot step far enough back from a wall to capture a room with a longer lens. The distortion is acceptable and expected in this genre.
Aerial and drone photography typically locks you into whatever focal length the drone’s camera provides (often equivalent to 24–28mm), but if you’re shooting from a plane or helicopter, 50–70mm reduces the haze effect and gives a more compressed, detailed view of the ground.
Astrophotography and night sky photography favors 14–24mm at f/2.8 or wider — you need to capture as much sky as possible in a single frame while admitting maximum light. The 500 Rule (divide 500 by your focal length to find the maximum shutter speed before stars trail) means wider lenses give you more exposure time: at 14mm, you can expose for ~35 seconds; at 50mm, only ~10 seconds.
35mm vs. 50mm, Prime vs. Zoom Lenses
This section tackles the three debates beginners encounter most often when choosing their first lenses. Each comparison has a clear answer — but the right choice depends on how you shoot.
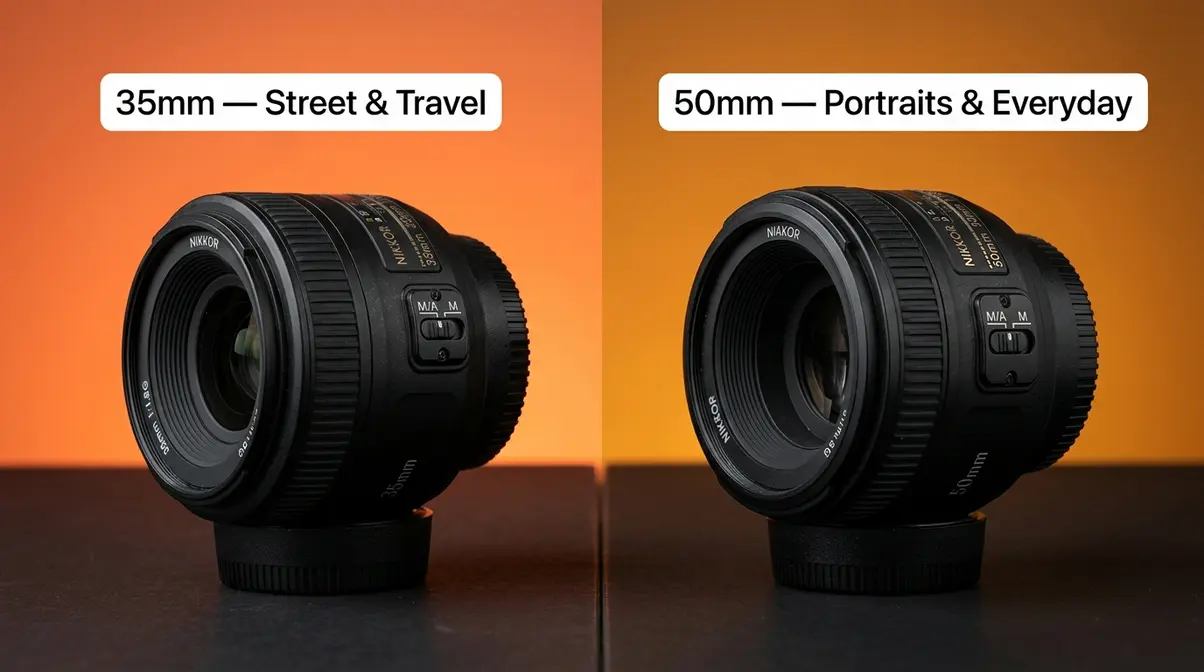
35mm vs. 50mm: Which Should You Choose?
This is one of the most searched comparisons in beginner photography, and competitors almost never answer it directly. Here’s the honest breakdown.
The 50mm lens on a full-frame camera produces an angle of view of approximately 47°, which closely matches the field of view of the human eye when you factor in peripheral vision and focused central vision. According to research cited in MIT OpenCourseWare’s optics curriculum, the human eye’s sharp central vision covers roughly 40–60°, making 50mm the closest approximation in a single still frame. This is why 50mm is called the “nifty fifty” — photos taken with it feel natural and unpretentious.
The 35mm lens on a full-frame camera produces a wider 63° angle of view. It captures more environmental context, making it better for street photography, documentary work, and situations where you want your subject to exist within their surroundings. The New York Times Wirecutter recommends 35mm as the preferred focal length for street photography precisely because it includes enough context to tell a story without the distortion of a wider lens.
- Choose if:
- You shoot street, documentary, or travel photography
- You want to include environmental context around your subject
- You shoot in tight spaces (small rooms, crowded streets)
- Choose if:
- You shoot portraits, everyday life, or food
- You want a natural, “invisible” perspective that doesn’t announce itself
- You’re buying your first prime lens and want one that does everything well
Many photographers own both. At $125–$200 each for the f/1.8 versions on most systems, they’re the most affordable quality primes available.
Prime vs. Zoom Lenses: Pros and Cons
A prime lens has a fixed focal length — you can’t zoom. A zoom lens covers a range of focal lengths — twist the zoom ring and you shift from, say, 24mm to 70mm.
| Feature | Prime Lens | Zoom Lens |
|---|---|---|
| Maximum aperture | f/0.95–f/1.8 typical | f/2.8–f/4 typical |
| Image sharpness | Excellent (simple optics) | Very good to excellent |
| Size and weight | Small and light | Larger and heavier |
| Versatility | Low (one focal length) | High (range of lengths) |
| Price (entry level) | $100–$250 | $300–$800+ |
| Creative discipline | Forces you to move and think | Easier to adjust quickly |
The common advice — “prime lenses make you a better photographer because you have to move” — has real merit for beginners. When you can’t zoom, you’re forced to think about your physical position, which teaches composition faster than any tutorial. However, zoom lenses are genuinely better for events, travel, and any situation where you can control your distance to the subject.
The practical recommendation: Start with the kit zoom lens your camera came with (usually 18–55mm or 24–105mm). Once you know which focal length you reach for most often, buy a prime at that length. You’ll immediately notice sharper images, better low-light performance, and shallower depth of field.
The Holy Trinity of Lenses
The Holy Trinity refers to a set of three professional zoom lenses that together cover every focal length a working photographer needs, all at a constant f/2.8 maximum aperture. The term is used across all major camera systems.
For Sony Alpha mirrorless cameras, the Holy Trinity consists of:
| Lens | Focal Range | Aperture | Primary Use |
|---|---|---|---|
| Sony FE 16-35mm f/2.8 GM II | 16–35mm | f/2.8 | Landscapes, architecture, interiors |
| Sony FE 24-70mm f/2.8 GM II | 24–70mm | f/2.8 | Portraits, events, everyday |
| Sony FE 70-200mm f/2.8 GM OSS II | 70–200mm | f/2.8 | Sports, wildlife, telephoto portraits |
According to Sony Alpha Universe’s official lens documentation, these three lenses together cover 16–200mm with no gaps and maintain the same fast f/2.8 aperture throughout, which matters for consistent exposure when switching lenses mid-shoot.
The Holy Trinity concept exists for Canon (RF 15-35mm, 24-70mm, 70-200mm f/2.8), Nikon (Z 14-24mm, 24-70mm, 70-200mm f/2.8), and other major systems. The specific lenses differ, but the concept — three zooms covering wide, standard, and telephoto at f/2.8 — is universal.
Important caveat: The Holy Trinity is a professional-grade investment. Each Sony GM II lens costs $2,300–$2,800 (as of Q1 2026). For beginners, the concept is useful to understand as a framework for how focal lengths complement each other — you don’t need to own all three to apply the thinking.
Crop Factor, Aperture, and the Sweet Spot
This section addresses three concepts that frequently confuse beginners once they move past the basics. We’ll give each one a clear summary and point you toward dedicated resources for deeper reading.
Crop Factor and Equivalent Focal Length
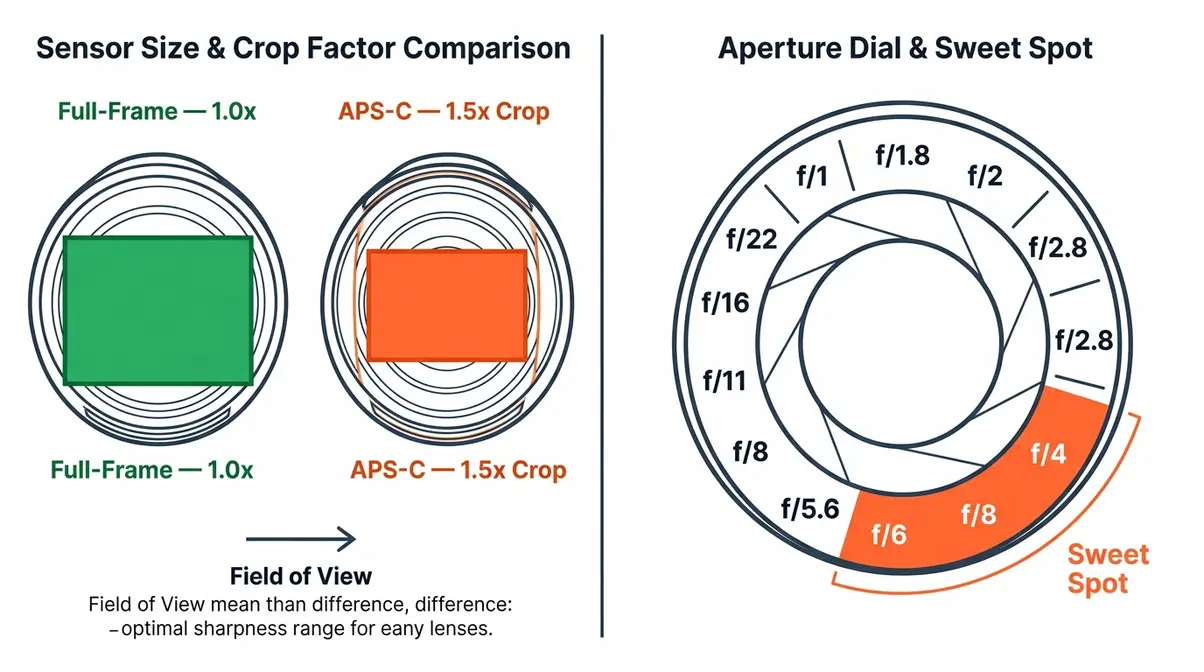
Crop factor is the multiplier you apply to a lens’s focal length to find its equivalent focal length on a full-frame camera. It exists because APS-C sensors (used in most entry-level DSLRs and mirrorless cameras) are physically smaller than full-frame sensors. A smaller sensor captures a narrower slice of the image circle projected by the lens — effectively “cropping” the image.
According to Sony’s official sensor documentation, APS-C sensors have a crop factor of approximately 1.5x (Canon APS-C uses 1.6x). This means a 35mm lens on an APS-C camera behaves like a 52mm lens on a full-frame camera (35 × 1.5 = 52.5mm). A 50mm lens on APS-C behaves like a 75mm lens — closer to portrait territory than the “standard” perspective it gives on full-frame.
Quick crop factor reference:
| Sensor Type | Crop Factor | 50mm Equivalent |
|---|---|---|
| Full-frame (35mm) | 1.0x | 50mm |
| APS-C (Sony/Nikon) | 1.5x | 75mm |
| APS-C (Canon) | 1.6x | 80mm |
| Micro Four Thirds | 2.0x | 100mm |
For a deeper exploration of crop factor and how it affects lens selection across camera systems, see our dedicated guide on crop factor and sensor size.
Aperture and Image Sharpness
Aperture (the size of the opening inside your lens that controls how much light reaches the sensor) is written as an f-number: f/1.4, f/2.8, f/8, f/16. Smaller f-numbers = wider opening = more light + shallower depth of field. Larger f-numbers = narrower opening = less light + more of the scene in focus.
Focal length and aperture interact in two important ways:
- Depth of field: Longer focal lengths produce shallower depth of field at the same f-number. An 85mm lens at f/2.8 blurs the background more than a 24mm lens at f/2.8 from the same distance.
- Diffraction: At very small apertures (f/16 and beyond), light bends as it passes through the narrow opening, actually reducing sharpness. This is why shooting at f/22 doesn’t always give you the sharpest image, even though everything is technically “in focus.”
For a complete guide to aperture, depth of field, and the exposure triangle, see our dedicated aperture guide on understanding aperture and depth of field.
The Sweet Spot: Finding Peak Sharpness
Every lens has a sweet spot — the aperture setting at which it produces its sharpest images. According to ZEISS’s official lens testing documentation, most lenses reach peak optical performance at 2–3 stops down from their maximum aperture.
- This means:
- f/1.8 lens → sweet spot is approximately f/4–f/5.6
- f/2.8 lens → sweet spot is approximately f/5.6–f/8
- f/4 lens → sweet spot is approximately f/8–f/11
At maximum aperture, most lenses show slightly soft edges, reduced contrast, and chromatic aberration (color fringing). Stopping down to the sweet spot corrects these issues. Going too far (past f/11–f/16) introduces diffraction softening. The sweet spot is the optimal balance between these two competing factors.
Practical application: When sharpness matters most — product photography, architecture, landscapes — shoot at f/5.6–f/8 regardless of your lens’s maximum aperture. You’ll see a noticeable improvement over shooting wide open.
Common Focal Length Mistakes Beginners Make
Understanding focal length conceptually is one thing. Applying it in the field is where most beginners stumble. Our team evaluated the most common errors reported across photography communities and forums to identify the patterns that consistently hurt beginner results.
Three Focal Length Mistakes
Mistake 1: Shooting portraits with a wide-angle lens
This is the most common beginner error. Shooting someone’s face at 18–24mm from close range causes significant facial distortion — the nose appears larger, the ears recede, and the overall face shape looks wider and less flattering. This isn’t a flaw in the lens; it’s the natural result of perspective at close distances.
Fix: Use 50mm as your absolute minimum for portraits of people. For headshots, start at 85mm. Step back if the focal length forces you to be too close.
Mistake 2: Assuming telephoto = more blur
Many beginners buy a 70–300mm zoom expecting it to produce more background blur than their kit lens. They’re disappointed when the results look similar. The confusion comes from not accounting for subject distance — telephoto lenses require you to stand farther away, which partially cancels the shallow depth of field advantage.
Fix: To maximize background blur, use the longest focal length you have AND get as close to your subject as the focal length allows. The blur comes from the ratio of subject distance to background distance, not from the focal length alone.
Mistake 3: Ignoring crop factor when comparing lenses
A photographer with an APS-C camera reads that “50mm is the natural perspective” and buys a 50mm lens — then wonders why their photos feel slightly zoomed in compared to what they expected. The answer is crop factor: their 50mm behaves like a 75mm on their APS-C sensor.
Fix: On APS-C cameras, a 35mm lens gives you the natural 50mm-equivalent perspective. Buy accordingly.
When to Use a Different Approach
Focal length rules exist to be broken — but only intentionally, not accidentally. Here are three scenarios where the “standard” advice doesn’t apply:
- Creative distortion is the goal. Shooting a 14mm ultra-wide close to a face IS valid for surreal, editorial, or fashion photography where exaggeration is deliberate. The difference between a mistake and a creative choice is knowing what you’re doing and why.
- You’re physically constrained. Shooting real estate interiors, you often have to use a 16–24mm lens because there’s no room to back up. In these cases, correct the distortion in post-processing using lens correction profiles in Lightroom or Adobe Camera Raw.
- Your camera’s sensor changes the math. As covered in the crop factor section, APS-C and Micro Four Thirds shooters need to adjust all focal length recommendations by their crop factor. A “portrait lens” recommendation of 85mm becomes 56mm for APS-C shooters (to achieve the same angle of view).
Limitations and Common Pitfalls
Common Pitfalls
Pitfall 1: Treating focal length as the only variable. The biggest misunderstanding in beginner photography is assuming that buying a longer lens automatically produces better portraits, or that a wider lens automatically produces better landscapes. Focal length is one input in The Focal Length Triangle — your distance to the subject and your sensor size matter equally. A 50mm lens on a Micro Four Thirds camera gives a 100mm-equivalent view; the same 50mm on a full-frame camera gives a natural 50mm view. Same lens, completely different result.
Pitfall 2: Confusing zoom lenses with telephoto lenses. “Zoom” refers to a variable focal length range. “Telephoto” refers to a long focal length. A 24–70mm is a zoom lens, but it’s not a telephoto. An 85mm prime is telephoto, but it doesn’t zoom. These terms are often used interchangeably in casual conversation, which creates confusion when shopping for gear.
Pitfall 3: Chasing the “perfect” focal length before learning composition. Many beginners spend more time researching which focal length to buy than actually shooting. The most important focal length is the one on the lens you already own. Spend 30 days shooting exclusively with a single focal length before buying anything new — you’ll learn more about your own vision than any gear purchase can teach you.
When to Choose Alternatives
- If you shoot events, weddings, or sports and can’t control your distance to subjects, a zoom lens (24–70mm or 70–200mm) is a better choice than any prime, regardless of the sharpness advantage primes offer.
- If you shoot video as well as stills, consider that focal length affects camera shake visibility differently in video — longer focal lengths amplify shake dramatically, making in-body image stabilization (IBIS) or a gimbal essential above 50mm.
- If you’re on APS-C and budget is limited, a 35mm f/1.8 lens (which gives a 50mm-equivalent view) offers more creative value than any zoom in the same price range.
When to Seek Expert Help
If you’re building a professional kit for commercial work (advertising, architecture, product photography), the focal length decisions become more complex — you’re balancing lens rendering character, distortion correction, and client deliverable requirements. Consulting with a working professional photographer in your specific genre, or attending a camera manufacturer’s hands-on demo event, will give you more relevant guidance than any online guide.
Frequently Asked Questions
1. What is the definition of focal length in simple terms?
Focal length is the distance, in millimeters, between a lens’s optical center and the camera sensor when the lens is focused at infinity. In practical terms, it tells you how zoomed in or wide a lens is. A 24mm lens captures a wide view; a 200mm lens captures a narrow, magnified view. The mm number is printed on every lens barrel, and it’s the single most important spec for understanding how a lens will frame your scene.
2. What is the focal length for dummies?
Think of focal length as your lens’s zoom level — a small number (14–35mm) sees wide like stepping back from a scene, and a large number (85–300mm) sees narrow like zooming in with binoculars. The key thing to remember: changing focal length doesn’t just zoom in and out — it also changes how your background looks and how your subject’s proportions appear. A 50mm lens is the best starting point because it looks closest to natural human vision.
3. Is 35mm or 50mm better?
Neither is objectively better — they serve different purposes. The 35mm (63° angle of view) includes more environmental context, making it ideal for street photography, travel, and documentary work. The 50mm (47° angle of view) produces a more natural, “invisible” perspective closest to how the human eye sees a scene, per MIT optics documentation — making it better for portraits, everyday life, and food photography. On an APS-C camera, a 35mm lens gives you the 50mm-equivalent perspective, so APS-C shooters should consider 35mm as their “nifty fifty.”
4. Is f/2.8 or f/4 better?
f/2.8 is better in low light and for background blur; f/4 is better for sharpness and size/weight. At f/2.8, you admit twice as much light as f/4, which means faster shutter speeds in dim conditions and shallower depth of field for subject separation. However, f/4 lenses are typically smaller, lighter, and less expensive — and the difference in image quality at the sweet spot is negligible. For event and wedding photographers, f/2.8 is worth the premium. For landscape and travel photographers, f/4 is often the smarter choice.
5. What is the sweet spot for focal length?
The sweet spot refers to the aperture setting, not the focal length itself — it’s the f-stop at which your specific lens produces its sharpest images. According to ZEISS lens testing data, most lenses peak at 2–3 stops down from maximum aperture — so an f/1.8 lens is sharpest around f/4–f/5.6, and an f/2.8 lens peaks around f/5.6–f/8. For focal length choice, the “sweet spot” concept means using the focal length that naturally suits your genre rather than forcing a wide or telephoto lens into a scene it wasn’t designed for.
6. What is the sharpest aperture?
For most lenses, the sharpest aperture is f/5.6–f/8 — approximately 2–3 stops below maximum aperture. At maximum aperture, lenses show soft edges and chromatic aberration. At very small apertures (f/16–f/22), diffraction (light bending through the narrow opening) reduces overall sharpness. The f/5.6–f/8 range avoids both problems and delivers peak optical performance across virtually every lens category, from budget kit lenses to professional primes.
7. What is the Holy Trinity of Sony lenses?
The Holy Trinity of Sony lenses consists of three professional zoom lenses that together cover every focal length at f/2.8: the Sony FE 16-35mm f/2.8 GM II (wide), the Sony FE 24-70mm f/2.8 GM II (standard), and the Sony FE 70-200mm f/2.8 GM OSS II (telephoto). According to Sony Alpha Universe documentation, these three lenses cover 16–200mm with no gaps and a consistent f/2.8 aperture throughout. Each lens costs approximately $2,300–$2,800 (as of Q1 2026). The Holy Trinity concept exists across all major systems — Canon RF, Nikon Z, and others follow the same wide/standard/telephoto f/2.8 framework.
8. Why is a 50mm lens so popular?
The 50mm lens is popular because it most closely mimics natural human vision on a full-frame camera, with an angle of view of approximately 47°. This makes photos taken with it feel natural and unmanipulated — neither dramatically wide nor noticeably zoomed. Beyond the optical reason, 50mm f/1.8 lenses are available for $125–$200 on most camera systems, making them the most affordable way to get a fast prime lens with excellent low-light performance and beautiful background blur. They’re also compact, light, and sharp — a rare combination at that price.
The Focal Length Triangle in Practice
Focal length in photography is not a single number to memorize — it’s a relationship between three variables working together. The Focal Length Triangle captures this: the mm number on your lens, the size of your camera’s sensor, and your physical distance from your subject all determine your final image. Change any one of those three, and the photo changes. Understanding this three-way relationship is what separates photographers who choose their settings deliberately from those who guess and hope.
The most practical summary: wide lenses (14–35mm) show the world expansively; standard lenses (35–70mm) show it naturally; telephoto lenses (70mm+) isolate and compress. On APS-C cameras, multiply every focal length by 1.5x to find its full-frame equivalent. And for peak sharpness, shoot 2–3 stops down from your lens’s maximum aperture — regardless of which focal length you’re using.
Start with what you already own. If you have a kit zoom, spend a week shooting only at 35mm, then a week at 50mm, then a week at 70mm. Notice how each focal length makes you see differently. That hands-on exploration will teach you more about focal length than any guide — including this one.
When you’re ready to add your first prime lens, use the genre recommendations in this guide to match your focal length to the type of photography you love most. And when you’re ready to go deeper on sensor size and aperture, our dedicated guides on crop factor and sensor size and understanding aperture and depth of field will take you further into The Focal Length Triangle.
