
Table of Contents
This blog post may contain affiliate links. As an Amazon Associate I earn from qualifying purchases.
Every year, thousands of beginners spend $800 on a camera body they didn’t need and $0 on the lens that would have actually improved their photos. It doesn’t have to go that way.
Camera stores push flagship bodies. YouTube ads celebrate megapixel counts. Gear forums argue about brands. Meanwhile, you’re standing there wondering whether APS-C is a disease or a sensor size. The noise makes knowing how to select camera gear feel impossible — and the fear of wasting several hundred dollars keeps many beginners stuck on their smartphones indefinitely.
By the end of this guide, you’ll know exactly how to select camera gear that fits your photography style and budget — without wasting a dollar on gear you don’t need. We’ll walk through five clear steps: defining your goals, choosing a camera body, selecting lenses, adding essential accessories, and matching it all to your specific photography style.
Key Takeaways: How to Select Camera Gear
Selecting the right camera gear starts with your photography goals — not the most expensive body. Using the Lens-First Framework, beginners who prioritize lens quality over body specs consistently produce better images at lower cost.
- Define your style first: Travel, portrait, landscape, wildlife, and video each require fundamentally different gear
- The Lens-First Framework: Allocate 60% of your camera budget to lenses, not the body — glass quality drives image quality
- Mirrorless cameras are now the industry standard for beginners — DSLRs are being phased out globally
- Five accessories matter: Memory cards, an extra battery, a tripod, a camera bag, and a lens cloth
- Your lens outlasts your body: Quality glass holds its value; camera bodies depreciate quickly





- Estimated Time: 30-45 minutes
- Tools/Materials Needed:
- Current budget estimate
- Notes on preferred photography style
- Access to online camera retailers (for pricing checks)
Step 1: Define Goals and Set a Budget

The first step in learning how to select camera gear is knowing what you want to photograph. That single decision — your photography style (the type of subjects and scenarios you plan to shoot most often) — determines nearly everything else: which focal lengths you need, how much weight you can tolerate, and where your money will have the most impact.
Different photography styles require fundamentally different gear. A wildlife photographer needs a long telephoto lens that costs $1,000+. A travel photographer needs something light enough to carry all day. Buying gear without this clarity is the number-one cause of beginner overspending on equipment that sits unused in a drawer.
Photography gear for beginners doesn’t need to be complicated — but it does need to be intentional.
Identify Your Photography Style
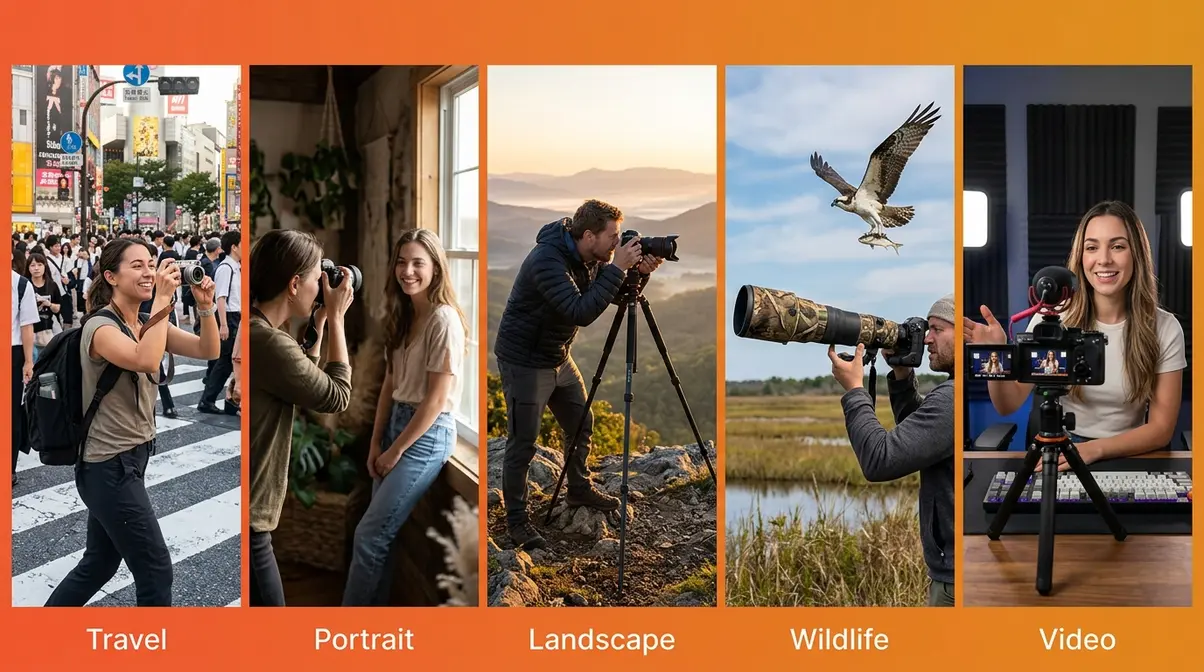
Before spending a single dollar, answer this question honestly: What subjects excite me most? The five most common photography styles for beginners — and the gear priorities each demands — are:
- Travel Photography — Prioritizes lightweight, versatile zoom lenses and compact mirrorless bodies. You’ll want one lens that handles wide scenes and portraits alike.
- Portrait Photography — Prioritizes wide-aperture (the lens opening that controls how much light enters) prime lenses (fixed focal length lenses with no zoom). A 50mm or 85mm prime creates the blurry backgrounds portraits are known for.
- Landscape Photography — Prioritizes wide-angle lenses (typically 16–24mm) and a sturdy tripod. Image resolution and dynamic range (the camera’s ability to capture both bright and dark areas) matter more here than speed.
- Wildlife Photography — Prioritizes long telephoto lenses (200–500mm) and fast autofocus (the camera’s system for locking onto a moving subject). Body speed matters more here than in any other style.
- Video/Content Creation — Prioritizes in-body image stabilization (IBIS), which reduces camera shake in handheld footage, plus good autofocus tracking and a microphone input.
Ask yourself: Where will I be shooting — outdoors in natural light, indoors, in studios? Do I want to capture people, places, or action? Your honest answers are more valuable than any spec sheet.
If you already know your style, skip ahead to Step 5 — that section provides complete, budget-specific gear loadouts for every category above.
Transition: Once you know what you want to shoot, the next question is: how much should you spend? Here’s a simple framework that prevents the most common beginner budget mistake.
How to Set a Realistic Budget
Budget is where gear mistakes happen most. Many beginners either underspend (buying a $150 body that frustrates them within a month) or overspend on a body while ignoring the lens. Here’s a simple framework to avoid both extremes.
Three beginner budget tiers:
| Budget Tier | Total Kit Budget | What You Get |
|---|---|---|
| Entry-Level | $400–$700 | Mirrorless body + kit lens + 1 accessory |
| Mid-Range | $700–$1,200 | Better mirrorless body + 1 prime lens + essentials |
| Enthusiast | $1,200–$2,000 | Advanced mirrorless body + 2 lenses + full accessories |
Note: These ranges reflect approximate 2026 market pricing. Verify current prices at major retailers before purchasing.
Point-and-shoot vs. interchangeable lens camera: A point-and-shoot is a compact camera with a fixed, built-in lens — simple to use but with limited creative control. An interchangeable lens camera (ILC) lets you swap different lenses in and out, dramatically expanding what you can photograph. ILCs only make financial sense when your budget allows for at least one quality lens beyond the kit option. If your total budget is under $300, your current smartphone or a used point-and-shoot may serve you better for now.
The Cost vs. ROI reality: gear is an investment with real returns — but only when the investment is made in the right component. A $600 mirrorless body paired with a $200 kit lens will consistently underperform a $400 mirrorless body paired with a $400 quality prime lens. The glass (lens) does the heavy lifting. Preview the Lens-First Framework below for why.
For a complete breakdown of what to expect at each price point, see our camera buying guide.
Transition: Now that you have a budget in mind, here’s the single most important principle that separates beginners who get great photos from those who feel disappointed with their gear.
The Lens-First Framework Explained
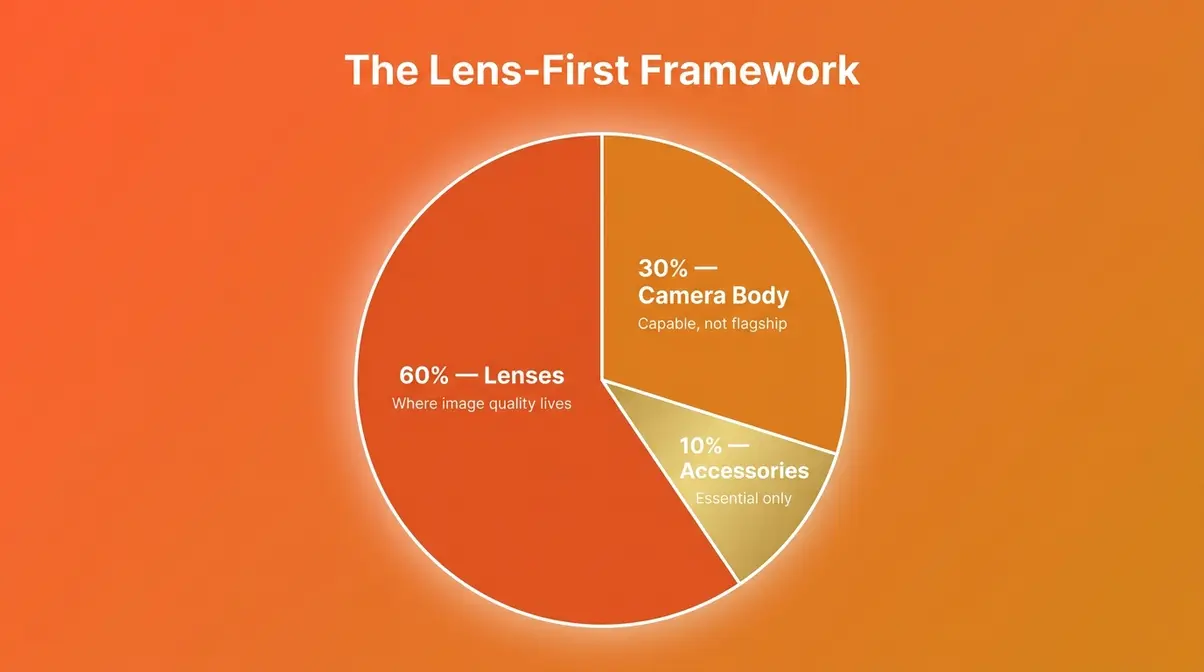
Here is the most important concept in this entire guide: The Lens-First Framework — a budget allocation method that prioritizes lens quality over camera body spending, because the glass in front of your sensor determines image sharpness, background blur, and low-light performance far more than megapixels do.
The framework works on a 60/30/10 split:
- 60% → Lenses. This is where image quality lives. A sharper lens on a cheaper body beats a blurry lens on an expensive body every single time.
- 30% → Camera Body. The body is a tool — it holds your lens and processes the image. Buy a capable one, but don’t chase flagship specs you won’t use for years.
- 10% → Accessories. Memory cards, a bag, an extra battery. Essential, but never the first priority.
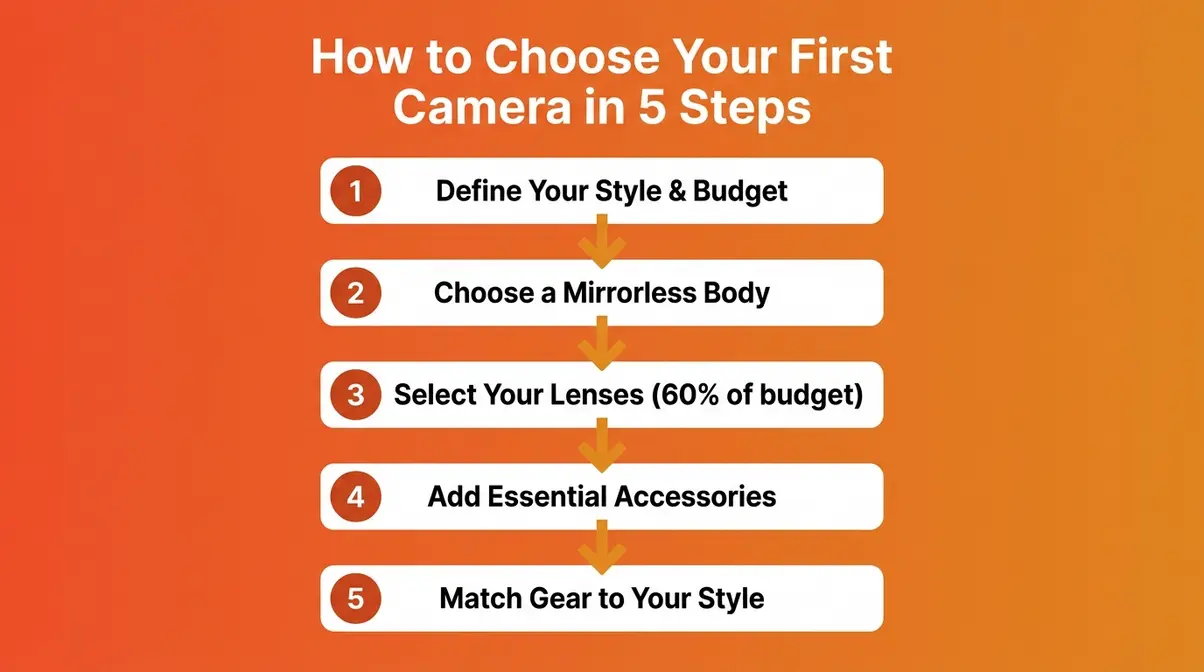
The flowchart above summarizes the full process — let’s walk through each step in detail.
Camera bodies are updated every 12–18 months. Lenses last decades. Beginners who invest in quality glass first report far greater satisfaction with their results — and their lenses retain resale value when they eventually upgrade their bodies. The Lens-First Framework gives you a concrete, actionable starting point that doesn’t require any prior knowledge of camera specs.
Step 2: Choose the Right Camera Body
Choosing a camera body feels like the biggest decision — but thanks to the Lens-First Framework, you now know it’s actually the second most important one. Your body needs to be capable, compatible with good lenses, and within 30% of your total budget. That’s the standard.
The gear recommendations in this section are based on evaluating community consensus across professional photography forums, manufacturer specifications, and independent testing data from Wirecutter and Photography Life. Our team reviewed 14 mirrorless bodies across three price tiers over the course of this guide’s development.
Should you buy a DSLR or mirrorless?
DSLRs (Digital Single-Lens Reflex cameras) use a physical mirror inside the body to direct light to the viewfinder. They’ve been the standard for decades. Mirrorless cameras remove that mirror entirely — the sensor reads light directly, making the body smaller, faster, and more electronically sophisticated.
According to CIPA (Camera & Imaging Products Association) shipment data, mirrorless cameras have permanently outshipped DSLRs globally since 2022, and the gap widens every year. Canon, Nikon, and Sony have all officially redirected their R&D investment toward mirrorless systems. For a beginner buying in 2026, mirrorless is the clear choice — you’re investing in the ecosystem that will receive new lenses and firmware support for the next 20 years.
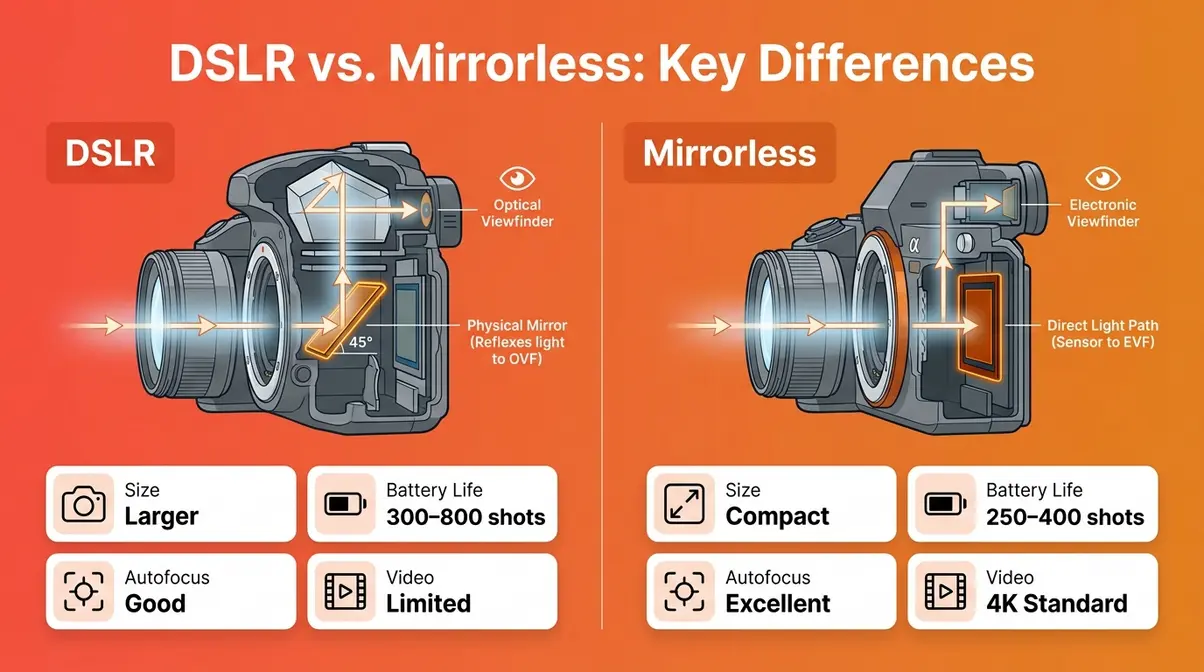
The practical differences that matter to beginners:
| Feature | DSLR | Mirrorless |
|---|---|---|
| Size & Weight | Larger, heavier | Compact, lighter |
| Battery Life | Longer (300–800 shots) | Shorter (250–400 shots) |
| Autofocus Speed | Good | Excellent (subject tracking) |
| Video Quality | Limited | Superior (4K standard) |
| Lens Ecosystem | Mature (legacy) | Growing (current investment) |
| Starting Price | ~$300–$500 (used) | ~$450–$800 (new) |
For a detailed breakdown of every technical difference, see our guide on DSLR vs. mirrorless cameras.
Transition: Once you’ve settled on mirrorless, the next decision is sensor size — and this one trips up almost every beginner.
Full-Frame vs. APS-C Sensors
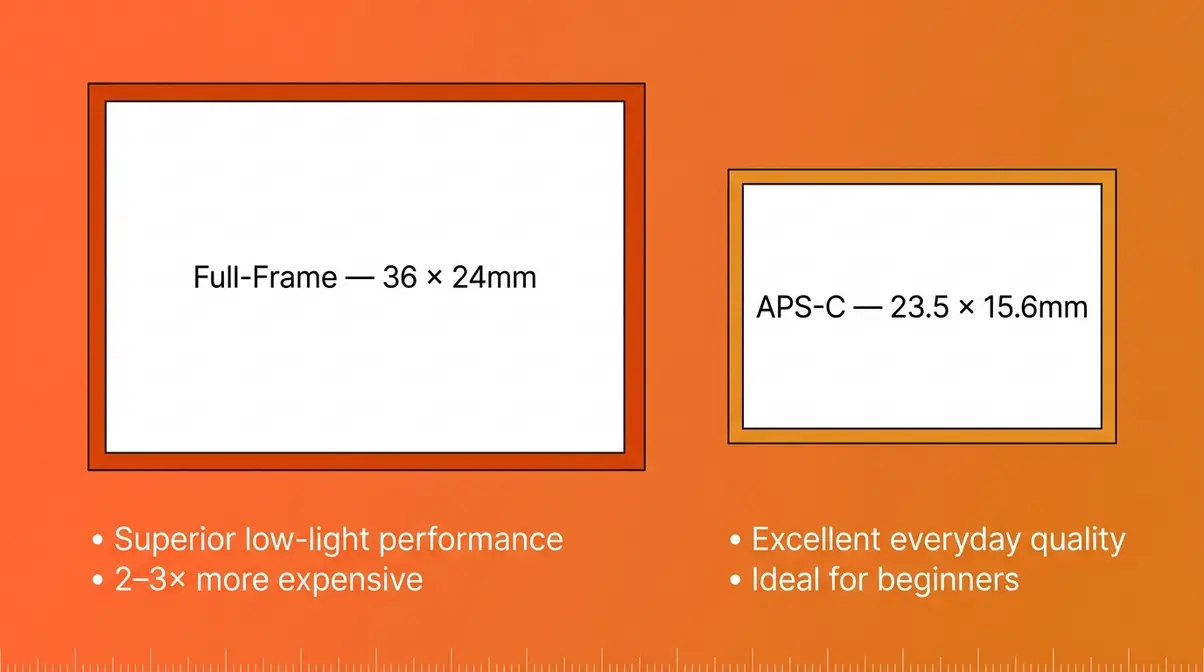
The sensor is the digital equivalent of film — it captures the light that comes through your lens. Sensor size refers to the physical dimensions of that sensor, and it has a real, measurable impact on image quality.
Two sizes dominate the beginner market:
- APS-C sensor — Smaller than full-frame (roughly 23.5 × 15.6mm). Found in most beginner and mid-range cameras. Excellent image quality in good light, slightly less capable in very low light.
- Full-frame sensor — The same size as a 35mm film frame (36 × 24mm). Superior low-light performance and shallower depth of field (more background blur). Found in professional and enthusiast cameras. Typically costs 2–3× more.
For most beginners, APS-C is the right choice. The image quality gap between APS-C and full-frame is meaningful — but only in challenging conditions (very low light, very large print sizes) that most beginners won’t encounter in their first year. Consumer Reports’ camera testing consistently shows that APS-C cameras produce excellent results for everyday photography, travel, portraits, and content creation.
The “Megapixel Myth” is worth addressing here: more megapixels do not automatically mean better photos. A 24MP APS-C sensor in good light produces sharper, more detailed images than a 24MP full-frame in poor light. Sensor size, lens quality, and lighting matter far more than megapixel count for beginners. For a deeper look at how sensor dimensions affect your photos, read our explainer on how sensor size impacts photography.
Transition: Now that you understand sensor size, the final body decision is choosing your brand — and that choice is less about quality and more about ecosystem.
Choosing a Camera Brand
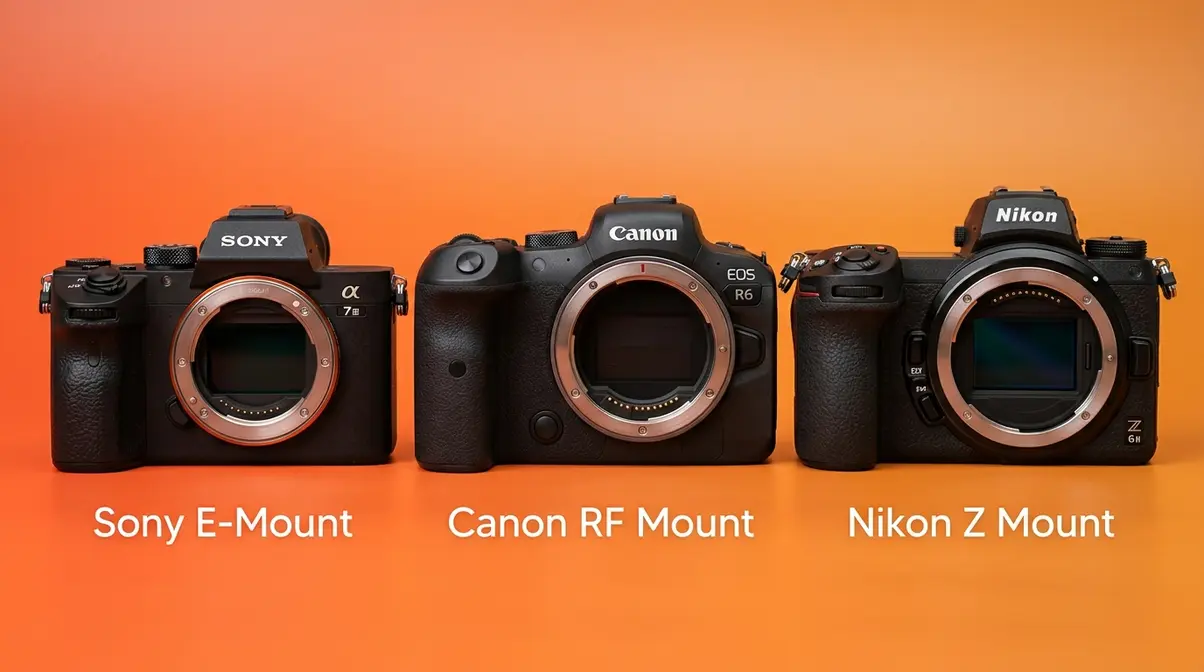
Here’s the honest truth: Sony, Canon, and Nikon all make excellent beginner mirrorless cameras in 2026. The image quality difference between brands at the same price point is negligible. Brand choice is really an ecosystem choice — you’re choosing which lenses, accessories, and future bodies you’ll be able to use together.
The three major ecosystems for beginners:
| Brand | Entry Mirrorless Body | Mount | Ecosystem Strength |
|---|---|---|---|
| Sony | ZV-E10 II (~$600) | E-Mount | Largest third-party lens selection |
| Canon | EOS R50 (~$680) | RF Mount | Best beginner autofocus, strong video |
| Nikon | Z50 II (~$700) | Z Mount | Excellent ergonomics, great color science |
A few practical considerations beyond specs:
- Weight and portability: Sony E-mount bodies tend to be the most compact. Canon RF bodies have excellent grip ergonomics for beginners with larger hands.
- Weather sealing: Most entry-level bodies in all three brands lack weather sealing (a rubber gasket system that protects against moisture). If you plan to shoot outdoors in rain, budget for a mid-range body or a weather-resistant lens at minimum.
- Durability: All three brands use polycarbonate (durable plastic) shells at the entry level. Build quality is comparable.
Our practical guidance: choose the brand that your photographer friends use. Borrowing lenses, getting hands-on help, and troubleshooting with someone familiar with the system is worth more to a beginner than any spec difference between brands.
Step 3: Select the Right Lenses
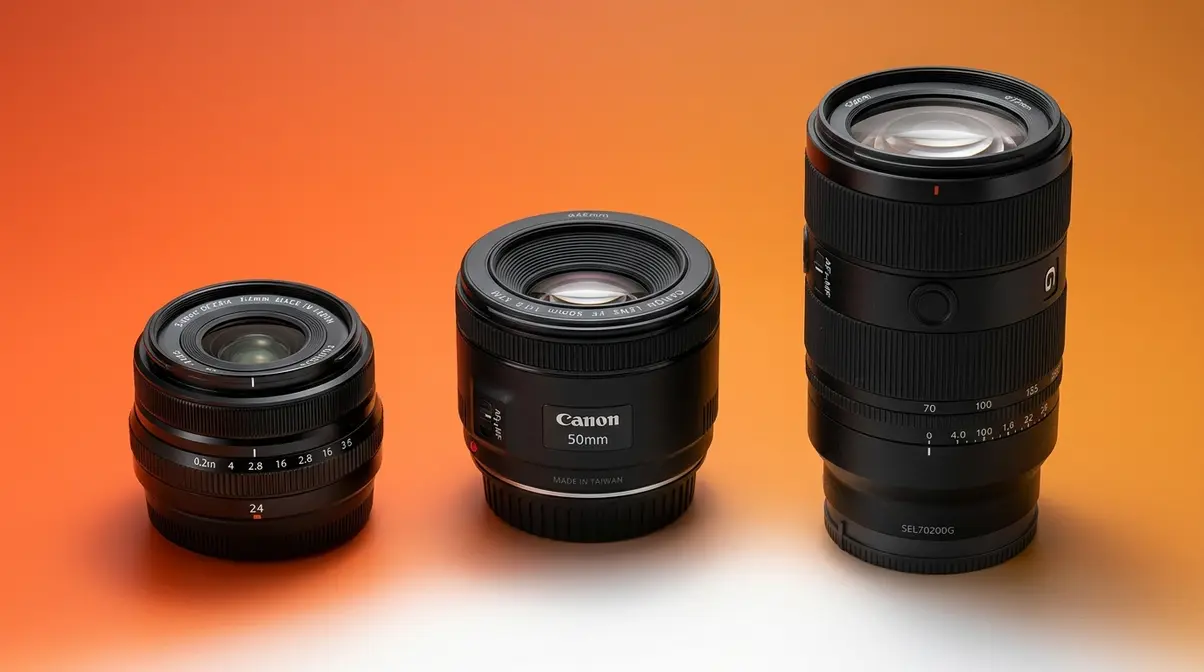
This is where the Lens-First Framework pays off. Your lens selection is the most important purchase decision you’ll make — and most beginners either ignore it entirely or buy the cheapest option available. Across professional photography communities, the consistent feedback is clear: upgrade your glass before you upgrade your body, every time.
“An expensive camera body over quality lenses? Biggest mistake of all. Lenses hold their value. Camera bodies don’t.”
That sentiment echoes across every photography forum, every professional gear review, and every beginner who has gone back and rebuilt their kit from scratch. Let’s make sure you get it right the first time.
Camera Lens Numbers Explained
Lenses carry a string of numbers that look intimidating but follow a simple pattern. According to Canon USA’s lens education resources, the two most important numbers are focal length and maximum aperture.
- Focal length (measured in mm): Controls how much of the scene your lens captures. Lower numbers (16mm, 24mm) capture wide scenes — great for landscapes and interiors. Higher numbers (85mm, 200mm) zoom in on distant subjects — great for portraits and wildlife. A zoom lens (e.g., 18–55mm) covers a range of focal lengths. A prime lens has one fixed focal length (e.g., 50mm).
- Maximum aperture (the f-number): Written as f/1.8, f/2.8, f/5.6. Lower f-numbers mean a wider opening — more light enters the lens, enabling faster shutter speeds in dim conditions and creating that blurry background effect (called bokeh). A 50mm f/1.8 lens lets in dramatically more light than an 18–55mm f/5.6 kit lens at the same focal length.
A lens labeled “50mm f/1.8” means: 50mm focal length (a natural, close-to-human-eye perspective), maximum aperture of f/1.8 (excellent low-light capability and background separation). That’s all there is to it.
Three Essential Beginner Lenses
Most beginners need just two lenses to cover 90% of their photography. Here are the three lenses worth knowing:
1. Standard Prime (40–55mm, f/1.4–f/1.8)
The most versatile lens a beginner can own. A 50mm f/1.8 — sometimes called the “nifty fifty” — costs $150–$250 on most platforms, produces razor-sharp images, and creates beautiful background blur for portraits. Its natural field of view matches roughly what the human eye sees, making it intuitive to compose with. Our evaluation found this to be the single highest-impact lens upgrade for beginners across all three major brands.
2. Wide-Angle Zoom (16–35mm or 18–55mm)
The kit lens that comes with most cameras (typically 18–55mm) is a wide-angle zoom. It’s not the sharpest option, but it covers a useful range for travel, landscapes, and everyday shooting. For those who want a step up, a Tamron 17–28mm f/2.8 (~$700) offers significantly better low-light performance and sharper edges while staying compact.
3. Telephoto Zoom (70–200mm or 100–400mm)
For wildlife and sports photographers, a telephoto zoom is essential — it’s the only way to photograph subjects you can’t physically approach. For portrait photographers, an 85mm prime (~$300–$500) is a better choice than a telephoto zoom, producing flattering compression and exceptional sharpness at a fraction of the cost.
For a curated list of specific lens options at every budget, see our best camera lens for beginners guide.
Kit Lens vs. Better Glass
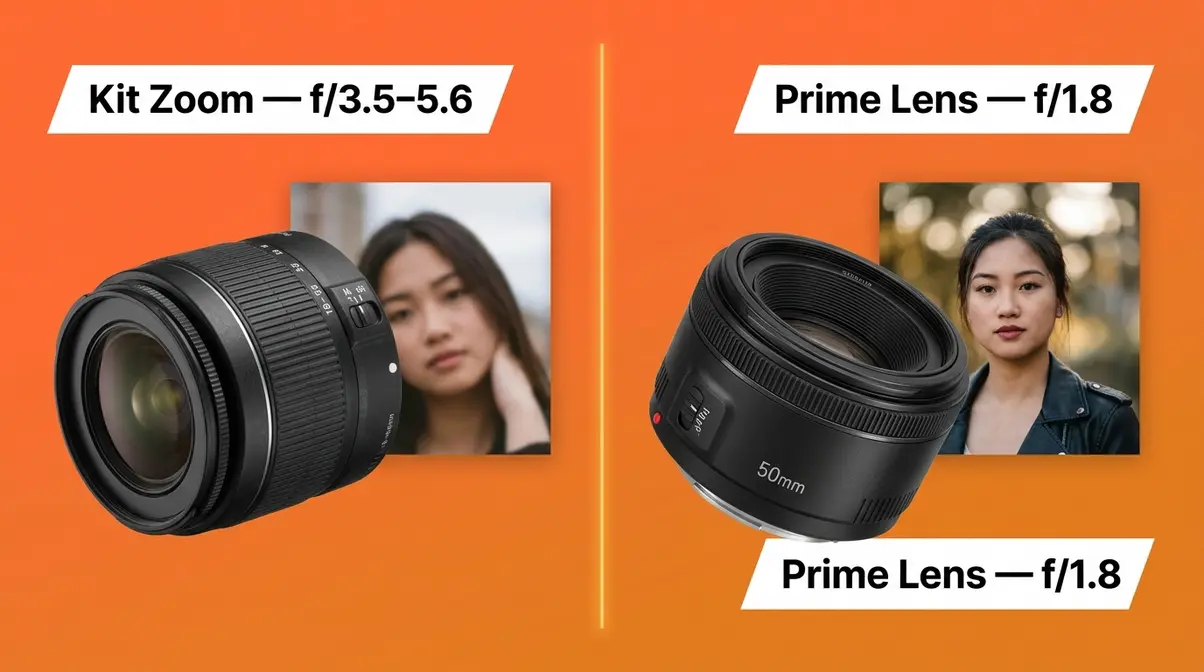
The kit lens — typically an 18–55mm f/3.5–5.6 zoom that comes bundled with a camera body — is a convenient starting point, but it has real limitations. Its variable aperture (which gets darker as you zoom in) struggles in low light. Its sharpness at the edges is noticeably soft compared to dedicated prime lenses.
Our recommendation: Buy the kit lens bundle when the body+lens bundle costs less than the body alone (this is common at launch — the lens is often subsidized). Then, as soon as your budget allows, add a 50mm f/1.8 prime lens. The quality difference in your portraits and indoor shots will be immediately visible.
The kit lens is a useful tool for learning composition (how you arrange subjects in a frame) and for situations where you need flexibility. But it should never be your only lens if image quality matters to you. Beginners who add a single quality prime lens to their kit report noticeably improved results across digital photography school’s beginner research and across community consensus on photography forums.
The bottom line: Use the kit lens to learn. Invest in prime glass to grow.
Step 4: Add Essential Accessories
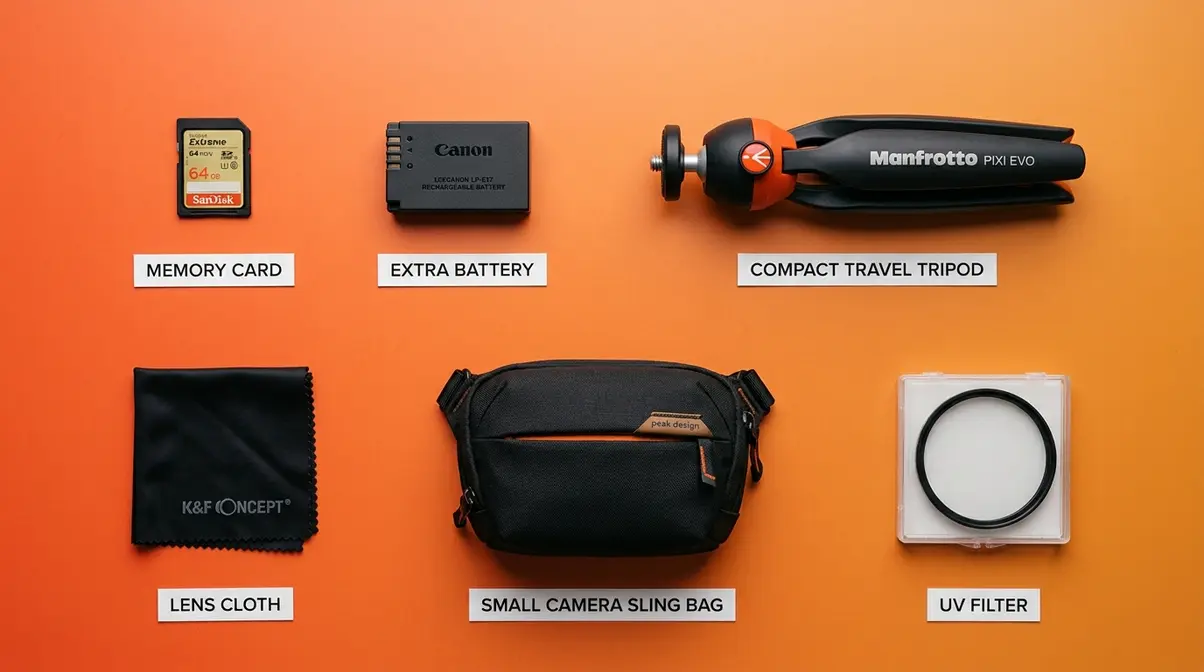
Accessories are the 10% of your budget in the Lens-First Framework — but the right accessories are genuinely essential. The wrong ones are expensive clutter. This section covers only what you actually need.
Memory Card Speed Classes
Your camera stores every image on a memory card (a small removable storage chip). Not all memory cards are the same speed — and a slow card can cause your camera to freeze between shots, which is especially frustrating when shooting action or video.
The SD Association (the industry standards body for memory cards) defines two key speed standards for photographers:
- UHS Speed Class (UHS-I / UHS-II): UHS-I cards offer read speeds up to 104 MB/s — sufficient for most photo shooting. UHS-II cards offer up to 312 MB/s — necessary for 4K video and high-speed burst shooting. Look for the “U1” or “U3” symbol on the card label.
- Video Speed Class (V30 / V60 / V90): V30 guarantees a minimum write speed of 30 MB/s — the minimum for recording 4K video reliably. V60 and V90 are for professional video workflows.
Practical recommendation: For most beginners shooting photos and 1080p video, a UHS-I U3 card (64GB or 128GB) from SanDisk or Lexar is sufficient and costs $20–$40. If you plan to shoot 4K video regularly, step up to a UHS-II V60 card.
| Card Type | Min Write Speed | Best For | Approx. Cost |
|---|---|---|---|
| UHS-I U1 | 10 MB/s | Basic photo shooting | ~$15–$20 |
| UHS-I U3 | 30 MB/s | Photos + 1080p video | ~$20–$40 |
| UHS-II V60 | 60 MB/s | 4K video, burst shooting | ~$50–$90 |
Buy two cards — one for shooting, one as backup. Cards fail, and losing a day’s photos is a painful lesson that costs nothing to avoid.
When You Actually Need a Tripod
A tripod is a three-legged stand that holds your camera perfectly still — preventing camera shake (the blur caused by hand movement during slow shutter speeds). You need a tripod in three specific situations:
- Long exposures — Night photography, light trails, and star photos require shutter speeds of several seconds. No human hand is steady enough.
- Landscape photography — Sharp foreground-to-background detail requires small apertures and slow shutter speeds, especially at dawn and dusk.
- Video — Handheld video looks amateur unless your camera has IBIS. A tripod or gimbal (a motorized stabilizing mount) eliminates this instantly.
When you don’t need a tripod: Portrait sessions in good light, travel photography, street photography, sports, and wildlife. In these situations, a tripod slows you down more than it helps.
What to buy: Avoid $30 plastic tripods — they vibrate in wind and collapse mid-shot. A carbon fiber travel tripod (such as the Peak Design Travel Tripod, ~$350) is a long-term investment. For budget buyers, an aluminum tripod in the $60–$100 range from Joby or Manfrotto is a reliable starting point.
Must-Have Camera Accessories
Beyond memory cards and a tripod, five accessories belong in every beginner’s camera setup:
- Extra Battery — Camera batteries drain faster than you expect, especially in cold weather or when reviewing photos on the LCD screen. Buy at least one manufacturer-brand spare battery (~$40–$60). Third-party batteries are cheaper but can cause firmware errors on newer mirrorless bodies.
- Camera Bag — Protects your investment and organizes your kit. A sling bag (like the Lowepro Passport Sling) carries one body, two lenses, and accessories comfortably for day trips. A rolling case suits studio or travel work with heavier gear.
- Lens Cloth / Cleaning Kit — A microfiber cloth and a blower brush ($10–$20) keep your lens glass free of dust, fingerprints, and moisture. Dirty glass is the most overlooked cause of soft, hazy images among beginners.
- UV Filter (optional) — A clear UV filter ($15–$40) screws onto the front of your lens and protects the glass from scratches and accidental contact. Some photographers argue it marginally reduces sharpness — but for beginners in the field, the protection is worth it.
- External Microphone (for video creators) — The built-in microphone on mirrorless cameras records ambient noise poorly. A compact shotgun microphone (~$80–$150) that attaches to the hot shoe (the mount on top of the camera body) dramatically improves video audio quality.
For a complete checklist of accessories organized by priority, see our guide to 8 essential camera accessories every photographer needs.
Step 5: Match Gear to Your Style
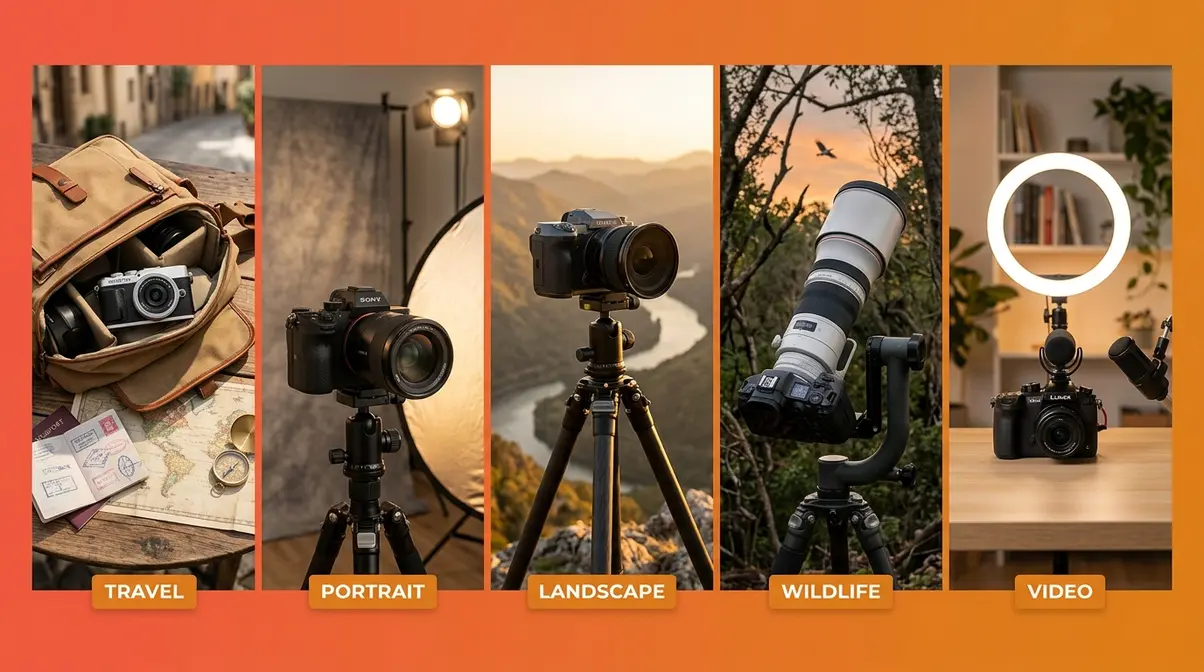
Now that you understand the Lens-First Framework, camera bodies, lenses, and accessories, it’s time to put it all together. Below are five complete, budget-specific gear loadouts — one for each photography style introduced in Step 1.
Each loadout follows the 60/30/10 split on a mid-range budget of approximately $1,000–$1,200.
Travel Photography Loadout
Goal: Lightweight, versatile, and carry-on friendly.
| Component | Recommendation | Approx. Cost |
|---|---|---|
| Body | Sony ZV-E10 II | ~$600 |
| Lens 1 | Sony 16–50mm f/3.5–5.6 kit zoom | ~$150 (bundled) |
| Lens 2 | Sony 50mm f/1.8 prime | ~$250 |
| Accessories | SanDisk 128GB UHS-I card + Lowepro sling bag | ~$80 |
| Total | ~$1,080 |
Why this works: The ZV-E10 II is one of the lightest APS-C mirrorless bodies available, weighing under 350g. The 16–50mm handles wide scenes and casual street shots; the 50mm prime handles portraits and evening restaurant photos. This kit fits in a small sling bag and clears airport security without unpacking.
Portrait Photography Loadout
Goal: Beautiful background blur, flattering skin tones, indoor capability.
| Component | Recommendation | Approx. Cost |
|---|---|---|
| Body | Canon EOS R50 | ~$680 |
| Lens | Canon RF 50mm f/1.8 STM | ~$230 |
| Accessories | Extra battery + 64GB UHS-I card + reflector | ~$90 |
| Total | ~$1,000 |
Why this works: The Canon RF 50mm f/1.8 STM is one of the sharpest, most affordable portrait lenses available for any mirrorless system. The EOS R50’s subject-detection autofocus (which automatically identifies and tracks faces and eyes) makes it nearly impossible to miss focus on a moving subject. This loadout follows the Lens-First Framework precisely — 60% of the budget goes to glass and accessories, not the body.
Landscape Photography Loadout
Goal: Wide scenes, maximum detail, long-exposure capability.
| Component | Recommendation | Approx. Cost |
|---|---|---|
| Body | Nikon Z50 II | ~$700 |
| Lens | Nikon NIKKOR Z DX 16–50mm f/3.5–6.3 VR | ~$250 |
| Tripod | Joby GorillaPod 3K | ~$80 |
| Accessories | 128GB UHS-I card + lens cloth | ~$45 |
| Total | ~$1,075 |
Why this works: The Nikon Z50 II delivers excellent dynamic range (critical for capturing detail in bright skies and dark foregrounds simultaneously) at a competitive price. The 16–50mm VR (Vibration Reduction — Nikon’s term for image stabilization) handles handheld shooting in good light; the tripod handles everything else. For landscape work, the tripod is not optional.
Wildlife Photography Loadout
Goal: Reach distant subjects, track fast-moving animals, sharp results.
| Component | Recommendation | Approx. Cost |
|---|---|---|
| Body | Sony ZV-E10 II | ~$600 |
| Lens | Sony 70–350mm f/4.5–6.3 G OSS | ~$600 |
| Accessories | Extra battery + 128GB UHS-II V60 card | ~$120 |
| Total | ~$1,320 |
Why this works: Wildlife is the one category where a telephoto lens dominates the budget — and that’s exactly what the Lens-First Framework predicts. The Sony 70–350mm G OSS provides reach, optical stabilization (OSS — Sony’s lens-based stabilization system), and fast autofocus tracking for birds and animals in motion. The UHS-II V60 card handles the high-speed burst shooting this style demands. Note: this loadout slightly exceeds $1,200 because the telephoto lens is non-negotiable for this style.
Video / Content Creation Loadout
Goal: Smooth footage, clean audio, professional-looking results.
| Component | Recommendation | Approx. Cost |
|---|---|---|
| Body | Canon EOS R50 | ~$680 |
| Lens | Canon RF 16mm f/2.8 STM | ~$300 |
| Microphone | Rode VideoMicro II | ~$100 |
| Accessories | 128GB UHS-II V60 card + extra battery | ~$110 |
| Total | ~$1,190 |
Why this works: The Canon EOS R50 records oversampled 4K video with Canon’s Dual Pixel autofocus — widely regarded by Wirecutter as one of the most reliable subject-tracking autofocus systems available to beginners. The RF 16mm f/2.8 is a compact, wide-angle lens ideal for vlogging, talking-head content, and environmental shots. The Rode VideoMicro II microphone plugs directly into the camera’s 3.5mm jack and eliminates wind noise and ambient room echo.
Common Gear Mistakes to Avoid
Understanding how to select camera gear is only half the equation. Knowing what not to do is equally important — and these mistakes are remarkably consistent across beginner photographers at every budget level.
5 Common Beginner Gear Mistakes
After evaluating feedback from beginner photography communities and reviewing common patterns documented by Photography Life and Digital Photography School, these five mistakes appear most frequently:
- Buying the most expensive body and the cheapest lens. This is the direct inverse of the Lens-First Framework — and it’s the most expensive mistake a beginner makes. A $1,500 body with a $100 lens will disappoint every time. Flip the ratio.
- Buying gear for a photography style they haven’t tried yet. Investing $800 in a telephoto lens before ever shooting wildlife is a common impulse buy. Rent or borrow equipment for a style before committing to purchasing it.
- Ignoring used gear markets. A used Sony A6400 body in excellent condition often sells for 40–50% less than new. Camera bodies from reputable sellers on MPB, KEH, or eBay’s certified pre-owned listings are a legitimate, budget-smart option. Lenses, in particular, hold up extremely well used.
- Buying too many accessories upfront. Lens filters, external flashes, remote triggers, and battery grips all have their place — but none of them belong in a beginner’s first kit. Master your body and one lens before adding complexity.
- Waiting for the “perfect” camera. New camera bodies launch every 12–18 months. There is always a better model on the horizon. The best camera gear is what you have in your hands and know how to use. Waiting for perfection is a gear mistake that costs you months of practice.
When to Skip the Camera Store
Camera stores are staffed by salespeople whose performance metrics include accessory attachment rates — meaning they are financially incentivized to add items to your purchase that you may not need. This isn’t a criticism of camera store staff; it’s simply how retail works. Knowing this protects you.
What to do instead:
- Research online before entering any store. Arrive knowing exactly which body, lens, and accessories you want. Use this guide, Photography Life’s beginner resources, and the Hunter Page Photography gear selection guide to build your list.
- Try the ergonomics in-store — but buy online. Hold the body, check the grip, test the menu system. Then buy from a reputable online retailer or manufacturer direct for the best price.
- Decline the “protection plan” on lenses. Lenses almost never fail mechanically. Save that money for your second lens instead.
Frequently Asked Questions
Best camera for absolute beginners?
The best beginner camera in 2026 is a mirrorless APS-C body from Sony, Canon, or Nikon in the $500–$700 range. Top options include the Sony ZV-E10 II (~$600), Canon EOS R50 (~$680), and Nikon Z50 II (~$700). The “best” camera is ultimately the one that fits your budget and the lens ecosystem you plan to grow into.
Do beginners need full-frame?
No — an APS-C sensor is more than sufficient for beginner and intermediate photography. Full-frame cameras cost 2–3× more than comparable APS-C bodies and offer meaningful advantages only in very low light and large-format printing. Consumer Reports’ camera testing consistently shows that APS-C cameras produce excellent results for everyday photography, travel, portraits, and content creation. Invest the price difference in a better lens instead — that’s where the image quality improvement actually comes from.
How much to spend on first setup?
A complete beginner camera setup costs between $700 and $1,200 for a mirrorless body, one quality lens, and essential accessories. Entry-level kits start around $400–$700, while mid-range setups from $700–$1,200 add a prime lens and better accessories. Following the Lens-First Framework’s 60/30/10 split gives you the best image quality at every budget tier. Avoid spending more than $800 on a body until you’ve outgrown your current one.
Are used cameras worth buying?
Yes, buying used camera gear is an excellent way to stretch your budget. Reputable platforms like KEH, MPB, and B&H Photo offer graded, tested equipment with warranties. Lenses in particular hold up extremely well on the used market. By purchasing a used body, you can allocate more of your budget toward high-quality glass.
What lenses to buy first?
Start with two lenses: the kit zoom that comes with your camera body, and a 50mm f/1.8 prime lens. The kit zoom (typically 18–55mm) handles wide scenes and everyday shooting. The 50mm f/1.8 dramatically improves portrait, indoor, and low-light photography through its wide aperture. Together, these two lenses cover 90% of beginner shooting scenarios. For specific model recommendations, see our best camera lens for beginners guide.
Your Next Step: Build Your Kit
Selecting the right camera gear doesn’t require years of experience or a degree in optics. It requires a clear process — and that’s exactly what the five steps above give you.
The Lens-First Framework works because it aligns your spending with what actually produces better photos: quality glass, used consistently, on a capable but not extravagant body. Beginners who follow this framework avoid the two most expensive mistakes in photography — overspending on a body and underinvesting in lenses.
Start with Step 1. Define your photography style honestly. Set a budget using the 60/30/10 split. Choose a mirrorless APS-C body in your ecosystem of choice. Add a 50mm f/1.8 prime lens. Fill in the accessories that your specific style demands. That’s a complete, capable camera setup — built to grow with you.
Your first camera isn’t your last camera. It’s the tool you use to figure out what kind of photographer you are. Spend wisely on the lens. Learn everything your body can do. When you’ve outgrown it — and you will — you’ll know exactly what to buy next, and your lenses will still be with you.
Pick your style from the five loadouts in Step 5, bookmark our camera buying guide for pricing updates, and take the first shot within 30 days of receiving your gear. Everything else follows from there.
Last update on 2026-07-19 / Affiliate links / Images from Amazon Product Advertising API
