
Table of Contents
This blog post may contain affiliate links. As an Amazon Associate I earn from qualifying purchases.
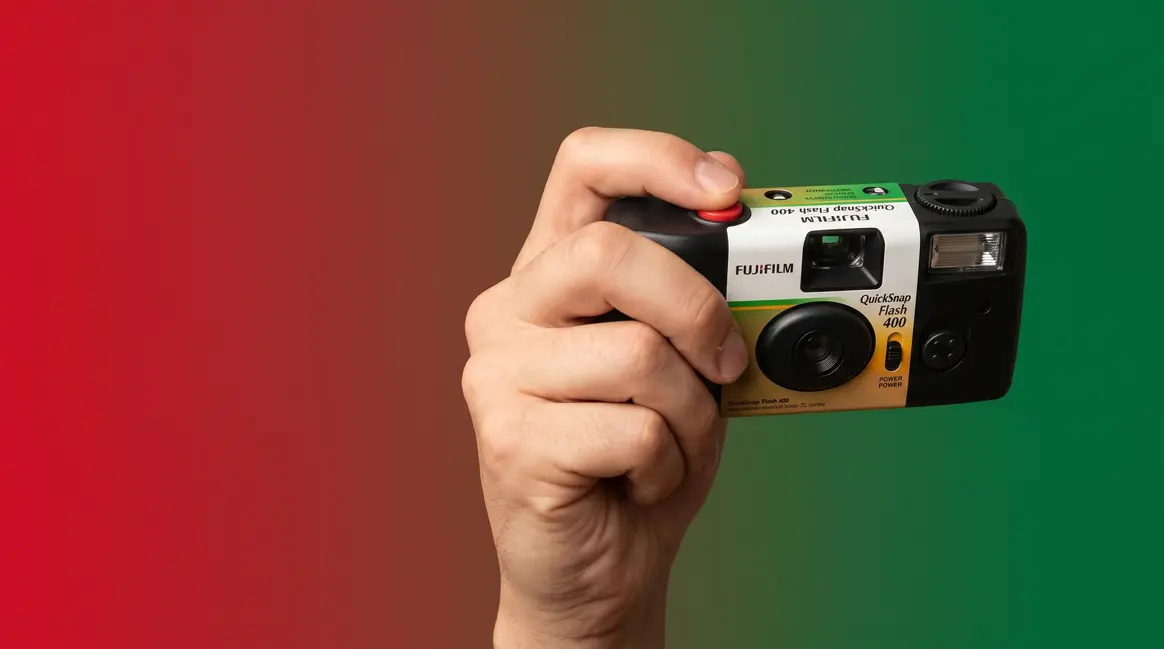
You picked up a Fujifilm QuickSnap and now you’re staring at a thumbwheel, a flash switch, and a shutter button — and you don’t want to waste a single one of your 27 shots figuring it out. Knowing how to use a Fujifilm disposable camera before you press anything is the difference between a full roll of sharp memories and a stack of dark, blurry disappointments.
“I like to think I’m good at composition and want to capture my everyday life but I’m too poor and too stuffed with other hobbies to fully invest into…”
If that sounds familiar, the Fujifilm QuickSnap is exactly the right way to dive into the film photography world — but only if you know the three things most guides forget to tell you. In this guide, you’ll learn exactly how to use a Fujifilm disposable camera from the first wind to the last exposure — and then how to get those photos developed and onto your phone. We’ll cover the step-by-step shooting process, key tips to avoid dark or blurry photos, and a clear breakdown of your development and digitizing options.
Learning how to use fujifilm disposable camera follows a simple three-phase Shoot to Smartphone Workflow: shoot your 27 frames correctly, get the film developed at a local lab or mail-in service, then receive digital scans straight to your phone.
- Wind first: Always advance the thumbwheel until it stops before every shot
- Flash is not optional indoors: The QuickSnap’s built-in flash covers 3–10 feet — use it for any indoor or shaded scene
- 27 exposures = 27 photos: The counter counts down from 27 to E as you shoot
- Getting photos on your phone is easy: Most labs email digital scans when you drop off the camera
- Airport travel tip: Always request a hand inspection for your film — CT scanners can damage 400 ISO film in a single pass
What You’ll Need Before You Start
Getting your QuickSnap ready takes under a minute. Run through this short checklist before you shoot your first frame.
Estimated Time: 5 minutes
- Materials Needed:
- Fujifilm QuickSnap Flash 400 camera
- Adequate lighting (daylight or flash)
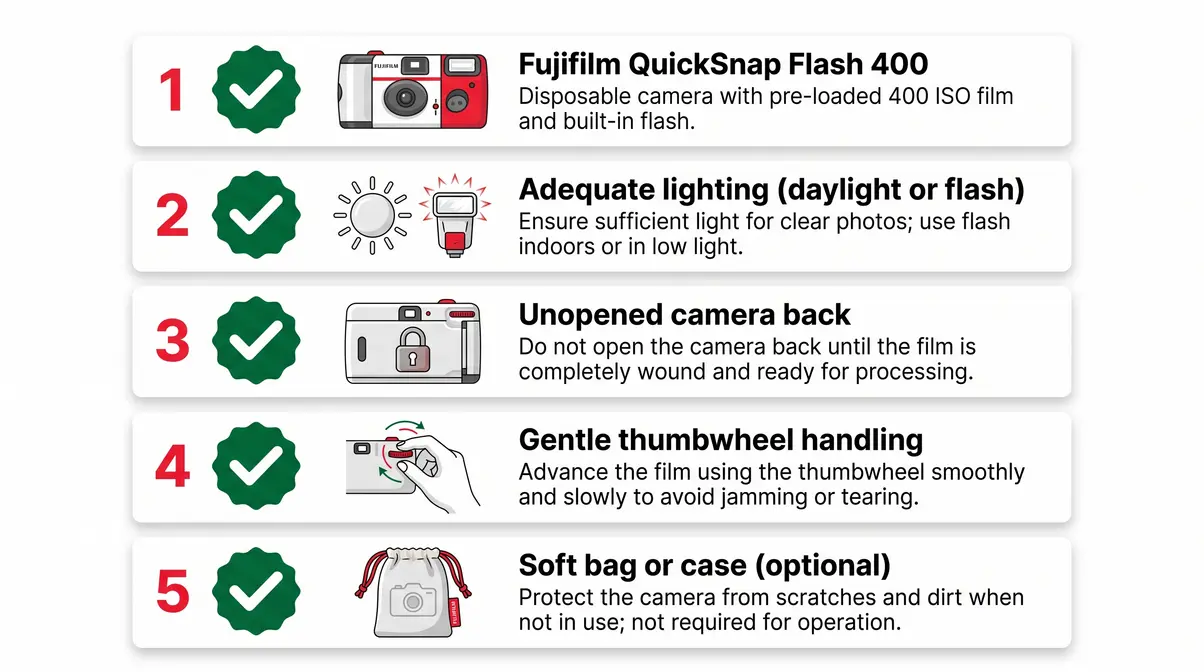
- Your camera: Confirm it’s a Fujifilm QuickSnap Flash 400 — the most common model, pre-loaded with 27 exposures. If the packaging says “Waterproof,” you’ll get model-specific tips in the Shooting Tips section below.
- Adequate light: The QuickSnap is loaded with 400 ISO film — meaning it’s reasonably light sensitive, but it still needs good exposure to produce sharp, well-saturated results. Bright daylight is ideal; indoors, you’ll need to engage the flash.
- An unopened camera back: Never open the cardboard back panel. Film is light sensitive and will be permanently destroyed in seconds if exposed to daylight before development.
- Gentle hands on the thumbwheel: Don’t force it. If it resists, you’ve reached the end of the roll — not a jam.
- Optional — a soft bag or case: The QuickSnap’s body is cardboard. It’s not drop-proof, so tuck it somewhere padded if you’re heading out for a day of shooting.
Once you’ve confirmed you have your QuickSnap in hand and you’re in a well-lit space, here’s exactly how to use it.
How to Use a Fujifilm Disposable Camera
If you are wondering exactly how to use fujifilm disposable camera, it takes about 30 seconds to learn: wind the film, engage the flash if needed, frame your shot, and press the shutter. The QuickSnap Flash 400 uses fixed settings — a pre-set aperture and shutter speed — so there are no dials to adjust and no settings to memorize. That simplicity is a feature, not a limitation — it means you focus on composition, and the camera handles the exposure.
How Do Fuji Disposable Cameras Work?
The Fujifilm QuickSnap Flash 400 is a single-use 35mm film camera pre-loaded with 27 exposures of Fujicolor Superia X-TRA 400 color negative film. It comes ready to shoot straight out of the box — no batteries to insert, no settings to configure.
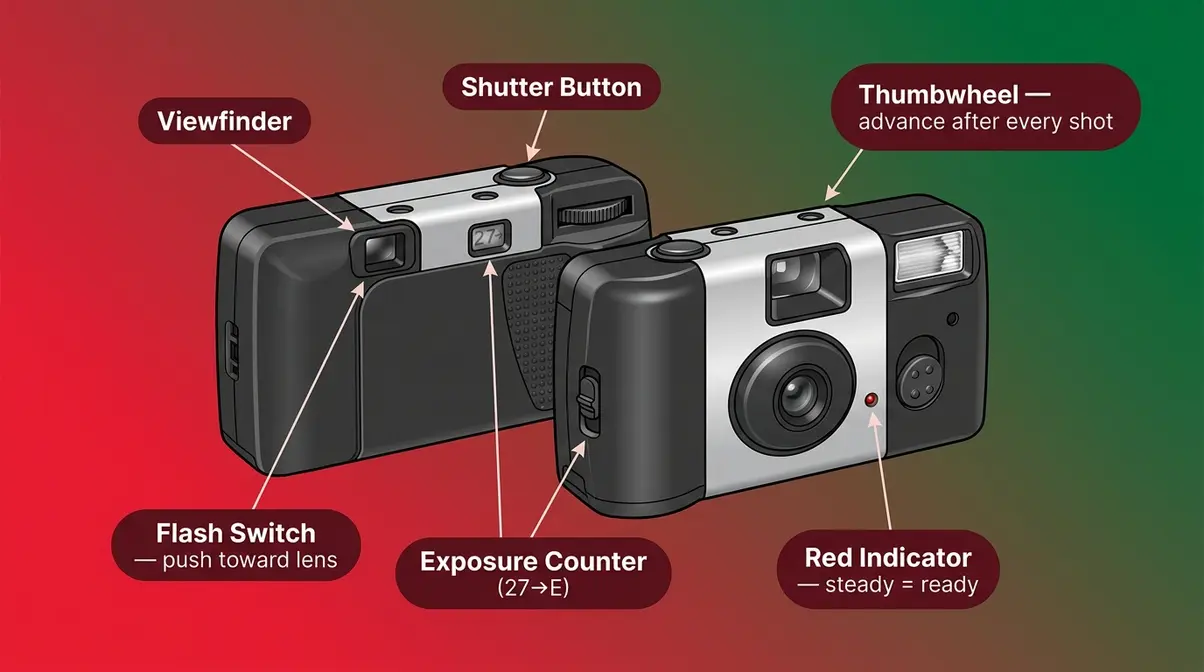
The camera has three physical controls worth knowing by name:
- The thumbwheel — the ridged dial on the back-right of the camera. You rotate this forward after every single shot to advance the film.
- The flash switch — a small slide lever on the front-left of the camera. Push it toward the lens to activate the flash; a red charging indicator light on the front confirms it’s powering up.
- The shutter button — the raised button on the top of the camera. Press it fully and smoothly to take a picture.
The QuickSnap operates at a fixed f/10 aperture (how wide the lens opens to let in light) and a 1/100s shutter speed (how long the lens stays open per shot), making adequate lighting or flash engagement essential for every indoor shot (fixed aperture and shutter speed mechanics, Adobe, 2026). Unlike a smartphone that auto-adjusts for low light, the QuickSnap cannot compensate for darkness on its own. Think of the fixed settings as the camera’s personality — consistent, reliable, and completely dependent on you to put it in the right light.
The Fujifilm QuickSnap Flash 400 operates at a fixed f/10 aperture and 1/100s shutter speed, making adequate lighting or flash engagement essential for every indoor shot.
Step 1 — Advance the Film with the Thumbwheel
Before your very first shot — and after every shot thereafter — rotate the thumbwheel forward (away from you) with your right thumb until it stops.

Why this matters: The thumbwheel physically moves the film strip behind the lens to a fresh, unexposed frame. If you skip this step and press the shutter, you’ll double-expose the same frame — layering two images on top of each other. It only takes a moment, and building the habit of “wind, then shoot” after every frame will save you from wasted exposures.
Pro tip: The thumbwheel will feel slightly different in resistance as the roll progresses — that’s normal. When it stops moving entirely and won’t advance no matter how gently you try, you’ve reached the end of your 27 exposures. Do not force it.
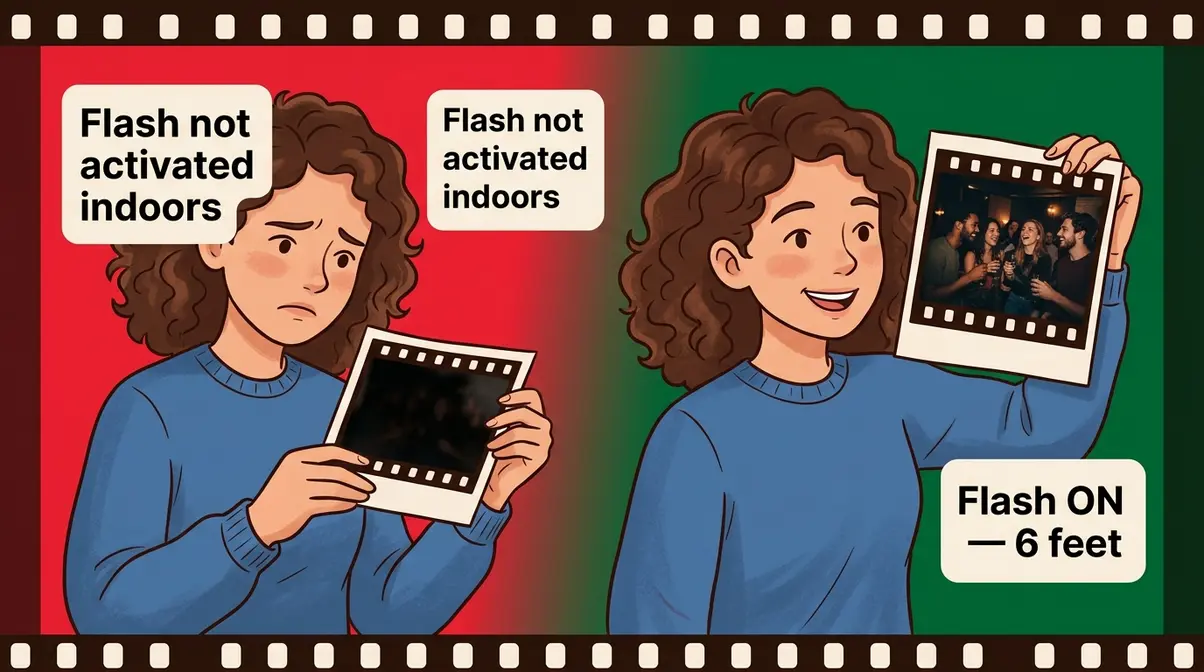
Step 2 — Activate the Flash for Low-Light Shots
The QuickSnap’s built-in flash covers a maximum range of 10 feet and must be manually engaged for indoor photography (Fujifilm QuickSnap 10-foot flash range, Wirecutter, 2026). It is not automatic.
To activate the flash:
- Locate the small slide lever on the front-left side of the camera body.
- Push the lever toward the lens (toward the front of the camera).
- Watch for the red charging indicator light to glow on the front panel — this means the flash capacitor is charging.
- Wait 5–10 seconds for the light to stop blinking and hold steady. A steady red light means the flash is ready to fire.
- Take your shot. The flash fires automatically when you press the shutter.
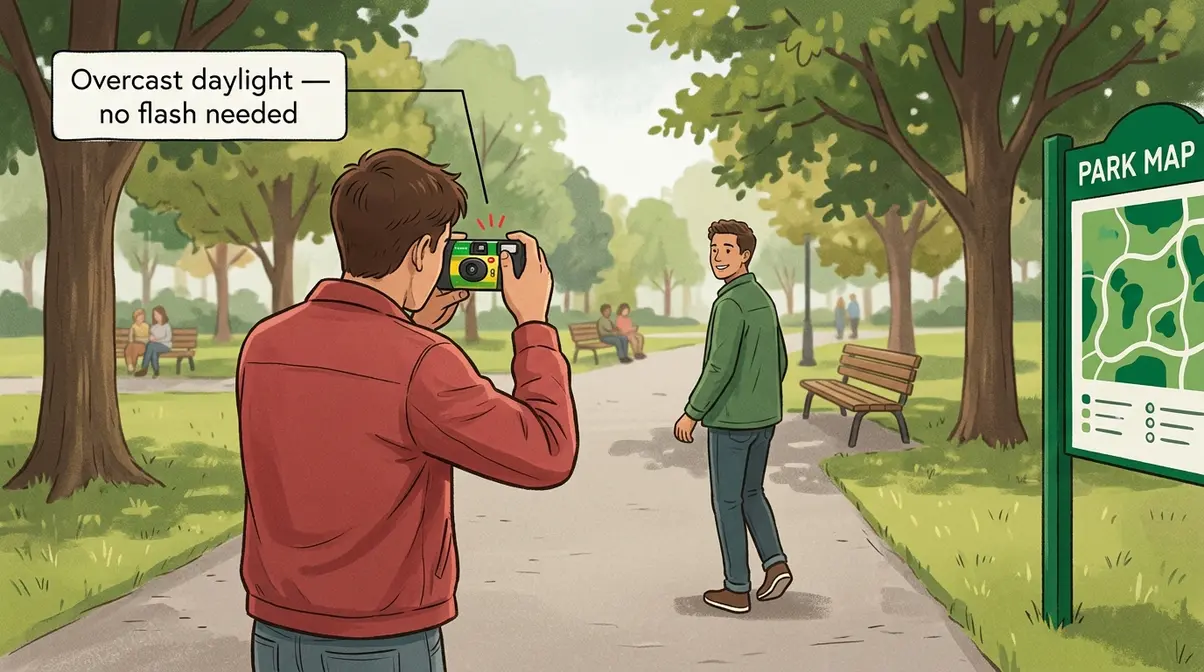
When to use flash: Any time you’re indoors, in shade, or shooting within 10 feet of your subject after sunset. The 400 ISO film handles daylight well on its own — outdoors on a bright or overcast day, you can leave the flash off entirely.
Step 3 — Frame Your Shot and Press the Shutter
Look through the small rectangular viewfinder on the back of the camera. Position your subject so they’re centered and within the flash’s 3–10 foot range if you’re using flash indoors.
One important note: the viewfinder shows a slightly different field of view than the lens itself. For group shots, leave a small margin around your subjects rather than cramming them to the edges of the frame. Press the shutter button smoothly and fully — jabbing it quickly can introduce camera shake and blur.
Does 27 Exposures Mean 27 Pictures?
Yes — 27 exposures means exactly 27 individual photographs, one per frame. On the back of the QuickSnap, a small exposure counter window displays a number that decrements with each shot. It starts at 27 and counts down toward “E” (empty). There are no bonus frames or partial exposures.
Common first-timer mistake: watching the counter obsessively and then rushing to use up the last few frames on unimportant subjects. Treat every frame with the same intention as the first. When the counter reaches E and the thumbwheel won’t advance, your roll is complete and ready for development.
Think of this as Phase 1 of your Shoot to Smartphone Workflow — once you’ve mastered the shooting phase, the next two phases (Develop and Digitize) will get your photos from the camera to your phone with minimal friction.
Shooting Tips to Avoid Wasted Film
Once you understand how to use fujifilm disposable camera mechanically, lighting and distance decisions determine whether your photos come out sharp and vibrant or muddy and dark. Finding essential photography tips for beginners can help you frame better shots, but mastering the camera’s fixed limitations is the real secret. After reviewing community feedback from film photography forums and testing the QuickSnap’s flash across multiple lighting conditions, the most consistent finding is this: the majority of ruined disposable camera photos trace back to two errors — wrong flash distance and skipped flash activation. Here’s how to avoid both.
Flash Distance Rules: Stay Between 3 and 10 Feet
The QuickSnap’s flash has a fixed output — it cannot brighten or dim based on your distance from the subject. That means distance is entirely your responsibility.
| Distance from Subject | Flash Result | What to Do |
|---|---|---|
| Under 3 feet | Overexposed, washed-out | Step back |
| 3–10 feet | Sharp, well-lit | Ideal zone — stay here |
| Over 10 feet | Underexposed, too dark | Move closer or shoot outdoors |
Overcast daylight outdoors is actually ideal for the QuickSnap. Soft, diffused cloud cover eliminates harsh shadows and produces even, flattering light without any need for flash. Bright direct sunlight can occasionally overexpose lighter subjects, but the 400 ISO film handles most daylight conditions reliably.
Avoiding mirror glare: If you’re shooting in a bathroom or near reflective surfaces, angle yourself 15–20 degrees off-center from the mirror rather than shooting straight at it. The flash will reflect directly back into the lens at a 90-degree angle and produce a white blowout in the center of your photo.
Model-Specific Tips: Waterproof and Simple Ace
If your QuickSnap says “Waterproof” on the packaging, the core shooting steps above apply exactly the same way — wind, flash, frame, shoot. The waterproof model adds a sealed casing rated to 10 meters depth, which means you can shoot at the pool, beach, or in rain without protecting the camera body. The flash range and film specs are identical to the standard model, but reviewing tips for using waterproof cameras can help you manage underwater lighting conditions.
The Fujifilm Simple Ace (sold primarily in Japan and some Asian markets) uses the same 400 ISO film and fixed-lens design but omits the built-in flash entirely. If you’re using a Simple Ace, you’re dependent on natural light for every shot — keep it strictly for outdoor or very well-lit indoor scenes.
Traveling with Your Camera: Protecting Film at Airports
If you’re taking your QuickSnap on a flight, the CT scanners now standard at most major airports pose a real risk to 400 ISO film — even in a single pass. Empirical testing confirms that CT scanners cause pronounced fogging and banding on 400 ISO film, regardless of protective bags (Lina Bessonova Photography, 2026). This is meaningfully different from older X-ray machines, which were generally safe for 400 ISO film at low pass counts.
What to do at airport security:
- Remove the QuickSnap from your bag before approaching the security checkpoint.
- Politely tell the TSA agent: “I have unprocessed film — I’d like to request a hand inspection, please.”
- If they hesitate, ask to speak with a supervisor. Hand inspection is explicitly permitted at all TSA checkpoints for unprocessed film (TSA film inspection policy, TSA.gov).
- Never place undeveloped film in checked luggage — the high-powered scanners used on checked bags will destroy it entirely.
Across photography communities, the consistent advice is: request hand inspection every time, for every roll, regardless of ISO. The few extra seconds are worth protecting your 27 frames.
How to Develop and Digitize Your Fujifilm Photos
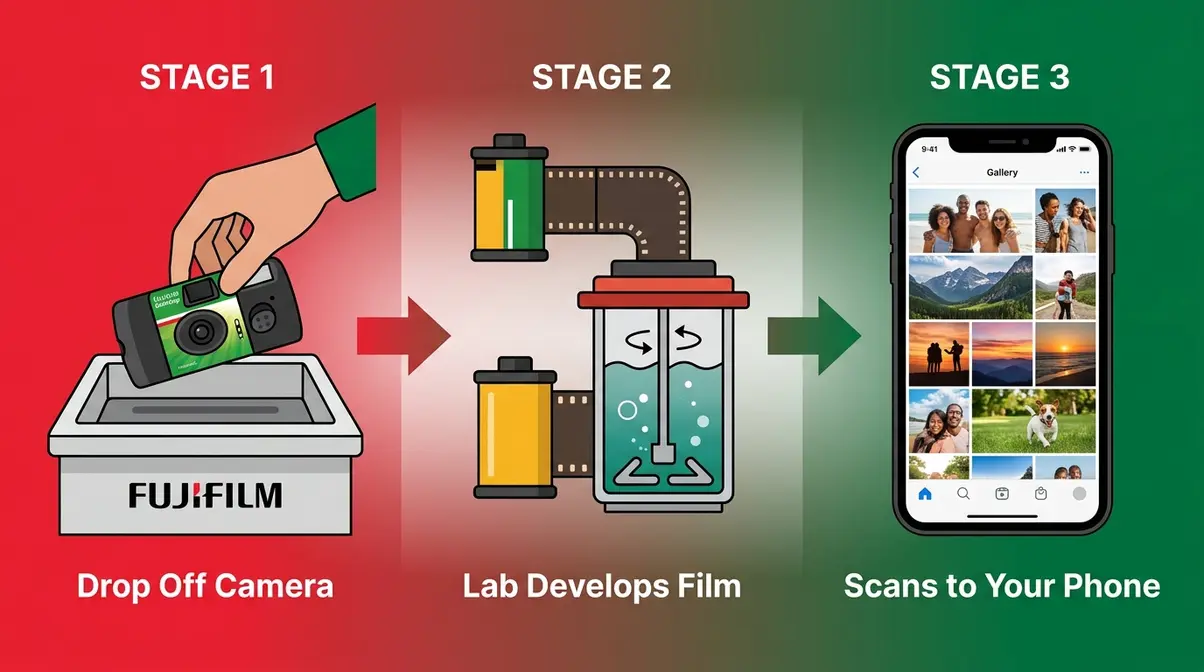
Once your exposure counter hits E and the thumbwheel won’t advance, Phase 2 of the Shoot to Smartphone Workflow begins. Your film is locked inside the camera — don’t open it. Bring the entire camera (intact) to a lab or mail it in. Here’s everything you need to know to go from finished roll to photos on your phone.
Where to Get Your Fujifilm Disposable Camera Developed
You have two main paths: local drop-off at a drugstore or photo lab, or mail-in service to a professional lab. Both work — but they differ significantly in scan quality and turnaround time.
The Fujifilm QuickSnap uses standard C-41 color negative film. Because C-41 is the universal standard for color film, virtually any commercial photo lab can process it. However, the way they process it differs drastically between local drugstores and professional labs.
Local drop-off options (as of July 2026):
| Provider | Price | Turnaround | Scan Quality | Negatives Returned? |
|---|---|---|---|---|
| Walgreens | ~$15.99/roll | 3–10 days | Low-res (1–4 MP) | No |
| CVS | ~$15.99–$17.99/roll | 7–10 days | Low-res (1–4 MP) | No |
| Walmart | ~$12.96–$14.96/roll | 7–10 days | Basic scans | No |
(Prices verified July 2026. Call ahead to confirm your local branch still offers film processing — not all locations do.)
Local drugstores typically act as middlemen; they collect your camera and ship it to a massive third-party central facility. This logistics chain is why they take longer and why they destroy your physical negatives after scanning.
Mail-in lab options (as of July 2026):
| Lab | Price (develop + scan) | Turnaround | Scan Quality |
|---|---|---|---|
| The Darkroom | From ~$13/roll | 5–7 business days | High-res, negatives returned |
| North Coast Photo (NCPS) | From ~$24/camera | 5–7 business days | Up to 3390×5035 px |
| Kubus Photo | From ~$12/roll | 4–6 business days | High-res, negatives returned |
Mail-in professional labs process your film in-house. This allows for strict chemical quality control and guarantees you get your physical negatives back. Archiving your negatives is crucial — if you ever lose your digital files, or if you decide you want a massive high-resolution scan for a wall print years from now, those physical strips are your only backup.
How to Get Your Photos on Your Phone
This is the step that 75% of disposable camera guides never explain — and it’s easier than most first-timers expect. You have three routes:
Method 1 — Lab digital delivery (easiest, recommended)
Most labs — including Walgreens, The Darkroom, and NCPS — email you a download link or photo gallery when your film is ready. When you use a professional lab, they typically upload your high-resolution JPEG files to a secure cloud service like Dropbox, Google Drive, or WeTransfer. You simply click the link in your email, select ‘Save to Camera Roll,’ and the images are instantly available. Done. No extra apps, no extra steps.
Method 2 — Mail-in with high-res scan request
When ordering online from a mail-in lab, select the highest scan resolution available. Labs like NCPS offer scans up to 3,390 × 5,035 pixels — large enough to print at 8×10 inches or crop significantly without losing quality. If you want to take your editing further, this is the perfect time to explore digitizing and processing your photos using dedicated mobile apps like Lightroom or Snapseed to adjust contrast and color balance.
Method 3 — Scan prints with your phone (last resort)
If your lab only returns physical prints and no digital files, apps like Google PhotoScan can digitize prints. Avoid using your standard smartphone camera app, as it will capture harsh glare from the glossy photo paper. Instead, Google PhotoScan prompts you to hover your phone over four different points on the physical print. It then uses computational photography to stitch these angles together, effectively eliminating glare and automatically cropping the borders.
The clearest path: Choose a mail-in lab that includes high-res scans and delivers via email link. You’ll have your photos on your phone within a week, at print-ready resolution, without any extra apps or equipment.
How Long Does It Take to Develop Disposable Camera Photos?
Development time depends entirely on which route you choose. Local drugstores typically take 7–10 business days for 35mm film processing, as most locations ship film out to a regional processing center rather than developing on-site. Some Walgreens locations with active in-store labs can turn around in 3–5 days — call ahead to check.
Mail-in professional labs generally complete development and scanning in 4–7 business days from the day they receive your camera. Factor in 2–3 days of shipping each way if you’re mailing from a rural area. Total door-to-door time for mail-in: typically 10–14 days.
Planning around an event? Drop off or mail your camera the same day the event ends. Keep in mind that the photography industry has distinct busy seasons. If you mail your camera in right after Christmas, or during the peak summer wedding season (June through August), expect turnaround times to extend by an additional 3 to 5 business days. If you are on a strict deadline, many professional mail-in labs offer expedited processing and overnight shipping for an additional fee.
Common Mistakes and Camera Limitations
Mistakes That Waste Film (and How to Avoid Them)
Common mistakes reported by first-time film shooters cluster around three categories: flash errors, distance errors, and handling errors. Here are the most avoidable ones:
- Handling Errors:
- Forgetting to wind between shots. Result: double exposures. Fix: make “wind until it stops” a reflex after every shutter press.
- Opening the camera back. Result: entire roll destroyed by light exposure. Fix: never open the back — bring the entire camera to the lab.
- Putting the camera through airport CT scanners. Result: fogged, banded, or completely ruined film. Fix: always request hand inspection at security.
- Lighting and Distance Errors:
- Shooting indoors without activating the flash. Result: completely dark or underexposed frames. Fix: if you’re inside or in shade, the flash switch goes on — no exceptions.
- Standing too far from the subject with flash on. Result: subject lost in darkness, background overexposed. Fix: stay within 10 feet.
- Standing too close with flash on. Result: washed-out, overexposed faces. Fix: back up to at least 3 feet.
- Shooting directly at mirrors or windows. Result: blinding white flash reflection in the center of the photo. Fix: angle 15–20 degrees off-center from any reflective surface.
- Flash not fully charged before shooting. Result: dark photo despite flash being “on.” Fix: wait for the red indicator light to hold steady (not blink) before pressing the shutter.
When to Choose a Different Camera
The QuickSnap is an excellent tool for capturing everyday life, social events, and casual outdoor shooting — but it has real limits. Skip if:
- You need to photograph subjects more than 10 feet away indoors (the flash simply won’t reach them)
- You’re shooting fast-moving subjects like sports or children running (the 1/100s shutter speed can introduce motion blur in lower light)
- You want control over depth of field for portrait photography (the fixed f/10 aperture keeps nearly everything in focus — there’s no background blur)
- You plan to print larger than 8×10 inches (35mm film grain becomes visible at large print sizes)
For those scenarios, a reloadable 35mm film camera like the Canon AE-1 or Nikon FM2 — both widely available used for under $150 — gives you manual control without a massive investment. The QuickSnap’s strength is its simplicity and low commitment: it’s the ideal way to test out if you like film photography before spending more.
Frequently Asked Questions
How do I get pictures from a Fuji disposable camera?
Bring the entire camera — unopened — to a film lab or drugstore photo counter. The lab extracts the film, develops it using a chemical process, and returns your images as prints, digital scans, or both. Never open the camera back yourself; even brief light exposure destroys undeveloped film. Most Walgreens and CVS locations accept disposable cameras for processing, typically returning results in 7–10 days (as of July 2026).
How do I get my Fujifilm disposable pictures on my phone?
The easiest method is requesting digital scans when you drop off your camera at the lab. Most labs — including Walgreens, The Darkroom, and NCPS — email a download link or online gallery when your film is ready. Open the link on your phone and save images directly to your camera roll. For higher quality, mail-in labs like NCPS offer scans up to 3,390 × 5,035 pixels delivered via email link — no extra apps required.
How do I get my Fujifilm disposable camera pictures developed?
Drop the entire camera off at any Walgreens, CVS, or Walmart photo counter, or mail it to a professional lab like The Darkroom or Kubus Photo. Local drugstores charge approximately $14–$18 per roll with a 7–10 day turnaround (verified via Walgreens Photo, as of July 2026). Mail-in labs start around $12–$24 depending on scan resolution, with 4–7 business day processing time after receiving the camera. Mail-in labs return your negatives; drugstores typically do not.
How do I activate a disposable camera?
Push the small slide lever on the front-left of the QuickSnap toward the lens to activate the flash — that’s the only activation step required. The Fujifilm QuickSnap Flash 400 comes pre-loaded and ready to shoot; there are no power buttons or startup sequences. After pushing the flash lever, watch for the red charging indicator light on the front panel. When it holds steady (rather than blinking), the flash is fully charged and ready to fire.
How long does it take for a Fujifilm disposable camera to develop?
Expect 7–10 business days at local drugstores and 4–7 business days at mail-in labs after they receive your camera. Walgreens and CVS ship film to regional processing centers in most locations, which accounts for the longer window. Mail-in labs like The Darkroom and Kubus Photo process film on-site, delivering digital scans via email link within 4–7 business days of receiving your camera. Add 2–3 shipping days each way if mailing from a rural location — total door-to-door time is typically 10–14 days (as of July 2026).
Ready to Shoot Your First Roll
Mastering how to use fujifilm disposable camera makes film photography genuinely accessible: wind the thumbwheel, activate the flash indoors, stay between 3 and 10 feet from your subject, and press the shutter. Your 400 ISO film handles daylight beautifully on its own, and the fixed f/10 aperture keeps virtually everything in focus — so your main job is composition, not settings. Following the Shoot to Smartphone Workflow — shoot your 27 frames, develop at a local lab or mail-in service, then download your scans via email link — gets your photos from camera to phone in as little as 10–14 days.
The Shoot to Smartphone Workflow matters because it closes the gap that most disposable camera guides leave open. Knowing how to press the shutter is only a third of the process — understanding development options and digital delivery is what transforms a finished roll into photos you can actually share, print, and keep.
Pick up your QuickSnap, find good light, and start shooting. Drop the camera at your nearest Walgreens or mail it to The Darkroom when the counter hits E — and within two weeks, you’ll have 27 frames of your everyday life waiting in your inbox. That’s the simplest way to test out if you like film photography before committing to anything more.
