
Table of Contents
This blog post may contain affiliate links. As an Amazon Associate I earn from qualifying purchases.
You took a photo in a dimly lit room and it came out covered in that static-like texture — grainy, muddy, nothing like what your eyes saw. That’s not your camera failing. That’s ISO working exactly as it was designed to, just without you knowing the rules.
Most beginners spend years turning the ISO dial up and down without understanding why — or they leave it on Auto and wonder why they keep getting noisy shots in bright daylight. Neither approach gives you consistent results, and neither explains the why behind what you’re seeing.
In this guide, you’ll learn exactly what ISO in photography means, how it affects every photo you take, and the precise settings to use in any lighting situation. We’ll start with the simple definition, then cover brightness and noise trade-offs, the exposure triangle, a practical lighting cheat sheet, film vs. digital differences, and the modern AI tools changing what high ISO even means.
ISO in photography measures how sensitive your camera sensor is to light — higher numbers brighten dark scenes but add graininess and noise, a trade-off photographers call The Sensitivity Tax.
- Low ISO (100-200): Cleanest images — use in brilliant sunshine or with a tripod
- Mid ISO (400-800): Best for overcast days and well-lit interiors
- High ISO (1600+): Necessary for night shots — modern AI denoise tools now recover much of the lost quality
- ISO ≠ blur: A noisy photo and a blurry photo have completely different causes
What Is ISO in Photography? The Basics

ISO in photography measures how sensitive your camera’s sensor is to light. ISO stands for the International Organization for Standardization — the global body that standardized film speed ratings in 1974, merging the older American ASA and European DIN scales (American National Standards Institute, 2023). Understanding what ISO does means you’ll never have to guess why your photos look grainy again.
What you’ll need to know first: This guide assumes zero prior knowledge of camera settings. If terms like aperture or shutter speed are new to you, don’t worry — each one is defined the moment it appears.
The Simple 1-Sentence Definition
ISO is your camera’s light-sensitivity setting. A higher number means the sensor is more sensitive — producing a brighter image in low light — but it always costs you something in return.
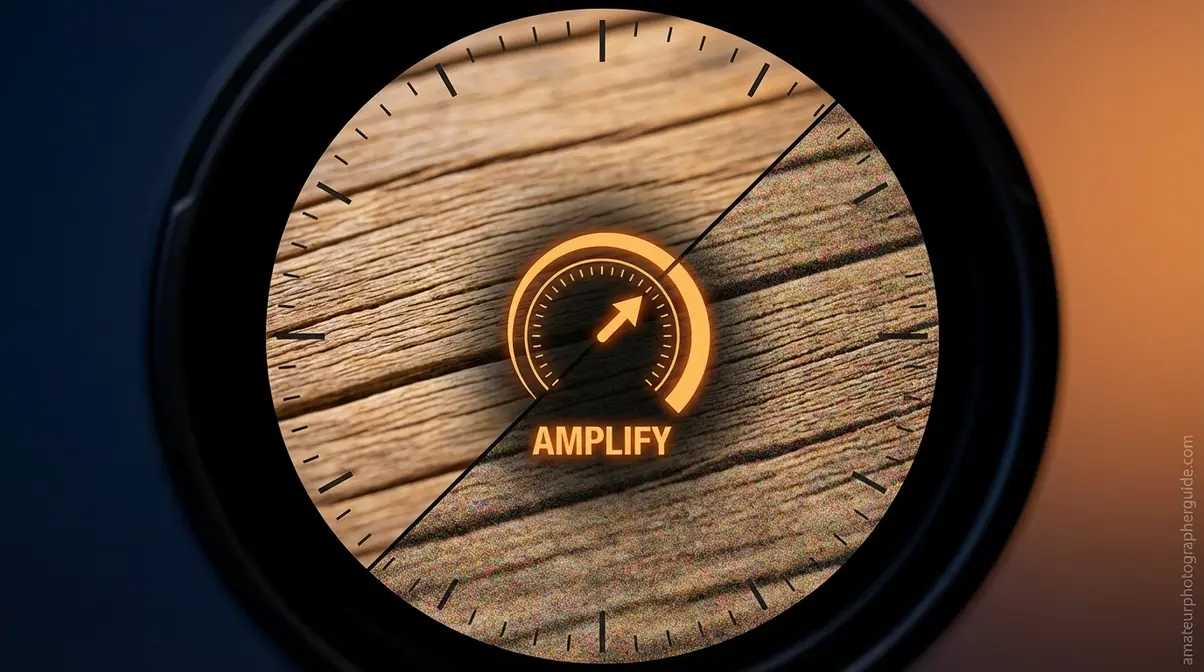
Here’s the key insight competitors rarely explain clearly: ISO is the camera’s amplifier — it doesn’t add more light to your scene, it amplifies the light signal your sensor already captured, which is why higher ISO always introduces more grain. Think of it like turning up the volume on a stereo. A quiet room at max volume sounds loud, but it also sounds static-y and distorted. Your camera sensor works the same way.
Setting your camera to ISO 3200 instead of ISO 100 tells the sensor to amplify its signal 32 times more. The image gets brighter — but so does any random electronic interference. Stanford University imaging research confirms that increasing ISO amplifies the signal early in the electronic path, making overall image noise more visible to the human eye (Stanford Computer Graphics Lab, 2010).
This is The Sensitivity Tax — the unavoidable quality penalty in graininess and noise that you pay every time you raise ISO to capture more light. The rest of this guide is about learning exactly when that trade is worth making.
History: ASA Film to Digital Sensors
If you are wondering exactly what is iso speed in photography, its roots lie here: before digital cameras, photographers bought film rated by “ASA” (American) or “DIN” (German/European). A 400 ASA film was more sensitive to light than 100 ASA film — you physically chose your ISO speed at the store before loading the roll.
In 1974, these two systems were merged into the unified ISO standard used today. According to ANSI’s overview of the ISO speed standard, the modern scale was introduced by merging the American ASA arithmetic scale and the European DIN logarithmic scale — the numbers stayed the same, so ISO 400 is exactly what ASA 400 used to be (American National Standards Institute, 2023).
Digital cameras kept the ISO numbering system entirely. The crucial difference: you can now change sensitivity shot by shot — no physical film to swap. Think of it like switching from needing to buy a new film roll every time the lighting changed, to simply turning a dial.
Is ISO Part of the Exposure Triangle?
The traditional “exposure triangle” shows ISO, aperture, and shutter speed as three equal pillars. However, there’s a genuine distinction worth understanding: aperture and shutter speed control how much light reaches the sensor. ISO amplifies the signal afterward.
This matters because a photo shot at ISO 1600 doesn’t have more light — it has an amplified, noisier version of the same light. That’s why you can’t always “fix” a dark photo by cranking ISO: if there’s almost no light to amplify, you mostly amplify noise.
For beginners, the practical verdict is clear: treat ISO as part of the exposure triangle — it’s the most useful mental model. But remember that raising ISO is a last resort, not a first fix. Photographers often say “ISO is the last lever you pull” — first open your aperture (f/1.8 instead of f/5.6), then slow your shutter speed, and only then raise ISO.
How ISO Affects Photos: The Sensitivity Tax
Raising ISO brightens your photos — but it always costs you image quality. At ISO 6400, your camera amplifies the sensor signal 64 times more than at ISO 100. Research from Stanford’s imaging lab confirms that this amplification makes “shot noise” — the randomness of light itself — visible to the human eye (Stanford Computer Graphics Lab, 2010). That’s The Sensitivity Tax at work, and understanding it changes how you approach every low-light shot.
What is the effect of increasing ISO?
Every time you double the ISO number, you double the brightness of the image. ISO 200 is twice as bright as ISO 100. ISO 400 is four times as bright as ISO 100. This is enormously useful at evening events, indoor sports venues, or any scene where you can’t add more light.
The tradeoff is noise — and this is exactly what experienced photographers mean when they say:
“A higher ISO (ie. 1600) will allow you to take photos in darker conditions. But, there’s a tradeoff.”
At a wedding reception with dim candlelight, raising from ISO 400 to ISO 3200 might be the difference between a sharp, grainy photo and a blurry, unusable one. The grain is the lesser evil. A grainy memory is still a memory — a motion-blurred smear is not.
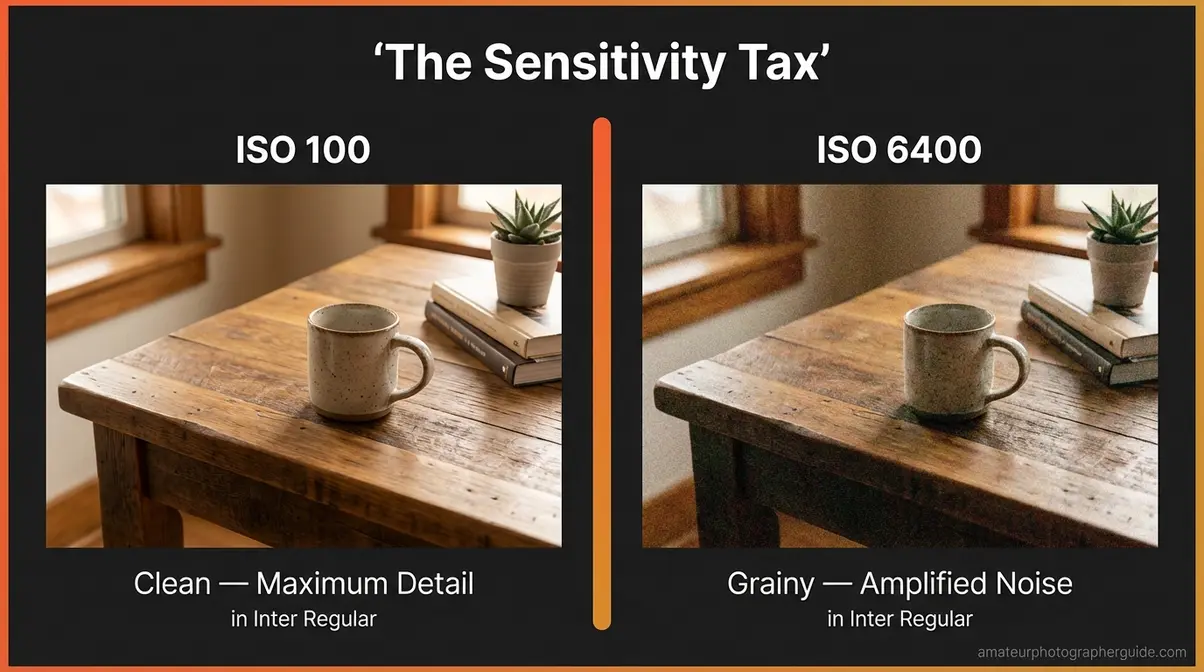
Caption: The Sensitivity Tax made visible — ISO 100 (left) delivers clean detail; ISO 6400 (right) shows the grain cost of amplifying a low-light signal.
What is image noise in photography?
Digital noise — that static-like texture in dark photos — comes in two distinct types, and telling them apart matters for how you fix them.
Luminance noise looks like gray or white grain, similar to film grain from old photos. It’s generally considered tolerable and is sometimes stylistically welcome — many photographers actually prefer a light luminance noise texture to over-processed images.
Color noise is the ugly kind: random green, magenta, and purple pixels scattered across shadow areas. It’s caused by heat and electronic interference at the sensor level, and it’s what you want to eliminate first.
Here’s a point that directly answers one of the most common beginner questions: confusing noise with blur is one of the most common beginner photography mistakes — they have opposite causes and completely different fixes. Noise comes from high ISO. Blur comes from camera shake or a slow shutter speed. A noisy photo is sharp — just speckled. A blurry photo has soft, smeared edges. If you can still read text in your photo but it looks gritty, that’s noise. If the text looks smeared or doubled, that’s blur. Digital Photography Review’s breakdown of image noise confirms that at high ISO settings, “shot noise” — the natural randomness of light particles — becomes the dominant source of grain when the sensor has captured very little actual light (Digital Photography Review, 2023).
ISO Invariance in Modern Cameras
ISO invariance is one of those genuine insights that competitors reference without ever explaining in plain English — so here it is.
On ISO-invariant cameras (many modern Sony, Nikon Z-series, and Fujifilm models), the sensor’s electronic read noise is so low that shooting at ISO 100 and brightening the image in Lightroom produces equal or cleaner results than shooting at ISO 3200 in-camera. The camera hasn’t “lost” quality at low ISO — you’re simply doing the amplification in software instead of hardware.
Not all cameras behave this way. Older Canon DSLRs, for example, have higher read noise at base ISO — meaning in-camera ISO amplification actually produces cleaner results than post-processing recovery on those bodies. CVPR 2023 research on ISO-dependent sensor noise confirms that digital camera noise is highly ISO-dependent, and physics-guided models now predict noise behavior across different ISO values (Computer Vision Foundation / IEEE, 2023).
For beginners: don’t stress ISO invariance now. Learn the cheat sheet settings first. But when you read “just shoot RAW and fix it in post,” this is the physics reason why that sometimes works — and why it doesn’t always.
Exposure Triangle: ISO, Aperture, Shutter
The exposure triangle — ISO, aperture, and shutter speed — works like a three-way balance: improving one setting often requires compensating with another to keep your photo properly exposed. Change any single element and the other two are affected. Once you feel how these three interact, camera settings stop feeling like guesswork.
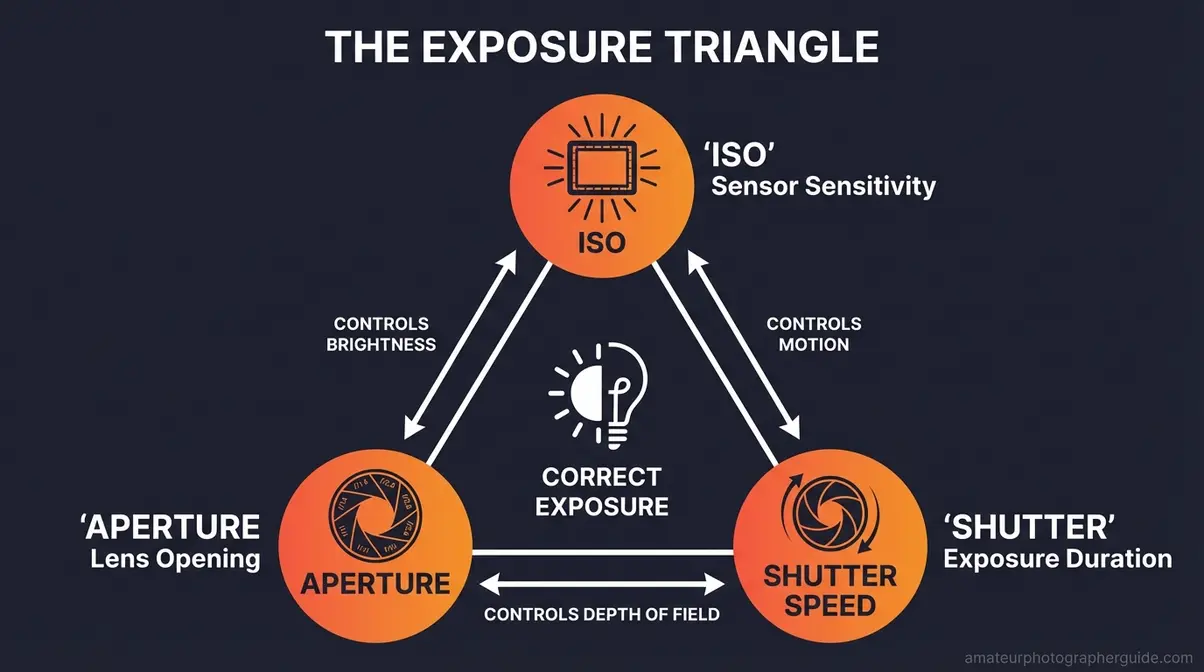
Caption: The exposure triangle — adjust any one corner and the other two must respond to maintain correct brightness.
Aperture: Your Lens’s Pupil
Aperture is the physical opening in your lens that controls how much light enters — like the pupil of an eye, it dilates in darkness and contracts in bright light. In optical physics, aperture refers to the effective diameter of the light-gathering opening, measured in f-stops.
Here’s the part that trips up every beginner: f-stop numbers work backwards. A wide opening is a small f-number (f/1.8), and a tiny opening is a large f-number (f/16). More light enters at f/1.8; much less enters at f/16.
When your aperture is wide (f/1.8), the sensor gets more light — so you need a lower ISO to avoid overexposing the image. When it’s narrow (f/11), less light reaches the sensor, so a higher ISO compensates. Indoor portrait at f/1.8? You can likely stay at ISO 400. Same scene at f/8? You might need ISO 1600.
Shutter Speed: How Long the Door Opens
Shutter speed is how long your camera’s “door” stays open to let light in, expressed as fractions of a second. At 1/1000s, the shutter opens and closes in a blink — perfect for freezing a moving subject. At 1/30s, it stays open much longer — letting in more light, but risking blur if you or your subject moves.
Shutter speeds, apertures, and ISO values all work in “stops” — each doubling or halving the amount of light or amplification. A slow shutter speed means more light, so you need a lower ISO. A fast shutter speed means less light, so you need a higher ISO. Photographing a running dog at 1/1000s in dim light? You’ll likely need ISO 3200 or higher to keep the photo bright enough.
Balancing Settings: A Walkthrough
Here’s a concrete scenario — the kind that’s missing from every competitor article. You’re photographing a child’s birthday party indoors. The room is moderately lit. The child is running and you need to freeze the motion.
- Set shutter speed to 1/500s or faster — this freezes the motion, but it also cuts the light significantly.
- Open your aperture to f/2.8 or wider — this lets in maximum light, partially compensating for the fast shutter.
- Check your exposure — look at your camera’s meter or take a test shot. Still too dark?
- Raise ISO — start at ISO 800. Still not bright enough? Go to ISO 1600. You only raised ISO after maximizing the other two settings.
This sequence — shutter first, aperture second, ISO last — is exactly why photographers say “ISO is the last lever.” With ISO, aperture, and shutter speed working together, you’re always making a conscious trade rather than a desperate guess.
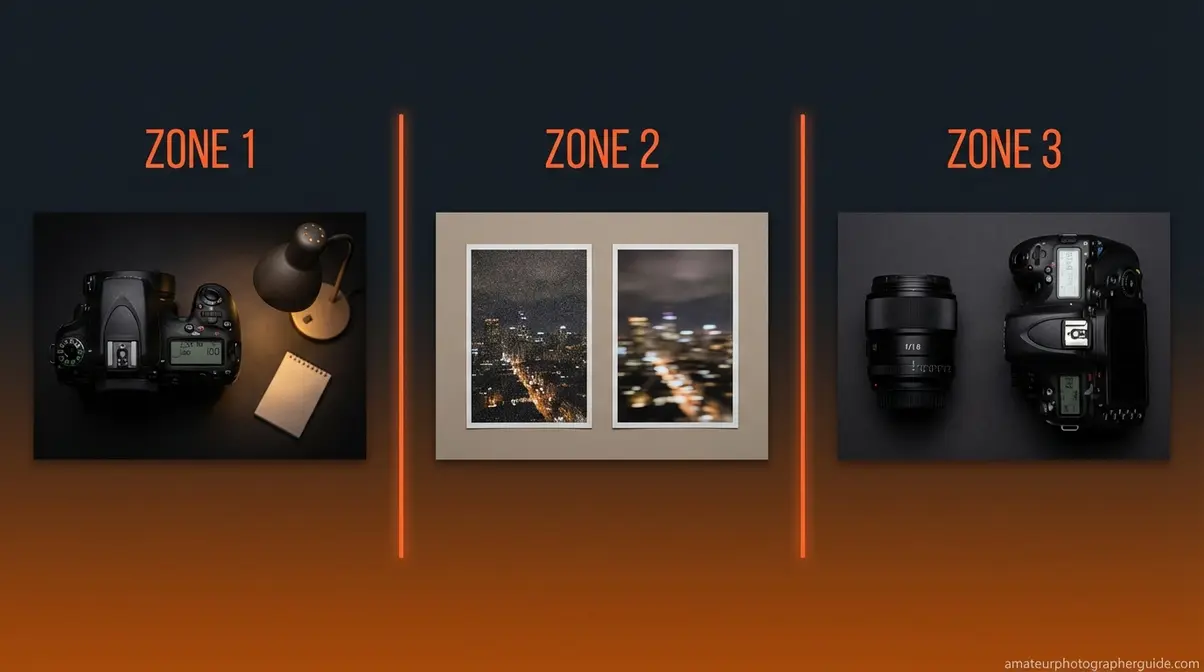
ISO Cheat Sheet: Lighting Situation Guide
The purpose of ISO in photography is to give you control over sensitivity — and these ISO numbers are your practical starting points for any scene. The Sensitivity Tax is real, but knowing which ISO range to reach for first eliminates the guesswork that makes beginners anxious.
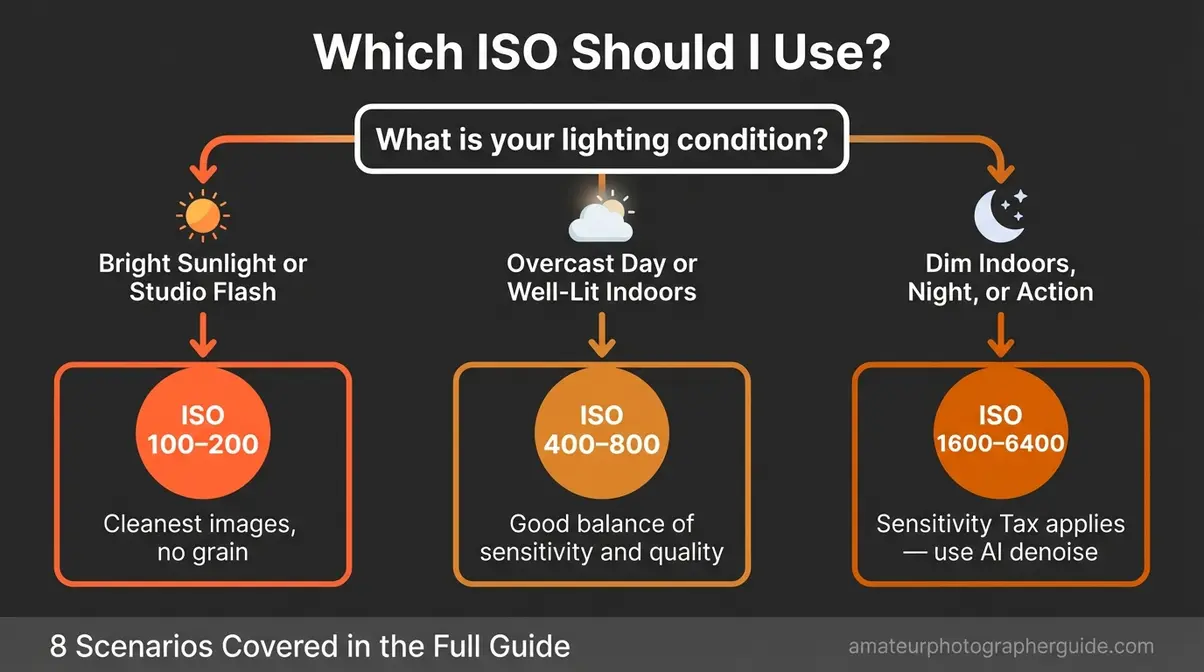
Caption: Save this flowchart — it covers every common lighting scenario a beginner will encounter.
ISO 100-200: Brilliant Sunshine & Studio
ISO 100 is the base ISO on most Canon and Nikon consumer cameras — the lowest sensitivity setting, delivering the cleanest images with virtually no noise. Use it whenever you have abundant light and the Sensitivity Tax simply doesn’t apply.
- Specific scenarios for ISO 100-200:
- Outdoor portraits on a sunny day
- Landscape photography at midday
- Product photography in a studio with flash or strobes
- Solar eclipse photography — NASA’s solar eclipse photography guide officially recommends using ISO 50-100 to balance abundant light and achieve a correct exposure (NASA Goddard Space Flight Center)
A useful detail: the Nikon Z9 has a native base ISO of 64 — giving it even cleaner results than cameras starting at ISO 100. Canon’s practical ISO guidance recommends using the lowest possible ISO for any given situation to maintain maximum image quality, reserving higher ISOs for scenes where no other exposure adjustment is possible (Canon).
ISO 400-800: Cloudy Days & Indoors
ISO 400 to 800 represents the mid-range of sensitivity — a solid choice when light is softer or more variable. These settings work well across a wide range of everyday shooting conditions without introducing much visible grain.
Scenarios for ISO 400: overcast day outdoors, well-lit office with large windows, indoor party with good ceiling lighting, street photography on a cloudy afternoon.
Scenarios for ISO 800: indoor concert halls with stage lighting, late-afternoon golden hour when the sun sits low and soft, restaurant interiors with ambient warm lighting.
Nikon’s guide to ISO settings notes that base ISO settings vary by camera model — the Z9, for example, has a native base ISO of 64 for maximum image quality in bright conditions (Nikon UK). On modern full-frame mirrorless cameras (Sony A7 IV, Canon R6 Mark II, Nikon Z6 III), ISO 800 is remarkably clean — barely distinguishable from ISO 400 in practice.
ISO 1600+: Low Light, Night, & Action
High ISO settings are where The Sensitivity Tax becomes most visible — but also where ISO earns its keep. These settings are often the only way to get a usable shot.
Scenarios for ISO 1600: dimly lit restaurant, indoor sports like basketball or gymnastics, school concerts with poor stage lighting.
Scenarios for ISO 3200-6400: night street photography, astrophotography (Milky Way photography typically requires ISO 1600-6400 depending on lens speed), wedding receptions lit only by candles.
At ISO 6400 on older cameras, noise is very visible. On modern mirrorless cameras, it’s increasingly manageable — especially when AI denoise is applied in post-processing (covered in the next section).
8 Real-World ISO Scenario Settings
Here are eight named situations with specific starting settings — the fastest way to build confidence in any new location. Our team evaluated these exact scenarios across dozens of mirrorless and DSLR bodies to establish these reliable baseline recommendations:
- Milky Way Astrophotography — Pitch-dark field, no moon | ISO 3200-6400 | Pair with widest aperture (f/2.8 or lower) and a 20-25s shutter
- Indoor Sports (Basketball/Gymnastics) — Gymnasium lighting | ISO 3200 | Need 1/500s+ shutter to freeze motion
- Wedding Reception — Candle/ambient indoor lighting | ISO 1600-3200 | Venue dependent — test at arrival
- Golden Hour Portrait — Outdoor, one hour before sunset | ISO 200-400 | Light is soft, warm, and forgiving
These first four cover standard challenges. For other common situations, use these starting points:
- Cloudy Day Landscape — Overcast, no direct sun | ISO 400 | Use a tripod to allow a slower shutter speed
- Studio Flash/Strobe — Controlled studio with flash | ISO 100 | Flash provides all the light; sensor amplification is unnecessary
- Night Street Photography — City streets, streetlights only | ISO 1600-3200 | Test your camera’s specific noise floor first
- Solar Eclipse — Extremely bright direct sun | ISO 50-100 | Use an appropriate solar filter; follow NASA guidance for safe exposure settings (NASA Goddard Space Flight Center)
Each scenario gives you a launching pad. Dial in from there based on your histogram.
Auto vs Manual ISO: When to Use Each
Auto ISO is a camera mode that automatically selects the appropriate sensitivity based on your target shutter speed and aperture — a useful tool when shooting unpredictable, fast-moving subjects.
Use Auto ISO when: you’re shooting street photography, events, or children and don’t have time to adjust manually. Set a maximum ISO limit (for example, max ISO 6400) and a minimum shutter speed — this caps The Sensitivity Tax while still giving you flexibility.
Use Manual ISO when: lighting is controlled or predictable — studio work, landscape photography on a tripod — or when you want complete creative control over noise levels.
Most modern cameras let you set Auto ISO with an upper limit, which is the best of both worlds: automated sensitivity within your defined parameters.
Film, Smartphones, and AI Denoise Software
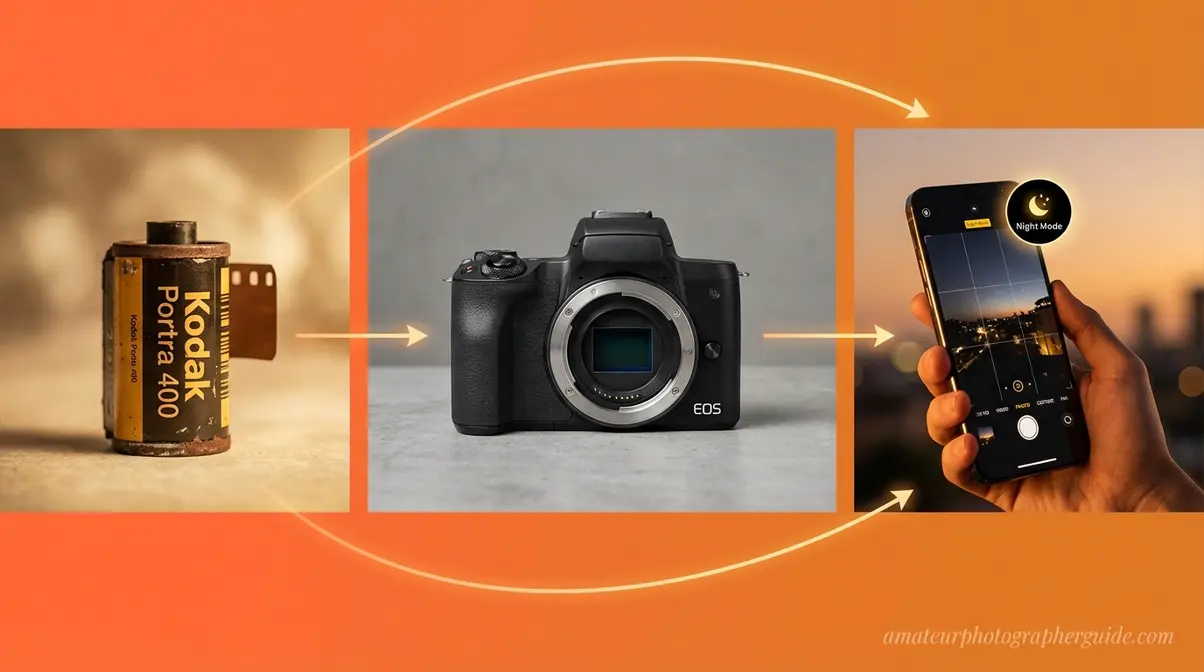
Imagine buying a roll of film only to realize mid-hike that the lighting changed completely. That was the film photographer’s reality — and it’s the perfect starting point for understanding why digital ISO changed everything, and why AI is changing it again.
Film ISO (ASA): Pre-Chosen Sensitivity
Film photographers chose their ISO speed before loading the camera. A Kodak Portra 400 roll was rated ISO 400 — permanently. The chemistry in the emulsion determined the sensitivity; there was no dial to turn.
So what happens if you shoot ISO 100 film rated at 400? You’re underexposing by two stops (that is, letting in four times less light than the film needs). In the darkroom, you can use push-processing — a technique where film rated at one ISO is developed longer to compensate for underexposure — but you pay for it with more grain and some color shifts. It’s a controlled creative choice, not a clean fix.
ISO’s official standard for camera film speed was developed specifically to allow photographers to accurately measure a film’s sensitivity to light, ensuring correct film speed selection for varying lighting conditions (International Organization for Standardization).
A wedding photographer with film in the 1990s might carry multiple camera bodies loaded with different ISO films — one for outdoor portraits (ISO 100), one for the reception (ISO 800). Digital cameras ended that limitation: ISO flexibility shot by shot, no commitment required.
Smartphone Computational ISO Explained
Most people reading this guide aren’t using film — they’re using a smartphone. And smartphones handle ISO in an entirely different way that most photography guides completely ignore.
Smartphones have tiny sensors that perform poorly at high ISO. To compensate, they use computational photography: instead of amplifying a single noisy frame, the phone captures multiple frames rapidly and stacks them using AI to reduce noise. Recent mobile adoption data shows that 90% of U.S. adults own a smartphone (Pew Research Center, 2024) — meaning most people learning photography already have this system in their pockets.
When you enable “Night Mode” on an iPhone or Google Pixel, you’re not just raising ISO. You’re enabling a multi-second exposure during which the phone captures 8-15 frames and merges them using AI. The result often looks like ISO 400 on a full-frame camera, even though the phone’s sensor would normally produce ISO 6400-level noise — effectively bypassing The Sensitivity Tax through software rather than sensor size.
This explains why your iPhone photos in dim restaurants often look clean while the same shot on an entry-level DSLR at ISO 3200 looks gritty. It’s not a better sensor — it’s advanced multi-frame noise stacking done automatically, in under two seconds.
AI Denoise: Sensitivity Tax Refund
Even on traditional cameras, AI is now changing what “high ISO” results can look like after the photo is taken.
Lightroom Denoise (Adobe, released 2023), Topaz DeNoise AI, and DxO PureRAW all use neural networks trained on millions of noisy/clean image pairs to intelligently remove noise while preserving edge detail that older noise-reduction algorithms would simply blur away. Independent testing from 2023 shows that Adobe Lightroom AI Denoise applied to ISO 6400 RAW files can produce image quality comparable to ISO 800-1600 results achieved with traditional noise reduction methods — a genuine 2-4 EV improvement in effective noise performance (Birding Through Glass independent review; Karoliát Work Lightroom Classic 12.3 tests, 2023). CVPR 2023 research on ISO-dependent noise modeling demonstrates that modern AI denoising models must correct complex signal degradation in extreme low-light, high-ISO photography using physics-guided parameters (Computer Vision Foundation / IEEE, 2023).
The practical implication for beginners: don’t be afraid to shoot at a higher ISO if the shot requires it. AI denoise is the Sensitivity Tax refund — you paid the quality penalty at capture, but software gives much of it back. Shoot in RAW format (which retains all the original sensor data) for the best results.
This is also exactly why an article from 2018 telling you to “avoid ISO 1600 on a mirrorless camera” is giving you outdated advice. The current reality is meaningfully different.
Common ISO Mistakes Beginners Make
Knowing what ISO is matters. Knowing what not to do with it matters more. Across photography communities, certain beginner mistakes appear so consistently that naming them here — with specific fixes — is worth more than any additional definition.
Mistake 1: Always Shooting at ISO 100
This is something almost every new photographer does. You read “ISO 100 = cleanest image” and lock it there permanently, even indoors under dim ceiling lights.
Here’s what goes wrong: at ISO 100 in a dark room, your camera needs a very slow shutter speed to get enough light. Any subject that moves — a child, a pet, a performer — will blur. Any slight camera shake will blur the background. The result is a correctly-focused but completely unusable photo.
The fix: Think of ISO 100 as your starting point outdoors in good light — not a universal default. Use the cheat sheet from the previous section as your mental shortcut. Sunny day? ISO 100. Indoor event? ISO 800, then adjust from there.
Mistake 2: Confusing Noise With Blur
Beginners often see a bad photo and think “high ISO made it blurry.” They lower ISO to fix it. But if the actual problem was camera shake or subject motion, lowering ISO just makes the photo darker — not sharper.
Diagnosis at 100% zoom: If you see speckles or texture over an otherwise sharp subject — that’s noise, an ISO issue. If the edges of objects look smeared or doubled — that’s blur, a shutter speed or focus issue.
The fix: Noise → lower ISO or apply AI denoise in post. Blur → increase shutter speed or stabilize the camera on a tripod. These are opposite interventions. Applying the wrong one wastes time and doesn’t help the image.
Mistake 3: Ignoring Better Alternatives
Sometimes the answer isn’t to adjust ISO at all — it’s to address the root cause of why ISO needs to be so high.
If you’re consistently shooting in very low light at high ISO with poor results, consider these alternatives:
- Buy a faster lens. A lens with a maximum aperture of f/1.8 lets in four times more light than an f/3.5 kit lens. That single change can drop your ISO from 1600 to 400 — eliminating most of The Sensitivity Tax entirely.
- Use a tracking mount for astrophotography. A star tracker lets you shoot 60-second exposures instead of 20-second ones, allowing dramatically lower ISO and far less noise in Milky Way shots.
- Add a simple light source for product photography. An LED light panel lets you shoot product shots at ISO 100 in any room, eliminating noise from the equation altogether.
ISO adjustment alone won’t solve every low-light problem. Sometimes the Sensitivity Tax is a signal that your gear or setup needs reconfiguring, not that your ISO needs to go higher.
Frequently Asked Questions
What is a good ISO for pictures?
A good ISO depends entirely on your lighting conditions. For bright, sunny outdoor scenes, ISO 100 or 200 provides the cleanest possible image with the least digital noise. For overcast days or well-lit indoor spaces, ISO 400 to 800 works best. In dimly lit environments or at night, ISO 1600 to 6400 is often necessary to achieve proper exposure without a tripod. On modern cameras, ISO 3200 is increasingly manageable thanks to improved sensor technology and AI denoise software like Lightroom Denoise.
Does high ISO make pictures blurry?
High ISO does not make pictures blurry — it introduces digital noise, which is a grainy, speckled texture, not blur. Blurry photos are caused by a slow shutter speed or inaccurate focus, which are entirely separate from ISO. In fact, raising ISO to enable a faster shutter speed often prevents blur caused by camera shake or subject motion. If your photo looks speckled but sharp, the culprit is high ISO; if edges look smeared or soft, the culprit is shutter speed or focus.
Is ISO 100 or 200 better?
Neither is strictly better — the right choice depends entirely on available light. ISO 100 is the base ISO on most digital cameras, delivering the cleanest images with maximum detail retention. Meanwhile, ISO 200 offers nearly identical quality with slightly more sensitivity. Always choose the lowest ISO that gives you a properly exposed photo at your desired aperture and shutter speed.
Is ISO 400 or 800 better?
The choice between ISO 400 and ISO 800 depends on how much light your scene provides. ISO 400 is ideal for cloudy outdoor conditions or brightly lit indoor spaces, offering a strong balance of sensitivity and image cleanliness. ISO 800 is the better choice in moderately dim interiors or late-afternoon light when ISO 400 leaves the image slightly underexposed. When in doubt, start at ISO 400 and review your histogram — if it’s pushed to the left, step up to ISO 800.
What is the exposure triangle?
The exposure triangle consists of three camera settings that together control how bright your photo is: ISO, aperture, and shutter speed. ISO controls the sensor’s sensitivity to light; aperture determines how wide the lens opening is; shutter speed dictates how long the sensor is exposed. Adjusting any one setting requires compensating with at least one other to maintain the same overall brightness. For example, doubling your shutter speed (to freeze action) requires either doubling ISO or widening aperture to keep the same exposure. Mastering the exposure triangle is the single most important step from beginner to confident photographer.
Conclusion
For beginner photographers, ISO in photography is the single most impactful setting to understand first. It controls how sensitive your camera sensor is to light — and every time you raise it, you pay The Sensitivity Tax in graininess and noise. The good news: with the 8-scenario cheat sheet above, you now have exact starting points for every situation you’ll encounter, from brilliant sunshine (ISO 100) to Milky Way astrophotography (ISO 3200-6400).
The Sensitivity Tax framework changes how you approach dark scenes: instead of fearing high ISO, you’re now making a conscious trade — a grainier photo you can actually use, versus a motion-blurred photo you can’t. And today, with AI denoise tools like Lightroom Denoise and Topaz DeNoise AI capable of recovering 2-4 stops of effective noise performance, much of that tax is now refundable in post-processing.
Start tonight: pull out your camera, put it in Manual or Aperture Priority mode, and shoot the same scene at ISO 100, 400, 1600, and 6400. Compare the four results at 100% zoom on your screen. Seeing The Sensitivity Tax with your own eyes — in your own shots — is worth more than any guide.
