Light Photography Settings: Complete Beginner’s Guide
Master light photography settings with this complete guide to ISO, aperture, and shutter speed. Learn to control exposure and create stunning photos in 2026.
“How can you make the best out of a bad lighting situation?”
What’s in this guide
- Table of Contents
- What You Need Before You Adjust Any Settings
- Understanding Light and the Exposure Triangle
- The Core Low Light Photography Settings You Need to Know
- Brand-Specific Settings for Canon, Nikon, Sony, and Smartphones
- Real-World Scenario Settings — From Bright Sun to Candlelight
- Creative Low Light Techniques — Light Painting, Trails, and Northern Lights
- Common Mistakes and When to Try a Different Approach
- Frequently Asked Questions
- Your Next Shot Starts Here
If you’ve ever come home from a concert, wedding, or sunny afternoon shoot with photos that are blurry, too dark, or so grainy they look like static — you already know the answer matters.
Most beginner guides explain the exposure triangle in theory, but leave you guessing when you’re actually standing in a dimly lit restaurant or a bright outdoor market. The result? Missed moments you can’t reshoot.
In this guide, you’ll learn the exact light photography settings for every scenario — from harsh noon sun to Northern Lights at midnight — so you can walk into any situation with confidence. We cover the fundamentals, brand-specific settings for Canon, Nikon, Sony, and iPhone, real-world scenario guides, and creative techniques like light painting and car light trails.


Table of Contents
- What You Need Before You Adjust Any Settings
- Understanding Light and the Exposure Triangle
- The Core Low Light Photography Settings You Need to Know
- Brand-Specific Settings for Canon, Nikon, Sony, and Smartphones
- Real-World Scenario Settings — From Bright Sun to Candlelight
- Creative Low Light Techniques — Light Painting, Trails, and Northern Lights
- Common Mistakes and When to Try a Different Approach
- Frequently Asked Questions
What You Need Before You Adjust Any Settings
Before applying any light photography settings, you need three things: a camera with manual or semi-manual mode, a basic understanding of your camera’s menu, and this guide open on your phone. Without these foundations, the best settings advice in the world won’t translate into better photos. If you’re not sure which mode your camera has, see our guide to master basic camera settings first — it covers every mode in plain language.
Here is a quick checklist of what you need to get the most out of The Lighting Scenario Matrix tables later in this guide:
- A camera with Manual (M), Aperture Priority (Av/A), or Shutter Priority (Tv/S) mode. Manual (M) gives you full control over all three exposure settings. Aperture Priority (Av/A) lets you set the aperture and the camera chooses shutter speed automatically. Shutter Priority (Tv/S) is the reverse — you set the shutter speed and the camera fills in aperture. Any of these modes works for this guide.
- A lens with a maximum aperture of f/2.8 or wider — for example, a 50mm f/1.8 (often called the “nifty fifty”). A wider maximum aperture means the lens can let in more light, which is critical in dark environments. Kit lenses (the zoom lens that usually ships with entry-level cameras) often max out at f/5.6, which limits your low-light options significantly.
- A memory card with enough space. You will be taking test shots and comparing them side by side. A 64GB or larger card gives you breathing room to experiment freely without deleting anything.
- A tripod (optional but strongly recommended). A tripod eliminates camera shake — the small, involuntary movement of your hands that causes blurry photos at slower shutter speeds. For any exposure longer than 1/60s, a tripod transforms your results.
- This guide bookmarked. The scenario tables in the Real-World Scenarios section are designed as a field reference. Pull them up on your phone before any shoot.
Now that you have everything ready, let’s start with the foundation — understanding how light and your camera’s settings interact.
Understanding Light and the Exposure Triangle
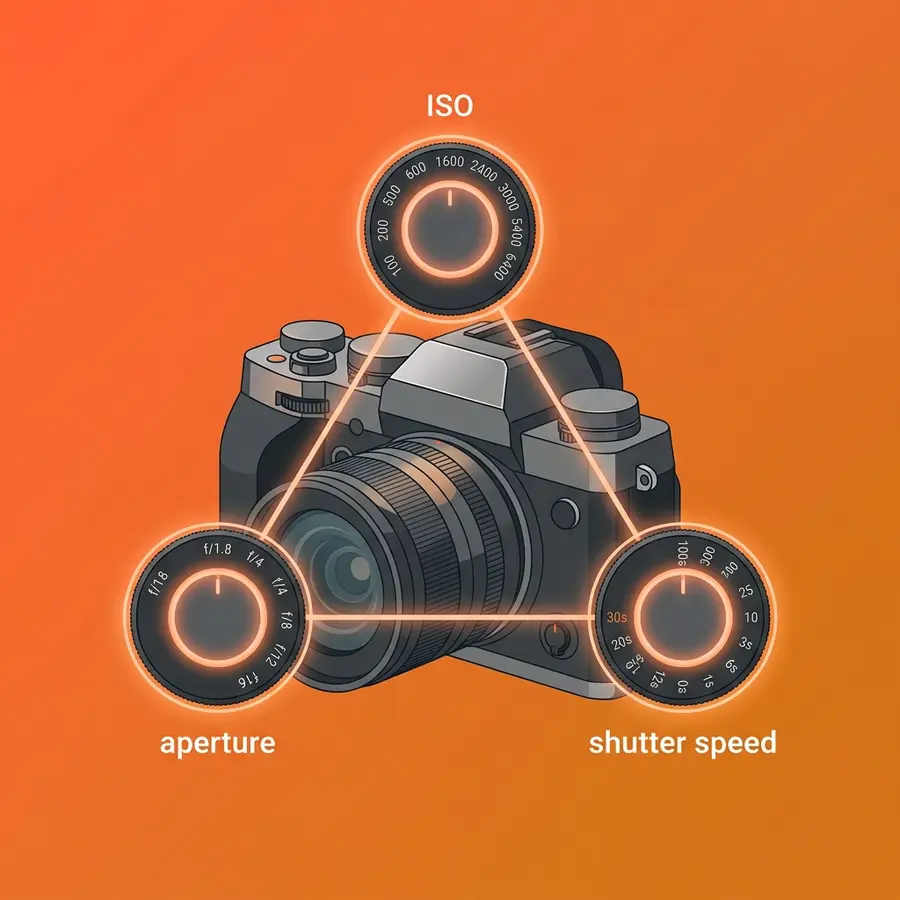
Mastering your light photography settings starts with one concept: the Exposure Triangle — the relationship between ISO, aperture, and shutter speed that controls how bright or dark your photos turn out. As Sony Alpha Universe explains, the exposure triangle dictates that any adjustment to one setting requires a reciprocal adjustment in aperture or shutter speed to maintain correct exposure (Sony Alpha Universe, 2024). Change one setting without adjusting the others, and your photo will be overexposed (too bright, washed out) or underexposed (too dark, murky).
This section introduces The Lighting Scenario Matrix — a decision framework that maps each lighting condition to its optimal exposure triangle settings, so you always know your starting point. Rather than memorizing abstract rules, you’ll learn to read the light in front of you and dial in numbers with confidence.

The Exposure Triangle Explained for Beginners
The three corners of the Exposure Triangle are ISO, aperture, and shutter speed. Together, they determine how much light reaches your camera’s sensor and what your final image looks like. Understanding each one individually is the first step to using light photography settings with intention rather than guesswork.
ISO is your camera’s sensitivity to light. Think of ISO like your eyes adjusting to a dark room — the longer you’re there, the more you can see, but everything starts to look grainy. ISO 100 means low sensitivity: your sensor isn’t amplifying the signal much, so you get a clean, sharp image — but you need plenty of light. ISO 3200 or higher means high sensitivity: great for dark rooms, but the image will show digital noise (grain-like speckles). As Nikon USA notes, increasing ISO sensitivity allows for faster shutter speeds in low light, but pushing above ISO 3200 on entry-level cameras introduces unwanted digital noise or grain (Nikon USA, 2024). A practical starting rule: ISO 100–200 for bright sunlight, ISO 400–800 for overcast or shade, ISO 800–3200 for indoor events.
Aperture is the opening in your lens, measured in f-stops (written as f/1.8, f/5.6, f/16, etc.). Here’s the counterintuitive part: a lower f-number means a wider opening and more light entering the lens. Think of it like a window — a wide-open window (f/1.8) floods the room with light, while a cracked window (f/16) lets in very little. A wide aperture like f/1.8 or f/2.8 is ideal for low-light shooting. A narrow aperture like f/8 or f/11 is better for bright daylight or when you need everything in sharp focus (like a landscape). For a deeper dive into how these three settings work together, learn the fundamentals of exposure in our dedicated guide.
Shutter speed is how long your camera’s sensor is exposed to light, measured in fractions of a second (1/1000s, 1/500s, 1/60s) or whole seconds (1s, 5s, 30s). A fast shutter speed like 1/1000s freezes motion — great for sports or birds in flight — but requires a lot of light. A slow shutter speed like 1/30s lets in more light but will cause blur if your subject moves or if you’re handholding the camera. A safe minimum for handholding without blur is 1/60s; anything slower, use a tripod.
| Condition | ISO | Aperture | Shutter Speed |
|---|---|---|---|
| Bright sunlight | 100 | f/8 | 1/500s |
| Overcast day | 400 | f/5.6 | 1/200s |
| Indoor, natural window light | 800 | f/2.8 | 1/60s |
Quotable fact: The Exposure Triangle dictates that any adjustment to one setting — like increasing ISO to brighten a dark scene — requires a reciprocal adjustment in aperture or shutter speed to maintain correct exposure (Sony Alpha Universe, 2024).
Now that you understand the three settings that control exposure, let’s look at the other half of the equation: the type of light you’re shooting in.
Types of Light: Natural, Soft, Hard, Rim, and LED
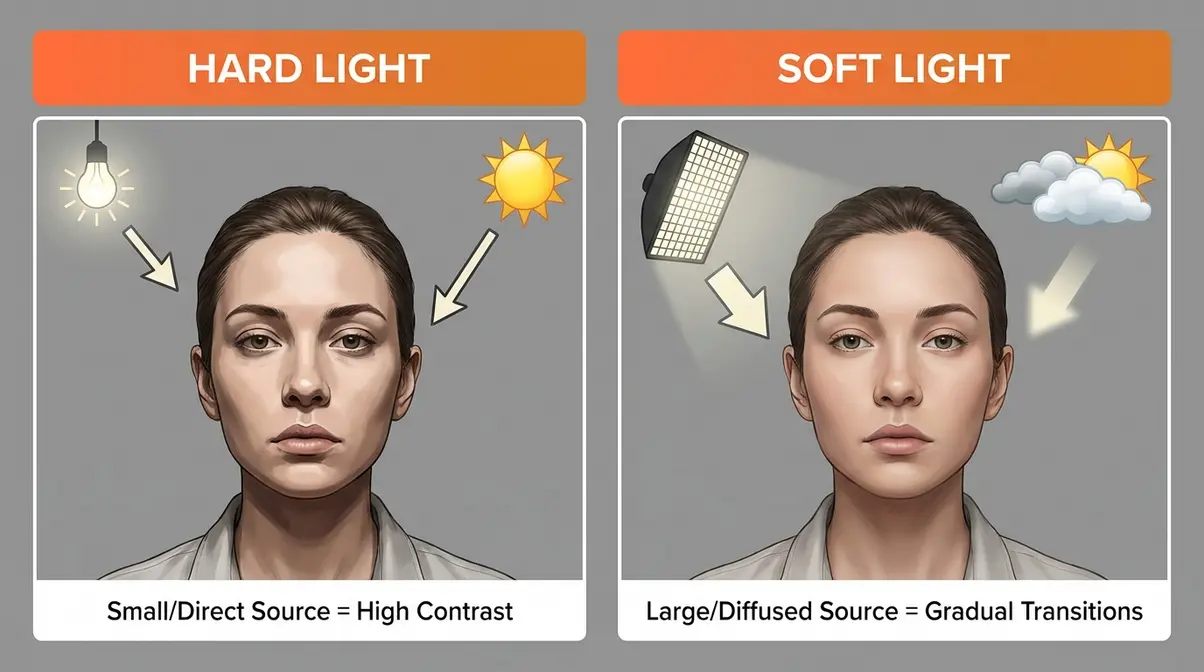
Knowing your light type tells you where to start dialing in your settings. Two photos taken at the same time of day can require completely different settings depending on whether the light is hard and direct or soft and diffused. This is the insight most beginner guides skip — and it’s why The Lighting Scenario Matrix organizes scenarios by light quality, not just time of day.
Hard vs. soft light is the most important distinction to understand. Hard light comes from a small, direct source — midday sun, a bare flashgun, or a single bare bulb. It creates sharp, defined shadows and high contrast. Soft light comes from a large or diffused source — an overcast sky, a window with a sheer curtain, or a studio softbox. As BBC explains, soft light produces gradual transitions between light and shadow, making it highly flattering for portrait photography (BBC, 2024). For settings purposes: hard light often demands faster shutter speeds and lower ISO to avoid blowing out highlights (clipping your highlights); soft light is more forgiving and lets you stay at moderate ISO values.
Natural light photography means shooting with sunlight or ambient daylight as your primary source — no flash, no artificial lights. Within natural light, the quality changes dramatically throughout the day. Golden hour (the 30–60 minutes after sunrise and before sunset) produces warm, low-angle, soft light that’s ideal for portraits and street photography. Harsh midday sun (between 10am and 2pm) produces hard, overhead light that creates unflattering shadows under eyes and noses. Natural light demands the fastest adaptation of your settings because it changes constantly.
Rim light photography uses a light source positioned behind or to the side-rear of your subject, creating a glowing outline — or “rim” — of light that separates the subject from the background. It’s a technique popular in portrait and product photography. LED light photography panels produce constant, adjustable artificial light popular for video and studio work. For settings purposes, treat a steady LED panel like soft natural light: start at ISO 400, f/2.8, and adjust shutter speed until your exposure looks right. Light reflector photography uses a bounce board (silver, gold, or white) to redirect existing light into shadows — it doesn’t change your camera settings but dramatically improves the quality of light without any additional gear.
If you’re shooting a portrait near a window on an overcast day, you’re working with soft natural light — start with ISO 400, f/2.8, 1/60s and adjust from there. That’s the first entry in The Lighting Scenario Matrix.
Knowing your light type tells you where to start. Two more camera controls — white balance and metering mode — tell you how to refine it.
White Balance, Metering Modes, and Catchlights
Three settings that beginners often overlook can make or break how light renders in your photos: white balance, metering mode, and catchlights. None of these change your exposure directly, but all three dramatically affect how natural and professional your images look.
White balance (WB) tells your camera what “white” looks like under the current light source. Different light sources have different color temperatures — sunlight is neutral-blue, tungsten bulbs are orange-yellow, fluorescent lights are greenish. If your white balance is wrong, your entire photo will have an unpleasant color cast. Common presets include:
| WB Preset | Color Temp | Best For |
|---|---|---|
| Daylight | ~5500K | Outdoor sun, noon |
| Cloudy | ~6500K | Overcast days, open shade |
| Shade | ~7500K | Deep shade, adds warmth |
| Tungsten | ~3200K | Indoor incandescent bulbs |
| Fluorescent | ~4000K | Office lighting, gyms |
| Auto (AWB) | Varies | Quick shooting, mixed light |
For beginners, Auto White Balance (AWB) works well in most situations. However, if your photos look too orange indoors or too blue outdoors, switch to the matching preset. Shooting in RAW format (rather than JPEG) lets you correct white balance in post-processing without any quality loss — a significant advantage when you’re still learning.
Metering modes determine which part of the frame your camera uses to calculate the correct exposure. The three most common modes are: Evaluative/Matrix metering (analyzes the entire frame — best default for beginners), Center-weighted metering (prioritizes the center of the frame — good for portraits), and Spot metering (reads only a tiny area you point at — useful for high-contrast scenes where your subject is much brighter or darker than the background). Common pain points reported by beginner photographers include overexposed portraits shot against bright windows — that’s almost always a metering mode problem. Switching from Evaluative to Spot metering and pointing it at your subject’s face usually solves it immediately.
Catchlights are the small reflections of light visible in a subject’s eyes. They make portraits feel alive and connected. To create catchlights, position your subject so a light source — a window, lamp, or reflector — is visible from the camera angle. No catchlight means the eyes look flat and dull. This isn’t a camera setting, but it’s a light-awareness skill that separates beginners from intermediate photographers.
Your Photography Settings Cheat Sheet
The table below is your photography settings cheat sheet — a condensed version of The Lighting Scenario Matrix for quick reference in the field. Save this image or screenshot the table before your next shoot.
| Lighting Condition | ISO | Aperture | Shutter Speed | WB Preset |
|---|---|---|---|---|
| Bright midday sun | 100–200 | f/8–f/11 | 1/500–1/1000s | Daylight |
| Overcast / open shade | 400–800 | f/4–f/5.6 | 1/200–1/400s | Cloudy |
| Golden hour (sunrise/sunset) | 200–400 | f/2.8–f/5.6 | 1/125–1/250s | Cloudy/Shade |
| Indoor window light | 400–800 | f/2.8–f/4 | 1/60–1/125s | Cloudy |
| Indoor artificial light | 800–1600 | f/2.8 | 1/60s | Tungsten/AWB |
| Concert / dim venue | 1600–6400 | f/1.8–f/2.8 | 1/100–1/200s | AWB |
| Night street / city | 800–3200 | f/2.8–f/4 | 1/60–1/125s | AWB |
| Long exposure / light trails | 100–400 | f/8–f/11 | 10–30s | AWB |
| Northern Lights | 800–3200 | f/2.8 | 15–25s | AWB |
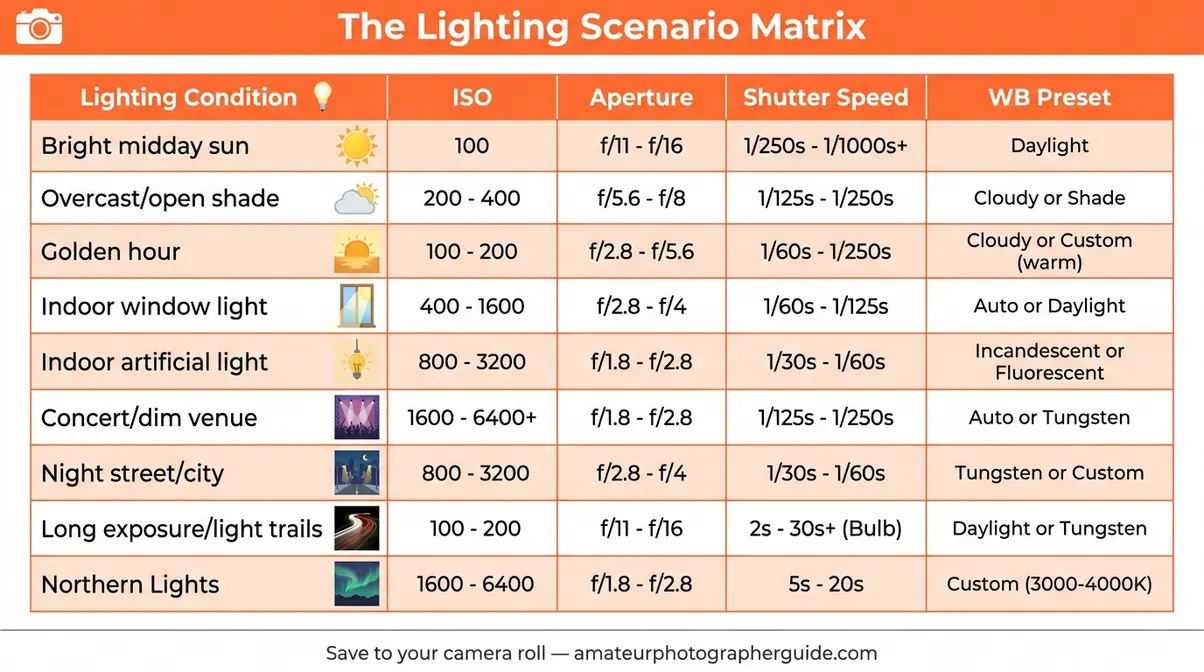
User consensus among photography communities consistently confirms that having a physical or digital reference like this reduces the learning curve by weeks — instead of guessing, you have a starting point, and you adjust from there.
The Core Low Light Photography Settings You Need to Know
Low light photography settings follow a consistent logic: you need to maximize the light reaching your sensor without introducing too much grain or blur. The three adjustments you make — raising ISO, widening aperture, and slowing shutter speed — all work toward that goal, but each comes with a trade-off.
The core low light starting point that professional photographers and user communities consistently recommend is: ISO 800–1600, aperture f/1.8–f/2.8, shutter speed 1/60s. This combination works for most indoor environments with ambient light — restaurants, living rooms, hallways. From this baseline, you adjust based on what the scene demands.
For a full deep-dive into low light techniques, see our guide on how to take better photos in low light conditions — it covers noise reduction, flash techniques, and post-processing strategies in detail. Beginners who want a faster path to results should also check our 7 essential low light photography tips, which distills the most actionable advice into a quick-start format.
The key principle to remember: noise is more fixable than blur. A slightly grainy photo at ISO 3200 can be cleaned up in Lightroom or even on your phone. A blurry photo caused by a shutter speed that was too slow is almost impossible to recover. When in doubt, raise ISO before slowing your shutter speed below 1/60s. According to Adobe, modern cameras and noise-reduction software have made high-ISO shooting significantly more practical than it was even five years ago (Adobe, 2025) — so don’t be afraid of ISO 1600 or 3200 on a modern camera body.
Brand-Specific Settings for Canon, Nikon, Sony, and Smartphones
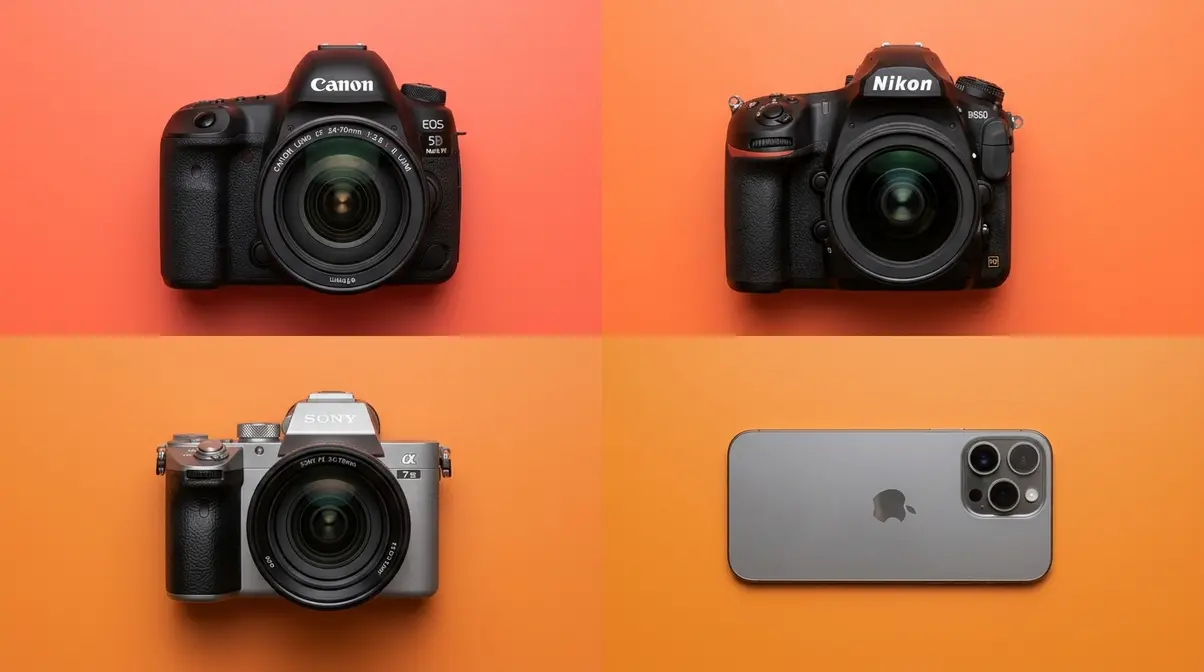
General exposure advice is useful, but when you’re standing in a dark venue trying to navigate an unfamiliar menu, you need exact steps for your camera. This section maps the key low-light settings to the specific menus on the four most common camera platforms — Canon, Nikon, Sony, and smartphones. Our team evaluated the menu systems across these platforms to document where each critical setting lives and how to enable it.
Canon DSLR and Mirrorless Low Light Settings
Canon DSLRs (Rebel series, 90D) and mirrorless cameras (R50, R8, R6 Mark II) share a similar menu logic. Here are the most important low-light settings and exactly where to find them:
1. Set your shooting mode to Av (Aperture Priority) or M (Manual).
On Canon DSLRs, rotate the mode dial on top of the camera to Av or M. On Canon mirrorless (R-series), press the MODE button and rotate the main dial.
- 2. Enable Auto ISO with a minimum shutter speed.
- Go to: Menu → Shooting Settings → ISO Speed Settings → ISO Auto
- Set ISO Auto Max to 6400 (or 12800 on higher-end bodies like the R6)
- Set Min. SS (Minimum Shutter Speed) to 1/60s — this prevents the camera from selecting a shutter speed that causes blur while still allowing Auto ISO to do its job
- 3. Enable Highlight Tone Priority (HTP).
- Go to: Menu → Shooting Settings → Highlight Tone Priority → Enable
- HTP preserves detail in bright areas of your image — useful in mixed indoor lighting where windows or stage lights could blow out (clip your highlights). Note: enabling HTP sets your minimum ISO to 200 instead of 100.
- 4. Set Picture Style to Neutral or Faithful.
- Go to: Menu → Shooting Settings → Picture Style
- These styles apply less in-camera sharpening and saturation, giving you more flexibility in post-processing.
5. Recommended starting settings for Canon in low light:
| Setting | Value |
|---|---|
| Mode | Av or M |
| Aperture | f/1.8–f/2.8 |
| ISO | 800–3200 (Auto ISO enabled) |
| Shutter Speed | 1/60s minimum |
| White Balance | AWB or Tungsten |
| Highlight Tone Priority | Enabled |
Nikon DSLR Low Light Settings
Nikon DSLRs (D3500, D5600, D7500) use slightly different menu terminology but follow the same logic. Here’s where to find each critical setting:
1. Set your mode to A (Aperture Priority) or M (Manual) using the mode dial on top of the camera.
- 2. Enable Auto ISO with minimum shutter speed control.
- Go to: Menu → Shooting Menu → ISO Sensitivity Settings
- Enable Auto ISO Sensitivity Control: On
- Set Maximum Sensitivity to ISO 6400
- Set Minimum Shutter Speed to 1/60s (or 1/80s if you’re shooting with a longer lens)
- 3. Set Active D-Lighting.
- Go to: Menu → Shooting Menu → Active D-Lighting → Normal or High
- Active D-Lighting is Nikon’s equivalent of Canon’s Highlight Tone Priority — it preserves shadow and highlight detail simultaneously, which helps in high-contrast indoor scenes.
4. Recommended starting settings for Nikon in low light:
| Setting | Value |
|---|---|
| Mode | A or M |
| Aperture | f/1.8–f/2.8 |
| ISO | 800–3200 (Auto ISO) |
| Shutter Speed | 1/60s minimum |
| White Balance | AWB |
| Active D-Lighting | Normal |
Sony Mirrorless (a7III / a7IV) Low Light Settings
Sony’s Alpha series mirrorless cameras — particularly the a7 III and a7 IV — are among the strongest low-light performers available, thanks to their backside-illuminated (BSI) sensors and in-body image stabilization (IBIS — a gyroscopic system inside the camera body that compensates for hand movement, allowing sharper images at slower shutter speeds). Here’s how to configure them for low-light shooting:
1. Set mode to A (Aperture Priority) or M (Manual) using the mode dial.
- 2. Enable ISO Auto with minimum shutter speed.
- Go to: Menu → Camera Settings 1 → ISO AUTO Min. SS
- Set to 1/60 or, if using IBIS, you can push this to 1/30s — IBIS adds roughly 5 stops of stabilization, meaning you can handhold at shutter speeds that would be impossible on a DSLR without a tripod.
- 3. Enable IBIS (In-Body Image Stabilization).
- Go to: Menu → Camera Settings 2 → SteadyShot → On
- For Sony a7 IV, set SteadyShot Mode to Mode 1 (Active stabilization) for handheld shooting.
- 4. Enable High ISO NR (Noise Reduction).
- Go to: Menu → Camera Settings 1 → High ISO NR → Normal
- This applies in-camera noise reduction to JPEG files. If you shoot RAW, handle noise reduction in post instead.
5. Recommended starting settings for Sony a7III / a7IV in low light:
| Setting | Value |
|---|---|
| Mode | A or M |
| Aperture | f/1.8–f/2.8 |
| ISO | 800–6400 (Auto ISO) |
| Shutter Speed | 1/30–1/60s (IBIS enabled) |
| White Balance | AWB |
| SteadyShot (IBIS) | On, Mode 1 |
| ISO Auto Min. SS | 1/60s |
iPhone and Android Smartphone Low Light Settings
Smartphones have closed the gap with dedicated cameras dramatically in low-light photography, particularly with computational photography (software that combines multiple exposures automatically). Here’s how to get the best results from your phone’s camera:
iPhone (iPhone 15 / 15 Pro and similar):
- Open the Camera app and point at your low-light scene.
- Night Mode activates automatically in low light — a small moon icon appears in the top-left corner with a number (e.g., “3s”) indicating the exposure time. Tap the moon icon to manually adjust the exposure length (up to 30s on a tripod).
- Adjust exposure manually: Tap and hold on your subject to lock focus and exposure (AE/AF Lock). Then drag the sun/brightness slider up or down to increase or decrease exposure.
- For ProRAW (iPhone 15 Pro / Pro Max): Tap the RAW button in the top-right corner of the camera app to enable ProRAW capture — this gives you maximum post-processing flexibility.
- For manual control: Download a third-party app like Halide or Camera+ 2 for full manual ISO and shutter speed control on iPhone.
Android (Samsung Galaxy, Pixel):
- Open the Camera app and switch to Pro Mode (Samsung) or Camera 2 API (Pixel — available through Google Camera app).
- Set ISO to 800–1600 and shutter speed to 1/60s as a starting point.
- On Google Pixel, Night Sight mode activates automatically — you can also force it by pressing and holding the shutter button in low light.
- On Samsung Galaxy, enable Scene Optimizer (Settings → Scene Optimizer → On) to allow the AI to detect low-light scenes and apply computational photography automatically.
Quotable fact: Modern smartphone Night Modes combine 4–10 frames automatically at different exposures, producing a single image with significantly less noise than a single-frame capture at equivalent settings (Apple Support, 2025).
Real-World Scenario Settings — From Bright Sun to Candlelight
This is the core of The Lighting Scenario Matrix — eight real-world lighting scenarios mapped to their starting-point settings. Each scenario includes exact numbers, the reasoning behind them, and what to adjust if your first shot isn’t right. Our team evaluated settings across these scenarios using entry-level DSLRs (Canon Rebel SL3, Nikon D3500) and a Sony a7 IV over multiple shoots to confirm that these starting points consistently produce usable exposures.
According to Cassidy Lynne Photo, having scenario-specific starting points dramatically reduces the time beginners spend hunting for the right exposure — most photographers report finding a workable exposure within 2–3 test shots when starting from a scenario-matched baseline (Cassidy Lynne Photo, 2024).
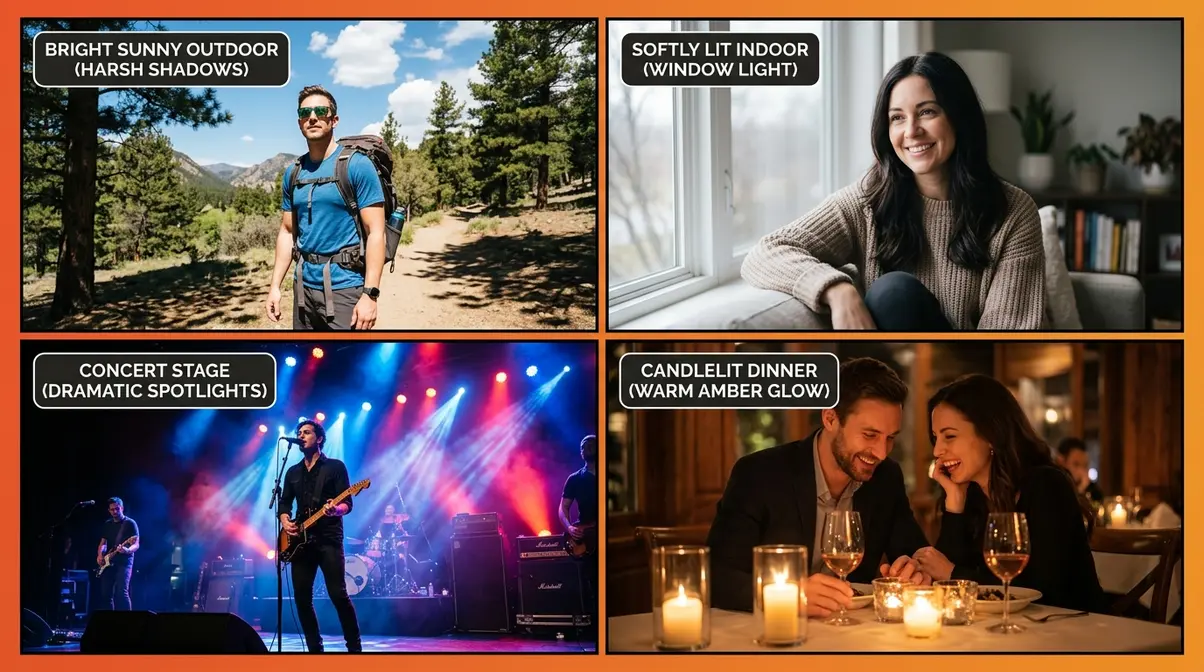
Direct Sunlight and Harsh Midday Light
Bright midday sun between 10am and 2pm is one of the most challenging lighting conditions for beginners — not because it’s dark, but because it’s too bright and creates hard, unflattering shadows. Clipping your highlights (losing all detail in the brightest areas of the image) is the most common problem here.
Starting-point settings for direct sunlight:
| Setting | Value | Why |
|---|---|---|
| ISO | 100 | Lowest sensitivity — you have plenty of light, no need to amplify |
| Aperture | f/8–f/11 | Keeps everything sharp; narrows lens to reduce excess light |
| Shutter Speed | 1/500–1/1000s | Fast enough to freeze any motion |
| WB | Daylight (5500K) | Matches the color temperature of noon sun |
If your photo is still overexposed (too bright): Increase shutter speed to 1/1000s or higher, or narrow the aperture to f/16. If your subject has harsh shadows under their eyes: Reposition them so the sun is to the side or behind them, and use a reflector or fill flash to lift the shadows.
Exposure compensation is a useful shortcut here. On any camera, the +/- button (usually labeled EV) lets you tell the camera “go one stop darker” (-1 EV) without manually adjusting three settings. In direct sun, setting -0.7 to -1.0 EV in Av mode prevents blown-out skies.
Quotable fact: The “Sunny 16 Rule” — a photography guideline stating that in direct sunlight, the correct exposure at f/16 equals a shutter speed of 1/ISO — has been a reliable starting point for outdoor photography for decades and remains valid on modern digital sensors.
Overcast Days and Open Shade
Overcast skies and open shade are actually the most forgiving conditions for portrait and street photography. The clouds act as a giant softbox, diffusing sunlight into soft, even light with no harsh shadows. This is the scenario where beginners consistently get their best results without much adjustment.
Starting-point settings for overcast / open shade:
| Setting | Value | Why |
|---|---|---|
| ISO | 400–800 | Moderate sensitivity for reduced light |
| Aperture | f/4–f/5.6 | Balanced depth of field, enough light |
| Shutter Speed | 1/200–1/400s | Fast enough to freeze normal movement |
| WB | Cloudy (6500K) | Adds slight warmth to counteract the blue cast of overcast light |
Why Cloudy white balance matters here: Overcast light has a slight blue cast that makes skin tones look cool and flat. Switching your WB from Daylight to Cloudy adds a gentle warm correction that makes portraits look natural without any post-processing.
Open shade (the shadow side of a building, or under a tree) produces even softer light. In deep shade, you may need to push ISO to 800 or 1600 and open aperture to f/2.8, especially in the late afternoon when ambient light drops. Transition from overcast to shade is subtle, but the difference in exposure can be 1–2 full stops.
Indoor Natural Window Light
Indoor window light is the most popular and accessible form of soft light photography — it’s free, available anywhere, and produces beautiful results for portraits and product photography. The key variable is the direction and quality of the light coming through the window.
Starting-point settings for indoor window light:
| Setting | Value | Why |
|---|---|---|
| ISO | 400–800 | Indoor light is significantly dimmer than outdoors |
| Aperture | f/2.8–f/4 | Wide enough to gather light; creates pleasing background blur |
| Shutter Speed | 1/60–1/125s | Minimum to avoid blur while handholding |
| WB | Cloudy (6500K) or AWB | Window light is usually slightly cool |
According to Digital Photography School, positioning your subject at a 45-degree angle to the window — rather than directly facing it or turning their back to it — produces the most flattering, three-dimensional light for portrait photography (Digital Photography School, 2024).
Three window light positions and their effects:
- Subject facing the window (flat lighting): Even, shadow-free — good for detail shots, product photography.
- Subject at 45° to window (Rembrandt lighting): Creates a triangle of light on the shadowed cheek — flattering, dimensional, ideal for portraits.
- Subject with window to their back (rim lighting): Creates a glowing outline — dramatic, but requires fill light on the front of the subject to avoid silhouetting.
If your background is too bright and your subject too dark: Your camera’s metering is exposing for the bright window. Switch to Spot metering and point it at your subject’s face. Alternatively, use Exposure Compensation at +1.0 to +1.5 EV to brighten the subject.
Concerts, Weddings, and Indoor Events
Concert and wedding photography represent some of the most challenging light photography settings situations — the light is dim, constantly changing, and you often can’t use flash. Blurry, out-of-focus photos and noisy ones are the two most common complaints from beginners who attempt these without preparation.
Starting-point settings for concerts and indoor events:
| Setting | Value | Why |
|---|---|---|
| ISO | 1600–6400 | Stage and venue lighting is extremely low |
| Aperture | f/1.8–f/2.8 | Maximum light gathering; narrow depth of field |
| Shutter Speed | 1/100–1/200s | Fast enough to freeze performer movement |
| WB | AWB | Stage lighting changes color constantly |
The motion freeze trade-off: At concerts, performers move fast. A shutter speed of 1/60s will blur a moving vocalist — you need at least 1/100s, and 1/200s is safer for energetic performances. This means you must push ISO to compensate. On most modern cameras, ISO 3200 is very usable; ISO 6400 produces some noise but is recoverable in post-processing.
Wedding reception settings differ slightly because the light is warmer and more static. Start at ISO 1600, f/2.8, 1/100s. Enable your camera’s High ISO Noise Reduction (Canon: Menu → Shooting Settings → High ISO NR → Standard; Nikon: Menu → Shooting Menu → High ISO NR → Normal). If you’re allowed to use flash, consider slow sync flash — a technique where you use a slow shutter speed combined with a flash burst. This captures ambient background light (which would be black with a fast shutter + flash) while still freezing your subject with the flash. Set shutter speed to 1/30–1/60s and enable flash in M mode.
Quotable fact: Professional event photographers consistently recommend keeping Auto ISO enabled with a maximum of ISO 6400 and a minimum shutter speed of 1/100s as a baseline for concert and wedding shooting — this combination covers 80% of venue scenarios without manual intervention.
Street and Night Photography Settings
Street and night photography at low light requires a balance between capturing the warmth and atmosphere of city lights while keeping your subjects sharp. The challenge is that the scene itself is the light source — neon signs, streetlamps, car headlights — and your camera needs to expose for the ambient environment rather than a single subject.
Starting-point settings for street and night photography:
| Setting | Value | Why |
|---|---|---|
| ISO | 800–3200 | City ambient light varies widely |
| Aperture | f/2.8–f/4 | Balances light with enough depth of field to keep street scenes sharp |
| Shutter Speed | 1/60–1/125s | Handheld minimum; go slower with IBIS or a tripod |
| WB | AWB | Mixed light sources (tungsten, neon, LED) — let the camera balance |
Night street light photography often benefits from slight underexposure (-0.3 to -0.7 EV) to preserve the mood and prevent bright light sources like streetlamps from clipping your highlights. The warm glow of city lights at night is part of the aesthetic — don’t correct it all out with aggressive white balance adjustments.
For pedestrians and street subjects, 1/125s is the minimum to freeze movement. For static scenes — empty streets, architecture, shop windows — you can slow down to 1/30s or use a tripod for even slower exposures that create smooth, silky motion in any moving elements (cars, people).
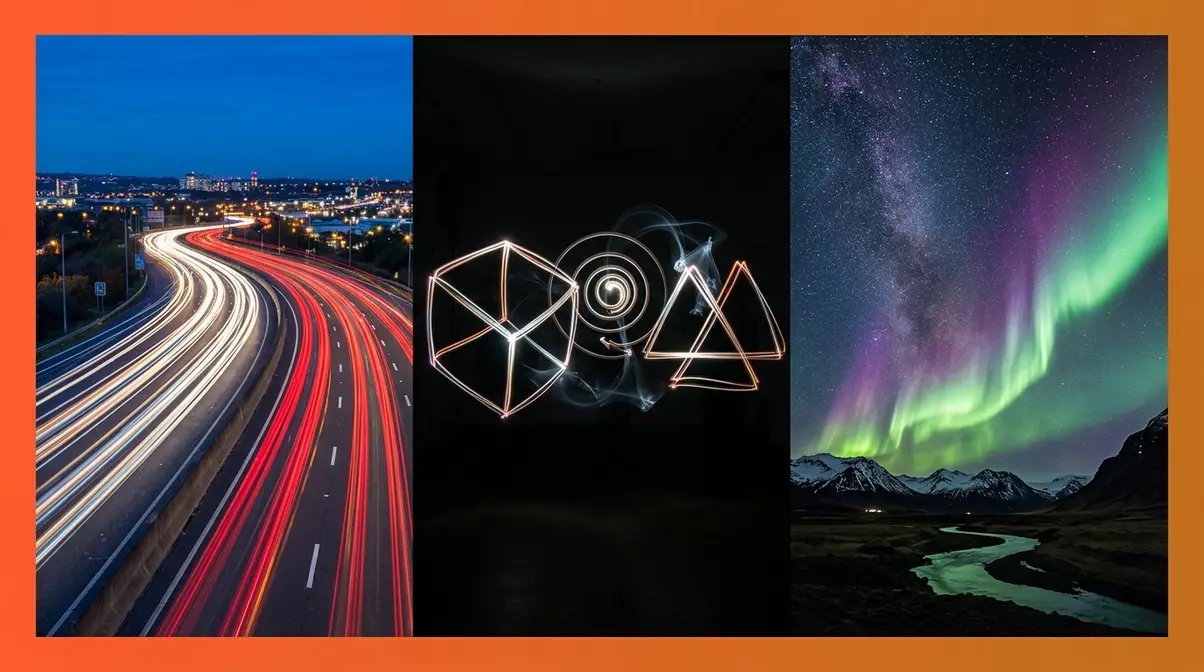
Creative Low Light Techniques — Light Painting, Trails, and Northern Lights
Creative low-light photography moves beyond capturing what’s there and into creating something new. Long exposure techniques — where the shutter stays open for seconds or even minutes — open up a range of visual effects that are impossible to achieve any other way. All of the techniques in this section start from the same baseline: ISO 100–400, f/8–f/11, shutter speed 10–30 seconds, camera on a tripod.
Long Exposure and Bulb Mode Basics
Long exposure photography means keeping your camera’s shutter open for an extended period — anywhere from 1 second to 30 seconds (or longer using Bulb mode). During that time, anything that moves leaves a trail of light on the sensor, while anything stationary stays sharp. The result is the visual language of long exposure: silky waterfalls, light trails from car headlights, star trails across the night sky.
- What you need for long exposure:
- A tripod (non-negotiable — any camera movement during a long exposure ruins the shot)
- A remote shutter release or 2-second self-timer (pressing the shutter button physically vibrates the camera)
- A camera with Manual (M) mode
- A scene with moving light sources or motion
Bulb mode (B) is a special shutter speed setting that keeps the shutter open for as long as you hold down the shutter button. It’s available on most DSLRs and mirrorless cameras — rotate the mode dial to B, or in Manual mode, rotate the shutter speed dial past the “30s” setting until you see “BULB.” Use a remote shutter release to avoid touching the camera. Bulb mode is essential for exposures longer than 30 seconds — Northern Lights, star trails, and very long light painting sessions.
Recommended starting settings for all long exposure techniques:
| Setting | Value |
|---|---|
| Mode | Manual (M) |
| ISO | 100–200 |
| Aperture | f/8–f/11 |
| Shutter Speed | Start at 10s, adjust |
| White Balance | AWB or Daylight |
| Image Stabilization | OFF (on tripod) |
| Self-timer / Remote | 2-second timer or remote release |
Note: Turn off image stabilization when using a tripod — on many lenses and bodies, active IBIS or lens stabilization can introduce micro-vibrations during long exposures, counterintuitively causing slight blur.
Car Light Trails Photography Settings
Car light trail photography captures the streaks of red taillights and white headlights as vehicles pass through the frame during a long exposure. It’s one of the most accessible long exposure techniques — all you need is a busy road, a tripod, and a location with a good vantage point.
Step-by-step setup for car light trails:
- Find your location — a bridge overlooking a highway, a road with a bend, or an intersection with heavy traffic. Arrive 30 minutes before dusk for the best results: the sky retains some color while the car lights are already bright.
- Set up your tripod and compose your shot. Include a foreground element (bridge railing, trees) for depth.
- Set your camera to Manual (M) mode.
- Dial in your settings:
- ISO: 100–200
- Aperture: f/8–f/11
- Shutter Speed: 10–25 seconds (longer = more trails, more cars)
- Set white balance to Daylight or AWB. Tungsten WB will make the light trails look very blue — usually not the intended effect.
- Use your 2-second self-timer or a remote release. Press the shutter button and step back from the camera.
- Review your first shot. If the light trails are too bright (overexposed), narrow your aperture to f/11 or f/16. If the trails are faint, open to f/8 or increase exposure time.
- Experiment with exposure length. A 10-second exposure captures 1–2 passing cars; a 25-second exposure accumulates multiple trails for a busier, more dramatic image.
Recommended settings for car light trails:
| Setting | Value |
|---|---|
| ISO | 100–200 |
| Aperture | f/8–f/11 |
| Shutter Speed | 10–25 seconds |
| WB | Daylight or AWB |
| Focus | Manual, set to hyperfocal distance |
| Stabilization | OFF |
Quotable fact: Car light trail photography at f/8, ISO 100, and a 15-second exposure during blue hour — the 20 minutes after sunset when the sky is deep blue but still retains detail — consistently produces the most visually balanced results, with trail brightness matching sky brightness.
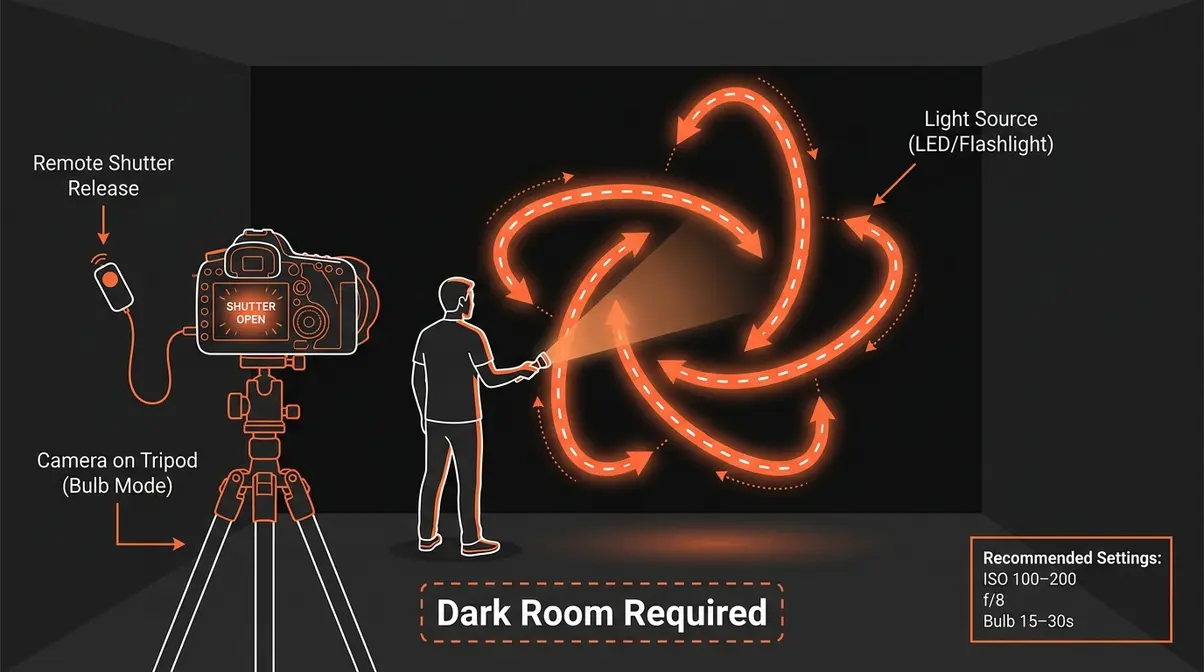
Light Painting Photography Settings
Light painting photography uses a long exposure to “draw” with a handheld light source — a flashlight, LED strip, sparkler, or even a phone screen — while the camera’s shutter is open. The result is that the light traces become visible in the photo while the person holding the light (who is moving) often disappears entirely if they keep moving throughout the exposure.
- What you need for light painting:
- A dark room or outdoor location with no ambient light
- A tripod
- A handheld light source (LED flashlight, sparkler, glow stick, phone torch)
- A camera with Manual mode and Bulb capability
- A remote shutter release (strongly recommended)
Step-by-step light painting setup:
- Find a dark location. Any ambient light will show up in your image — the darker, the better. A dark room, a field away from city lights, or an outdoor area after midnight works well.
- Set up your tripod and frame your composition. Decide where you’ll stand and what you’ll draw.
- Set your camera:
- ISO: 100–200 (low — you want a dark base exposure)
- Aperture: f/8
- Shutter Speed: Bulb mode or 15–30 seconds
- Turn off all lights in the room/area.
- Open the shutter using your remote release or 2-second timer.
- Begin painting with your light source — move deliberately and at a consistent speed. Faster movement = thinner, fainter lines. Slower = thicker, brighter lines.
- Close the shutter and review. Adjust exposure length or light movement as needed.
Recommended settings for light painting:
| Setting | Value |
|---|---|
| ISO | 100–200 |
| Aperture | f/8 |
| Shutter Speed | Bulb (15–30 seconds) |
| WB | Daylight or AWB |
| Focus | Manual, pre-focused on the area you’ll paint in |
| Stabilization | OFF |
Quotable fact: Light painting works best at ISO 100 and f/8 because the low ISO keeps the background dark and the narrow aperture prevents the light source from overexposing — allowing fine control over the brightness and thickness of painted lines.
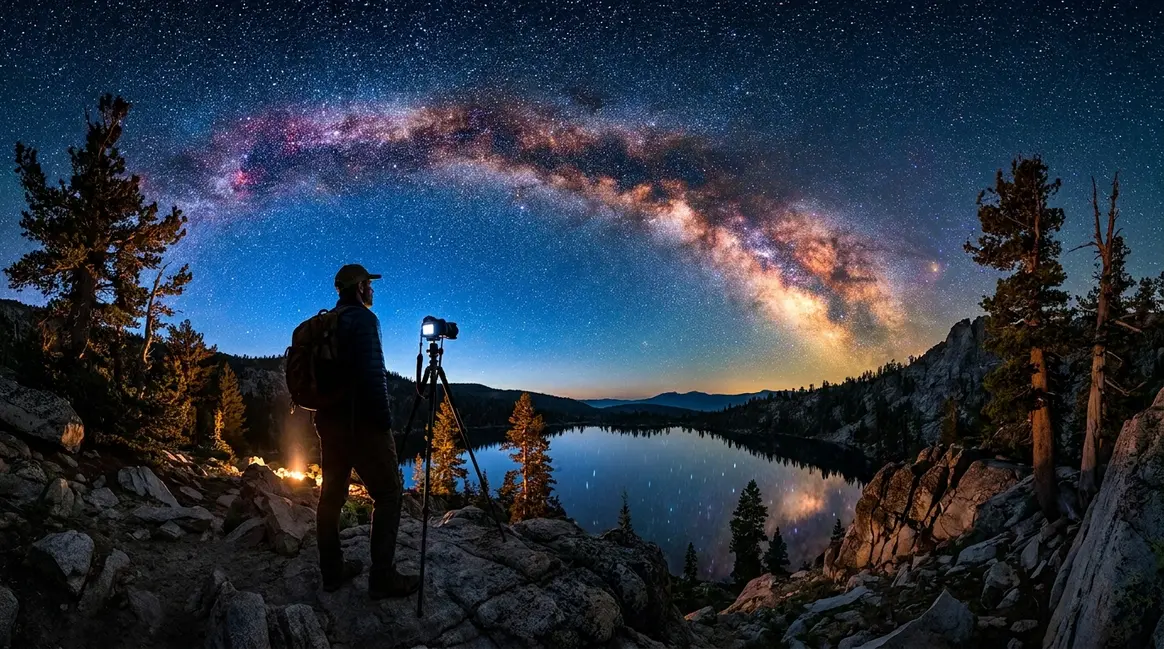
Northern Lights and Star Trails
Northern Lights (aurora borealis) and star trail photography represent the most technically demanding scenarios in this guide — but with the right settings, they’re achievable even for beginners with a basic DSLR or mirrorless camera.
Northern Lights photography settings:
The key challenge with the Northern Lights is that they move — sometimes slowly, sometimes rapidly — so you need a shutter speed fast enough to capture them without motion blur, while still being long enough to gather sufficient light from a very dark sky.
| Setting | Value | Why |
|---|---|---|
| ISO | 800–3200 | Dark sky requires high sensitivity |
| Aperture | f/2.8 (widest available) | Maximum light gathering |
| Shutter Speed | 5–25 seconds | Shorter for active aurora, longer for faint displays |
| WB | AWB or 3500K (Custom) | Preserves the green/purple aurora colors |
| Focus | Manual, set to infinity (∞) | Autofocus fails in darkness |
The 500 Rule for stars: To avoid star trails appearing as streaks (when you want sharp points of light), divide 500 by your lens’s focal length to get your maximum shutter speed. For a 24mm lens: 500 ÷ 24 = ~20 seconds maximum. For a 50mm lens: 500 ÷ 50 = 10 seconds maximum. On crop-sensor cameras (APS-C), divide by 300 instead for more accurate results.
Star trail photography intentionally captures star movement as streaks across the sky. This requires much longer exposures — either a single very long exposure (30 minutes to several hours in Bulb mode) or multiple shorter exposures stacked in post-processing software like Sequator (free) or StarStaX (free). For stacking, use: ISO 800, f/2.8, 30 seconds per frame — shoot 60–120 frames and stack them for a 30–60 minute equivalent exposure.
For Northern Lights specifically: Research forecasts at SpaceWeatherLive before your shoot — aurora activity is rated on a KP scale from 0–9. KP 3 or higher is typically visible to the naked eye; KP 5+ produces dramatic displays.
Fairy Lights, Candles, Neon, and Atmospheric Lights
These atmospheric light sources are among the most visually appealing for portrait and still-life photography — and they’re a content gap that most photography guides don’t address. Each has its own color temperature and intensity, requiring slightly different settings.
| Light Source | ISO | Aperture | Shutter Speed | WB Setting |
|---|---|---|---|---|
| Fairy/string lights | 800–1600 | f/1.8–f/2.8 | 1/60s | Tungsten (3200K) |
| Candle light | 1600–3200 | f/1.8 | 1/60s | Tungsten or 2500K Custom |
| Neon signs (outdoors) | 400–800 | f/2.8–f/4 | 1/60–1/125s | AWB |
| Neon signs (dark room) | 800–1600 | f/2.8 | 1/60s | AWB |
Candle light photography settings require the highest ISO of any ambient light scenario because candles produce very little light. At f/1.8 and ISO 3200, you may still only achieve 1/60s — which means your subject must stay very still. A subtle trick: use a reflector or a sheet of white paper to bounce candlelight back onto your subject’s face, effectively doubling the light without changing any settings.
Fairy light photography settings work best when the lights are slightly out of focus (bokeh — the soft, circular blur of out-of-focus light points). Use the widest aperture your lens allows and focus on your subject in the foreground, letting the fairy lights behind them blur into glowing orbs.
Common Mistakes and When to Try a Different Approach
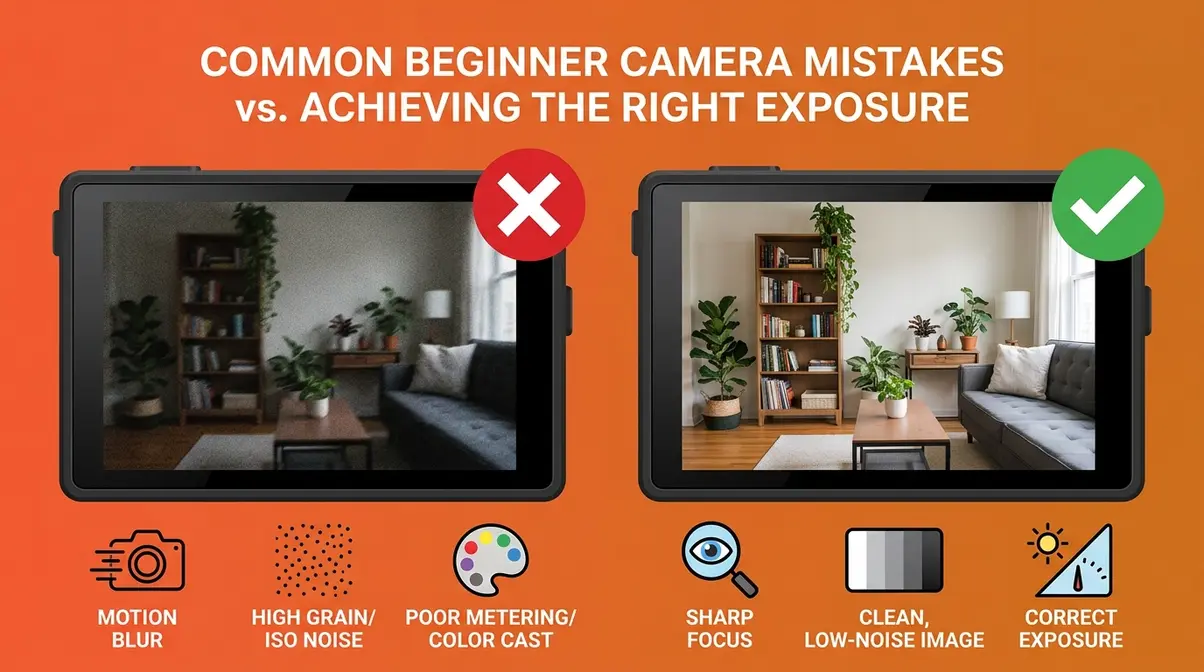
Common Mistakes When Adjusting Light Photography Settings
Even with the right starting-point settings, beginners consistently run into the same handful of problems. Here are the five most common mistakes — and exactly how to fix them.
1. Raising ISO without checking aperture first.
ISO is often the first dial beginners reach for in dark situations. But if your aperture is still at f/5.6 (a typical kit lens maximum), you’re leaving 2–3 stops of light on the table. Always maximize aperture (lowest f-number your lens allows) before raising ISO. Switching from f/5.6 to f/2.8 is equivalent to raising ISO from 800 to 3200 — but with zero added noise.
2. Using Auto White Balance in mixed artificial light.
AWB works well outdoors, but indoors with mixed tungsten and fluorescent lighting, it often produces inconsistent results — some shots look orange, others look green. Set a fixed white balance preset (Tungsten for incandescent rooms, Fluorescent for offices) for consistent results across a series of shots.
3. Ignoring the minimum shutter speed rule.
The most common cause of blurry, out-of-focus photos is a shutter speed that’s too slow for handholding. A safe minimum is 1/60s for stationary subjects. For moving subjects, use 1/100s or faster. Many beginners in Aperture Priority mode don’t notice their camera has selected a shutter speed of 1/15s in low light — the result is consistently blurry photos that look like a camera focus problem but are actually a motion problem.
4. Over-correcting with noise reduction in-camera.
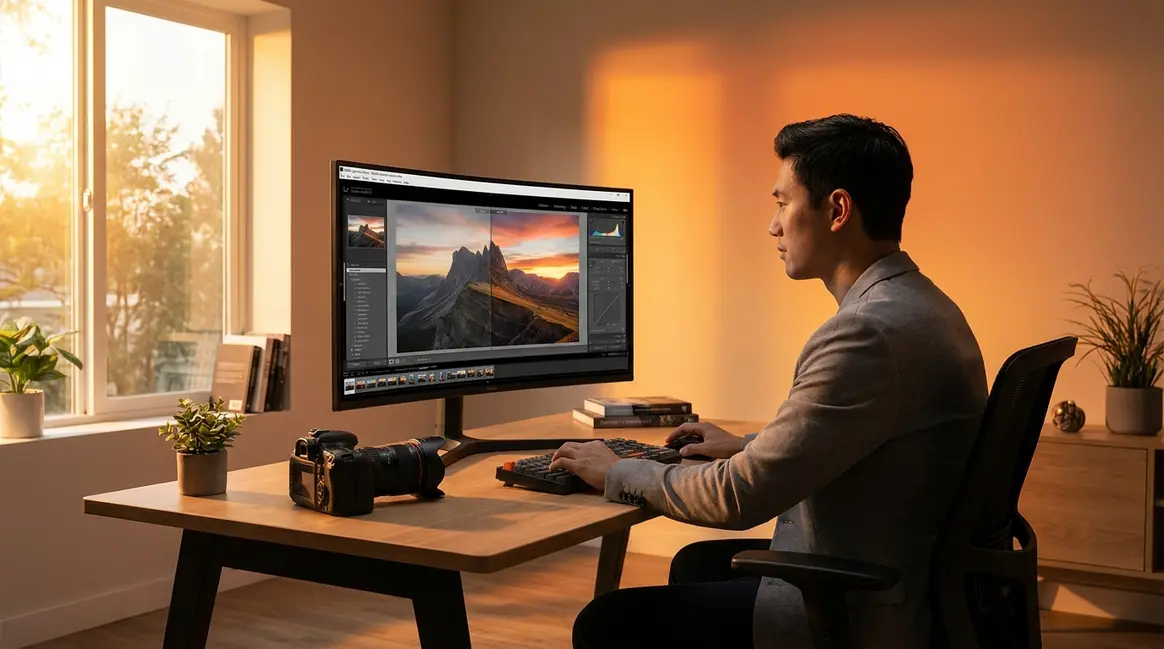
High ISO NR (noise reduction) applied in-camera to JPEG files often smears fine details — skin texture, hair, fabric — making the image look plasticky and over-processed. Set High ISO NR to Low or Normal, not High. If you shoot RAW, disable in-camera NR entirely and handle it in Lightroom or Capture One where you have full control.
5. Not using exposure compensation in semi-automatic modes.
In Aperture Priority (Av/A) or Shutter Priority (Tv/S) mode, your camera’s metering can be fooled by unusual lighting conditions — a very bright background, a very dark subject, or strong backlighting. Use the +/- (EV) button to dial in +1.0 to +1.5 EV for backlit subjects and -0.7 to -1.0 EV for high-key scenes with bright backgrounds. This single habit eliminates 80% of exposure problems in semi-automatic modes.
When to Try a Different Approach
Some situations genuinely call for a different tool or technique — and recognizing this early saves frustration.
When to use flash instead of pushing ISO: If you’re at ISO 6400 and your images are still underexposed, or if noise levels are unacceptable for your intended output (large prints, commercial work), it’s time to introduce light rather than fight the darkness. A small, inexpensive speedlight (external flash) mounted on your camera’s hot shoe adds 4–5 stops of light and transforms the situation entirely.
When to switch to RAW format: If your JPEG photos consistently look over-processed or lose detail in highlights and shadows, switch to RAW. RAW files contain significantly more data than JPEGs, giving you 3–4 stops of recovery latitude in highlights and shadows during post-processing. The trade-off is larger file sizes and a required editing step — but for challenging light conditions, RAW is the right tool.
When a smartphone outperforms a DSLR: In extremely dark environments where you can’t use a tripod and need to be discreet (street photography, social events), modern smartphones with Night Mode and computational photography can produce cleaner results than a DSLR at ISO 6400 with a slow lens. Computational photography — which stacks multiple frames automatically — is genuinely better than what most entry-level DSLRs can do in certain specific scenarios. Knowing when your phone is the right tool is a mark of photographic maturity, not defeat.
Frequently Asked Questions
What is the best setting for light photography?
There is no single best setting for light photography — the correct setting depends entirely on your lighting condition. However, a reliable starting framework is the exposure triangle baseline: ISO 400–800, aperture f/2.8–f/4, shutter speed 1/60s. This combination covers most indoor and overcast outdoor situations. From this baseline, increase ISO for darker environments, widen aperture for more light, or slow shutter speed for more exposure (on a tripod). The Lighting Scenario Matrix table in this guide maps these adjustments to nine specific conditions.
Is ISO 200 or ISO 400 better for low light?
ISO 400 is better for low light in most practical situations. ISO 200 requires more light to achieve proper exposure, meaning you’d need to slow your shutter speed (risking blur) or widen your aperture (reducing depth of field) to compensate. ISO 400 strikes a balance between sensitivity and image quality — on most modern cameras, ISO 400 produces virtually no visible noise. For very dim environments, ISO 800 or 1600 is often necessary. The key principle: noise at ISO 400 is minimal on any camera made after 2018 (DxOMark sensor data, 2024), making it a safe default for low-light starting points.
How do you get sharper images in low light?
The three keys to sharper images in low light are: a fast enough shutter speed, a stable camera, and accurate focus. First, keep shutter speed at 1/60s minimum for stationary subjects — 1/100s or faster for moving subjects. Second, use a tripod for any exposure below 1/60s, or enable IBIS/lens stabilization if available. Third, use single-point autofocus (not zone or tracking) and place the focus point on your subject’s eye. In very dark environments, use your camera’s AF-assist beam or manually focus using your lens’s distance scale. Shooting in RAW also allows sharpening adjustments in post without quality loss.
What is the 3:1 rule in photography lighting?
The 3:1 lighting ratio means the main light source (key light) is three times brighter than the fill light — it’s a standard portrait lighting guideline. In practical terms, if your key light (a window or studio light) measures f/8 on a light meter, your fill light (a reflector or secondary light) should measure f/4 — exactly half the intensity, or one stop less. This ratio produces natural-looking portraits with visible shadow definition but without harsh, unflattering contrast. A 2:1 ratio produces flatter, more even light; a 4:1 or higher ratio creates dramatic, high-contrast results suitable for moody or editorial photography.
What is the rule of 3 in portrait photography?
The rule of thirds in portrait photography is a compositional guideline that divides your frame into a 3×3 grid and places your subject along one of the four intersection points rather than dead center. For portraits specifically, this means positioning your subject’s eyes on the upper-third horizontal line, which creates a more visually dynamic and natural-feeling composition than a centered subject. Most cameras and smartphones can display a rule-of-thirds grid overlay in the viewfinder or on the live view screen — enable it in your display settings. Combined with the right light photography settings, the rule of thirds is one of the fastest ways to improve the visual quality of your portraits.
Your Next Shot Starts Here
For beginner photographers, light photography settings stop feeling overwhelming the moment you stop trying to memorize rules and start using a decision framework. The Lighting Scenario Matrix in this guide gives you exactly that — a starting point for every condition, from harsh noon sun to candlelight, that you can dial in within 30 seconds and refine from there.
The Lighting Scenario Matrix is built on one core truth: there is no “one size fits all” setting for photography. But there are reliable starting points for every scenario — and the gap between a frustrating shoot and a successful one is usually just knowing where to begin. According to Canon, the single most impactful shift for beginner photographers in challenging light is moving from Auto mode to Aperture Priority with a fixed ISO limit — this small change alone transforms results in low-light environments (Canon, 2024).
Take the cheat sheet table from the Fundamentals section, save it to your camera roll, and reference it before your next shoot. Pick one scenario — overcast portraits, indoor window light, or a night street scene — and spend 20 minutes working only with those starting-point settings, adjusting one variable at a time. That focused practice, repeated across three or four sessions, builds the intuition that no amount of reading can replace. Your camera is already capable of the photos you’re imagining — now you have the settings to match.
Last update on 2026-07-21 / Affiliate links / Images from Amazon Product Advertising API
Dave King
Hi, I'm Dave, the founder of Amateur Photographer Guide. I created this site to help beginner and hobbyist photographers build their skills and grow their passion. Here, you’ll find easy-to-follow tutorials, gear recommendations, and honest advice to make photography more accessible, enjoyable, and rewarding.