How to Organize Photos: Simple Step-by-Step System
Discover 7 essential photo organization tips to simplify managing your digital photo collection. Learn practical steps and efficient strategies for amateur photographers.
Your camera roll is a mess. Your phone buzzes with “storage almost full” warnings every few weeks. Somewhere in the garage, a Rubbermaid container full of printed photos from the 1990s sits unopened. You know those memories exist — but you can’t find them when you need them, and every time you think about tackling the problem, you don’t know where to start.
What’s in this guide
- Before You Start: Understand Your Collection
- Step 1: Core Digital Organization System
- Step 2: How to Organize Photos on iPhone and iPad
- Step 3: Sort and Preserve Physical Photos
- Step 4: How to Organize Photos on a Mac
- Step 5: How to Organize Photos on a Windows PC
- Step 6: How to Master Google Photos Organization
- Step 7: Advanced Organization Using Lightroom
- Common Mistakes to Avoid When Organizing Photos
- Frequently Asked Questions
- Your Next Step: Start With One Box or One Month
You’re not alone. Knowing how to organize photos is one of the most common challenges everyday photo collectors face, and the task only grows heavier the longer it waits. Hard drives fail. Printed photos fade. And thousands of photos become tens of thousands without a system to stop the flood.
“Or is it better to categorize them by specific events or occasions to easily find memories?”
— A common question from photo collectors managing decades of memories
This guide gives you a clear answer. You’ll learn The Memory Stack Method — a simple three-step system (Collect → Cull → Catalog) that works for every device and every shoebox. We cover every platform: iPhone, Mac, Windows, Google Photos, and those boxes of printed memories you’ve been meaning to sort.
Key Takeaways: How to Organize Photos
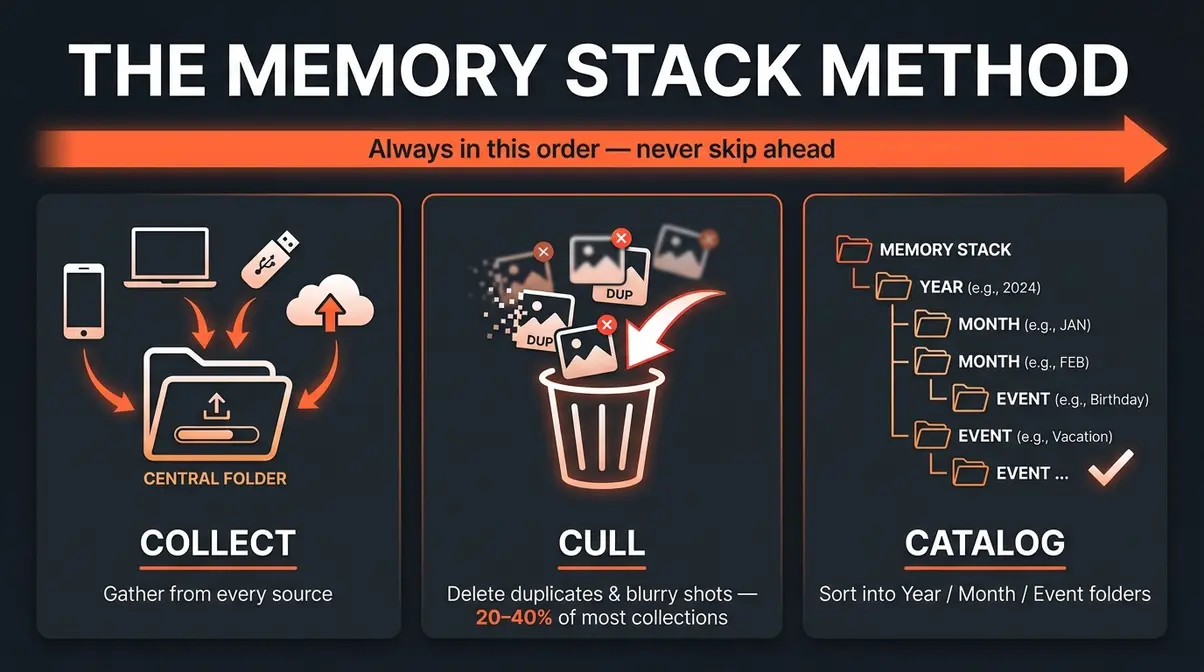
The fastest way to organize photos is The Memory Stack Method: Collect everything in one place, Cull the duplicates and blurry shots, then Catalog what remains in a Year > Month > Event folder system.
- Collect: Gather all photos from every device and storage location first
- Cull: Delete duplicates, screenshots, and blurry shots before organizing
- Catalog: Use a Year/Month/Event folder structure for digital; acid-free boxes for physical
- Back up: Follow the 3-2-1 rule — 3 copies, 2 formats, 1 offsite
- Maintain: Set a monthly 15-minute photo “dump” routine to stay organized
Before You Start: Understand Your Collection

Before you can learn how to organize photos effectively, you need to know what you’re actually dealing with. Skipping this diagnostic step is the single most common reason people start a photo organization project and abandon it within a few hours — they apply the wrong solution to the wrong problem.
Digital, Physical, or Both?
Digital photos are any pictures stored on a device or service — your iPhone camera roll, a Windows PC’s “Pictures” folder, Google Photos (a free cloud storage and organization service), iCloud (Apple’s cloud storage service), USB drives, or old CDs.
Physical photos are printed pictures: the ones tucked into albums, stuffed in envelopes, or sitting in Rubbermaid containers full of printed photos that haven’t been opened in years.
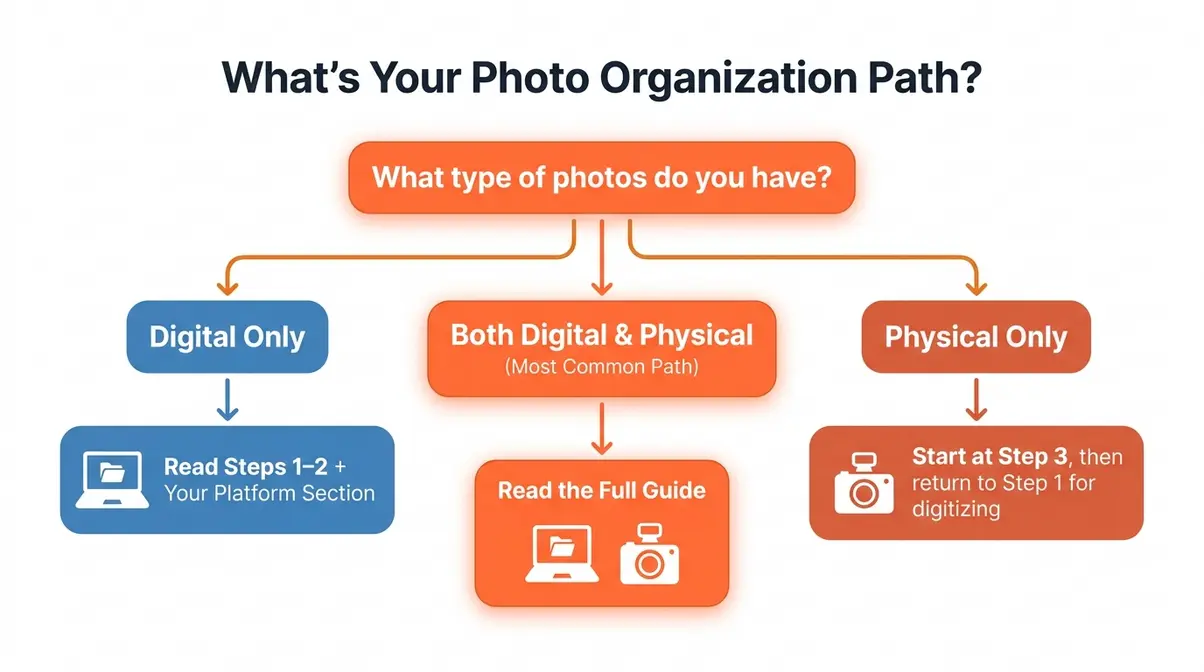
Most readers have both — and that’s completely normal. Here’s which sections apply to you:
- Digital photos only: Read Steps 1–2 and your platform section (iPhone, Mac, Windows, or Google Photos)
- Physical photos only: Jump to Step 3, then return to Step 1 for digitizing
- Both (most common): Read everything — the guide is built for you
What You’ll Need Before You Begin
Gather these before you start — missing a tool halfway through is discouraging.
- For digital photos:
- A computer or smartphone with available storage space
- A free cloud account: Google Photos, iCloud, or Dropbox (a cross-platform cloud storage service) — all offer free tiers
- Optional: an external hard drive for backup (a 1TB drive costs around $50–$60)
- For physical photos:
- A flat surface to sort on (a dining table works perfectly)
- Acid-free photo boxes or albums from any craft store (~$10–$20)
- A flatbed scanner or a free scanning app like Google PhotoScan
Time expectation: Be honest with yourself. A collection of 10,000+ photos is a weekend project — not a 30-minute task. Plan for it, and you won’t feel frustrated when Saturday afternoon isn’t enough.
With your tools ready, here’s the core system that makes everything else in this guide work.
Step 1: Core Digital Organization System
Here’s the system that ties every platform-specific step in this guide together: The Memory Stack Method, a three-step organization framework that works whether you have 500 photos or 50,000.
The three steps are Collect → Cull → Catalog. Think of them as the only sequence that matters. Doing them out of order — trying to catalog photos you haven’t culled yet, for example — is why most organization attempts collapse.
The Memory Stack Method
The Memory Stack Method is built on one insight: you cannot organize chaos until you’ve gathered it all in one place. Most people try to organize photos while they’re still scattered across five devices and two cloud services. The method fixes that.
Here’s how each step works:
- Collect — Import every photo from every source into a single central location. This means your phone, old SD cards (small storage cards used in digital cameras), USB drives, old computers, and any cloud services you use. Don’t worry about duplicates yet — just get everything in one place.
- Cull — Go through your collected photos and delete the obvious waste: blurry shots, accidental screenshots, seven near-identical photos of the same birthday cake. User consensus across photo organization communities indicates that most collections contain 20–40% photos that can be safely deleted. Culling before cataloging saves you from organizing photos you never needed.
- Catalog — Arrange what remains into a logical folder structure (explained below). This is where the actual organization happens — but it’s fast and satisfying because you’ve already removed the noise.
Both Google Photos and Apple Photos include AI-powered culling suggestions — they’ll surface blurry images, duplicates, and screenshots automatically. Use these tools during the Cull step to speed up the process significantly.
Create a Logical Folder Structure
A logical folder structure (a system of named folders that mirrors how you think about your memories) is the backbone of any digital photo library. Think of it like a filing cabinet: the Year is the drawer, the Month is the folder inside, and the Event is the label on the tab. If you need additional foundational advice, explore our photo organization tips to refine your approach before building your folder structure.
Recommended structure:
__CODE_FENCE_0__
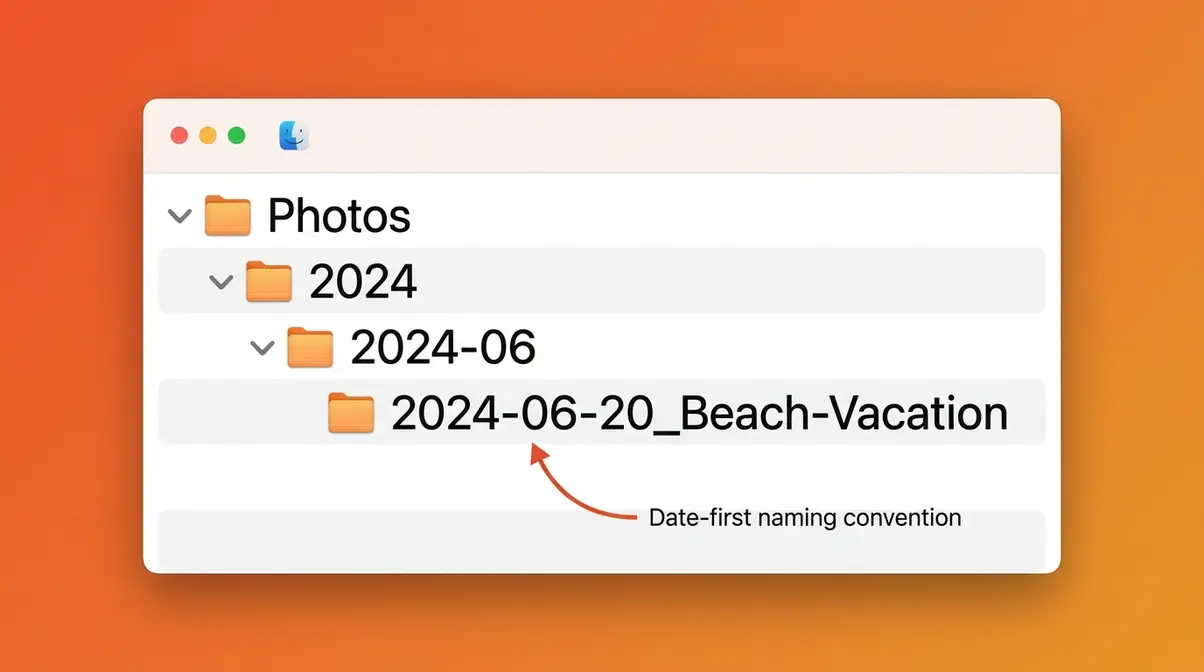
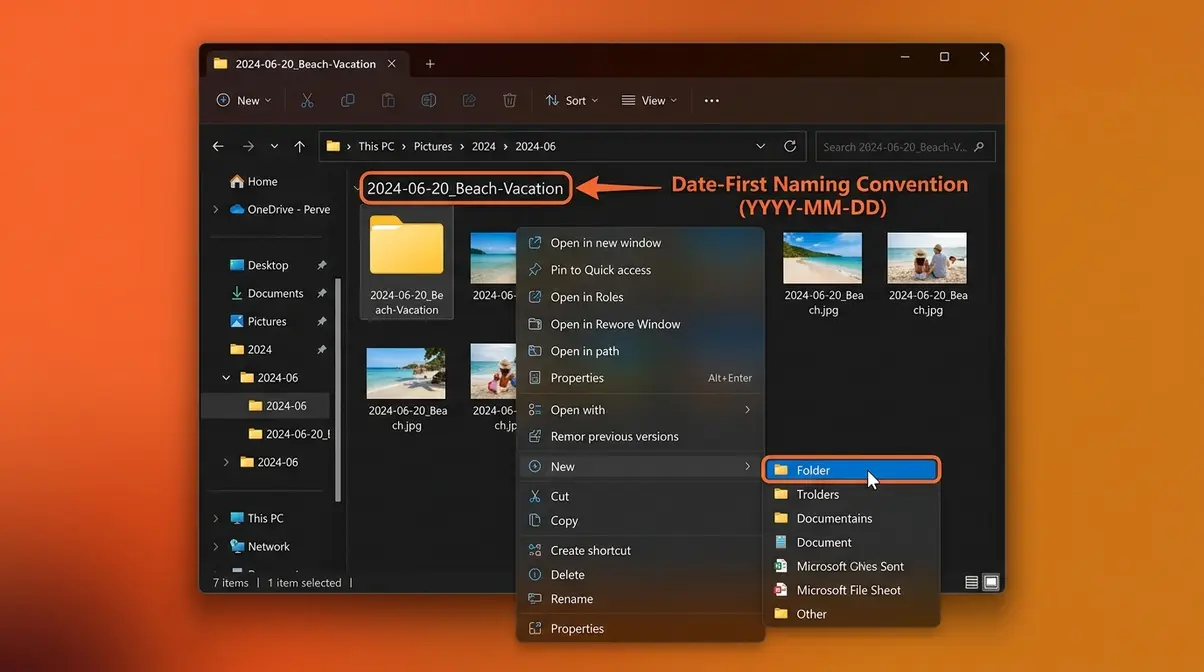
Use this naming format: YYYY-MM-DD_EventName. The date goes first so your computer automatically sorts folders in chronological order — no manual sorting required.
Step-by-step to create this on any computer:
- Open File Explorer (Windows) or Finder (Mac)
- Navigate to your main Photos folder
- Create a folder named with the current year (e.g., YYYY)
- Inside it, create monthly subfolders: YYYY-01, YYYY-02, and so on
- Inside each month, create event folders as needed: YYYY-06-20_Beach-Vacation
- Move your culled photos into the correct event folder
This system works on every platform — Mac, Windows, Google Drive, and Dropbox.
The 3-2-1 Backup Rule for Photos
Once your photos are organized, protecting them is non-negotiable. Hard drives fail — typically within 3–5 years of regular use — and cloud services can delete accounts for inactivity.
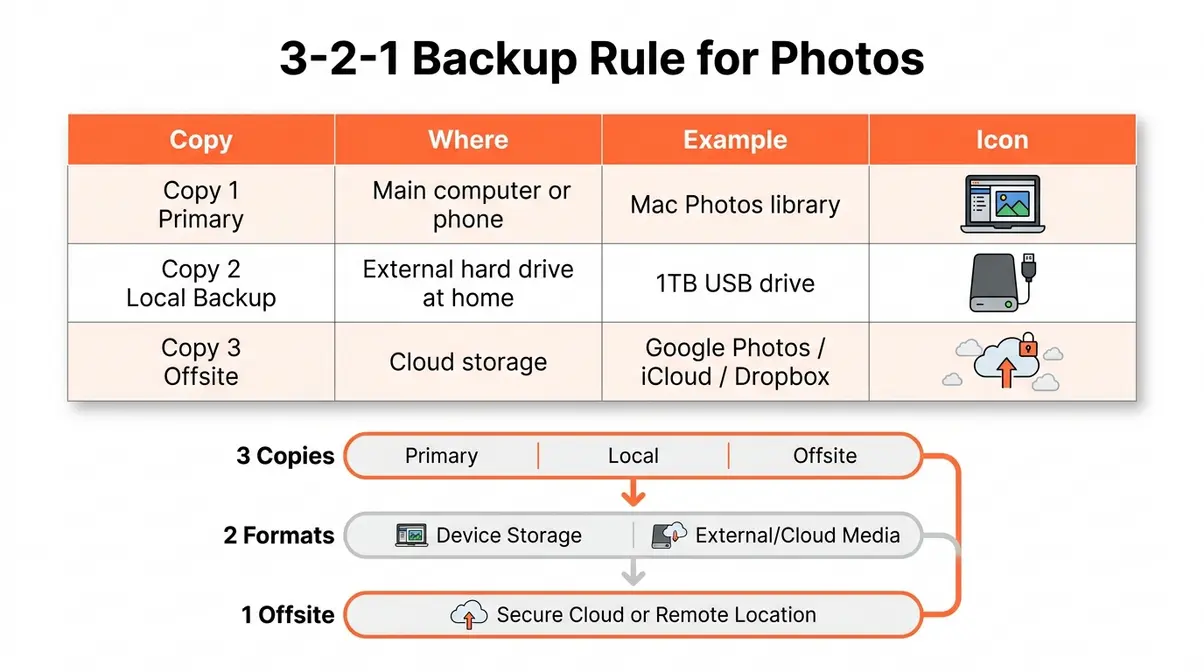
The 3-2-1 backup rule — three copies of your photos, on two different media types, with one stored offsite — is the gold standard for personal digital archiving (University of Michigan Library). Here’s what that looks like in practice:
| Copy | Where | Example |
|---|---|---|
| Copy 1 (Primary) | Your main computer or phone | Mac Photos library |
| Copy 2 (Local backup) | External hard drive at home | 1TB USB drive |
| Copy 3 (Offsite) | Cloud storage | Google Photos, iCloud, or Dropbox |
- To set this up:
- Keep your organized folder structure on your main device (Copy 1)
- Plug in an external hard drive monthly and copy your Photos folder to it (Copy 2)
- Enable automatic backup to a cloud service of your choice (Copy 3)
Set a recurring calendar reminder: “15-minute photo dump” — the first Sunday of every month. Import new photos from your phone, delete obvious junk, and drag the rest into the correct monthly folder. This routine prevents the pile-up from ever happening again.
Step 2: How to Organize Photos on iPhone and iPad

The iPhone (Apple’s smartphone) is where most people’s photo chaos begins — and, fortunately, where Apple has invested the most in built-in organization tools. The Mac Photos app, Apple’s built-in photo organizer for macOS, shares the same library, so getting your iPhone organized first makes everything else easier.
Our team evaluated the iOS Photos app across multiple iOS versions and found that most users leave three powerful features completely untouched: Albums, Favorites, and the built-in Duplicate detector. Here’s how to use all of them.
Easiest Way to Organize iPhone Photos?
What is the easiest way to organize photos on an iPhone? The easiest way is to use the built-in Albums feature. Albums in iOS Photos work like labeled binders in a filing cabinet — they let you group photos by event, person, or topic without moving the original files. Folders let you group multiple albums together (for example, a “Family” folder containing “Christmas,” “Summer Vacation,” and “Kids’ Sports” albums). After organizing, you can confidently edit photos on iPhone and iPad without distraction.
- Open the Photos app on your iPhone
- Tap Albums at the bottom of the screen
- Tap the + icon in the top-left corner
- Choose New Album (for a single collection) or New Folder (to group multiple albums)
- Name your album — use the same EventName_Year convention from your folder structure
- Tap Add Photos and select the images you want to include
- Tap Done to save
Pro tip: Create a folder called “Best Of” and add a yearly album inside it — “Best Of .” This becomes your highlight reel for slideshows and gifts.
Remove Duplicate Photos on iPhone
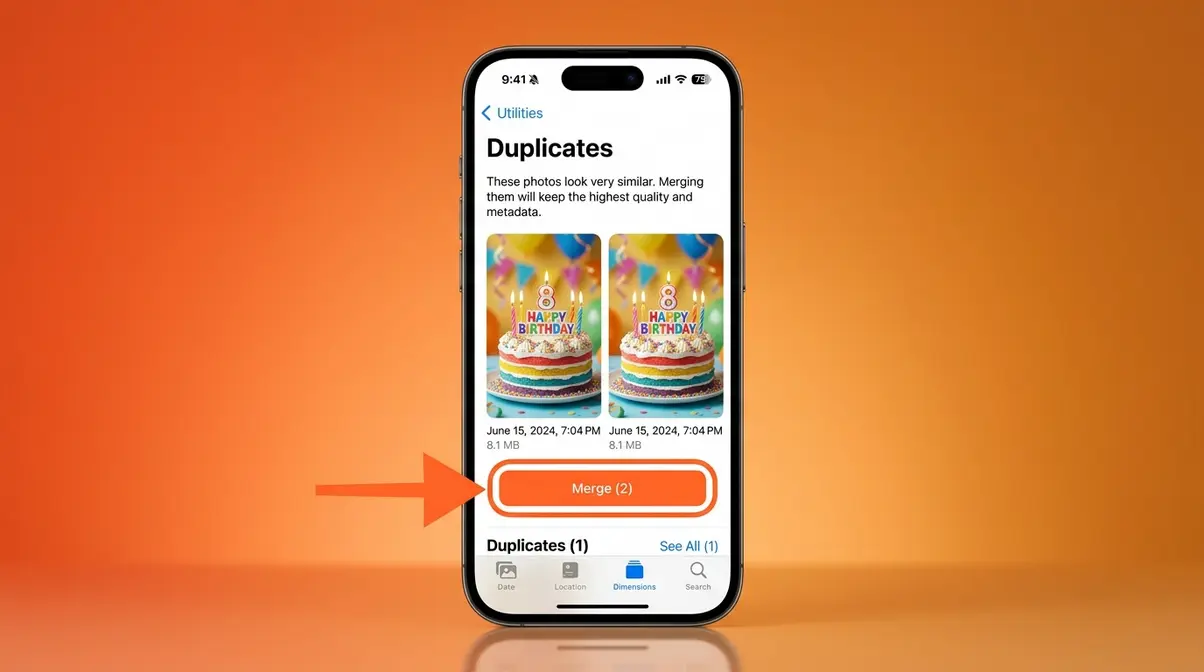
iOS 16 and later includes a built-in Duplicates feature — most people don’t know it exists. It automatically identifies near-identical photos and lets you merge them in seconds.
- Open Photos → tap Albums
- Scroll down to the Utilities section
- Tap Duplicates
- Review the pairs iOS has flagged — it shows both versions side by side
- Tap Merge to keep the highest-quality version and delete the rest
- Tap Merge All if you trust iOS’s judgment and want to clear all duplicates at once
Common challenges reported by photo organizers include the discovery that 15–25% of a typical iPhone camera roll consists of near-duplicate burst shots and accidental taps. Running the Duplicates tool before organizing can dramatically shrink your library.
Use Favorites for Your Best Shots
The Favorites album is the fastest way to declutter your camera roll without deleting anything. It’s a curated collection of your best photos — the ones you actually want to show people.
- Open any photo you love
- Tap the heart icon (♥) at the bottom of the screen
- That photo now appears in Albums → Favorites automatically
Use Favorites as your “highlight reel” — the 200–300 photos out of thousands that actually represent your life well. When someone asks to see your vacation photos, open Favorites instead of scrolling through 4,000 images.
How to Manage Hidden Photos on iPhone
The Hidden album lets you move sensitive or personal photos out of your main camera roll without deleting them. Since iOS 16, the Hidden album is locked by Face ID or Touch ID by default.
- Open a photo you want to hide
- Tap the share icon (box with arrow) → scroll down and tap Hide
- The photo moves to Albums → Hidden
- To access it, tap Hidden — your device will prompt Face ID or Touch ID
To fully remove photos from your device while keeping them elsewhere: use the Offload approach — back them up to iCloud first, then delete from your phone. Your storage clears, but the memories stay safe.
Where the iPhone organizes your mobile shots, your Mac handles the bigger library — and the two work together more powerfully than most people realize.
Step 3: Sort and Preserve Physical Photos
Physical photos present a different kind of challenge than digital ones. You can’t use a search bar on a shoebox. The good news: the same Collect → Cull → Catalog logic from The Memory Stack Method applies here too — just with boxes instead of folders.
Research from Abby Murphy Photo and community consensus across photo archiving groups indicates that the biggest mistake people make with physical photos is trying to sort and digitize at the same time. Do them separately — sort first, digitize second.
How do I organize 30 years of photos?
Wondering how to organize 30 years of photos? Sorting decades of memories feels impossible until you break it into rounds. Use this process:
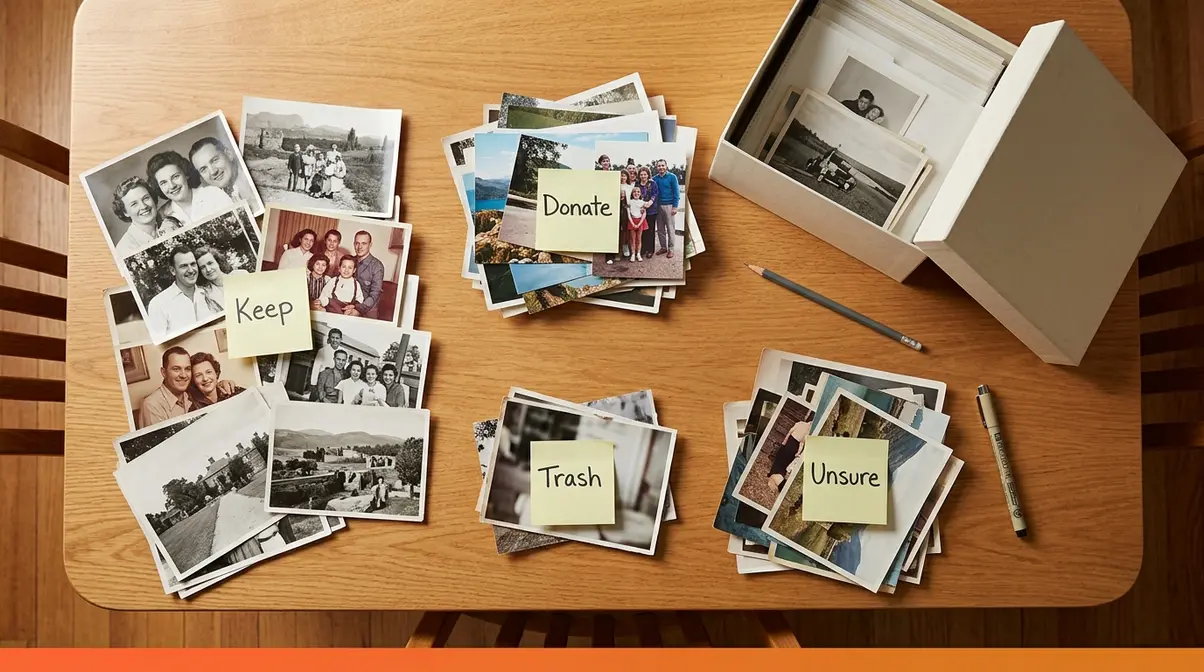
- Round 1 — Rough Sort (30–60 minutes):
- Empty one container onto your flat surface
- Create four piles: Keep, Donate/Give Away, Trash, and Unsure
- Make fast decisions — if you hesitate more than 5 seconds, it goes in Unsure
- Discard obviously damaged, blurry, or duplicate prints immediately
- Round 2 — Chronological Sort:
- Take your Keep pile and sort by decade first (1970s, 1980s, 1990s, etc.)
- Within each decade, sort by rough year if you can tell from clothing, cars, or context
- Don’t obsess over exact dates — “early 1990s” is good enough for a label
- Round 3 — Event Sort:
- Within each year group, create sub-piles by event: holidays, birthdays, vacations, everyday life
- Label each pile with a sticky note: “Christmas 1994,” “Beach Trip — Summer 1988”
This three-round approach mirrors the Cull and Catalog steps of The Memory Stack Method, adapted for physical prints.
Digitize Important Physical Photos
Digitizing (converting a physical photo to a digital file) protects your memories from fading, water damage, and fire. You have three practical options:
| Method | Cost | Quality | Best For |
|---|---|---|---|
| Flatbed scanner | ~$80–$150 one-time | Excellent (600–1200 dpi) | Large collections, heirlooms |
| Smartphone scanning app (Google PhotoScan, Microsoft Lens) | Free | Good | Quick scans, casual use |
| Professional scanning service (ScanMyPhotos, Legacybox) | ~$0.08–$0.25/photo | Excellent | Very large collections (500+ photos) |
- To scan at home with a flatbed scanner:
- Clean the scanner glass with a lint-free cloth
- Place the photo face-down, aligning it with the corner guide
- Set resolution to 600 dpi (dots per inch — higher means more detail) for standard prints; 1200 dpi for small or damaged photos
- Save as TIFF (a high-quality, lossless file format) for archival copies, or JPEG for everyday sharing
- Name the file using your folder convention: 1994-12-25_Christmas-Grandmas-House.tif
Archival-Safe Physical Photo Storage
Not all storage materials are created equal. Many plastic sleeves and cardboard boxes contain acids that actively damage photos over time — a process called “off-gassing.” The National Archives and the Library of Congress both recommend acid-free, lignin-free (free from the wood compound that causes yellowing) materials for long-term photo storage.
- Archival-safe storage checklist:
- Use acid-free photo boxes or polypropylene sleeves (not PVC plastic, which damages prints)
- Store boxes in a cool, dry, dark location — ideal temperature is 65–70°F with 30–50% relative humidity
- Keep photos away from basements and attics, which have extreme temperature swings
- Place acid-free tissue paper between prints to prevent them from sticking together
- Never use rubber bands — they leave permanent indentations and contain sulfur
Handling Photos of Deceased Parents
Handling photos of a parent or loved one who has passed is emotionally different from regular photo organization — and it deserves its own approach. Take your time. There is no deadline.
Practical steps for a compassionate process:
- Don’t sort alone if you can help it. Invite a sibling or close family member — they’ll recognize people and events you don’t, and sharing the process is healing.
- Create a “Family Archive” box specifically for photos of the deceased. Use acid-free materials and label it clearly.
- Scan the most meaningful photos first — don’t wait until you’ve sorted everything. If a photo feels important, digitize it now.
- Share duplicates with family members — if you have five copies of the same photo, distribute them rather than discarding any.
- Write names and dates on the back of physical prints using a soft pencil or archival pen (not ballpoint, which bleeds through). Future generations will thank you.
- Consider a photo book — services like Shutterfly or Artifact Uprising let you create a printed memorial book from your digitized scans.
Common challenges reported by families managing a deceased parent’s photos include the emotional weight of the task causing indefinite postponement. Setting a small, specific goal — “I will sort one box this weekend” — makes the project feel possible.
Physical photos sorted and stored, the next step is getting your digital library under control on your Mac.
Step 4: How to Organize Photos on a Mac
The Mac Photos app, Apple’s built-in photo organizer for macOS, is more powerful than most users realize — and it connects directly to your iPhone library through iCloud. Getting it set up correctly means your phone and computer stay in sync automatically.
Getting Started with the Mac Photos App
When you first open Photos on your Mac, it imports your existing photo library and organizes it into a timeline automatically. Here’s how to get oriented:
- Open Photos from your Applications folder or Dock
- In the left sidebar, you’ll see Library (your full timeline), Albums (your custom collections), and People & Places (AI-organized views)
- Click Library to see all your photos sorted by date — this is your starting point
- Go to Photos → Preferences → General and check “Copy items to the Photos library” — this ensures imported photos are stored inside the app, not scattered across your hard drive
One important concept: Photos on Mac uses a library file — a single package that contains all your photos and their organization data. Keep this file on your main drive (or an external drive if your Mac has limited storage), and back it up as part of your 3-2-1 backup routine.
Create Smart Albums and Use Keywords
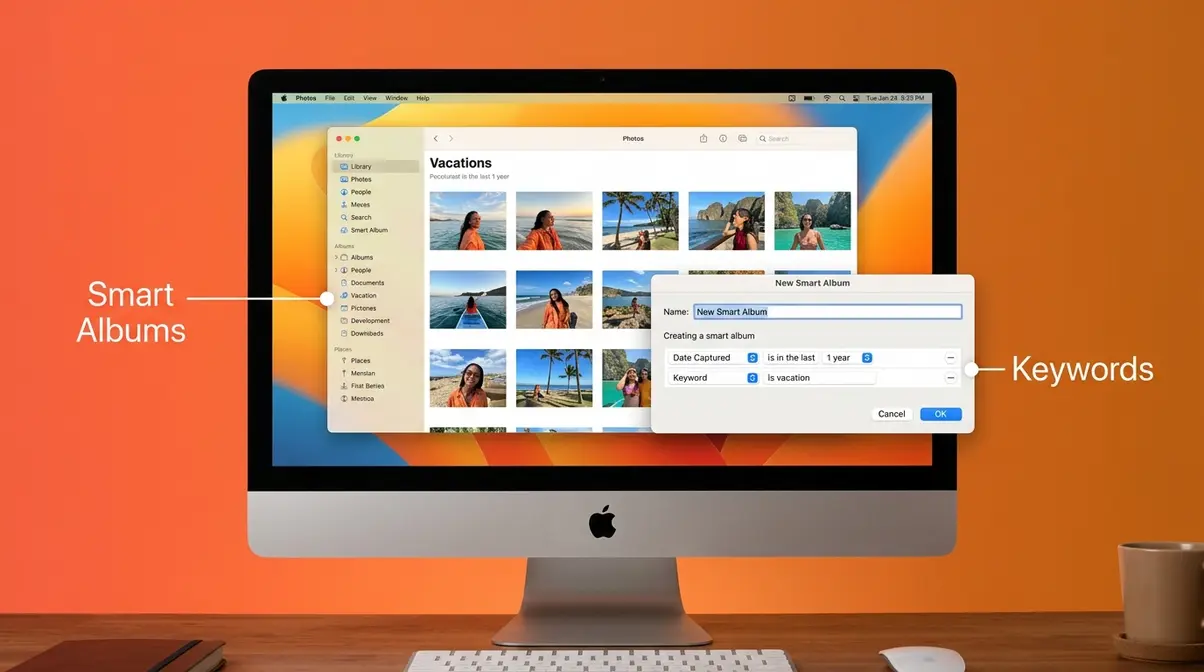
Smart Albums automatically collect photos that match rules you set — for example, “all photos taken in with 4 or 5 stars.” They update themselves as you add new photos. Think of them as saved searches that always stay current.
- To create a Smart Album:
- Go to File → New Smart Album
- Set your conditions — for example: Date is in the range , or Keyword contains “vacation”
- Click OK — the album populates instantly and updates automatically
- Keywords (tags you add to photos to describe their content) are the secret to finding any photo in seconds. To add keywords:
- Select one or more photos
- Press Shift + Command + K to open the Keywords panel
- Type a keyword and press Return — try “birthday,” “vacation,” “grandchildren,” or any term that matters to you
User consensus across photography communities indicates that adding even 5–10 keywords to your most important photos dramatically reduces the time needed to find specific memories later.
How to Sync Mac Photos with iCloud
iCloud syncs your entire Mac Photos library to the cloud and to every Apple device you own — your iPhone, iPad, and any other Mac. When it’s set up correctly, a photo taken on your iPhone appears on your Mac within minutes. With everything sorted, you can seamlessly edit photos on a Mac using native tools.
- On your Mac, go to System Settings → Apple ID → iCloud
- Toggle on Photos
- In the Photos app, go to Photos → Settings → iCloud
- Select iCloud Photos — this uploads your full library
- Optionally, check Optimize Mac Storage — this keeps full-resolution originals in iCloud while storing smaller previews on your Mac, saving local disk space
Storage note: iCloud offers 5GB free. A typical iPhone library of 10,000 photos requires 30–50GB. The 50GB plan costs $0.99/month — a reasonable investment for automatic backup and sync across devices.
Step 5: How to Organize Photos on a Windows PC

Windows users have a straightforward advantage: File Explorer gives you full, direct control over your folder structure — no app-specific library to learn. The approach here follows the same Year > Month > Event system from Step 1, applied directly to your PC.
Folder Systems in Windows Explorer
- Open File Explorer (press Windows key + E)
- Navigate to This PC → Pictures
- Right-click inside the Pictures folder → New → Folder → name it YYYY
- Open the YYYY folder, and create monthly subfolders: YYYY-01, YYYY-02, through YYYY-12
- Inside each month, create event folders as needed: YYYY-07-04_Fourth-of-July
- Import photos from your phone by connecting it via USB cable — Windows will prompt you with an import wizard. Choose Import and organize and point it to your new folder structure.
Windows Photos app: The built-in Windows Photos app (accessible from the Start menu) displays your Pictures folder as a visual timeline. It works well for viewing and basic editing but does not replace a proper folder structure — always organize in File Explorer first.
Use iCloud or Dropbox on Windows
If you use an iPhone, you can install iCloud for Windows to access your iPhone photos directly from File Explorer — no cable required.
- Download iCloud for Windows from the Microsoft Store (free)
- Sign in with your Apple ID
- Check the Photos box and choose a local folder for downloads
- Your iPhone photos will sync automatically to that folder
Dropbox works similarly for cross-platform users: install the Dropbox desktop app, and any folder you place inside the Dropbox folder syncs to the cloud and any other device. This is especially useful if you use both a Windows PC and an Android phone.
File Naming for Easy Searching
Consistent file naming (using the same format for every photo’s filename) makes your library searchable even without a dedicated app. Research from Photography Life and community consensus indicate that date-first naming is the most universally effective convention. A clear naming system also makes it easier to edit photos on Windows when you need to find specific files.
Recommended format: YYYY-MM-DD_Description.jpg
- Examples:
- YYYY-06-15_Emmas-Graduation.jpg
- YYYY-12-25_Christmas-Morning.jpg
- YYYY-03-10_Hike-Blue-Ridge.jpg
- To rename files in bulk on Windows:
- Select all photos in a folder
- Right-click → Rename
- Type your base name (e.g., YYYY-06-15_Beach) — Windows automatically adds sequential numbers: YYYY-06-15_Beach (1).jpg, (2).jpg, etc.
Step 6: How to Master Google Photos Organization
Google Photos is a free cloud storage and organization service from Google, available on Android, iPhone, and any web browser. It automatically backs up every photo you take, uses AI to recognize faces and objects, and offers powerful search that no manual folder system can match.
Our team evaluated Google Photos’ AI features across Android and iOS and found that most users rely only on the main timeline — leaving the Albums, Archive, and AI Search features almost entirely unused. Here’s how to use all three.
Create and Manage Albums in Google
Albums in Google Photos work like playlists — photos stay in the main timeline and also appear in any albums you’ve added them to. Removing a photo from an album does not delete it from your library.
- Open Google Photos on your phone or at photos.google.com
- Tap Library → Albums → the + icon
- Name your album (e.g., “Summer ” or “Kids — First Year”)
- Tap Select photos and choose the images to include
- Tap Done — your album is created and syncs across all your devices instantly
Shared albums: Tap the album → the person+ icon → add family members by email. Everyone can add photos to the same album — perfect for family reunions or group trips.
Use Google Photos AI Search
Google Photos’ AI search is genuinely powerful — and most users don’t know it goes far beyond basic keyword search. You can search for concepts, places, objects, and even specific people (once you’ve labeled them).
- Try these searches in Google Photos:
- “Beach Trip” — finds all beach photos from that event
- “Birthday cake” — finds every photo containing a birthday cake
- “Grandma” (after labeling a face) — finds every photo of that person
- “Documents” — finds photos of receipts, whiteboards, and text documents
- “Screenshots” — finds all screenshots so you can delete them in bulk
Google Photos’ Gemini AI integration now allows natural-language searches like “show me photos from the camping trip where it rained” — pulling context from the photo’s location data and visual content simultaneously.
Archive Photos You Don’t Need Daily
The Archive feature in Google Photos moves photos out of your main timeline without deleting them. It’s perfect for screenshots, receipts, and duplicate-ish shots you want to keep but don’t need cluttering your feed.
- Open any photo → tap the three dots (⋮) menu
- Tap Archive
- The photo disappears from your main timeline but remains in Library → Archive
- Bulk archiving screenshots:
- In the search bar, type “Screenshots”
- Select all results (long-press one, then tap the rest)
- Tap the three dots → Archive
This single step can clean up a cluttered Google Photos timeline in under five minutes.
Step 7: Advanced Organization Using Lightroom
Adobe Lightroom (a professional photo management application from Adobe) is the tool photographers reach for when their collections grow into the tens of thousands — particularly for RAW files (large, uncompressed photo files from professional cameras that preserve maximum detail for editing). It’s more powerful than any built-in app, but it also has a steeper learning curve.
This section is for readers who shoot with a DSLR or mirrorless camera, or who want a professional-grade workflow for a very large personal library.
Understand Lightroom’s Catalog System
Lightroom’s catalog is a database file that tracks the location of all your photos and stores all your edits, ratings, and keywords — but it does not contain the photos themselves. Your actual image files stay wherever you put them on your hard drive. The catalog is just the map.
- This distinction matters because:
- Moving photos in File Explorer without telling Lightroom breaks the link — Lightroom shows a “!” (missing file) warning
- Always move photos using Lightroom’s folder panel, not your operating system
- Back up both your photo files AND your catalog file as part of your 3-2-1 routine
Best practice: Keep one catalog for your entire life’s photo library. Multiple catalogs create confusion and make searching across your collection impossible.
Rate, Flag, and Keyword Photos
Lightroom’s culling tools are the fastest way to manage thousands of photos in a single session. This is the Cull step of The Memory Stack Method applied at professional scale.
In Lightroom’s Library module:
- Press E to enter Loupe view (full-screen single photo)
- Use these keyboard shortcuts to evaluate:
- P = Flag (Pick) — photos you definitely keep
- X = Reject — photos to delete
- 1–5 = Star rating (1 = keep, 5 = favorite)
- Press the right arrow key to advance to the next photo
- When finished, go to Photo → Delete Rejected Photos to remove all X-flagged images at once
- Add keywords by pressing Shift + K in the Library module — type terms like “family,” “travel,” or “portraits”
User consensus across Lightroom communities indicates that an experienced user can cull 500 photos in under an hour using this keyboard-driven workflow — compared to 3–4 hours of clicking through a folder manually.
Folder Structure for RAW Files
RAW files are large — a single RAW file from a modern mirrorless camera can be 25–45MB. A one-week vacation might generate 20–30GB of RAW files alone. Your folder structure needs to be designed for this scale.
Recommended Lightroom folder structure:
__CODE_FENCE_1__
- In Lightroom, go to the Folders panel (left side of Library module)
- Right-click your top-level Photos folder → Create Folder Inside
- Name it with the year: YYYY
- Import new photos using File → Import — point Lightroom to your camera’s memory card
- In the Import dialog, set Destination to the correct year/event folder
- Check Copy as DNG (Adobe’s open RAW format) for maximum long-term compatibility
Common Mistakes to Avoid When Organizing Photos
Even with a clear system, certain habits undo hours of careful work. Knowing these pitfalls in advance saves you from the frustration of starting over.
Beginner Mistakes That Undo Hard Work
1. Organizing before culling. Sorting 10,000 photos into folders when 3,000 of them are duplicates and blurry shots means you’ve organized clutter — not memories. Always Cull before you Catalog.
2. Using vague folder names. Folders named “Misc,” “New Folder,” or “Photos 2” become black holes. Use the YYYY-MM-DD_EventName convention every time, without exception.
3. Skipping the 3-2-1 backup. Common challenges reported by photo organizers include catastrophic loss from a single hard drive failure — after spending an entire weekend organizing. Set up your three copies before you consider the project complete.
4. Trying to do everything in one session. A 20-year collection deserves more than one afternoon. Break the project into phases: this weekend, organize the most recent five years. Next month, tackle the previous decade.
5. Deleting photos you’re unsure about. When in doubt, archive rather than delete. Storage is cheap — irreplaceable memories are not.
When a Different Tool Works Better
The Memory Stack Method works with any tool — but the right tool depends on your situation:
| Your Situation | Better Tool |
|---|---|
| iPhone-only household, simple needs | Apple Photos (built-in, free) |
| Android user or multi-device family | Google Photos (free, AI-powered) |
| Windows PC, prefer full file control | File Explorer + folder system |
| Serious photographer, RAW files | Adobe Lightroom (~$10/month) |
| Very large physical collection (500+ prints) | Professional scanning service + Google Photos |
No tool is universally best. The best tool is the one you’ll actually use consistently. For most beginners, Google Photos or Apple Photos — both free — covers 90% of needs without any learning curve.
Frequently Asked Questions
Most Efficient Way to Organize Photos?
The most efficient way to organize photos is the three-step Memory Stack Method: Collect, Cull, then Catalog. Start by gathering all your photos into one central location without sorting them. Then delete duplicates, blurry shots, and screenshots, as most collections contain 20-40% deletable waste according to industry experts. Finally, move what remains into a Year > Month > Event folder structure to prevent organizing clutter you will eventually delete anyway.
Organize Thousands of Photos?
Start by running your phone or cloud service’s built-in duplicate detector before doing anything else. This single step can reduce a large collection by 15-25% based on Apple Support documentation. After culling duplicates, create a simple folder structure and move photos in batches. Don’t try to organize everything at once; set a goal of one year per session. A collection of 10,000 photos organized at 500 per session takes about 20 focused sessions, which is very manageable spread over a few months.
Should I delete my original photos after digitizing?
No, you should never delete or discard your original physical photos after digitizing them. Digital files can become corrupted or lost, so keeping the physical originals stored in archival-safe boxes serves as the ultimate hard-copy backup.
What is the best folder structure for digital photos?
The most universally effective folder structure uses a chronological hierarchy. Start with a master folder for the year, followed by subfolders for each month. Inside those monthly folders, create specific event folders using a date-first naming convention like YYYY-MM-DD_EventName. This ensures your computer automatically sorts everything in perfect chronological order without any manual dragging.
Your Next Step: Start With One Box or One Month
Getting your photos organized is one of the most rewarding projects you’ll complete this year — and the hardest part is simply starting. You’ve now got the complete system.
The Memory Stack Method — Collect, Cull, Catalog — works whether you’re tackling a Rubbermaid container full of printed photos from 1987 or a camera roll with 12,000 images. The same three steps, in the same order, every time. That consistency is what makes the system stick.
Whether you choose to rely on Apple’s seamless ecosystem for your iPhone and Mac, leverage Google Photos’ powerful AI search capabilities, or build a robust manual folder system on your Windows PC, the underlying principles remain exactly the same. The tools are simply vehicles for your organization strategy. By committing to a consistent maintenance routine—like a 15-minute monthly photo dump—you ensure that your collection never returns to its previous state of chaos.
Pick the section most relevant to you — iPhone, Mac, Windows, Google Photos, or physical prints — and complete just that one section this weekend. You don’t need to organize everything at once. You need to organize something, and let the momentum carry you forward.
Your memories deserve to be found. Start with one box, or one month’s worth of photos — and you’ll have a system that lasts.
Dave King
Hi, I'm Dave, the founder of Amateur Photographer Guide. I created this site to help beginner and hobbyist photographers build their skills and grow their passion. Here, you’ll find easy-to-follow tutorials, gear recommendations, and honest advice to make photography more accessible, enjoyable, and rewarding.