Landscape Photography Guide: 4 Proven Pillars for 2026
Discover the ultimate guide to landscape photography with a step-by-step approach. Learn to plan, shoot, edit, and evaluate breathtaking landscape photos confidently.
You went to the location. You waited for the view. You pressed the shutter — and the photo looks nothing like what you actually saw. The reason isn’t your camera. Nobody gave you a complete framework. According to Statista data on photography, approximately 19–20% of U.S. adults engage in photography as a hobby (Statista, 2026), yet most self-taught photographers never adopt a structured learning approach — they chase techniques in isolation, buying better gear when what they really need is a better system.
What’s in this guide
- What Is Landscape Photography? The 4 Pillars
- Camera Settings and Composition Techniques
- Essential Gear: Lenses, Tripods, and Filters
- Landscape Photography Styles and Niches
- Best Locations for Landscape Photography
- Courses, Workshops, and Going Pro
- Common Mistakes to Avoid
- Frequently Asked Questions
- The Framework That Changes Everything
Every trip to a stunning location without the right framework is a missed opportunity you cannot get back. Golden hour lasts 20–30 minutes. The light that transforms a mountain range into something otherworldly is gone before most photographers even finish setting up their tripod.
By the end of this landscape photography guide, you’ll have a complete system — covering settings, gear, composition, and style — so your next shot reflects what you actually saw. This guide is organized around The 4 Pillars Framework: Location, Composition, Light, and Processing. Six sections cover everything from planning with PhotoPills to printing and selling your work.
Before You Start: You’ll get the most from this guide if you have a camera with manual or aperture-priority mode, know how to change ISO and aperture, and have shot outdoors at least once. If you’re starting from scratch, see our step-by-step guide to landscape photography first.
What Is Landscape Photography? The 4 Pillars
Landscape photography is the deliberate practice of capturing the natural and built environment as the primary subject, with the goal of conveying a sense of place and emotional response. It goes far beyond pointing a camera at a pretty view. Stanford University’s photography curriculum describes landscape photography as a medium designed to make viewers rethink the environment in which they live (Stanford, 2011) — which reframes the photographer’s role from documentarian to storyteller. Understanding that purpose changes every decision you make in the field.
Defining Landscape Photography
Landscape photography is the art of capturing the natural or built environment as the primary subject, emphasizing light, scale, and a sense of place. Unlike wildlife photography — where animals are the focus — landscape work treats the environment itself as the story. As you read through this landscape photography guide, remember that your goal is to convey the feeling of the location, not just its visual facts.
The Library of Congress on landscape photography notes that these images tell stories deeply tied to human interactions with the land, shaping our impressions of the earth (Library of Congress, 2021). That’s a useful reminder: you’re not just documenting a place, you’re interpreting it.
Landscape photography spans five broad types:
- Natural/wilderness — mountains, deserts, forests, coastlines
- Urban/cityscape — skylines, bridges, industrial environments
- Intimate/detail — close-up textures, patterns, isolated elements within a larger scene
- Aerial — drone or elevated-position perspectives that reveal scale and geometry
- Black and white — tonal and textural studies that strip color from the equation
These categories will map directly to the Styles section later in this guide.
Transition: With a clear definition in hand, the question becomes: what separates a forgettable landscape photo from a memorable one? The answer is a framework — and it has exactly four parts.
The 4 Pillars Framework Explained
Imagine arriving at a location at sunrise that stops you cold — the kind of place that belongs on a magazine cover. You shoot for an hour. You get home. The images are flat. Something is wrong, but you can’t diagnose it.
That’s the problem The 4 Pillars Framework solves. We organize every element of landscape photography into four interdependent pillars. Weakness in any single pillar cannot be compensated by strength in the others — a stunning location with bad composition still produces a weak photo.
| Pillar | Definition | Common Failure |
|---|---|---|
| Location | Where and when you shoot — including scouting, access, and timing | Arriving without pre-visualizing the shot |
| Composition | How you arrange elements in the frame | Flat horizon, no foreground interest |
| Light | Quality, direction, and timing of illumination | Shooting midday in harsh, overhead light |
| Processing | How you develop the RAW file in post | Underexposing and failing to recover shadows |
The diagnostic power of the framework is what makes it useful in the field. When a shot fails, you ask: which pillar failed? Was it the location choice, the framing, the light quality, or the editing? That single question replaces hours of frustrated guessing.
A concrete example makes this real: two photographers shoot the same canyon at the same time. Photographer A arrived with no plan, shot from the parking lot, and processed the JPEG on their phone. Photographer B pre-scouted with Google Earth, positioned near a curved rock formation as a foreground element, waited for the golden hour window, and processed a RAW file in Lightroom. Same location. Same camera. Completely different photographs.
These landscape photography tips are organized around the 4 Pillars so you always know which skill to practice next. For additional depth, see our essential tips for stunning landscape photos.
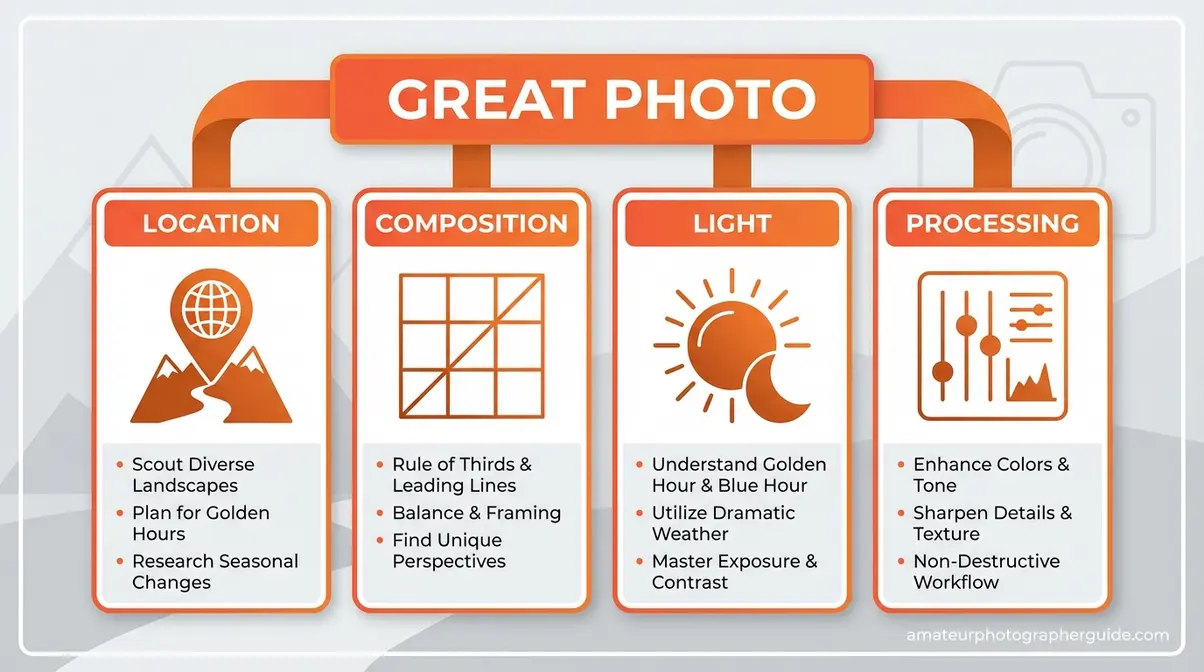
Caption: The 4 Pillars Framework — diagnose any failed shot by identifying which pillar fell short.
Transition: “The first pillar — Location — isn’t just about picking a pretty place. It’s about arriving at the right place at the right time. Here’s how professionals do it.”
Planning Your Shoot with PhotoPills
One of the most overlooked landscape photography tips for beginners is to plan before you arrive. Most intermediate photographers focus on the Light pillar (chasing golden hour) while entirely neglecting the Location pillar — specifically, scouting and composition planning before they ever leave the house. PhotoPills landscape planning guide confirms that pre-visualizing sun and moon alignments at any location before arrival is a defining habit of professional landscape photographers (PhotoPills, 2026).
Here is the four-step pre-visit workflow used by experienced landscape shooters:
- Search the location on Google Earth — identify terrain, access points, elevation changes, and potential foreground elements. Look for water bodies, rock formations, and tree lines that could anchor your composition.
- Open PhotoPills and use the Planner — overlay the sun or moon path on a satellite map of your location. Drag the time slider to see exactly where the sun rises, sets, and tracks across the sky on your planned date.
- Identify the precise alignment — find the date and time when the sun aligns with your planned composition. PhotoPills’ Augmented Reality view lets you hold your phone up and see exactly where the sun will be in the sky at any future moment.
- Check weather 24–48 hours before — apps like Windy or Weather Underground show cloud cover, wind speed, and precipitation. Partial cloud cover often produces more dramatic light than a clear sky.
The golden rule: never arrive at a location for the first time at golden hour. Arrive 30–45 minutes early to scout foreground options, set up your tripod, and test at least two compositions before the light peaks. Planning a shot at Crater Lake, Oregon? PhotoPills shows the exact morning when the sun rises directly behind Wizard Island — a shot that looks lucky but is actually engineered.
PhotoPills also includes a Milky Way planner and an Ephemeris view (a full-day arc of the sun’s path) that intermediate shooters rarely discover on their own. These tools give you a genuine competitive advantage over casual shooters who just show up and hope.
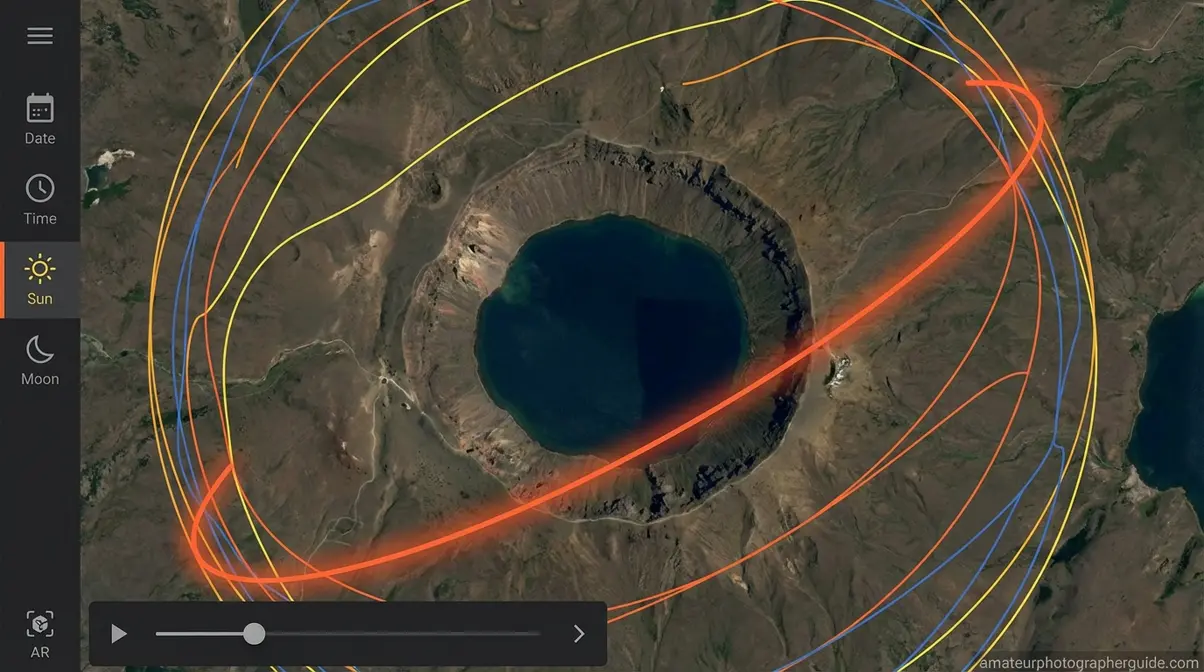
Caption: PhotoPills’ Planner overlays the sun’s path on a satellite map — use it to engineer your shot before you leave home.
For tips on adapting this workflow when you’re traveling to new locations, see our travel photography tips for capturing new locations.
Transition: “Once you’ve scouted your location and timed your arrival, the next question is how to develop those RAW files into the images you pre-visualized. Here’s the basics.”
Post-Processing Basics
Post-processing is Pillar 4 of The 4 Pillars Framework — and this landscape photography guide covers it because no amount of perfect light and composition rescues a poorly processed file. The first non-negotiable: shoot RAW, not JPEG. RAW files contain three to four times more tonal data than JPEGs, giving you recovery latitude in blown highlights and crushed shadows that JPEG simply discards at the moment of capture.
Here are the five essential Lightroom adjustments for landscapes, applied in order:
- Exposure — Set overall brightness. Aim for a histogram that fills the frame without clipping either end.
- Highlights — Pull down (–40 to –80) to recover blown sky detail. This is your most-used slider for landscape work.
- Shadows — Lift (+30 to +60) to reveal foreground detail — rocks, grass, water — that the camera underexposed.
- Clarity — Add texture (+20 to +40) to rocks, bark, and water without over-sharpening smooth skies.
- Dehaze — Use sparingly (+10 to +25) to cut atmospheric haze on distant mountains.
A forest example: the canopy is blown out in the RAW file. Pull Highlights to –60, lift Shadows to +40, and both the canopy and the dark forest floor become visible — detail that existed in the RAW data but was hidden.
For next-level work, Photoshop’s focus stacking combines three to five shots focused at different distances, creating front-to-back sharpness that a single exposure at f/16 cannot always achieve — particularly useful for extreme wide-angle shots with very close foreground elements.
Caption: The same RAW file before and after five targeted Lightroom adjustments — no presets, no filters.
Transition: “Now that you understand the 4 Pillars and how to plan a shoot, let’s go deeper into Pillars 2 and 3 — Composition and Light — because these are where most intermediate photographers have the most room to improve.”
Ready to put the 4 Pillars to work? Our step-by-step guide to landscape photography walks you through your first complete shoot from scouting to final export.
Camera Settings and Composition Techniques
The most common reason landscape photos disappoint isn’t the gear — it’s the settings and timing. The best landscape photography settings start with aperture between f/8 and f/16, ISO at its base level (100 or 64 on most modern cameras), and Aperture Priority mode rather than full manual when shooting in changing light. This range maximizes depth of field while avoiding the diffraction softness that appears above f/16 on most sensors. It also gives you the flexibility to let the camera adjust shutter speed as clouds shift and light evolves. These settings cover 80% of landscape scenarios; the remaining 20% — long exposure, astrophotography, bracketed HDR — are addressed in the H3s below.
The Exposure Triangle for Landscapes
The exposure triangle is the relationship between aperture, ISO, and shutter speed that determines every photo’s brightness and sharpness. For landscape work, you’re not using it the same way a portrait or sports photographer does. Every setting choice is shaped by one goal: front-to-back sharpness with minimum noise at maximum dynamic range.
| Setting | Recommended Value | Why |
|---|---|---|
| Aperture | f/8–f/16 | Maximum depth of field, avoids diffraction |
| ISO | 100 (base) | Minimum noise, maximum dynamic range |
| Shutter Speed | Varies (let camera set in Av mode) | Adjust for wind/motion in scene |
| Mode | Aperture Priority (Av/A) | Control DoF while camera manages exposure |
| Format | RAW | Maximum post-processing latitude |
| White Balance | Auto or Kelvin (4,500–5,500K) | Accurate color baseline for editing |
Aperture: f/4 gives shallow depth of field — foreground sharp, background blurry — which is generally wrong for landscapes. f/22 triggers diffraction softness that no sharpening can fully recover. f/8 to f/11 is the sharpest point on most lenses, the diffraction-free sweet spot for this type of photography. At Horseshoe Bend, Arizona: f/11, ISO 100, 1/60s in Av mode produces a perfect exposure for canyon walls and river with no filter needed at midday.
ISO: Always start at base ISO (100 or 64). Since you’re using a tripod, you can keep ISO 100 even at 30-second exposures — there’s no handholding risk. Only raise ISO if you’re shooting handheld or in conditions where the tripod isn’t viable. Bracketing is worth mentioning here: shoot one frame exposed for sky, one for foreground, then blend the two in post for high-contrast scenes where a single exposure can’t hold both ends.
Shutter Speed for Creative Effects: Long exposures (0.5s–30s) blur water and clouds into silky motion — requires a tripod and ND filter. Fast shutter speeds (1/500s and above) freeze crashing waves for a “frozen moment” aesthetic. Neither approach is more correct; they tell different stories from the same location.
One technique worth adding to your toolkit: focus stacking. When f/16 still isn’t enough for extreme wide-angle shots with very close foreground elements, combine three to five shots focused at different distances for true front-to-back sharpness.
Caption: The exposure triangle applied specifically to landscapes — every setting choice flows from the goal of front-to-back sharpness.
Caption: Save this cheat sheet to your phone — it’s the only settings reference you need in the field.
Transition: “Getting the exposure right is Pillar 3 (Light) in technical form. Now let’s look at Pillar 2 — Composition — because a perfectly exposed photo of a badly framed scene is still a bad photo.”
Composition Rules That Work
Composition is where most intermediate photographers have the most room to improve — and the most to gain. Adobe’s rule of thirds guide defines the rule of thirds as placing the subject in the left or right third of the image to create dynamic visual balance (Adobe, 2026). For landscapes specifically: the horizon line belongs on the top or bottom horizontal grid line, not the center. Key subjects — a mountain peak, lone tree, lighthouse — belong at one of the four intersection points. Enable your camera’s grid overlay and practice this until it becomes instinctive.
Leading lines are one of the most powerful tools in landscape photography composition techniques. Roads, rivers, fences, shorelines, and tree rows draw the eye from the foreground into the depth of the frame. Converging lines — two lines meeting at a vanishing point — are especially effective. The practical tip most guides skip: get physically low and close to the leading line to maximize its visual pull. A river shot from standing height is decorative; the same river shot from six inches above the bank is immersive.
Foreground interest is what separates compelling landscapes from flat snapshots. The community expresses this clearly:
“The composition must be above average. Generally, this means in landscape photography you have a foreground, middle ground and background.”
That three-layer depth — a textured rock, wildflowers, or tide pool in the foreground; a tree line or hillside in the middle ground; mountains or sky in the background — creates the visual journey that keeps a viewer’s eye moving through the frame rather than stopping at the horizon.
Color harmony is the fourth compositional tool, and it’s one that golden hour delivers for free. Complementary colors — blue sky against golden wheat, orange sandstone against blue water — create visual tension that photographers spend hours trying to replicate in post. Shooting at golden hour naturally produces warm-cool contrast that makes post-processing faster and more satisfying.
At Death Valley’s Mesquite Flat Sand Dunes: use the curving dune ridgeline as a leading line, place a textured dune surface in the foreground, and position the mountain range at the upper-left intersection point of the rule-of-thirds grid. That’s three compositional tools working simultaneously.
For a deep-dive into framing and layering, see our guide to mastering landscape photo composition and the rule of thirds.
Caption: Grid overlay showing exactly where the horizon and key subjects belong — enable this in your camera’s viewfinder settings.
Caption: A river used as a leading line pulls the viewer from foreground to background — composition doing the work that a filter cannot.
What is the rule of thirds in landscape photography?
The rule of thirds divides your frame into nine equal sections using two horizontal and two vertical lines. For landscapes, place the horizon on the top or bottom horizontal line — not in the center — and position key subjects (mountain peaks, lone trees, lighthouses) at one of the four intersection points. Adobe identifies this as the foundational composition principle for dynamic visual balance (Adobe, 2026). Enable your camera’s grid overlay to practice until the framing becomes automatic.
Transition: “Even the best composition falls flat without the right light. The single most impactful thing you can do for your landscape photography is show up at the right time — and that means understanding golden hour and blue hour.”
Golden Hour vs. Blue Hour Light
Light quality outranks technical precision for landscape impact. A slightly imperfect f/8 shot at golden hour produces drama. A technically perfect f/11 shot at midday produces flat, harsh results. This is the editorial insight that most settings guides miss.
Golden hour occurs shortly after sunrise and just before sunset — typically a 20–40 minute window that varies by latitude and season. The National Park Service photography guide identifies this as the optimal time for landscape photography due to the quality of warm, directional, low-angle light (NPS, 2026). Characteristics: warm color temperature (~3,000–4,000K), soft shadows, low contrast. These conditions enhance surface textures and create long shadows that reveal terrain geometry invisible at midday.
Blue hour occupies the 20–30 minutes before sunrise and after sunset, when the sun is below the horizon and the sky produces a deep, even blue. Lower ambient light requires slower shutter speeds — tripod mandatory — and ISO bumps to 400–800. The resulting images are cooler and more serene: ideal for water reflections, cityscapes, and minimalist compositions. Blue hour light is more consistent than golden hour light, which makes it forgiving for beginners learning long-exposure work.
| Time of Day | Light Quality | Best For | Settings Adjustment |
|---|---|---|---|
| Golden Hour | Warm, directional, low-angle | Mountains, coastlines, fields | ISO 100, Av mode |
| Blue Hour | Cool, even, diffused | Water reflections, cityscapes | ISO 400–800, Manual mode |
| Overcast Midday | Soft, flat, neutral | Forest interiors, waterfalls | ISO 100–400, no harsh shadows |
| Clear Midday | Harsh, overhead, high-contrast | Generally avoid for landscapes | — |
Consider the same shot of the Grand Teton range: golden hour produces warm orange peaks with long blue shadows across the Snake River plain. Blue hour, 45 minutes later, produces cool purple peaks reflected in still water. Two completely different emotional tones from the same location. That’s the power of timing over technique.
For blue hour in Manual mode: start at ISO 400, shutter 2–15 seconds, and check your histogram. Underexposure is the common mistake — the scene looks brighter to your eye than it registers on the sensor.
Caption: Same location, 45 minutes apart — golden hour and blue hour produce entirely different emotional tones.
Bookmark our best camera settings for golden hour landscapes for exact timing and settings for your next sunrise shoot.
Transition: “You now have the settings and compositional knowledge to shoot. The next question is whether your gear can execute the vision — and the answer is almost certainly yes, with a few key upgrades.”
Essential Gear: Lenses, Tripods, and Filters
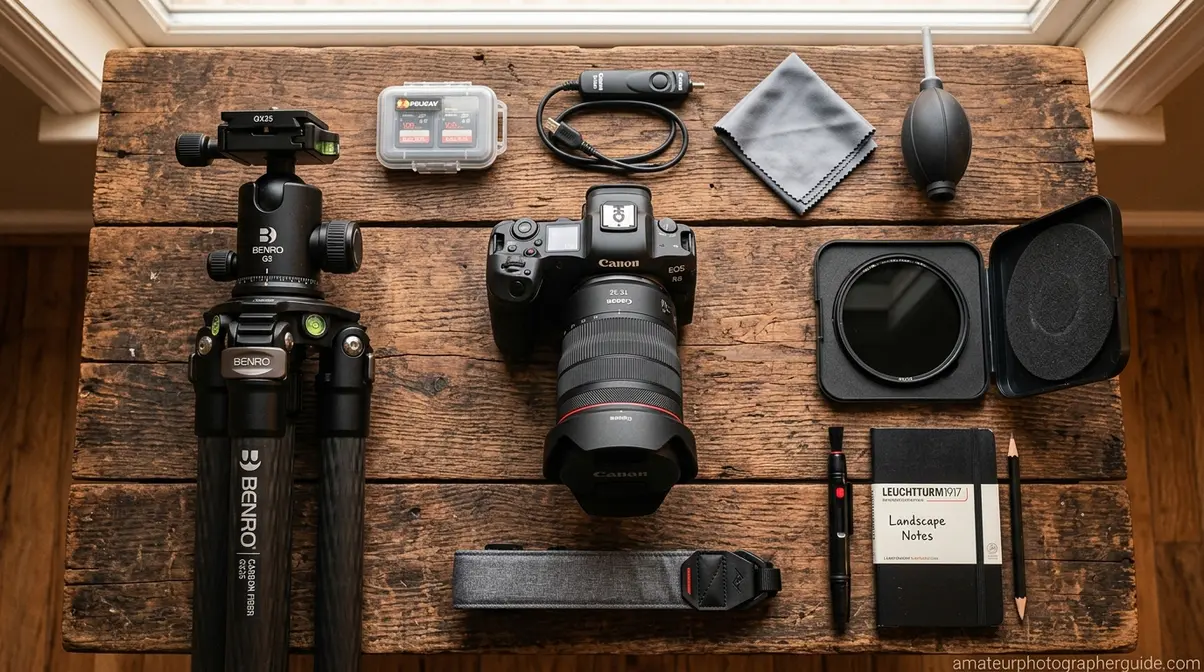
You don’t need the most expensive gear to capture stunning landscapes, but you do need the right combination of lens, tripod, and filter for your camera system. Lens choice directly affects three of the four pillars: it determines how much of the scene you capture (Location), shapes your composition options (Composition), and controls depth of field — a function of both aperture and focal length. The practical starting point: a wide-angle zoom in the 14–35mm range, a quality tripod, and a circular polarizing filter. That combination outperforms an expensive mirrorless body used handheld with a kit lens.
Best Lenses by Brand
Wide-angle lenses — typically 14–35mm focal lengths — capture expansive vistas and emphasize foreground-to-horizon depth. They’re the primary tool for most landscape work. These lens recommendations pair naturally with the f/8–f/16 settings from the previous section.
If you are searching for the best lenses for landscape photography canon provides several excellent options.
- Canon (RF mount):
- RF 15-35mm f/2.8L IS USM — the go-to landscape lens for EOS R5/R6 shooters; sharp edge-to-edge, weather-sealed, f/2.8 for astrophotography (around $2,300–$2,500)
- RF 16mm f/2.8 STM — budget-friendly prime for APS-C and full-frame (around $300)
- Canon (EF mount/DSLR):
- EF 16-35mm f/4L IS USM — excellent image stabilization, sharp across the zoom range (around $1,100)
- EF-S 10-18mm f/4.5-5.6 IS STM — outstanding budget wide-angle for APS-C bodies (around $300)
- Nikon (Z mount):
- NIKKOR Z 14-30mm f/4 S — compact, sharp, weather-sealed; excellent for travel (around $850)
- NIKKOR Z 17-28mm f/2.8 — f/2.8 flexibility for low-light golden hour work (around $800)
- Sony (E mount):
- Sony FE 12-24mm f/2.8 GM — best-in-class for high-resolution sensors like the a7R series; weather-sealed (around $2,200–$2,500)
- Tamron 17-28mm f/2.8 Di III RXD — an outstanding budget option that trades marginal edge sharpness for significant cost savings (around $800)
Prices are approximate as of 2026 — check current retailer listings before purchasing.
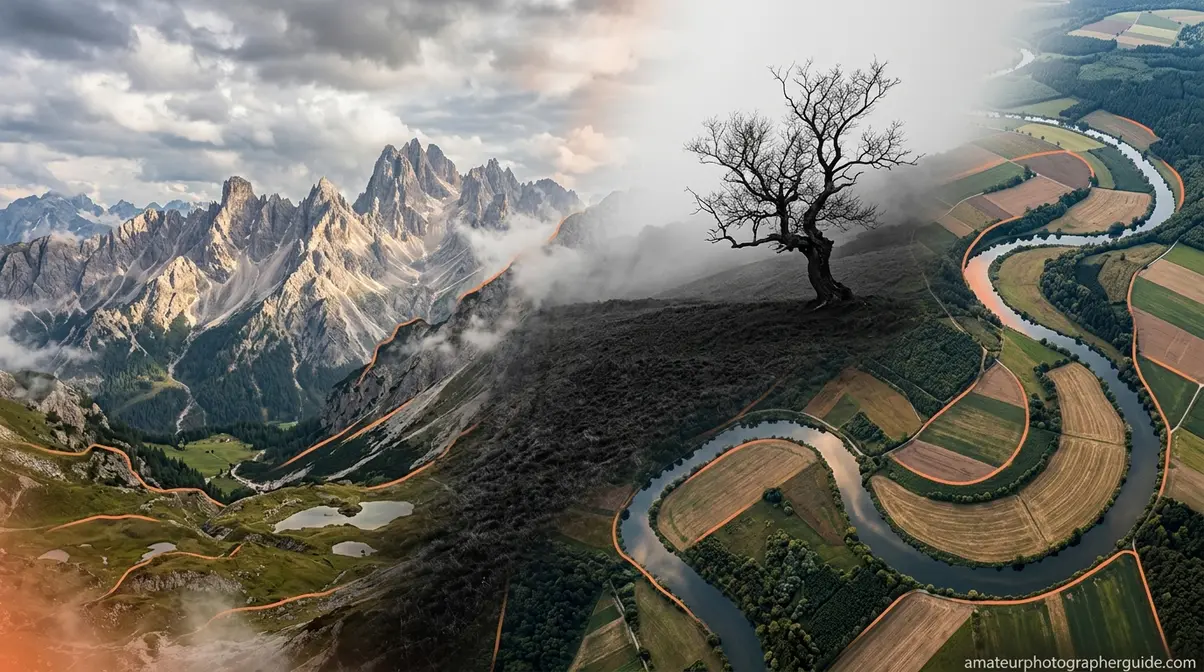
Telephoto lenses (70–200mm) serve a different but equally valuable purpose: telephoto compression. A 200mm shot of a distant mountain range stacks the layers of the scene — foreground ridge, mid-range valley, background peaks — in a way that a 16mm shot simply cannot. This is the foundation of intimate landscape photography, covered in detail in the Styles section. A 16mm lens and a 200mm lens at the same location tell completely different stories of the same mountain.
For a complete breakdown of camera bodies and sensor options, see choosing the best camera gear for landscapes.
Caption: Same mountain, same day — 16mm emphasizes scale and foreground depth; 200mm compresses layers for an intimate, graphic composition.
For a deeper look at focal length decisions, see our guide on why wide-angle lenses are ideal for landscapes.
What is the best lens for landscape photography?
A wide-angle zoom in the 16–35mm range is the standard starting point for landscape work on full-frame cameras. Canon shooters favor the RF 15-35mm f/2.8L IS USM; Nikon Z-mount shooters often choose the NIKKOR Z 14-30mm f/4 S; Sony shooters frequently reach for the FE 12-24mm f/2.8 GM or the budget-friendly Tamron 17-28mm f/2.8. Adding a 70–200mm telephoto opens up intimate landscape work — telephoto compression and shallow depth of field for isolating detail within grand scenes.
Transition: “Whatever lens you choose, it’s only as sharp as the platform holding it. And that platform is your tripod.”
Why a Tripod Is Non-Negotiable
A quality tripod is the single most impactful gear investment for landscape photography — it enables long exposures at ISO 100 that no image stabilization system can replicate. One of the most practical landscape photography tips is also the most overlooked: buy a tripod before a new lens.
Here’s why the math works in the tripod’s favor: at golden hour, light drops fast. Without a tripod, you’re forced to raise ISO to 3200 or higher to maintain a usable shutter speed — and ISO 3200 introduces noise that degrades fine detail in skies, foliage, and water. With a tripod, you keep ISO 100 and shoot a 2-second exposure. The image quality difference is substantial and immediate.
- What to look for:
- Carbon fiber vs. aluminum — carbon fiber is lighter (better for hiking) and doesn’t conduct cold (better for winter shoots); aluminum is heavier but more affordable
- Minimum height — 55–60 inches at eye level without extending the center column
- Load capacity — at least 2x your heaviest camera-plus-lens combination
- Ball head — faster to reposition than pan-tilt heads; preferred for landscape work
- Budget options by level:
- Beginner: K&F Concept aluminum tripods in the $40–70 range — solid stability for still conditions
- Intermediate: K&F Concept carbon fiber series in the $80–150 range — meaningful weight reduction for day hikes
- Travel: Joby GorillaPod — flexible legs that wrap around branches and rocks; limited for serious long-exposure work but genuinely useful for travel
Cold-weather note: Metal tripod legs conduct cold and can stick to wet rock or ice. Carbon fiber or foam leg wraps are worth the investment for winter landscape work — a small detail that makes a real difference in comfort and safety.
See our full guide to choosing the best camera gear for landscapes for body and accessory recommendations to pair with your tripod setup.
Transition: “With a stable platform secured, you can start using filters — the final gear layer that changes what’s optically possible in-camera.”
Polarizing and ND Filters
Consider this your essential guide to filters for landscape photography — simplified to the two that actually matter.
A Circular Polarizer (CPL) is a rotating glass element that reduces glare on water surfaces, deepens blue skies, and eliminates atmospheric haze on distant mountains. Rotating it reveals the rocks and color beneath a lake surface that otherwise appears as a mirror. Critically, a CPL cannot be replicated in post-processing — Lightroom can reduce glare, but it cannot remove it. For most landscape scenarios, a CPL is always-on. Budget option: K&F Concept CPL (~$25–40). Pro option: B+W Käsemann (~$80–150).
- An ND (Neutral Density) filter is a darkened glass element that extends shutter speed for long-exposure effects. The stops you need depend on the effect you want:
- 3-stop ND — 1–2 second exposures; silky waterfalls with detail retained
- 6-stop ND — 10–30 second exposures; misty water, moving cloud streaks
- 10-stop ND — 1–4 minute exposures; glass-smooth water, dramatic cloud motion
Variable ND filters offer flexibility but introduce image quality tradeoffs — specifically, an “X” pattern at extreme settings — that fixed-stop NDs avoid.
Buy order: CPL first, ND second. A polarizing filter affects nearly every landscape shoot you’ll ever do. An ND filter is situational — useful for waterfalls, beaches, and long-exposure work, but not essential until you’ve built a foundation with the other three pillars.
Caption: A CPL removes the glare from the water surface entirely — an effect that cannot be replicated in Lightroom.
Transition: “Gear sets the boundaries of what’s possible. Now let’s look at the creative choices within those boundaries — the different styles and niches that define your personal vision as a landscape photographer.”
Landscape Photography Styles and Niches
Landscape photography is not a single genre — it’s a family of related disciplines, each with different technical approaches and creative goals. Understanding which styles resonate with you helps you weight the four pillars differently. A minimalist black-and-white photographer leans heavily on Light and Processing; an intimate landscape photographer prioritizes Composition and Location. The Smithsonian Institution’s photography archives note that different landscape traditions have historically shaped how entire cultures perceive their natural environment — a reminder that style is never merely aesthetic. Across the landscape photography community, the consistent feedback from photographers at every level is that finding a personal style dramatically accelerates improvement.
Natural, Forest, and Beach Landscapes
Natural and wilderness landscapes — the sweeping mountain vistas, open deserts, and dramatic coastlines — are what most people picture when they think of landscape photography. The technical approach follows the 4 Pillars directly: scout the location, arrive early, compose with foreground interest, shoot at golden hour.
Forest landscapes require a different approach. Overcast midday light — which is generally terrible for open landscapes — is actually ideal for forests. Diffused light eliminates harsh shadows, lets the greens saturate naturally, and makes long-exposure waterfall shots possible without an ND filter. Shoot vertically to emphasize tree height. Use a wide aperture (f/4–f/5.6) to separate a single tree or fern from a busy background.
Beach and coastal landscapes introduce the challenge of moving water. Decide on your aesthetic before you set up: do you want frozen waves (1/500s or faster) or silky water (0.5s or slower with a tripod and ND filter)? Tide pools offer foreground interest that rivals any mountain range — low tide, overcast light, polarizing filter to cut surface glare. The coastal environment also demands weather-sealed gear; salt spray is corrosive to camera internals.
Black, White, and Minimalist Styles
Black and white landscape photography strips color from the equation and forces the viewer to engage with tone, texture, and form. Strong candidates for conversion: high-contrast scenes (bright sky, dark foreground), fog and mist, dramatic cloud formations, and graphic rock textures. The key technical note: shoot RAW and convert in post rather than using in-camera black-and-white mode — you retain full color channel data for Lightroom’s B&W mix panel, which lets you independently lighten or darken specific colors.
For a comprehensive treatment of black-and-white technique, our dedicated black and white photography guide covers the full workflow in depth — including zone system exposure, split toning, and dodge-and-burn.
Minimalist landscapes — a single tree in a field, a lone rock in still water, an empty road vanishing into fog — use negative space as a compositional tool. The goal is reduction: remove every element that doesn’t contribute to the single subject. Telephoto lenses and overcast light are your best tools here. For a deeper exploration of minimalism as a photographic philosophy, see our minimalism in photography guide.
Urban, Intimate, and Aerial Shots
Urban landscape photography treats cities and built environments as the natural landscape. The same compositional principles apply — leading lines (roads, railways, bridges), foreground interest (street furniture, puddle reflections), and light timing (blue hour is particularly effective for cityscapes because ambient artificial light balances with the sky). The challenge unique to urban work is dynamic range: artificial lights are extremely bright against dark surroundings. Bracketing and HDR blending are more useful here than in natural landscape work.
Intimate landscape photography is the sub-genre with the highest reward-to-effort ratio for photographers who feel stuck shooting the same wide-angle vistas. An intimate landscape isolates one small part of a scene — a cluster of lichen on rock, light filtering through a single fern, the texture of weathered driftwood — and gives it the full frame. The approach requires a fundamental shift: instead of asking “what’s the biggest view I can capture?”, you ask “what’s the most interesting detail within this scene?”
Technically, intimate landscapes rely on two tools: telephoto compression and shallow depth of field. A 70–200mm lens at f/4 aimed at a pattern of autumn leaves, with the background thrown out of focus, produces an image that rivals any grand vista for impact. Specifically, the telephoto compresses the apparent distance between elements — stacking mountain ridges, layering forest trees, or pulling a distant waterfall closer to a foreground rock. According to the landscape photography community consensus reported by Photography Life, intimate landscape techniques using telephoto lenses are among the most underutilized approaches by intermediate photographers who default to wide-angle shooting (photographylife.com, 2026).
- Practical starting points for intimate landscape work:
- Portions of a waterfall rather than the full cascade
- Sand or rock textures with raking sidelight to reveal surface detail
- Symmetry and repetition in natural patterns (fern fronds, tree bark, wave ripples)
- Backlit leaves or grasses with the sun directly behind them
Aerial landscape photography — using drones or elevated vantage points — reveals geometry and pattern invisible from ground level. Farmland becomes abstract color grids. River deltas become branching networks. Coastal rock formations reveal their true shape. The technical requirements are different: you’re essentially shooting straight down or at a low angle, so composition rules shift toward pattern, color, and scale relationships. Drone regulations vary significantly by location — always check local airspace rules before flying, particularly in or near national parks.
Caption: Telephoto compression stacks mountain layers into a graphic composition — the same scene a wide-angle lens would flatten.
Best Locations for Landscape Photography
Location is Pillar 1 of The 4 Pillars Framework — and choosing the right one matters as much as any technical skill. The best landscape photography locations share common traits: accessible vantage points with natural foreground elements, predictable golden hour alignments, and enough visual variety to reward multiple visits. Bucket-list locations are worth the trip, but the photographers who consistently produce their best work are those who understand a single location deeply rather than chasing novelty.
Top US Locations
The United States contains some of the most photographically diverse terrain on earth. Based on PhotoHound’s 2026 rankings of US photo locations and community consensus among landscape photographers, these are the locations that consistently reward the effort:
Yosemite National Park, California — Tunnel View, Half Dome from Glacier Point, and the Valley floor in spring mist. Best in spring when waterfalls are running and wildflowers cover the meadows. Iconic for good reason — but arrive before 6 AM to avoid crowds at the most-photographed spots.
Grand Teton National Park, Wyoming — Snake River Overlook (made famous by Ansel Adams), Oxbow Bend for autumn reflections, and Mormon Row barns at sunrise. Fall is peak season: golden aspens against the Teton range.
Arches National Park, Utah — Delicate Arch at sunset, Landscape Arch in the morning, and the Windows section for wide-angle compositions. The red rock against blue sky provides natural complementary color contrast.
Glacier National Park, Montana — Logan Pass, Hidden Lake, and the Going-to-the-Sun Road. Turquoise lakes, alpine meadows, and jagged peaks. Best in late summer when wildflowers peak and roads are fully open.
Acadia National Park, Maine — Cadillac Mountain for the first sunrise on the US East Coast from October through March. Jordan Pond and Thunder Hole for coastal compositions.
Alabama Hills, California — Arch formations with Mount Whitney as backdrop. Underrated. Less crowded than Yosemite, with dramatic desert-to-alpine contrast.
The National Park Service photography guide provides location-specific guidance on permit requirements, sunrise/sunset access, and seasonal closures — essential reading before any national park shoot (NPS, 2026).
International Destinations
Beyond the US, several international locations consistently appear at the top of landscape photographers’ bucket lists — and each one rewards the pre-visualization approach from the Planning section.
Iceland — The combination of volcanic black sand beaches (Reynisfjara), glacier lagoons (Jökulsárlón), and the Northern Lights makes Iceland arguably the most photographically dense country per square mile. The midnight sun in summer means golden hour lasts for hours. The Westfjords region remains significantly less crowded than the Ring Road circuit.
Patagonia, Argentina and Chile — Torres del Paine’s granite towers, Los Glaciares National Park, and the Fitz Roy massif. Light here is notoriously unpredictable — wind and weather change within hours. The reward is that dramatic clouds and storm light, which landscape photographers elsewhere only occasionally encounter, are routine in Patagonia.
Faroe Islands — Dramatic sea cliffs, isolated villages, and fog that moves through valleys like a living thing. The Mulafossur waterfall at Gásadalur, with the Atlantic visible beyond, is one of the most compositionally complete scenes in European landscape photography.
Lofoten Islands, Norway — Red fishing huts (rorbuer) reflected in still fjords, Northern Lights from October through March, and midnight sun in summer. The combination of human-built foreground elements against dramatic natural backgrounds makes composition straightforward.
Canadian Rockies — Moraine Lake at sunrise (arrive before 5 AM or expect a full parking lot), Peyto Lake’s turquoise water visible from above, and Icefields Parkway for 230 kilometers of continuous mountain scenery.
For location-specific scouting, always cross-reference Google Earth with PhotoPills before arrival. PhotoPills landscape planning guide covers international sun and moon alignment planning with the same workflow used domestically (PhotoPills, 2026).
Courses, Workshops, and Going Pro
Hitting a plateau in self-taught skills is one of the most common pain points reported by intermediate photographers. The transition from “I know the settings” to “I consistently produce images I’m proud of” often requires structured feedback — something YouTube tutorials and blog posts cannot provide. Online courses and in-person workshops serve different needs, and choosing between them depends on your learning style and budget.
Online Courses vs. Workshops
Online courses offer flexibility, repeatability, and lower cost. In 2026, the most recommended options for landscape photography include:
- The School of Photography — Pro Landscape Photography Course; comprehensive coverage of composition, light, and editing with ongoing instructor access (membership-based, approximately £16/month)
- CreativeLive — Nature and Landscape Photography with John Greengo; strong foundational coverage with a one-time purchase model (approximately $59–$129)
- iPhotography — Landscape and Nature Photography Course; structured for beginners through intermediate, includes Lightroom editing modules
The advantage of online courses: you can pause, rewatch, and revisit specific techniques between shoots. The limitation: no real-time feedback on your specific images.
In-person workshops address exactly that limitation. A workshop leader can look at your shot on the LCD, identify the compositional problem, and demonstrate the fix in real time — a feedback loop no online course can replicate. Field workshops typically run $500–$2,500 for 2–5 day programs, depending on location and instructor. The investment is substantial, but photographers across the community consistently report that a single well-chosen workshop accelerates progress more than a year of self-guided practice.
Our team’s evaluation of both formats across the landscape photography community suggests the most effective approach combines both: an online course for technical foundations, followed by a field workshop once you’ve internalized the basics and have specific questions to bring to an expert.
The School of Photography’s landscape tips for beginners provides a solid free starting point before committing to a paid program. If you are starting completely from scratch, you might also want to read our advice on how to be a photographer with no experience.
Pricing Your Landscape Photography Work
Monetizing landscape photography involves three primary revenue streams, each with different pricing logic.
Print sales use a cost-multiplier model: if a framed print costs $100 to produce, price it between $300 and $500 (3x–5x markup). This accounts for time, equipment depreciation, and the fact that fine art prints are priced on perceived value, not just production cost. Edition size matters — limited editions of 25 or 50 command premium prices; open editions undercut their own value over time.
- Licensing fees are usage-based and vary significantly:
- Web use (non-exclusive): $50–$150 per image per year
- Editorial print use: $200–$800 depending on publication size and circulation
- Commercial advertising use: $500–$5,000+ depending on campaign reach and exclusivity
Stock photography provides passive income but at lower per-image rates. The landscape photography market on stock platforms is highly competitive — generic mountain and sunset shots are oversupplied. The photographers earning meaningful stock income specialize in specific niches (aerial, intimate, specific geographic regions) where supply is thinner.
The practical advice from the landscape photography business community: don’t wait until you feel “ready” to price your work. Set prices that reflect your costs and the value of the image, then adjust as you gather market feedback.
Common Mistakes to Avoid
5 Common Beginner Mistakes
Even technically capable photographers repeat these mistakes. Each one maps directly to a failure in one of the four pillars.
1. Shooting at midday (Light pillar failure)
Overhead, harsh light flattens terrain, blows out skies, and eliminates the long shadows that reveal texture. The fix: use midday for scouting, setup, and composition testing — not for capturing final images. Overcast midday is the exception; it works well for forests and waterfalls.
2. Ignoring the foreground (Composition pillar failure)
Pointing the camera at a distant mountain and shooting from standing height produces a flat, unremarkable image. The fix: get lower, find a foreground element within 1–3 feet of the lens, and let the composition build depth through all three layers.
3. Skipping pre-shoot planning (Location pillar failure)
Arriving at a location without knowing where the sun rises, where the best vantage points are, or what the weather will do wastes irreplaceable golden hour time. The fix: 30 minutes with PhotoPills and Google Earth before any new location visit.
4. Shooting JPEG instead of RAW (Processing pillar failure)
JPEG files discard tonal data at capture. A blown-out sky in a JPEG cannot be recovered. A blown-out sky in a RAW file often can be. The fix: switch to RAW immediately and accept the larger file sizes.
5. Over-processing in post
Heavy-handed HDR, oversaturated colors, and excessive clarity create images that look obviously artificial. The fix: process for what you saw, not for maximum drama. A light hand in Lightroom produces images that hold up over time; heavy processing dates itself quickly.
When to Seek Expert Guidance
Self-teaching has a ceiling — and most photographers hit it around the same point: technically correct images that feel uninspired. If your images are sharp, well-exposed, and properly composed but still feel flat, that’s the signal that feedback from a more experienced photographer will unlock the next level.
- Specifically, consider a workshop or one-on-one mentorship when:
- You’ve been shooting for 12+ months without a clear improvement trajectory
- You can identify problems in your images but can’t diagnose the cause
- You want to pursue licensing or print sales and need portfolio-level images
The landscape photography community — forums like Photography Life’s community section, Reddit’s r/LandscapePhotography, and in-person camera clubs — offers free peer feedback that’s a useful bridge between self-teaching and formal instruction.
Frequently Asked Questions
What are the best camera settings for landscape photography?
Start with f/8 to f/11, ISO 100, and Aperture Priority mode for the majority of landscape scenarios. This combination maximizes depth of field while keeping digital noise minimal. Shutter speed adjusts automatically in Av mode as light changes. For long-exposure work — silky waterfalls or moving clouds — switch to Manual mode and use a tripod. Always shoot RAW for maximum editing latitude. These settings work across Canon, Nikon, and Sony systems without modification.
Do I need a tripod for landscape photography?
A tripod is essential for serious landscape photography, not optional. It enables ISO 100 at any shutter speed, which is the foundation of clean, low-noise images at golden hour and blue hour. Carbon fiber tripods in the $80–150 range offer a meaningful weight reduction for hiking without sacrificing stability.
What is golden hour in photography?
Golden hour is the 20–40 minute window shortly after sunrise and before sunset when the sun produces warm, directional, low-angle light. The National Park Service photography guide identifies it as the optimal time for landscape photography due to the quality of this light (NPS, 2026). Color temperature runs approximately 3,000–4,000K — warm orange tones that enhance surface textures and create long shadows. Blue hour, the 20–30 minutes before sunrise and after sunset, produces cooler, more even light ideal for reflections and cityscapes.
The Framework That Changes Everything
For photographers who are still beginners in some areas and more advanced in others, The 4 Pillars Framework provides the structure that makes self-assessment honest and improvement targeted. Landscape photography isn’t about having the best gear or knowing the most locations — it’s about diagnosing which pillar is weakest and systematically strengthening it. The community consensus, reflected across photography forums and workshop feedback, is consistent: photographers who adopt a structured approach improve faster and enjoy the process more than those who chase individual tips in isolation.
The 4 Pillars Framework is the diagnostic tool that makes every failed shot useful. Location, Composition, Light, Processing — when you know which pillar failed, you know exactly what to practice next. That’s the shift from frustrated amateur to intentional photographer.
Your next step is specific: pick one location you’ve already photographed, open PhotoPills, and plan a return visit for golden hour with a pre-visualized composition. Bring a tripod. Shoot RAW. Apply the five Lightroom adjustments from Pillar 4. Compare the result to your previous visit. The difference will tell you more about your progress than any amount of reading — including this landscape photography guide. Amateur Photographer Guide’s resources are organized by pillar to support exactly that kind of targeted practice.
Dave King
Hi, I'm Dave, the founder of Amateur Photographer Guide. I created this site to help beginner and hobbyist photographers build their skills and grow their passion. Here, you’ll find easy-to-follow tutorials, gear recommendations, and honest advice to make photography more accessible, enjoyable, and rewarding.